
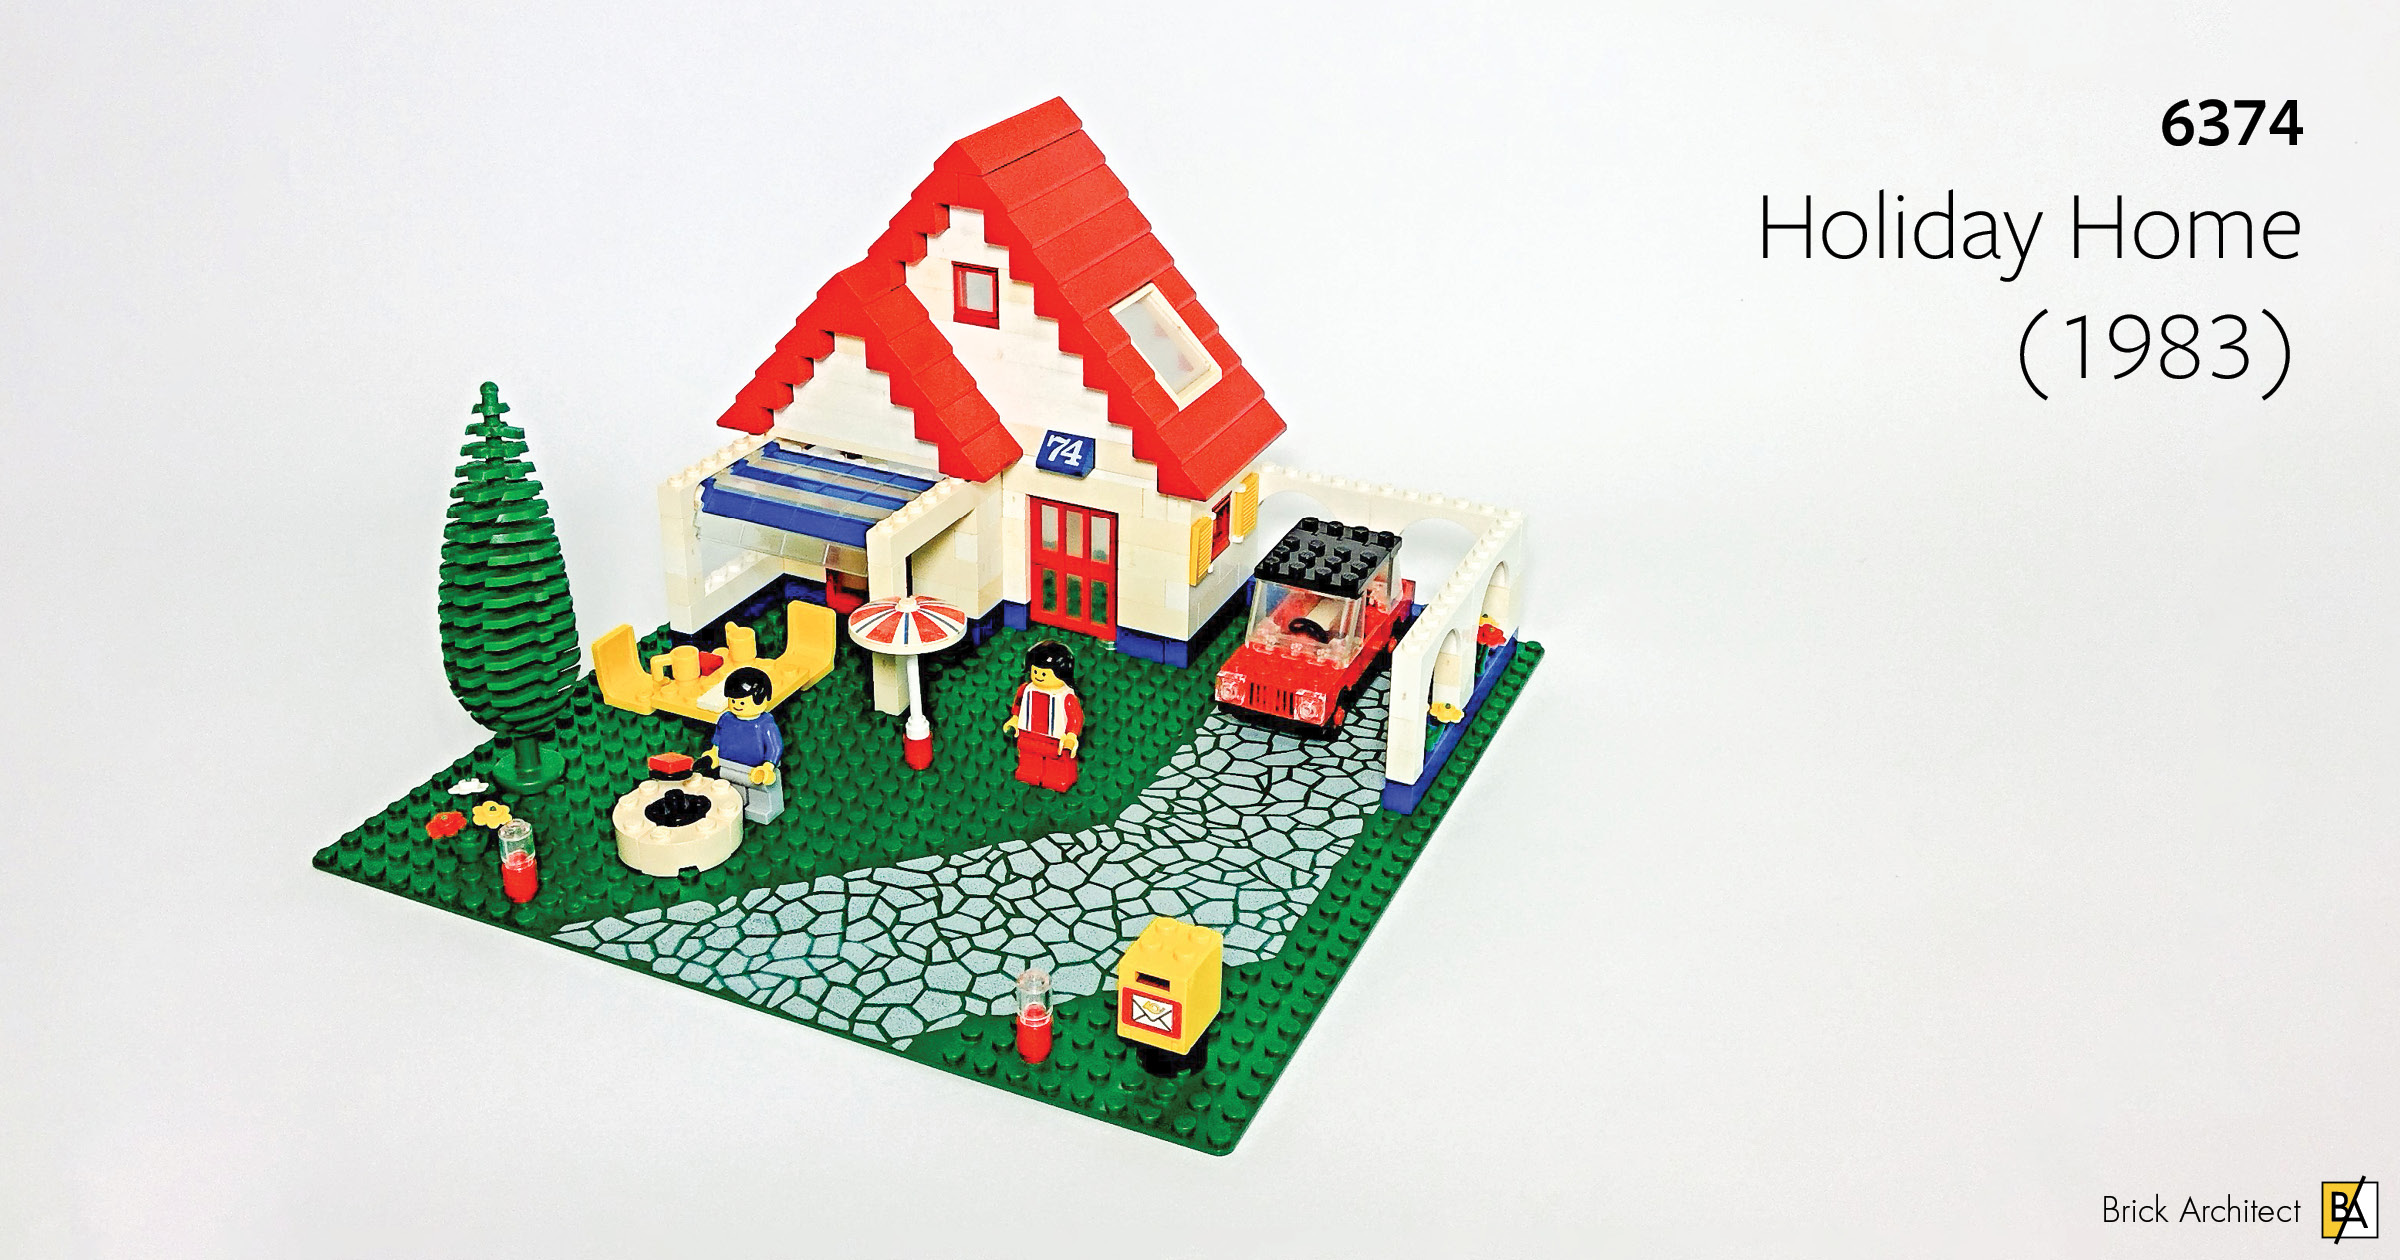
Review: #6374 Holiday Home
The Holiday Home is an iconic set from 1983. In this article, we’ll review this set and all six alternative builds while reflecting on how LEGO sets have evolved in the past 37 years!
As a child, of all the sets in my modest LEGO collection this was my favorite! This collection had spent years in a container in a cupboard at my parents’ place, and more recently was used to entertain the grandchildren when they visit. I rescued it all and did what all AFOL like to do… Sorted the pieces into the original sets and logged it all in Rebrickable! With high levels of nostalgia, I set about assembling this iconic holiday home set; for the first time in probably 30 years. Luckily, I still had the well-worn set of instructions plus some sides cut from the original set box.
About this set
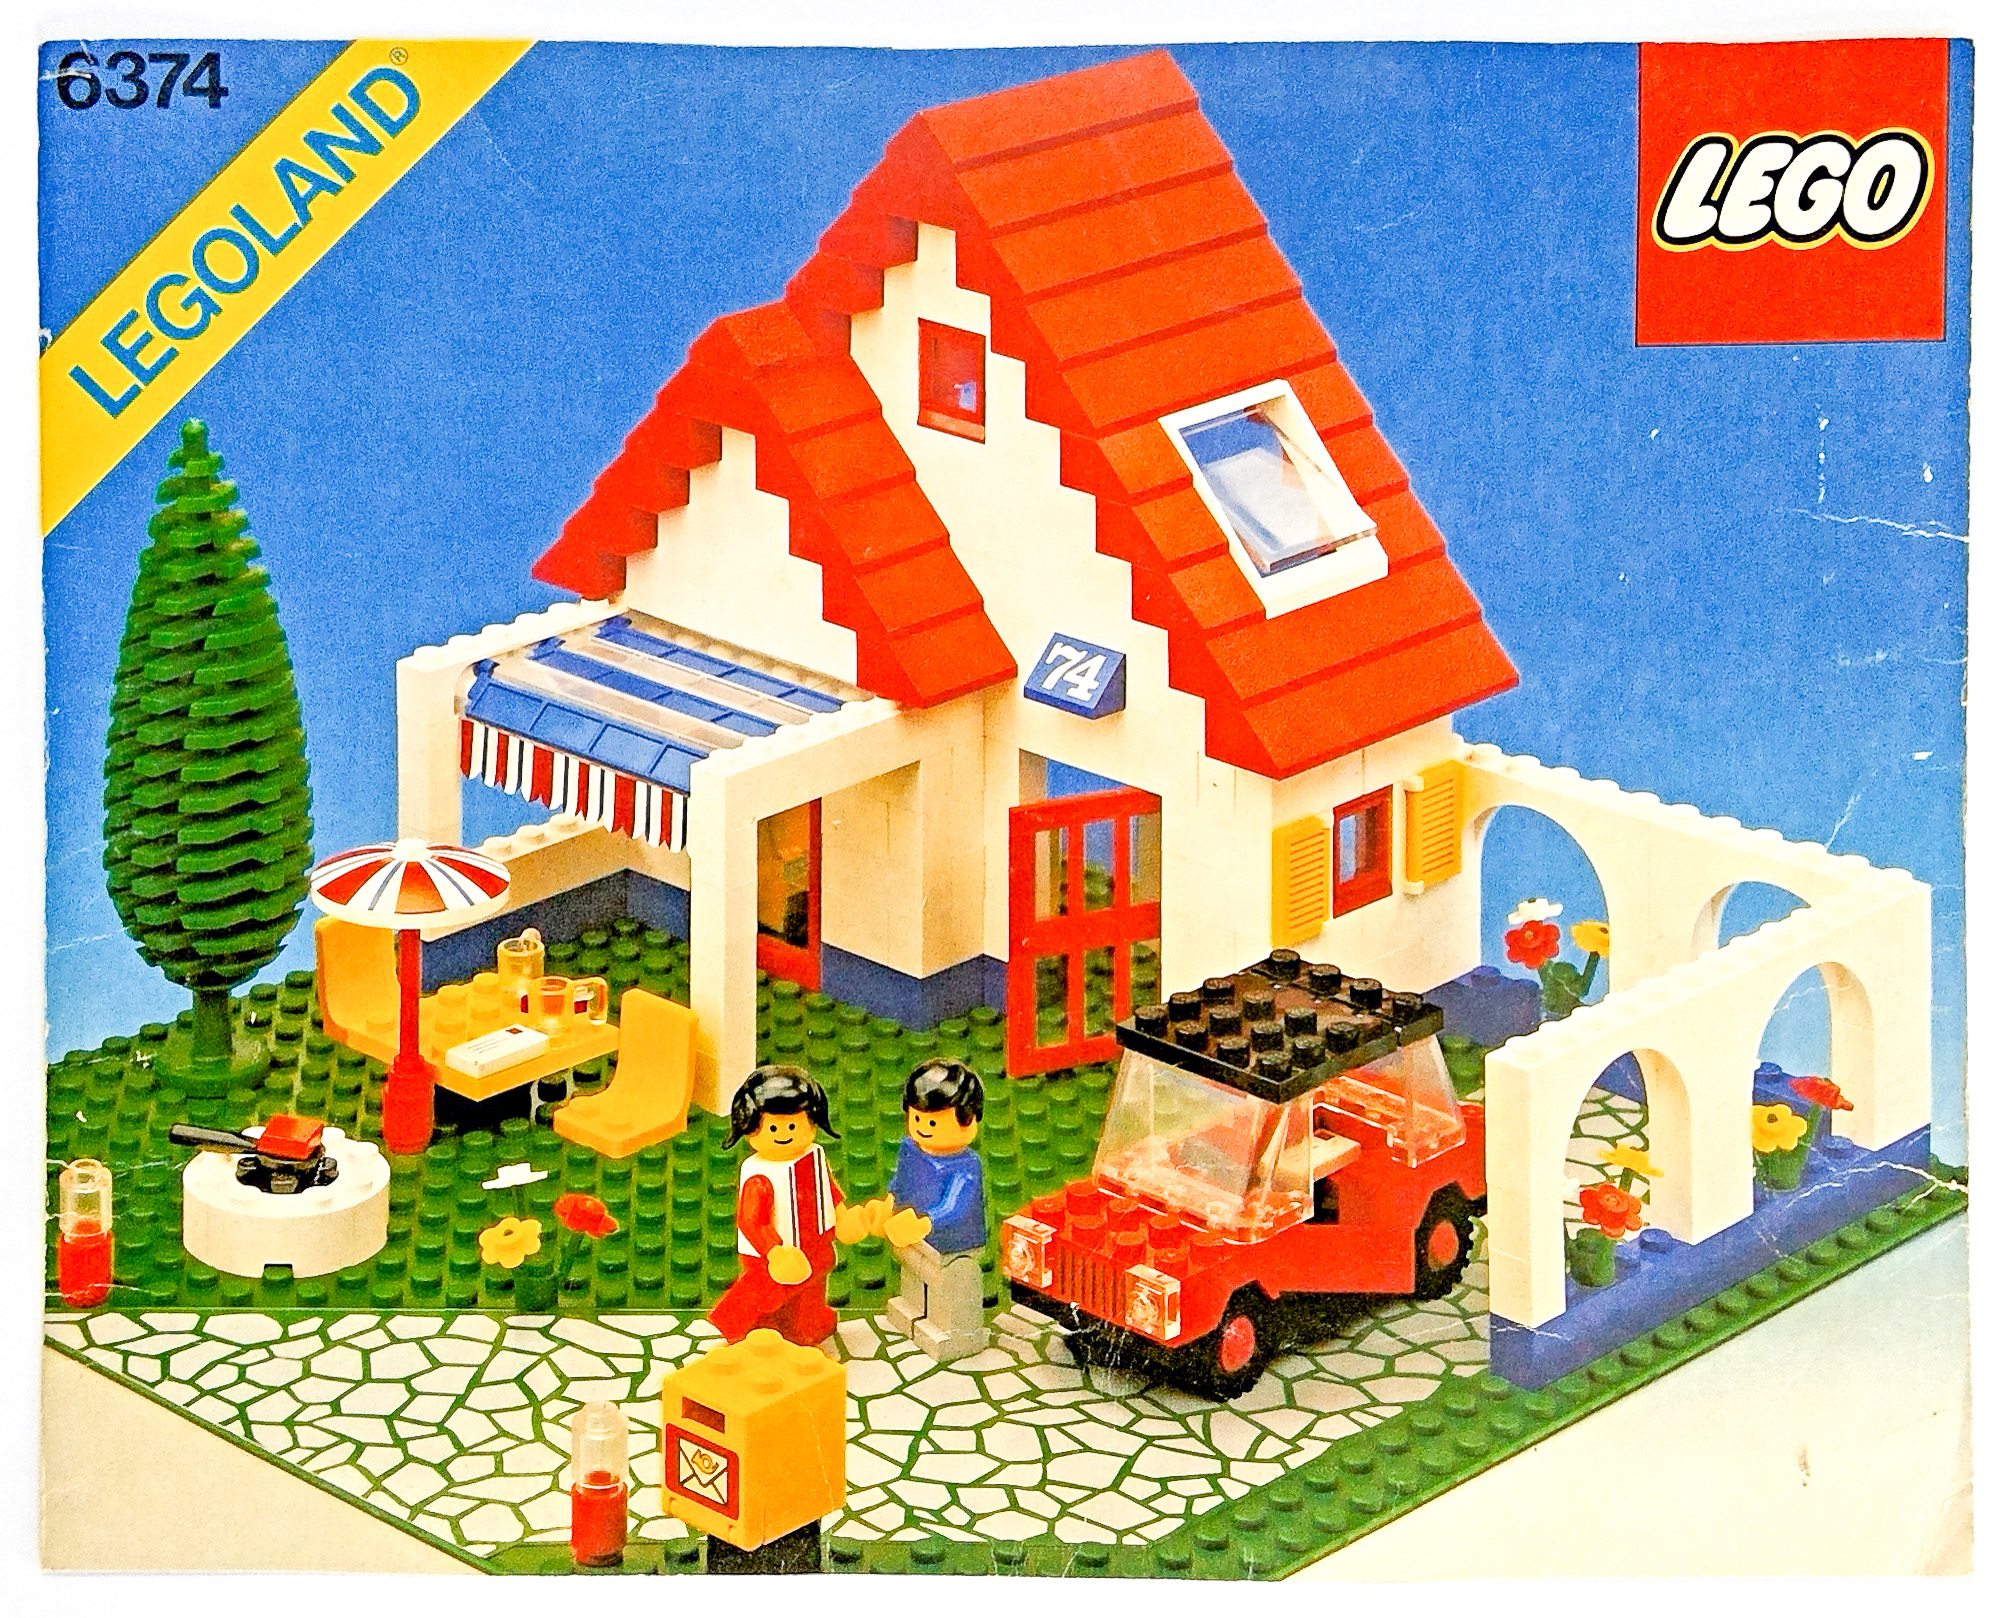
#6374 Holiday Home (1983) box cover.
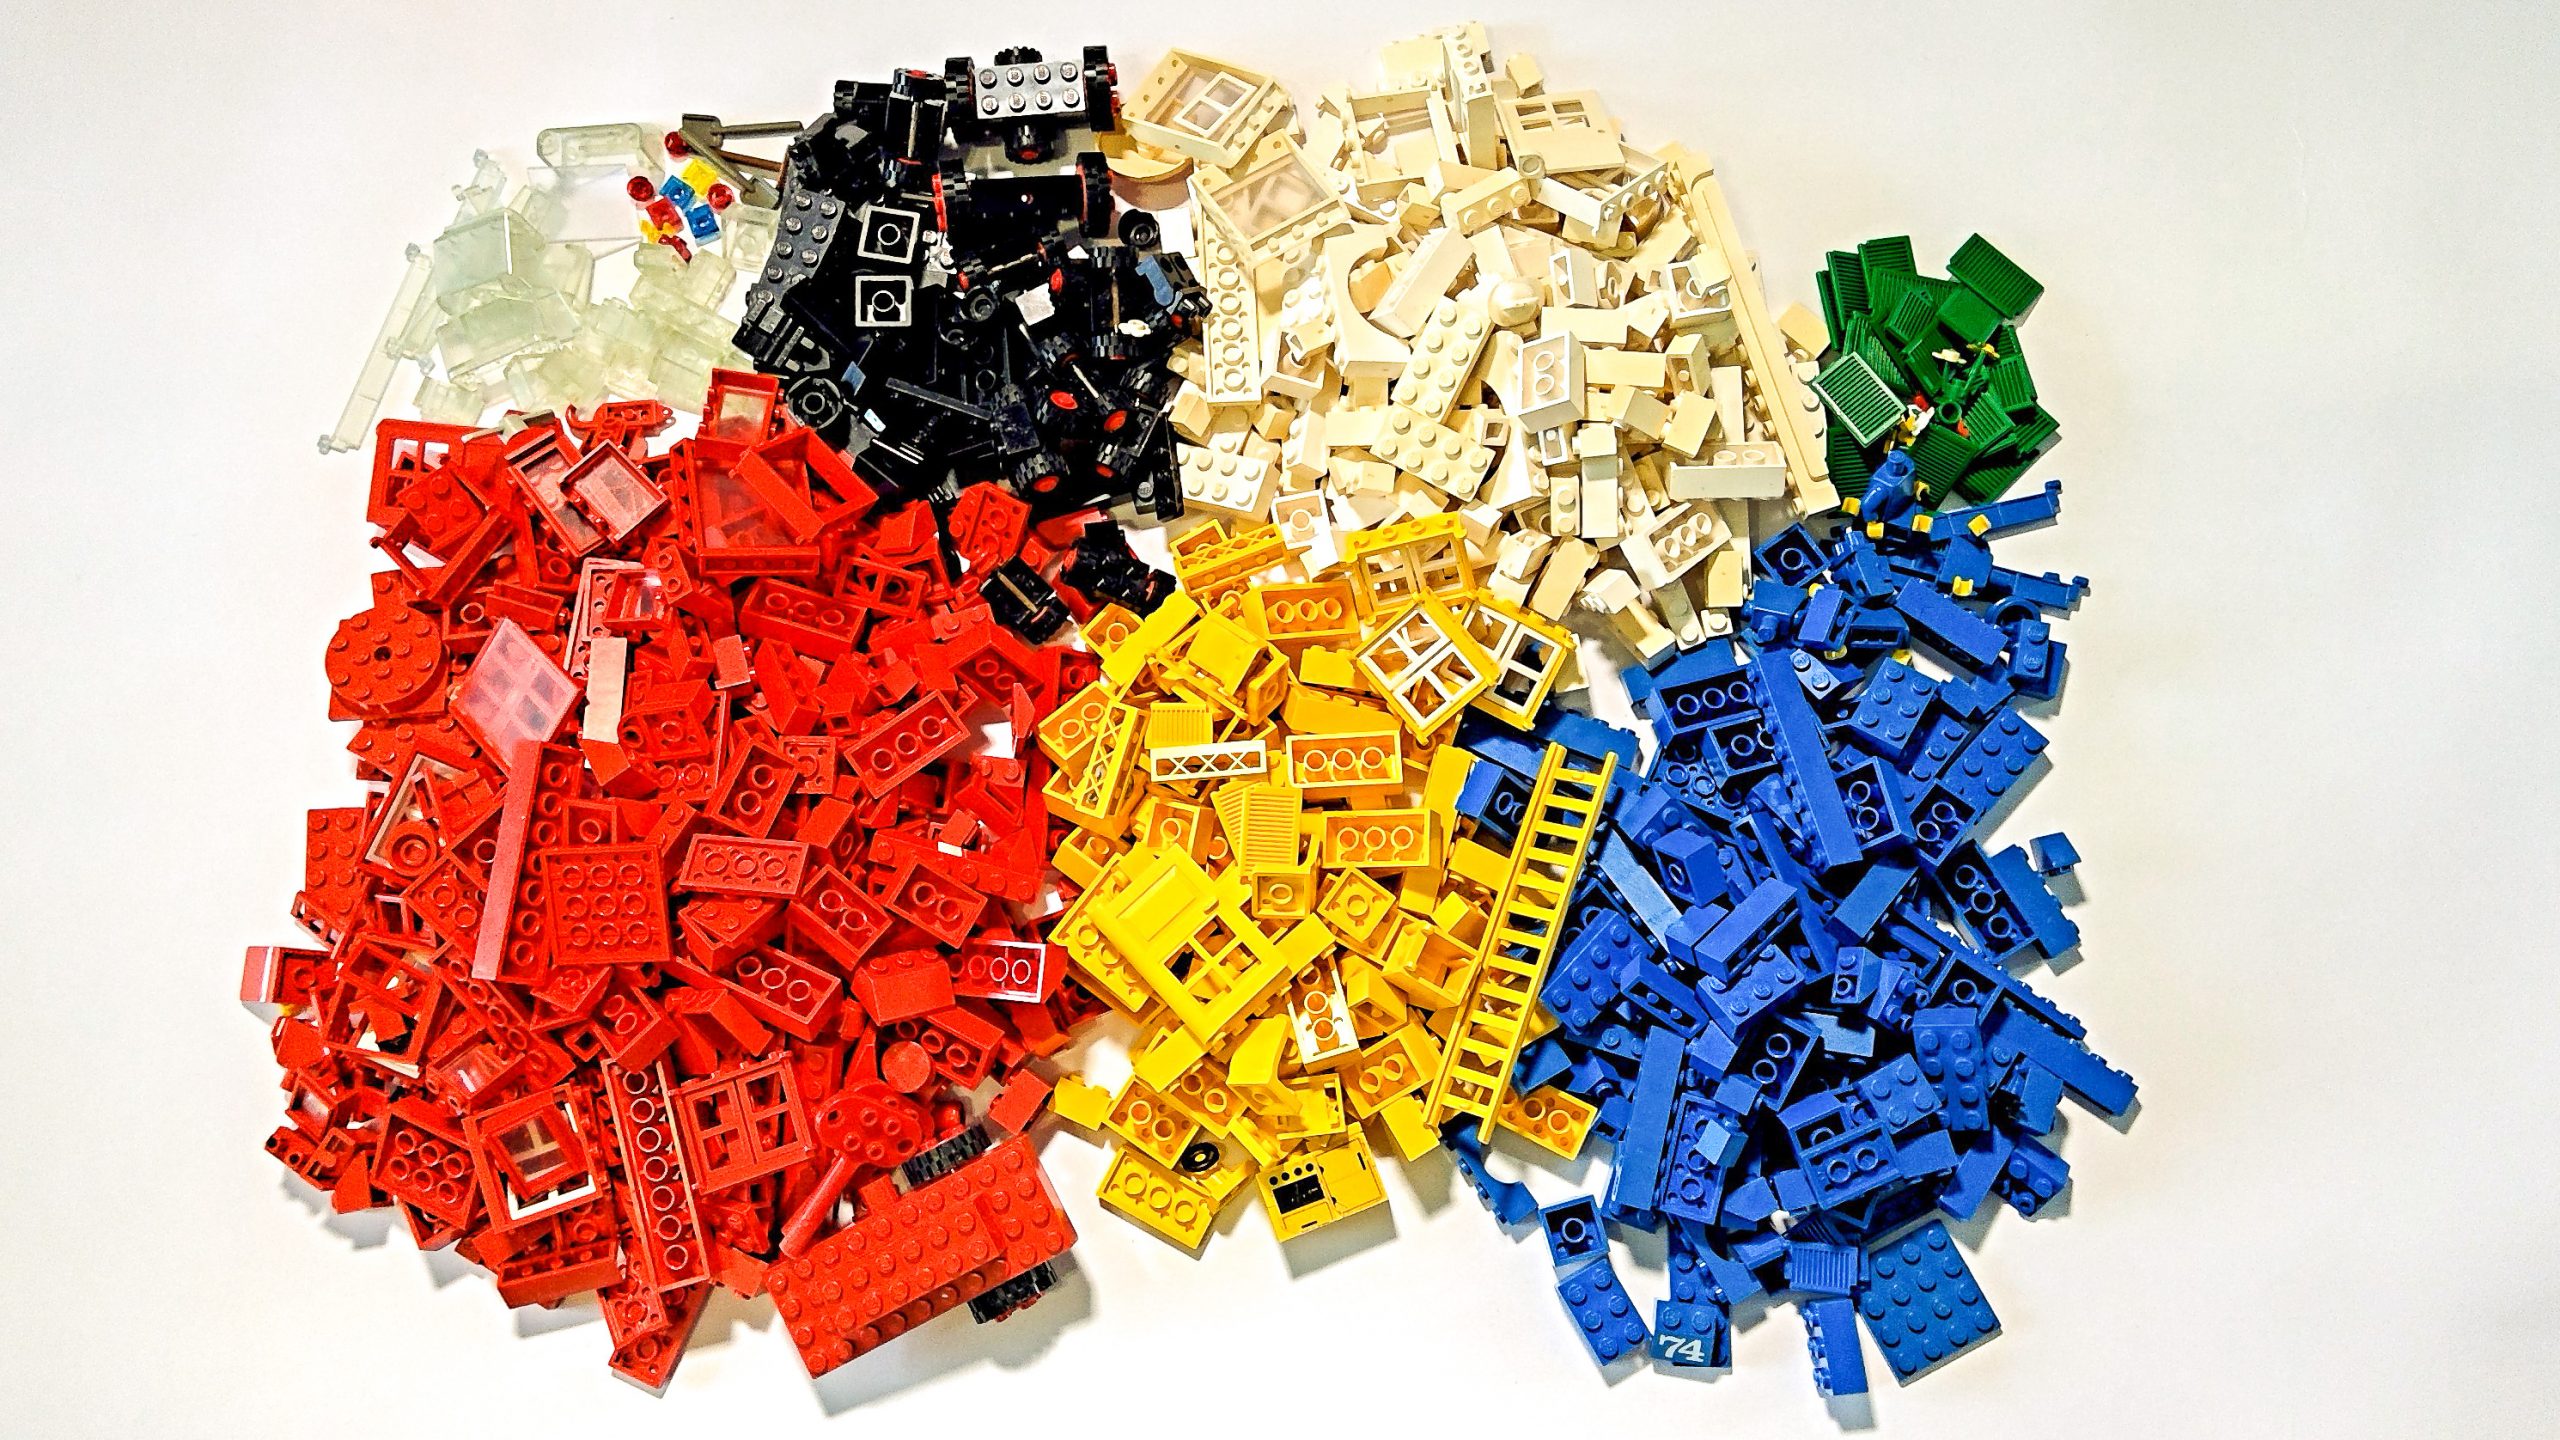
#5374 Holiday Home was released in 1983 and came with 244 pieces. A lot of pieces for the time. Before getting started with the review, there were some missing or broken parts to address. Not all of the 244 pieces had made it through decades of use and/or were intact enough to still have clutch power. The picture below shows the modern equivalents I added to ensure all the pieces were present. In some cases these were like for like but in other cases color substitutions had to be made. The most noticeable of these are 24Bright YellowYellow cups (3899) in place of the original transparent ones and a 1White 1×4 antenna (3957a) in place of the original red one.
One missing part I wasn’t able to substitute was the fringe on the garage roller door section which serves as the patio awning. This sticker didn’t have a logical replacement.
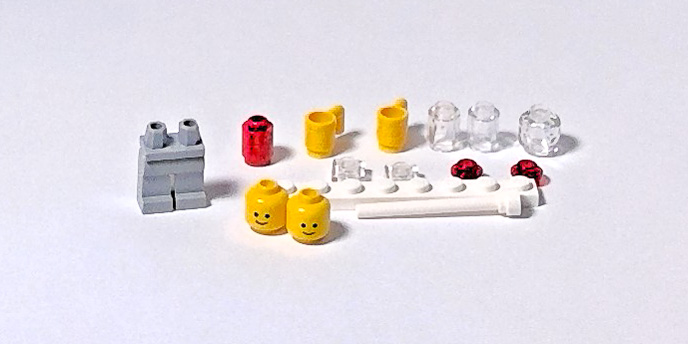
Not all the 244 pieces made it through decades of use, so I added these substitution pieces from my LEGO collection.
As you will also see from the photos in this review, the white bricks in particular have discolored substantially. Many of these have discolored on the one side only which is probably a testament as to how long we used this as a house as children without bothering to rebuild it. This LEGO spend a lot of time in the sunniest part of the living room floor in direct sunlight.
The Model
This two-level holiday home with simple color scheme of white walls and red roof is full of character. Given it’s age this set has a surprisingly modern feel. The detailing of the set makes nice use of parts that were relatively new at that time such as the 1White velux skylights through the window 4x4x3 roof part (4447), 24Bright YellowYellow minifig seat (4079), 24Bright YellowYellow letterbox (4345), 1White printed letter tile (3069bpr0099) and the 23Bright BlueBlue garage roller door sections (4218).
As this is a used set the parts are no longer bagged so the build process has been grouped as per the main steps in the instruction booklet.
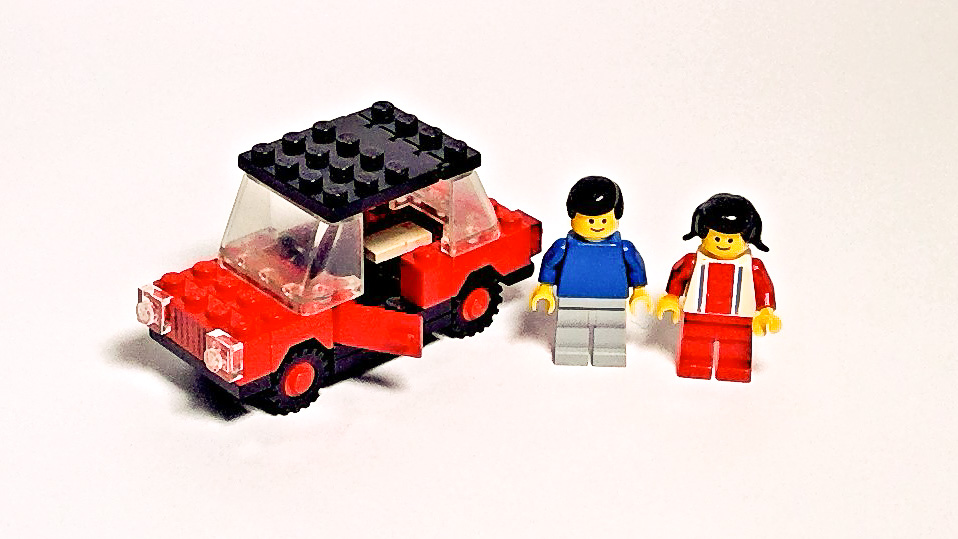
The Car
The front cover of the instructions provides the eight-step directions for the car assembly. This is a nice little car, and has the roof made of Window 1x2x2 Shutter (4213 and 4315) in 26Black, making it easy to add the minifigures.
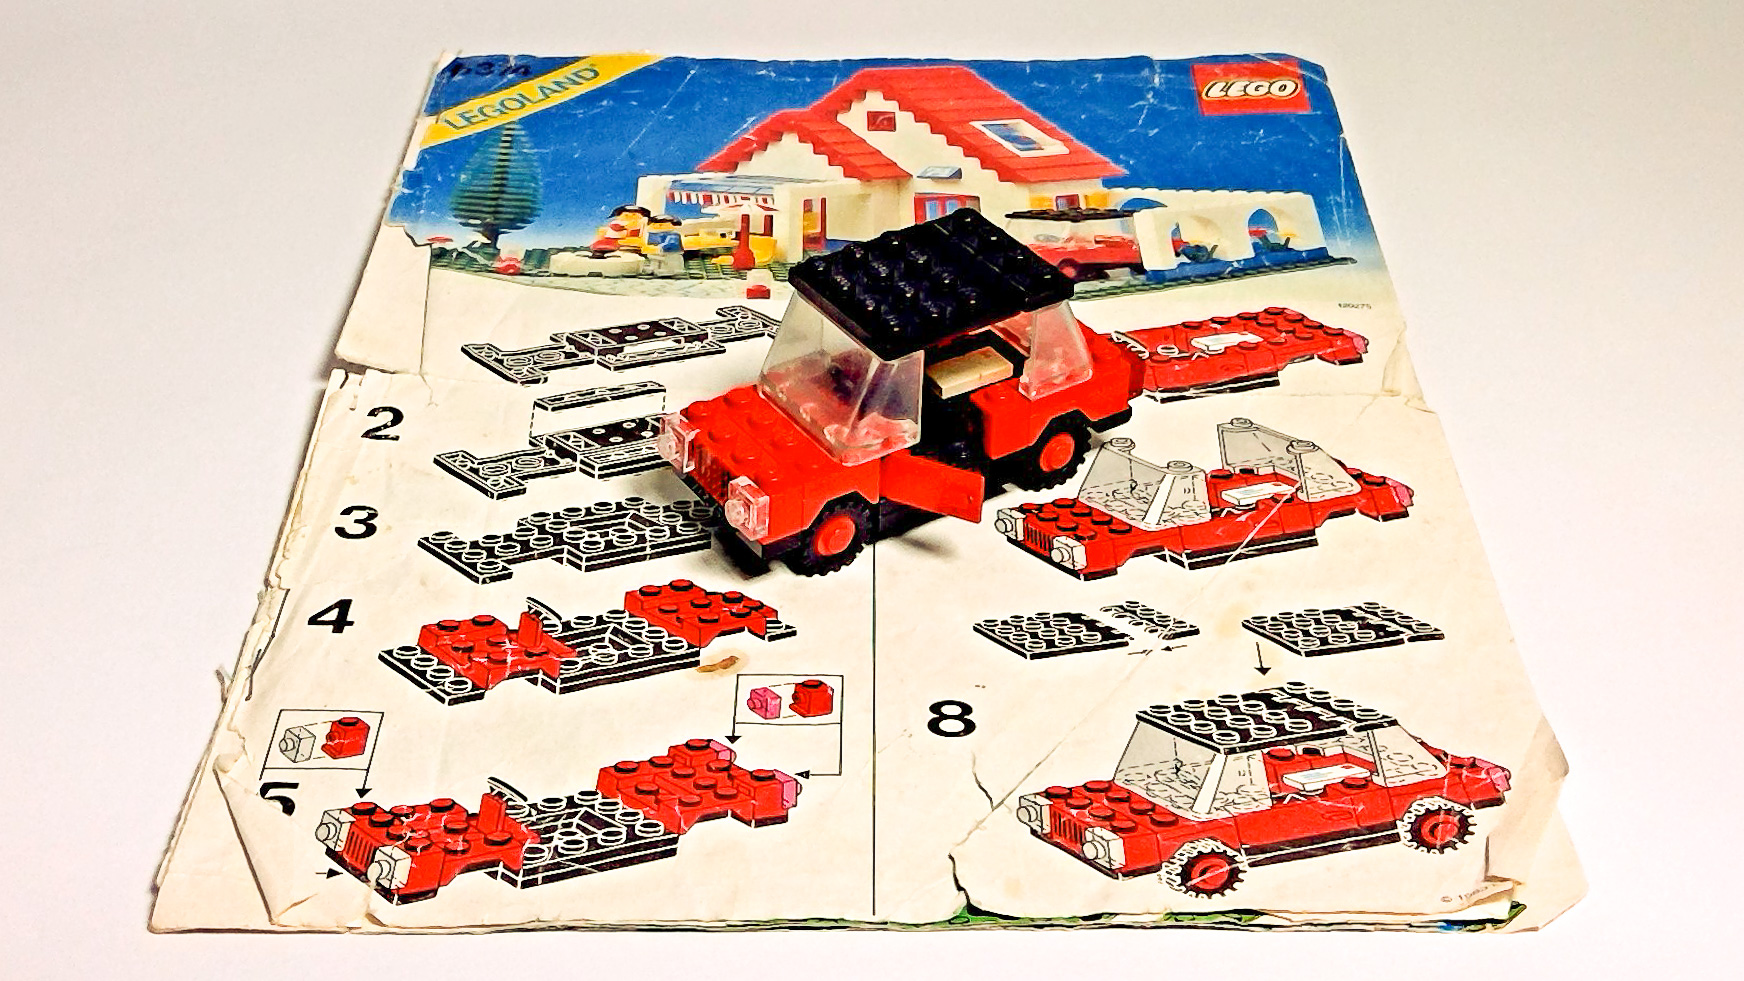
The front page of the instructions shows how to build the car.
Steps 1-8: The First Floor / Ground Level
Turning over to the next page of the instructions, we start with the two minifigures. Then we lay out the footprint of the building in 23Bright BlueBlue bricks plus the bases of the furniture. The next few steps see four layers of 1White bricks added on top of the 23Bright BlueBlue base layer.
The 21Bright RedRed door (73312) and 21Bright RedRed full height window (4347) are both 5 bricks high, unusual compared to the 6-brick high modern counterparts. The two windows have yellow shutters, the larger window has the shutter holders as part of the window frame (3853), whereas the smaller 21Bright RedRed kitchen window (3081) has 1White 1x1x2 bricks modified with shutter holders (3581).

Rear of model after step 7.
This stage of the build finishes with Step 8 which is the most challenging aspect of the assembly particularly when working with older brittle bricks. In this step we put on the 1×14 modified 1White bricks (4217) with the groove for the 23Bright BlueBlue awning pieces (4218). This is challenging as the 1×14 brick also holds together a standalone pillar in the building and the main exterior wall. Modern instructions would not combine providing this stability to the structure below with sliding in the roller door sections in one step. In a modern assembly perhaps a layer of plates would add some structural integrity to the building before the 1×14 bricks and 23Bright BlueBlue roller door sections (4218) was added.

Step 8 complete, with patio awning in place (minus the missing sticker fringe)
Steps 9-18: The Second Floor / Roof
We start these steps with a layer of plates to form the next floor. The first instruction step illustrates a shortcoming of these old instructions taken all from the same perspective as it is really hard to see what this assembly requires due to the lack of a rotated version of the model and lack of the summary of which parts used in this step. See more on this below.
The 45 degree angled bricks making up the roof to top off the build nicely, however it does require some careful assembly since it only has the gable end wall on the front side. More than once I pressed a bit hard and had some of it come away, particularly around the velux skylights.
Progress at the end of Step 18.
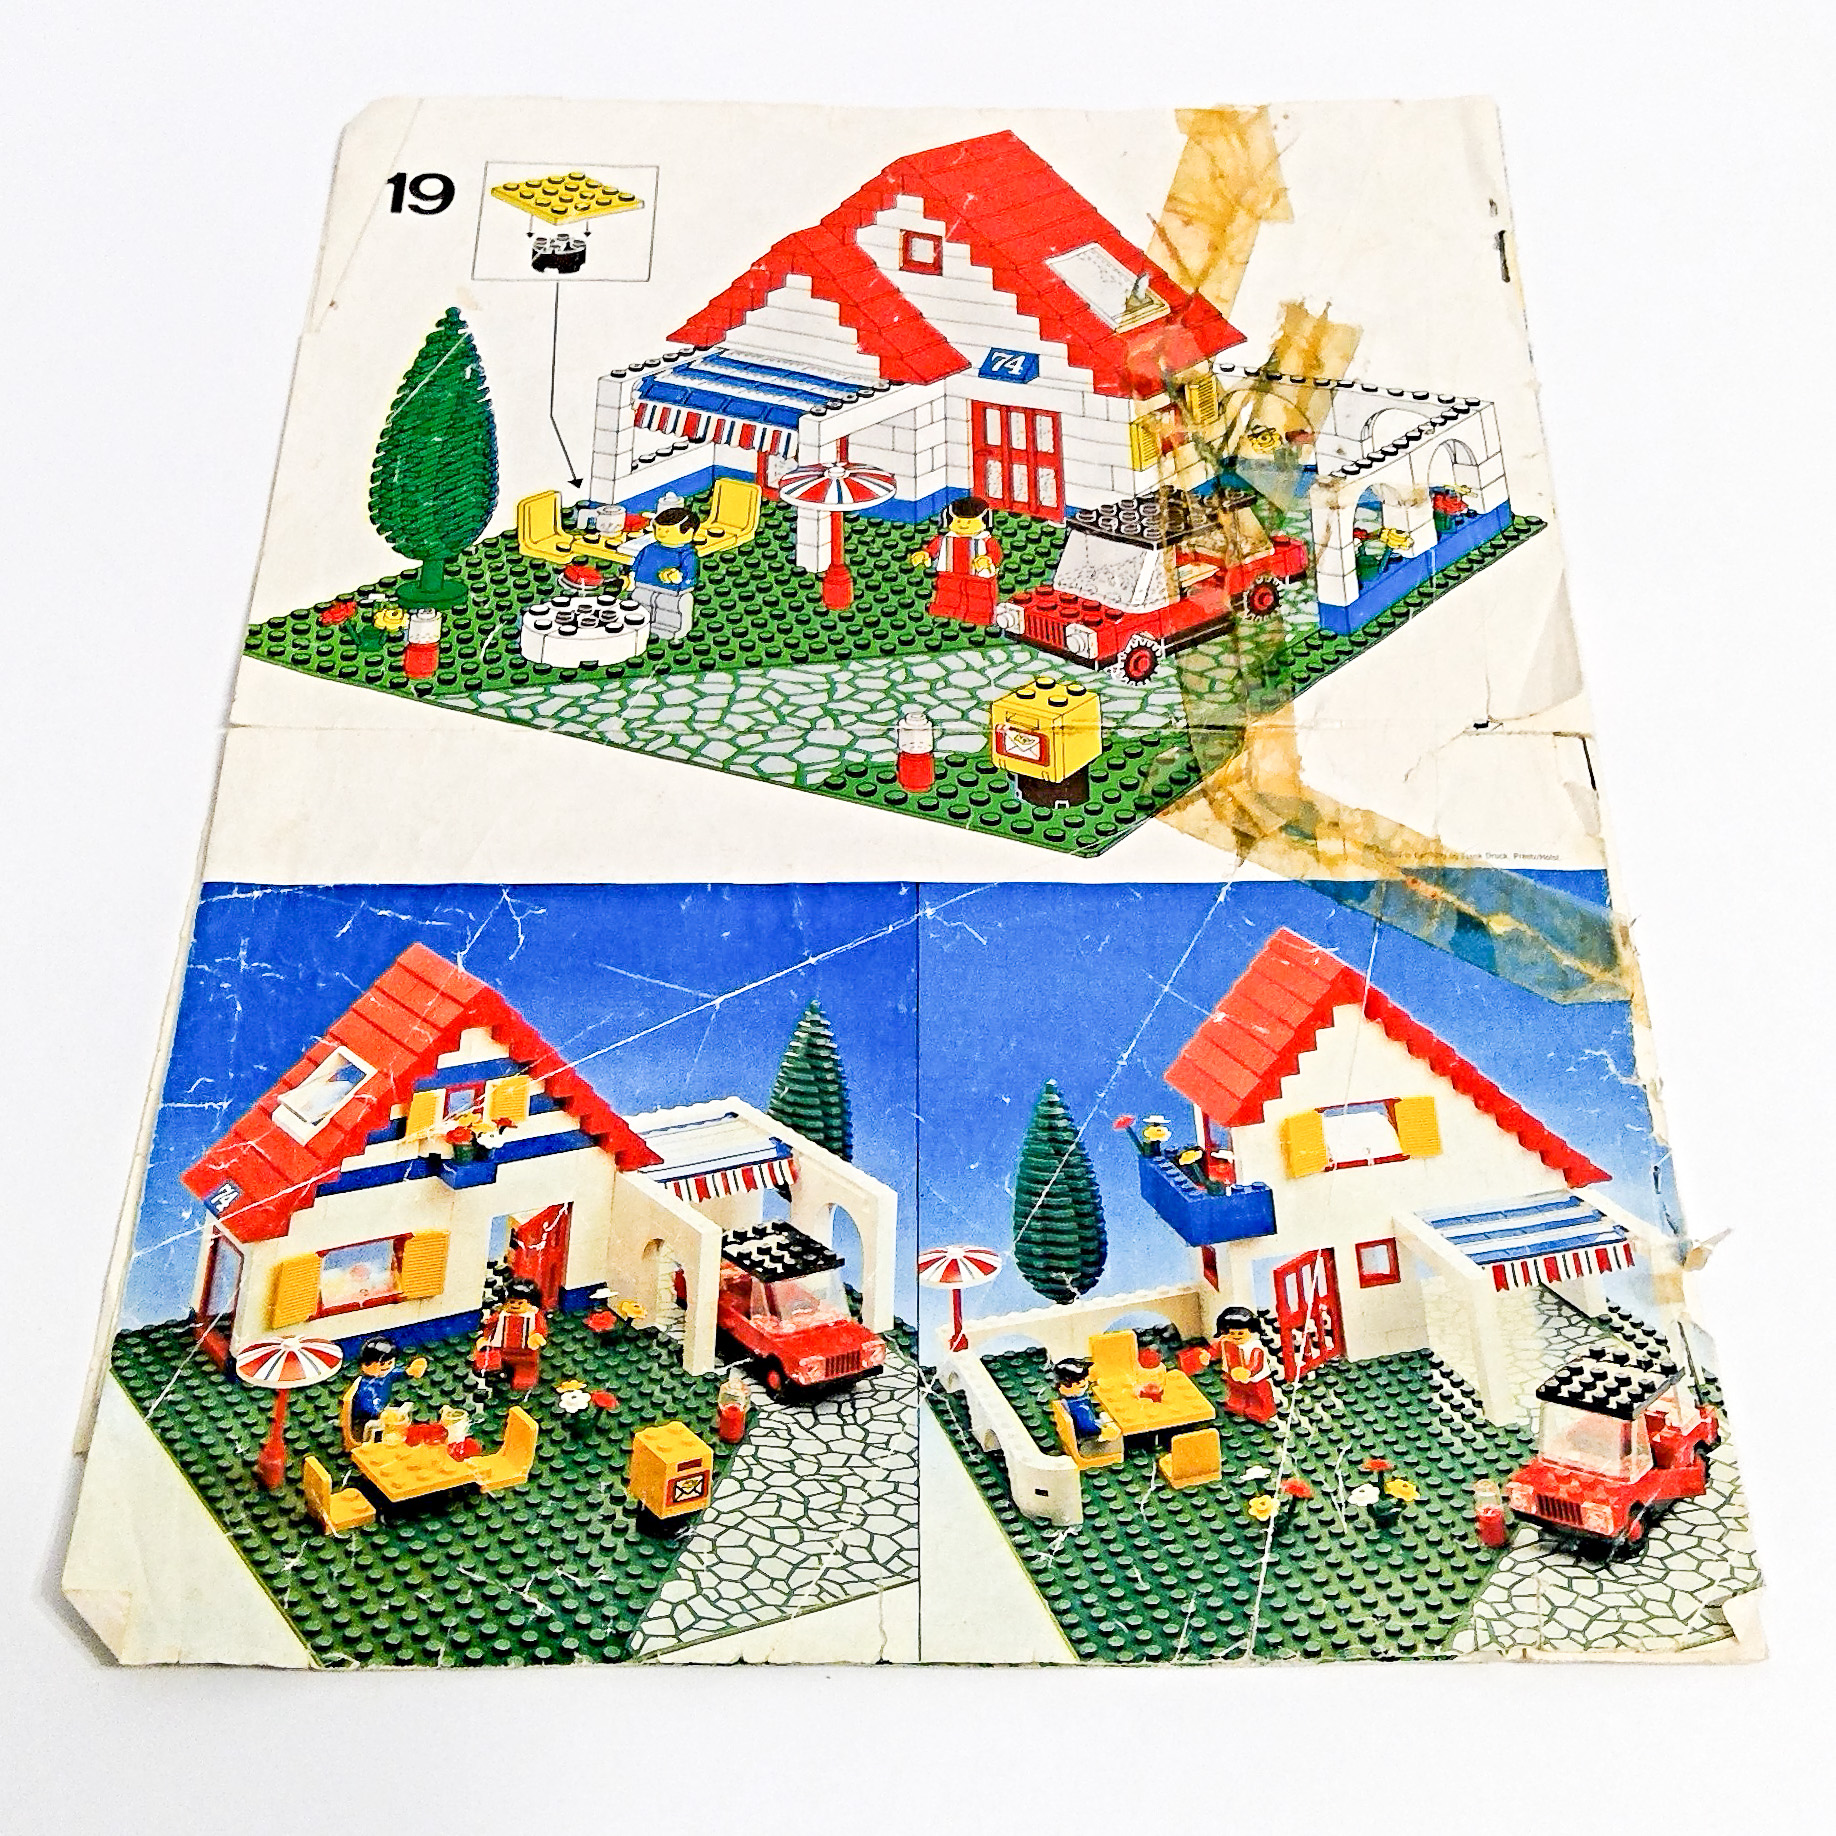
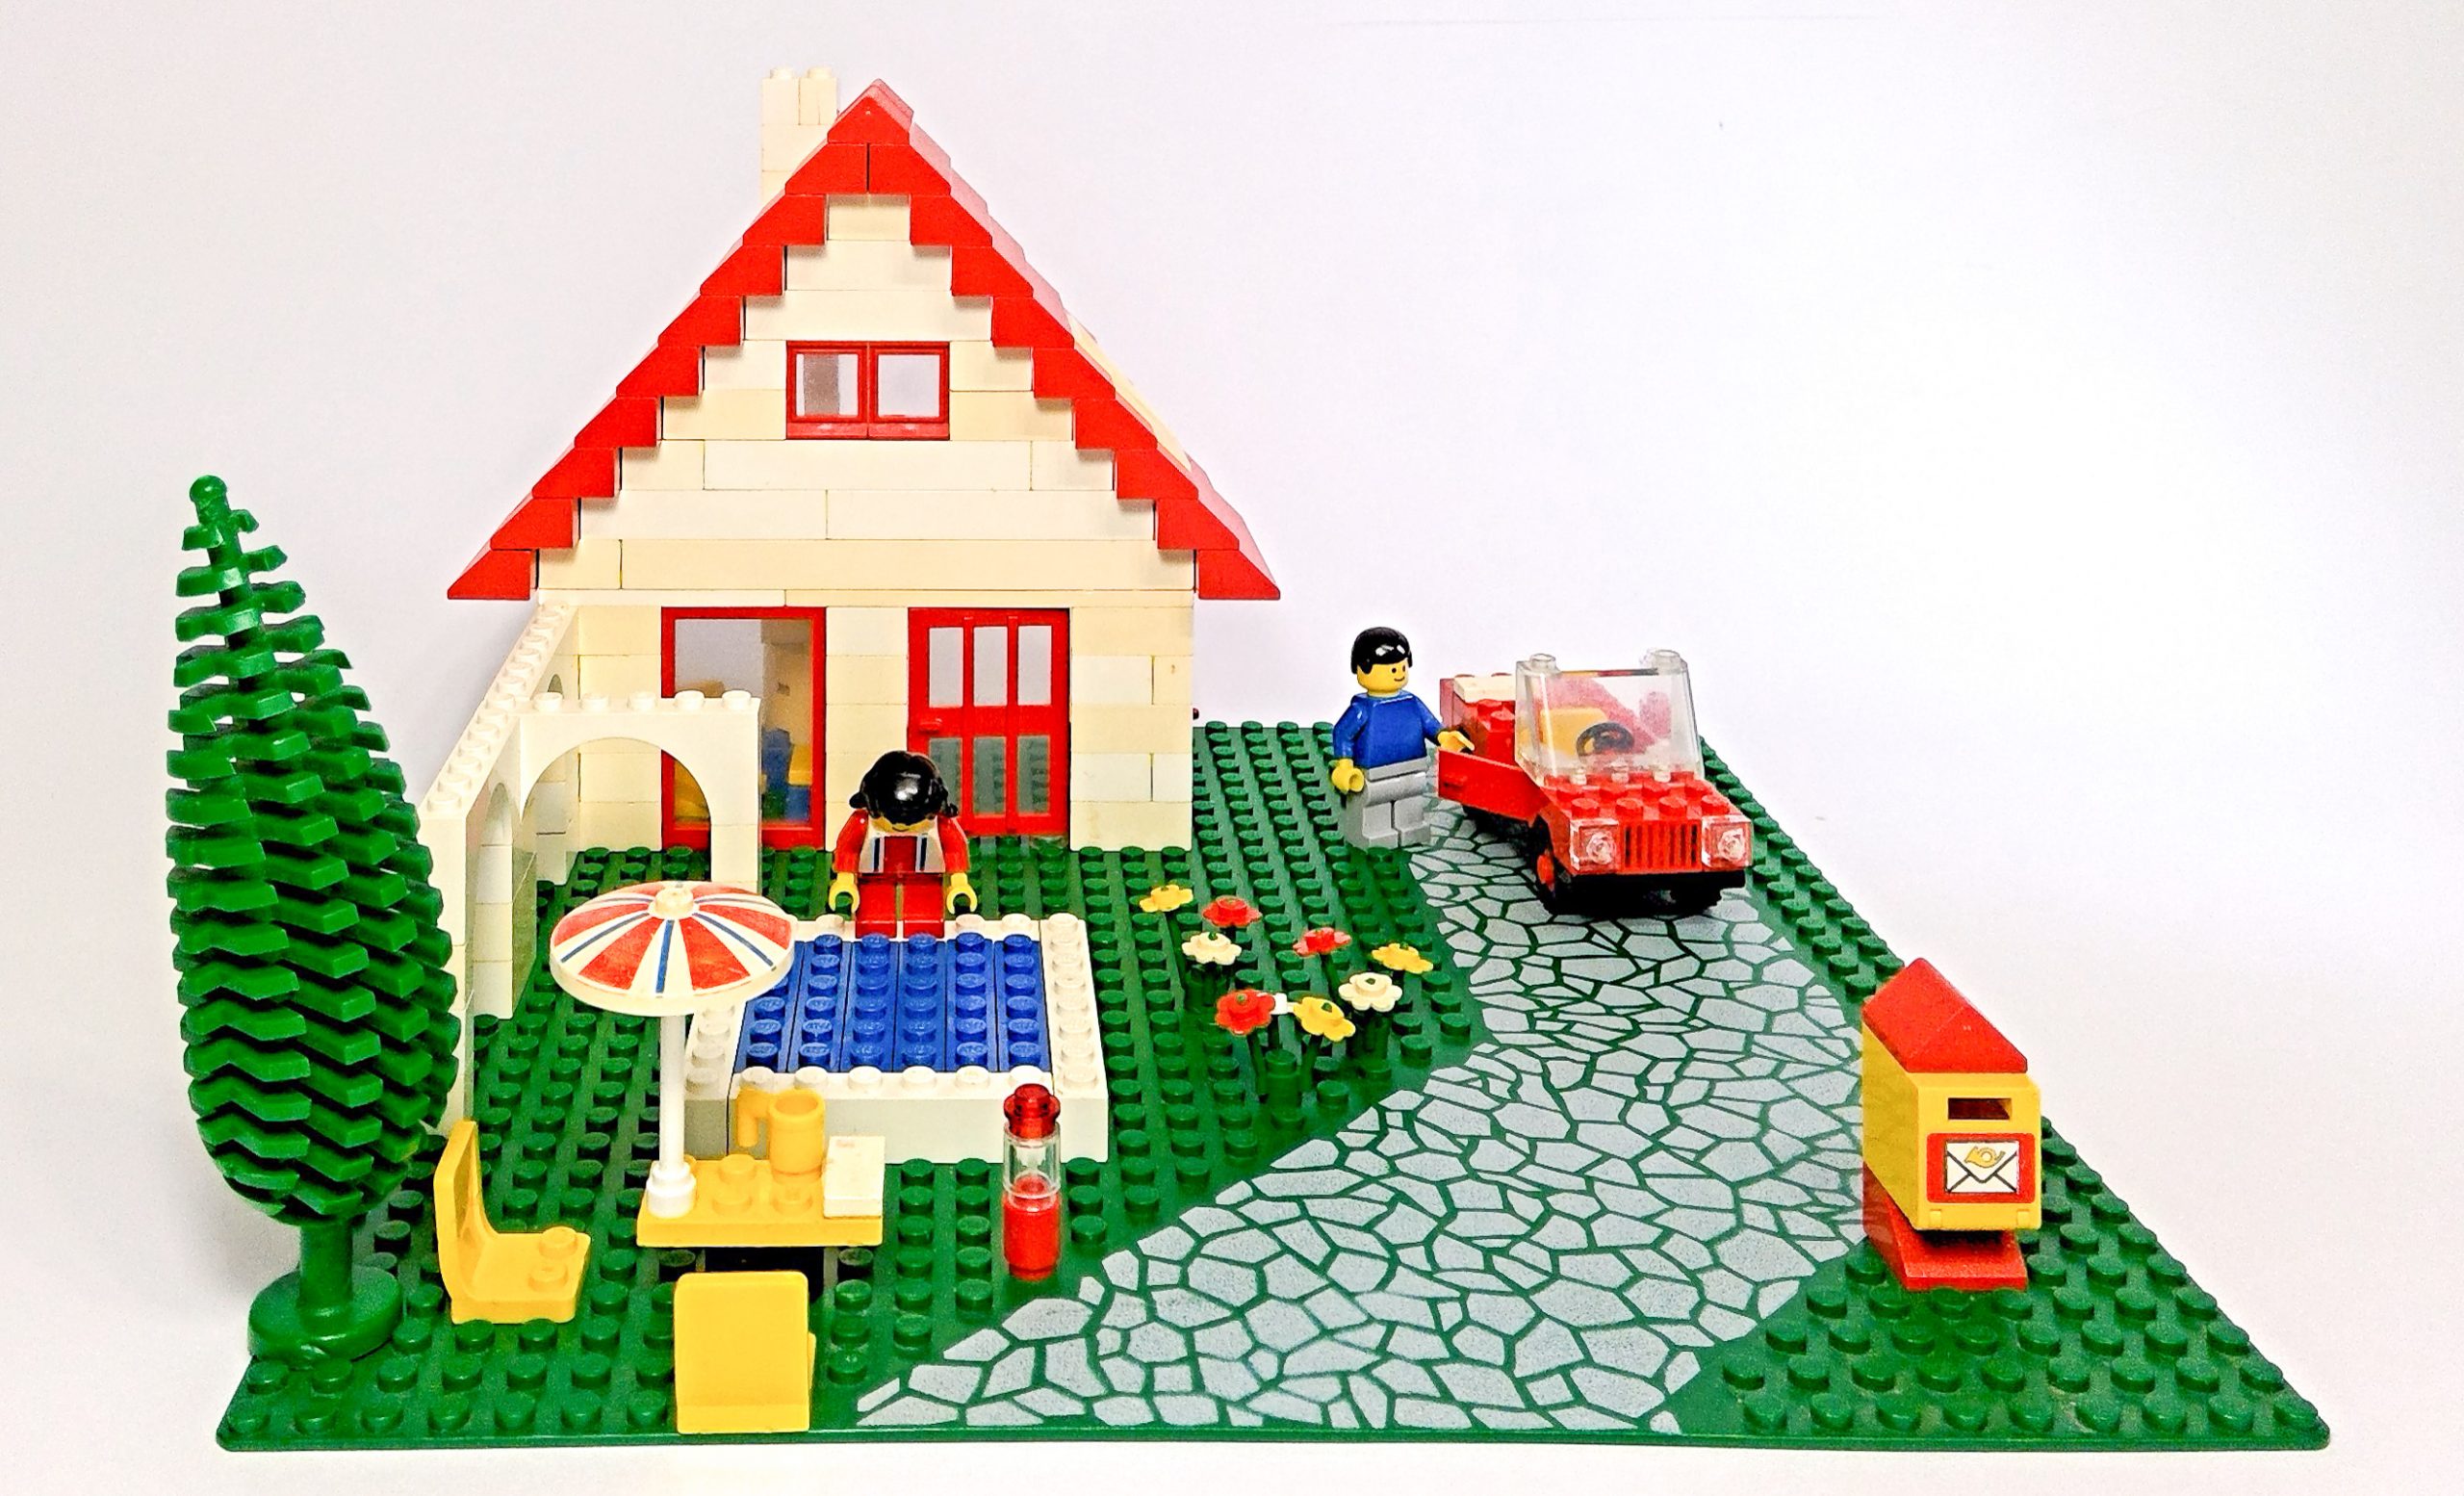
Step 19: The Garden
The back page of the instructions details the outdoor elements to add to the garden. It is not really a set of instructions, just an illustration of how the finished garden should look. This didn’t take long to recreate. I noticed that in this, and all the builds in the set, that the letter box is orientated to open frontwards. This is certainly not how we used it as kids and always opened it from the back as is normal for our letterboxes, but perhaps this varies around the world.
This back page also shows images of two alternative builds. This set is brimming with alternative build ideas with 6 in total shown on the box. We will tackle those next, but first let’s look at the parts in more detail.

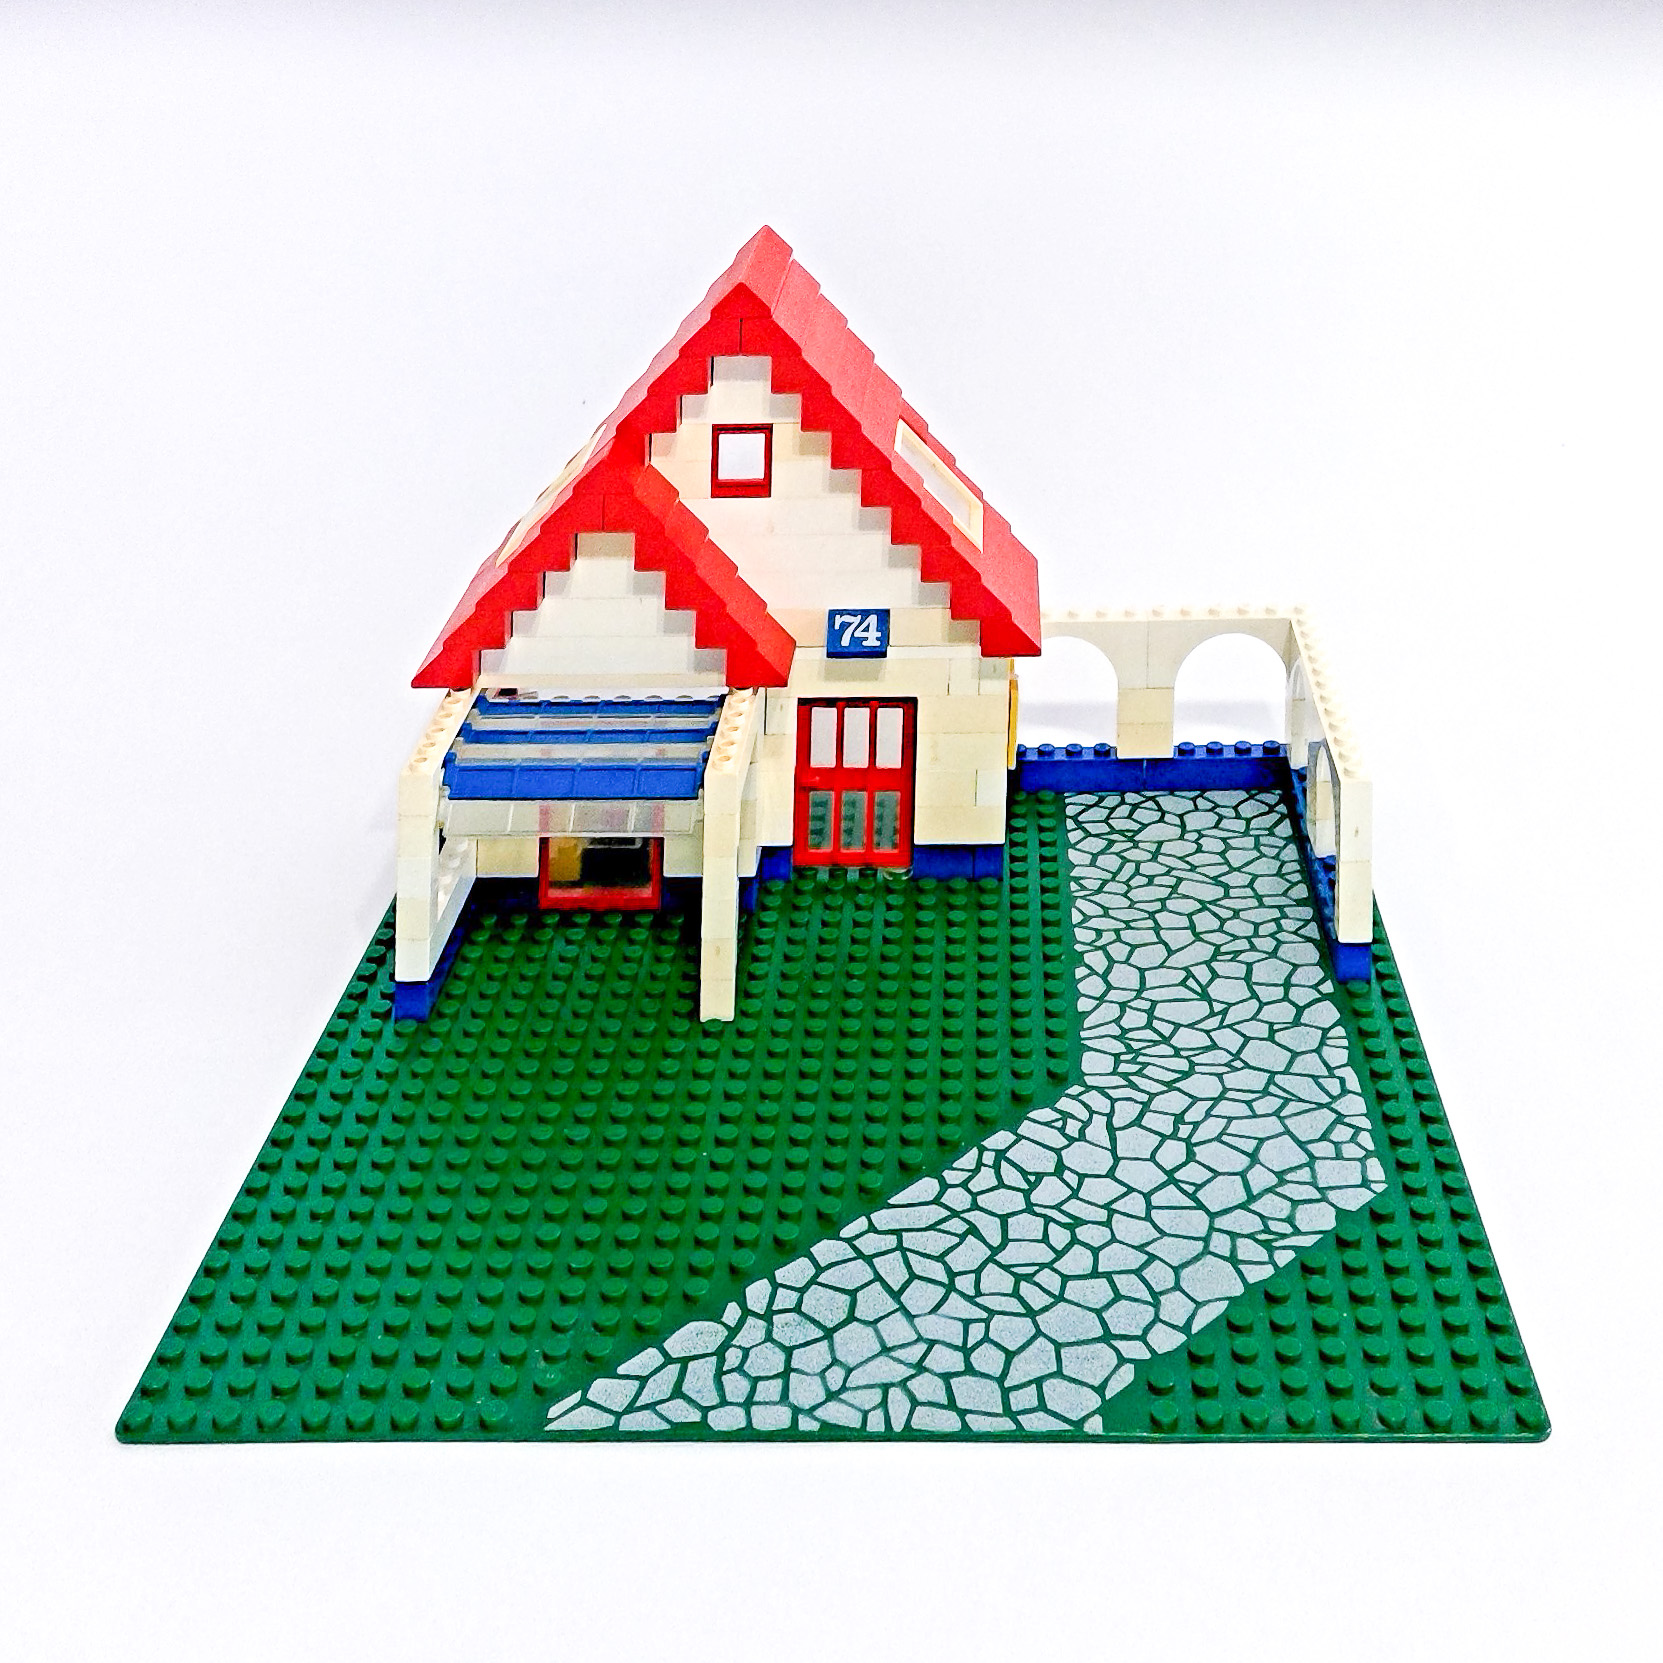
The completed set, front and back view.
About the Parts
The striking thing about this set is the basic range of colors contained. Today the LEGO color palette has evolved so much further than the primary colors with black and white. Almost all the parts in this set are 1White (19 elements), 26Black (7 elements), 21Bright RedRed (23 elements), 24Bright YellowYellow (12 elements) and 23Bright BlueBlue (8 elements). There is some use of 28Dark GreenGreen (3 elements), 40Transparent Trans-Clear (8 elements) and 41Transparent RedTrans-Red (2 elements).
The simpler color palette of the 1980s LEGO sets that I grew up with.
The set contains two minifigures with the simple face prints. The most novel elements of the minifigures are the pigtailed hairpiece (3625) and the 21Bright RedRed and 1White printed torso piece (973c22h01pr0001). This is reflected in their current value of USD$7.24 and USD$19.72 respectively.
A simple car and two minifigures are included in the set.
There are several printed parts and also stickered parts. One thing I noticed which was unusual was that the sticker for the oven was to be affixed to two stacked 2×4 bricks. This would not be done now, with stickers spanning just one piece. Though we do have a greater variety of taller bricks which make this possible.
Given the age of the set and that some of the parts are no longer made, it makes some parts quite valuable and/or rare. This includes:
- 28Dark GreenGreen baseplate with printed cobblestone driveway (4478pr0003)
- 28Dark GreenGreen Tree Cypress (3778) – now valued at nearly USD$75
- 40Transparent Trans-Clear Plate 2×4 (3020) – a simple 2×4 plate but now valued at nearly USD$30 in this color
- 40Transparent Trans-Clear Glass panes (4448) for the White Window 4x4x3 Roof (4447)
- 21Bright RedRed door 1x4x5 Right with 6 Panes (73312)
- 21Bright RedRed brick 1×2 with Black Grille Pattern (3004p06)
- 21Bright RedRed window 1x2x2 with Fixed Glass (7026)
- 21Bright RedRed window 1x4x5 with Fixed Glass (4347)
Using some of these old parts which are no longer available or very rare does make you yearn for some of these old options. One of my favorite parts from this set I wish we had again is the front door. I like that it doesn’t have a frame and that it is only 5 bricks high. It also just has a really pleasing design when compared to the door options we currently have. It just seems more sophisticated and has a stylish appearance appropriate to this sort of building. I also like that the door handle can be opened with a fingernail rather than having a stud for a separate handle to be added.
The Instructions
In rebuilding this set, I was most surprised at how far LEGO instructions have come along since the 1980s. One of the really clunky parts of these instructions was that the model was only shown from one viewpoint perspective. Modern instructions get the builder to rotate the model and this also enables the instructions to make the relevant parts of the model most visible.
Back in the 1980s architectural drawing was all done in 2D. The LEGO Group would have commissioned one drawing, from a particular angle to show all the steps of the build. To show the model from another angle would have increased the cost as a second perspective of drawings would have to be prepared.
While building with these instructions, I gained a new found appreciation for how much consideration would have gone into deciding just the right viewpoint to show as much of the building as was possible. Somewhat inevitably, this does leave some parts unclear. For example, in step 9 it is not possible to show clearly that two 26Black 1×4 plates are required, because in the same step a 1White 1×8 brick is also added. To overcome this an inset was created to explain this, but this seems clunky.
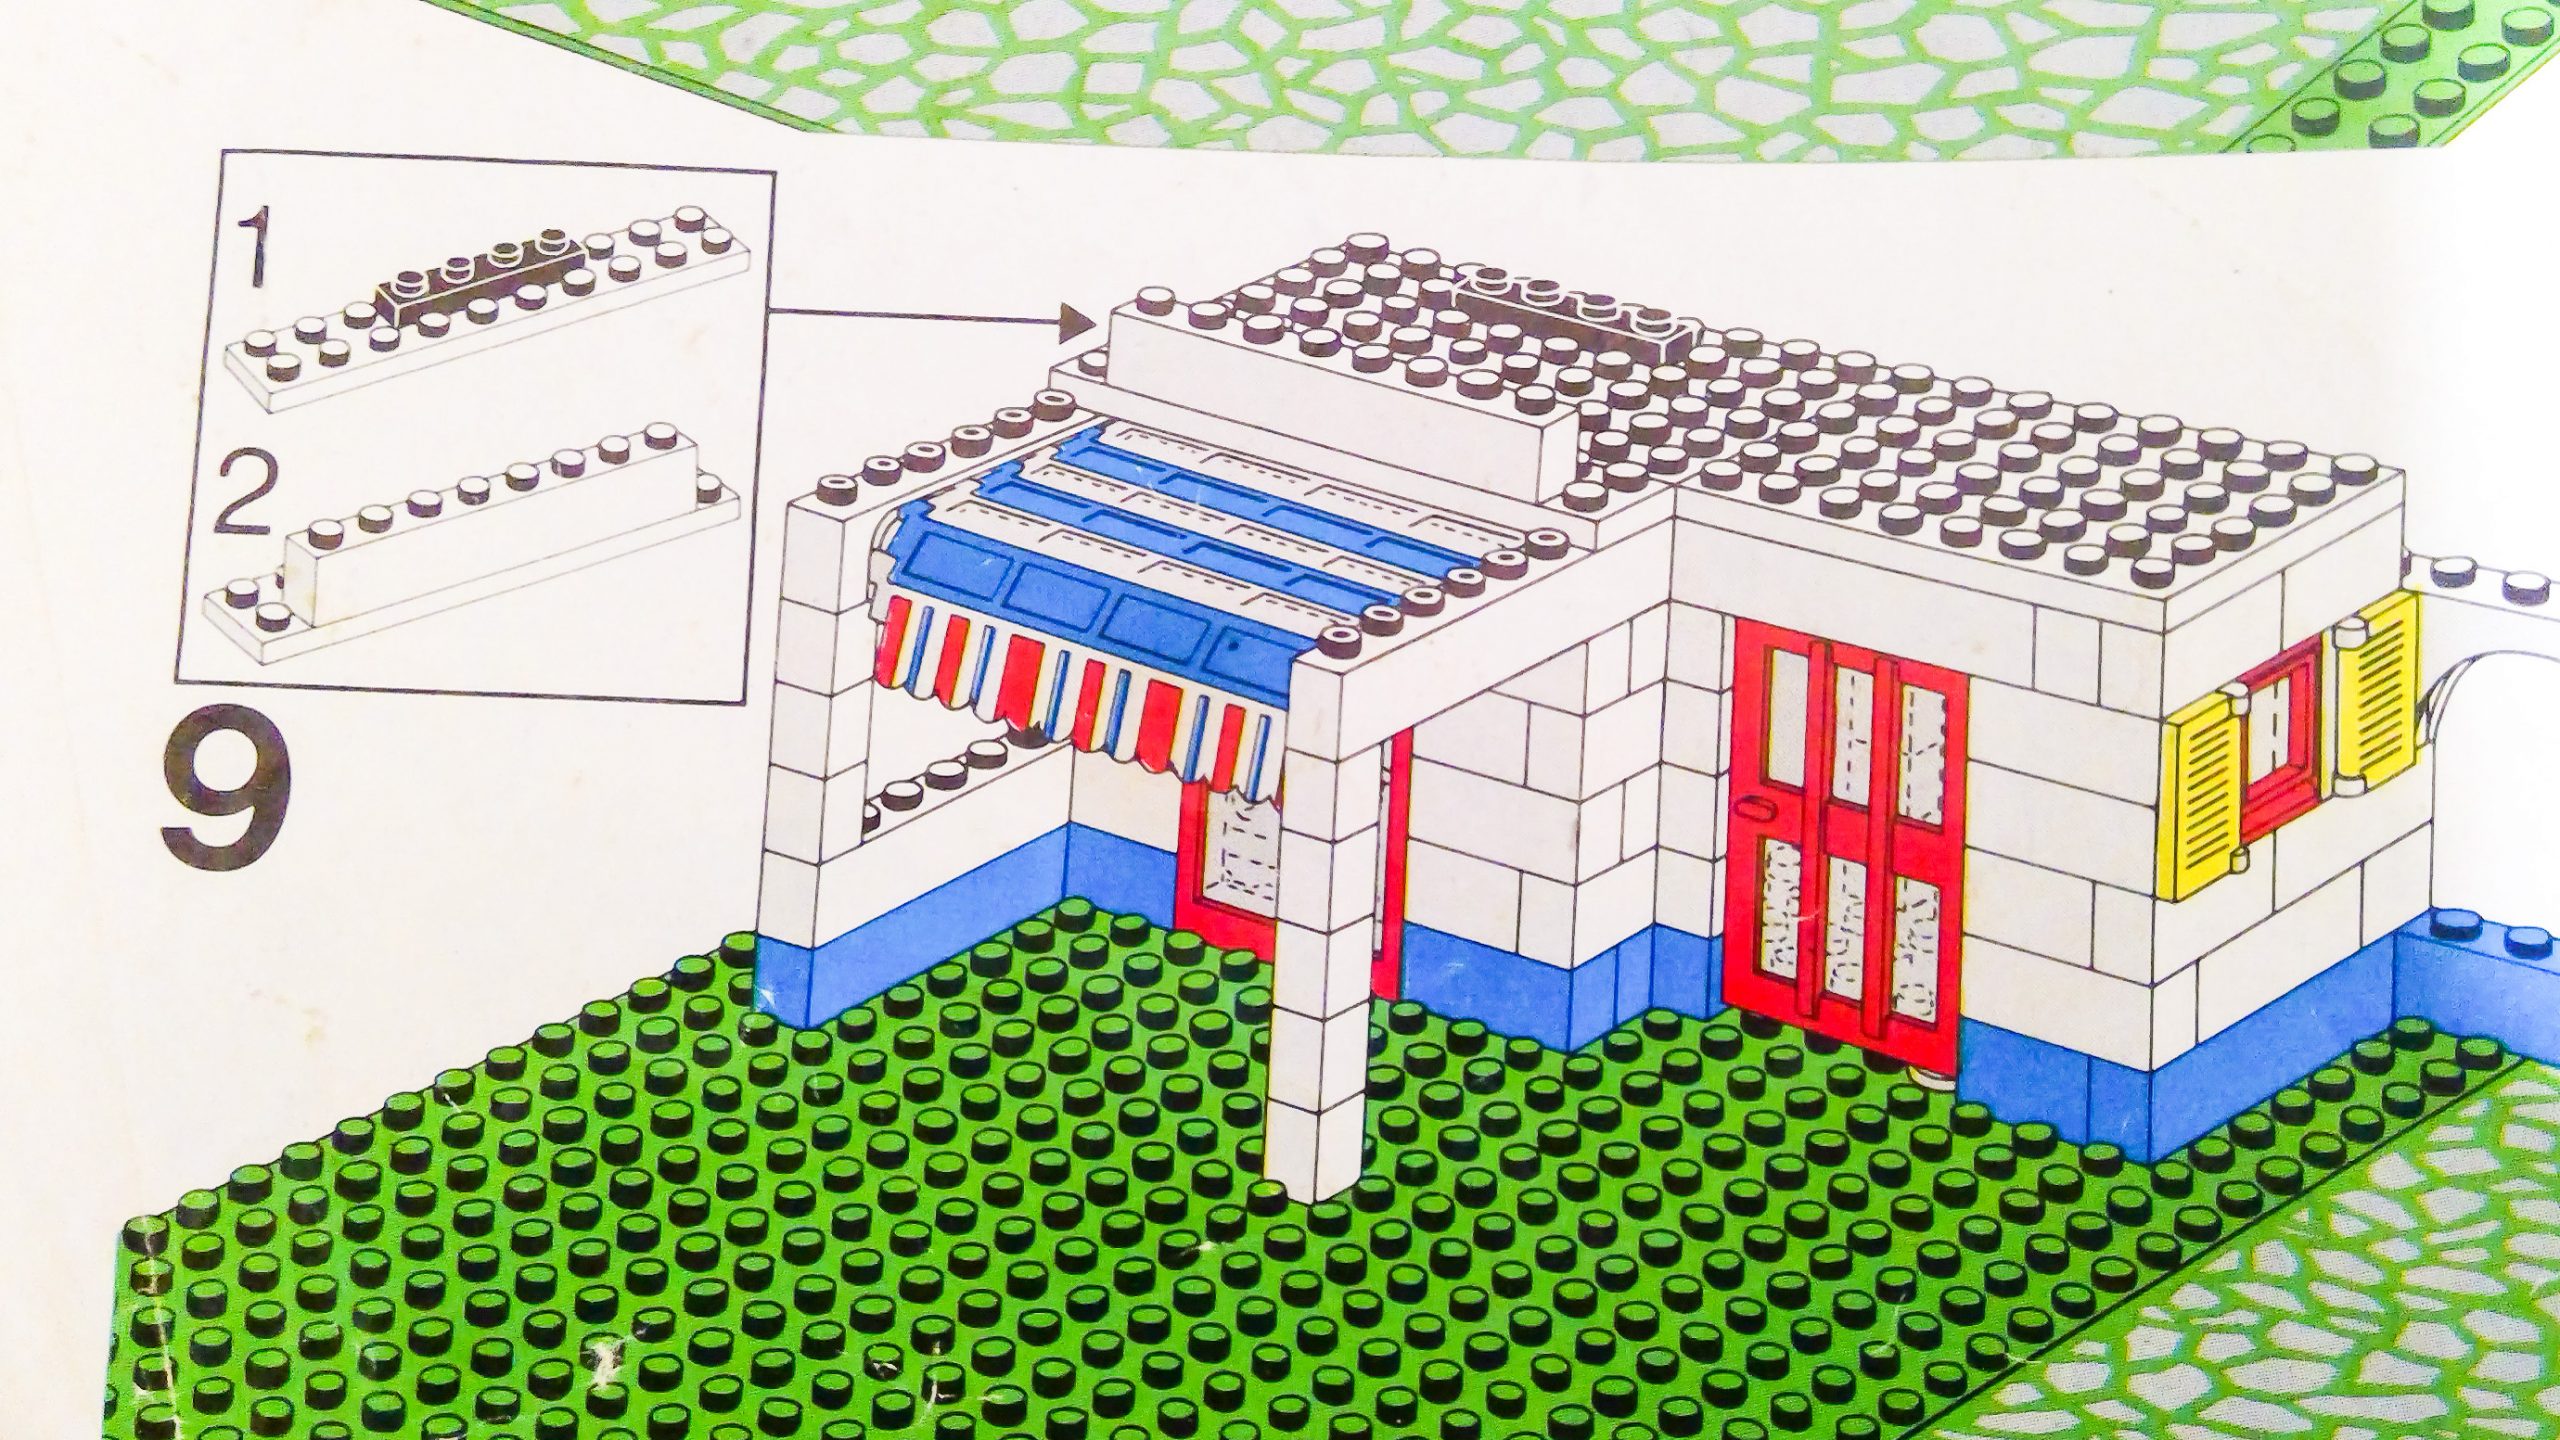
An inset box is required in step 9, since the white brick obscures one of the black plates.
In 2020 we can see how much things have changed from the 1980s. In real life architectural design and in LEGO too, we don’t prepare individual 2D drawings manually anymore. Instead, a 3D model of the design is created digitally and then it is as simple as using a rotate button to look at that model from any perspective. It costs nothing more to generate instructions showing the model at a range of different perspectives. Assembling this throwback set really showed me how the move from 2D to 3D design over the past few decades has influenced the development of LEGO instructions dramatically.
That said, there was something nice about having to really work to understand the instructions. Each step does not tell you in the top corner what pieces are to be put on in this step – this has to also be worked out from the drawing. Overall, the instructions were very ‘economical’ – there seemed to be more pieces added in each step compared with today’s instructions., The older instructions have 4 steps crammed on to each page, rather than each step taking up its own page on today’s instructions. The instruction book was eight sides in total which would contrast with what is achieved today.
Another striking aspect is the sheer number of alternative builds which were shown on the box. Modern sets typically only show the one set, except for those themes where multiple options are a feature such as Creator 3 in 1. Increasingly however the printed instructions only include the main set and the alternative instructions are online. Well in this case we have a massive 6 alternative builds but no instructions for any of these. Let’s see how I get on in assembling all of these!
Alternative Builds
This set had 6 alternative holiday home designs, none of which are covered in the instructions. This set really got me thinking about how times have changed. Pre-internet there would be no easy way to distribute alternative builds. Even the great sharing which goes on in the internet-based LEGO community would not have been possible either. As a result it was up to LEGO to provide some inspiration for the set owner as little other resource would have been available. This is really what these alternatives were about, to share some ideas to inspire the imagination.
Let’s start with the two alternative builds which were pictured at the end of the instruction booklet.
The back of the instruction book shows photos of two alternative builds.
The first alternative build gives us some nice 23Bright BlueBlue stripes on the gable end wall, with a planter box in front of the upper window. Creating this appeared to require a blue 2×4 of which I didn’t have in my set (perhaps another missing piece I didn’t pick up on), so I improvised with two 1×4. Whilst it is hard to see in these pictures, behind the flowers is a circular protrusion made from the 1White Brick Round Corner 2×2 Macaroni with Stud Notch (3063) from the main set’s BBQ.

The first of two alternate builds.
The second alternative build features a lovely 23Bright BlueBlue balcony upstairs. Unfortunately, I didn’t recreate this exactly as per the image. I couldn’t get the blue front wall of the balcony to sit in front of the white wall as was pictured while still making the balcony floor (the 40Transparent Trans-Clear 2×4 plate) fit in properly.

The second alternative build from the back of the instruction book
As with all the alternative builds, the features of the ancillary garden are also redesigned to give some fresh inspiration. The rounded end to the garden wall was a nice feature of this iteration, along with the use of red roof parts for the letterbox.
The box of this set also includes pictures for another four alternative builds (see picture of back cover).
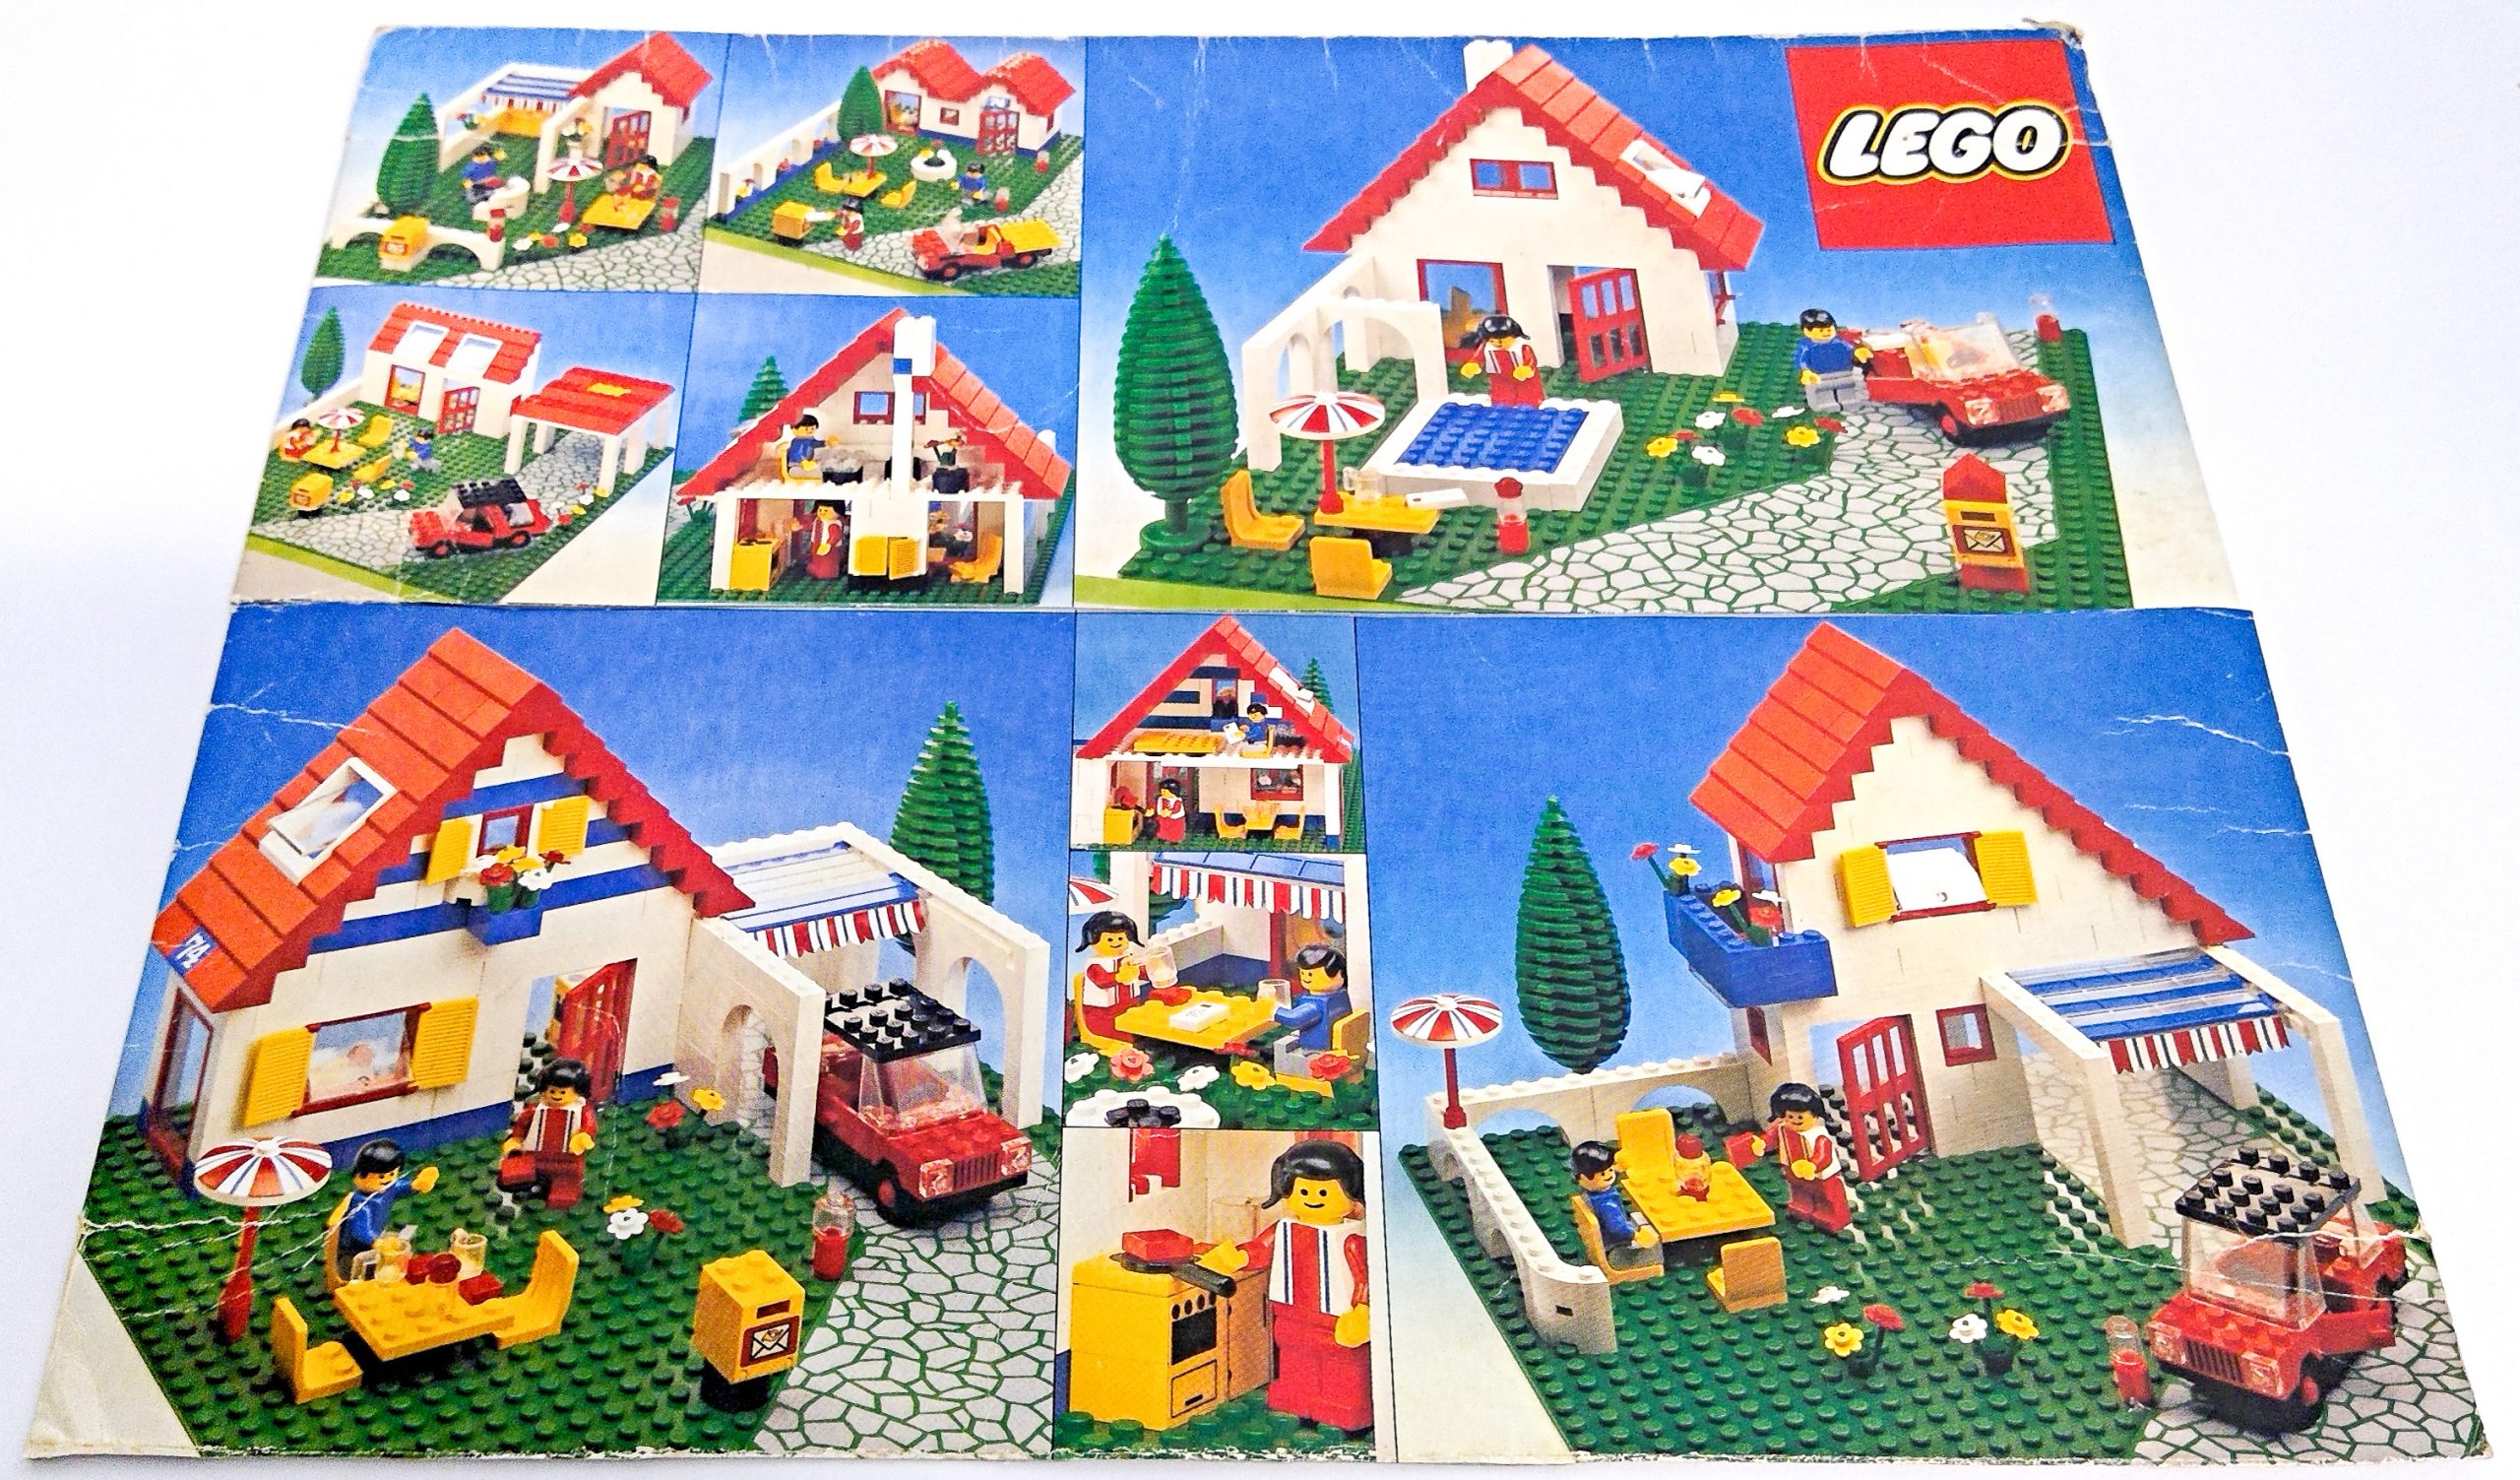
In addition to the box front set, the packaging shows six alternative builds from the pieces in this set!
One peculiar thing I noticed about these alternatives was that in many cases the tree would not actually be on the baseplate and was stood next to it instead. Presumably this was done so other details were not obscured during photography. In my recreations of these scenes, I have instead added the tree to the baseplate wherever seemed best. I also haven’t been two exact with the placement of the ancillary features on the baseplate, focusing instead of recreating the overall look rather than an exact depiction.
The next build features a swimming pool with some nice archways tying the pool to the house. In this example we get some variability in the roof design by the inclusion of a chimney. Paired with this is a firebox within the house formed with the small 24Bright YellowYellow window-1x2x2 shutter and backed with the 1White Brick Round Corner 2×2 Macaroni with Stud Notch (3063).
Another of the alternative builds, features a pool in the garden and an indoor fireplace with chimney.
The final three builds have less sizeable homes but play around with different roofing concepts and garden configurations. This really allows the design options to be explored. Without a doubt the hardest aspect of these to create was the freestanding carport. The picture showed a 24Bright YellowYellow plate visible on the carport roof but recreating this from the limited number of plates in the set seemed particularly elusive for some reason!
[PHOTO]The final three alternative builds provide smaller builds but with a variety of roof forms and more garden features
Conclusion
Assembling this set after so many years was a really nostalgic experience. It was quite amazing what could be created from a very limited selection of parts and even more limited selection of colors. The evolution of part and color options over time has given us an incredibly diverse set of elements which people could have only dreamed of back then.
It also left me feeling gratitude for some of those that have helped LEGO evolve into what it is today. It is very evident that LEGO instructions have developed for the better over time. Perhaps sometimes now we are too well looked after and it could be said ‘babied’ through the builds, it is sometimes forgotten how this reflects the technology we can access cheaply and easily these days.
While I had the instruction booklet, I did not have a parts inventory. This was critical to separate the parts from the different sets I had all in the one container. I also relied heavily on the fabulous websites such as Bricklink and Rebrickable which provide us such comprehensive digital resources about LEGO. This collective resource is a real testament to what fan communities can create with the internet. I was able to find a set inventory plus useful box imagery online to support my review of this set which is fantastic for a long-retired set no longer available from LEGO’s online instruction library. These digital resources brought together in the online LEGO community is what allows us and future generations of LEGO fans to collaborate to push what LEGO models can be far beyond what could have been dreamed about in 1983.
This was the first toy my father ever gave me, from Denmark. I love it so much that I even asked LEGO to reproduce it. I truly wish I could relive those beautiful memories, even for just a few moments.
This was my first favorite set. My parents gave away most of my LEGOs after I moved out but somehow I still have the baseplate. Thank you for the write up, I really enjoyed it!
Is there a site I will be able to buy this set or any from mid 80s
Ebay or BrickLink are good options for vintage sets.
how do we build the other versions of the house when we dont have instructions for it ?
PLEASE email me an answer, thank you
Instructions were not provided for the alternate builds when this set was released. It was up to you to figure it out by reverse-engineering the model from the photos.
I have this original set and have passed it to my son. Like you, just a few pieces missing (I blame my brother, he always jumbled my sets up!) but pleased to note the value of the tree!! Does any one know we’re I could find instructions for the alternate builds, am hoping some kindly soul has written them up….
“the roof made of Bright YellowYellow Window 1x2x2 Shutter (4213 and 4315)” – this part seems to be black in this set
Fixed, thanks!
Just as for humans, age and gravity have taken its toll on the cypress tree…