
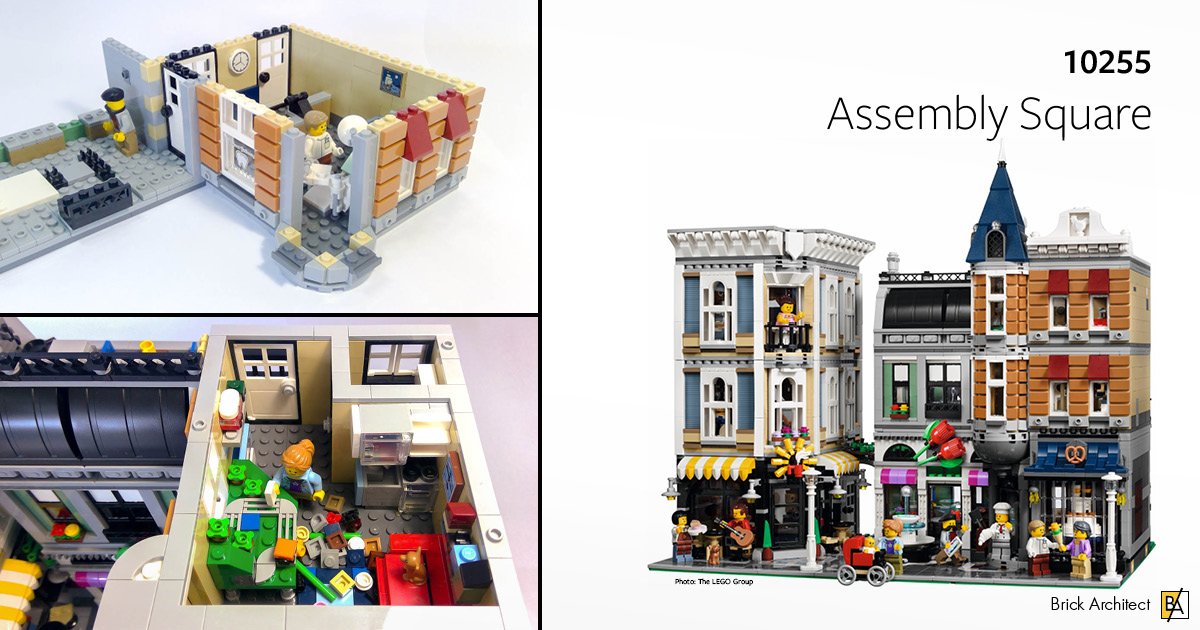
Review: #10255 Assembly Square
Assembly Square celebrates 10 years of the LEGO Creator Expert Modular Building theme. Let’s see how our writer Christine goes assembling this 4,000-plus piece set, as her first set from this theme.
My initial impression of the set centered around all the detail on the facades – it is certainly a set with lots of architectural elements and intricate detail. Almost all the LEGO we bring into our home is aimed at a younger audience, so a large set labeled for 16+years seemed like a great challenge for me.
About the set
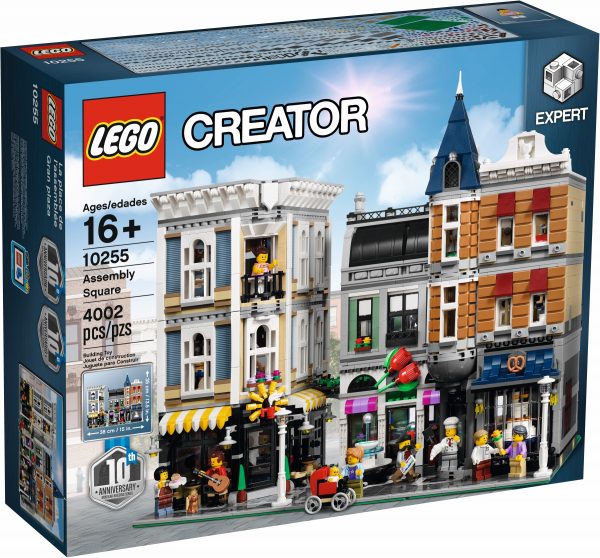
Assembly Square was released in January 2017, celebrating the 10th anniversary of the modular building series. The set has 4,002 pieces and costs $279.99 (USD). It has a price per part of $0.07.
#10255 Assembly Square. (Photo: The LEGO Group)
The completed model is 1.5 baseplates wide and one baseplate deep. It comprises three buildings. The middle building is set back to form a square with a fountain in the center. The two buildings at either end have three levels and the set-back building is two levels, with a third level concealed in the roof space. The set comes with eight minifigures and a baby figure.
Related Sets
The set features technic pins to connect it to other buildings in the Creator Modular Buildings sub-theme such as #10243 Parisian Restaurant, #10260 Downtown Diner, and the newly released #10264 Corner Garage. It is the largest set in the series, with the other recent sets being around the 2,500 piece mark. Because a new set is released every year, there are about a dozen Modular Buidling sets, although the early sets have been retired and command a high price on secondary markets.
Build process
I enjoyed this build process immensely—there were little delights along the way such as in terms ofinteresting new parts, creative designs for old LEGO favorites, and some things which I had not seen built in LEGO before. I built bags 1 to 3 in one day, and followed up with a bag each day for the following three days; this was an enjoyable pace. My young daughter helped with Bag 3, assembling large sections of it herself while I found the pieces and helped her with the more challenging assemblies. She is just about to turn 7, so I was very proud of how well she did in assembling such a challenging set. See later in this review for more commentary on my build process, as I learnt a lot about my personal building style from this large set.
The review walks through each of the six bags included in this set. Because the set is packed with creative building techniques which are fun to discover as you build the model, I’ve mentioned one or two highlights from each bag, but left some for you to discover on your own.
Bag 1 – The Ground Layout
Tiling the majority of one and a half baseplates is a daunting task, but the design included many patterns and features to make it very interesting. The entrances to both buildings have detailed tile patterns, and the raised fountain also includes detailed patterns. There is not a lot of repetition and a wide selection of colors and pieces used in this bag.
There were a couple of places in the instructions where it was not obvious which color to use, but the instructions group the pieces to help clear up ambiguities. I thought this really showed some insight from LEGO into the minds of the builder.
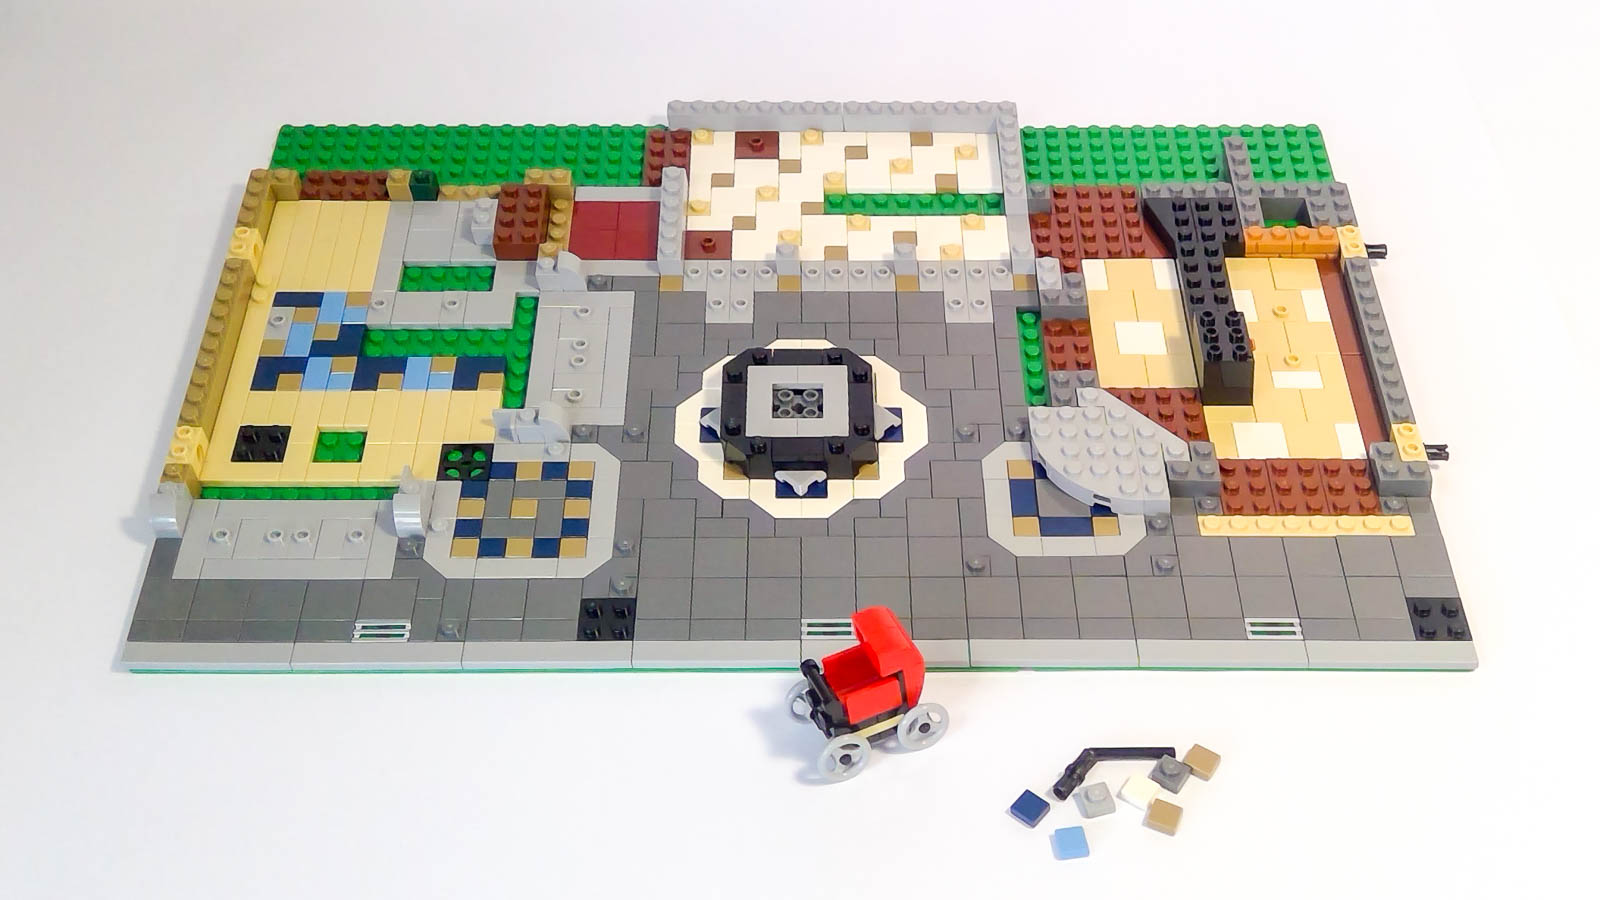
Progress by the end of Bag 1.
The last step in this bag was the baby carriage. It is a lovely vintage design, with the handle cleverly integrated into the side of the carriage. Most importantly, this bag creates a foundation for the rest of the project, but thankfully includes enough variety to be interesting in its own right.
Bags 2 and 3 – Bakery, Florist, and Café
This part of the build creates the first two ground level stores – a bakery and a florist. The bakery features an oven with nicely designed door. It also has a technic axle accessed under the rear stairs to push the baking tray out of the oven. I didn’t consider this was overly necessary, as it was easy to take the tray out the oven as it was formed on a plate with handle. Using the mechanism did however push the oven open and display the tray in one movement. It leaves the tray displayed at an angle which nicely shows the tray’s contents.
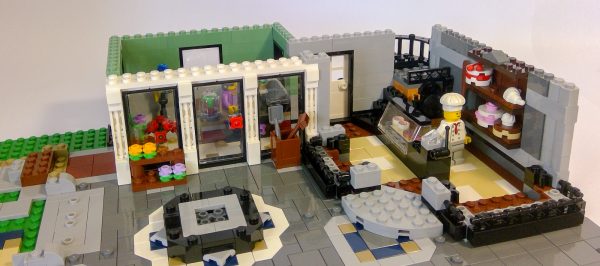
The bakery and florist shop almost complete. (One of the cakes has the wrong piece, but I hadn’t realized it yet.)
There were a number of cakes to make, and I did get the various white pieces topping these cakes mixed up and had to go back and swap them – this was my mistake in reading the instructions. The bride and groom topping the wedding cake are a nice touch, and formed so simply by six 1×1 round plates.
The other nice touch in this part of the build is the two bakery windows. These where formed with garage doors (Part 30061) placed vertically. These were very authentic looking especially when paired with the lights formed with a Minifig accessory welders torch (Part 13793) and the window base created with 1×2 plates with handles on side (Part 2540) – positioned with handle upright.
In the third bag, we complete the left hand side of the ground floor. This includes the café, and completing the florist store. The front door is on a 45 degree angle, which is created using 2×2 hinge plates (Parts 3679 and 3680).
My daughter built lots of the smaller elements including the café furniture, café kitchen equipment and the store itself. We enjoyed lots of the little features, she was thrilled with the design involved in this type of set.
We had also wondered where the 4×6 Lattice (Part 92589) would go. We loved that it formed a cover for the alley in the back which was covered in plants. This is a great touch which links all the buildings in the set together.
Bag 4 – Dentist Office and Photography Studio
The dentist office and photography studio sit above the bakery and florist respectively. The dentist office was really interesting, as these are not items I have seen made in LEGO before. All dentist items were a great design. The sink was created by using a small 1x2x2 window (Part 60592) placed glass side facing down. The plughole was created by the hole in a 1×2 technic brick (Part 3700) on its side below the window. The chair, reception counter and other elements were also well designed.
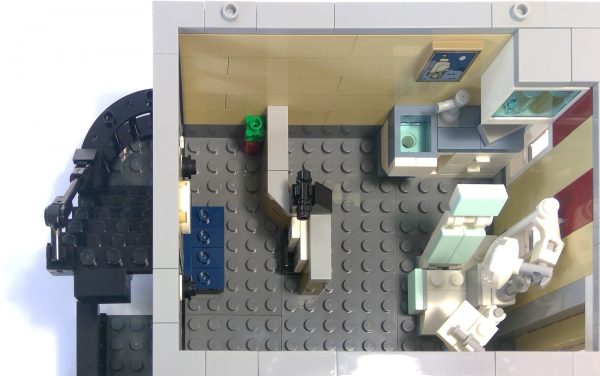
Sink in the dentist office formed with 1x2x2 window and a 1×2 technic brick with hole.
I would have liked a wall dividing the dentist off from the reception. It just seemed to need this, as the reception appeared to be shared with the photo studio next door. I would have also liked some use for the circular area of the office – in the apartment above this is put to good use to display the Eiffel Tower (see picture below), but this same space felt underutilized in the dentist layout. It would be unlikely for such an area to be left vacant, it needed something in the space. It could be as simple as an office plant or comfy chair. Even dentist equipment such as an x-ray stand would have given this space in the room some character and use.
The vintage camera in the photography studio was also a nice build, though oversized for what it was. I enjoyed the white backdrop in the studio more, it was well integrated into the wall.

The photography studio features a camera and a white backdrop.
Bag 5 – Music Store and Dance Studio
In this bag, we complete the third and final floor of the building on the left. This feels a bit repetitive, as the exterior is almost the same as the previous floor. I didn’t mind the repetition, as it meant that it could be assembled quickly.
The interior of the music shop features several instruments, with the drum being the most assembled element. In the dance studio above, there is only a piano and the ballerina barre. The Ballerina’s mirror (Part 20193) has only been used in one other set (#10246 Detective’s Office.) The wall construction holds the mirror in place nicely.
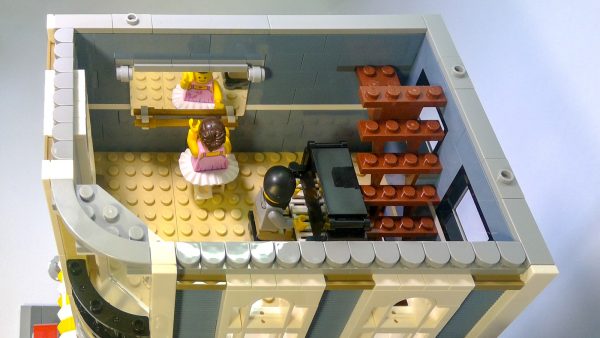
The dance studio features ballerina’s barre, mirror, and realistic piano.
This piano design is one of the best I have seen. The keys are formed with white grilles but are partially covered to give a more realistic size. This piano also has foot pedals formed by a 1×2 plate with teeth.
The roofs of these buildings don’t disappoint. This building has a flat roof, and features some detailed fretwork around the top.
Bag 6 – Studio Apartment and Rooftop Dining Area
In the final bag, we complete the other two buildings and a couple of finishing elements for the square – the fountain and the street lights. The focus is the studio apartment above the dentist office and an outdoor eating area above the photography studio.
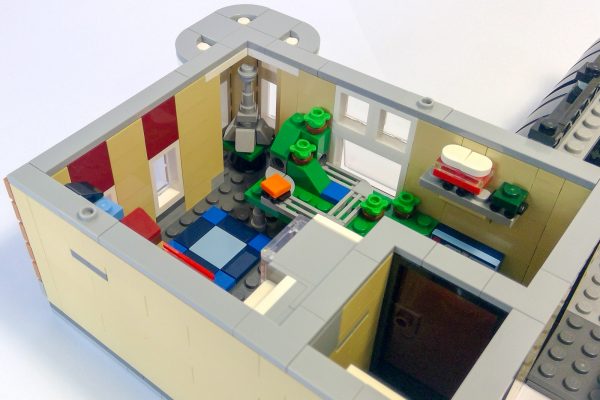
The apartment includes a nice selection of LEGO models including the Eiffel Tower, utilizing the round space in the corner.
I enjoyed the AFOL fan apartment – I am really enjoying this LEGO “meta thing” where we get decorated parts of LEGO sets and little micro builds to place in our scenes. This LEGO fan’s apartment has lots of little LEGO sets represented by one or two pieces of LEGO and it also has a large train set and tall Eiffel Tower in the circular corner of the room.
I enjoyed the kitchen build in this little apartment. The sink was formed with a 2×2 Wall Element Corner (Part 31959) in Medium Stone Grey and the wall included a 1×1 brick in the same color to form the rear side of the sink wall.
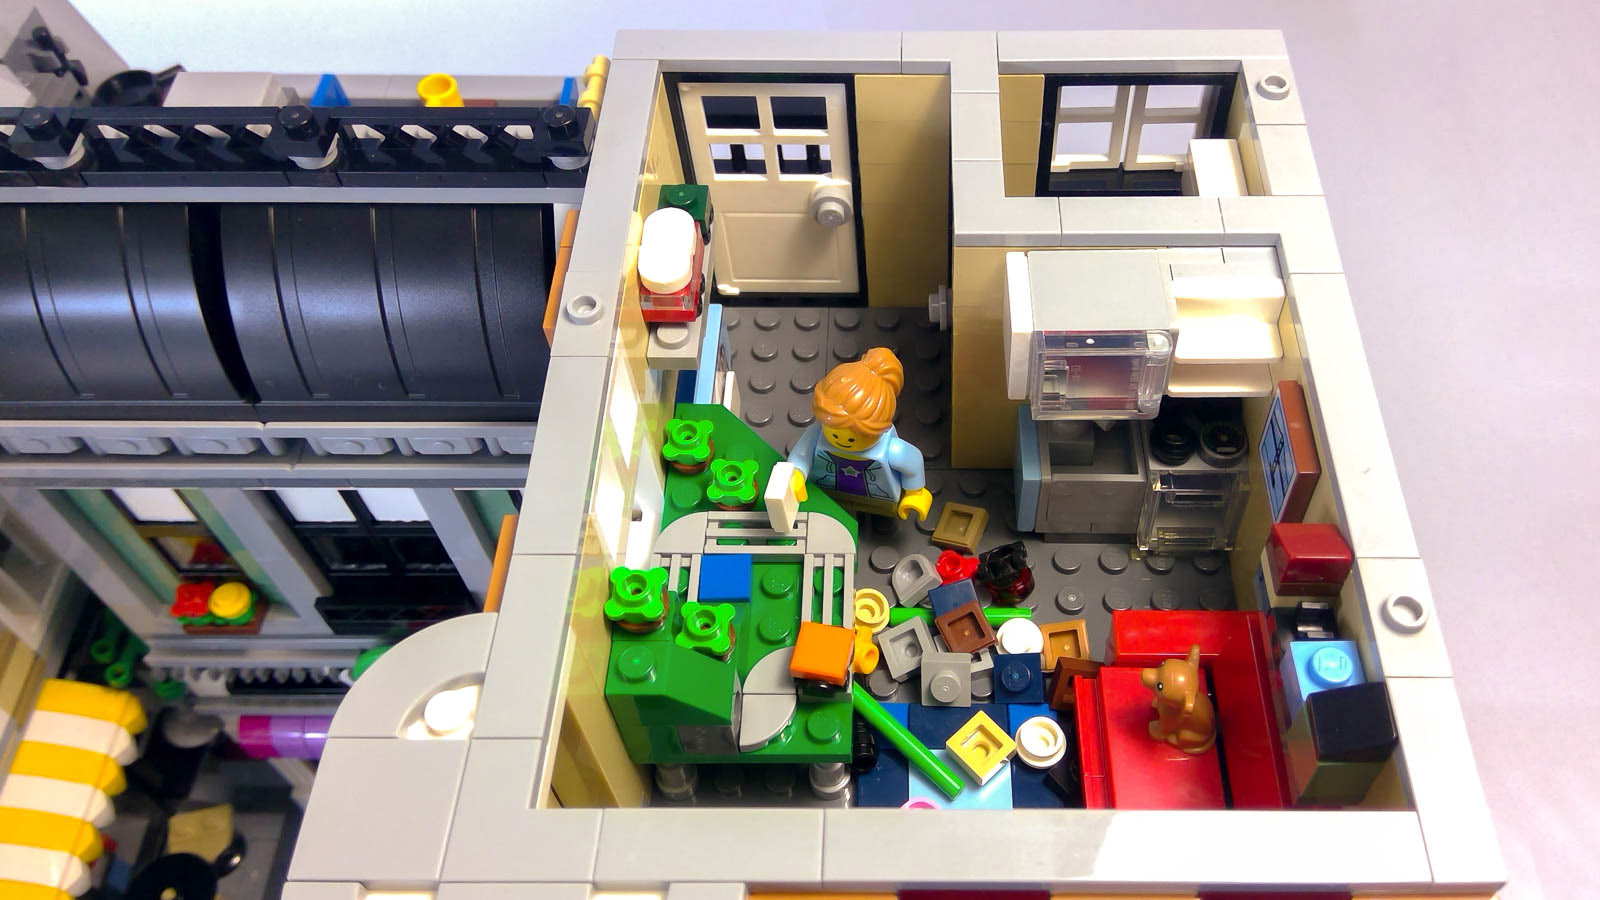
The kitchen sink makes use of a 1×1 tile in the wall to complete the sink basin. Spare parts added to make the room as messy as that of a real AFOL.
The toilet was also interesting and really “dated” the apartment and gave it a sense of its age and condition.
As with the roof of the other building, the flat roof for the apartment featured some nice detailing to complete the overall look of the building façade. The color scheme suited but was different to that below, adding some interest to these last stages of the building process.
The roof the set-back building featured some unique elements. It is based around two black Technic excavator scoops (part 18943) with an intricate base below including the use of a row of hammers (part 75904). This roof gave a good representation of the style of roof it is based on.
The rooftop dining area was a little strange in so far as its purpose – was it for the office workers below or part of the apartment complex? This was the weakest “room” in the set as its purpose was a little unclear. A scaled down version could have been put on the roof above the apartment and the space used for something else.
Play Features
The set is marked as 16 years plus. It is designed for display rather than to be play-friendly. While the building exteriors feature some delightfully inventive and intricate detailing, the cost of this external detail is taller internal room heights. This makes play difficult as it is fiddly to move things around inside the rooms. Whilst children’s smaller hands can theoretically better negotiate these tight areas, younger children lack the precision and visualization skills needed to place items in confined spaces.
While the majority of the base is tiled, there are a decent amount of single studs available to place minifigures in different positions in the rooms and in the square outside. The inclusion of an AFOL in the studio apartment is a nice touch. I was delighted when LEGO got meta and gave us tiles decorated as LEGO sets (such as element 6177290 in this set). It has been just as delightful to see real life AFOL create LEGO AFOL minifigures and minidolls to collect and display LEGO. It’s a lovely development in LEGO/fan interaction, and I am sure we will see more references to this relationship in the future. This set certainly takes these meta references to the next level by showing the home of an AFOL minifigure.
I do have one gripe with the AFOL apartment though—my daughter and I couldn’t agree if she was the baby’s mother. The box imagery could suggest the apartment occupant is the parent of the baby. Of all AFOLs, I think the most likely to have their LEGO boxed up in storage would be a single mother of a small toddler living in a small studio apartment on the top floor of a building with no elevator. I understand LEGO may have been keen to include a female AFOL (and indeed this would be a nice nod to LEGO’s journey in the past 10 years to better engage with female customers). However, if it was me I would have paired the baby with one of the other 7 mini-figure characters in the set. There are no baby elements in the apartment anyway, so the baby works better as a baby ‘out and about’ in the square with his/her doting parent/grandparent rather than residing in this building. In the end, we decided that the AFOL is funding her LEGO collection by supplementing her income with some weekend babysitting.
About the parts
The set has 4,002 pieces and costs $279.99 (USD). It has a price per part of $0.07. Overall, I rate this set quite highly when it comes to parts. As the buildings are centred around a square, we get two detailed facades of the main buildings. This leads to sizeable numbers of the façade elements. For example, the yellow and white striped café awning includes 16 pieces (8 of each color), making it easy to adapt it for MOC in many different configurations. There are enough for matching awnings above four standard windows. Similarly the two bakery windows formed via garage door pieces involve 18 sections of garage door in total. Again this could be adapted in a MOC building in several different workable window layouts such as a front façade with a bay window on each side of the entry door.
Other examples include a decent number of elements in less common colors such as:
- In 312Medium NougatMedium Dark Flesh there are 60x 1×1 cheese (Part 54200) and 49x 1×2 tiles (Part 3069).
- For 135Sand Blue there are 22x 1×1 brick (Part 3005), 50x 1×2 profile brick (Part 2877) and 51x 1×6 brick (Part 3009).
- There are a total of 21 door frames – 19x door frames (Part 60596) in Black plus a further two doors on 45 degree angle (Part 28327) in both Black and White. There is a good variety of the doors and clear windows fitting in to these door frames.
- Similarly there are plenty of windows – 80 windows or window like panels, plus an additional 21 solid panels.
- There are five staircases (Part 30134) in Black and Reddish Brown.
- Nearly 400 pieces in 199Dark Stone GreyDark Bluish Gray and over 900 pieces in 194Medium Stone GreyLight Bluish Gray along with a lot of Black and White as well.
Minifigures
This set includes eight minifigures plus a baby figure. There is a minifigure designed for each of the eight stores/rooms created within the set. Each minifigure has been well designed to match the likely occupant or worker for that store/room.
New Colors for Existing Parts / New Printed Parts
This set includes the following new colors for existing parts:
- Garage Door Panel (Part 30061) in Transparent (Element 6177175)
- Satellite Dish (Part 17964) in Silver Ink – Satellite dish Ø16 NO. “1000” (Element 6178683)
- Bird No 2 (Part 27062) in a blue and yellow multi-colored combination (Element 6178520)
- Windscreen 3X6, 25 Deg. (Part 35283) in Transparent Brown (Element 6230116
This set also includes the following new decorated parts:
- Glass for frame 1X4X3, NO.4 (Part 30718) in Transparent decorated with Dentist signage (Element 6177280)
- Dentist Minifigure Torso No. 3708 (Part 76382) which includes breast pocket with dentist tools and the torso also has white gloved hands (Element 6176783)
- Decorated Flat Tile 2X3, No. 2 (Part 30723) in 212Light Royal BlueBright Light Blue representing LEGO Creator Expert Set #10182 Café Corner (Element 6177290)
Conclusion
This set lived up to and exceeded my expectations. I was intrigued with all the little details as I built and found it really enjoyable. I rate this a Must Have (5/5 star) set. It will appeal to all builders and it’s a great set for parts.
I thoroughly enjoyed my first modular building set and am inspired to use the parts to create some MOC. If you haven’t tried the modular building set yet, consider getting one. Sets from the modular building series make a great family project for the upcoming holidays which will keep everyone engaged and connected with the family rather than on their devices. (I also learned a lot about my building style—read beyond the conclusion to see what I discovered.)
Learning about my Building Style
I learned a lot about my building style; this was the biggest set I have ever assembled, and this is a time in my life when I rarely get a ‘grown up’ set to build for myself.
The sets I spend most time with are designed for younger children (under 12). I spend most of my time helping two children build. So my roles are parts finder, helping with tricky steps, and a little bit of emotional coaching given the emotions that LEGO can elicit. (Plus I also get to do quite a bit of MOC to provide my kids with other things they need for the play scene they are building.)
As I built, I reflected on how my current circumstances has shaped my building style. Previously I would have categorized myself as a very methodical, by-the-book builder and would have carefully sorted pieces before starting to assemble the set. Instead I emptied all the different plastic bags making up a ‘Bag’ into adjacent piles and just started building.
When helping others, you are most of the time reading the instructions upside down and from a distance. So I discovered that I have largely learned to ignore the pieces list in the top left hand corner (it’s not very legible from a distance.) Instead, I have developed this habit of identifying the parts from the picture. I found this a really hard habit to break. Sometimes I would collect up the parts I needed, but just as often I wouldn’t. Thankfully, the instructions have a yellow outline around the pieces added in each step, and this makes it easy for this approach to work.
NAturally, the piece count per page is much more than you would find on a children’s set. There are about 146 two-page spreads of instructions in this book, giving an averaged piece count of 28 pieces per spread. This varies widely as some can be significantly more, particularly for repetitive elements. My haphazard approach meant I placed quite a few pieces incorrectly. Probably about 100 if I had to guess. I would either figure out my mistake on that same page or when I got to the next page or two. Perhaps there are some mistakes still in there.
The set was well designed to avoid any ambiguity about which color piece to use. There were times I hesitated as to which color piece to select. Helpfully other pieces in the same color were also used on that page which helped clarify. My daughter also helpfully pointed out that silver and gold pieces always have a “sparkle” so you really can’t confuse silver with grey. (Sometimes it takes a while to realize the obvious, unless you have a six year old to tell you.)
That said, I think I did pretty well. I think I am pretty adept at finding pieces promptly so the total build time of 11 hours I would say is pretty typical. I was stopping to take pictures, and actually took stills to create a speed build video, so there was a little bit of non-building time in that 11 hours. I would say this set would take 10-14 hours for one person.
The time I spent on bag three with my daughter was also a highlight. With the holidays coming up I would recommend this set for anyone with older children who is looking for an activity to involve the whole family. Building together is great. With all LEGO instructions on line, it is also easy to download a second set of instructions to make it easier for the whole family to work together. This set certainly lends itself to a team build given its modular nature.
For what it’s worth, in the Lego designer video for the set, Jamie (the set’s designer) confirms that the AFOL is, indeed, a babysitter. Nice article!