
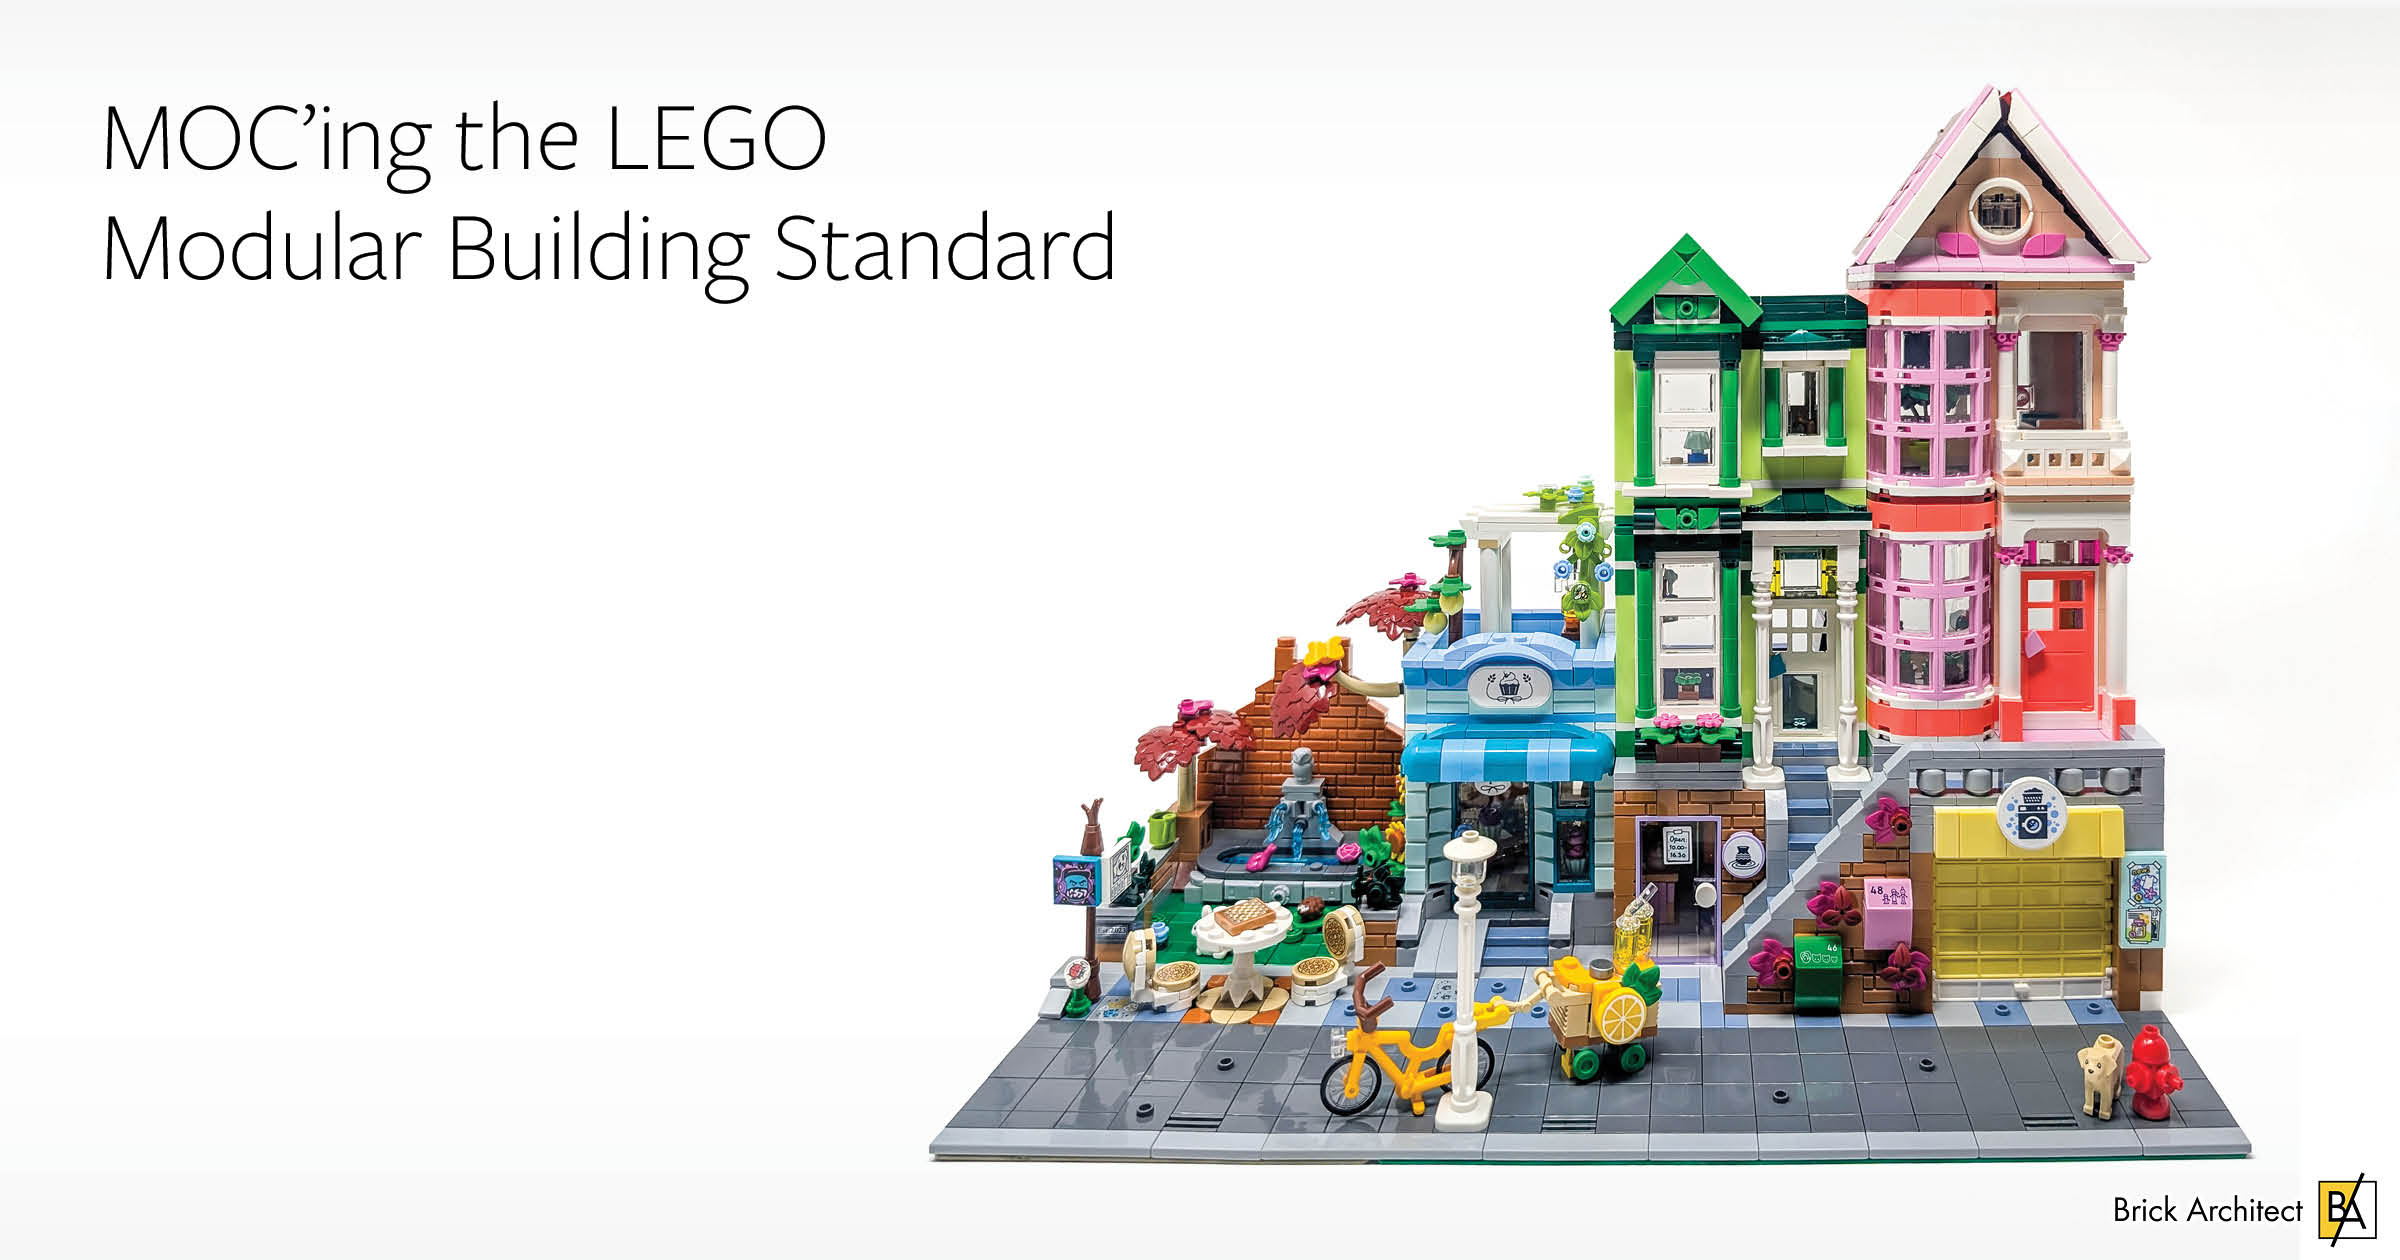
Getting Started: MOC’ing the LEGO Modular Building Standard
Pick a promising LEGO set, learn the modular standard, and expand your LEGO city!
Building Beyond the Box
Anyone who has built a LEGO set knows that they come with instructions, but creativity doesn’t follow these clear steps. Many builders find that the real fun begins when imagination takes over and you build your own creations.
If you had the opportunity to build with LEGO as a child, you probably have memories of digging through bins of parts, building fun custom creations, and tearing them apart because you need those pieces for your next build. As an adult, building your own MOC may seem daunting, but it doesn’t have to be. In this article we will explore how to break down this barrier to design something that looks great and connects seamlessly with other models following the Modular Building standard.
Sets in the Modular Building Series are a perfect way for adults to rekindle their love of LEGO. Modulars also offer a great way to unleash your creativity and get started with MOC building. With many great buildings released through themes such as Friends or Creator 3-in-1, there are plenty of sets that can provide a great foundation to transform a real set into a MOC.
Creator 3-in-1 provides a great foundation of pieces to build custom builds.
In this article, we will use two sets as our foundation; 31153: Modern House and 42670: Heartlake City Apartments and Stores, we will explore how to turn these custom sets into modular masterpieces as we pay close attention to some of the key details that make a Modular building … modular.
What is a Modular Building?
Modular buildings are series of buildings designed to connect side-by-side and stack vertically, forming cohesive streetscapes and city blocks. Introduced officially by LEGO in 2007 with #10182 Café Corner, the modular theme has stayed strong for nearly two decades with a whopping 19 official sets having been released.
Modular buildings are released in two formats, being built as a corner Modular or a straight Modular. The corner Modular Buildings are designed to sit at a 90° intersection, with façades on two adjacent sides, while the straight Modular Buildings are designed to sit between other buildings on a straight street, with one main façade. BrickArchitect is no stranger to Modular Buildings having covered many of them on this site. Some of the popular corner sets built over the years include 10264: Corner Garage and 10287: Boutique Hotel and popular straight sets including 10260: Downtown Diner and 10255: Assembly Square.
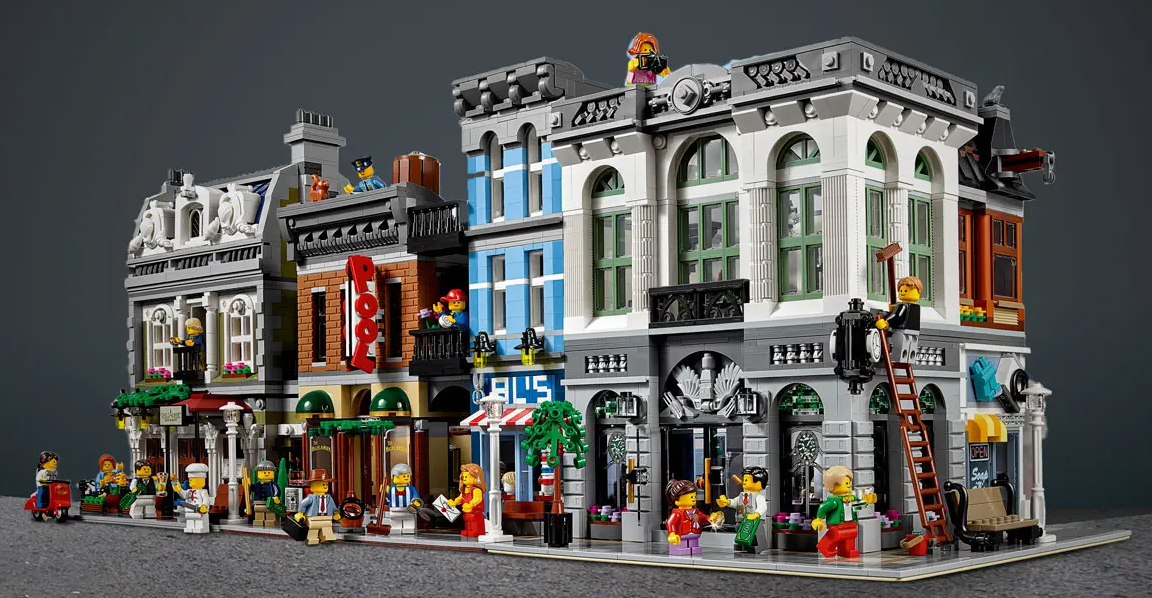
The Modular wave of sets are one of the most popular LEGO has created.
This increasingly popular theme is popular for its aesthetics, consistently great building experience, and expandability. Each floor lifts off cleanly, allowing for interior detailing and easy play. Sidewalks align across sets, creating a unified street view. As the standard is widely adopted, custom modulars can slot in right next to official sets without missing a beat. Each Modular Building set follows a standard that we will explore in this article that lets them connect seamlessly with one another and fit a general uniform standard that allows differences to exist between the sets without them looking out of place beside each other.
The sets in the Modular Buildings wave are released at an annual basis with one set released per year. Most of these sets have a shelf life of approximately 3 years with many skyrocketing in value following retirement so should you have interest in any Modular Building sets it is highly encouraged that you pick them up before retirement to save yourself some money.
Building your first custom Modular Building
When building your first custom Modular building you can either start from scratch or redesign an existing set. Building something from scratch is a great challenge, but can be daunting to first time MOC builders. That’s why I recommend lowering the barrier to entry by choosing an existing set you can modify while learning the Modular Building standard at the same time.
Identifying the Right Set to Modify
To make the most of this learning experience you need to choose a set to modify. Friends, City and Creator 3-in-1 are all great choices as they often contain buildings. This makes them easier to convert. You can always build the official set to get ideas for how the set designers put the pieces together, and adapt those ideas as you convert it into a modular.
Non modular sets can be modularized with ease by following some simple guidelines.
Showcasing two examples
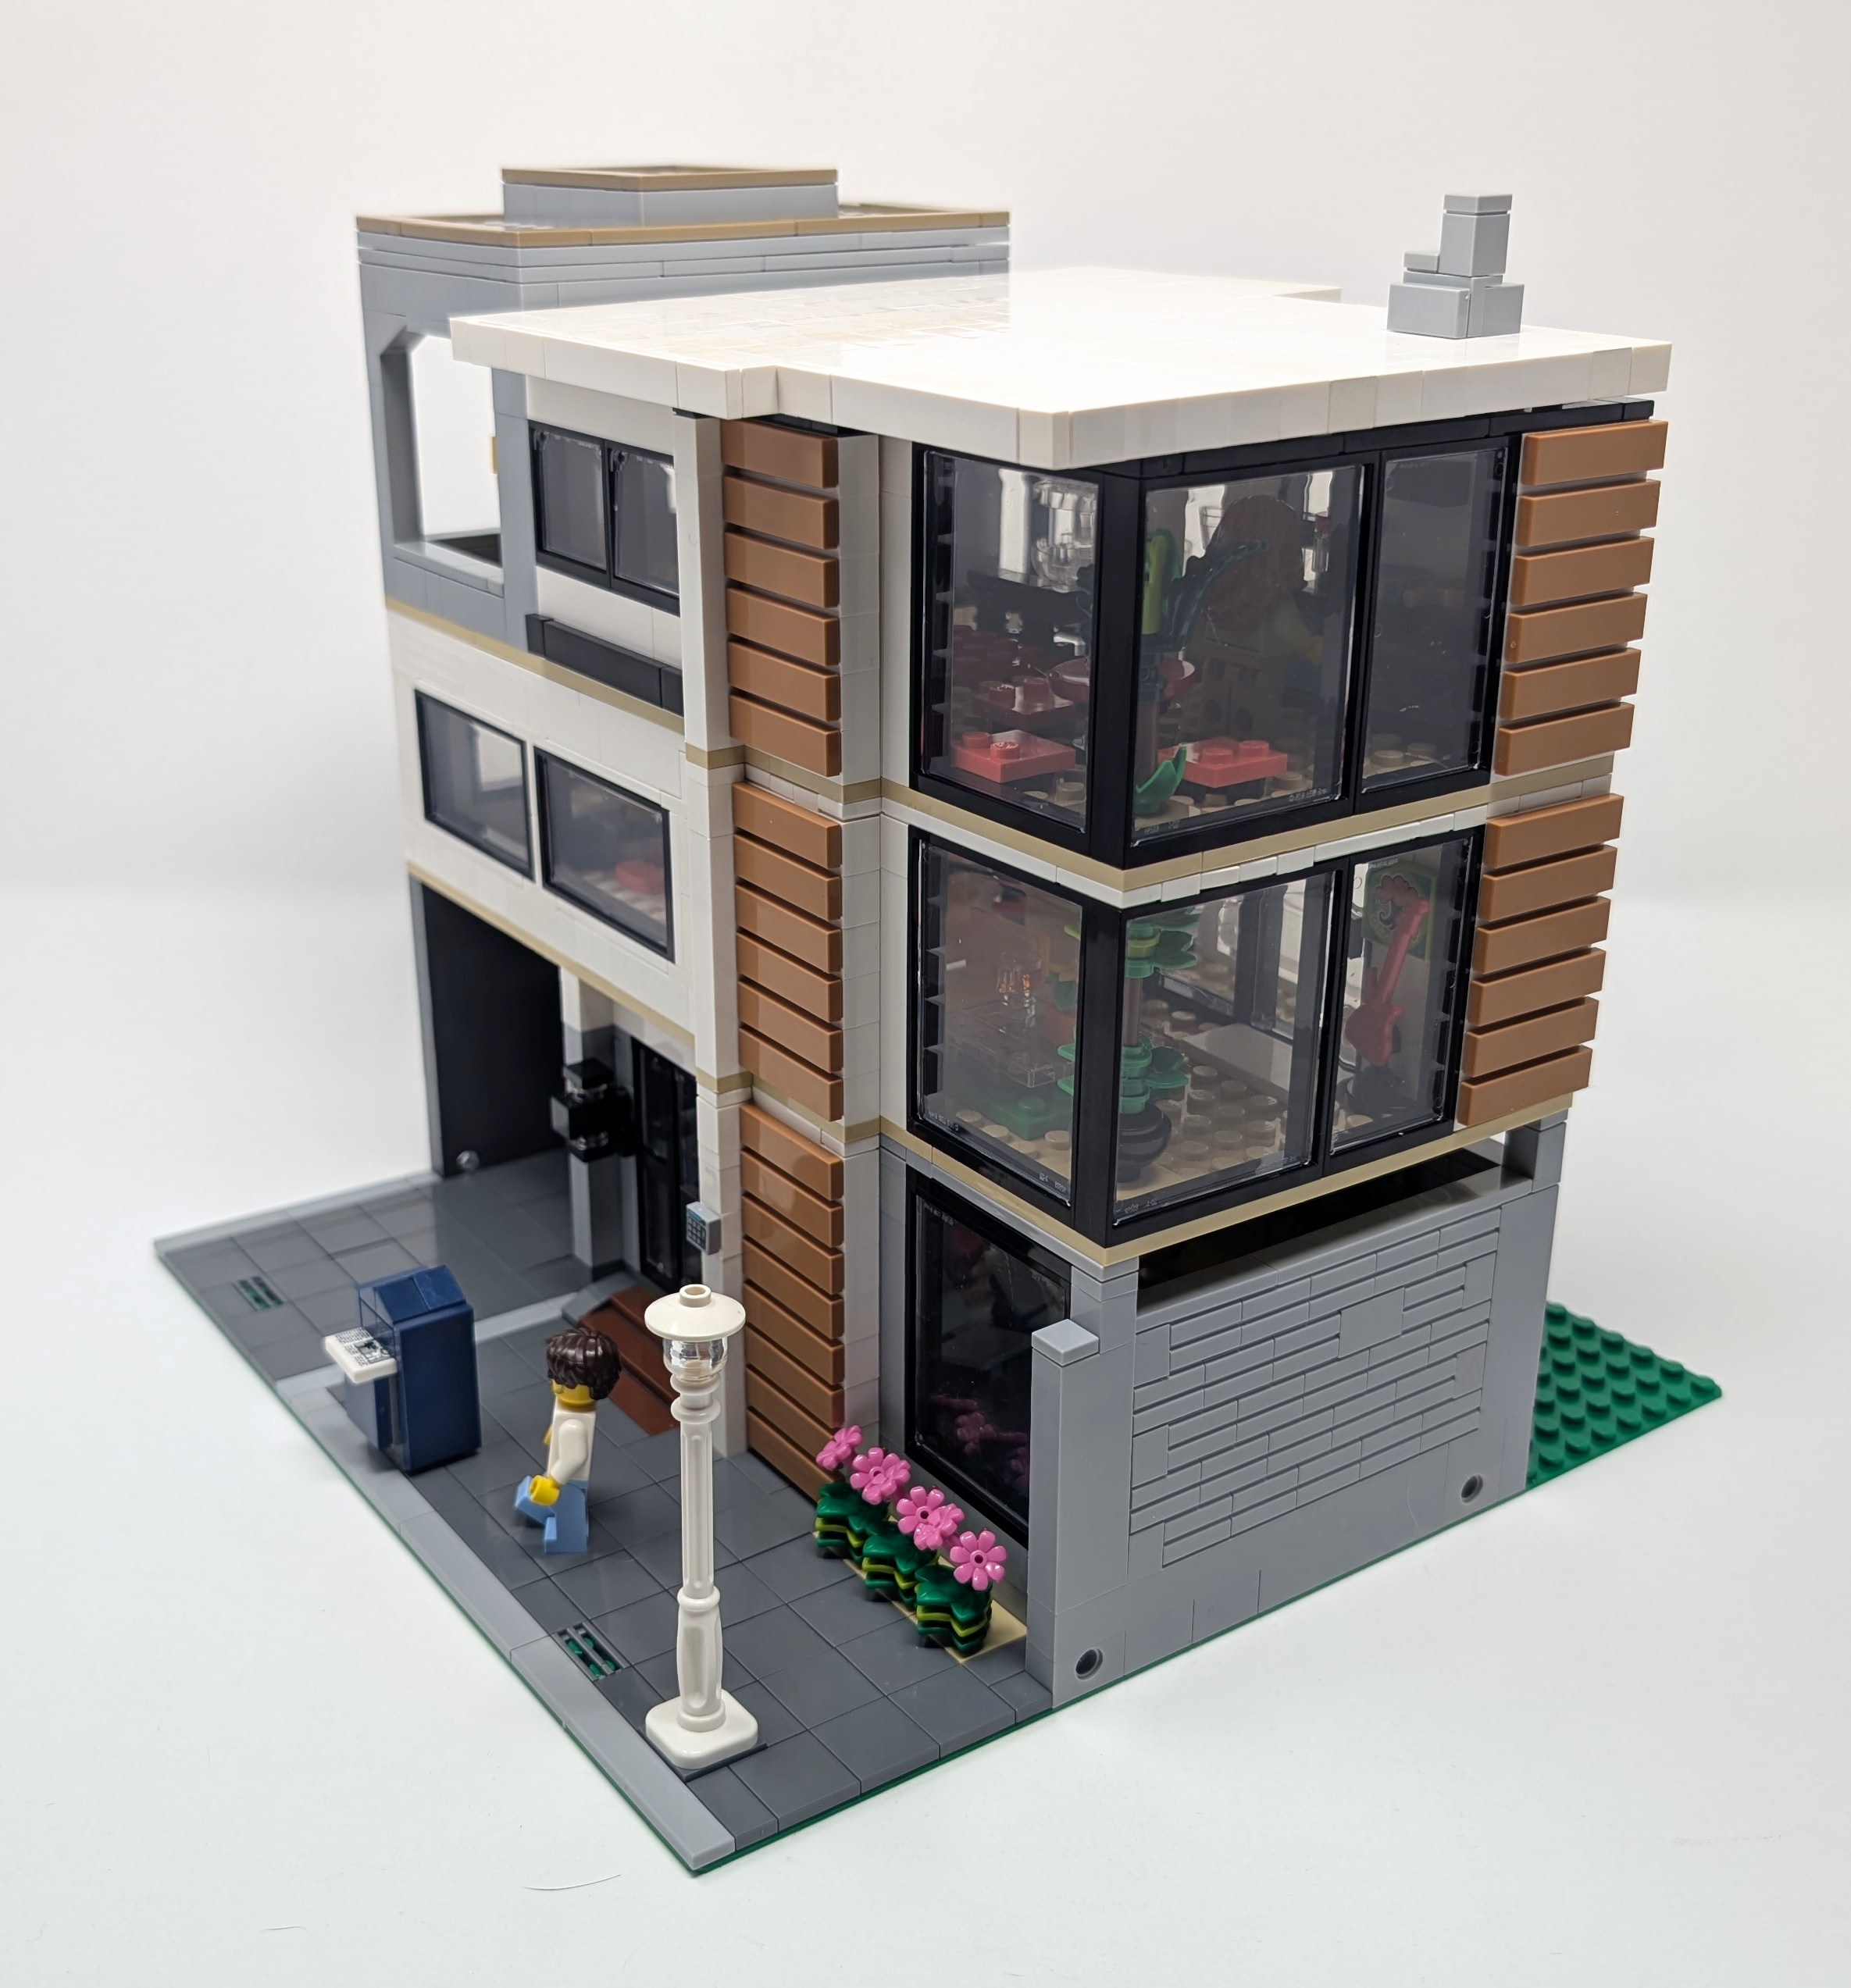
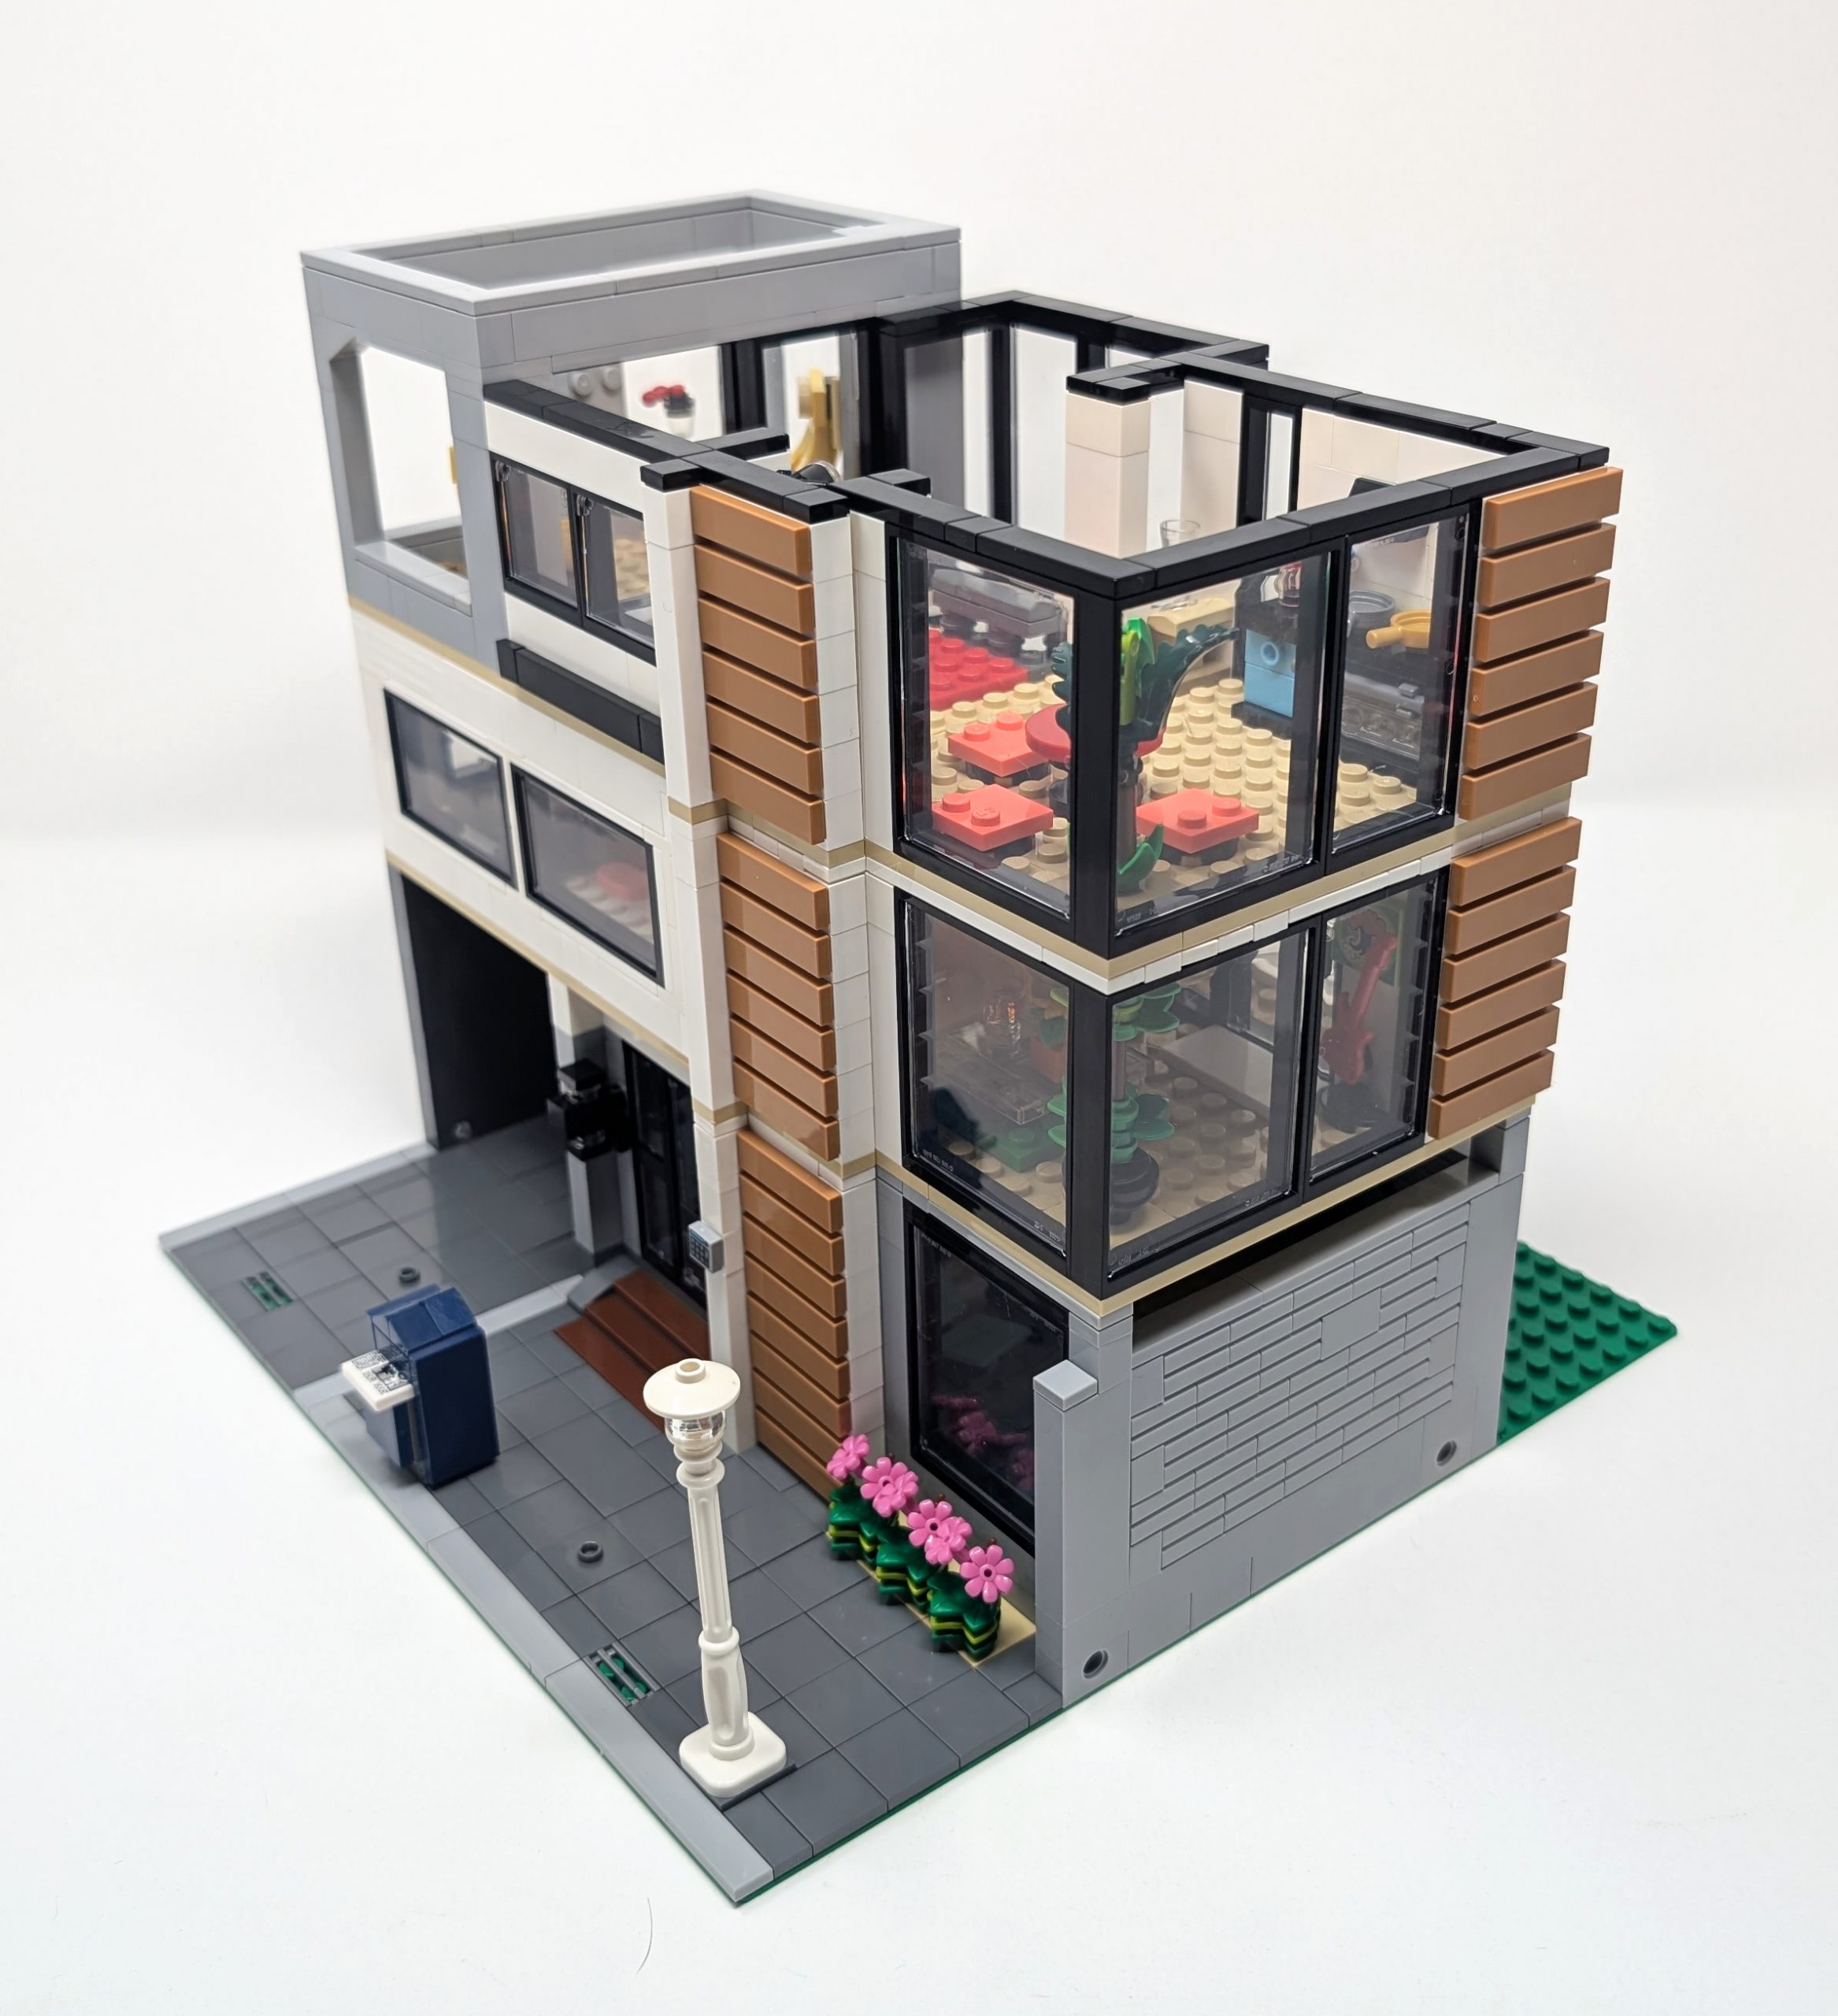
This article is written through the lens of two custom Modular buildings I created using pre existing sets: #31153 Modern House and #42670 Heartlake City Apartments and Stores. As we dig into the Modular standard, we will use examples from these sets to provide insight into how you can build a custom structure. Feel free to adapt details from my custom builds to build your own great custom Modular buildings.

While some sets can be easily translated, others allow for more creative interpretations.
Exploring the Modular Standard
The hardest part of building a Modular MOC is the ideation and getting started. In this section we will explore some of the fundamentals of the Modular Standard and highlight some of the common ideas that need to be followed to help you get started. Whether it is framing, sidewalks or even interiors, there is a ton of fun to be had when building a Modular building and if you do it right it fits right in with your official Modular sets.
The Skeleton
While sets in the Modular theme are varied and are a great expression of all of the creativity that LEGO has to offer that are a set of rules that all follow. If you want to build your own custom Modular creation that fits in with the existing sets you will need to follow this structure.
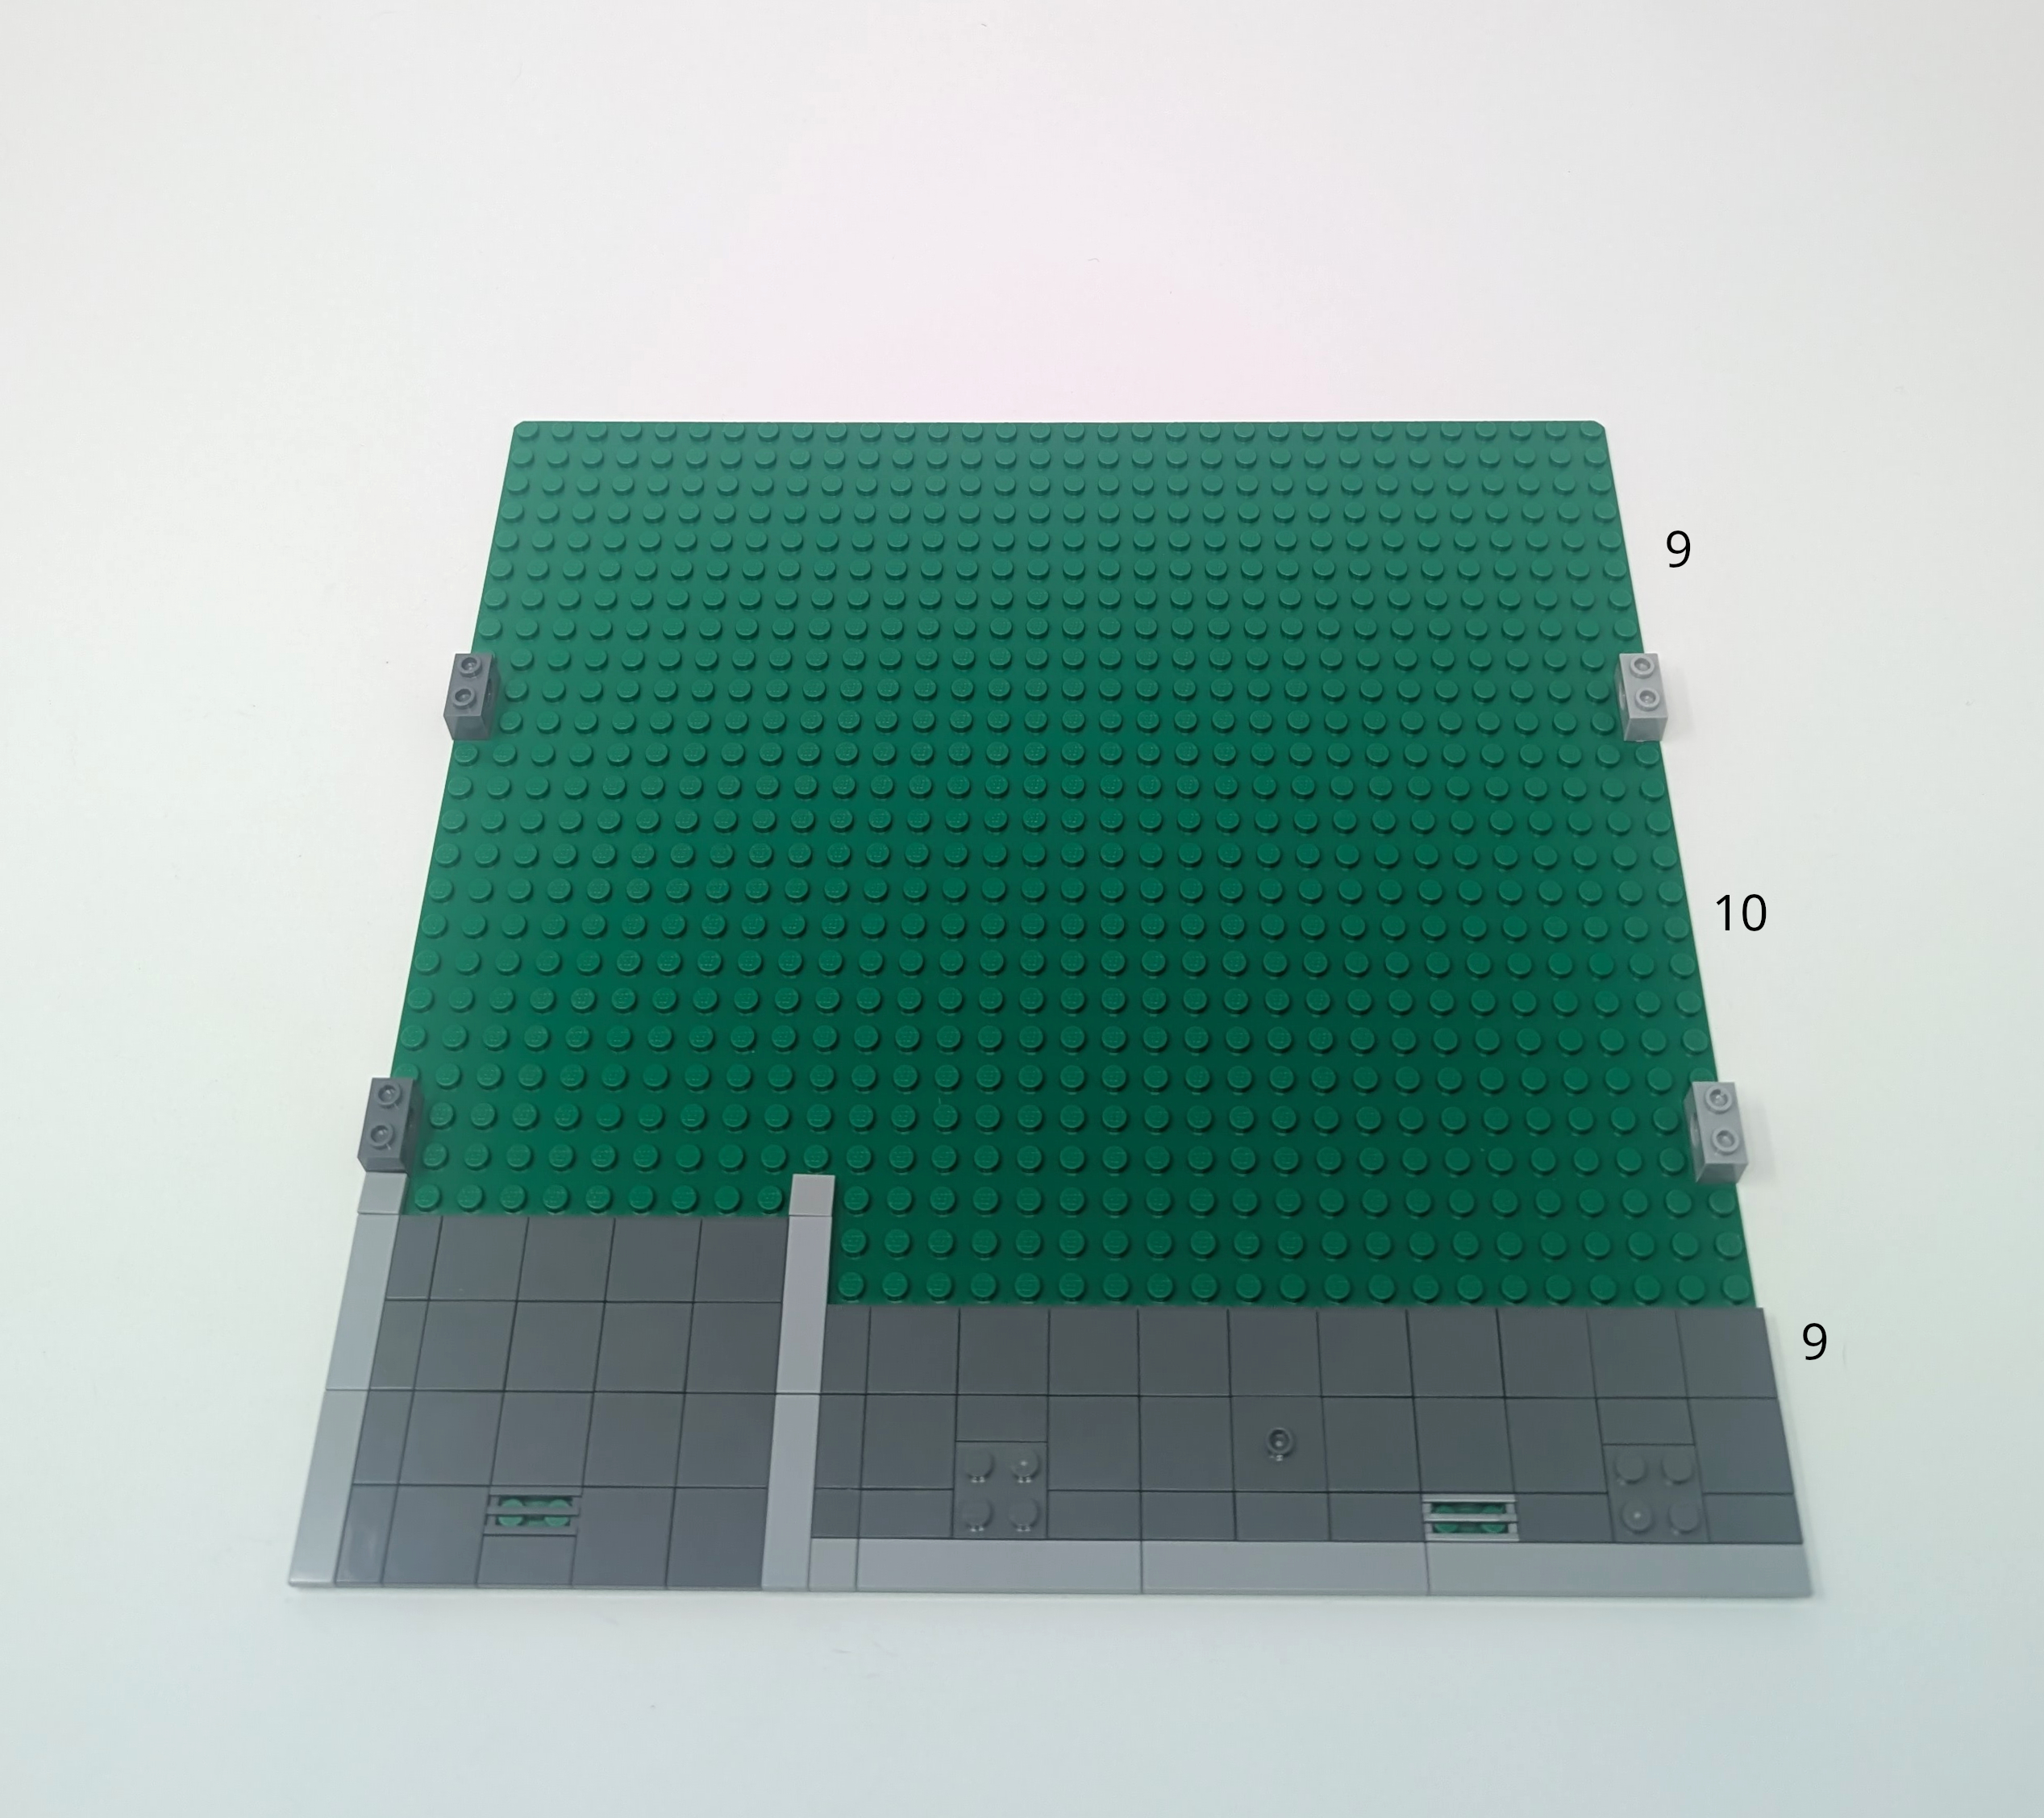
We start with a baseplate since sets in the Modular Building series still use flexible baseplates as a starting point. Most modulars are 32 studs wide because that’s the width of the classic 32×32 Baseplate (Part 3811). Some sets opt for shorter or longer widths, using a single 16×32 Baseplate (Part 3857). More than one baseplate can be combined to create a 48-stud of 64-stud width. I used both a 32 and a 48 stud width for the models featured in this article.
While the width has variety in the form of factor 16s, the depth is fixed, requiring a 32 stud baseplate depth to fit in with the other modular builds. There is no modular to date that has a depth deeper than the standard 32 stud baseplate in depth so changing this would make your build stick out like a sore thumb. Each of the modular buildings can be connected to each other using a traditional Pin, Smooth (Part 3673) slotting into each side of a 1×2 Technic Brick (Part 3700) on each building. As a result of this, these bricks need to be aligned in each build. The first brick sits 9 studs from the front and the second brick sits 9 studs from the back, giving 10 studs between the two. For corner modular builds, rather than having the bricks sit parallel to each other, the same rule applies but with the bricks sitting on adjacent edges to build a corner connection. You can be creative with your building techniques to hide the 1×2 Technic Brick (Part 3700) to not be visible. For straight builds. as the back of the build is not visible the depth of the buildings can vary depending on your needs, with some using the entire baseplate as depth for the building. The front however is constrained by the depth of the sidewalk. Although the sidewalk does not have a fixed size, most are about 8 studs deep. For corner modular buildings the 8 studs deep extends across a corner, reducing the available space for the structure.
There are common techniques all modular builds need to follow to fit.
More variability comes into effect with the height of the build. Typically the ground floor of the building is the tallest of all of the floors but there is no fixed rule that needs to be followed. The height of each of the floors can range anywhere from 6 bricks all the way to 12 bricks tall. You will want to ensure that the height of the floor is greater than the height of a minifigure: 5 or 6 bricks tall depending on the size of your hair or hat piece. Traditional door or window frame pieces such as 1×4×6 Window/Door Frame (Part 60596) are 6 bricks tall, so keep that in mind when deciding the height of each floor.
Height is variable in modular designs.
Sidewalk tiling
Sidewalk tiling ensures consistency when multiple modulars are displayed next to one another. They are usually at least 6 tiles deep and follow a pattern: A one-tile deep outer curb is built using a 194Medium Stone GreyLight Bluish Gray tile color, with the tiles used being either 1×8 Tile (Part 4162) or 1×6 Tile (Part 6636) to allow the outer layer to span across multiple inner divisions we will see next. This layer is consistent across all sets. The rest of the sidewalk typically uses one row of 1×2 Tile (Part 3069) followed by rows of 2×2 Tile (Part 3068) in 199Dark Stone GreyDark Bluish Gray for the remaining rows. This creates a more concrete-like sidewalk pattern.

Consistent sidewalk patterns create continuity between modular buildings.
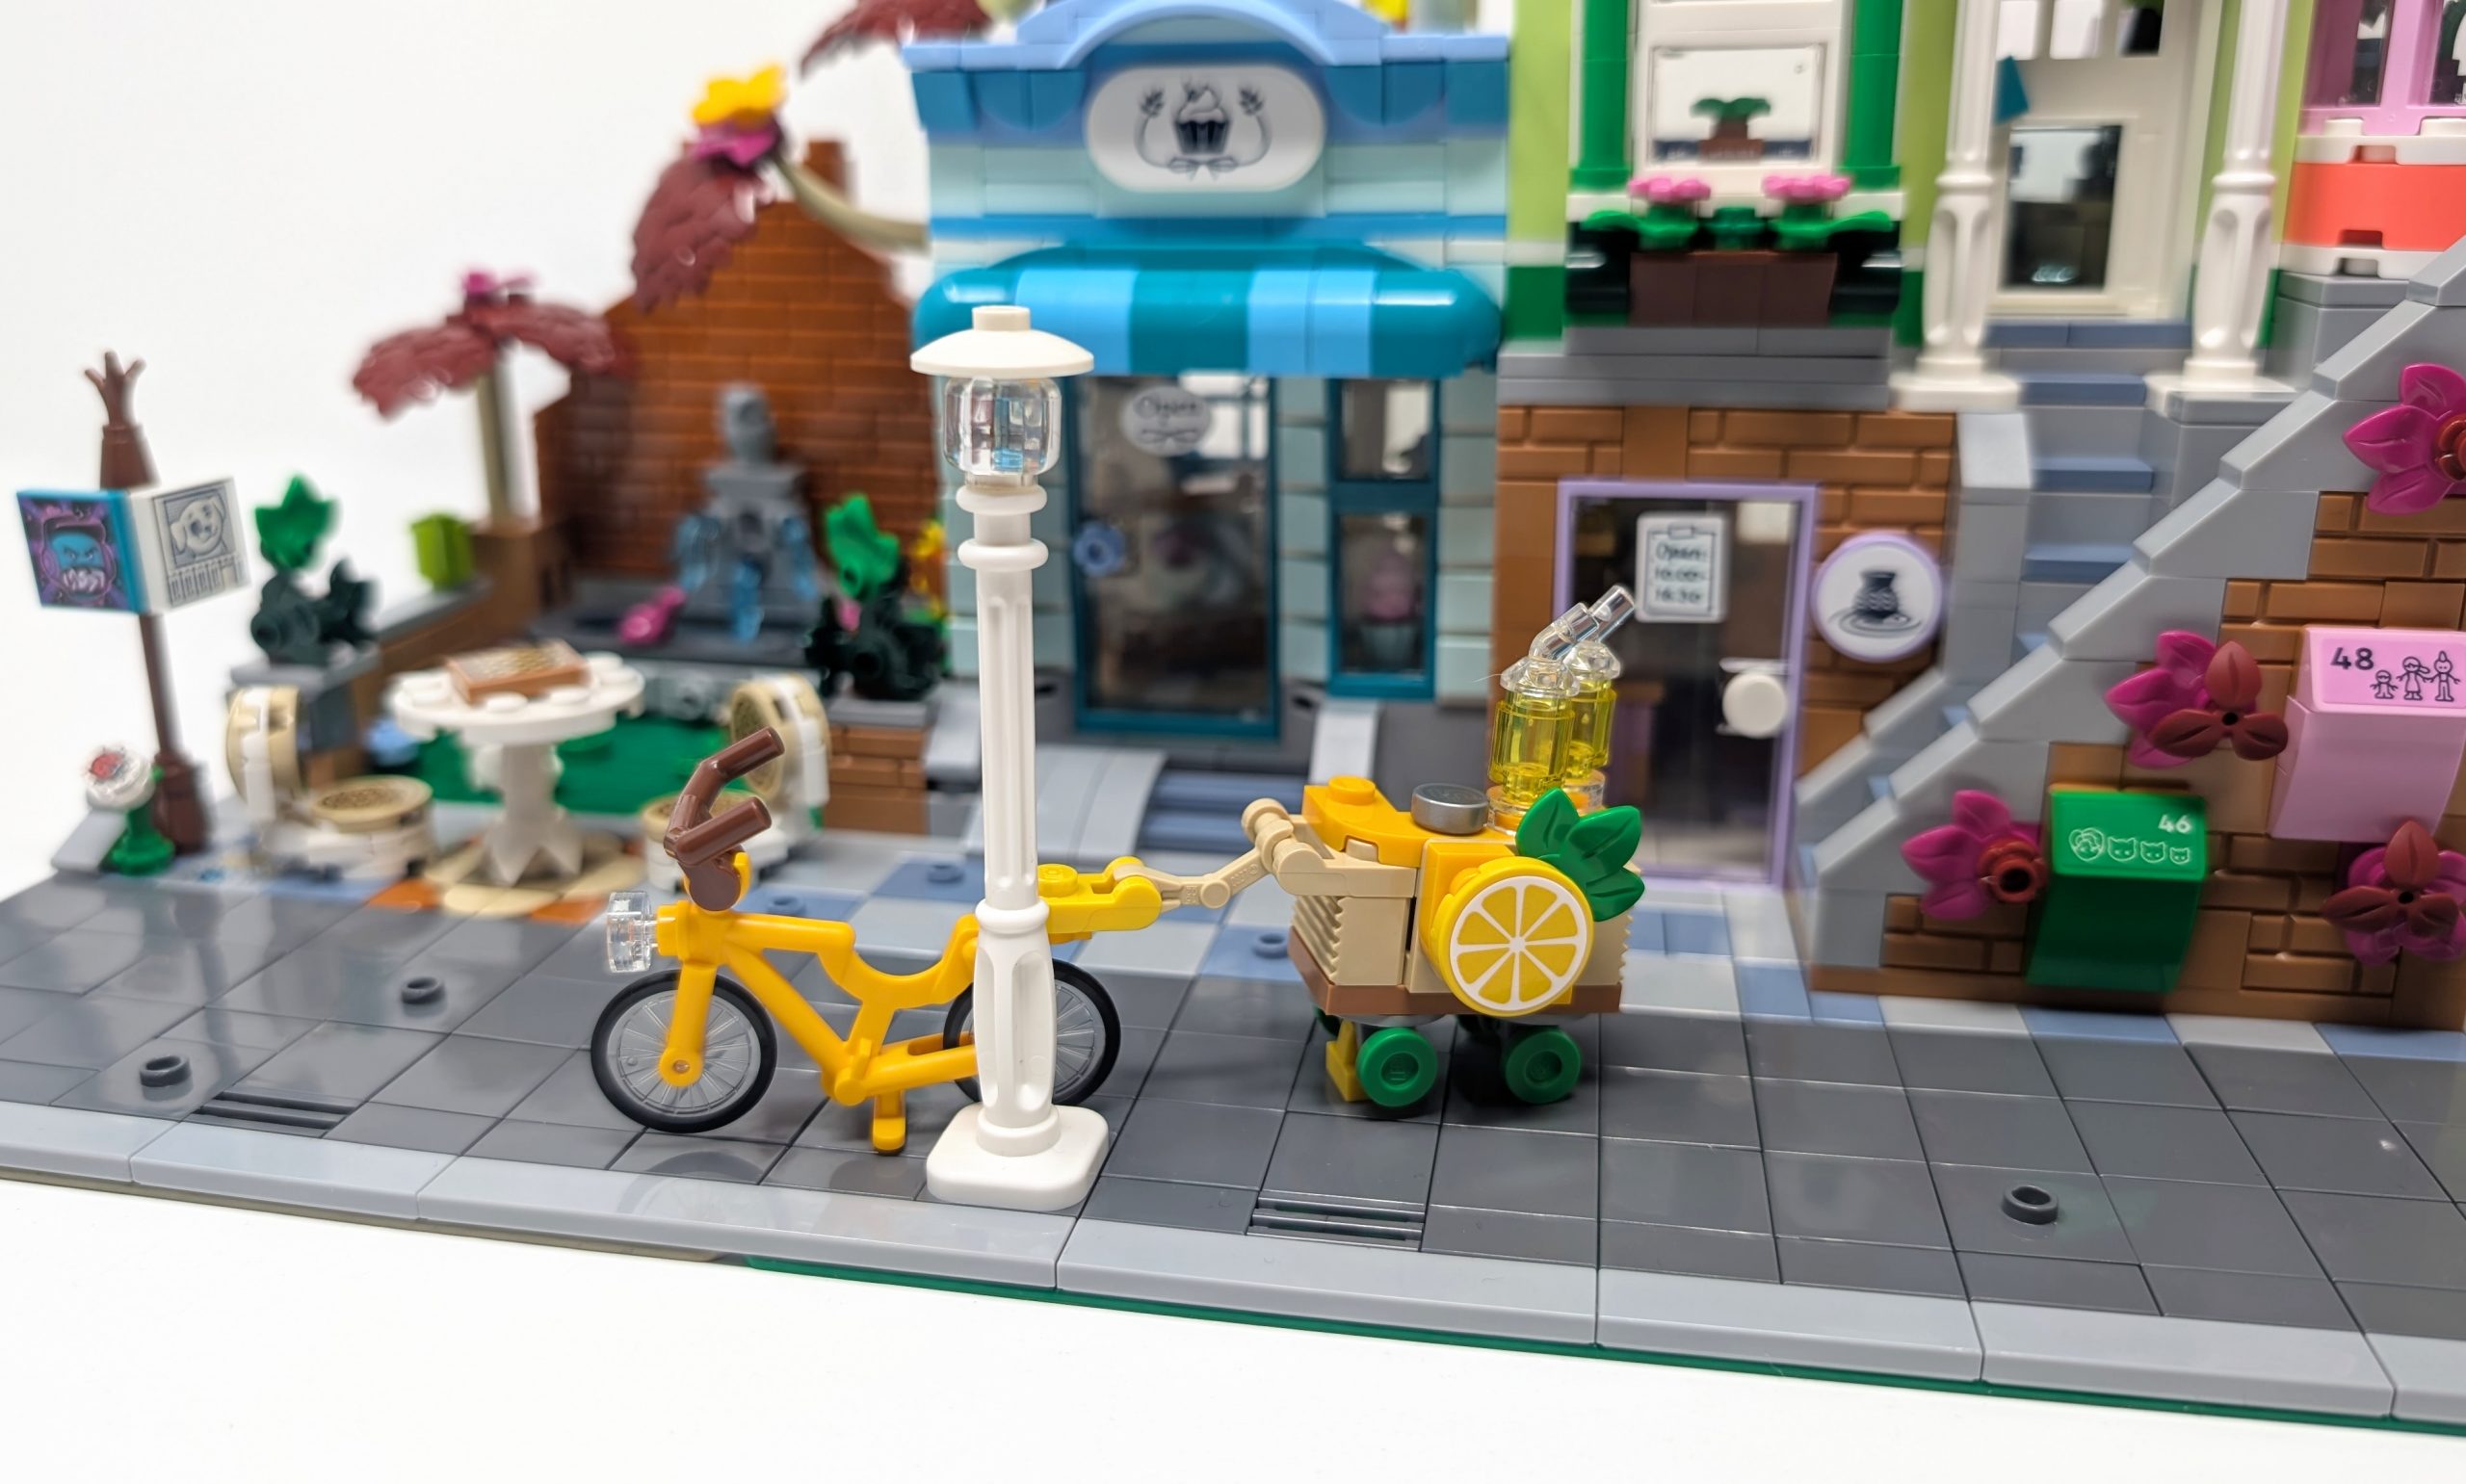
To break up what would otherwise be consistent tile texture two additional common pieces are used in the sidewalk tiling. Through use of a simple yet flashy 1×2 Tile, Grille (Part 2412) in 315 Silver MetallicFlat Silver we add gutter detailing. In earlier iterations of modular sets this piece used to be in 194Medium Stone GreyLight Bluish Gray but the new metallic color helps add a bit of color variety alongside the piece variety. This addition is so niche but adds a lot at the same time. I now pick up a ton of 1×2 Tile, Grille (Part 2412) in 315 Silver MetallicFlat Silver whenever I need to make a bricklink order just for modular MOCs. The second detail that serves as a great building block is through use of the always versatile 2×2 Jumper (Part 87580). This piece allows for minifigure posability or for sidewalk accessories to be placed on top of it.
Sidewalk Accessories
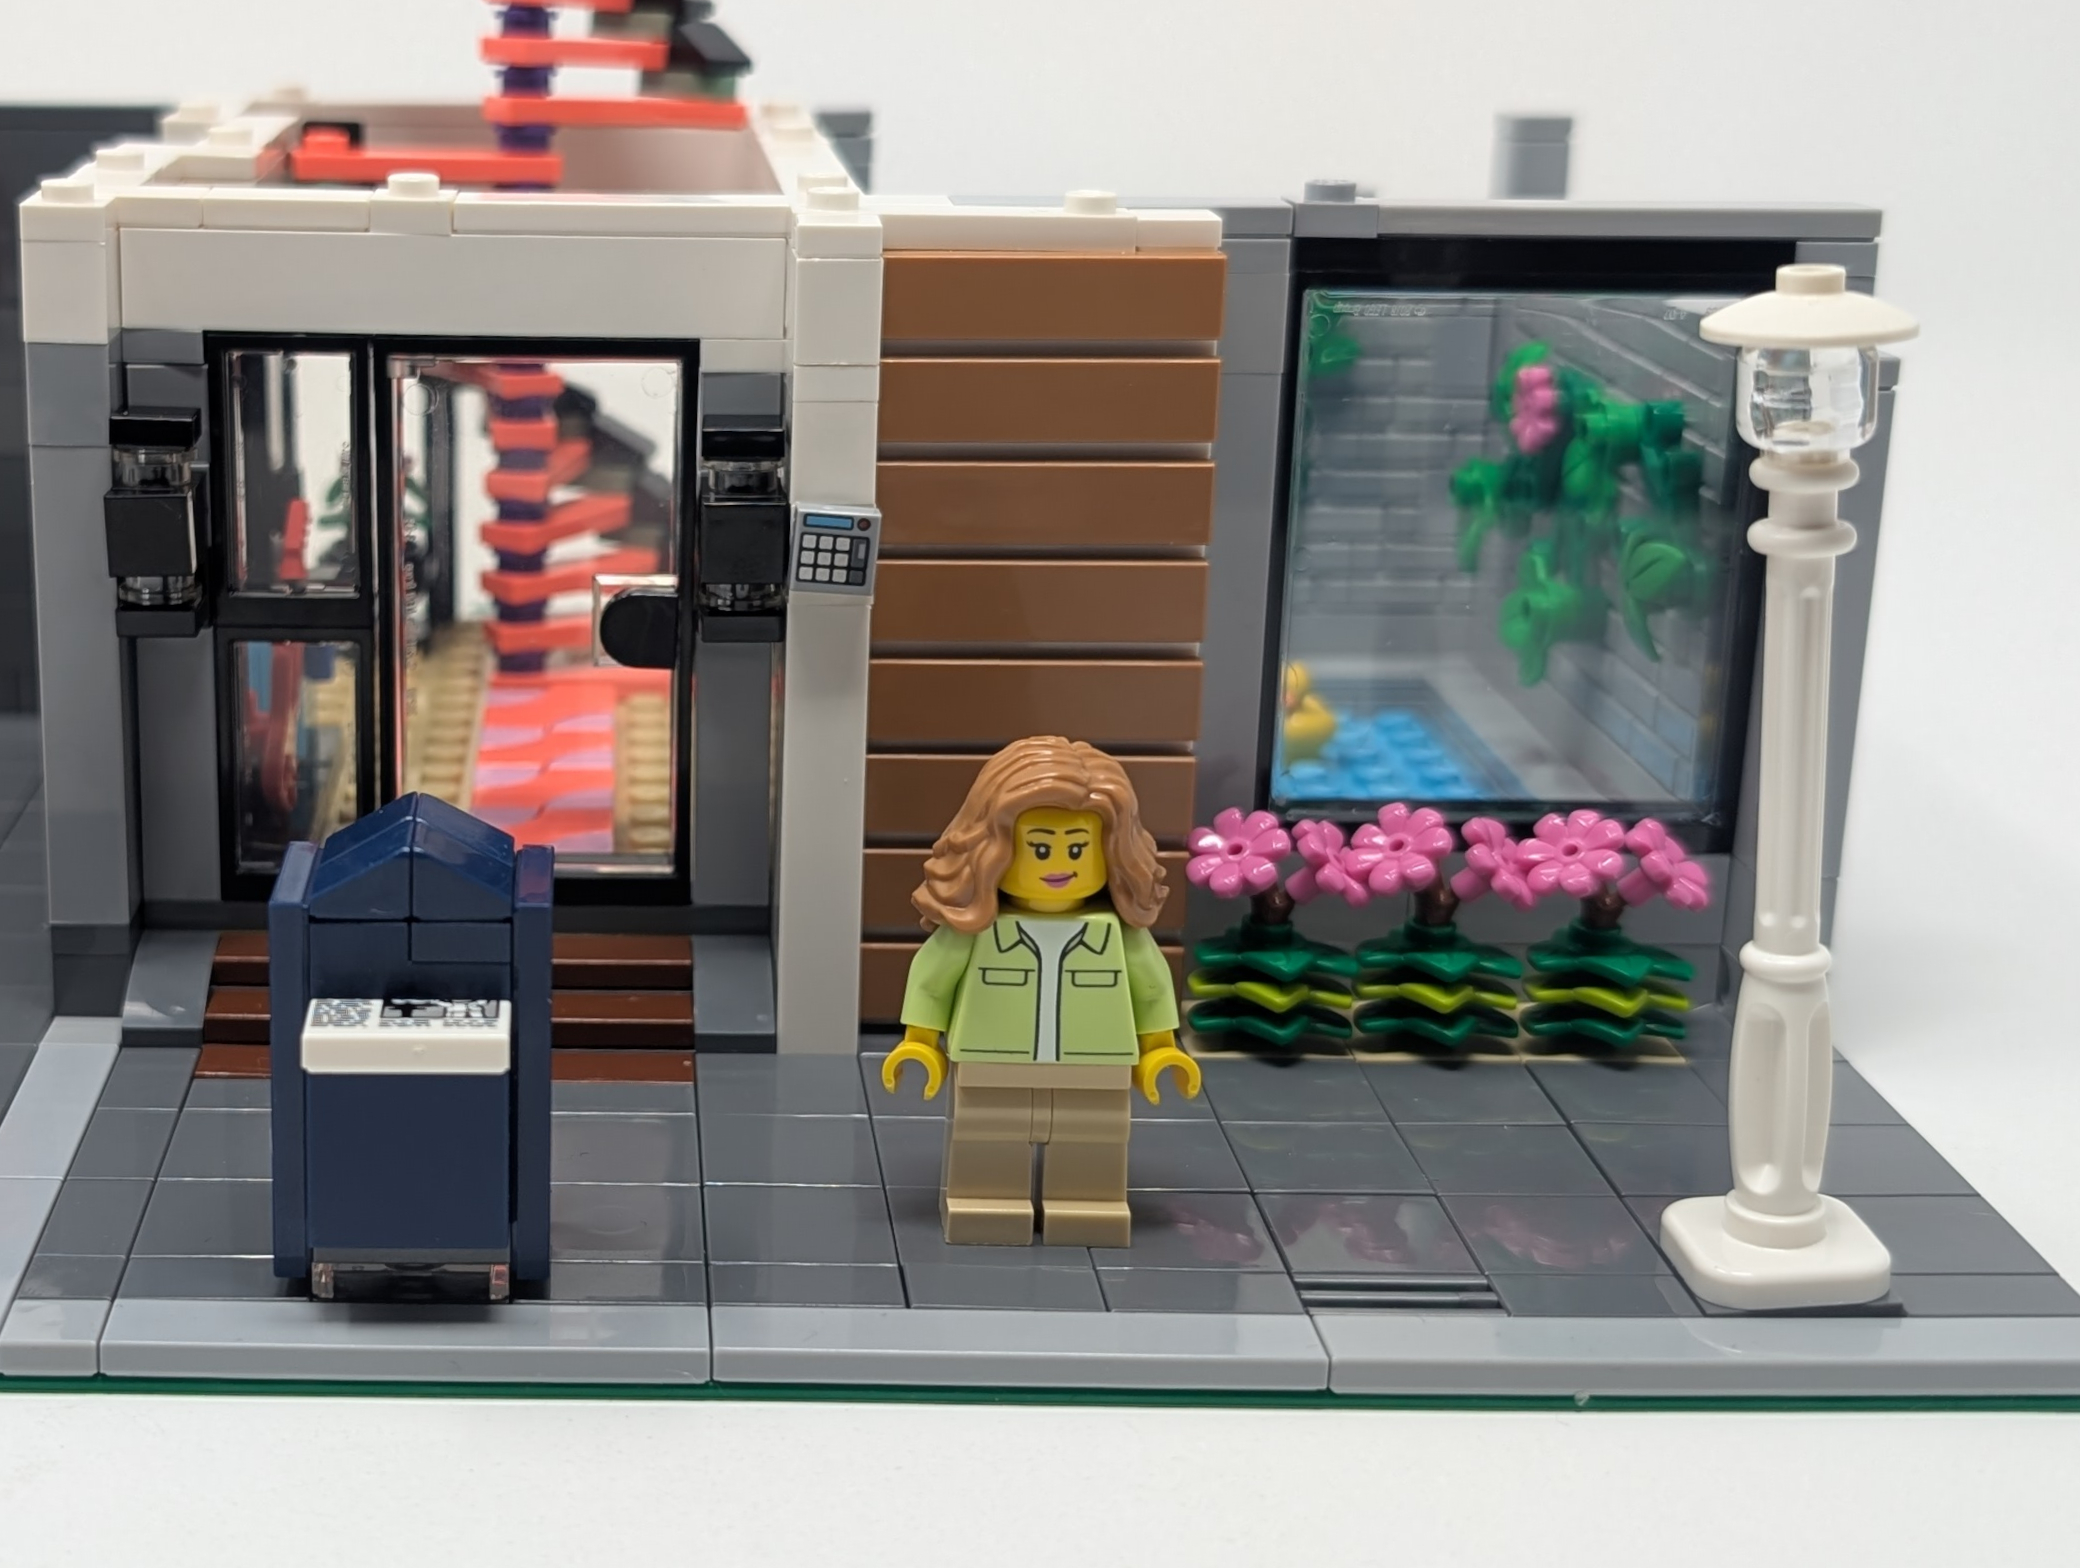
While the focus of Modular buildings is on the structure, various side builds can enhance the scene even more. A common sidebuild that allows for consistency across the builds is through the lamp posts. The lamp post is built using just 3 pieces, with the most unique being 2×2×7 Lamp Post (Part 11062). To maintain a level of consistency across the sets, each lamp post is usually in 1White. This piece can often be found on the pick a brick wall at your local LEGO store so if you plan to build multiple Modular buildings and see these available it is worth picking up a few. Each official set has one lamp post. Other accessories help accentuate the sidewalk as well, each being a creative expression that can fit the structure behind it. Some of the common accessories you can build are simple one piece builds like a trash can to builds such as a fire hydrant, mailbox, signpost or even trees. There are no rules when it comes to these accessories so build whatever fits the scene! These little builds help add variety to what would otherwise be a repetitive sidewalk experience across the sets.
Accessories help enhance the sidewalk.
Removable levels
One of the main features that makes Modular buildings so iconic are the removable levels. The sets have been designed to not just be detailed from the exterior, but also provide beautifully detailed interiors that allow for playability. We will go into interior detailing and how to make the most of that later in this article. Each level can easily be removed and allows for a collaborative building experience if building in groups as each level can often be built independently and connected at the end. This not only makes this a fun display feature but also a collaborative build experience. To accomplish the removable level aesthetic the top of each level is lined with tiles providing a smooth attachment with a small number of stud connections through tiles to allow the level to connect. By minimizing the brick connection points through it being majorly tiles it means that the levels are connected but easy to remove. The perfect piece for this kind of connection, and one that is commonly used here is 1×4, 2-Studs Ends (Part 41740). This piece marries tiles and studs perfectly to accomplish the loosely coupled connection perfectly. Something that both I and LEGO use in our Modular buildings!
Tiles make it easy to remove the levels.
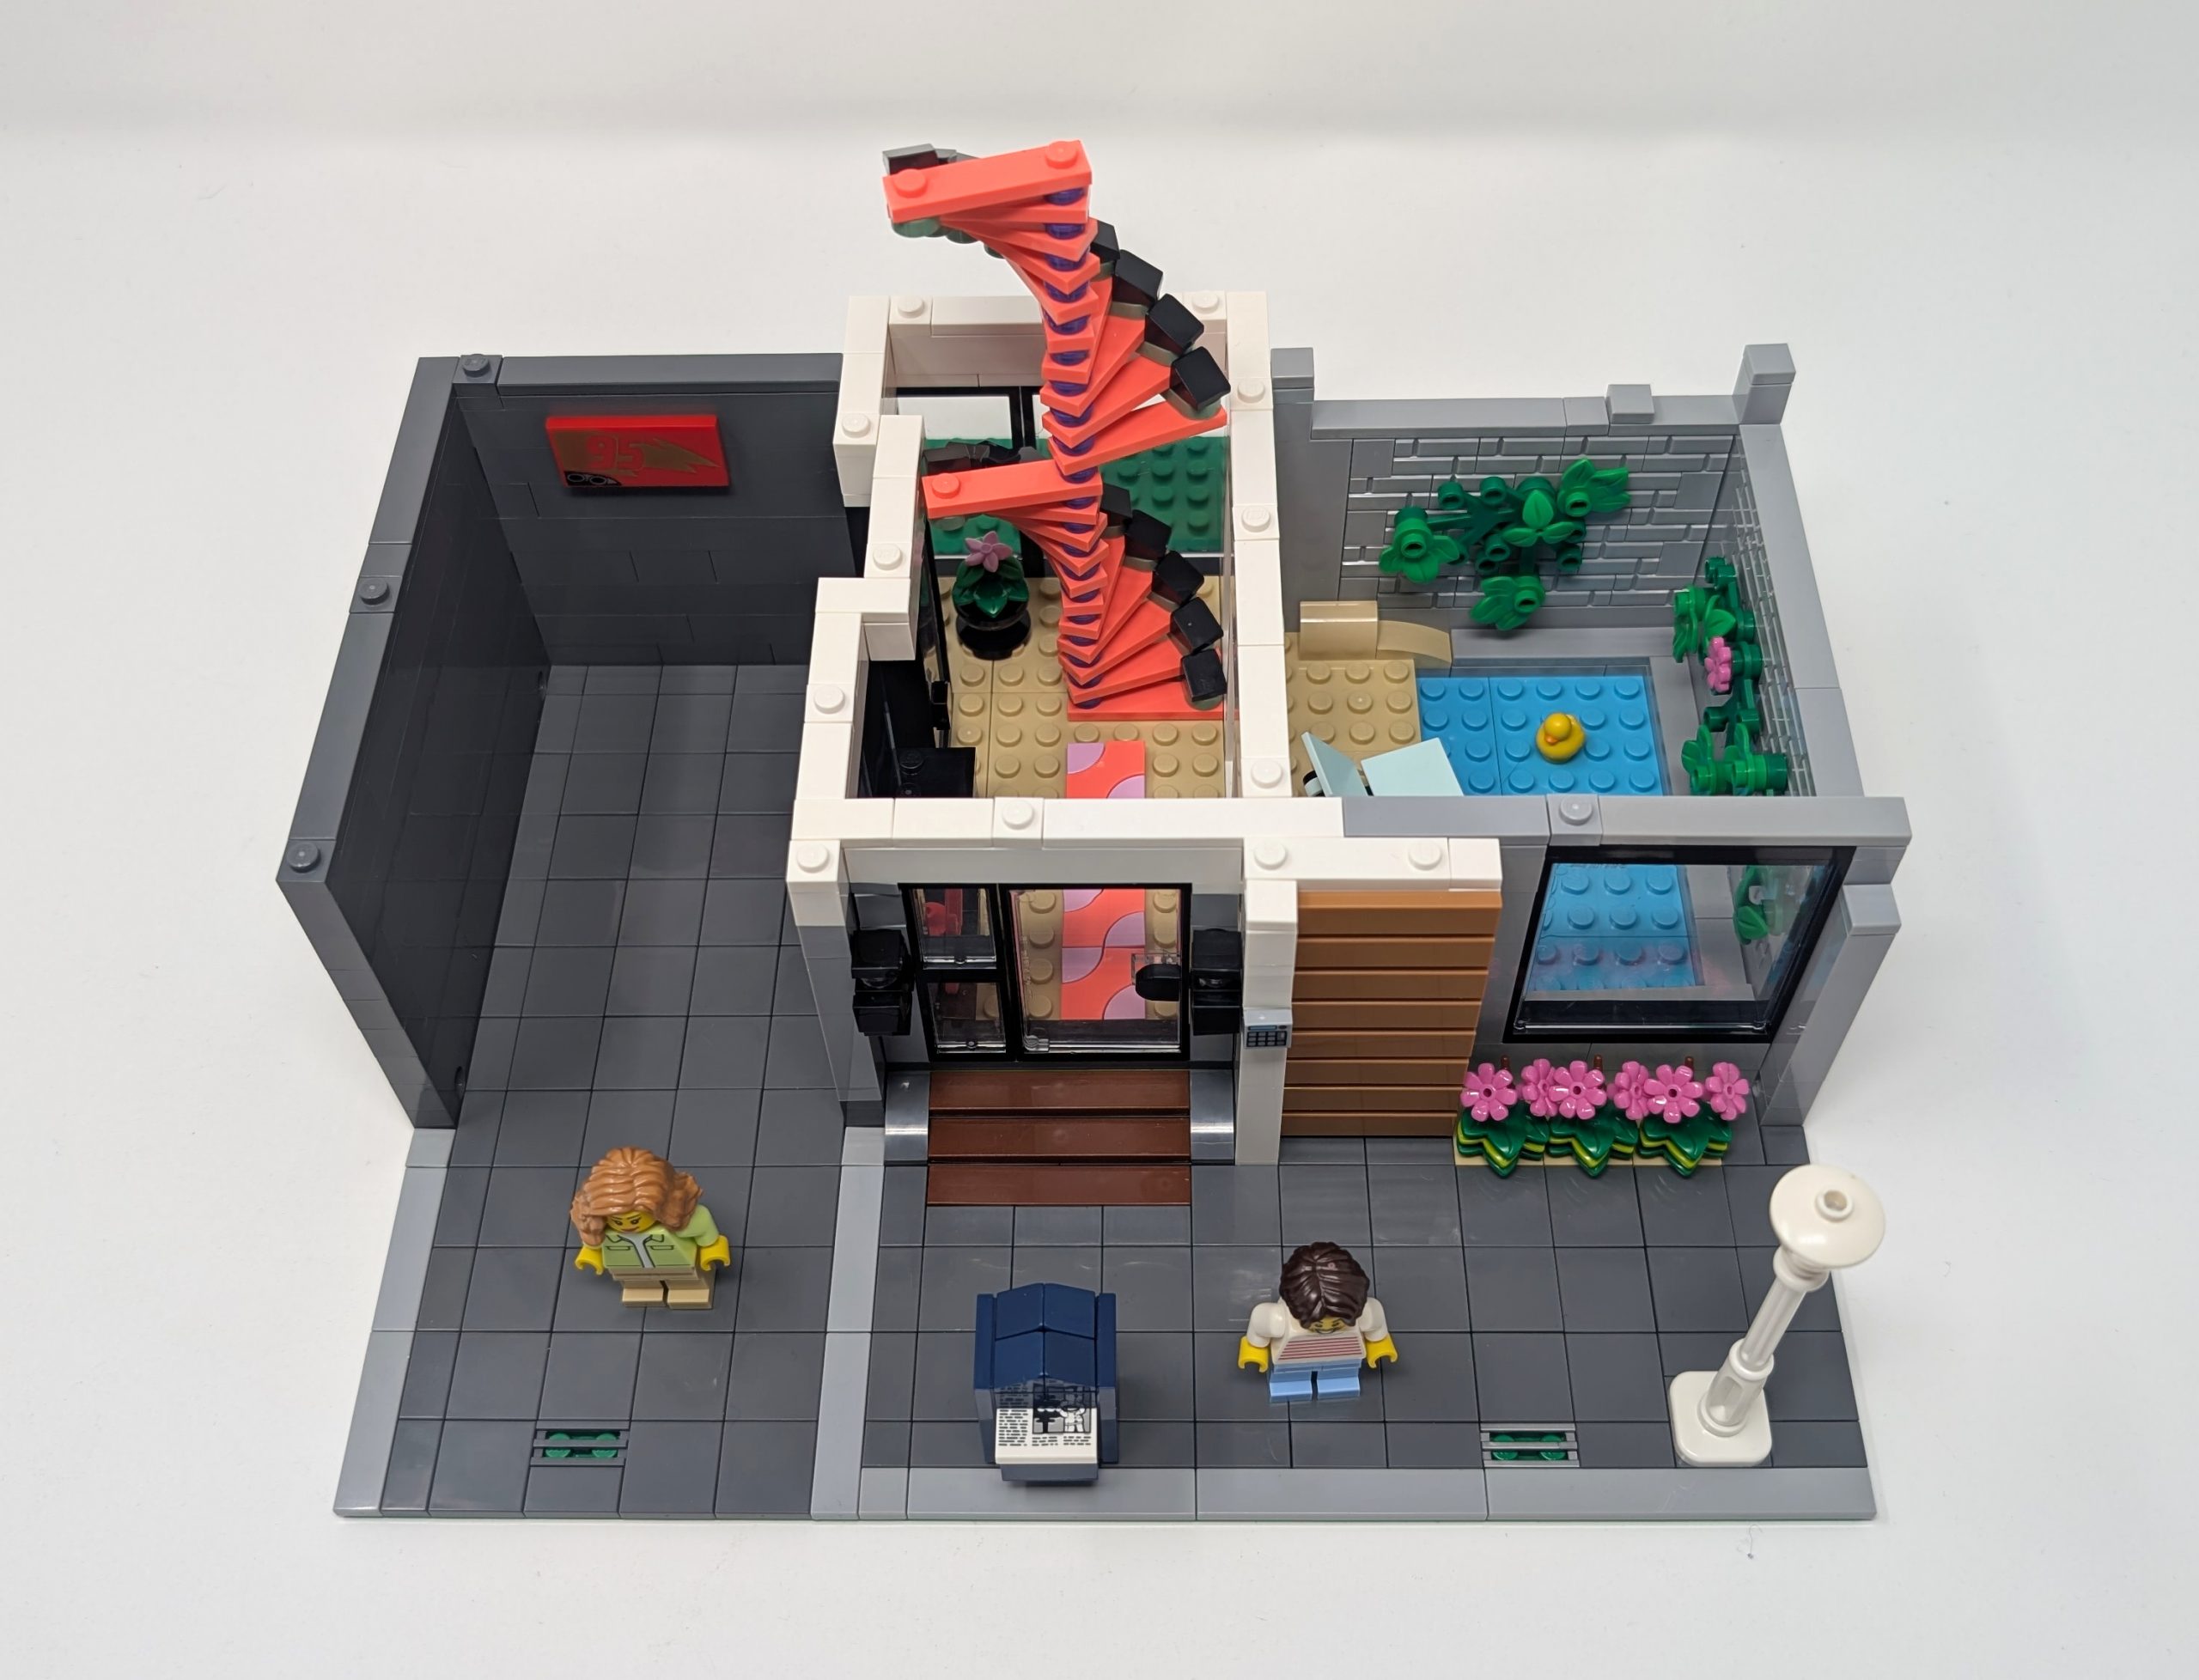
Often with Modular buildings, the designers ensure that every floor is connected to the floor below. This means there are either internal or external stairways for the inhabitants of the buildings to travel between. All the official LEGO Modular buildings follow this rule, but this is one that does not always need to be followed in custom creations as it comes with drawbacks. The major drawback is the space constraint. If using a standard 7×4×6 Stairs, Open (Part 30134) you lose 24 studs worth of workable decorative space, this being a whopping 2.34% of the total size of a baseplate. When you also factor in the sidewalk, walls and other decorative elements, for smaller builds such as a series of apartments, it does not leave you with much room to add details. In the modification of 42670: Heartlake City Apartments and Stores each floor of the house was 12 studs wide and 10 studs deep, meaning that if I added stairs I would lose half the usable interior space per floor. For larger single structure builds like my 31153: Modern House modification this is not as much of an issue as you have more space to work with. While the staircase piece exists this is not the only way to build staircases, as you can use your creativity to build stairs however you want. For this build I opted for a custom spiral staircase that fit the aesthetic of the structure, allowing it to span across all three levels and was tucked in at the back to not get in the way of the other details I wanted to build.
Each level can be removed easily to view the details within.
While stairs are a fun detail to add continuity they can also easily be skipped without detracting too much from the build. Fortunately due to the removable levels you can access each of the floors independently with ease regardless.
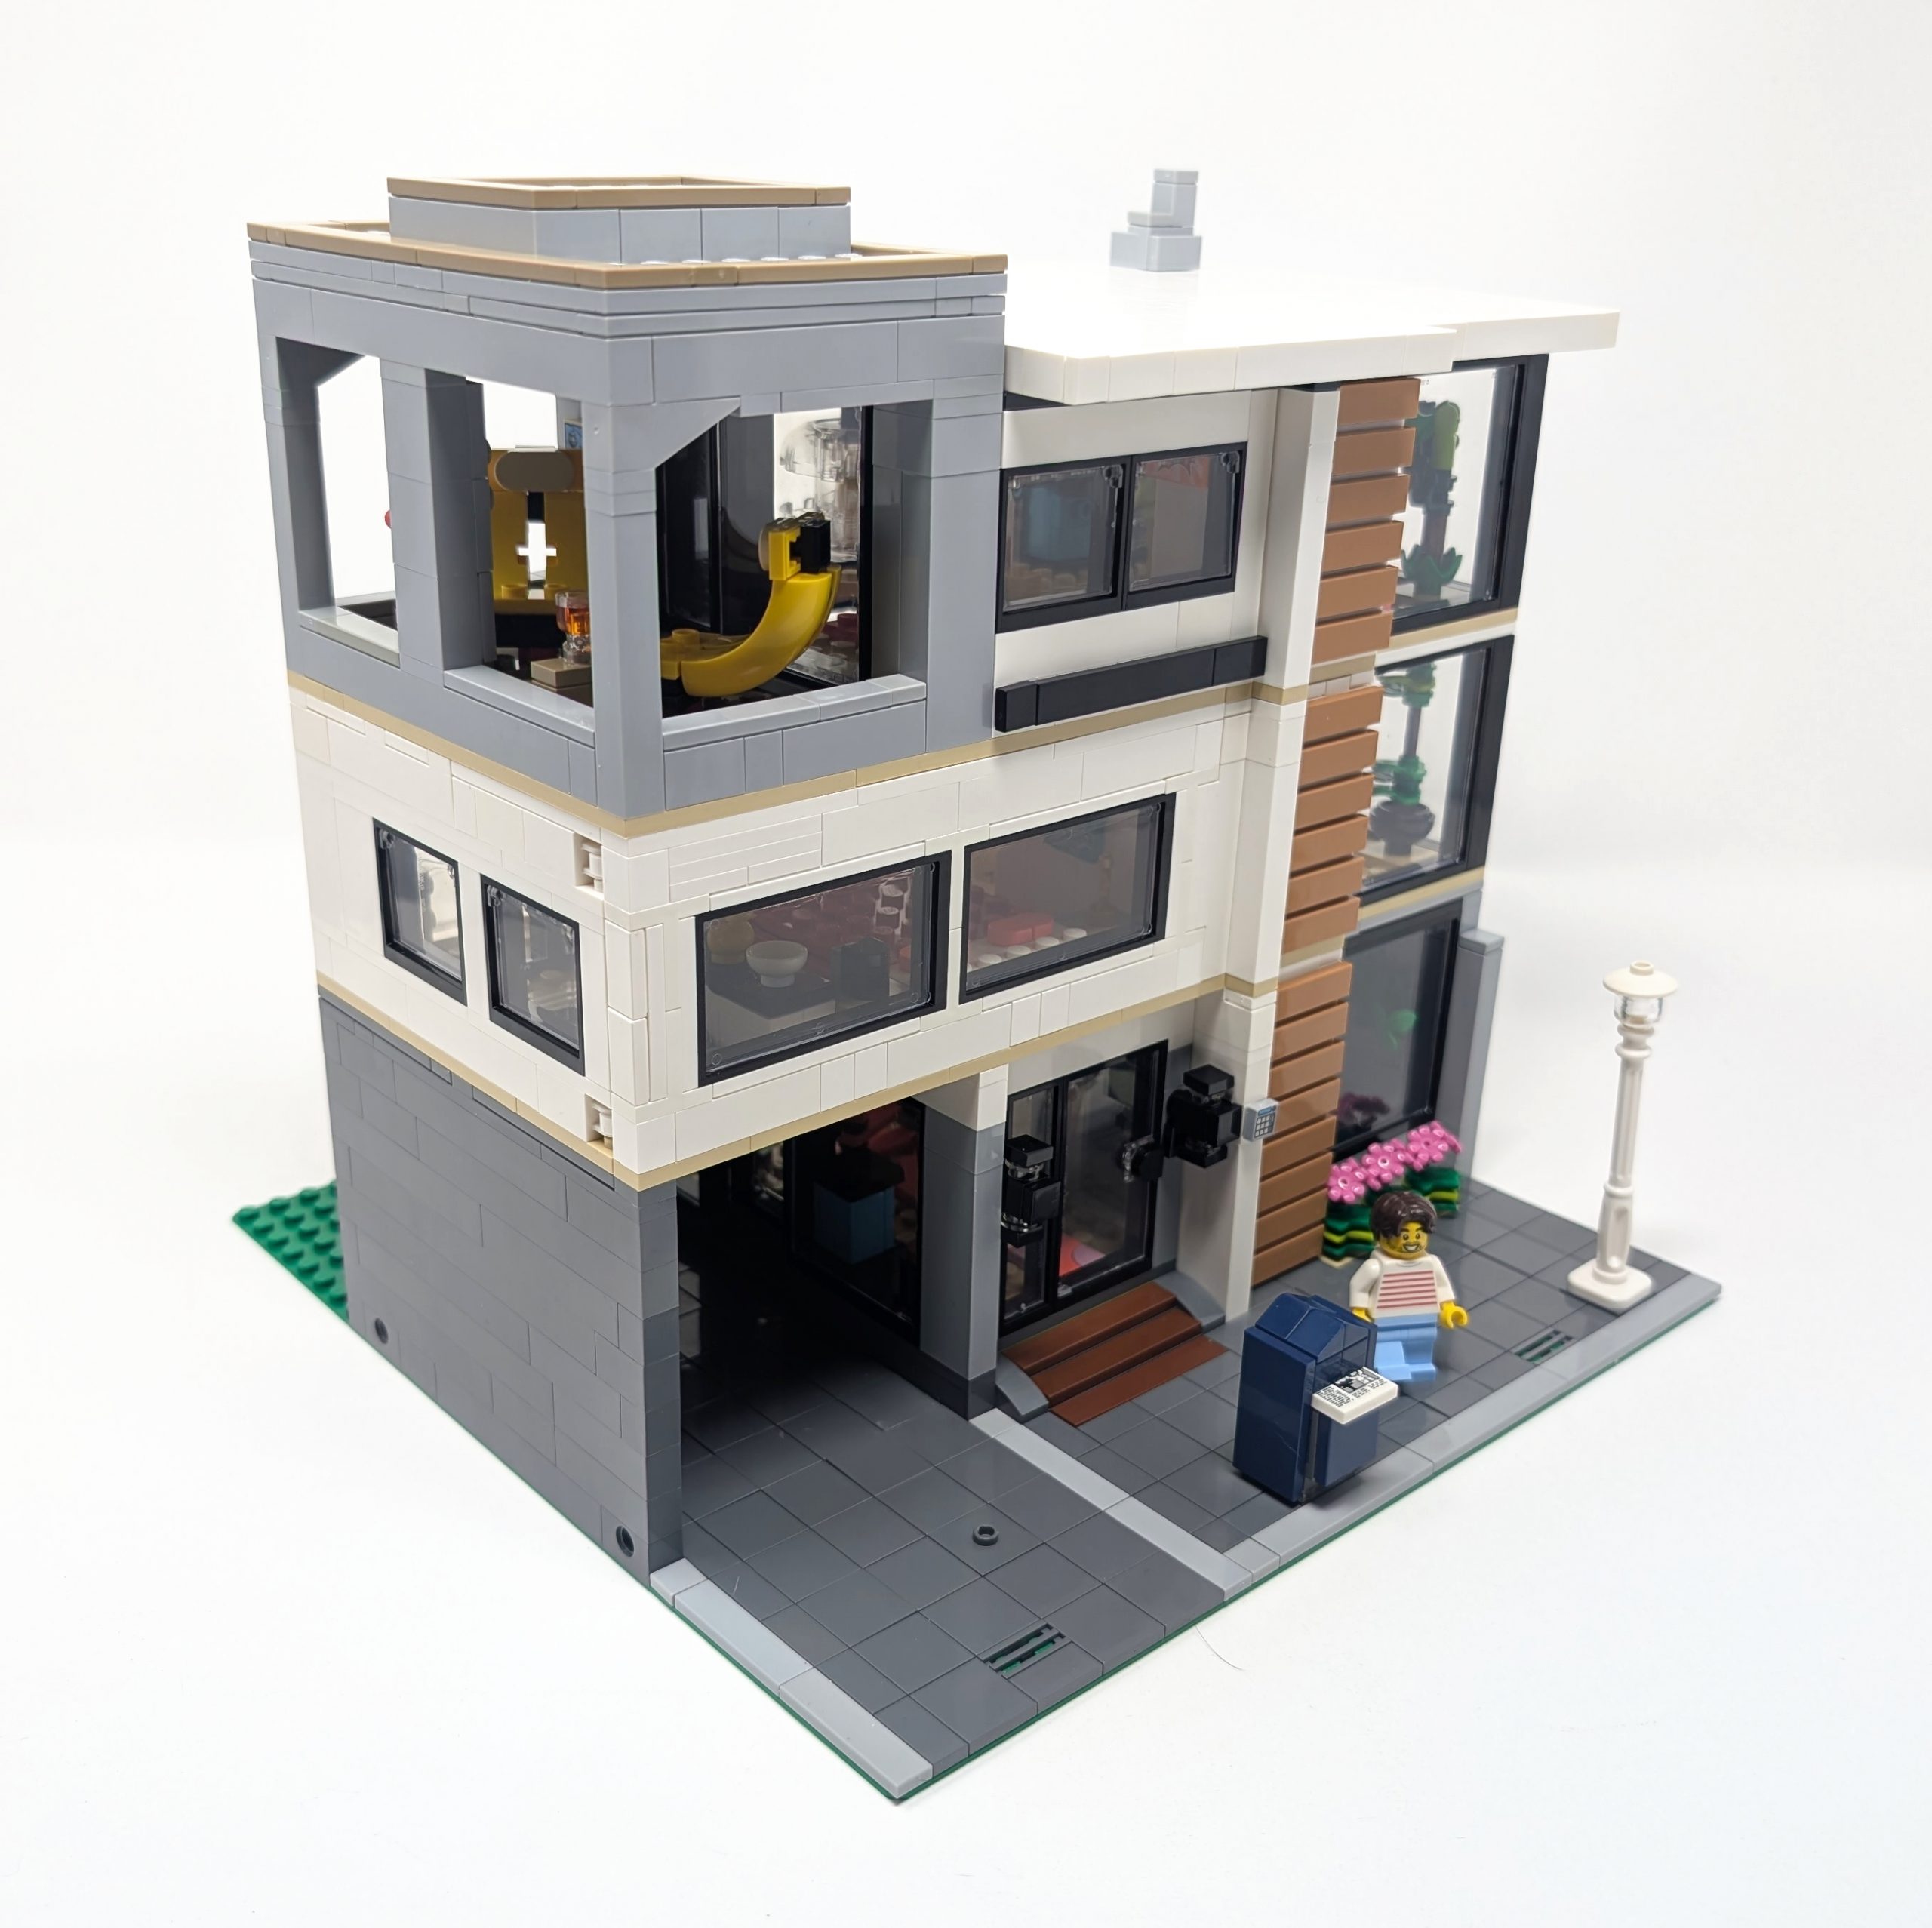
Varied roof designs
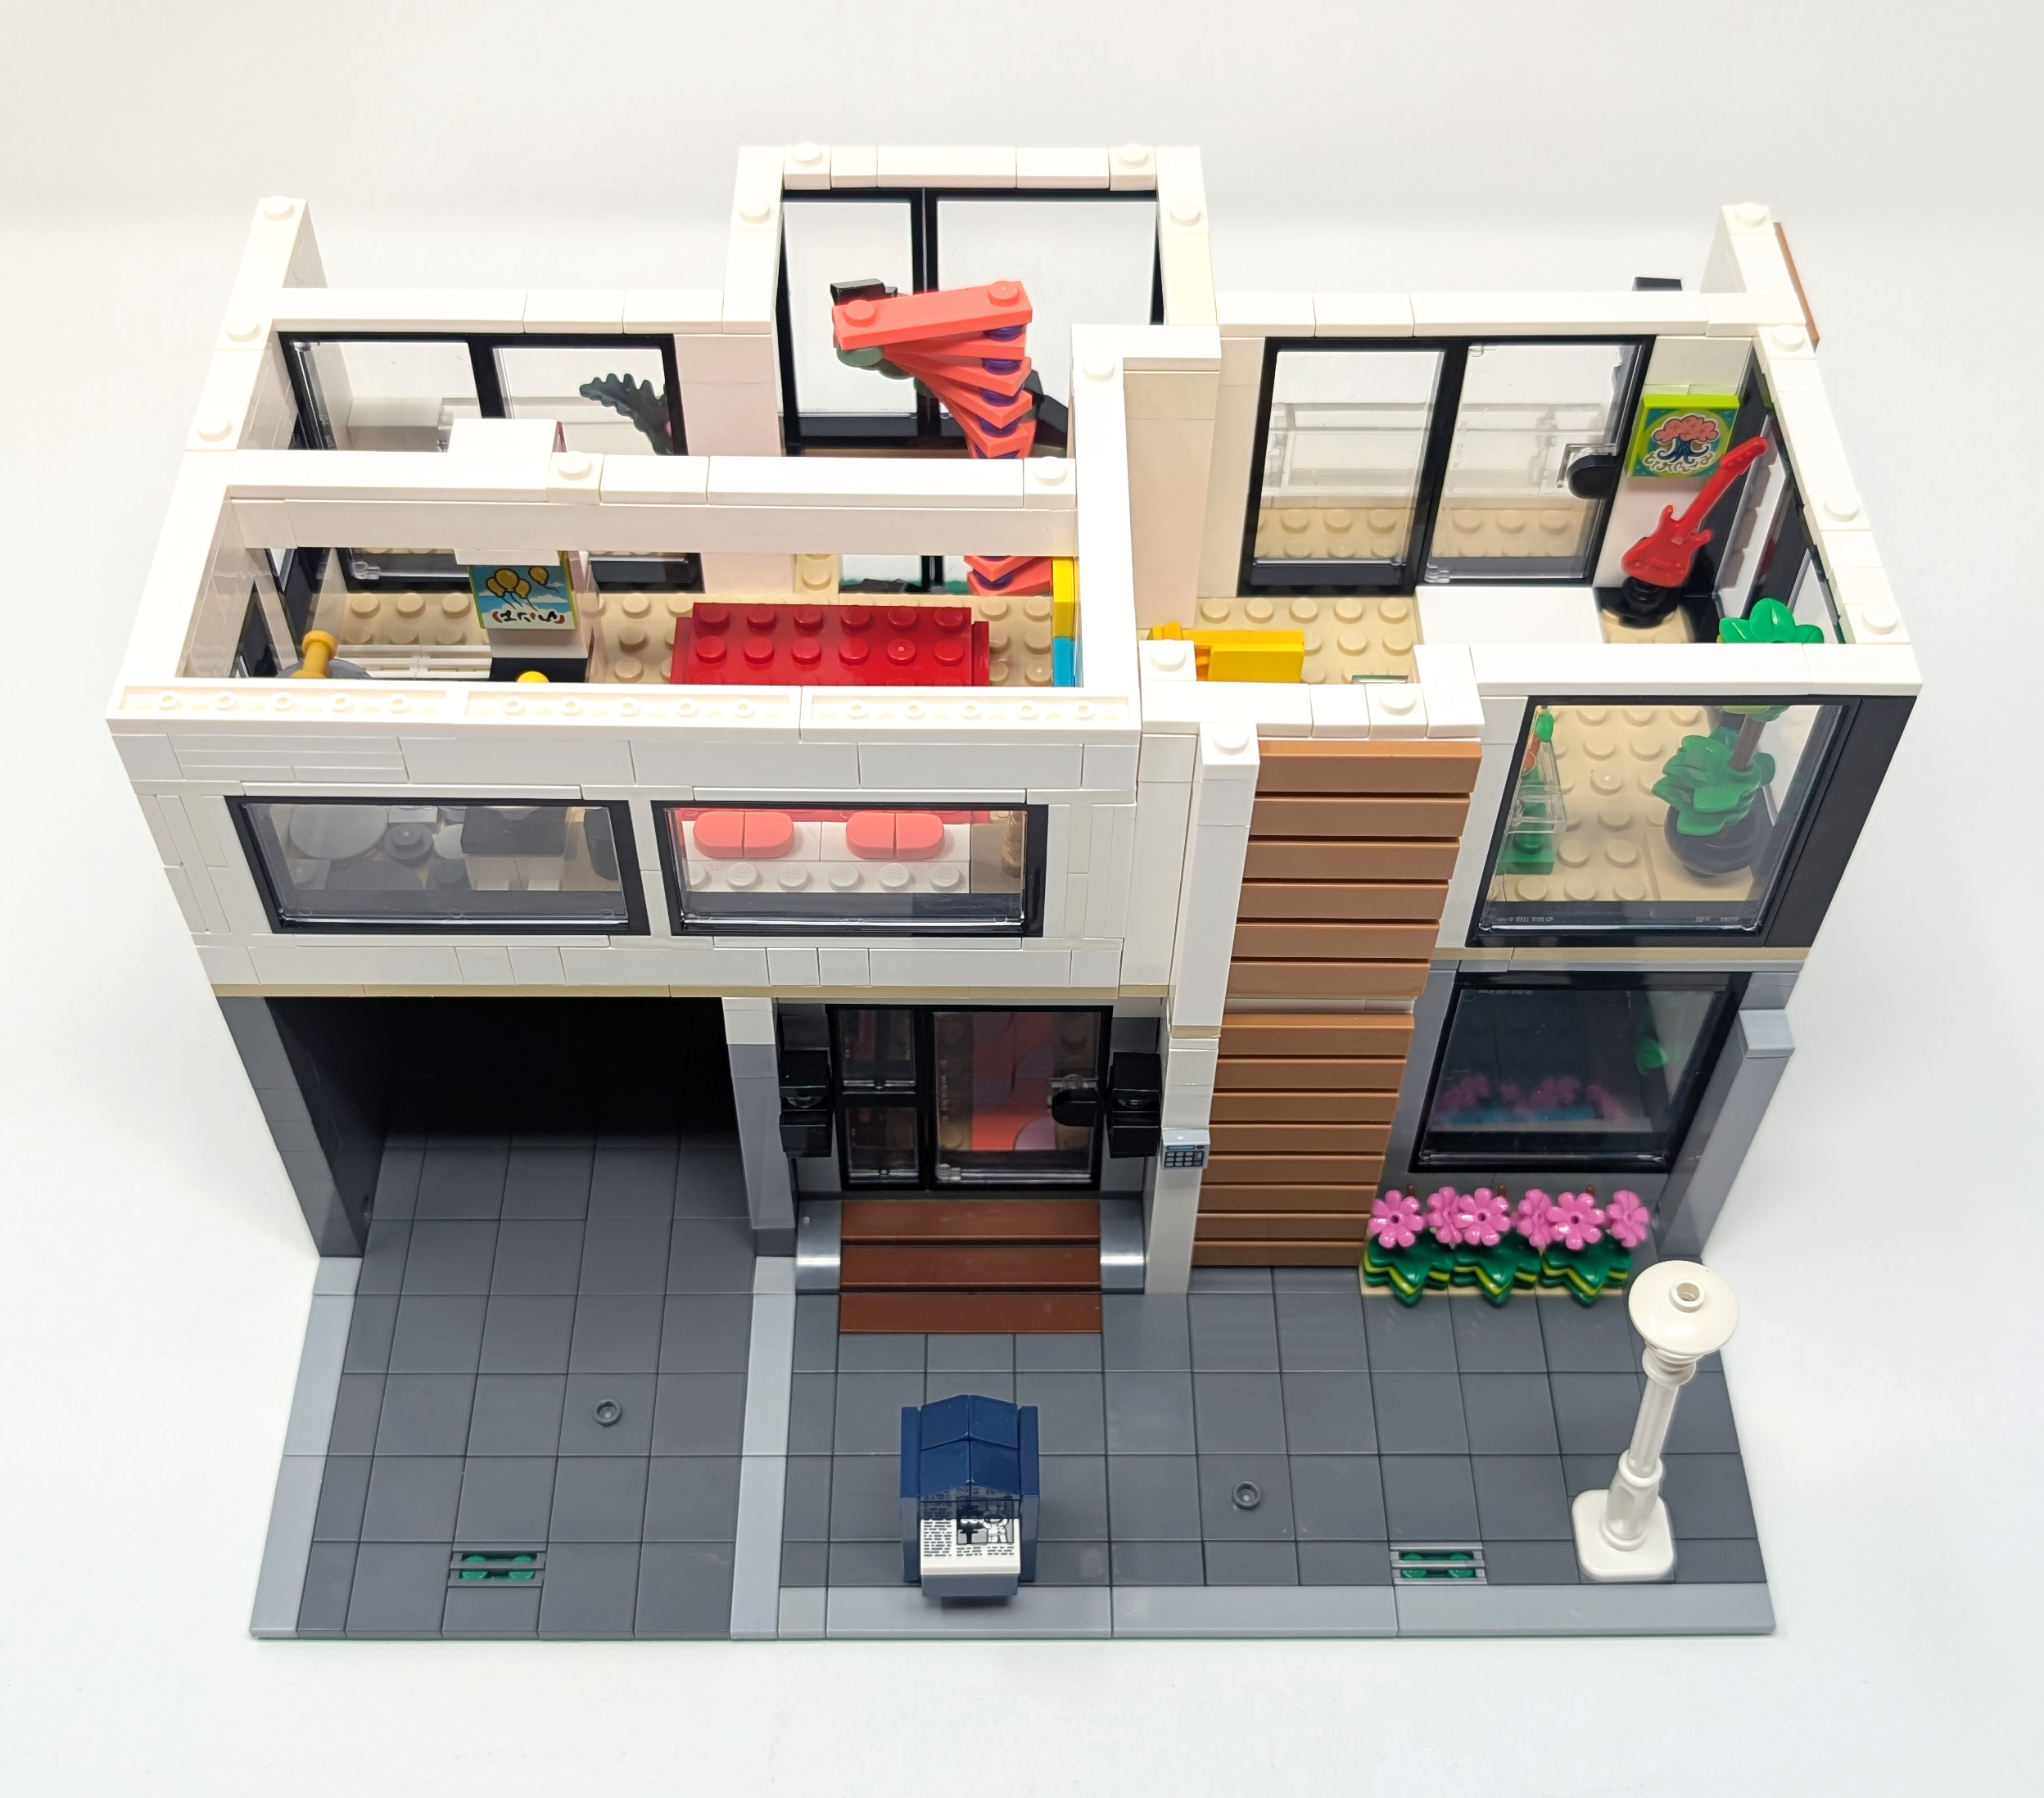
A good way to cap off builds is through varied roof designs. Just like real life there are a variety of roof designs to pick from, whether you are a fan of of gable, dormer or flat style, everything is possible in LEGO. For the two Modular builds I created for this review I opted with a vaulted open gable and a flat roof design for 42670: Heartlake City Apartments and Stores and 31153: Modern House respectively to capture both the Victorian and Modern styles each build was aiming for. The roof in 42670: Heartlake City Apartments and Stores has a traditional triangular shape with a round circular window named by its French name, oeil de boeuf, or “bull’s-eye”. Through use of SNOT (Studs Not On Top) construction detailing through depth and varied colors are brought out to accentuate the roof. A fitting stylistic crown to the stylized building it rests upon.

A vaulted roof creates a nice unique shape.
When looking at the different roof techniques in the Modular sets, the flat roof is often the most common one, both due to it being easy to build and due to its clean look. To show how even simple flat roof patterns can be complex I opted for two different flat roof designs for my Modular rendition of 31153: Modern House. The 194Medium Stone GreyLight Bluish Gray roof is a simple roof built using traditional plate techniques, albeit slightly amplified using tiles and bricks to add layering as opposed to just a flat surface. This was partially done to look good but also for structure, as it relies on the same tile and plate technique used for each level to attach. In my opinion the more fun flat roof of the two was employed when I built the 1White roof. I learned this technique when exploring my article on The architectural study of Hoke House and immediately fell in love so had to find a way to bring it into this build. The polished flat surface of bricks and no exposed studs helps create a very modern look, with the overhang adding both shade and cosmetic appeal to the structure. This technique is rather parts intensive and I had to exhaust my entire supply of white bricks to build it, as is evident by the yellowing of some of the older bricks. This weathering while not intentional works as replicates some of the sun damage that can be seen in real life roof of this sort. While both of the flat roof I built are fun, there is a real life inconsistency that was not built into the model. In real life the roof would sit at an angle of between 1 to 10 degrees to allow for water runoff, whereas the LEGO version would cause roof damage with pooling. This minor miss does not detract from the build but in my opinion was a fun thing to mention.
SNOT building allows for a flat surface on all edges for the roof.
As the brick built flat roof does not connect using any studs due to the SNOT nature of its construction I had to be creative to ensure it holds in place. To do this I used various forms of 1×1 Brick, Stud 1-Side (Part 87087) with the exposed connection point serving as the bracket that holds the roof in place. By lining it across the edges of the wall beneath it is able to hold itself in place easily and allows it to be easily lifted above in a similar fashion to that of the removable levels of each floor. By using SNOT construction in this way for the roof I am able to hang items from the roof, in the case of this set a modern chandelier. A fun detail that came from the original set design but was attached differently. The alternative approach for a flat roof is to build it using just the traditional large plate technique. This is done for the 194Medium Stone GreyLight Bluish Gray roof. This technique allows for easier placement, but captures a different aesthetic to the 1White roof beside it. Using traditional connection points this slots in place using standard bricks as support to keep it from moving. Through contrast in color and techniques each adjacent roof is accentuated further, in my opinion improving each of their designs.
Exposed studs on the underside act as support to hold the roof in place.
Interior detailing
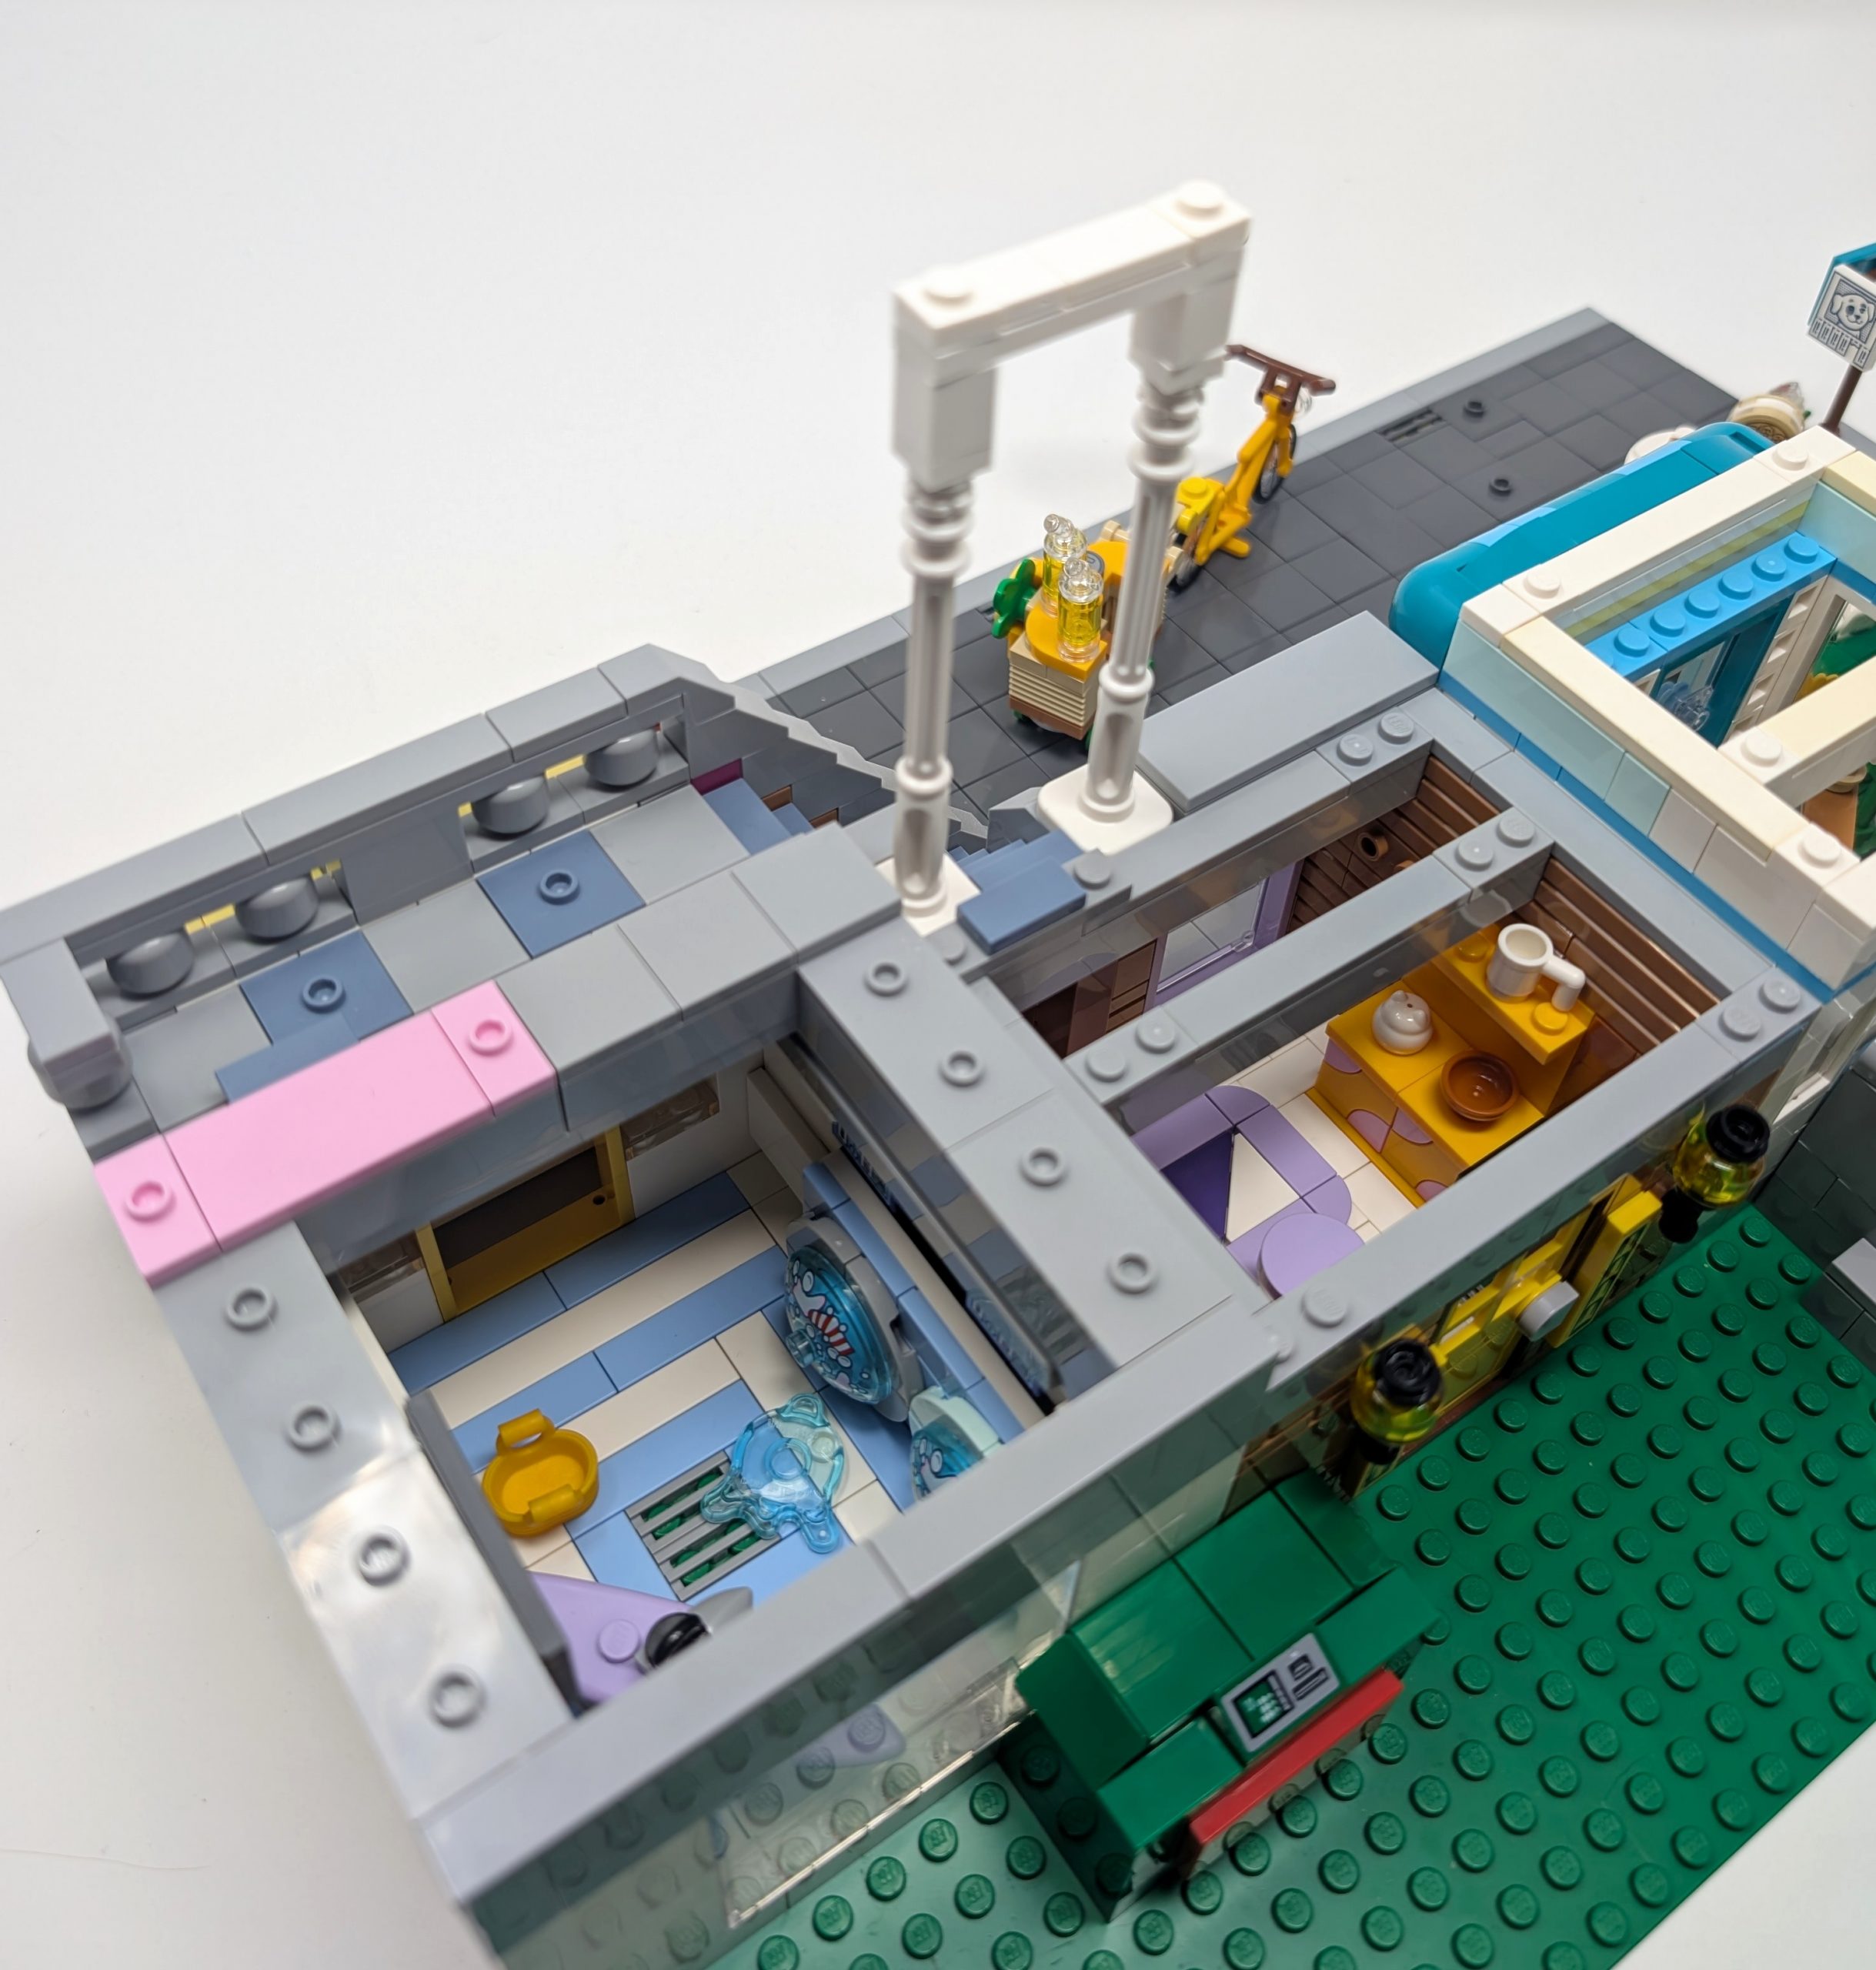
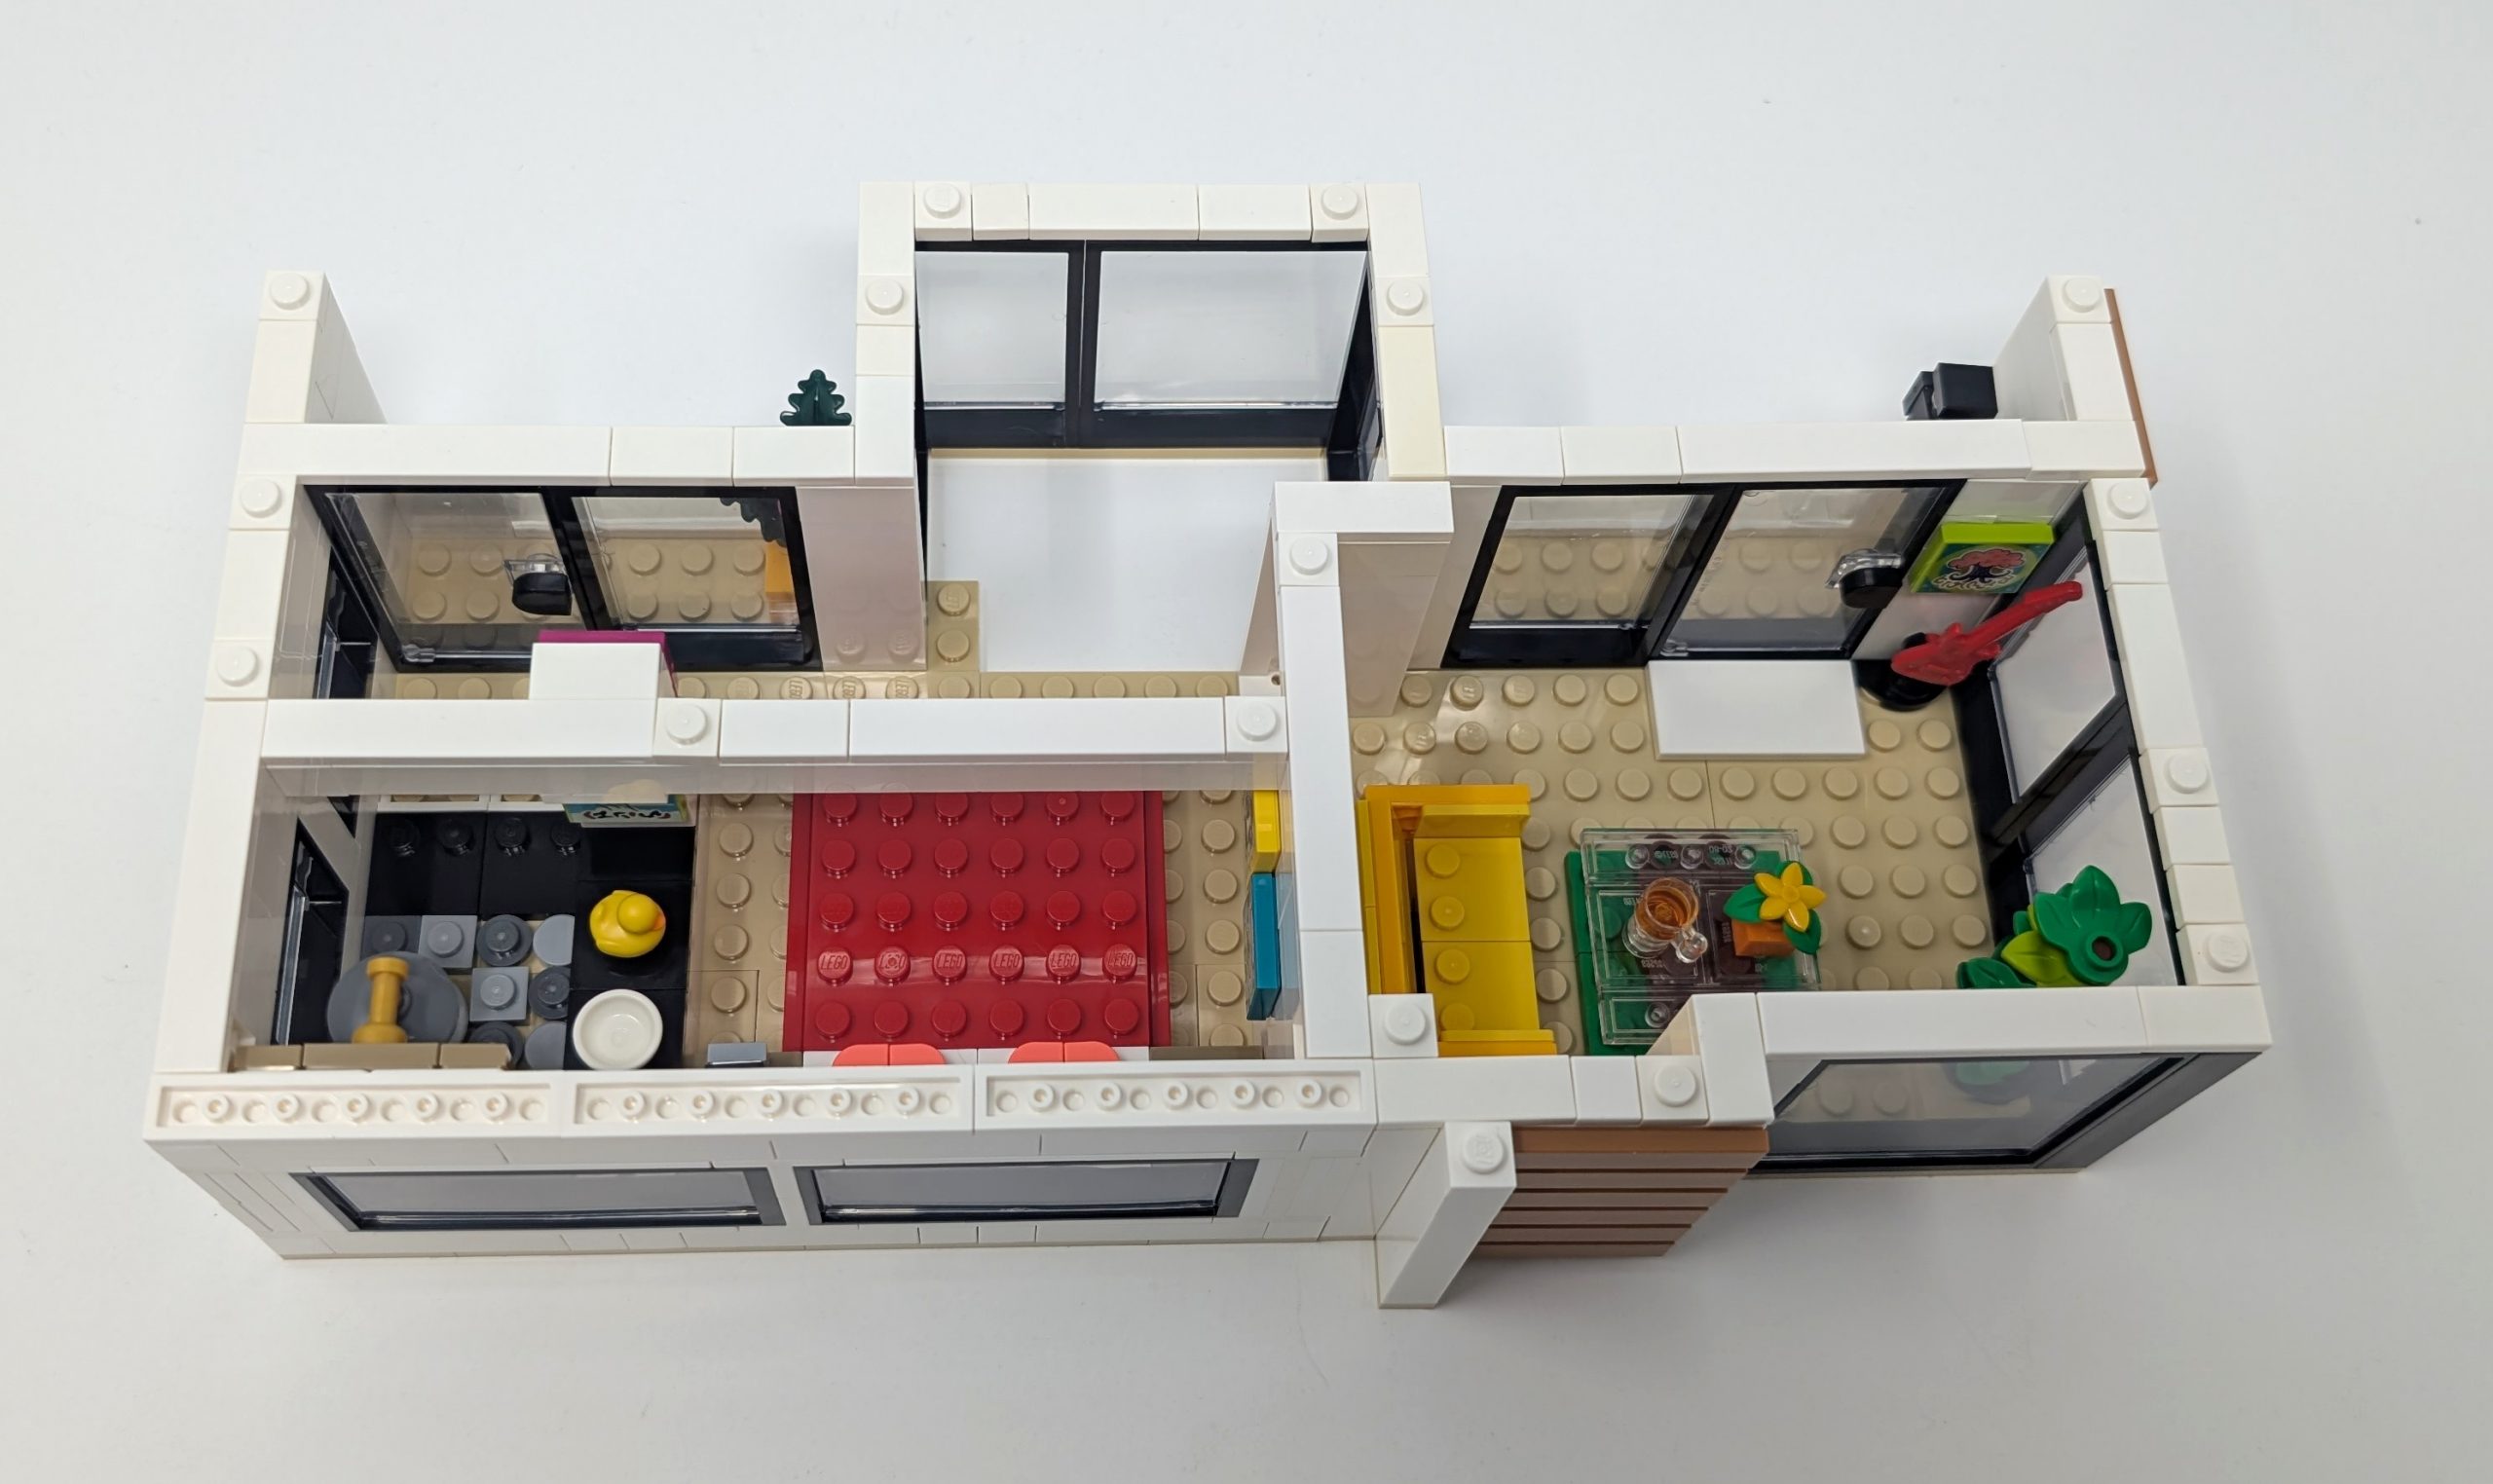
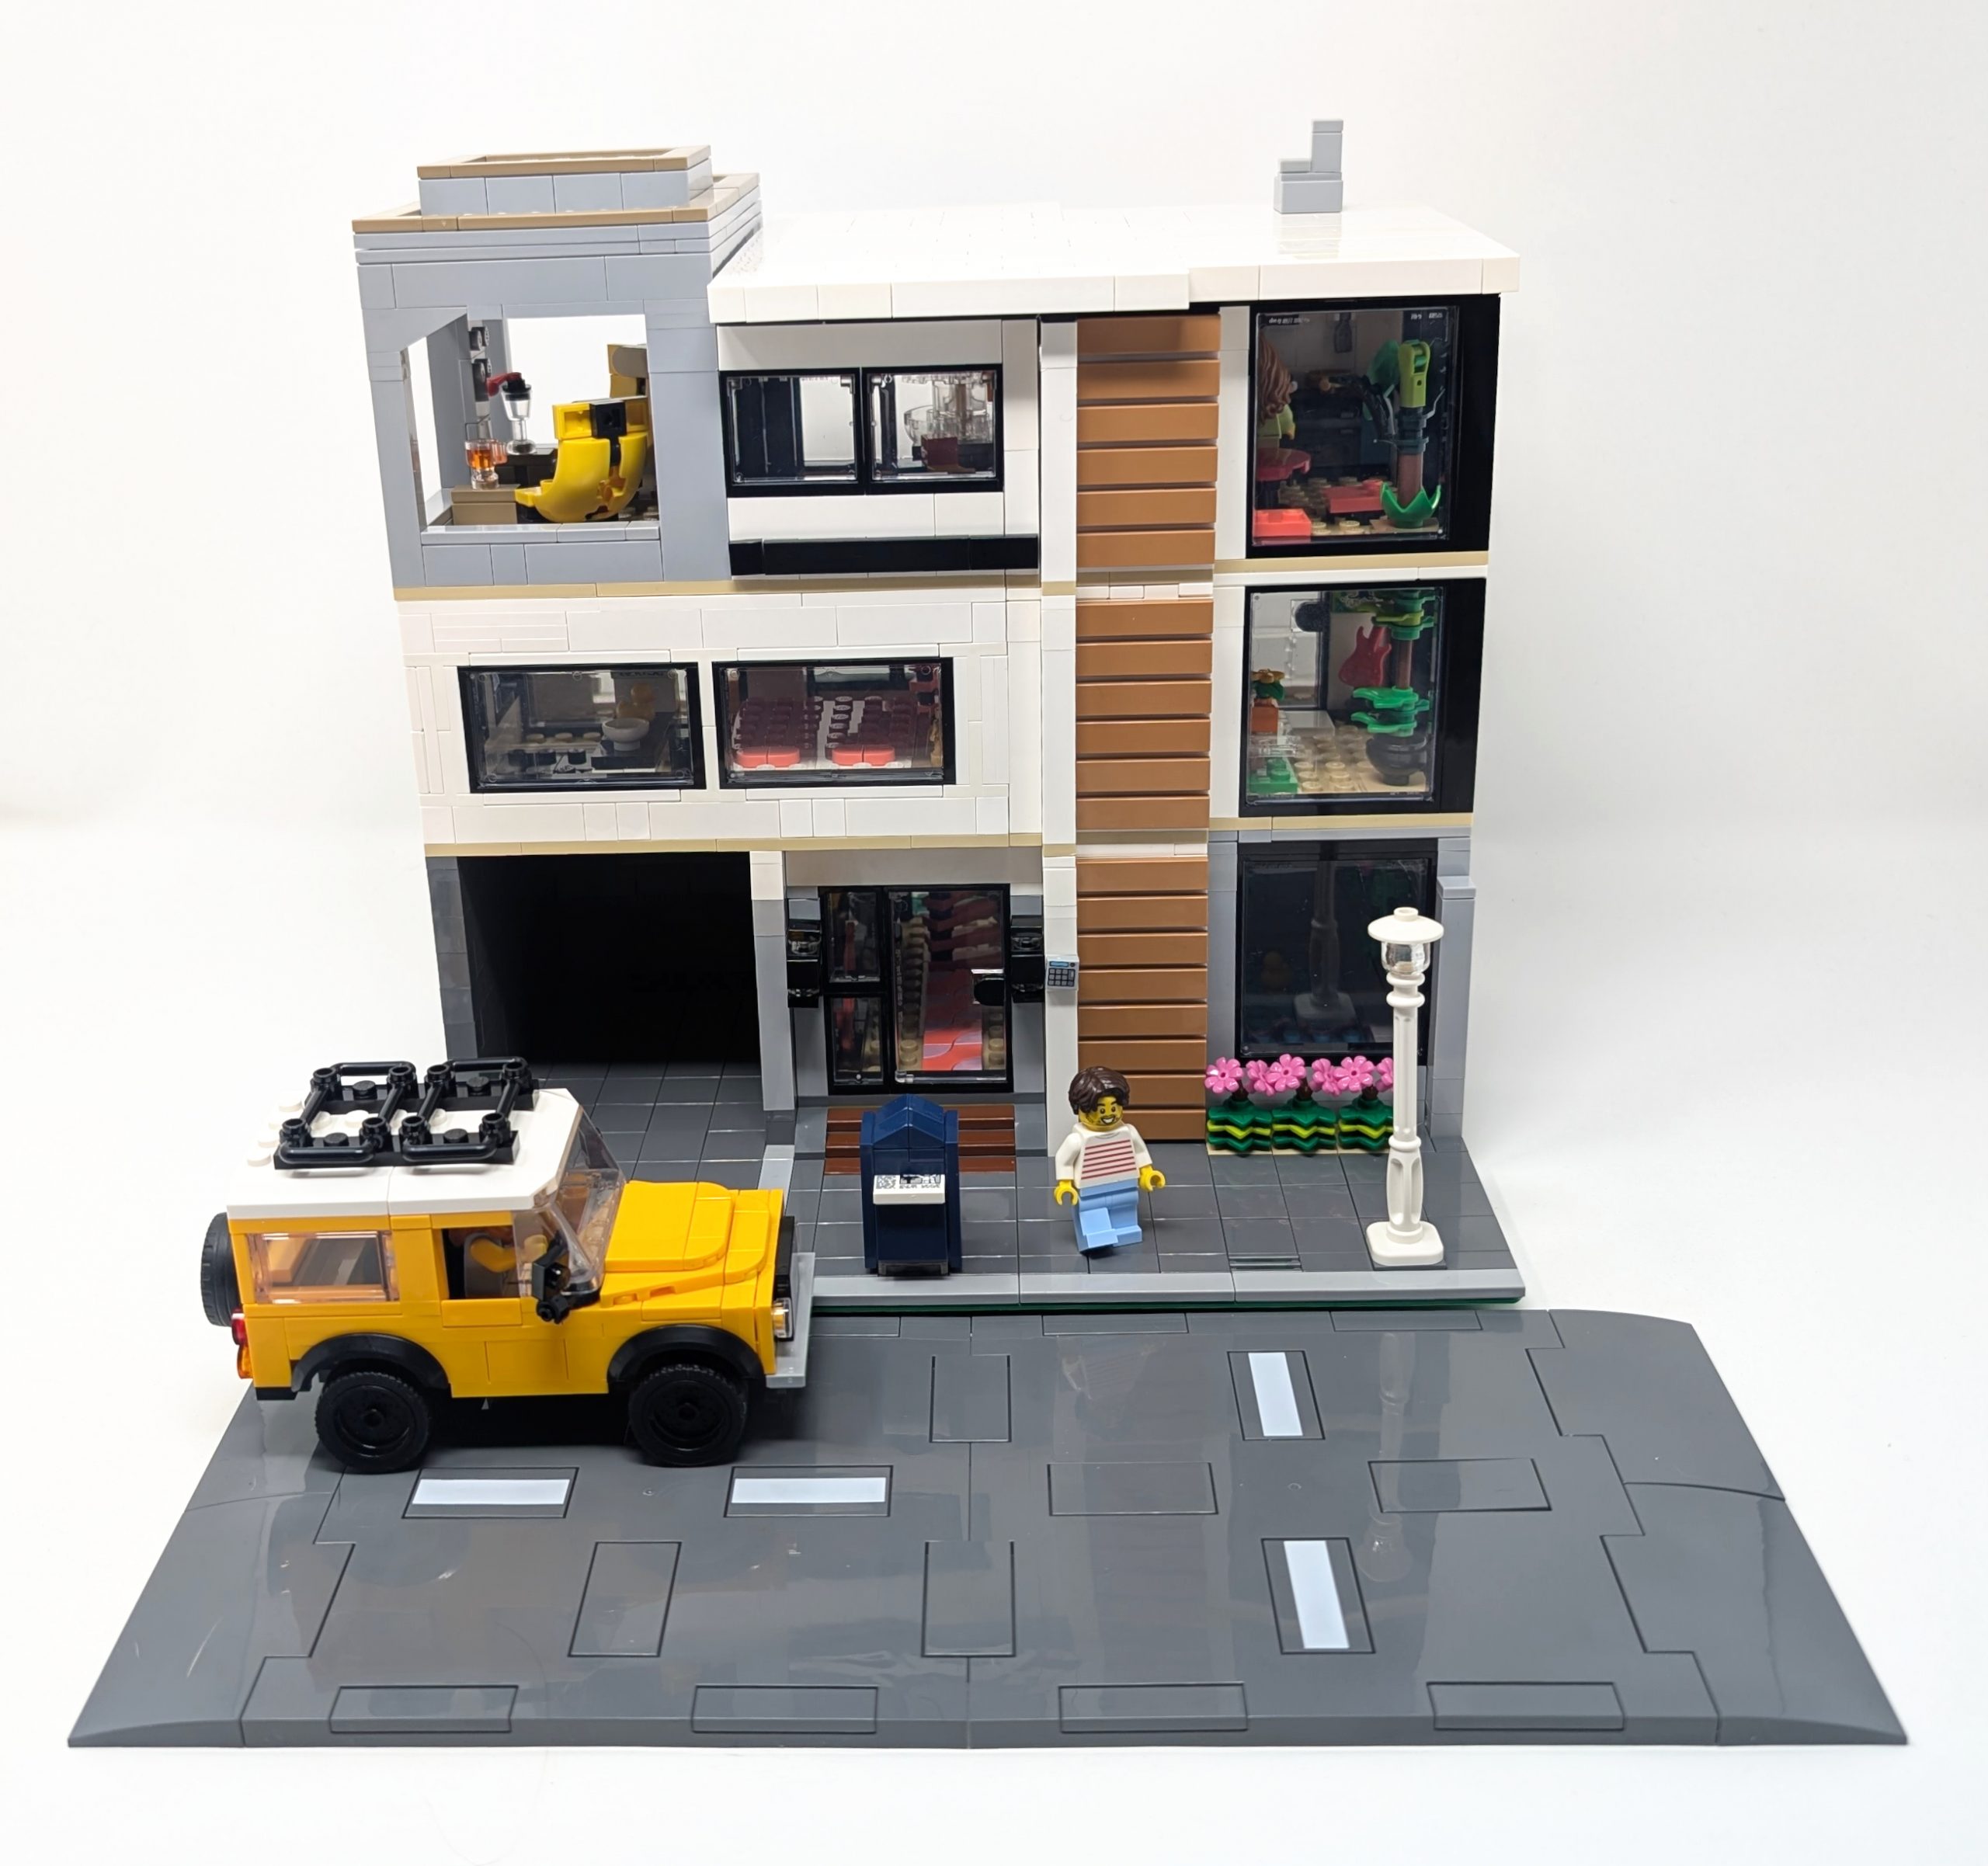
When looking at LEGO Modular buildings, the exterior is what you mostly see, and as such a lot of time and effort is spent to make the buildings as appealing to the eye as possible. As it is a building though there are windows so a good way to accentuate the structure is to build out interior details that help capture the slice of life of the inhabitants in the building. Whether it be furniture, scenes or even plants in the windows, each brings energy and life into the building. In my rendition of 31153: Modern House I decided to capture some of the great internal builds that LEGO recommended in the set and blended it with my own flavors to capture the scene best. To give you ideas for your own Modular structures I will go over the floors and showcase how energy can be captured using small interior builds.
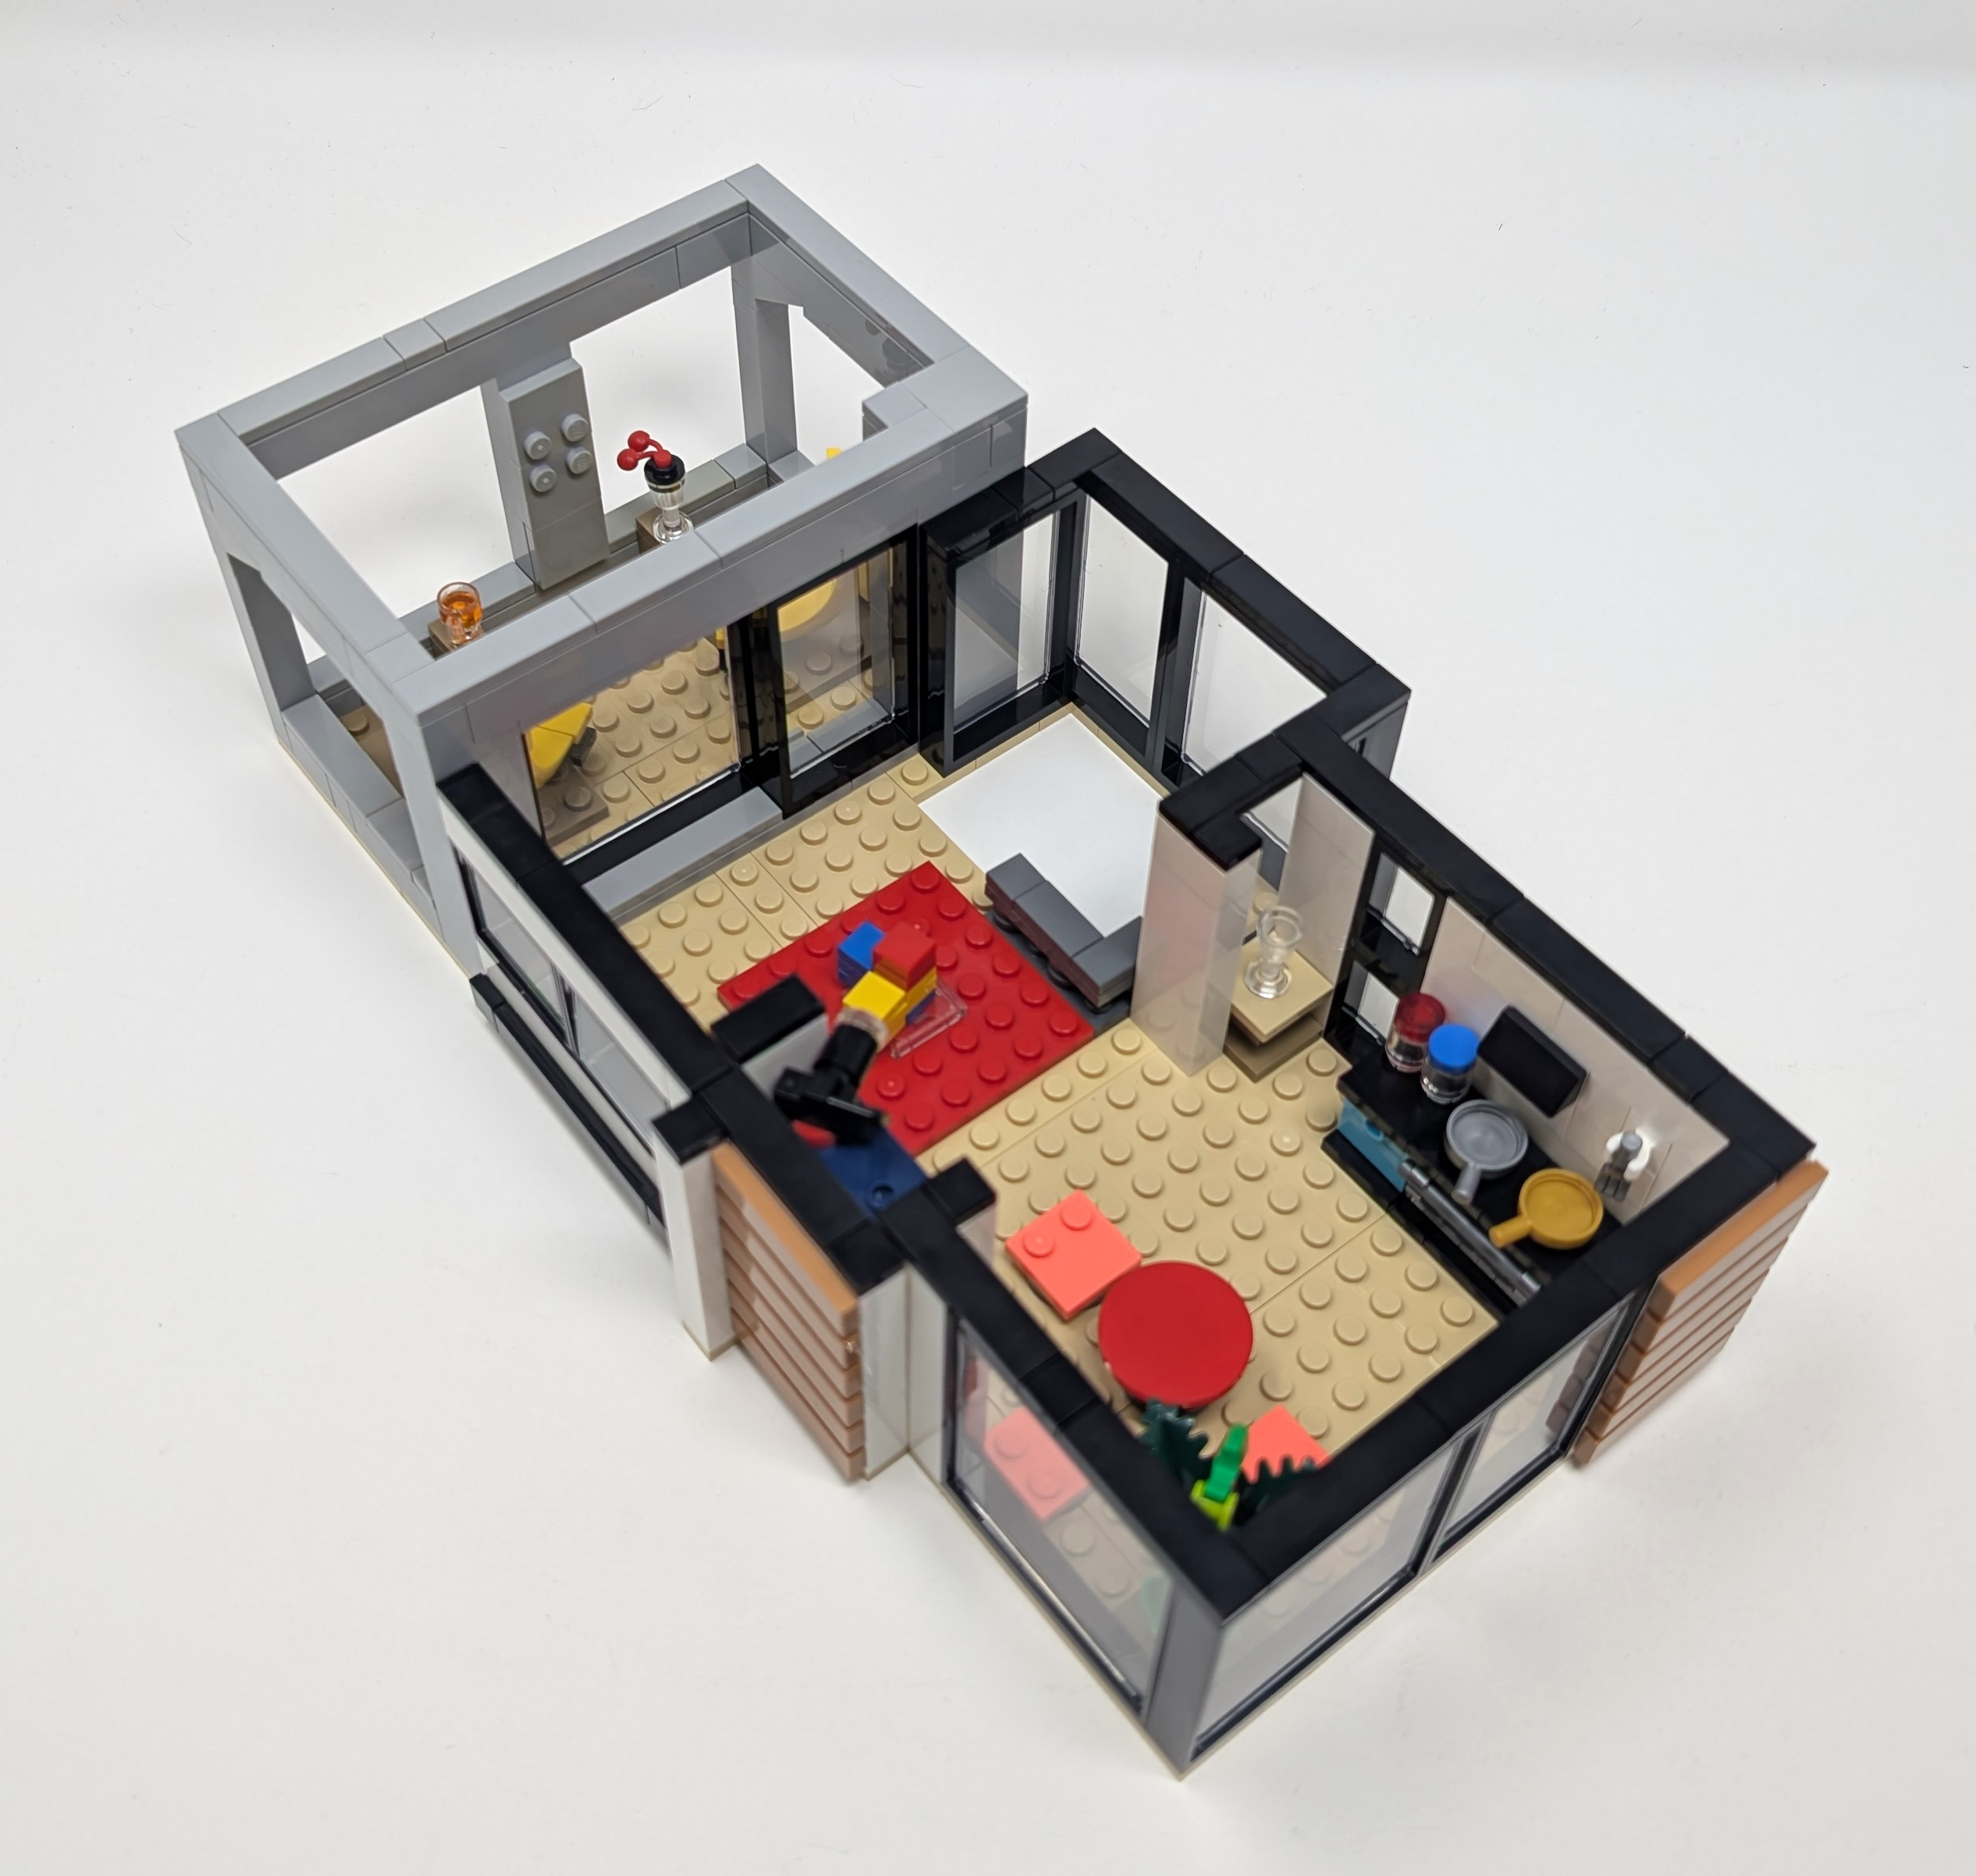
We start at the ground floor. For this building I went with the theme of affluence, and what screams affluence more than having a private walled off deck and pool. The ground floor is split between three rooms, the aforementioned pool, a large space for a car garage and the entryway into the house. One thing I feel that a lot of Modular buildings miss is space for vehicles. To fix this I created a 9 stud wide garage, sized to fit most LEGO cars, including all 6 and most 8 stud wide Speed Champions vehicles. As this is an empty space it help create volume easily without using many pieces. The pool is built rather simple, utilizing 322Medium AzurMedium Azure plates for water. If the set had come with tiles I would have used those instead to have a glossy finish, but to minimize my own personal parts usage to stay true to the source materials I decided to use what I had. Complexity comes in with the entryway, while there are various minor details like shelves, a rug and even paintings, the main focal point was creating the open space for the spiral staircase. This spiral staircase looks great but unfortunately is very fragile, with each step connected by just two points. This spiral staircase is the main staircase that runs across the building and raises across all three floors, the first of my many internal variations from the source material.
Most of the ground floor is used up by parking space.
The second floor serves to start building up the living quarters, focusing on a living room, bedroom and shower space. Upon writing this article I did notice two major flaws in the design for this floor, both being the bathroom space. Firstly, there is a large window so any character showering can be visible from the outside, for this sake we will assume that there is a curtain that can be drawn to give the inhabitant privacy. The second miss was the lack of toilet. This missing toilet is actually rather common in LEGO builds as many LEGO modular buildings opt to not build shower or toilet spaces as those are not normally topics of discussion. The depth of the house is only 14 studs deep, 2 of which are used by the exterior wall giving very limited room for detailing. As a result, to avoid the space feeling cramped I decided to not add too many objects, with the bedroom only having a bed and side tables. To help give me more space, I created an open floor plan between the bedroom and the bathroom, saving space from adding another wall and allowing for shared surface space between the two. In the adjacent room is a simple yet modern couch and coffee table, a beautiful reminder to relax and take it easy. Around the back of each room is balcony space, something to open up the room a bit for the inhabitants and get fresh air. To continue the modern look, the railings are built using 40Transparent Trans-Clear 1×2×3 Panel with Studs (Part 87544) pieces to continue the modern glass heavy look. While a lot of the details are on the floor, detailing can also be accomplished on the walls using printed tiles. This set did not come with printed tiles but I looked at what I had in my collection to add paintings or other wall decor that liven up the space.
The upper levels are packed with sleeping quarter details.
When peering through the window you can see the impact of interior detailing to enhance the build. All the details that we added below give a contrasting splash of color and adding shapes to what could otherwise be static surfaces. My favorite details are the potted plants in the windows. These simple addition create a natural feel to what otherwise is urbanization overload. To create some variability I borrowed a SNOT technique used in other sets for the bedroom windows. At first glance this looks like a normal window technique through use of the 1×4×6 Window/Door Frame (Part 60596) piece, however it is built on its side to create a long horizontal window rather than a long vertical window look. This add difference in window size and shows how one piece used in a different way can give a completely different vibe.
SNOT construction allows for piece usage.
As a continuation in the interior living space, the third level houses a kitchen, a living room space and an outdoor deck. The covered deck is my favorite of the rooms I have built, with the 194Medium Stone GreyLight Bluish Gray contrasting heavily against the 1White in the rest of the structure to make it pop out and give it the cement like grit look it tries to give off. Modern 24Bright YellowYellow chairs sit in this space to once again give it a color contrast. While not easy to see, a sliding door opens up to the interior space by using the rail on the 2×8 Door Rail (Part 30586) piece to easily slide a glass door back and forth. This minor play feature allows for posing which in my view add a unique angle to the build. The interior of the third level has minor living detailing through a SNOT built bookcase, a few LEGO blocks on the carpet and a kitchen and eating space to the right. The positioning of each of the rooms on each level were done by design as I wanted to make use of the windows on the side to ensure that the rooms that would require more outdoor lighting gets it. We can ignore the practicality of the layout though with the kitchen being on the top floor, forcing the inhabitants to take a lot of steps to clean, eat and take out the trash. Creativity and suspension of disbelief makes building with LEGO bricks fun!
Each level is distinct and offers something new.
As the three levels join we can see how interior and exterior details blend together to enhance a build. Although each floor is built independently, there are common themes that are mirrored across each level to keep consistency. To the right of the structure we see huge floor to ceiling windows across each level that allows light to enter the space, with the 26Black frames serving a beautiful contrast against the pristine 1White walls. While I would love to say that this was a design choice, the 5Brick YellowTan splitting each floor was a design limitation as the plates included in the set were in this color. While at first I wish they were white, I think the difference in color makes for a nice contrasting look that can be chalked up as modern architectural design. To ensure that 1White was not overwhelming, I ensured to add 312Medium NougatMedium Dark Flesh wooden panels along the front side of the structure, this helps bring nature into the fray, but through the gaps between the panels due to SNOT limitations also gives variability in surface texture, something that both the source material and the remake do well in my opinion. Looking through the windows, seeing all the interior details, the minifigures within and the greens of the plants helps bring the scene to life, capturing the modern look beautifully!
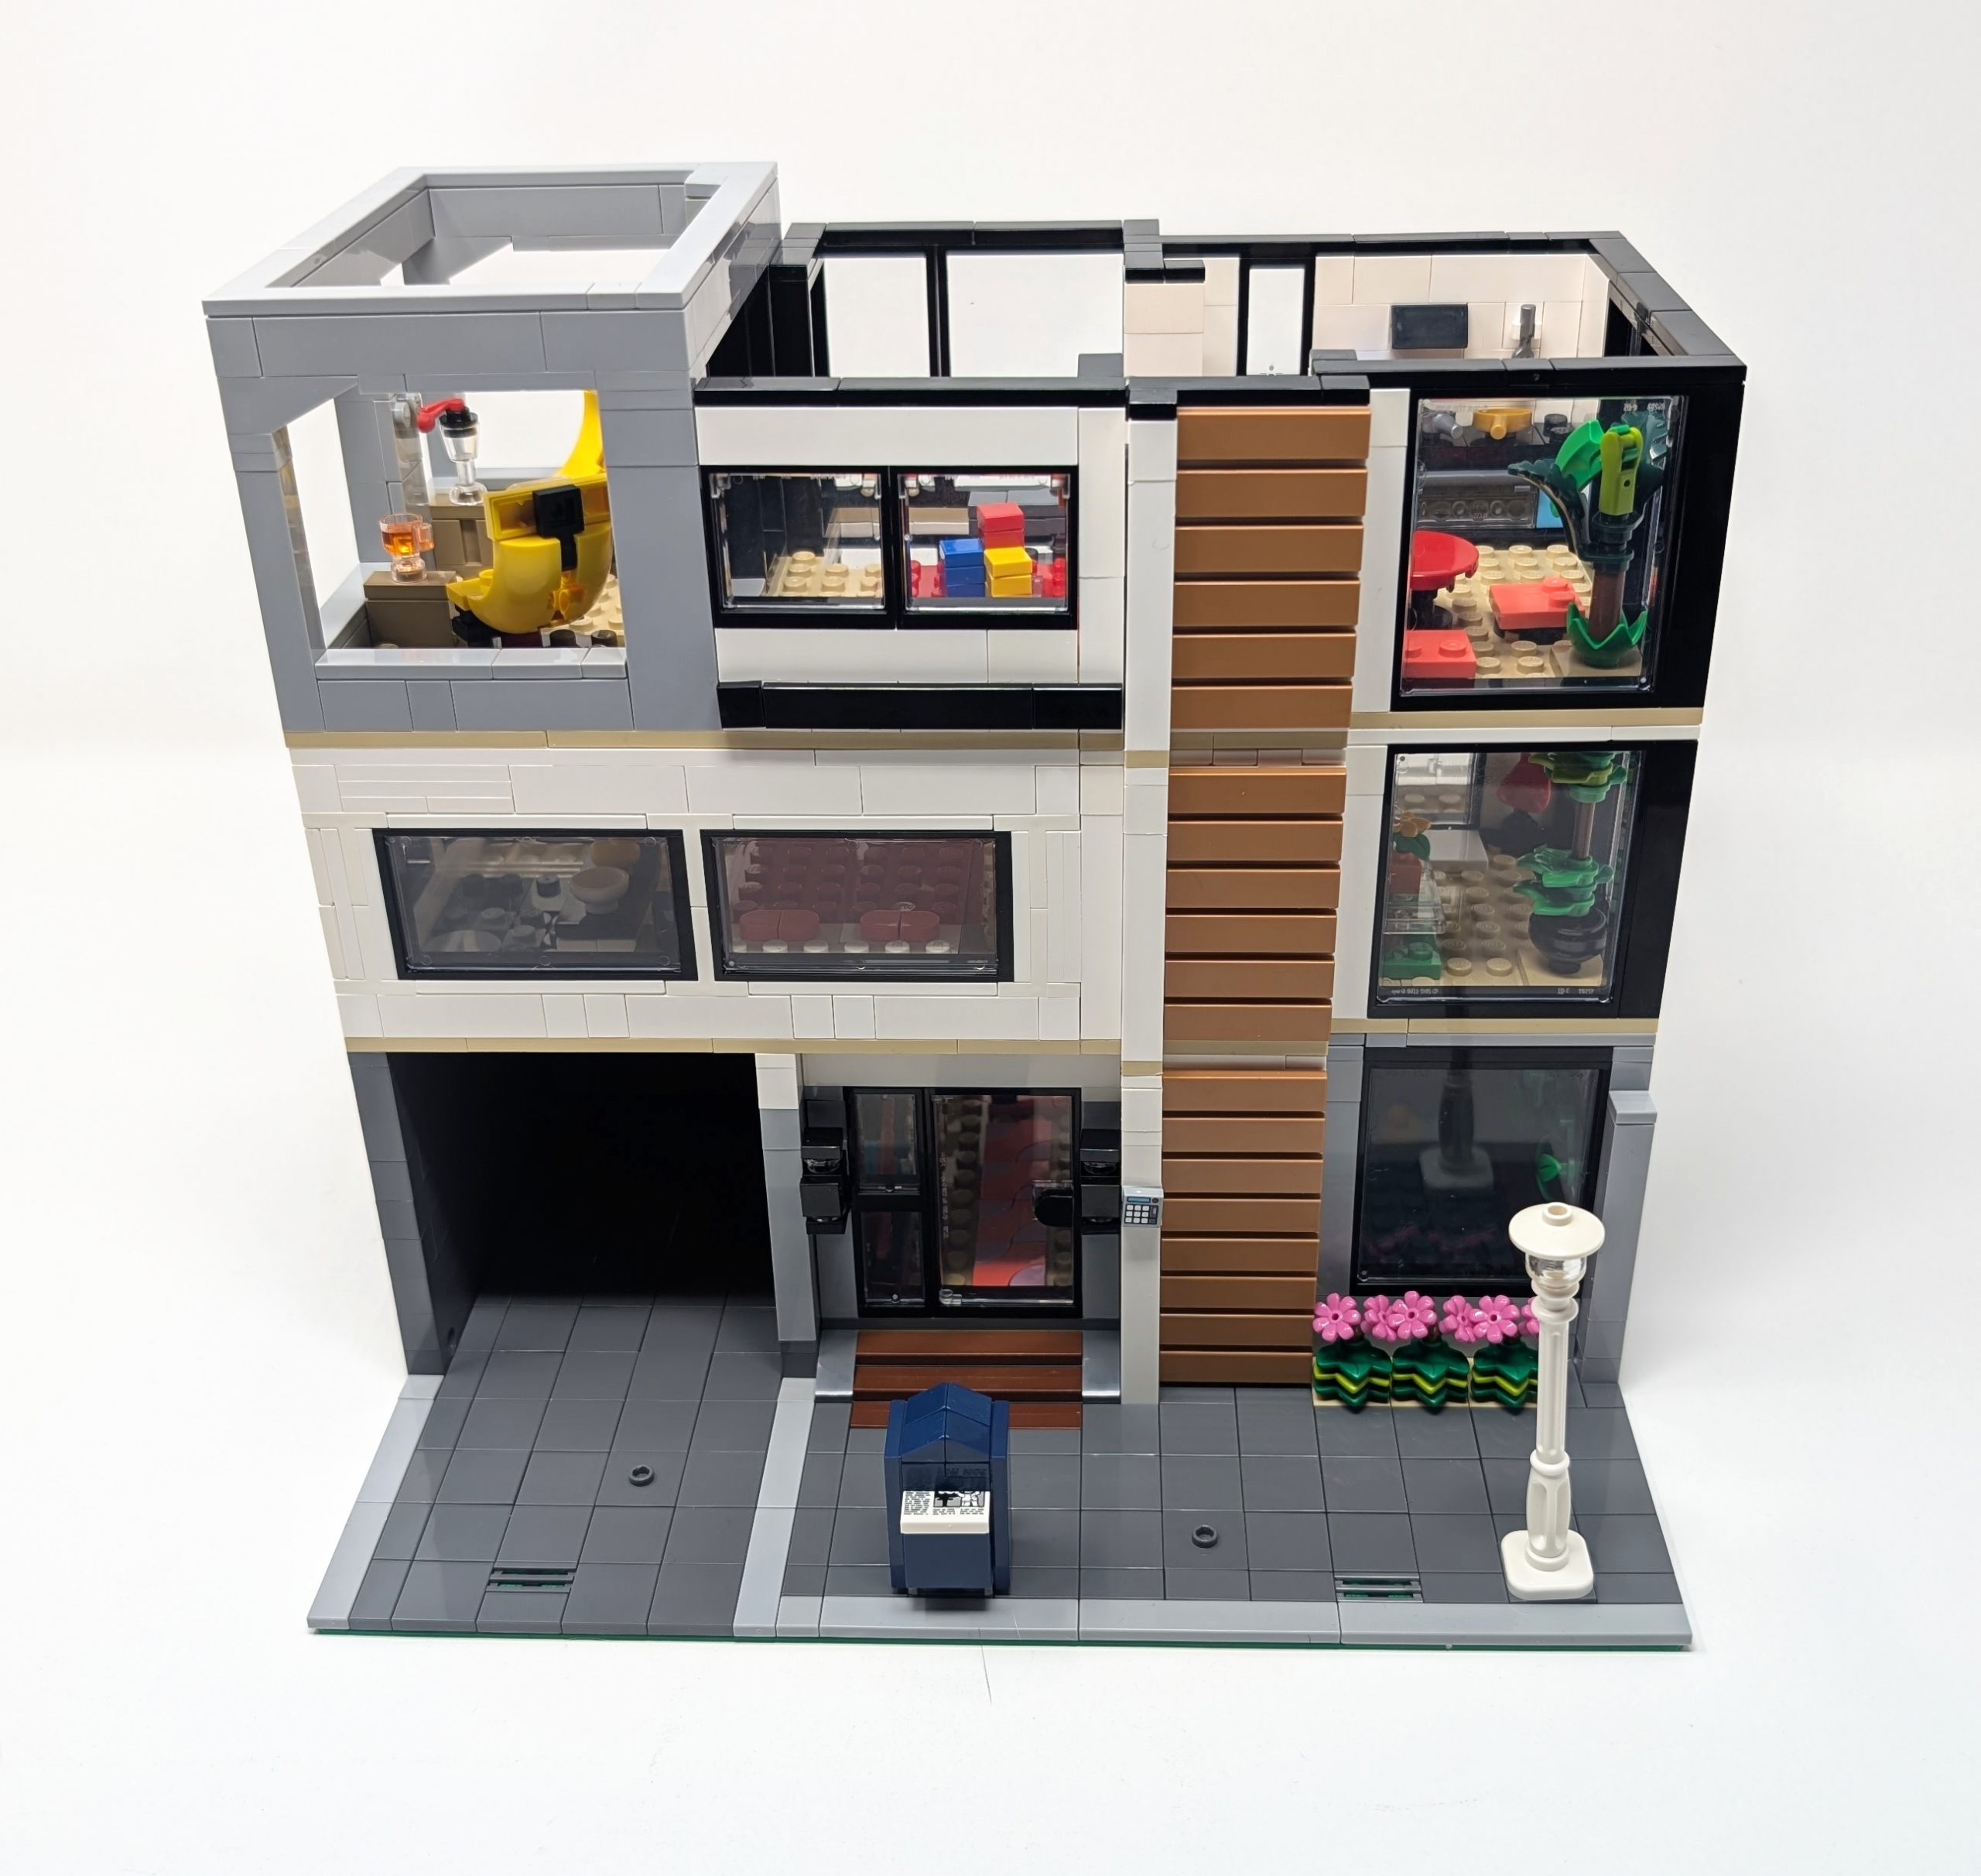
You can see the continuity between each of the levels when connected.
Expanding your Modular with Road Plates
60304: Road Plates was released on the 1st of January 2021 as LEGO’s solution to the discontinued road baseplates. Coming with 112 pieces and a price point of $19.99/£17.99/€19.99, 60304: Road Plates is a rather expensive set for what you get, especially given that there are no minifigures and a lot of duplicate parts. The original classic road baseplates introduced in the early 1960s were thin and lacked connectivity making it difficult to allow for customized layouts, this new solution solves that while not taking up an entire baseplate width for roads. Each section of the road is perfectly sized to fit a standard 6 tile wide vehicle and allows many of your speed champion vehicles to fit right into your city.
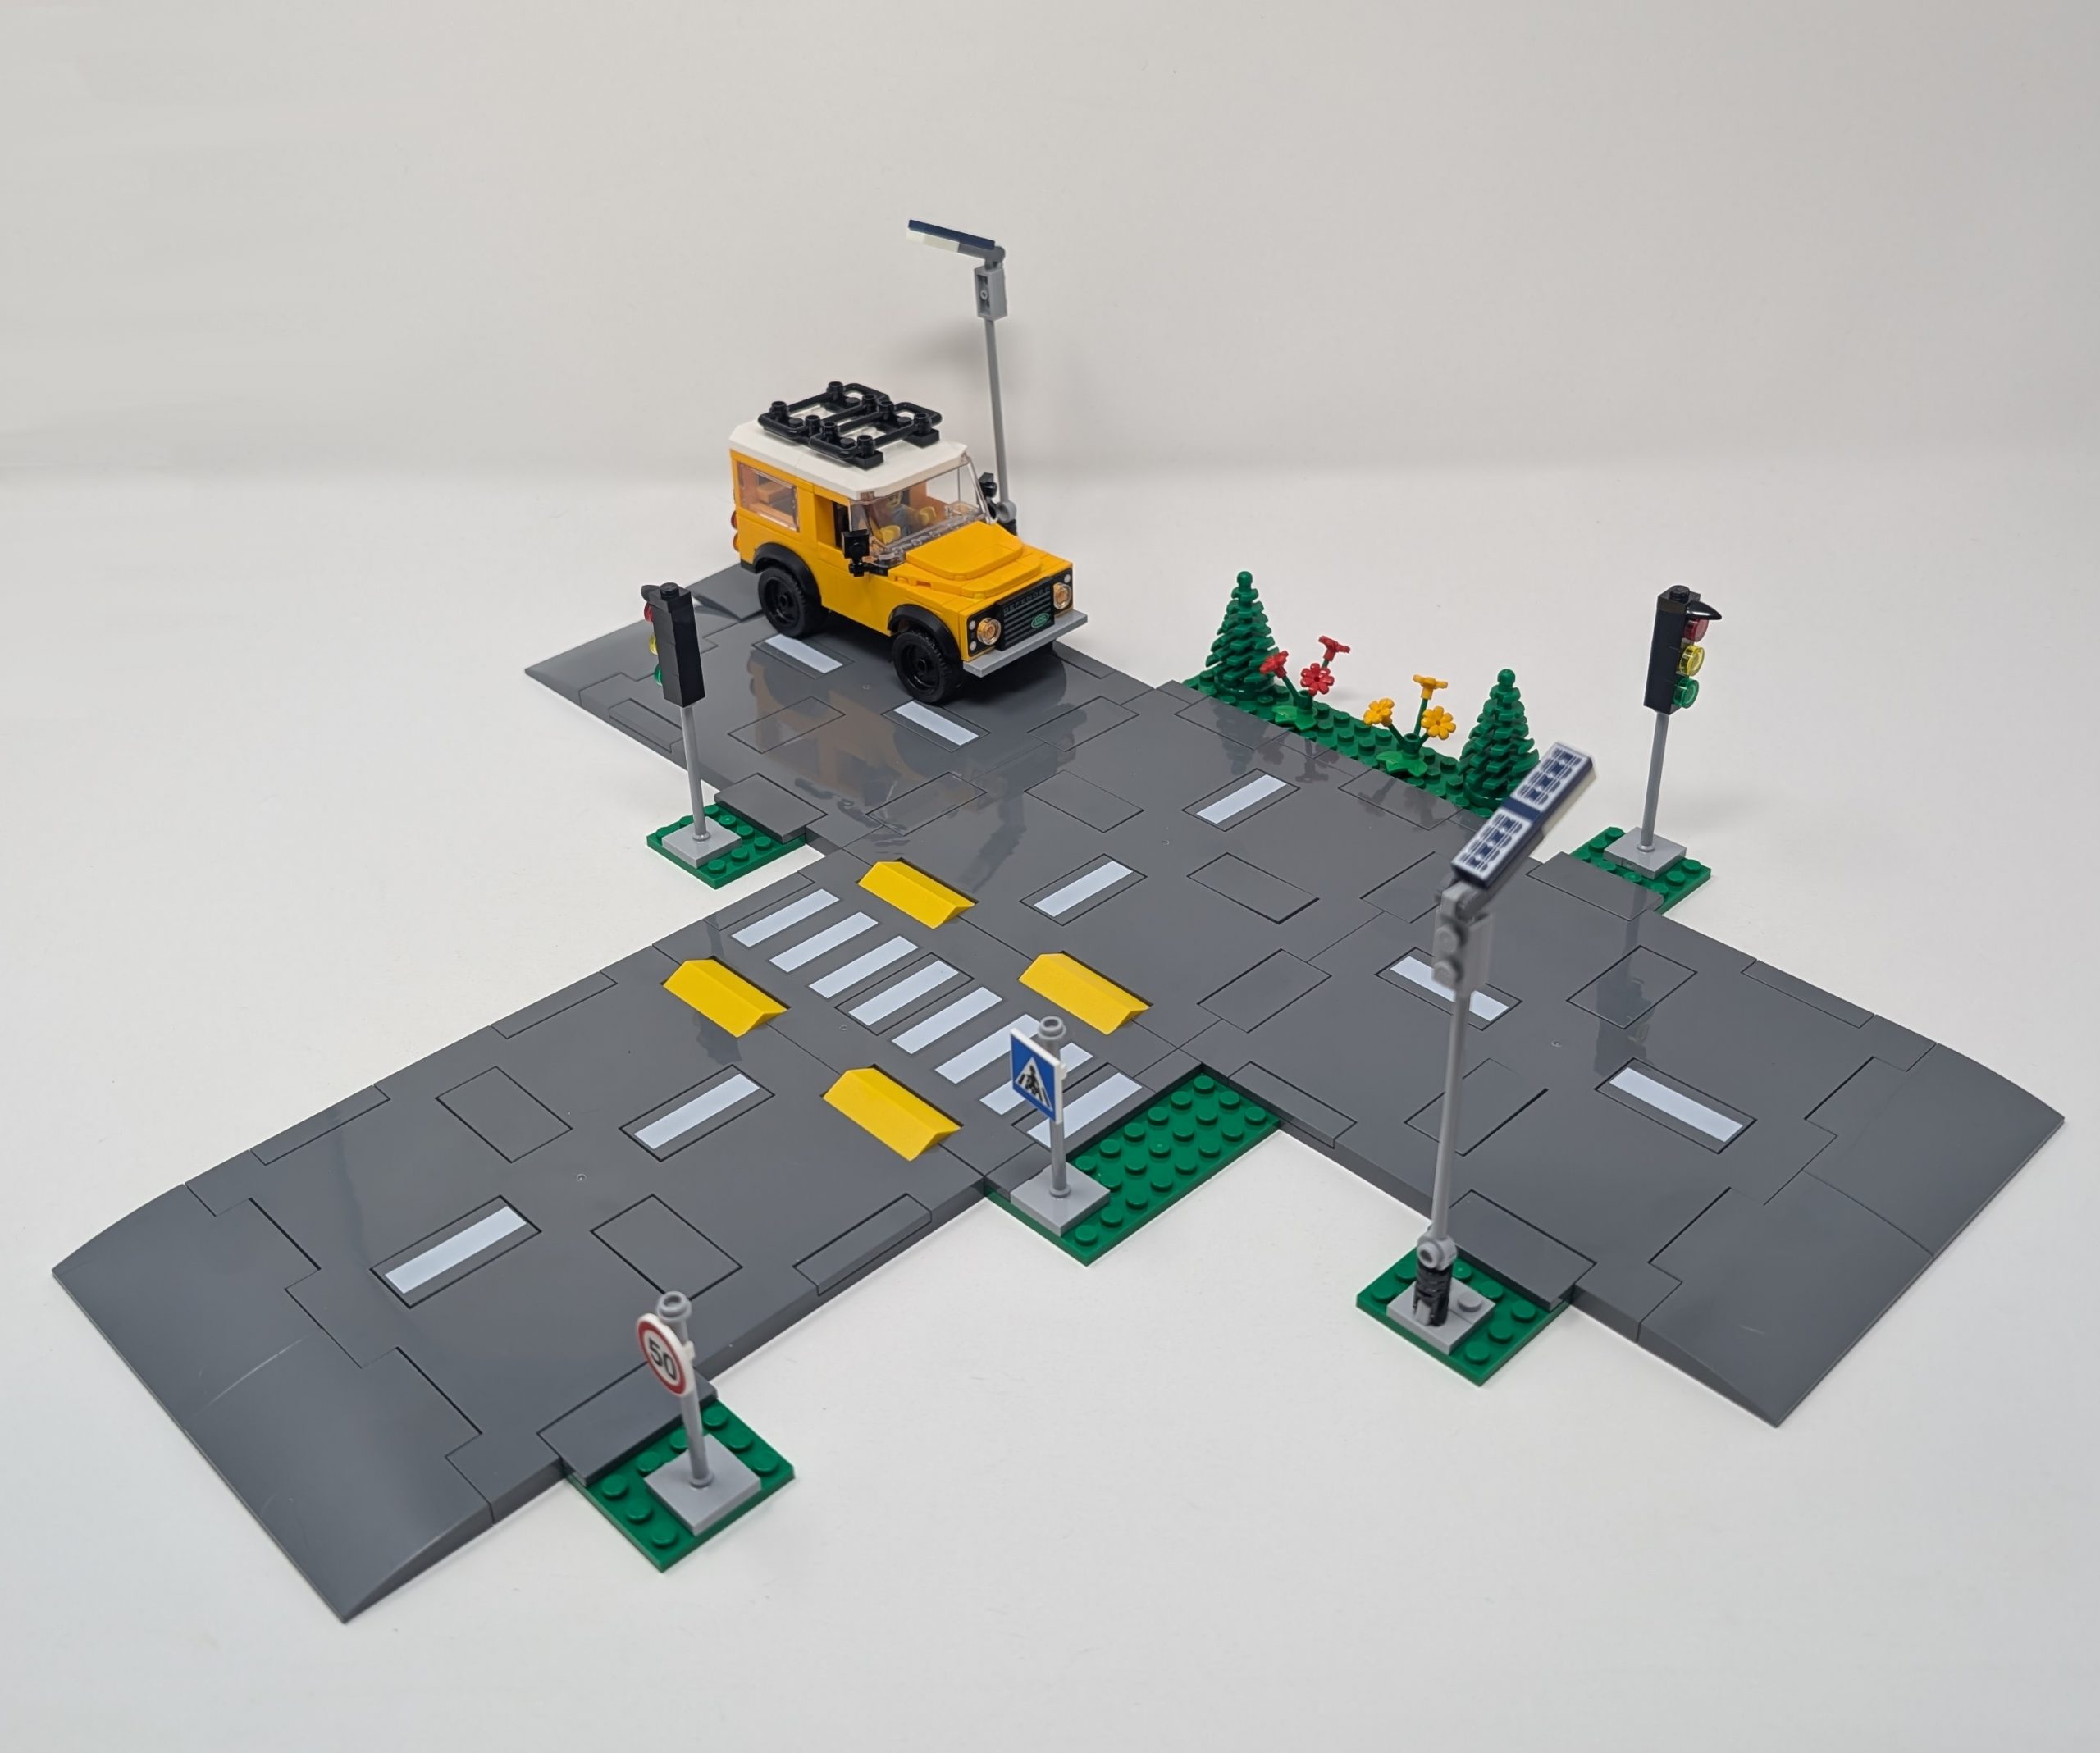
The road can be configured into whatever layout is desired.
60304: Road Plates is built with modularity in mind allowing for varied customization of not just the layout of the roads but also the roadside detailing. The set is built primarily using 16×16×⅔, Recessed Studs (Part 69958) for the main structure, featuring four of these that can easily be configured into whatever layout is desired. To supplement the main roads the set includes a large number of printed sidewalk plates and features one printed intersection piece in the form of https://brickarchitect.com/parts/71772. While the roads are the main wow factor of this, it is the accessories that enhance urban details. 60304: Road Plates includes a stoplight assembly, street signs, speed bumps, crosswalk markings, and decorative elements like trees and street lamps, each of which can be connected to the road plates with ease. The modular nature also makes it easy to build your own custom accessories to enhance the roads even further!
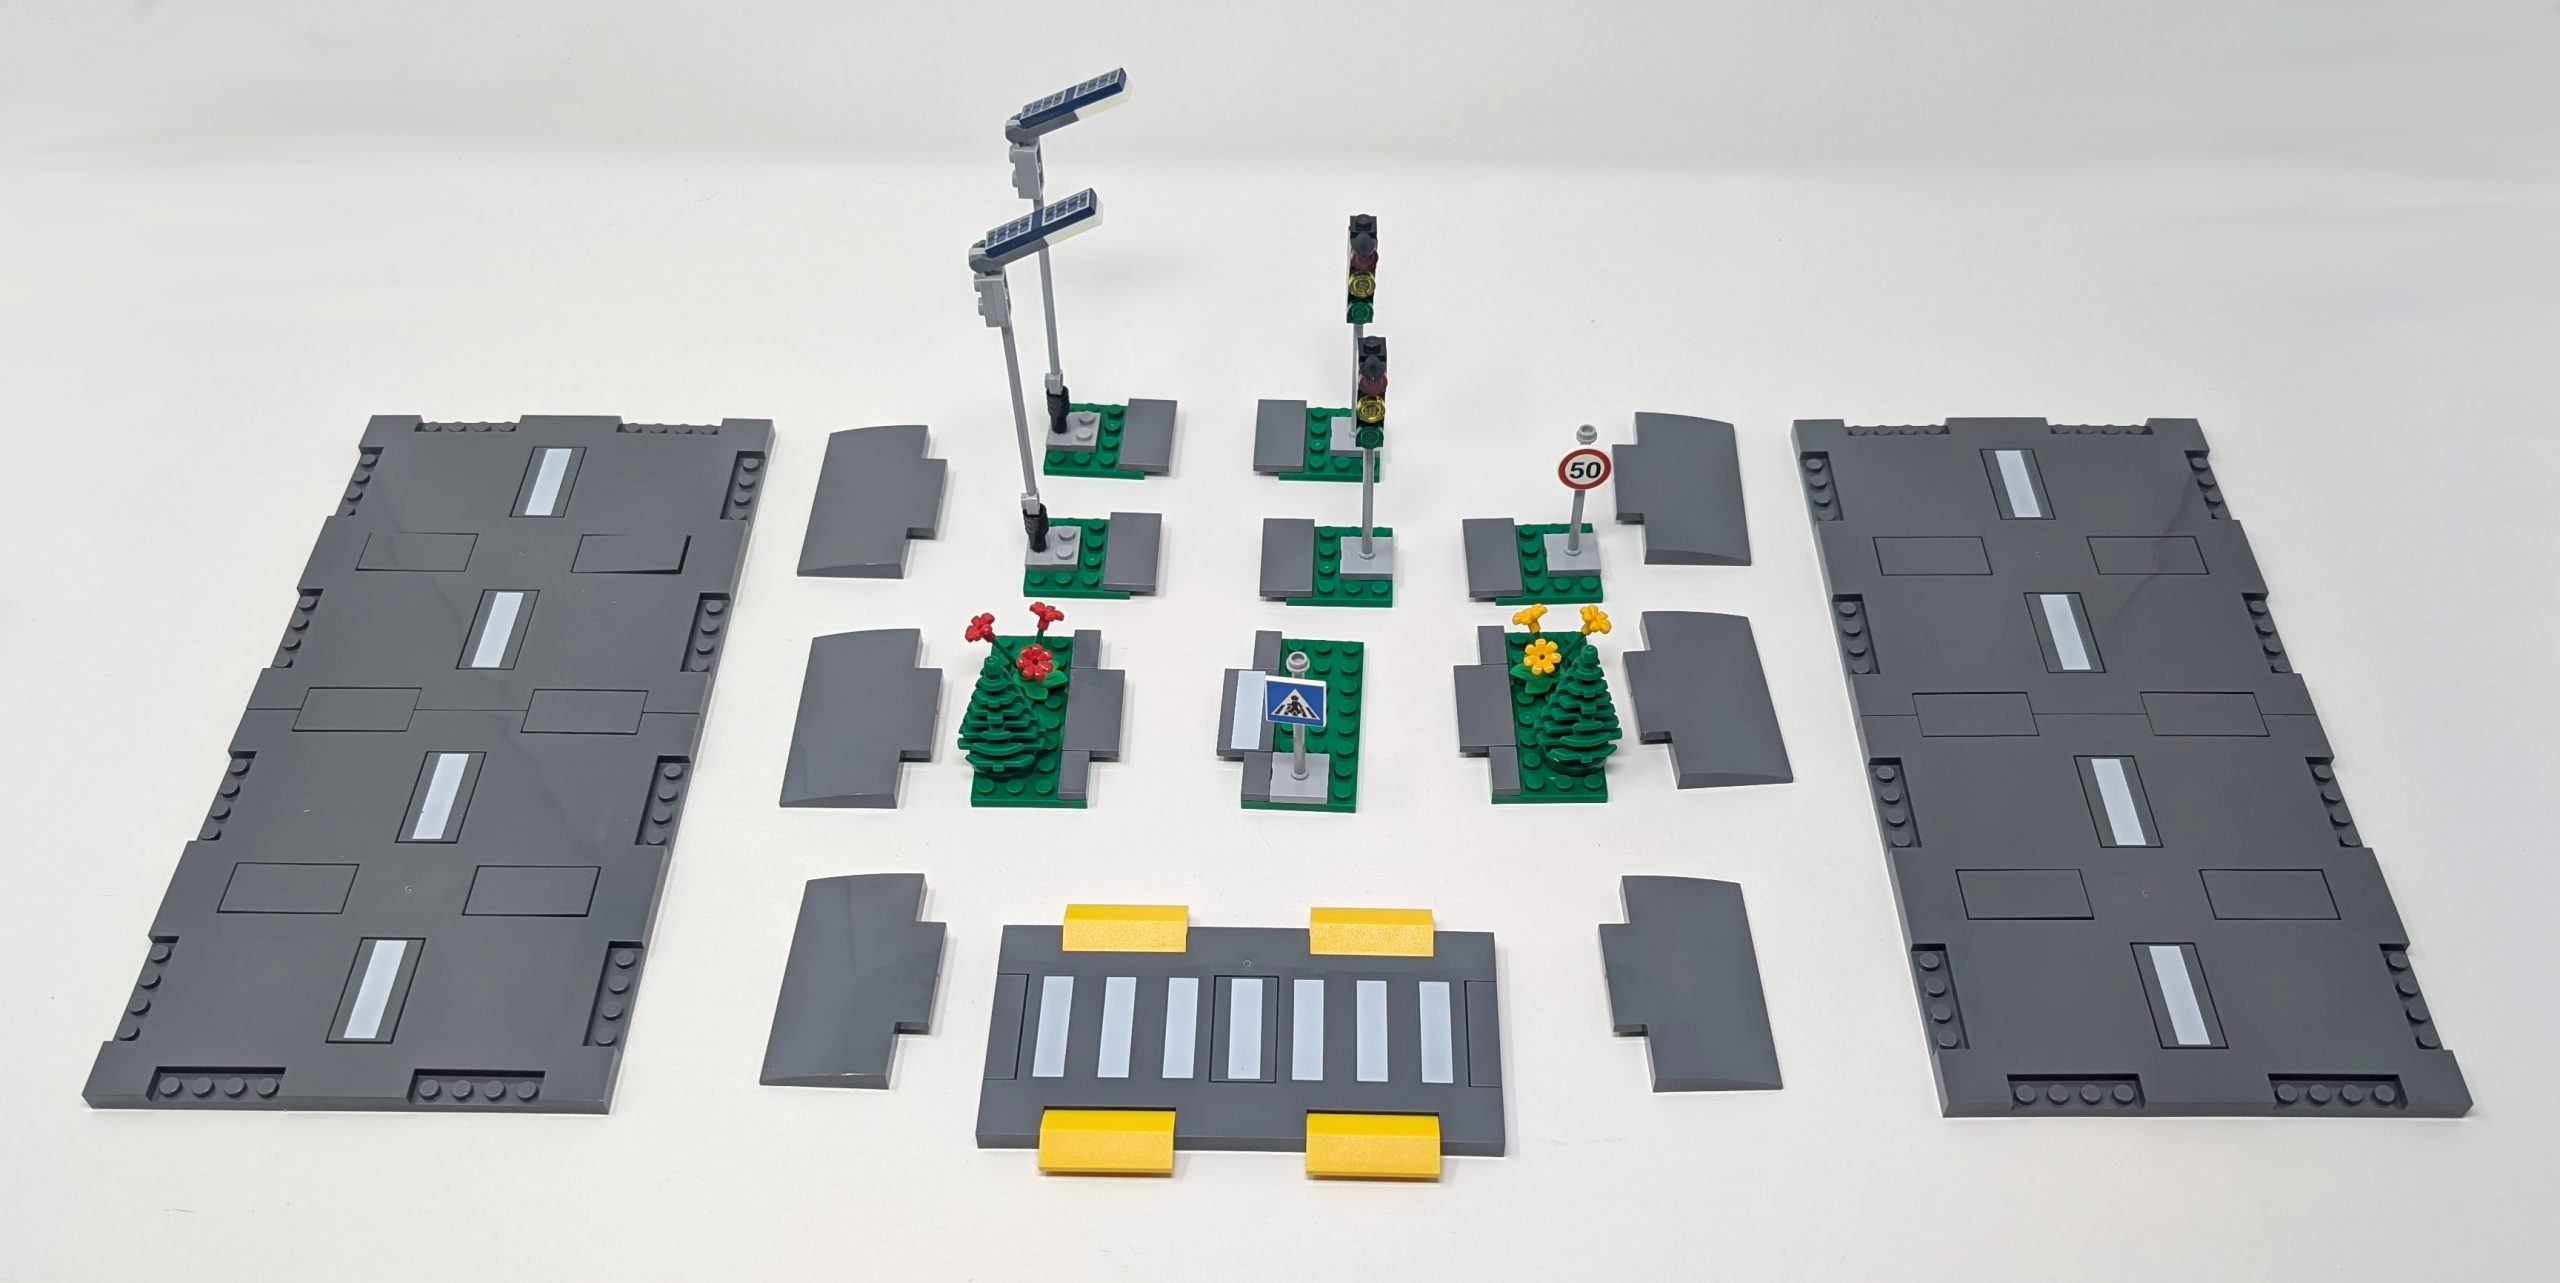
The modular nature of the roads allows you to easily add custom road details to your build.
As modular buildings traditionally sit on 32×32 baseplates the new road plates are a little too high being a brick tall and can look odd next to the flat sidewalk. To counteract this, the new road plates can be integrated using systems like MILS (Modular Integrated Landscaping System) or by building up the terrain to match the road plate height. This article will not dive deep into the MILS format but we highly recommend you check out this wonderful article on MILS by our friends at Brick Nerd who will cover this topic in great lengths!
By raising the modular structure to be a brick tall you can see the road align perfectly.
The great thing about the modular nature of the 60304: Road Plates makes it easier to expand or reconfigure city layouts without being locked into fixed baseplate design.
Final Thoughts
While there is no right or wrong way to build custom Modular buildings, by following a few simple rules and getting inspiration from the sets that already exist you can enhance your LEGO building experience by building many amazing Modular buildings. Almost every building based set can be converted into a Modular building, as is evident through 31153: Modern House and 42670: Heartlake City Apartments and Stores referenced in this article. I hope that by helping provide insight into how I built custom Modular buildings using these two sets as seed sets and highlighting the experience it encourages you to follow suit and build great Modular buildings as well. The hardest part is getting started so turning existing sets into Modular builds is an easy way to build you creative building muscle and get familiar with the foundations that can help you build great sets!
Great article. Planning to share it at our next LUG meeting with our members. Thanks!