
LEGO Brick Labels
The LEGO Brick Labels project has evolved!
I’ve added an option to download labels for more than 5000 unique parts to the online version of my LEGO Parts Guide. That’s more than double the number of parts in the ‘classic’ label collection found further down on this page.

Download a label for almost any part which you can print with a compatible Brother P-Touch Label Printer.
In the guide, more than 2500 parts have been meticulously organized into 12 easy-to-learn categories. Labels for many more parts can be found using the Most Common LEGO Parts page or by using the search box.
I’m also turning The LEGO Parts Guide into a printed book which should be available soon — It will be a perfect companion when organizing your own collection!
About the Labels
LEGO Brick Labels are carefully designed for Brother P-touch label printers, which I selected because the labels are printed on durable plastic tape with a strong adhesive. (You can move them to a different container as your storage system evolves.)
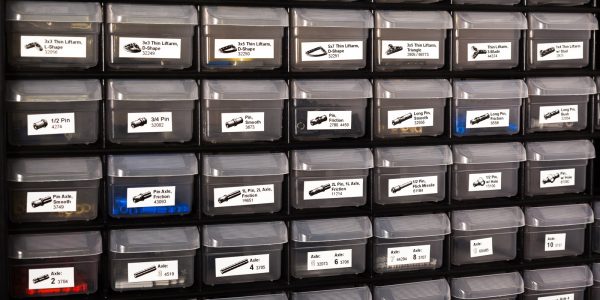
Labels make it easier to sort and find your LEGO bricks. (Labels shown on Akro-mils 64-drawer cabinet.)
The labels are designed to work with a wide range of storage solutions, including my favorite: The affordable 64-drawer cabinets by Akro-Mils. When printed on ½″ (12 mm) laminated tape, each label is less than 2″ (5 cm) wide.

Each label features a high-contrast image of the LEGO part.
Each label includes a picture, simplified part name, and the part number to help you find parts quickly! (Custom high-contrast images were created for each part to ensure they look great when printed.)
Download LEGO Brick Labels (Legacy Edition, 2023)
For the most up-to-date labels organized into improved categories, visit The LEGO Parts Guide.
Each part in the guide includes an option to print a label using a compatible Brother label printer. There are twice as many labels available in the guide, including brand new parts from sets released this year.
You can also download the ‘legacy’ version of my LEGO Brick Labels collection below — although it has not been updated since 2023!
It remains available because some people prefer the older categories or need an easy way to download 1800 unique labels in a single file.
Download LEGO Brick Labels – Version 40 (2023)
- Download Now: LEGO_BRICK_LABELS.zip
Download the ‘zip’ file if you already have a compatible Brother Label Printer. (You will need to install the ‘P-touch Editor’ application on your PC/Mac.) - Preview (PDF): LEGO_BRICK_LABELS-CONTACT_SHEET.pdf
Download the ‘PDF’ file to preview to the entire collection. You can also use my categories as a starting point for your LEGO organization project, or print a few labels on paper before investing in a label printer.
Further down on this page, you will find a list of compatible printers, and detailed instructions to help you print these labels.
Support LEGO Brick Labels
The easiest way to show your support is by sharing LEGO Brick Labels with other LEGO Artists! Please also consider using the referral links on this page when shopping at lego.com or amazon.com—it helps!
Become a Patron
You can also support LEGO Brick Labels by making a donation!
If you are able to make a donation to support LEGO Brick Labels project, please visit patreon.com to subscribe!
Current Patrons
Subscribe for even more labels!

Subscribe to the Brick Architect newsletter for early access to exclusive content, the latest articles, and updates to the Printable LEGO Brick Labels, LEGO Storage Guide, and my book The LEGO Architect.
Compatible Brother Label Printers
LEGO Brick Labels were designed to be printed on ½″ laminated label tape using a compatible Brother Label printer (such as the PT-D600.) The labels are waterproof, smudgeproof, durable, and they come in a variety of colors such as White, Black, Pink, Yellow, Lime Green, Clear, and even Gold.
Any Brother printer which connects to a PC/Mac using the Brother P-Touch Editor application and prints on ‘P-touch’ ½″ (12mm) labels will work. The multi-function PT-D600 seems to be the best value at this time.
NOTE: Brother does not provide printer drivers for Windows on ARM devices (including many of the excellent new Copilot+ PCs) — most Windows PCs from 2023 or earlier are not impacted by this issue… When asked (in April 2025), they responded that “I’m sorry, we do not have an ETA for the drivers availability.”
Recommended USB + Bluetooth Printers
The following printers are affordable and readily available. You will connect the printer to your PC/Mac (using USB or Bluetooth), then use the ‘P-touch Editor’ application to print the LEGO Brick Labels.
| Model | Features | Compatibility | Learn more |
|---|---|---|---|
| PT-D610BT | Standalone Model w/ Keyboard. Plug into PC/Mac (or connect via Bluetooth) to print LEGO Brick Labels, or design your own labels using the keyboard and small color screen. Compatible with labels up to 1″ (24 mm). Uses 6x AA Batteries or included Power Adapter. MSRP 150$ |
PC + Mac | PT-D610BT at Amazon |
| PT-D460BT | Standalone Model w/ Keyboard. Plug into PC/Mac (or connect via Bluetooth) to print LEGO Brick Labels, or design your own labels using the keyboard and tiny black-and-white screen. Compatible with labels up to 3/4″ (18 mm). Uses 6x AA Batteries or included Power Adapter. MSRP 90$ |
PC + Mac | PT-D460BT at Amazon |
| PT-P710BT (Cube Plus) | Wireless Model. Print LEGO Brick labels from PC/Mac using USB or Bluetooth, or design your own labels using Android or iOS. Compatible with labels up to 1″ (24 mm). Integrated Battery, Charge with USB. MSRP 115$ Note: The non-‘plus’ Cube model is not compatible because you can not connect it to your PC/Mac. |
PC + Mac | PT-P710BT (Cube Plus) at Amazon. |
Note: For best results when printing with the PT-P710BT (Cube Plus), I recommend the following settings: 1) Quality = Standard, 2) Graphics = Error Diffusion.
While text does look better when you select Quality = “High Resolution”, the part images are much lighter and harder to see for reasons I have been unable to diagnose so far. (Recommendation based on testing with a Windows 10 PC, and version 5.2.032 of the Brother P-touch Editor application.)
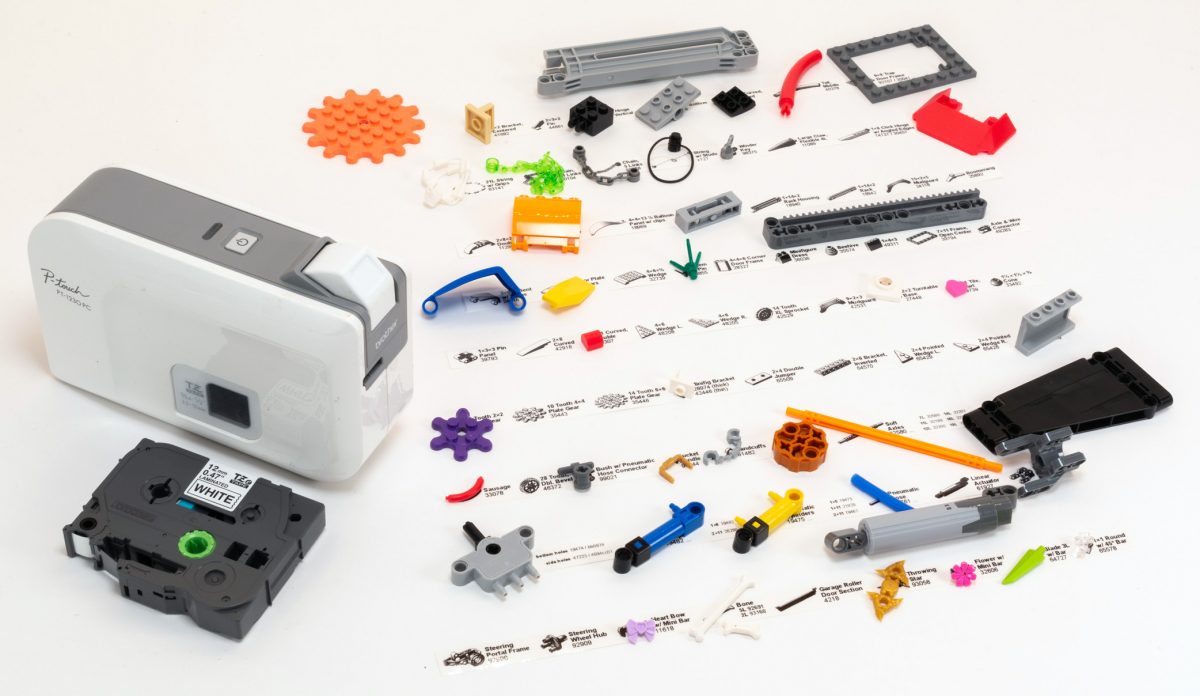
My Brother Label Printer alongside a few of the labels included in the collection.
Other Compatible Printers
The following printers are also compatible with LEGO Brick Labels using the P-touch Editor application. Most do not have Bluetooth support, and some do not work with a Mac.
Other current models:
- PT-D410 – A less expensive version of the PT-D460BT with an even smaller screen and no Bluetooth (USB only).
$70, PC/Mac, Up to 3/4″ (18 mm) labels. - PT-P910BT (Cube XP) – A larger (and more expensive) version of the Cube Plus.
$350, PC/Mac, Up to 1½″ (36 mm) labels. - PTE510 – Ruggedized printer for industrial applications.
$275, PC/Mac, Up to 1″ (24 mm) labels.
Retired models:
- PT-D600 – Earlier version of the D610, but without bluetooth connectivity.
$80, PC/Mac, Up to 1″ (24 mm) labels. - PT-P750W – More costly alternative to the PT-P710BT (Cube Plus).
$130, PC/Mac, Up to 1″ (24 mm) labels. - PT-P900W – Higher-resolution printer for commercial applications.
$430, PC/Mac, Up to 1½″ (36 mm) labels. - PT-P700 – Earliest version to support both PC & Mac.
$80, PC/Mac, Up to 1″ (24 mm) labels. - PT-D450 – Older model with integrated display & keyboard.
$80, PC/Mac, Up to ¾″ (18 mm) labels. - PT-1230PC – Low-cost option that’s no longer available.
$53, PC only, Up to ½″ (12 mm) labels. - PT-2430PC – Older version of PT-P700 without Mac support.
$80, PC only, Up to 1″ (24 mm) labels. - PTE500 – Ruggedized printer for industrial applications.
$270, PC/Mac, Up to 1″ (24 mm) labels.
How to Print LEGO Brick Labels
It’s easy to print LEGO Brick Labels on a compatible Brother Label Printer.
Step-by-step instructions:
- Confirm that you have a compatible label printer.
Only Brother label printers that connect to your Windows PC or Mac using USB or Bluetooth are compatible with these labels. (Some older models are not Mac compatible.) - Purchase several rolls of ½″ Brother Label Tape.
The labels are designed for ½″ label tape, which means that the labels will be ½″ tall and up to 2″ wide (1.2 cm × 5 cm). This size is perfect for common storage solutions like the 64-drawer cabinet by Akro-Mils. - Install Brother P-Touch Editor application.
It is available from the Brother website at brother.com/product/dev/label/editor/index.htm (There is a download link at the bottom of the page.) - Connect the printer to your computer.
In most cases you will use the included USB cable, although the PT-P710BT (Cube Plus) also supports Bluetooth. - Download LEGO Brick Labels.
You can find the latest version at brickarchitect.com/labels - Open .lbx files in Brother application.
After you install the “Brother P-Touch Editor” application, you should be able to simply click on label files (with .lbx file extension) and the labels should appear in the “Brother P-Touch Editor” application. - Print the labels you need.
If you want to print all of the labels from a single file, click “File” in upper left of application and press “Print…”. (If you want to print just one label, you may need to carefully select the image and text, copy it from that file, and “paste” it into a new file.)
FAQ
I’ve prepared this FAQ to cover the most common questions from fans of LEGO Brick Labels. (Please feel free to leave a comment on this page or send me an email if you have any additional questions!)
Q: Why are the labels cutting off after printing only 60% of each file?
Several Mac users have experienced a bug which prevents them from printing a complete 11 ¾″ strip of labels.
This issue was discovered with the ‘PT-D600’ printer on ‘Mac OS Mojave 10.14.6’ + ‘P-Touch Version 5.2.10’, and with ‘Mac OS Catalina 10.15.3’ + ‘P-Touch Version 5.2.9’. (Thanks to Gabriela who received the workaround from Brother customer support, and Lauren for helping diagnose this issue.)
Primary Workaround:
- Uninstall the current version.
- Go to support.brother.com
- Search for ‘QL 500’ (even though we have the PT-D600).
- Download and install the ‘P-touch Editor’. (It should be version 5.1.110, which is an older version than the one you uninstalled.)
- When prompted to enter a serial number for your device, enter “B2Z112233” (a serial number for the QL 500).
Alternate Workarounds:
- Use a Windows PC.
- Manually copy/paste the second half of each strip of labels into a new file.
Q: Can I use black labels with white text?
I had not tried this, but another reader confirmed that this works fine. For folks who want a darker look for their LEGO collection, the black label tape looks great!
You can also print LEGO Brick Labels on black label tape. (Photo: Shannon Peel)
Q: How did you get consistent images for each LEGO Part?
The images were created using custom LDraw scripts that optimize the viewing angle and enhance the contrast of each part. The scripts are proprietary and hard to use.
Workarounds:
- If the missing part is pretty common, ask me to include it in a future update!
- If you need to create additional labels, I recommend using images from BrickLink. They won’t look quite as good, but may meet your needs.
Q: How can I show my support for LEGO Brick Labels?
There are several ways you can help! Most of all, you can share a link to LEGO Brick Labels with your friends that have a large (or growing) LEGO Collection.
Other ways you can help:
- Please consider using our referral links when shopping on lego.com or amazon.com — It helps!
- If you want to make a donation to support LEGO Brick Labels, go to patreon.com/bricklabels and subscribe!
LEGO Brick Storage
There aren’t any “perfect” LEGO Storage solutions for all LEGO enthusiasts—the best solution for you will depend on dozens of factors such as the age of the primary LEGO builder, the size of your LEGO collection, how much space you have, and your budget.
Recognizing the importance of this topic to the LEGO community, I’ve written The LEGO Storage Guide, a free 8-chapter e-book which guides you through the process of understanding your LEGO collection, organizational strategies, and storage recommendations based on your needs. Most of the LEGO Storage products which work best with LEGO Brick Labels are featured in Chapter 5: LEGO Storage for Large Collections.
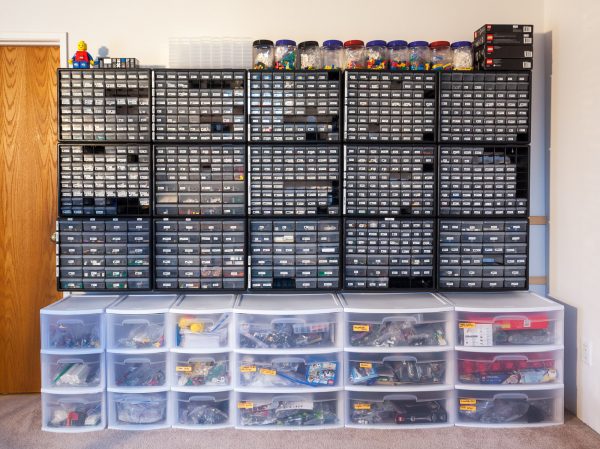
My storage solution consists of 15 Akro-mils cabinets. The Sterilite drawers beneath them are used for bulk storage, complete sets, and instruction manuals.
I have a “Large” collection, and have been very happy with the inexpensive plastic drawers manufactured by Akro-Mils. I prefer the cabinet with 64 smaller drawers—it’s perfect for sorting the majority of your collection by part. (When I have more parts than will fit in one of these smaller drawers, I store the extra parts in ziploc bags, which are stored in large plastic drawers or stackable bins.)
History of LEGO Brick Labels
LEGO Brick Labels began in April 2014, when I decided to organize all of the bricks included in 21050 Architecture Studio into two 44-drawer Akro-mils cabinets. The label collection grew throughout 2014, as I purchased additional LEGO bricks while writing my book, The LEGO Architect.
You can read the detailed version history to see which labels were added in each update.
Show your appreciation by sending a photo of your well-organized LEGO Storage!
Have questions/ideas to make LEGO Brick Labels even better—leave a comment below!
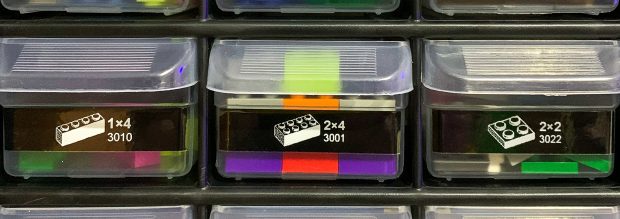
I have a question what about the labels in color. It only hows the type of brick what about the type of color of the brick?
Most people I have talked with use clear drawers, so the color of the bricks is obvious. I stuck with simple black-and-white images for simplicity and clarity.
You only show type of brick what about the color like 1×1 red, or 2×2 green brick, or do you just put all colors in like the 1×1 or 2×2 bin.
Super useful these labels, I am because of this everything again to sorting. I can find no labels of two components technic:
* Technic, Axle and Pin Connector Toggle Joint Smooth Item No: 44 Alternate Item No: 32126 (bricklink)
* Technic, Axle and Pin Connector Item No: 3651 (bricklink).
Are these not there?
Thanks Menno
We use the trofast storage, and I have taken your labels and made new ones with just the pictures grouped into categories so the kids can quickly find the bins with the parts. It has been so helpful, and they are bugging me to finish labeling the rest of the bins. Thanks for all your hard work!
This is an amazing contribution to the Lego world for fans of all ages. As a mom of two, I constantly step on Legos around my house, and this will be such a wonderful asset to our ever growing collection. I cannot thank you enough for your generosity… I imagine it was a tireless job!
Yes, it did take a lot of time, but it was spread out over several years. It’s about time for an update with some of the new 2018 parts!
I’m loving these labels, but have run into one problem. The first label in each batch is getting truncated on the left. In the P-touch editor there is a dotted line that shows the exact borders of the tape, and the first label is always just a little too far to the left. I’m running version 5.1.100 of the P-Touch editor on Windows 10. Is there a way to adjust the print area, or do I need to manually move the first element to the right for each set of labels?
Aside from the alignment issue, these are by far the best labels I have found. They work great in my ancient Brother PT-2610 printer.
I have not seen this issue, perhaps a greater margin is required for your printer as it is an older model.
Can you manually select all, and drag the label contents further to the right, then hit print?
Thanks for the quick reply and sorry for taking so long to post back. I was able to shift everything using “Select All” and then left-click on the first label to shift everything over. Previously I had been moving each label individually, which was tedious to say the least, still worth it for these great labels. One nice thing about the PT-2610 is it does not feed the extra inch of blank tape like the newer printers.
hello. i’m trying to print the labels with my pt700. it prints the images but does not print the text. any ideas what might be wrong?
I have never heard of this issue. make sure you have the latest version of the Brother p-touch software. Are you on a Mac or PC?
Is there any way to open the files with the part list if you don’t do it through the specific printer app?
To my knowledge, the label files can only be opened in the Brother P-Touch app.
I bought the PT-1230PC and it seems to be working great. but is there some setting I am just not seeing so it dont print out almost a inch of blank before it prints?
It always prints the extra inch of label – I don’t know why!
You made an incredible job!
The pictures on the labels. Can you give me an idea of how you format them to get them to look right. I’m needing a bunch of labels that you don’t have yet and I’m having trouble getting the pictures to look right. Especially when I’m printing white on clear.
There aren’t easy directions to make images which match the ones on my labels – I use custom scripts to make these images.
Thank you for these great resources Tom! I recently printed v.3 on a PT-P700! I got Filmax carts, and so far everything is amazingly easy!
Set “Chain printing/Auto cut” and it’s a snap. I think the labels used 3.5 cassettes! What an inspiration! Thank you!!!
Hi Tom. I’d like to rearrange the elements so they match the bricklink database. Do you have a link to the images you used?
Daniel,
The images are custom-created for the label collection, and I’m not sharing them for other purposes at this time.
Your best source for brick images is probably brickset.
hello Tom
Your Brick list is very nice and it´s super good for us who isn´t an expert in bricks, many many thanks
Was wondering what size paper you use for your printer/labels the 9mm or the 12mm and also what company do you use or where do you get the replacement rolls of paper? Additionally how many labels do you print per replacement roll? Thanks!
The labels are designed for the 12mm / 0.47″ TZe label tape – Brother P-touch printer system.
I don’t know for sure, but I expect you get about 300 labels per roll.
Have you considered or do you know if it’s possible to convert your labels for use with the DYMO label printers?
I’m sorry, but I don’t know how to convert the labels to the Dymo format., and it is way too much work to maintain more than one format.
Maybe you can borrow a Brother printer from someone, or find an used or inexpensive older model.
—tom
Hey Tom,
I don’t suppose there is anyway to purchase pre-printed sets of all these labels is there?
Excellent work by the way!!
It’s not practical to sell printed labels, as it would be more expensive to print and ship them to you then to purchase the printer and labels and do it yourself.
Good luck getting organized!
—tom
Hi there,
Do you by any chance have an old copy of the 1.2 version of the labels, which the history page says “includes most of the labels for a large general-purpose LEGO collection”? I’m just starting out organizing my kids’ bricks, and want to focus on just the basics to keep my sanity (hopefully). Thanks so much for this wonderful resource!!!
JT,
I do not offer the older versions because they have errors which I have since fixed. There have also been some new parts over the years which are common now but were not then.
My suggestion is to either:
1) Copy-paste just those specific labels you want into a blank strip in the P-touch app, then print them.
2) Print each strip that contains at least one label you need, and set aside the labels you don’t need for later. A good way to do this is to tape the unused labels to the printable PDF guide that’s also offered on my website. A tape with an easily removed adhesive like blue painter’s tape works best.
Good luck, and happy sorting!
—tom
Thank you for the labels! You just made my work a WHOLE lot easier! I’m trying to organize my 10 year old son’s large and growing collection.
We already bought your book! We’re fans of Lego and you!
Glad to hear that you’ve enjoyed organizing your collection using my labels, and thrilled to hear that you’ve enjoyed the book as well. Happy building!
Part request: minifigure walkie talkies (3962/19220)
Thanks for using my label collection and showing your support! To keep the label collection focused, I’ve decided to not include minifig accessories in the label collection. The exception are minifig accessories that are extremely useful in other non-minifig scenarios (ex: telescope.) That’s why I don’t think that the Walkie Talkie is something I will add anytime soon.
Hello, thank you for your work… I have a Mac and I am considering to buy Brother PT-P700 model for my Lego collection… Does the software (P-Touch Editor) works well on Mac? Is it possible to make my own labels with my own pictures to insert? Thank you… Marko
Marko, I do not have a Mac, but as far as I know the same Brother P-touch application that I use to design the labels on my PC is also available for the Mac. (I know that there are plenty of Mac users who have printed my labels to get organized.)
As for designing your own labels, please give it a try, but I assure you that it’s really time consuming to make nice looking labels. The hardest part are the small images – you want them to have sufficient contrast that they look good printed using a simple black-and-white printer.
Thanks for the support, and good luck!
—tom