LEGO Brick Labels
About the Labels
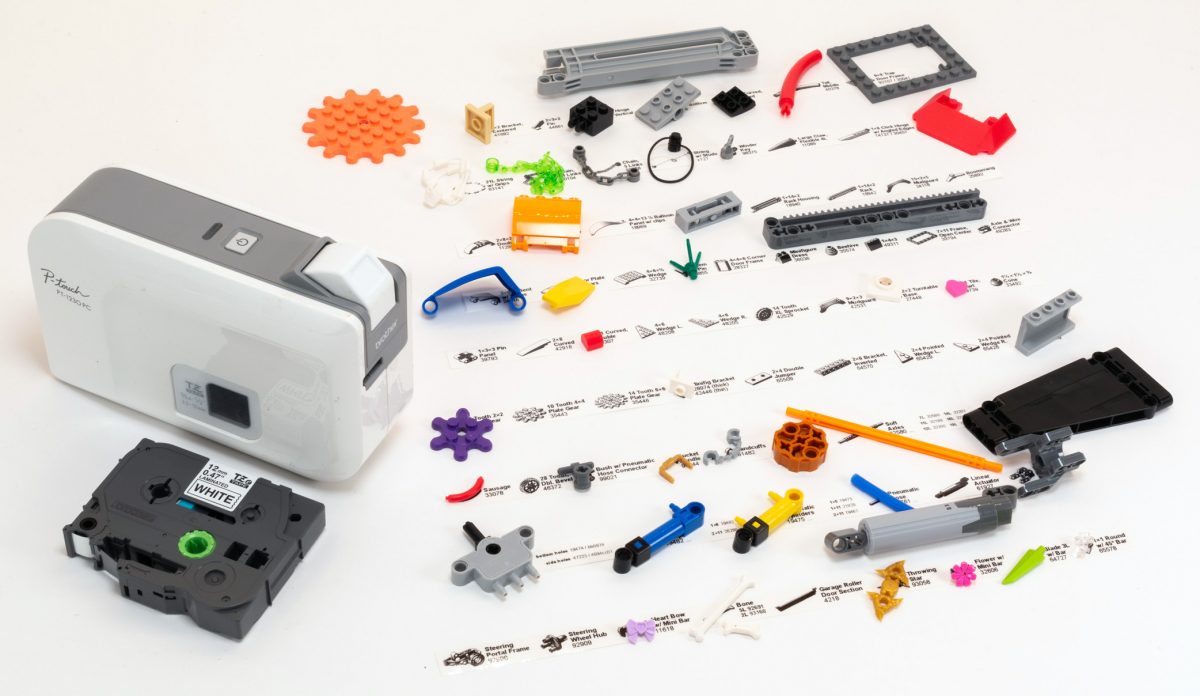
LEGO Brick Labels were carefully designed for Brother P-touch label printers, which I selected because the labels are printed on durable plastic tape with a strong adhesive. (You can move them to a different container as your storage system evolves.)
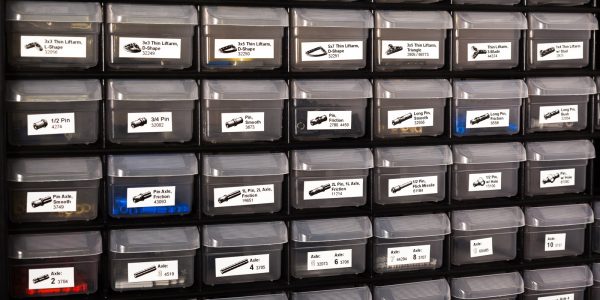
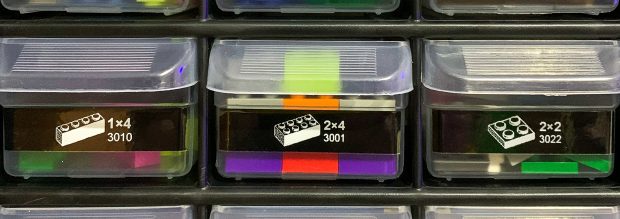
Labels make it easier to sort and find your LEGO bricks. (Labels shown on Akro-mils 64-drawer cabinet.)
The labels are designed to work with a wide range of storage solutions, including my favorite: The affordable 64-drawer cabinets by Akro-Mils. When printed on ½″ (12 mm) laminated tape, each label is less than 2″ (5 cm) wide.

Each label features a high-contrast image of the LEGO part.
Each label includes a picture, simplified part name, and the part number to help you find parts quickly! (Custom high-contrast images were created for each part to ensure they look great when printed.)
Download LEGO Brick Labels
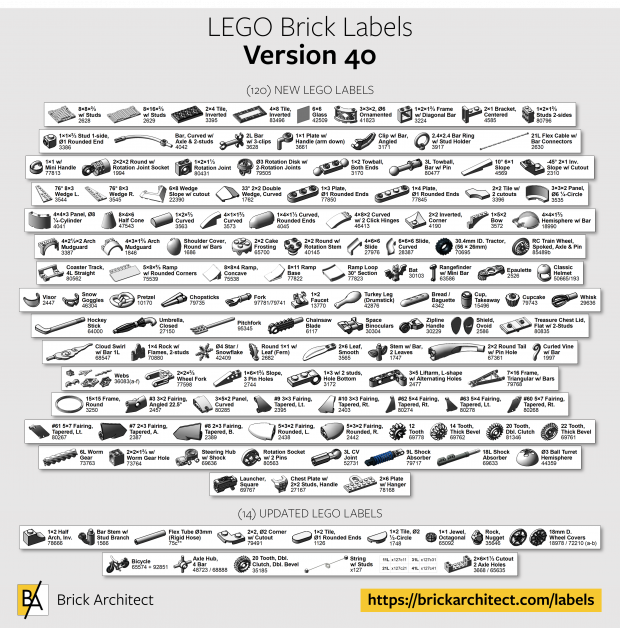
The collection has been organized into groups of related LEGO elements, like basic bricks, slopes, hinges, curves, Technic, and more. This makes it easier to quickly find the labels you need!
Download LEGO Brick Labels (Version 40)
- Download Now: LEGO_BRICK_LABELS.zip
Download the ‘zip’ file if you already have a compatible Brother Label Printer. (You will need to install the ‘P-touch Editor’ application on your PC/Mac.) - Preview (PDF): LEGO_BRICK_LABELS-CONTACT_SHEET.pdf
Download the ‘PDF’ file to preview to the entire collection, use my categories as a starting point for your LEGO organization project, or to print a few of the labels on paper (before investing in a label printer).
Further down on this page, you will find a list of compatible printers, and detailed instructions to help you print these labels.
Support LEGO Brick Labels
The easiest way to show your support is by sharing LEGO Brick Labels with other LEGO Artists! Please also consider using the referral links on this page when shopping at lego.com or amazon.com—it helps!
Become a Patron
You can also support LEGO Brick Labels by making a donation!
If you are able to make a donation to support LEGO Brick Labels project, please visit patreon.com to subscribe!
Current Patrons
Subscribe for even more labels!
Subscribe to the Brick Architect newsletter for early access to exclusive content, the latest articles, and updates to the Printable LEGO Brick Labels, LEGO Storage Guide, and my book The LEGO Architect.
Compatible Brother Label Printers
LEGO Brick Labels were designed to be printed on ½″ laminated label tape using a compatible Brother Label printer (such as the PT-D600.) The labels are waterproof, smudgeproof, durable, and they come in a variety of colors such as White, Black, Pink, Yellow, Lime Green, Clear, and even Gold.
Any Brother printer which connects to a PC/Mac using the Brother P-Touch Editor application and prints on ‘P-touch’ ½″ (12mm) labels will work. The multi-function PT-D600 seems to be the best value at this time.
Recommended Printers
The following printers are affordable and readily available. You will connect the printer to your PC/Mac (using USB or Bluetooth), then use the ‘P-touch Editor’ application to print the LEGO Brick Labels.
| Model | Features | Compatibility | Learn more |
|---|---|---|---|
| PT-D600 | Standalone Model w/ Keyboard. Plug into PC/Mac to print LEGO Brick Labels, or design your own labels using the keyboard and small screen. Compatible with labels up to 1″ (24 mm). Uses AA Batteries or included Power Adapter. MSRP 79.99$ |
PC + Mac | PT-D600 at Amazon |
| PT-P710BT (Cube Plus) | Wireless Model. Print LEGO Brick labels from PC/Mac using USB or Bluetooth, or design your own labels using Android or iOS. Compatible with labels up to 1″ (24 mm). Integrated Battery, Charge with USB. MSRP 99.99$ Note: The ‘Cube’ (not ‘Plus’) is not compatible because you can not connect it to your PC/Mac. |
PC + Mac | PT-P710BT (Cube Plus) at Amazon. |
Note: For best results, I recommend the following settings when printing with the PT-P710BT (Cube Plus): 1) Quality = Standard, 2) Graphics = Error Diffusion.
While text does look better when you select Quality = “High Resolution”, the part images are much lighter and harder to see for reasons I have been unable to diagnose so far. (Recommendation based on testing with a Windows 10 PC, and version 5.2.032 of the Brother P-touch Editor application.)
Other Compatible Printers
The following printers are also compatible with LEGO Brick Labels using the P-touch Editor application.
Other current models:
- PT-P750W – More costly alternative to the PT-P710BT (Cube Plus).
$129.99, PC/Mac, Up to 1″ (24 mm) labels. - PT-P900W – Higher-resolution printer for commercial applications.
$429.99, PC/Mac, Up to 1½″ (36 mm) labels. - PTE500 – Ruggedized printer for industrial applications.
$269.99, PC/Mac, Up to 1″ (24 mm) labels.
Retired models:
- PT-P700 – Earliest version to support both PC & Mac.
$79.99, PC/Mac, Up to 1″ (24 mm) labels. - PT-D450 – Older model with integrated display & keyboard.
$79.99, PC/Mac, Up to ¾″ (18 mm) labels. - PT-1230PC – Low-cost option that’s no longer available.
$52.99, PC only, Up to ½″ (12 mm) labels. - PT-2430PC – Older version of PT-P700 without Mac support.
$79.99, PC Only, Up to 1″ (24 mm) labels.
How to Print LEGO Brick Labels
It’s easy to print LEGO Brick Labels on a compatible Brother Label Printer.
Step-by-step instructions:
- Confirm that you have a compatible label printer.
Only Brother label printers that connect to your Windows PC or Mac using USB or Bluetooth are compatible with these labels. (Some older models are not Mac compatible.) - Purchase several rolls of ½″ Brother Label Tape.
The labels are designed for ½″ label tape, which means that the labels will be ½″ tall and up to 2″ wide (1.2 cm × 5 cm). This size is perfect for common storage solutions like the 64-drawer cabinet by Akro-Mils. - Install Brother P-Touch Editor application.
It is available from the Brother website at brother.com/product/dev/label/editor/index.htm (There is a download link at the bottom of the page.) - Connect the printer to your computer.
In most cases you will use the included USB cable, although the PT-P710BT (Cube Plus) also supports Bluetooth. - Download LEGO Brick Labels.
You can find the latest version at brickarchitect.com/labels - Open .lbx files in Brother application.
After you install the “Brother P-Touch Editor” application, you should be able to simply click on label files (with .lbx file extension) and the labels should appear in the “Brother P-Touch Editor” application. - Print the labels you need.
If you want to print all of the labels from a single file, click “File” in upper left of application and press “Print…”. (If you want to print just one label, you may need to carefully select the image and text, copy it from that file, and “paste” it into a new file.)
FAQ
I’ve prepared this FAQ to cover the most common questions from fans of LEGO Brick Labels. (Please feel free to leave a comment on this page or send me an email if you have any additional questions!)
Q: Why are the labels cutting off after printing only 60% of each file?
April 3, 2020: Several Mac users have experienced a bug which prevents them from printing a complete 11 ¾″ strip of labels.
This issue was discovered with the ‘PT-D600’ printer on ‘Mac OS Mojave 10.14.6’ + ‘P-Touch Version 5.2.10’, and with ‘Mac OS Catalina 10.15.3’ + ‘P-Touch Version 5.2.9’. (Thanks to Gabriela who received the workaround from Brother customer support, and Lauren for helping diagnose this issue.)
Primary Workaround:
- Uninstall the current version.
- Go to support.brother.com
- Search for ‘QL 500’ (even though we have the PT-D600).
- Download and install the ‘P-touch Editor’. (It should be version 5.1.110, which is an older version than the one you uninstalled.)
- When prompted to enter a serial number for your device, enter “B2Z112233” (a serial number for the QL 500).
Alternate Workarounds:
- Use a Windows PC.
- Manually copy/paste the second half of each strip of labels into a new file.
Q: Why isn’t ______ included in the LEGO Brick Labels collection?
Since many people print every label in the collection, I don’t want to include uncommon parts which few people own. It also takes a lot of time to create each label, so I focus on the most common and versatile parts.
When a very useful new part is included in many new sets, I’ll create a label as soon as possible. For a less common part, I wait a few years to see if it gains widespread adoption before adding it to the collection. (Many less common parts are retired after just a few years.)
I’ve also ensured that the top 600 most common parts from the last 5 years are included in the collection. (The only exception are weapons, because they are already covered by generic labels for Guns, Swords, etc…)
Q: Can I use black labels with white text?
I had not tried this, but another reader confirmed that this works fine. For folks who want a darker look for their LEGO collection, the black label tape looks great!
Q: How did you get consistent images for each LEGO Part?
The images were created using custom LDraw scripts that optimize the viewing angle and enhance the contrast of each part. The scripts are proprietary and hard to use.
Workarounds:
- If the missing part is pretty common, ask me to include it in a future update!
- If you need to create additional labels, I recommend using images from BrickLink. They won’t look quite as good, but may meet your needs.
Q: How can I show my support for LEGO Brick Labels?
There are several ways you can help! Most of all, you can share a link to LEGO Brick Labels with your friends that have a large (or growing) LEGO Collection.
Other ways you can help:
- Please consider using our referral links when shopping on lego.com or amazon.com — It helps!
- If you want to make a donation to support LEGO Brick Labels, go to patreon.com/bricklabels and subscribe!
LEGO Brick Storage
There aren’t any “perfect” LEGO Storage solutions for all LEGO enthusiasts—the best solution for you will depend on dozens of factors such as the age of the primary LEGO builder, the size of your LEGO collection, how much space you have, and your budget.
History of LEGO Brick Labels
LEGO Brick Labels began in April 2014, when I decided to organize all of the bricks included in 21050 Architecture Studio into two 44-drawer Akro-mils cabinets. The label collection grew throughout 2014, as I purchased additional LEGO bricks while writing my book, The LEGO Architect.
You can read the detailed version history to see which labels were added in each update.
Show your appreciation by sending a photo of your well-organized LEGO Storage!
Have questions/ideas to make LEGO Brick Labels even better—leave a comment below!

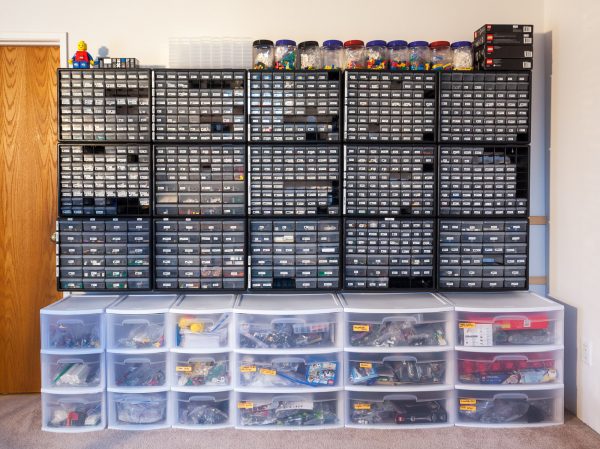
Hi Tom, WOW! Love, love, love your labels!!!!
We are in the process of sorting out the 9yo’s lego collections/pieces. Over this past holiday break, I handled and looked at over 10,000 pieces, probably more.
I was wondering if there’s a way to make the labels to print on the Avery return address labels (it’s just the perfect size!). At $11 for 800 labels, I think it’s much more economical for anyone who can’t invest on the brother label printer. Just a thought 🙂
Thank you!
I do not have the time to re-create all 1000+ labels at multiple sizes. I also very deliberately picked the brother system as the plastic labels have a very strong adhesive, but you can easily remove them if you decide to store something different in each compartment/drawer. The paper avery-style labels are a nightmare to remove, since the paper falls apart if you try to peel them off.
Yes, the Brother system is more expensive, but I think it is enough better to be worth it…
Hey Tom! Such a massive amount of work you put in this! I got a really stupid question. But don’t want to reinvent the wheel. Is there a pattern you use to organize your legos? Models numbering vs technic separately, arch separately, etc? Or something like – hinges here, slopes there etc?
I organize my parts into the same categories which appear as folders in the downloadable label collection. Yes, the categories are by function; slopes, bricks, hinges, Technic, etc…
How do you create the .bmp files for new elements. I have been successful in converting the labels over to Dymo format and want to expand the technic section.
Tim, I’m glad to hear you were able to print the labels on a Dymo printer. The .bmp files are created with a set of custom scripts. Which parts were you hoping to add to the technic collection?
Hi Tom, can you tell me how to convert labels over to Dymo format?
I’m afraid that the labels are not available in the Dymo format.
The Brother format is proprietary, so I’m not aware of an easy way to convert them. Unfortunately, it is far too time consuming to offer the labels in multiple formats.
do you have a zipfile for other printers like dymo 450 serie
No, The labels are only offered for Brother printers. It is too time consuming to maintain more than one collection of labels.
Hi Tom, Incredible job. These labels are amazing! Quick question . . . is there a way in editor to add a cut line in between each of the individual labels? I’m currently printing each file as a long string of labels and then having to cut them individually. I’m a bit OCD about it being perfect and don’t have a strimmer so wondered if there was a way I can get the Brother PT-P700 (I used your Amazon links! :)) machine to do it?
You can add cut lines within the “Brother P-touch editor” app. The Line insertion tool supports very thin lines, and you can make it into a dotted line if you like.
I did not put cut lines in the official label collection, as the cut line would be visible after cutting the labels. I prefer to do my best and cut in the middle of the space between two labels.
—tom
i have multiple types of pieces in my sorting drawer thingy. should i try to stick multiple lables on one drawer or do you have lables with multiple pieces on it?
Rigmundis,
I do not put more than one part in very many drawers, but when I do, I usually just put two stickers on the drawer.
It is not hard to design a custom label with two images in the Brother p-touch software, so you can always try!
—tom
Thanks for doing this! Can I ask how you got the icons? I have a lot of older pieces that aren’t being used anymore (like the old hinge clips). How do you do the icons? I found some 3d rendering on bricklink but wanted to see if I could get them looking like your labels and didn’t know if you just had a photoshop filter or export for them
I created the images using custom scripts which optimize the brightness and contrast for printing on this label printer system. The scripts are not easy to use and only work on my PC, so there is no easy way to create custom labels that match mine perfectly. Your best bet is to find pictures from BrickLink or similar.
For older parts you can use http://www.peeron.com, just use the original part number in the bottom of the brick. I did, and my wall is so much similar to Tom’s. But i made it some years ago. But, Tom Alphin i love what you did. Just discovered it last week. And i am going to use them , for my newer bricks. You should think that in the country that created LEGO, that we had such things. But no. 🙁
Oh thank you! I didn’t know peeron.com existed, but what a great resource!! To that end, I find that after collecting Legos for most of my childhood and into adulthood, I too have quite a few elements which Tom hasn’t included. No bother – but I was wondering if we might start branching Tom’s “parts list” as new elements are added and old ones are discontinued. May be tough to do since I don’t know if Lego publishes anything official to that end, but could be helpful when scrounging Ebay vs. Lego.com for replacements to broken pieces, old/yellowed pieces, etc.
Tom,
I bought a Brother Pt-P700 Label machine and downloaded the labels but can not print with my label machine? The files downloaded from this site have file extension .lbt not .lbx? Do you have any idea what to do for a fix? Any help would be greatly accepted!
Gary
Gary, the .zip file should include many folders containing .lbx files which can be opened in the “Brother P-Touch” software, which you can download from the Brother website.
Hello Tom,
Your labels are really helpful to organize my parts.
My questions: where did you get pictures about parts? Did you create them to yourself? (I would like to create similar labels for all released parts)
Thanks,
Kezany
Kezany,
I created the images using custom scripts which optimize the contrast for printing on these label printers. The scripts are not easy to use and only work on my PC, so there is no easy way to create custom labels that match mine perfectly, besides encouraging me to add some of your most desired labels to the collection in the future.
—tom
Thank you so much for all your work on this, i didnt buy a label printer yet but did a trial run with the PDFs and tape to organize first. I just hit the end and was trying to figure out what to do with all the drawers i have left over and came to see if there were any new labels yet.
https://i.redd.it/quble02skr221.jpg
“besides encouraging me to add some of your most desired labels to the collection in the future”
In that case… finger hinges and cockpit pieces would be much appreciated! Aquanauts parts too, but i understand those arent very common.
Sarah, I’m in the same boat with my 6 yo! SOOOOO Many sets! Good luck, Momma! I’m starting the sort process today…I might not make it out. Send coffee!
Hello,
I bought the brother So that i print all these great labels.. but I think some technic pieces could be missing. I am disassembling the Bucket-Wheel-Excavator(42055)and do not find back e.g. the buckets
Sandra, you are correct! At this point, the collection includes almost every “common” part that’s currently in production. I talked about this a little in the latest “version 3.1 update” release notes…
The buckets in the Excavator are an extremely uncommon part, having come in only a few sets. Most of the people I know who use the Brick Labels collection will maintain an “other” box/drawer for less common parts in each category.
That said, the collection grows about twice a year to include new labels. I’m always trying to add the latest new and interesting parts, as well as parts which cross the “common” threshhold – earning a place in the label collection!
Sincerely,
—tom
Some questions about your groupings with the labels: why are windscreens, 1×3 doors, and steering wheels not with vehicle parts?
Why not separate out Technic pieces using pins from ones using axels?
Also, what about printed pieces? Surely watermelon slices belong with food for example.
Thanks, eager to hear your reasonings. Love the guide and your book.
Stephanie,
You are absolutely right that the categories and sub-categories can never be perfect. Because each part is sorted into exactly one place in the hierarchy, something like a windscreen can not be both in the “vehicle parts” and “slope” sections at the same time. Likewise, a lot of Technic parts would need to appear in both the Axle and Pin categories.
That’s why I’ve had to prioritize these many attributes, and attempt to put each part in the place which captures it’s essence best. I have chosen to err on the side of organizing my shape and connection type, instead of sorting by it’s traditional purpose.
Why prioritize shape/connection over purpose? That’s easy—I value creative LEGO parts usage tremendously! Using vehicle parts as an example: I’ve placed “4×2.5×2 Mudguard (part 50745)” under the Curved category, because it’s literal shape is curved. While it’ may most frequently be used as a wheel wheel for a car or truck, it also looks great as an arched covering for a window in the Modular Building Series.
Examples of creative parts usage are all over the internet, and increasingly common in official sets too. I’m simply trying to do my part to encourage this by sorting the LEGO Brick Labels collection by shape or connection type over expected function whenever possible.
I hope this helps clarify my approach, and feel free to reply with further questions.
Sincerely,
—tom
P.S. I don’t include printed parts in the LEGO Brick Labels collection. One clever trick I’ve seen is to attach your printed parts to a large baseplate so you can see them all at once.
P.S.S. I should be honest, not every part is in the most logically perfect place in the collection… When I add a few labels to the collection, I quickly select a reasonable place to add the new label. Sometimes it is not logically ideal, and from time to time I will re-organize parts of the collection to make more sense.
Hello,
great job.. I have a DYMO labelwriter DYMO 320 … is there anyway how i could use your labeling files?
Sandra
I’m sorry, but I am not aware of a way to translate the labels from the brother format to the Dymo format—trust me, if there was an easy way, I would have done it already!
By far the easiest solution is to buy (or borrow) a compatible Brother printer. Everyone I’ve talked to has been happy with the results.
Good luck,
—tom
Hy Sandra,
Just download Brother’s software, open Tom’s labels and then simply copy/paste to DYMO Label editor.
I’m doing the same 😉
Regards,
Kezany
Kezany,
Did it work? I’ve not yet bought a label maker. The other application I want it for, the Dymo is better. Dymo Tech Support said that Copy/Paste may not work. I cannot test without owning a label maker as their PC software will not load unless a printer is attached.
Thanks for the beautiful labels! I have just begun the task of organizing my son’s LEGOs. I have only been able to print off the basic brick labels. Is there a way to get the rest (Technic, etc.). I have subscribed, but I can’t seem to figure out how to print the labels that are shown in the history. Thanks again!!
This site is a lifesaver!!
Lisa,
When you “download” the latest version of the labels, you get a .zip file which contains several folder filled with files in the .lbx format. Each file represents one strip containing between one at 10 labels, and the labels are organized into logical groups. One of the groups is filled with over a hundred Technic labels. The “contact sheet” file is a PDF which helps you know which label is in which file.
Good luck!
—tom
This is amazing. I am searching for storage ideas for my 6 yo son’s massive collection. He loves to build the set but then LOVES to take them apart and create his own creations more! We have so many buckets of legos that it’s becoming obscene so I’m tackling storing them.
Thank you so much for all your hardworking of creating the labels and giving such precise details about the label maker, etc. Help me out a lot!
This is going to take a while.
Hello Mr Alphin. I love Legos and have many more than I should. I was excited to see your printable labels for easier identification of drawers but can they just be printed on paper? I do it have a label maker and do have the time to cut and tape them. I did discover that I have a Lego book with your name on it. I enjoy looking through and look forward to being organized to build.
Thank you,
Vickie
Vickie, it is possible to print the contact sheet, but the labels will be pretty small and it is time consuming to cut them out and tape them to the drawers. The label printer results in higher quality, glossy, waterproof labels which look great, and they are less time consuming to cut and apply.
Good luck either way, and glad to hear you enjoy the book too!
Sincerely,
—tom
You can print the PDFs at 200% on 11×17 paper and theyll be the correct half inch height, then they can be cut out and attached with 3/4″ clear tape. I will be buying a label printer to make everything look nice now that its all organized, but paper and tape were good enough for a trial run. I wouldnt want to do it without a paper cutter though instead of just scissors.
Thanks for all the hard work you must have done, really useful for my family’s collection.
RE step 7, I’m having trouble cutting and pasting from tab to tab within P-Touch Editor. Is there something I’m doing wrong? I can cut & paste within the same tab/window, but as soon as I leave go to the other tab the paste option is disabled. Ideas?
Mac OS 10.13.4, Editor 5.1.109
Thanks,
Guy
Guy, I’m glad you love the labels! I apologize that I can’t help with your copy/paste issue as I am not a Mac user. (It *should* just work.)
Hi tom…
Thanks for these labels, you did an amazing job with them. Im starting to sort and organize my collection and ill be putting them in some flat file drawers and these labels will help keep everything nice and tidy. But i do have a question im hoping you could help me out with…
Can these labels be stored on the label maker itself or are they primarily printed from the computer?
It is possible that you can store the labels on a higher-end version of the label printer which includes a screen, but this is definitely not possible with most of the compatible printers.
The label you made are just great. I use reallyusefulboxes.com for all my storage. They are perfect. I had labels on them, but not with a picture. So it is much easier for me to find items now. We need more of the older ones. :):)
Thank you again
Congratulations for this great job!
I have observed a possible couple of errors in the TECHNIC-plate section:
– Parts 32529 and 32530 already appear in TECNIC-connector
– Part 98285 I think I should put Bottom instead of Top
Thank you
regards
Daniel
Daniel,
Thanks you for the kind words. I will look into these possible errors for the next update.