
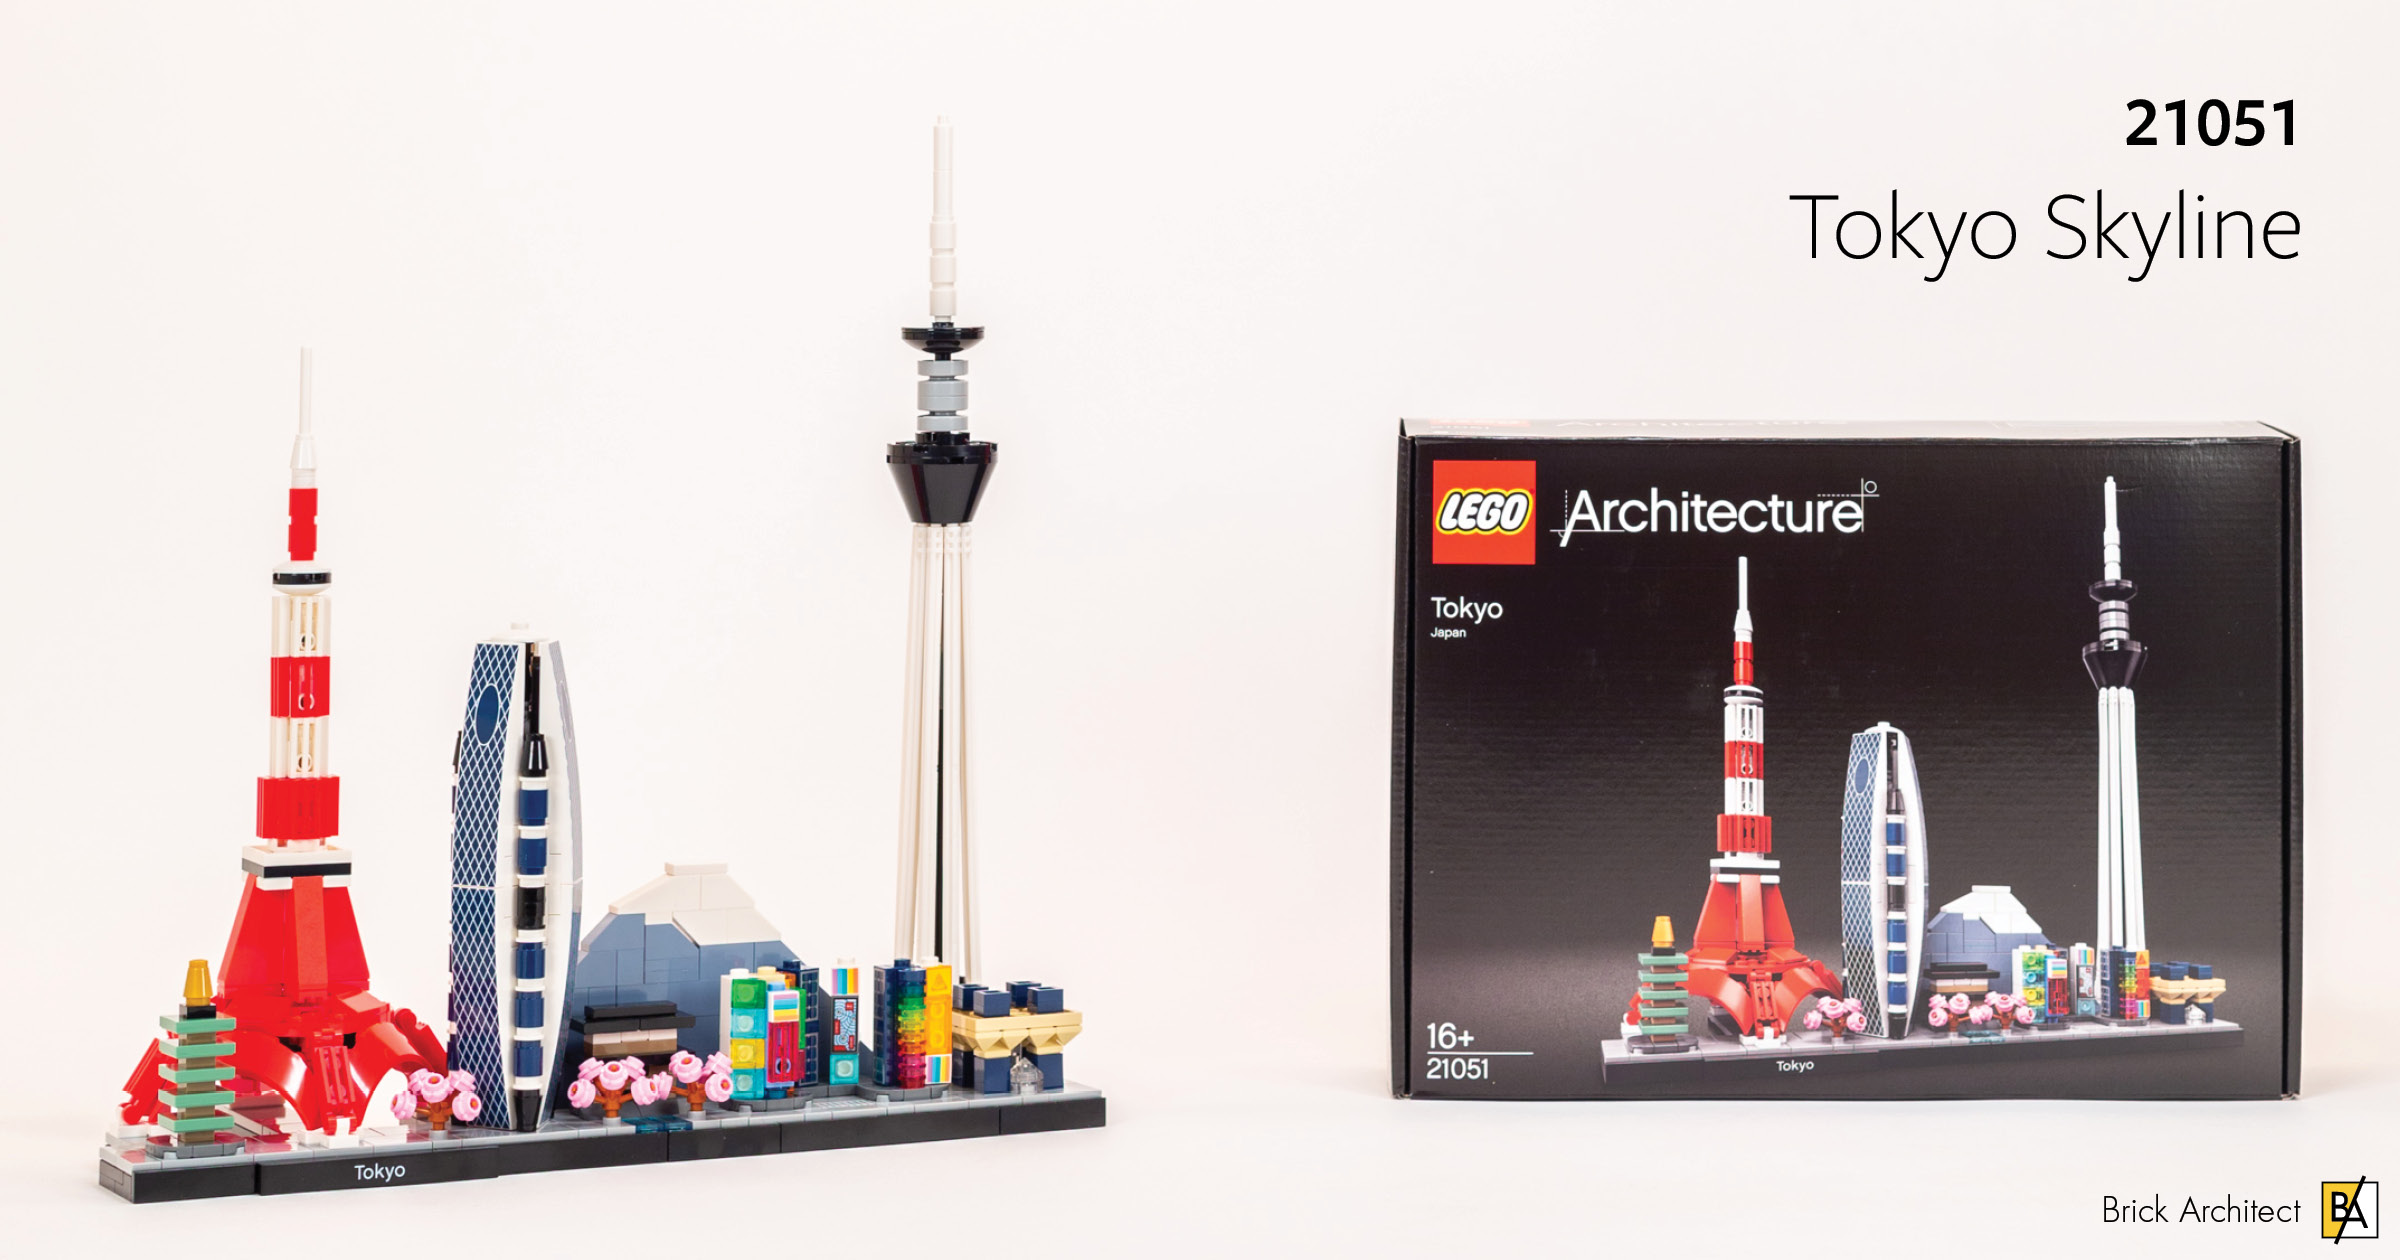
Review: #21051 Tokyo Skyline
This brightly colored addition to the LEGO Architecture Skyline set is jam packed and includes a lot of printed parts, but how does it compare to other sets in the series?
About the set
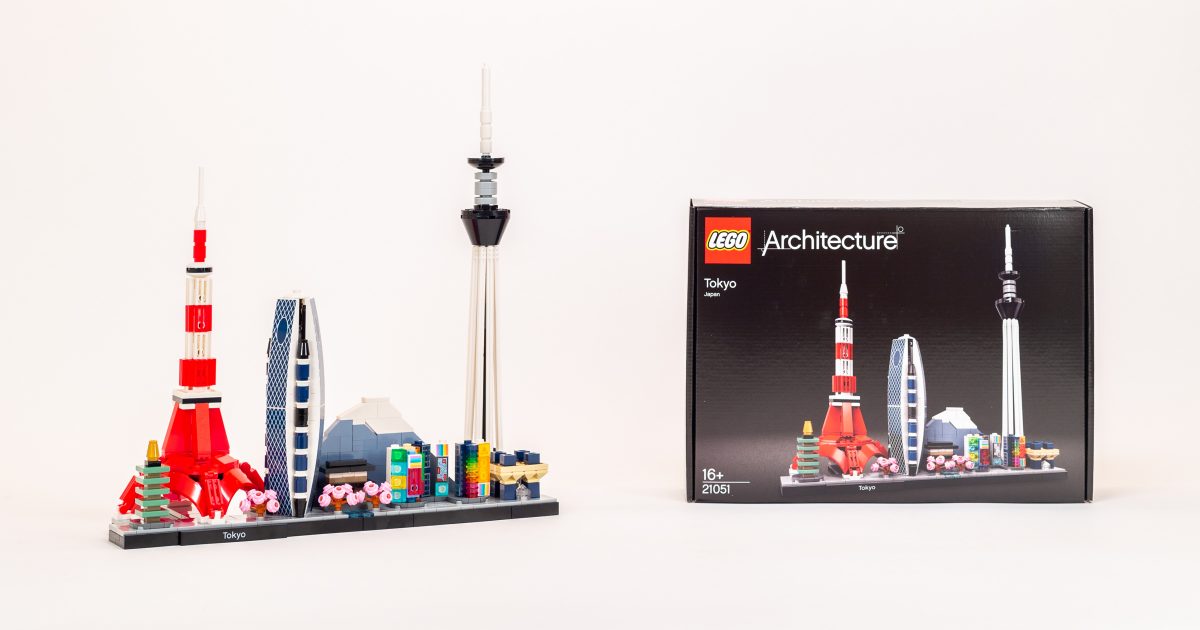
#21051 Tokyo Skyline costs $59.99 (£54.99, €59.99) for 547 pieces. Brick Architect is thrilled to offer this early look at the latest addition to the LEGO Architecture series!
#21051 Tokyo Skyline
As reported in my earlier preview of the Dubai & Tokyo Skylines, my initial impression of the Tokyo model was largely positive. Despite never having visited Tokyo, I was immediately drawn to the bright colors and the staggered composition. It feels a bit cramped but is filled with energy, matching my stereotype of how the city looks in the media. The model includes eight distinct landmarks, more than any other set in the series except last year’s #21043 San Francisco Skyline.
When I looked a little closer, my impression became mixed. I was displeased by last year’s re-creation of the Eiffel Tower in #21044 Paris Skyline, and unfortunately the Tokyo Tower is designed in much the same way. (The similar building techniques has one advantage–the Tokyo and Paris skylines will look great when displayed next to one another.)
On the positive side, I also noticed a lot of intriguing printed parts featured this set (especially for the Mode Gakuen Cocoon Tower), which I look forward to discovering in more detail as we get into the review. Lastly, I was pleased to see some advanced building techniques, especially for the Tokyo Big Sight exhibition center.
Build process
This set is assembled across two stages. The first stage uses one large bag (with code 641H9), and one small bag (no visible number). They include parts to assemble the base, a small temple on the left, and the Tokyo Tower.
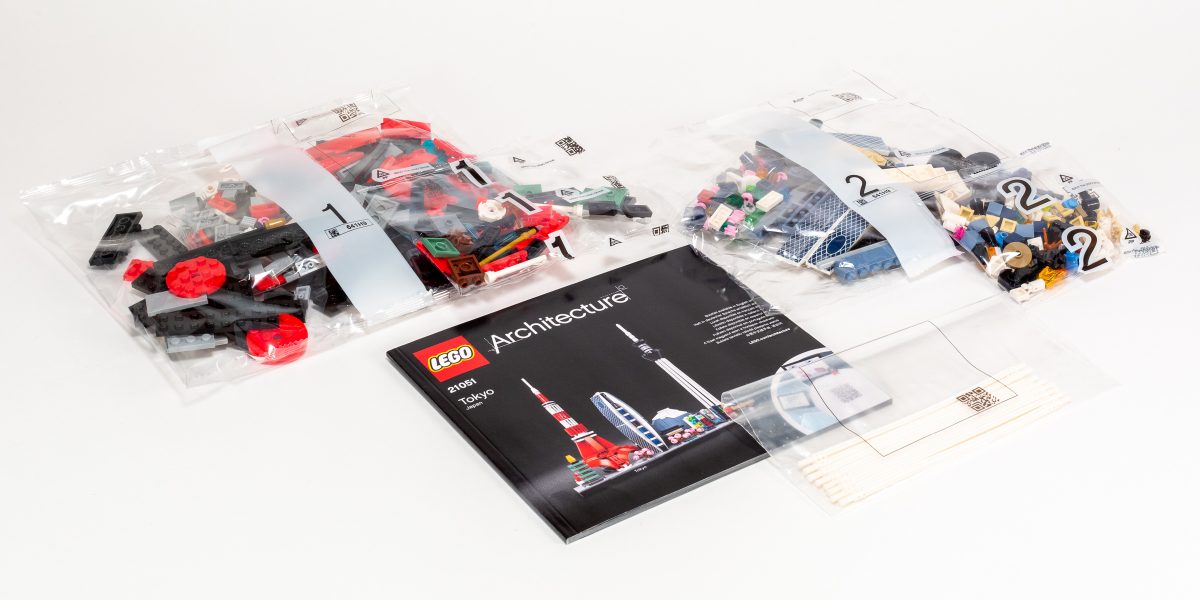
Contents of #21051 Tokyo Skyline.
The second stage uses a large bag (also with code 641H9), a small numbered bag, and an unnumbered bag containing eight soft axle 19L (part 32235) in 1White.
Bag 1
In the first bag, we build the base, followed by the Tokyo Tower, and a small temple on the far left side.
Base
The base is typical of sets in the Skyline series, with a width of 34 studs and a depth ranging from 4 studs on the right and left side, to 12 studs deep to support the Tokyo Tower. This is deeper than most sets in the series, but not unheard of. (The similar #21044 Paris Skyline is 36×13 studs—two studs wider and one stud deeper.)
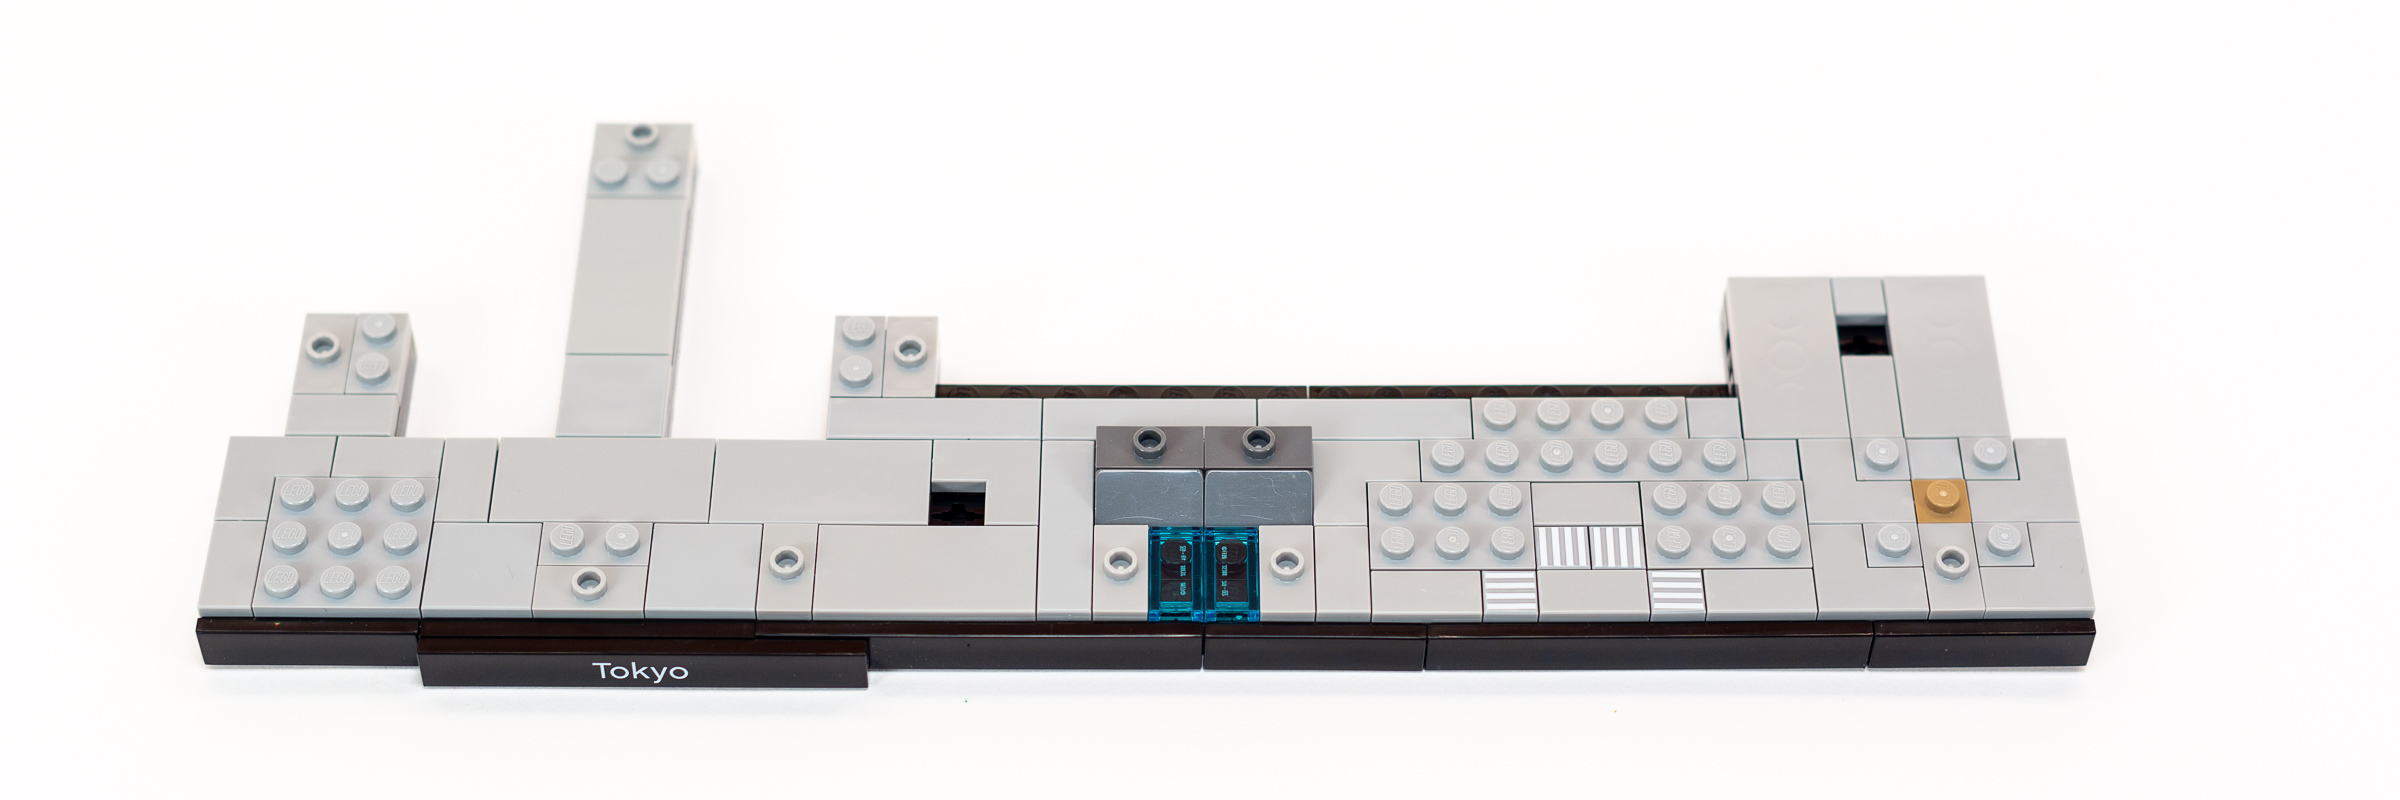
Base with two holes containing Technic Axle connectors.
While the base is not overly complex, I did notice that 1×5 Rotor (part 32124) is used in two places, allowing buildings to be attached using a Technic Axle connection.
Tokyo Tower
I continue to dislike this rendition of the Tokyo Tower for the same reasons that I disliked the Eiffel Tower included in the #21044 Paris Skyline set. In real life, both of the towers are elegant curved shapes constructed out of an intricate lattice of wrought-iron or steel. The difference in material is attributed to the difference in construction dates; The Eiffel Tower was completed in 1889 when steel was still cost prohibitive, whereas the Tokyo Tower was completed in 1958. (While the Tokyo Tower is 9 meters taller than the Eiffel Tower, it’s nearly half the weight due to the differences in building materials.)
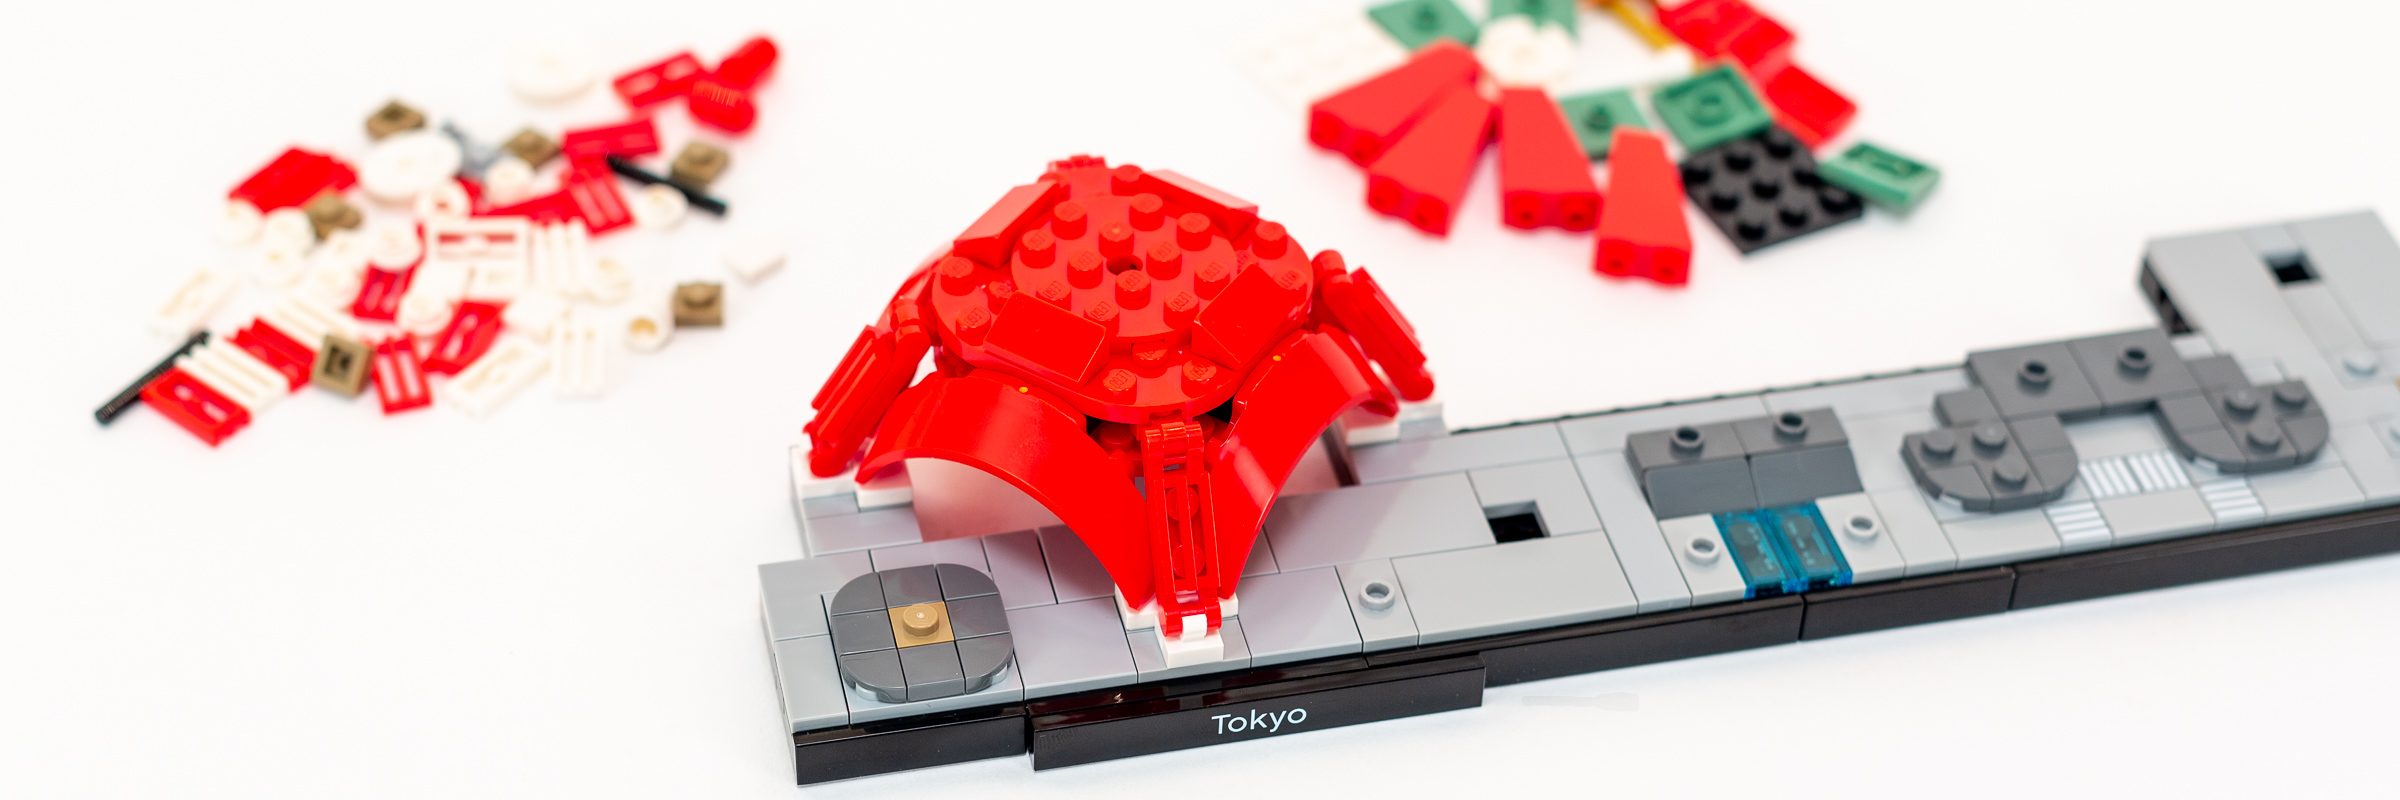
Base of the Tokyo Tower relies heavily on four 3×6×1 Windscreen (part 62360).
The LEGO re-creation of both towers loses most of their graceful curving shape, and retains none of the latticework that reminds me of fine handmade lace. The base is too wide, and I continue to find the use of four windscreen elements to be an inelegant facsimile for the base of the towers. I also dislike how the convex curve bulges at the transition to sloped bricks right above the four arches.
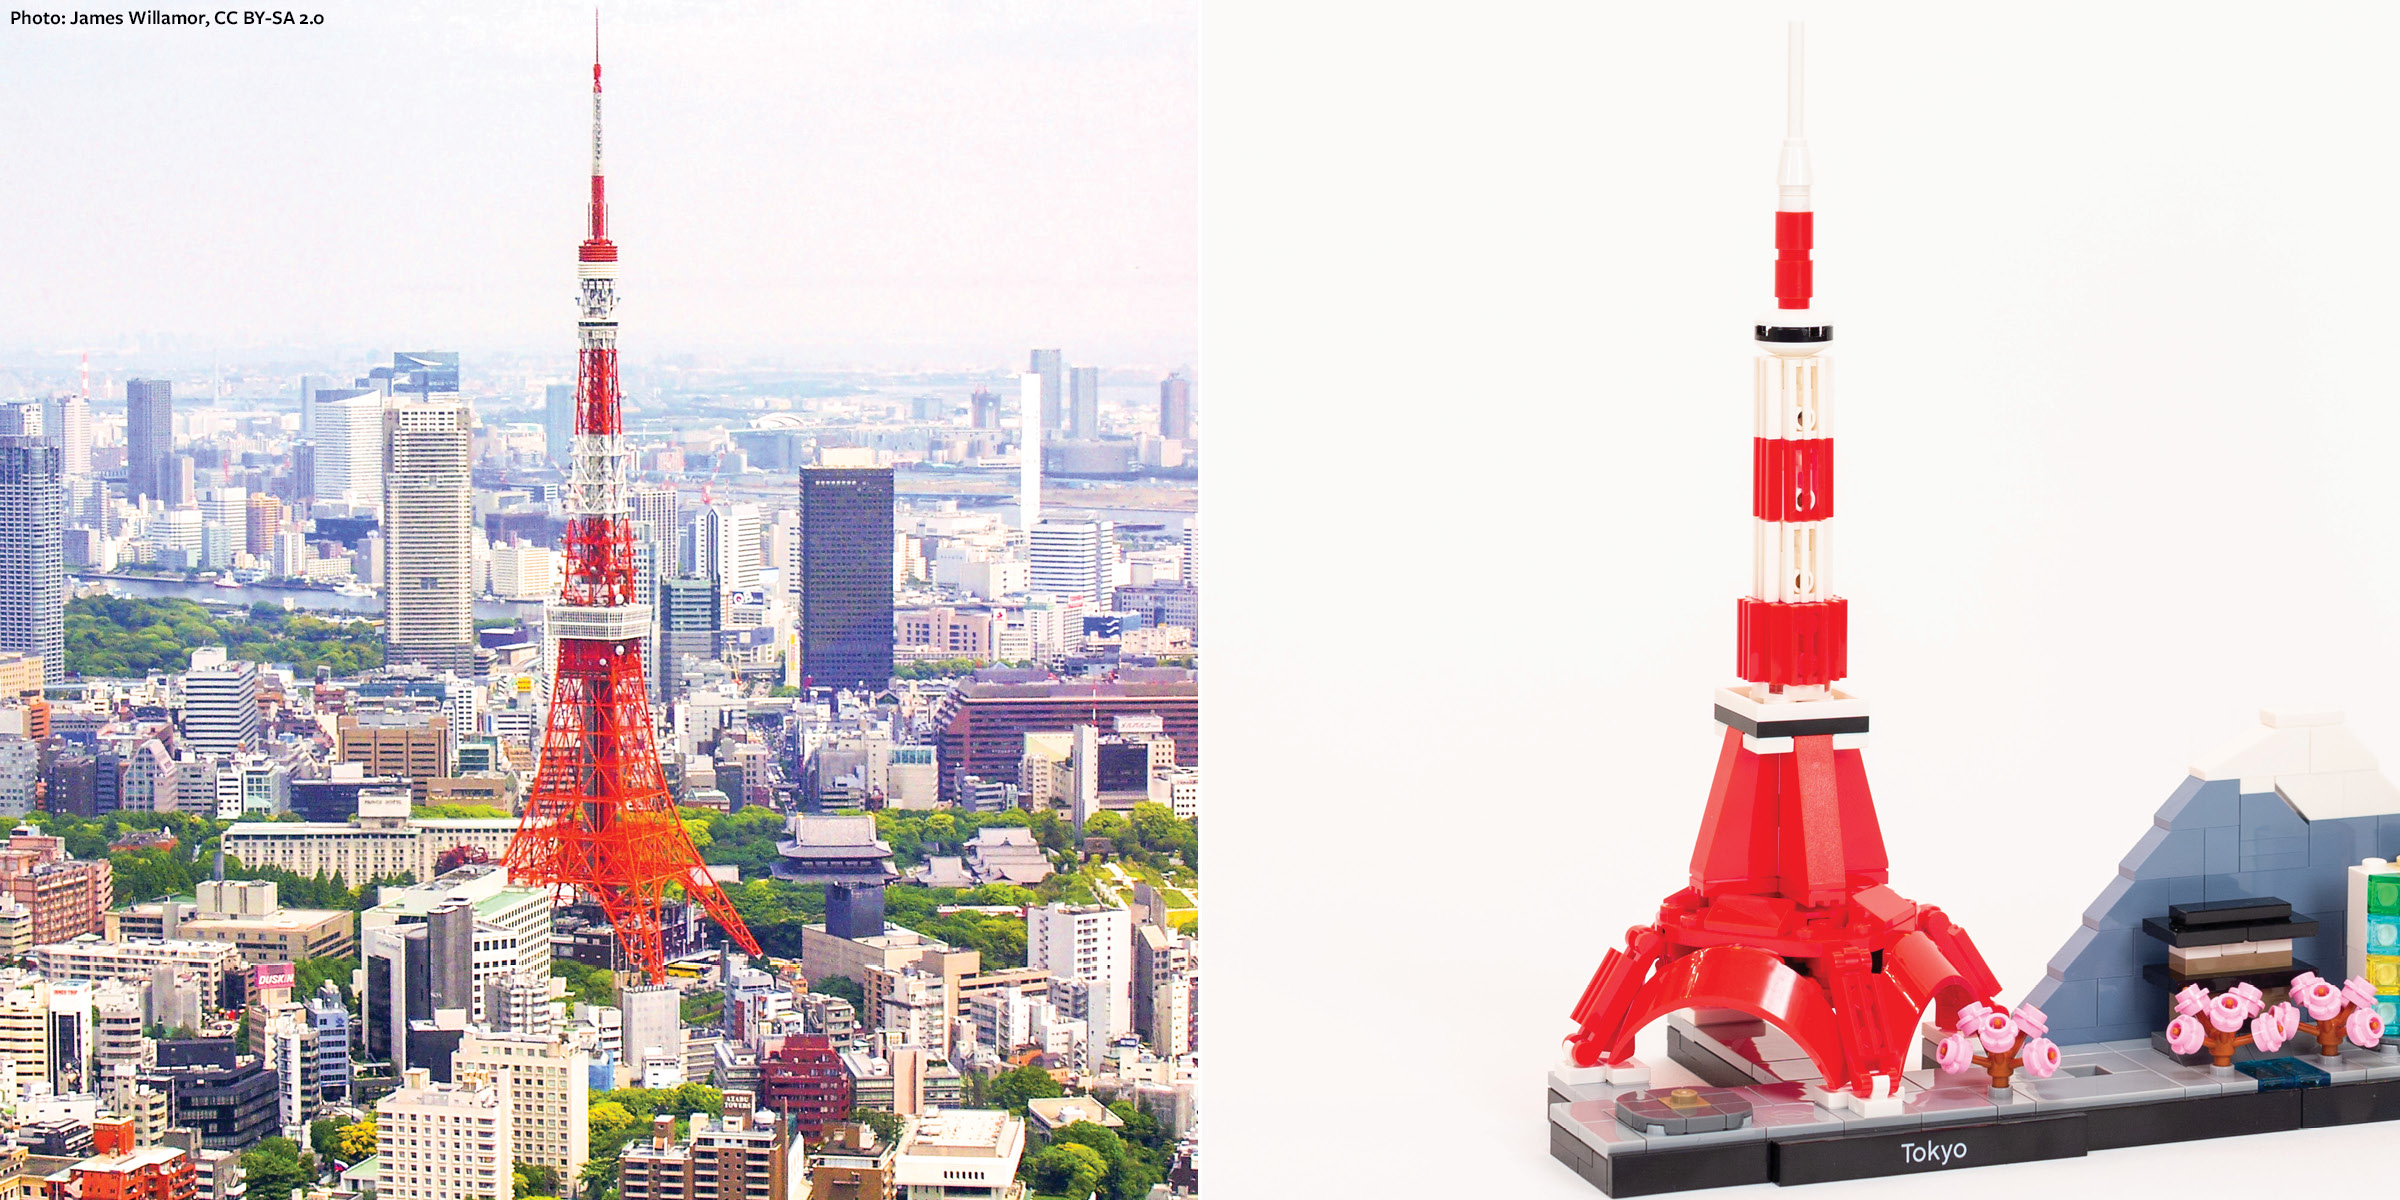
Tokyo Tower. (Photo: James Willamor, CC BY-SA 2.0)
Thankfully, the alternating red and white sections are immediately recognizable as the Tokyo Tower, so at least it works as a representative object. Aside from the base which is too wide, the proportions are reasonably close to those of the real building.
Pagoda
A small unnamed pagoda appears on the left side of the Tokyo Tower. It is made using alternating 2×2 Jumpers (part 87580) in 151Sand Green and 1×1 Plate (part 3024) in 138Sand YellowDark Tan. Failing to attribute this pagoda to a specific building is upsetting to me, both because this is a missed opportunity to teach builders more about the city, and because it feels like an insincere gesture towards the region’s history.

Progress at the end of Bag 1.
Bag 1: Build Time, 35 minutes.
Bag 2
In the second bag, we assemble all of the remaining structures, completing the model.
Chidorigafuchi Park
Chidorigafuchi Park is famous for the cherry blossoms surrounding one of the twelve moats around the Imperial Palace. It is a popular place to rent boats during Hanami season in late March when the blossoms are at their peak. The moat bends around Chidorigafuchi Cemetery, where 350,000 unidentified casualties of World War II are interred.
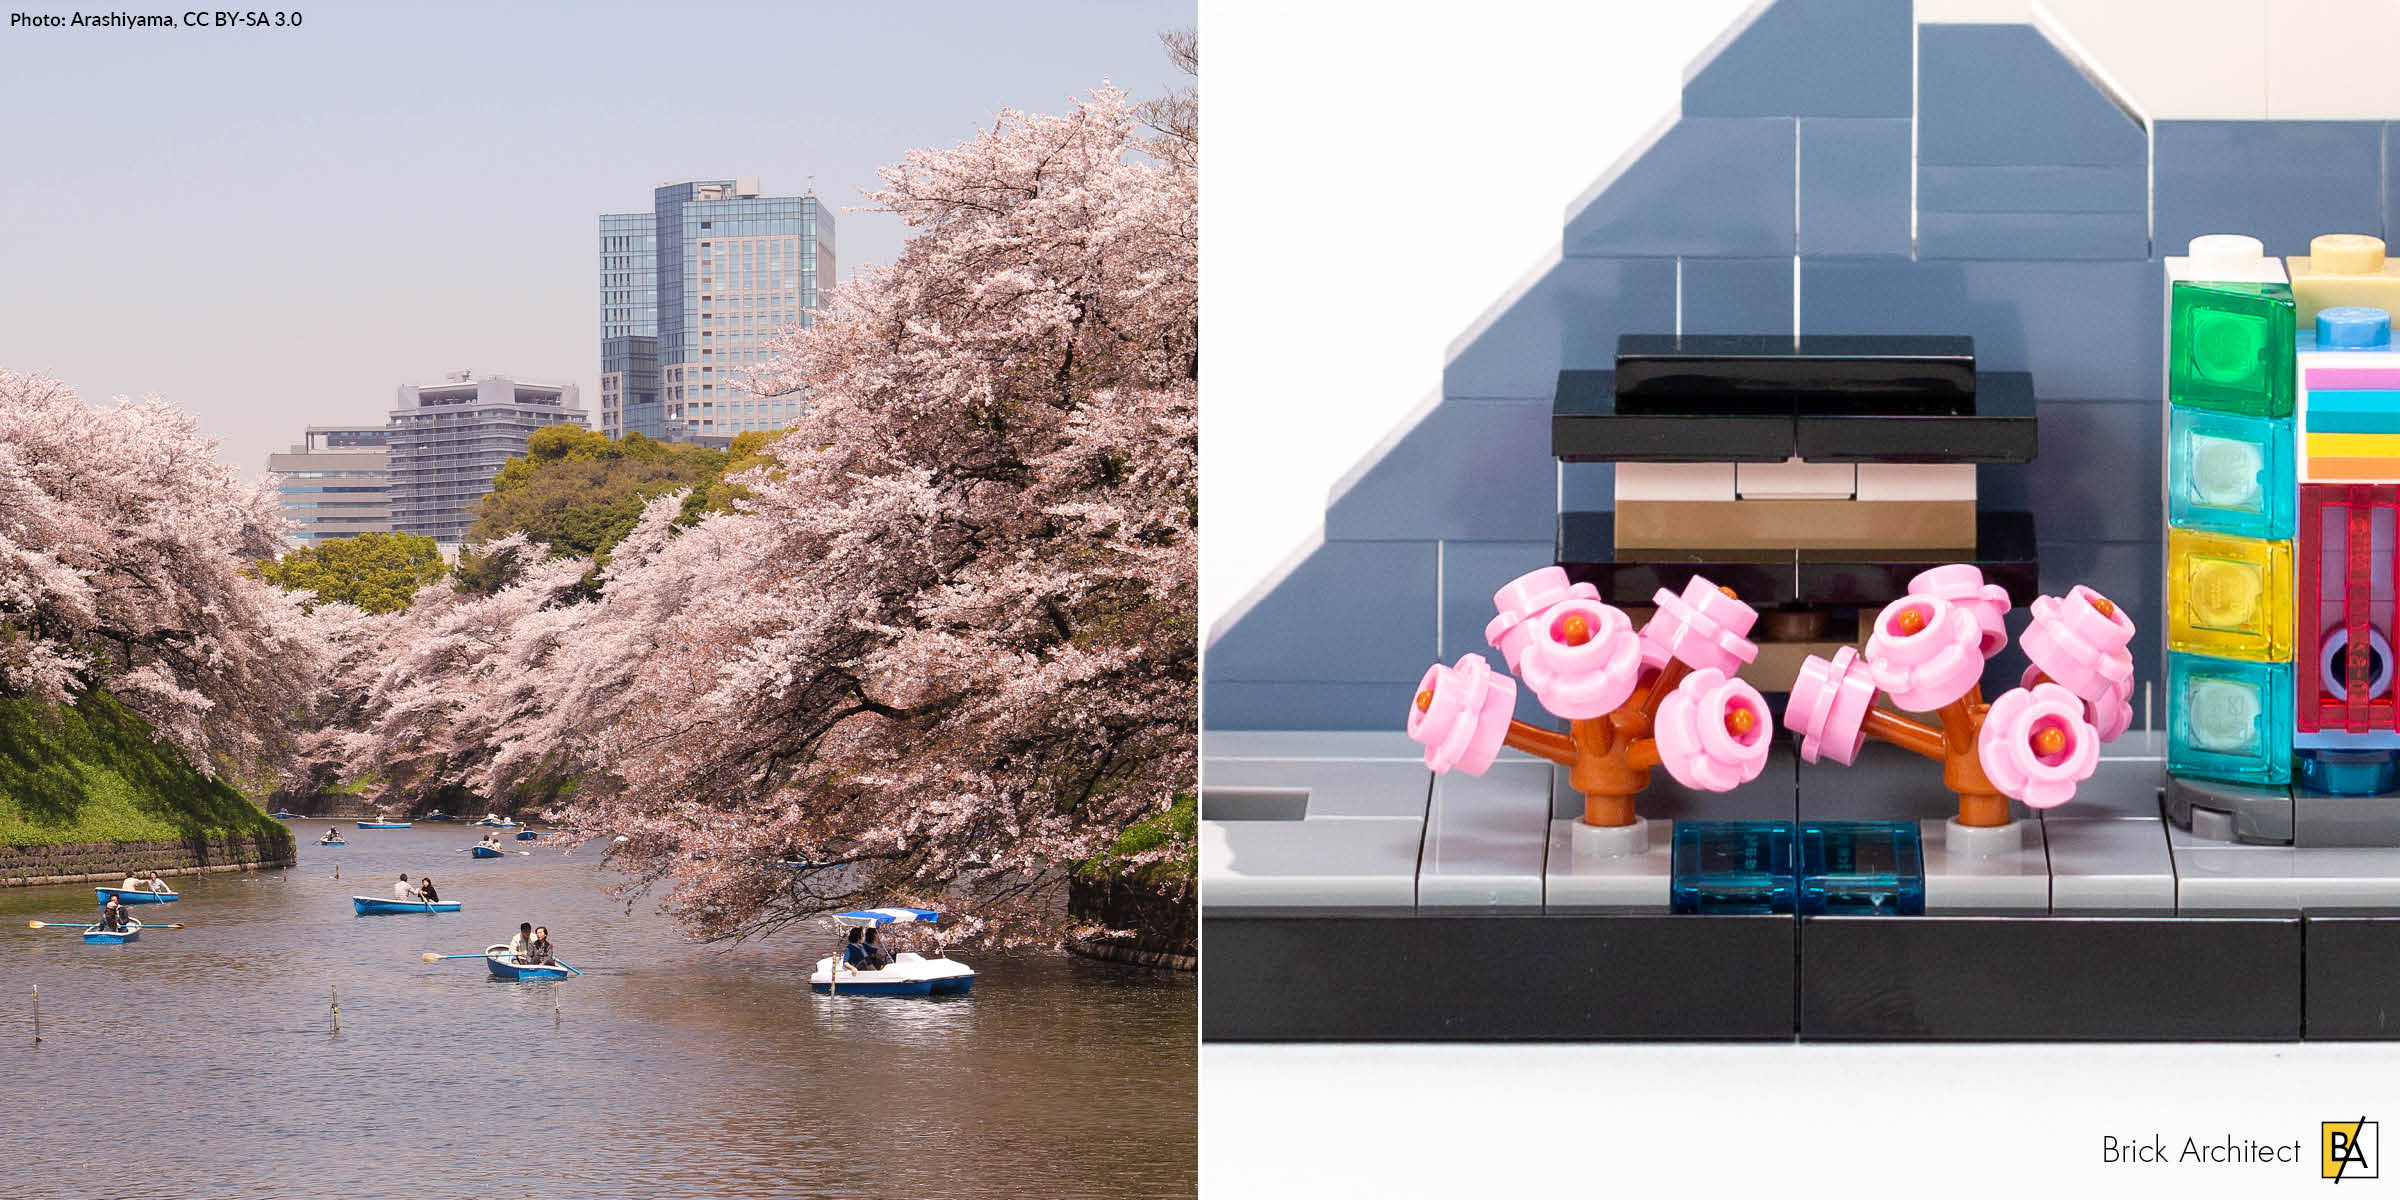
Cherry Blossoms at Chidorigafuchi Park. (Photo: Arashiyama, CC BY-SA 3.0)
The LEGO re-creation involves a tiny re-creation of the Moat uses two 1×2 Tiles (part 3069b) in 42Transparent Light BlueTrans-Light Blue flanked on both sides by trees with 222Light PurpleBright Pink flowers. The small structure behind the water is not identified in the instruction booklet, and I was unable to determine a specific building it is meant to represent when researching buildings in the area. That’s too bad, since there are a dozen interesting buildings within the palace grounds that could have been included.
Neither the trees nor the small building are interesting to assemble, but the cherry blossom trees in particular add a lovely ambience and cheerful personality to the completed model.
Shibuya Crossing
Next, we get to build Shibuya Crossing, the high traffic intersection in front of the Shibuya Railway Station where traffic stops in all directions to allow pedestrians to cross in all directions at once. With so much traffic, there is no wonder why the buildings are covered with signs and displays—comparisons with New York’s Times Square are perfectly reasonable!
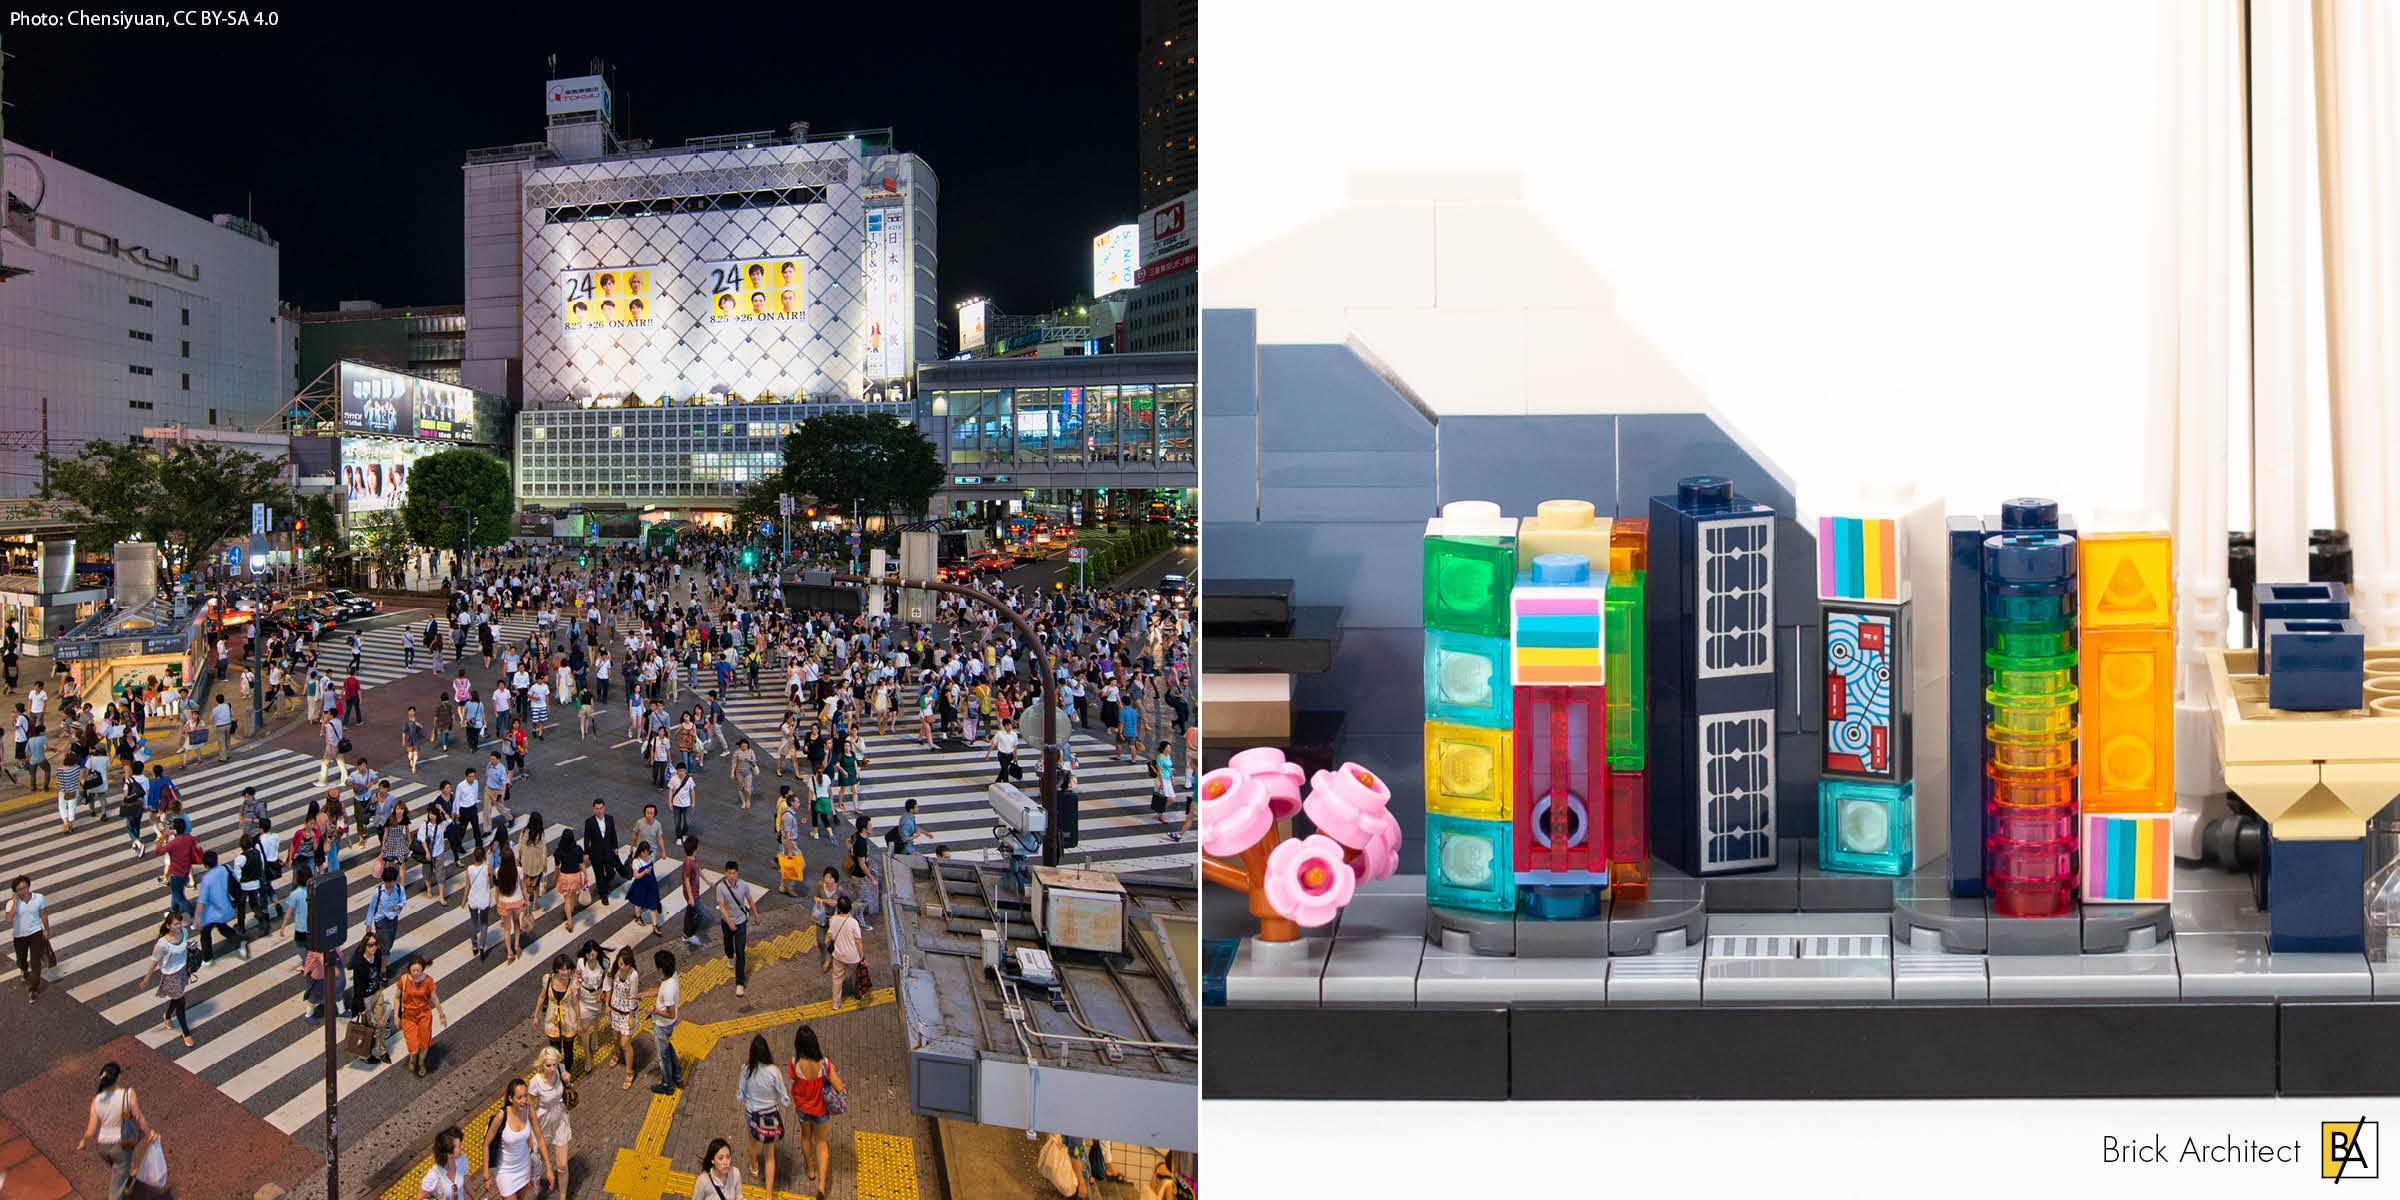
Shibuya Crossing. (Photo: Chensiyuan, CC BY-SA 4.0)
It is re-created using the widest array of different LEGO colors imaginable. Most notably, the right corner of the intersection is re-created using a stack of 1×1 round plates in 8 different transparent colors! It also uses 12 printed tiles (six different patterns) for the crosswalks and buildings—we will cover them in more detail later…
The end result is a tiny Technicolor cacophony. It exceeds the vibrance of photos of the real crossing, but captures the spirit. I was unable to attribute specific buildings in the model to real buildings in photographs, but it might be easier for people who have visited in person. I also wish that they did a custom printed tile for the crosswalks (zebra crossings), as the diagonal crosswalk is one of the most iconic aspects of this intersection, but is missing from the LEGO model.
Tokyo Big Sight
Featuring four prominent inverted pyramids, Tokyo Big Sight (completed 1996) is an iconic convention center located on the waterfront.
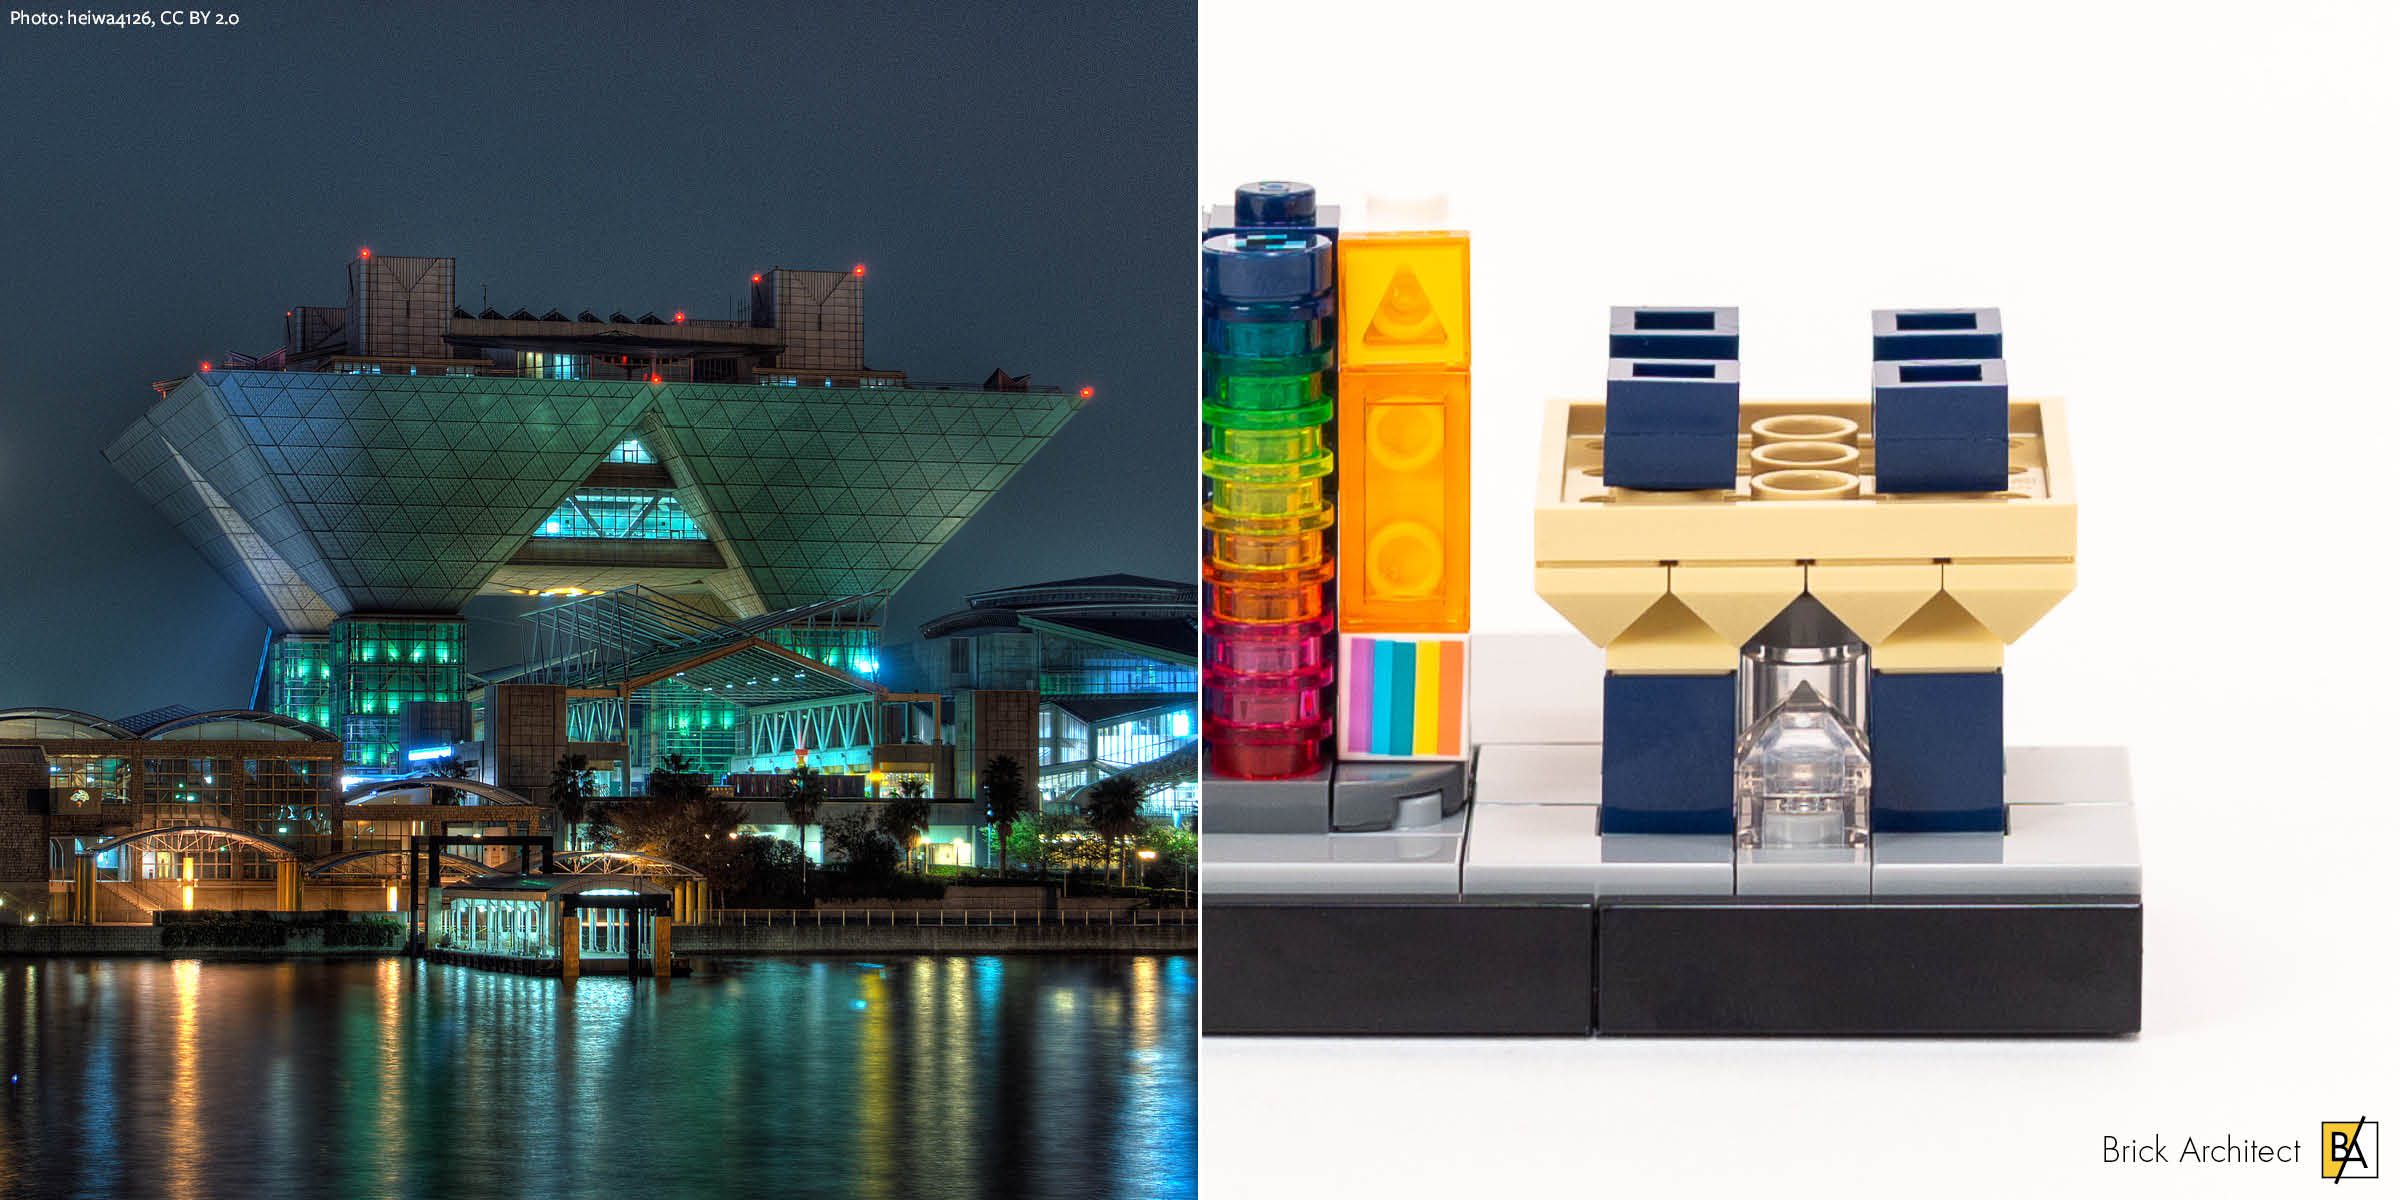
Tokyo Big Sight. (Photo: heiwa4126, CC BY 2.0)
I was immediately impressed by the advanced building techniques used to re-create this with LEGO. The entire roof section is assembled, then flipped upside-down to attach with a single bar connection in the middle. The result is aesthetically pleasing and faithful to the source material.
Mode Gakuen Cocoon Tower
I do not believe that LEGO Architecture sets should rely heavily on printed parts to make buildings recognizable. This feels like cheating, and it decreases the usefulness of the parts if you decide to disassemble the set and use the parts to build something else.
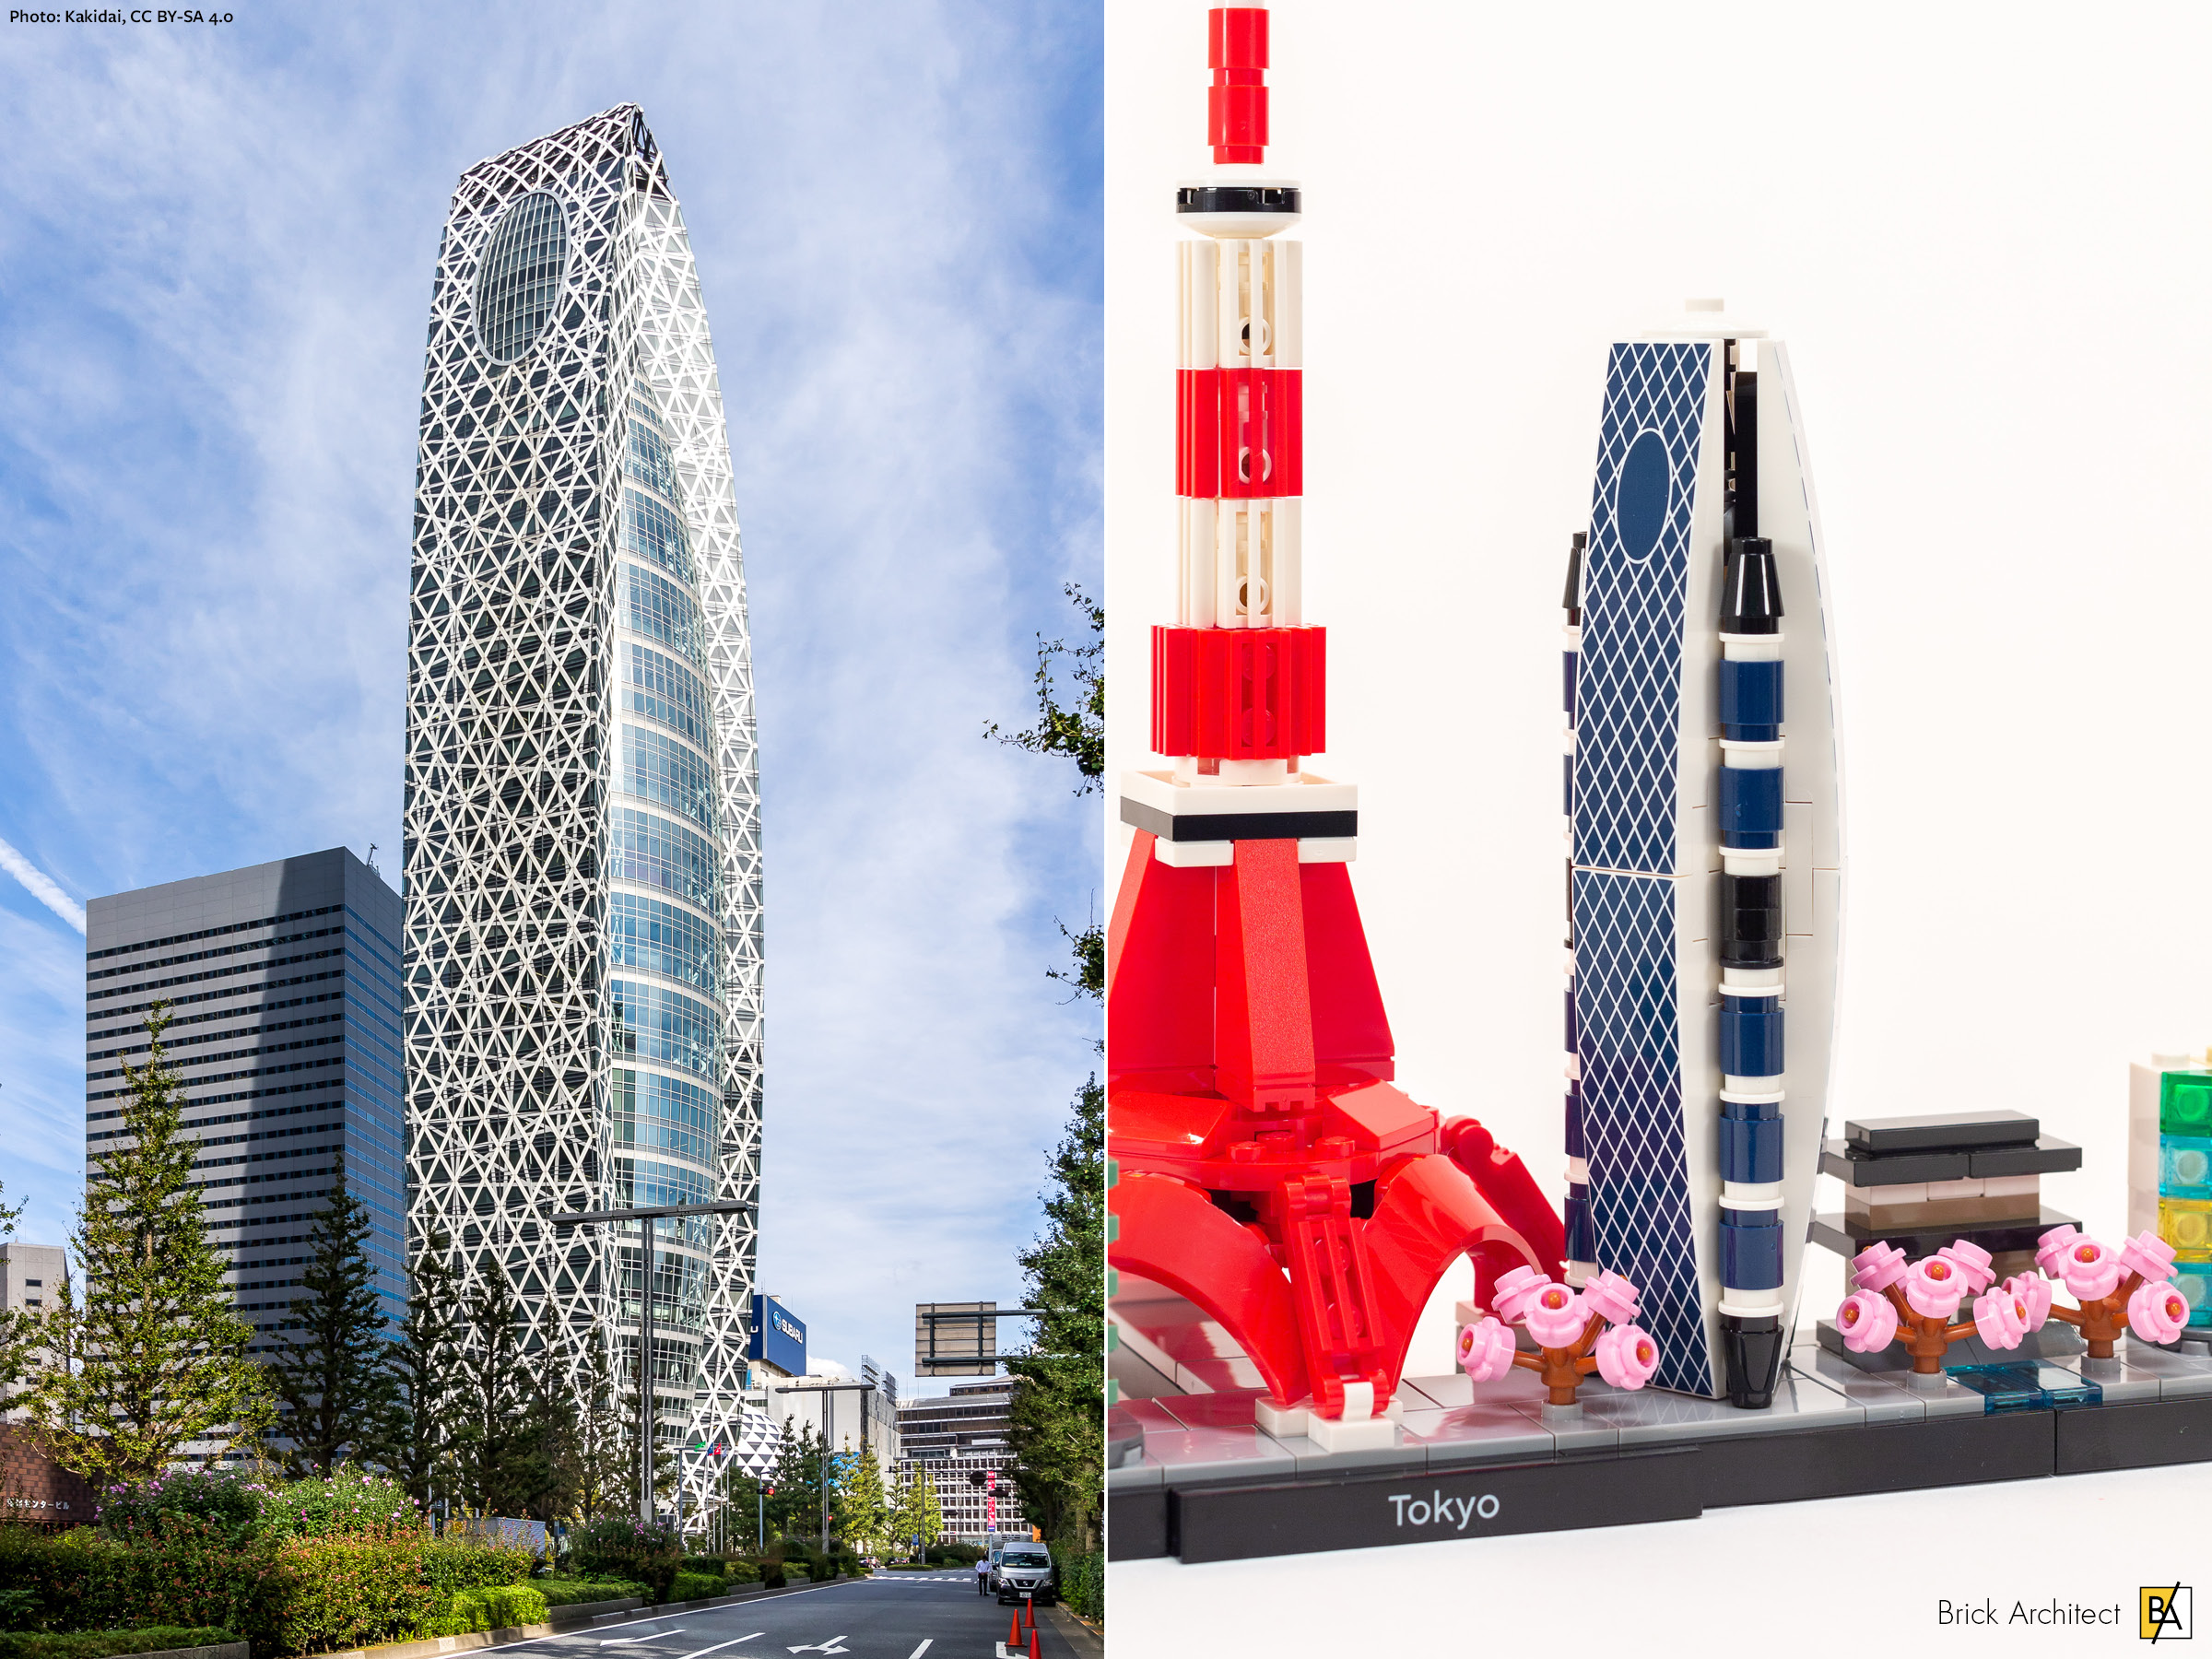
Mode Gakuen Cocoon Tower (Photo: Kakidai, CC BY-SA 4.0)
For this reason, I am especially displeased by this LEGO re-creation of the Mode Gakuen Cocoon Tower. I would have been much more impressed if they found a brick-built solution which did not reply on printed parts to achieve the unique shape. Nonetheless, it’s bulging shape is accurately captured using two 8×2 Curved (part 42918) pieces on each of the three sides.
Mount Fuji
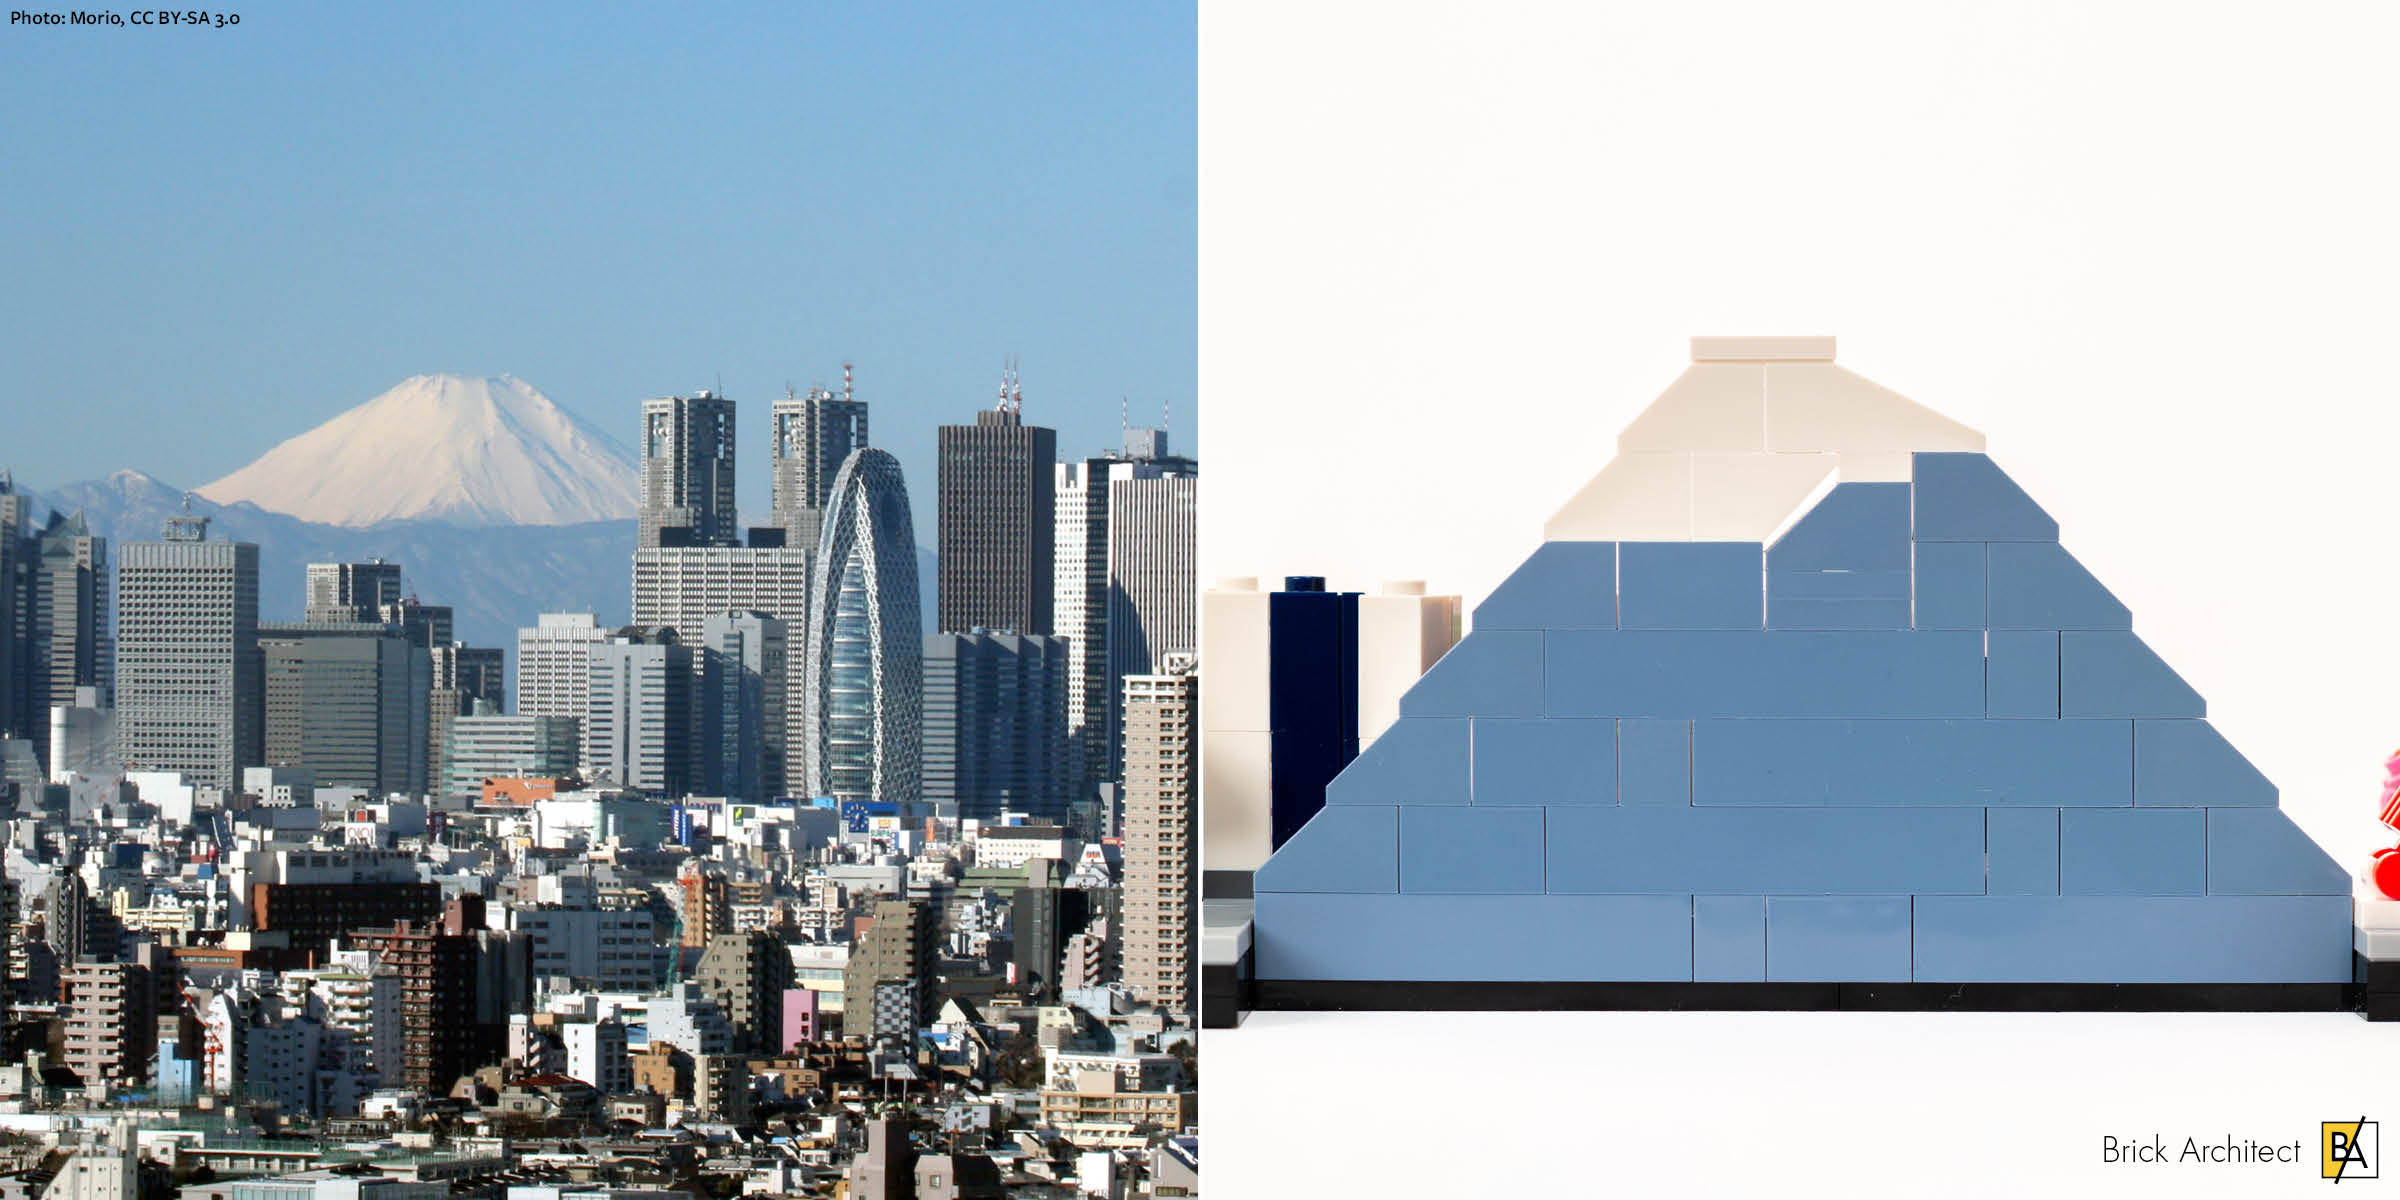
Mount Fuji. LEGO model viewed from back. (Photo: Morio, CC BY-SA 3.0)
Unfortunately, the LEGO re-creation is not interesting, although it does establish an immediately recognizable backdrop for the model. The choice to create an uneven snowcap using both a 2×1 Slope and the 2×1 Slope, Inverted reveals a gap when viewed from the front. The gap is caused by historic idiosyncrasies in the LEGO system of parts (Most notably, the fact that slopes have about a ½ plate tall vertical section at the base before the slope begins. Those parts could be modified to line up better, either by increasing the vertical section to 1 plate tall or eliminating it completely.)
Tokyo Skytree
The last addition to the skyline is the Tokyo Skytree. The building is 634m tall and was completed in 2012.

Tokyo Skytree (Photo: Kakidai, CC BY-SA 3.0)
The top uses some inverted building techniques. The most interesting aspect is a technique that I’ve never seen before where the eight soft axle 19L (part 32235) elements are hidden in a collar at the top but are not attached to anything. This works reasonably well, although soft axle components are hard to keep straight, making it difficult to a make the legs look uniform.
Bag 2: Build Time, 35 minutes.
About the parts
While there are no new parts in this set, there are a few parts appearing in new colors for the first time.
Existing parts in new colors:
- 4x – 3×6×1 Windscreen (part 62360) in 21Bright RedRed.
- 4x – 2×2 Plate with Hinge both ends (part 18649) in 21Bright RedRed.
- 1×1 Flower w/ 5 petals (part 24866) in 222Light PurpleBright Pink.
Printed Parts
The most striking aspect of the part selection is the sheer number of printed parts. This includes four new printed elements, and five existing printed parts. A total of 19 printed parts would be a lot for any set, and is much more than we’ve ever seen in the LEGO Architecture series.
New Printed Parts:
- 3x – 2×8 Curved (part 42918) in 1White, with Dark Blue Diamond Pattern (element 6291465).
- 3x – 2×8 Curved (part 42918) in 1White, with Dark Blue Diamond Pattern and Oval (element 6286276).
- 4x – 1×1 Tile (part 2555) in 194Medium Stone GreyLight Bluish Gray, with White Crosswalk Pattern (element 6286223).
- 1x – 1×8 Tile (part 4162) in 26Black, with “Tokyo” text (element 6212501).

The set contains nine unique printed parts. Four are new.
Existing Printed Parts:
- 3x – 1×1 Tile (part 2555) in 1White, with Rainbow Striped Pattern (element 6253635).
- 1x – 1×1 Tile (part 2555) in 182Transparent Bright OrangeTrans-Orange , with Yellow Rectangle and Triangle Cut-out (element 6255958).
- 1x – 1×2 Tile (part 3069) in 199Dark Stone GreyDark Bluish Gray, with Map With Blue Circles Pattern (element 6226606).
- 2x – 1×4 Tile (part 2431) in 140Earth BlueDark Blue, with Solar Panel Pattern (element 6215341).
- 1x – 1×1 Round Tile (part 98138) in 140Earth BlueDark Blue, with Pixelated Blue and Black Pattern (element 6253178).
Conclusion
I expected to really enjoy my trip to Tokyo through LEGO bricks, but was ultimately disappointed by the uninspired building techniques and over-reliance on printed parts. I disliked how the Eiffel Tower was handled in the Paris Skyline set, and continue to dislike the technique when applied to the Tokyo Tower. The only technically excellent model within the set is the Tokyo Skytree Convention Center, but it can’t carry the set since it is tiny and uses fewer than 30 pieces.
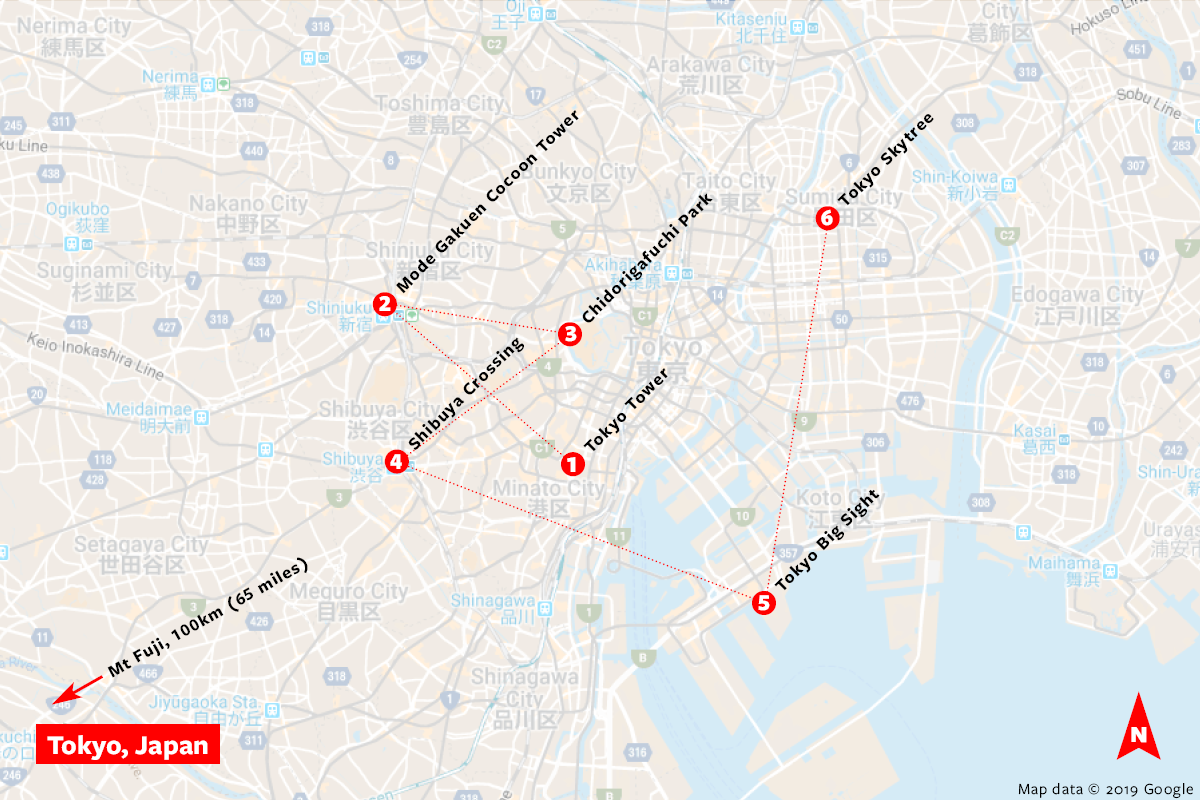
Map of Tokyo showing location of the various landmarks.
I’m similarly disappointed by the haphazard arrangement of structures in the LEGO Model. If the designers were serious about arranging the structures in a similar order to how they appear in the real city, they should have oriented the model facing toward the southwest where Mount Fuji is located, resulting in a completely different order of structures; with the Tokyo Big Sight on the far left and the Mode Gakuen Cocoon Tower on the far right. Complete disregard for the geography of the city adds to my disappointment with this model.
Despite serious misgivings about the individual elements within the model, the completed set is lighthearted, cheery, and will look good on your desk or bookshelf. While including Mount Fuji is a bit heavy-handed, it makes the model immediately recognizable. Lastly, it’s good to see more representation of cities outside of Europe and North America.
#21051 Tokyo Skyline.
Because sets in the LEGO Architecture Skyline Series contain many structures in a single model, it is difficult to assign a single numeric rating to the set as a whole. In the case of #21051 Tokyo Skyline, I feel like The LEGO Group has not done their best work, and the resulting set only deserves an Acceptable (2/5 star) rating. It doesn’t help that the set is more expensive than similarly sized sets. Because the finished model is immediately recognizable and vibrant, I suspect many readers will still want to add it to their collection despite these misgivings.
The connection of the top of Tokyo Tower to the base is in unacceptable. Flimsy and falls off at the slightest budge.
Extended the set to include a sports stadium, Tokyo Central station and train tracks, office block, more houses, a noh theatre and a small shinto shrine… The red riffle tower is cheap and sky tree is wrong, no large black bits and the bendy bits look awful. Since it’s Olympic year this set is a real disaster as it will be compared to the real thing. Mt Fuji is also wrong and the snow line is always leveled
I had been waiting for this set, as I lived in Tokyo for 13 years, and frankly this is disappointing. The kabuki theatre or Asakusa gate would have made great alternatives to either the gate or pagoda. Fuji should be more gently sloped and take u the entire width of the back-plane. Tokyo tower looks too heavy, and the sky tree too boring. Even the conference center would have been better with bricks indicating it was made of glass, rather than the sandstone colour used.
Agree with criticisms. Mount Fuji is shamefully the wrong shape, & the Sky tree is truly pathetic! The inclusion of the non – existent “pagoda” & the “Japanese” arch is not acceptable in an architecture set. A missed opportunity!
I personally think the element 6291465 (new 8×2 printed slope on the Mode Gakuen Cocoon Tower) could make amazing solar panels in mocs. Sure, as the set it’s a bit of a letdown, but is got some solid options for builds in the future.
This set is a hot mess! And yes, I’m growing tired of the printed pieces/stickers in both the architecture & speed champions series! They look childish; yet, they are being peddled to a grown-up audience…this is a hard pass.
I will, however, be getting the Dubai skyline set!
I think that printed parts are necessary to capture such small details as, say, the minuscule Ferrari logo, or the intricate latticework on the Mode Gakuen Tower. That choice was likely made in order to maintain a fairly consistent scale. I do think that stickers shouldn’t be used much, but prints are often necessary or recreate details far better than a brick-built solution.
This has been a highly anticipated set but I agree with most of your comments; it’s turned out to be a bit of a letdown. Totally agree that the bottom of Tokyo Tower looks overly bulky and doesn’t manage to convey the spirit of the tower’s steel construction very well. I know that others have said that it resembles the spaceship from Tintin! Nevertheless, I shamefully admit I will still be adding it to my collection…and hopefully making a few modifications.