
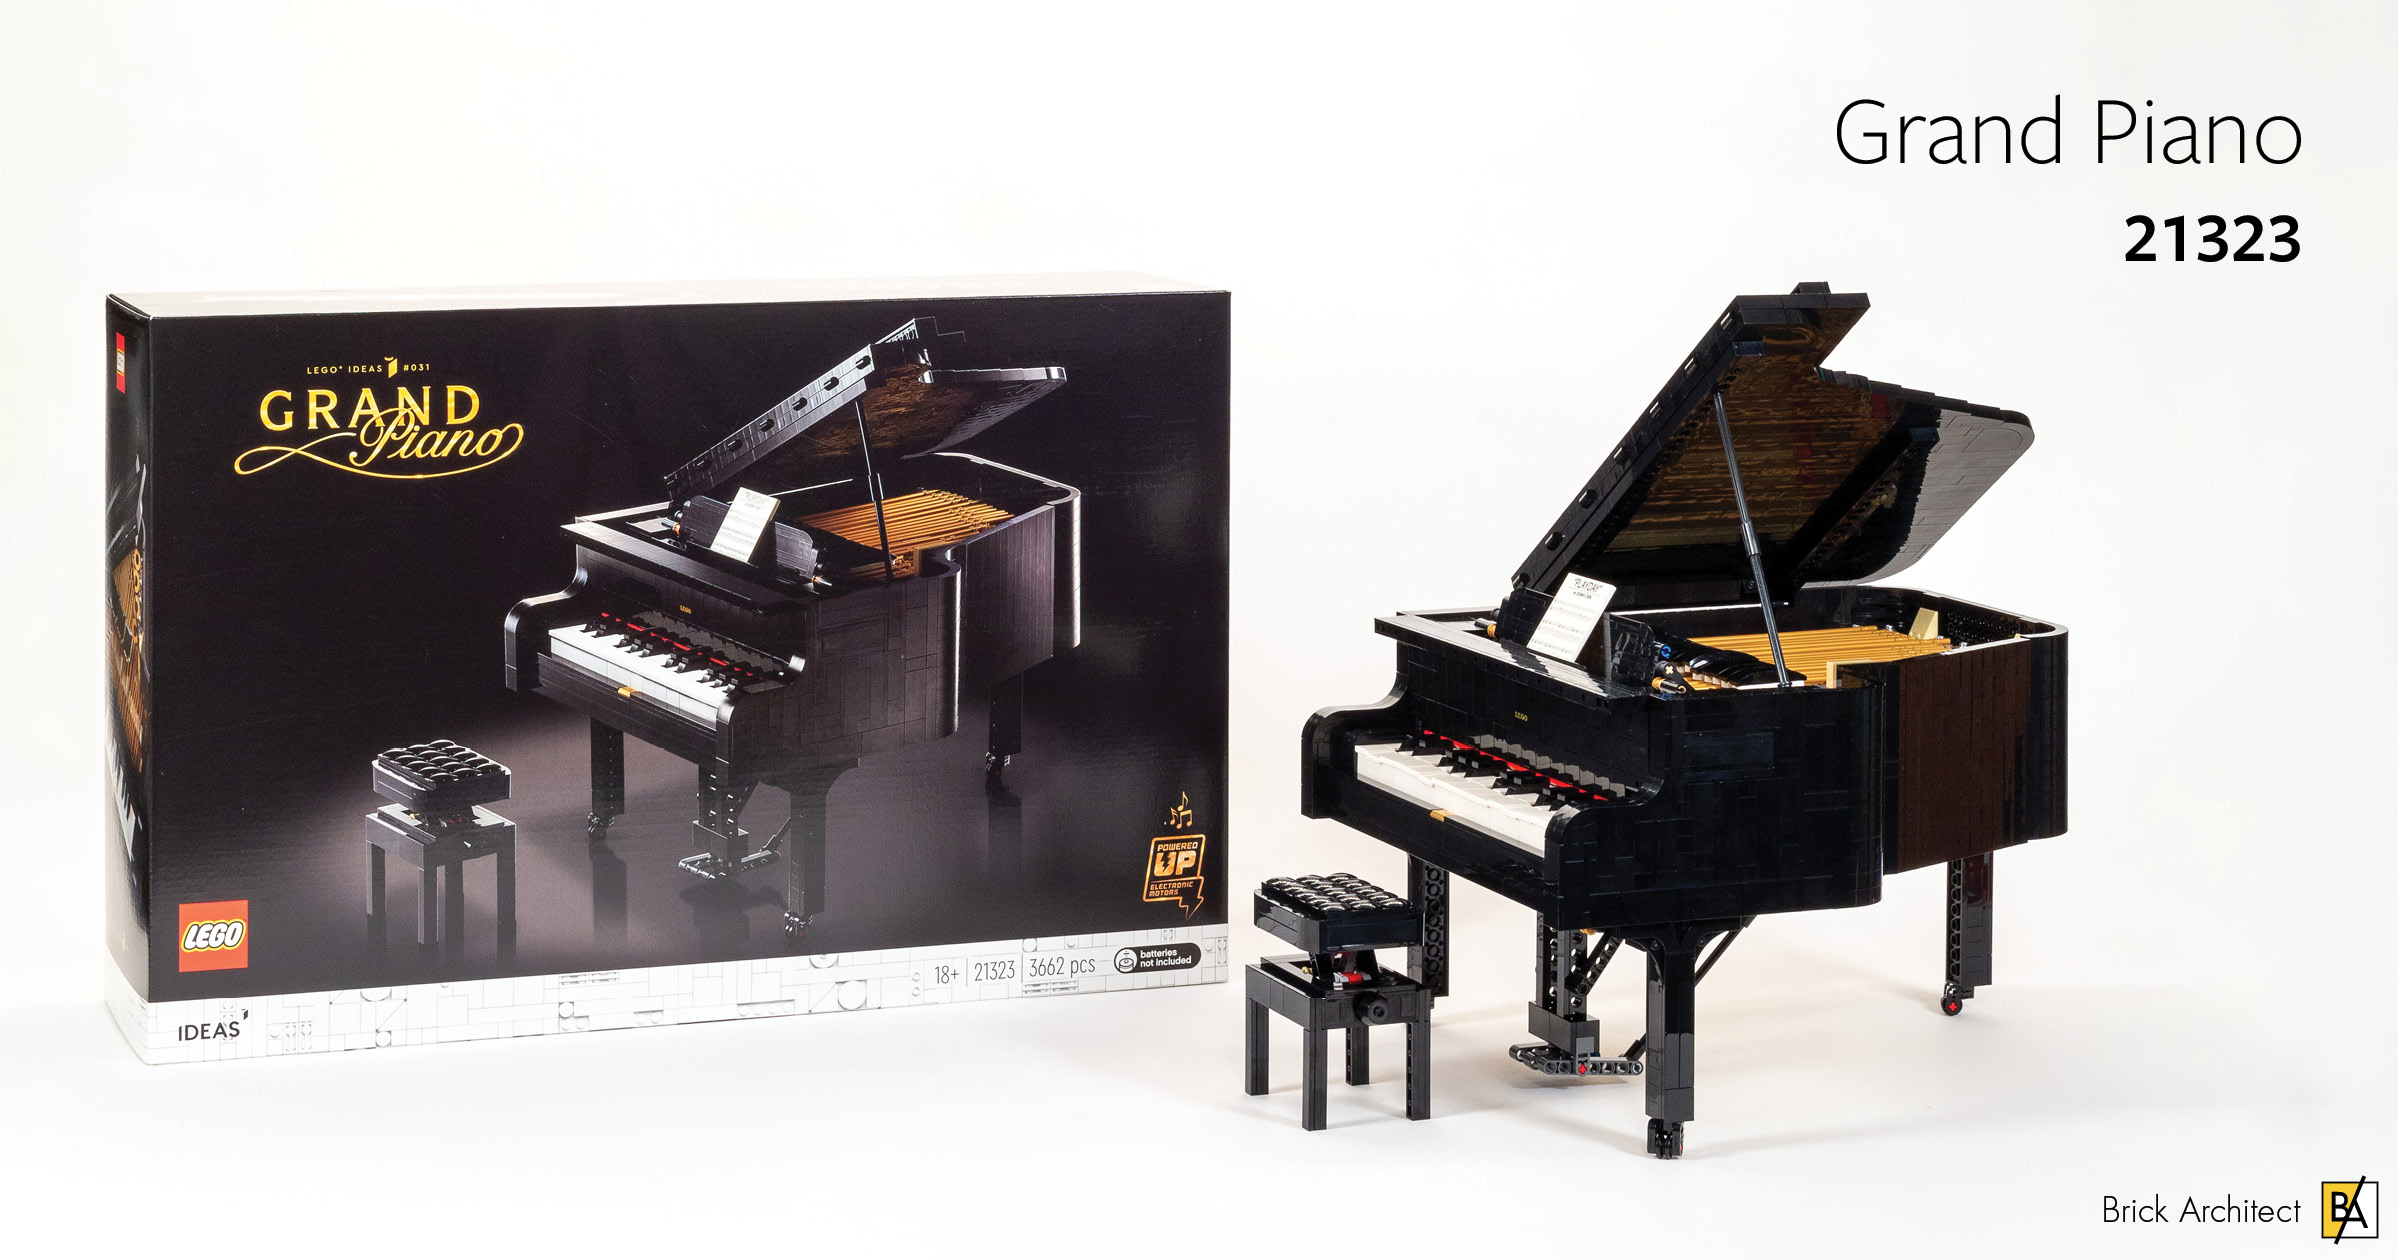
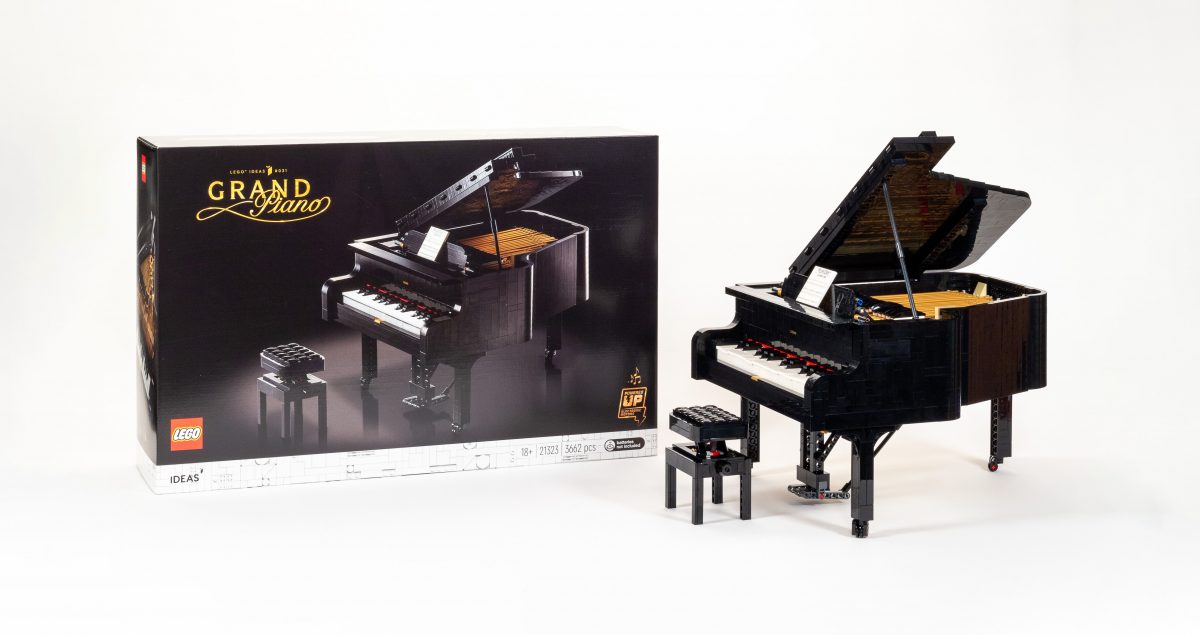
Review: #21323 Grand Piano
A playable LEGO Piano–or maybe not quite? Let’s see why this massive LEGO set aimed at AFOL’s keeps selling out!
#21323 Grand Piano is $349.99 (349.99€ / £319.99 / 449.99 CAD / 529.99 AUD), 3,662 pieces, ages 18+. This clocks in at just under $0.10 per piece in the USA, which is a popular benchline for comparison. That would be a bit high for an unlicensed set, but it is important to note that the set includes some fairly large pieces (plus a Powered Up Hub, Motor, and Optical sensor; AAA batteries not included.)

#21323 Grand Piano – Box Front and Back.
First Impressions
It’s important to be transparent as a reviewer, because many readers have limited time and budget to devote to their LEGO hobby. That’s why I want to be clear—I do not have a lot of passion or connection to Pianos as a musical instrument. I can not read sheet music, and I was not interested in learning to play as a child even though we had a piano in the home. That’s not to say that I don’t enjoy listening to music performed with a piano… In fact, one of my warmest memories from last winter was learning how to use our friend’s player piano to fill the room with festive tunes. (I got pretty good at pumping the pedals fast enough for each song.)
As for the opportunity to re-create a classic grand piano in the style of a classic Steinway, I’m lukewarm at best, especially given the staggering 4000+ piece part count. That said, I can completely acknowledge that the model is beautifully sculpted, and I am at least a little curious to see how the mechanical functions work.
Given my recent experience building the Colosseum, I’m expecting a build time of at least 8 hours (not including breaks, or time needed to photograph the build process.) Thankfully, the set is broken up into lots of smaller stages. Let’s get started!
Build Process
I can’t say for certain, but this is one of the most densely packed LEGO sets I’ve opened in recent years. The high quality box is actually two parts; after cutting the four seals on the bottom of the box, the lid lifts right off. Inside, you will find a second smaller box occupying the left ½ of the contents, and loose bags occupying the right half of the box.

Contents of smaller box include (most of) the bags 1-9.
The smaller box contains four loose parts, three un-numbered bags (including the motor and battery box), the instruction manual, and all of the bags marked for stages 1-9 (with the exception of the two bags for stage 5 which were loose in the larger box). Outside of that box, you will find all of the bags for stages 10-21, plus the two bags for stage 5. It would have made more sense to have two small boxes containing everything you need for each half of the build process. Alternately, they could have put bags 10-21 inside the smaller box, so you don’t need to open the second box until the model is partially complete (but I’m evidently not in charge).
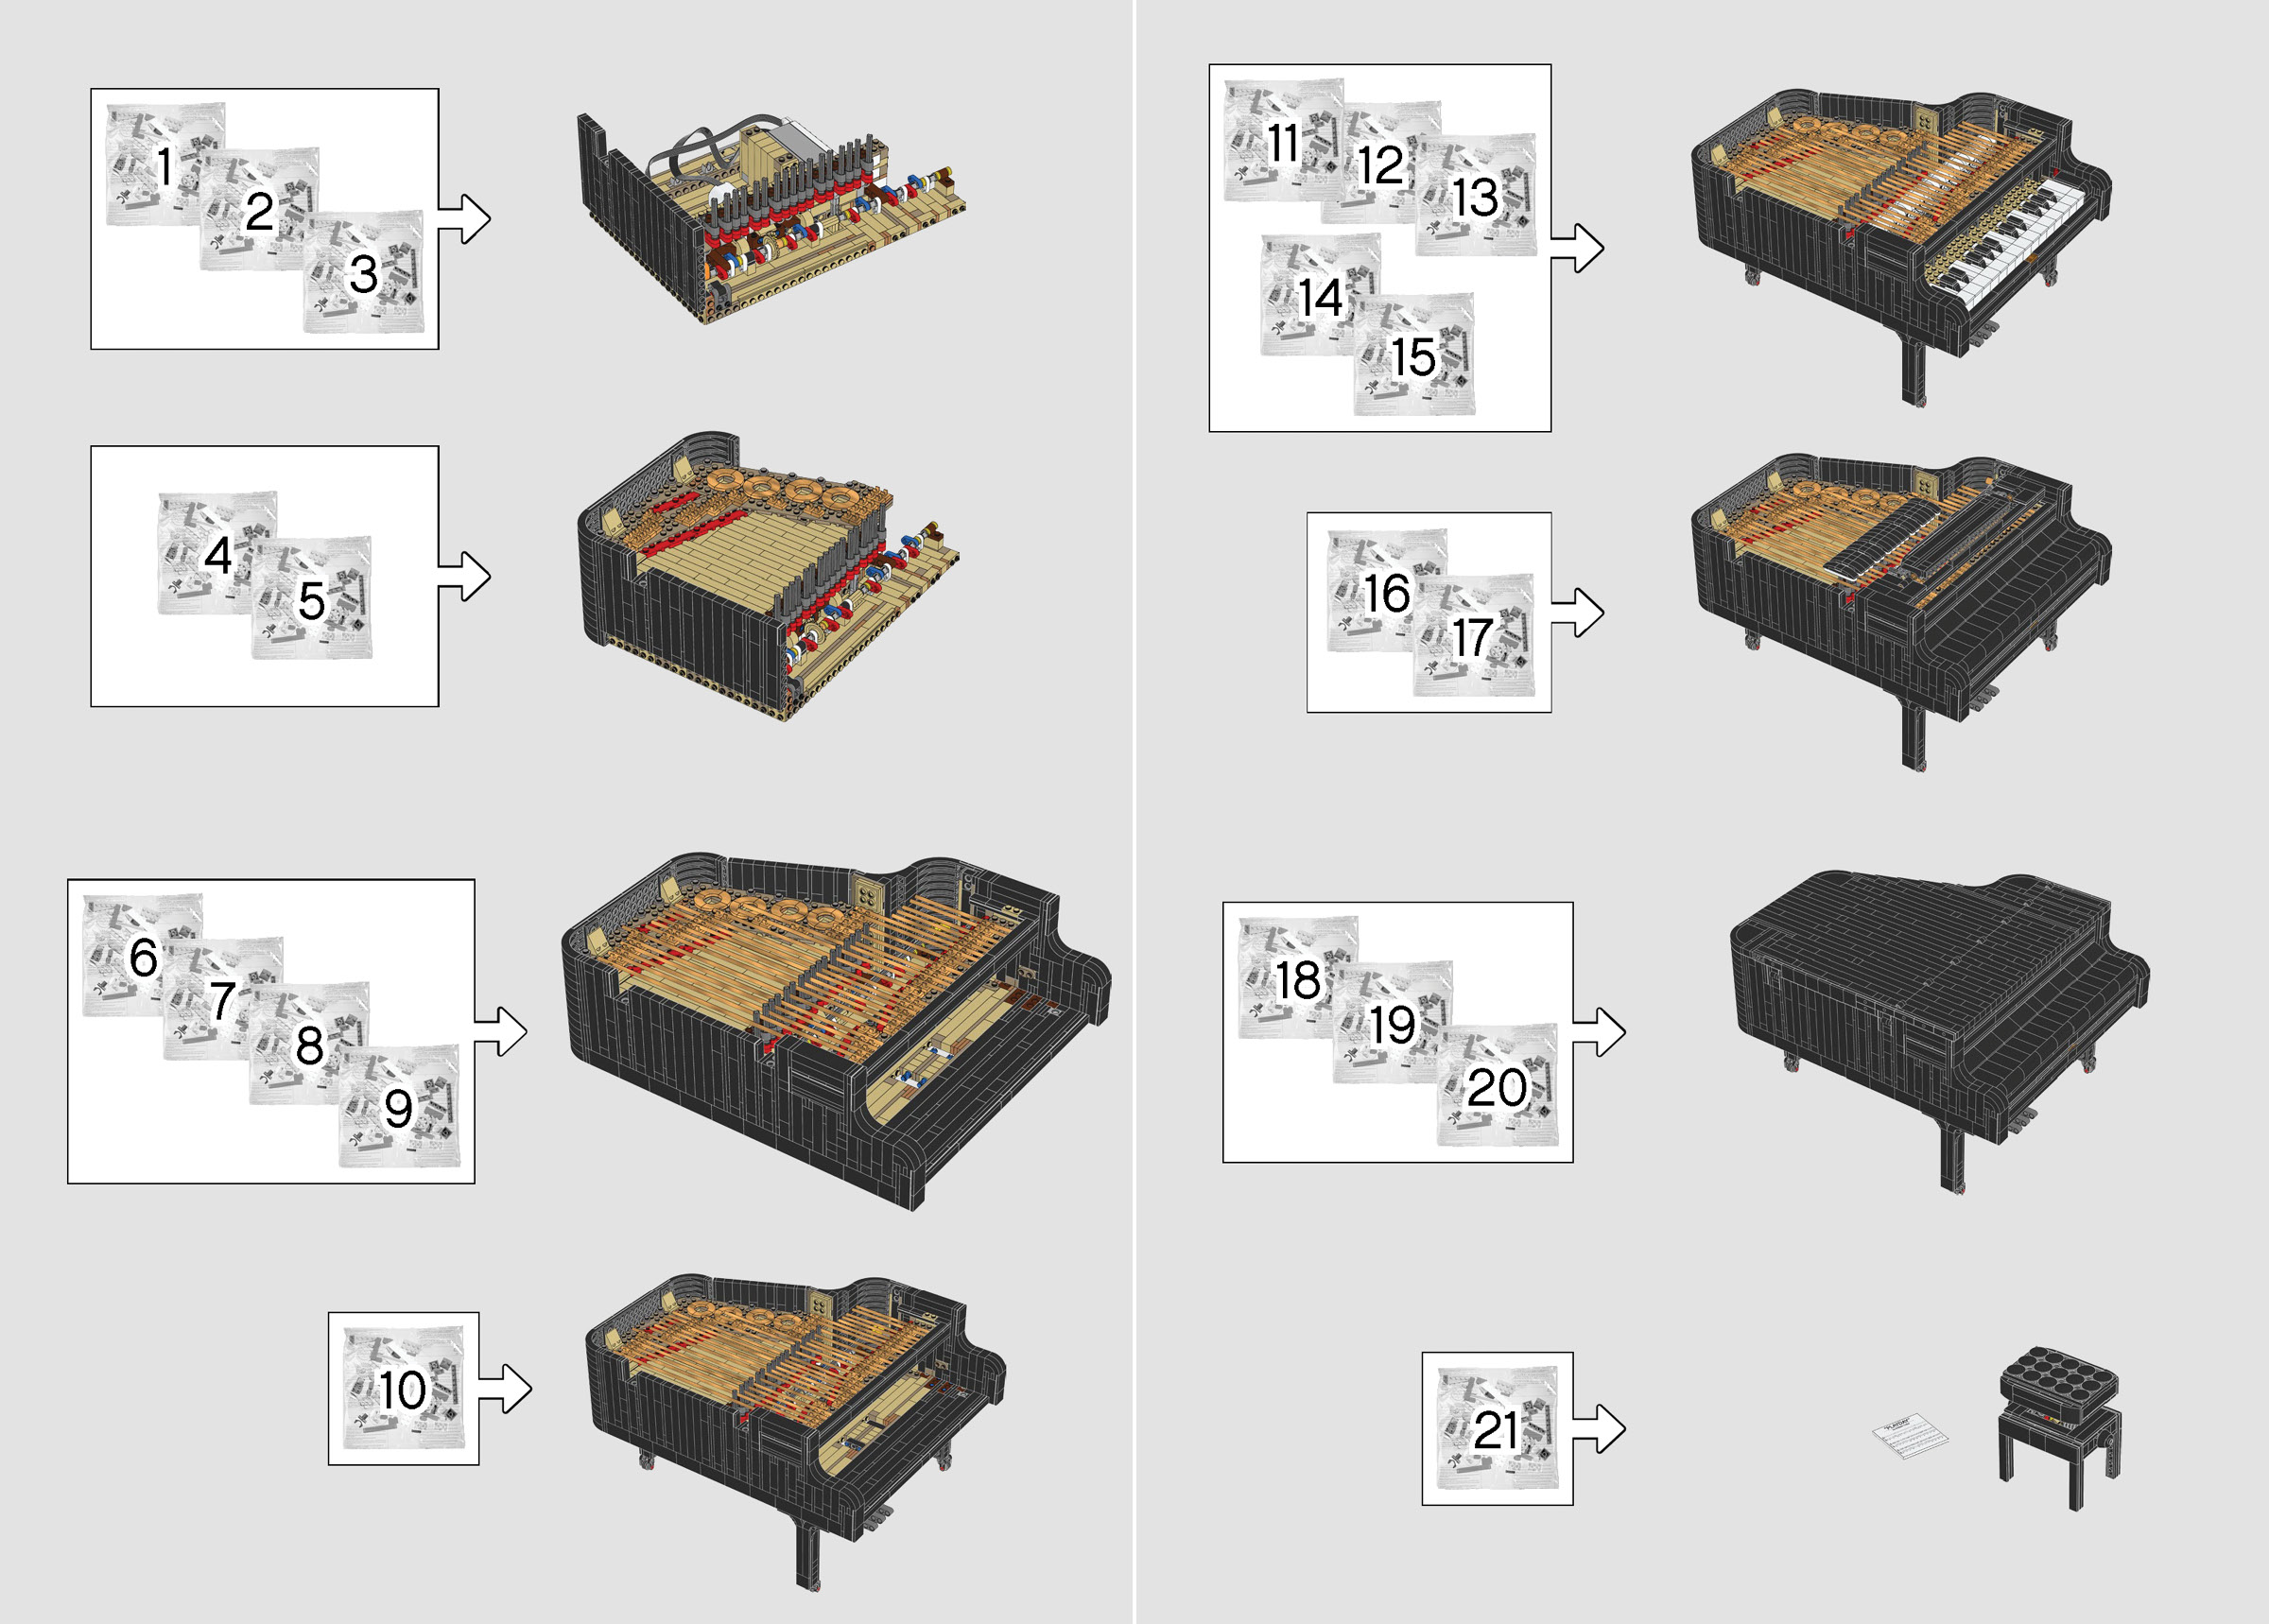
The Grand Piano is built across 21 bags and 8 phases. (Image: The LEGO Group)
The build process is broken down into 21 numbered bags, although as you can see in the instruction booklet, this works out to just 8 distinct phases. (With an average well under 200 pieces per bag, each stage should be quick.)
What’s in the smaller box?
- Instruction manual (in bag marked 6338731)
- 3 un-numbered bags. (1 Large bag containing 12x 16L Flex Tubes in 297Warm GoldPearl Gold, 1 Medium bag containing 8×16 Plates, shorter flex tubes and a motor, and finally 1 Medium bag containing the Battery Box, sensor, and some more flex tube in a variety of lengths.
- Loose Parts: 1x 16L Technic Axle, 3x 6×16 Plates in 5Brick YellowTan.
- Stage 1: 1x Large bag (marked 627S0), and 1x Small unmarked bag.
- Stage 2: 1x Large bag (marked 728S0), and 1x Small unmarked bag.
- Stage 3: 1x Large bag (marked 428S0).
- Stage 4: 1x Large bag (marked 327S0), and 1x Small unmarked bag.
- Stage 6: 1x Large bag (marked 128S0), and 1x Medium unmarked bag.
- Stage 7: 1x Large bag (marked 128S0).
- Stage 8: 1x Large bag (marked 427S0), and 1x Small unmarked bag.
- Stage 9: 1x Large bag (marked 527S0), and 1x Small unmarked bag.
What’s loose in the bigger box?
- Stage 5: 1x Large bag (marked 627S0), and 1x Small unmarked bag.
- Stage 10: 1x Large bag (marked 324S0).
- Stage 11: 1x Large bag (marked 424S0).
- Stage 12: 1x Large bag (marked 324S0), and 1x Small unmarked bag.
- Stage 13: 1x Large bag (marked 324S0).
- Stage 14: 1x Large bag (marked 224S0), and 1x Small unmarked bag.
- Stage 15: 1x Large bag (marked 328S0).
- Stage 16: 1x Large bag (marked 224S0), and 1x Small unmarked bag.
- Stage 17: 1x Large bag (marked 627S0).
- Stage 18: 1x Large bag (marked 124S0), and 1x Medium unmarked bag.
- Stage 19: 1x Large bag (marked 124S0).
- Stage 20: 1x Large bag (marked 324S0).
- Stage 21: 1x Large bag (marked 224S0), and 1x Medium unmarked bag.
Stages 1-3: Motors and Mechanisms
This is such a large model that you can’t expect to build something recognizable in just one bag. In the first bag, we build an L-shaped assembly with a black surface on the right, SNOT connections along the corner and a back wall made mostly of 5Brick YellowTan and 138Sand YellowDark Tan parts.
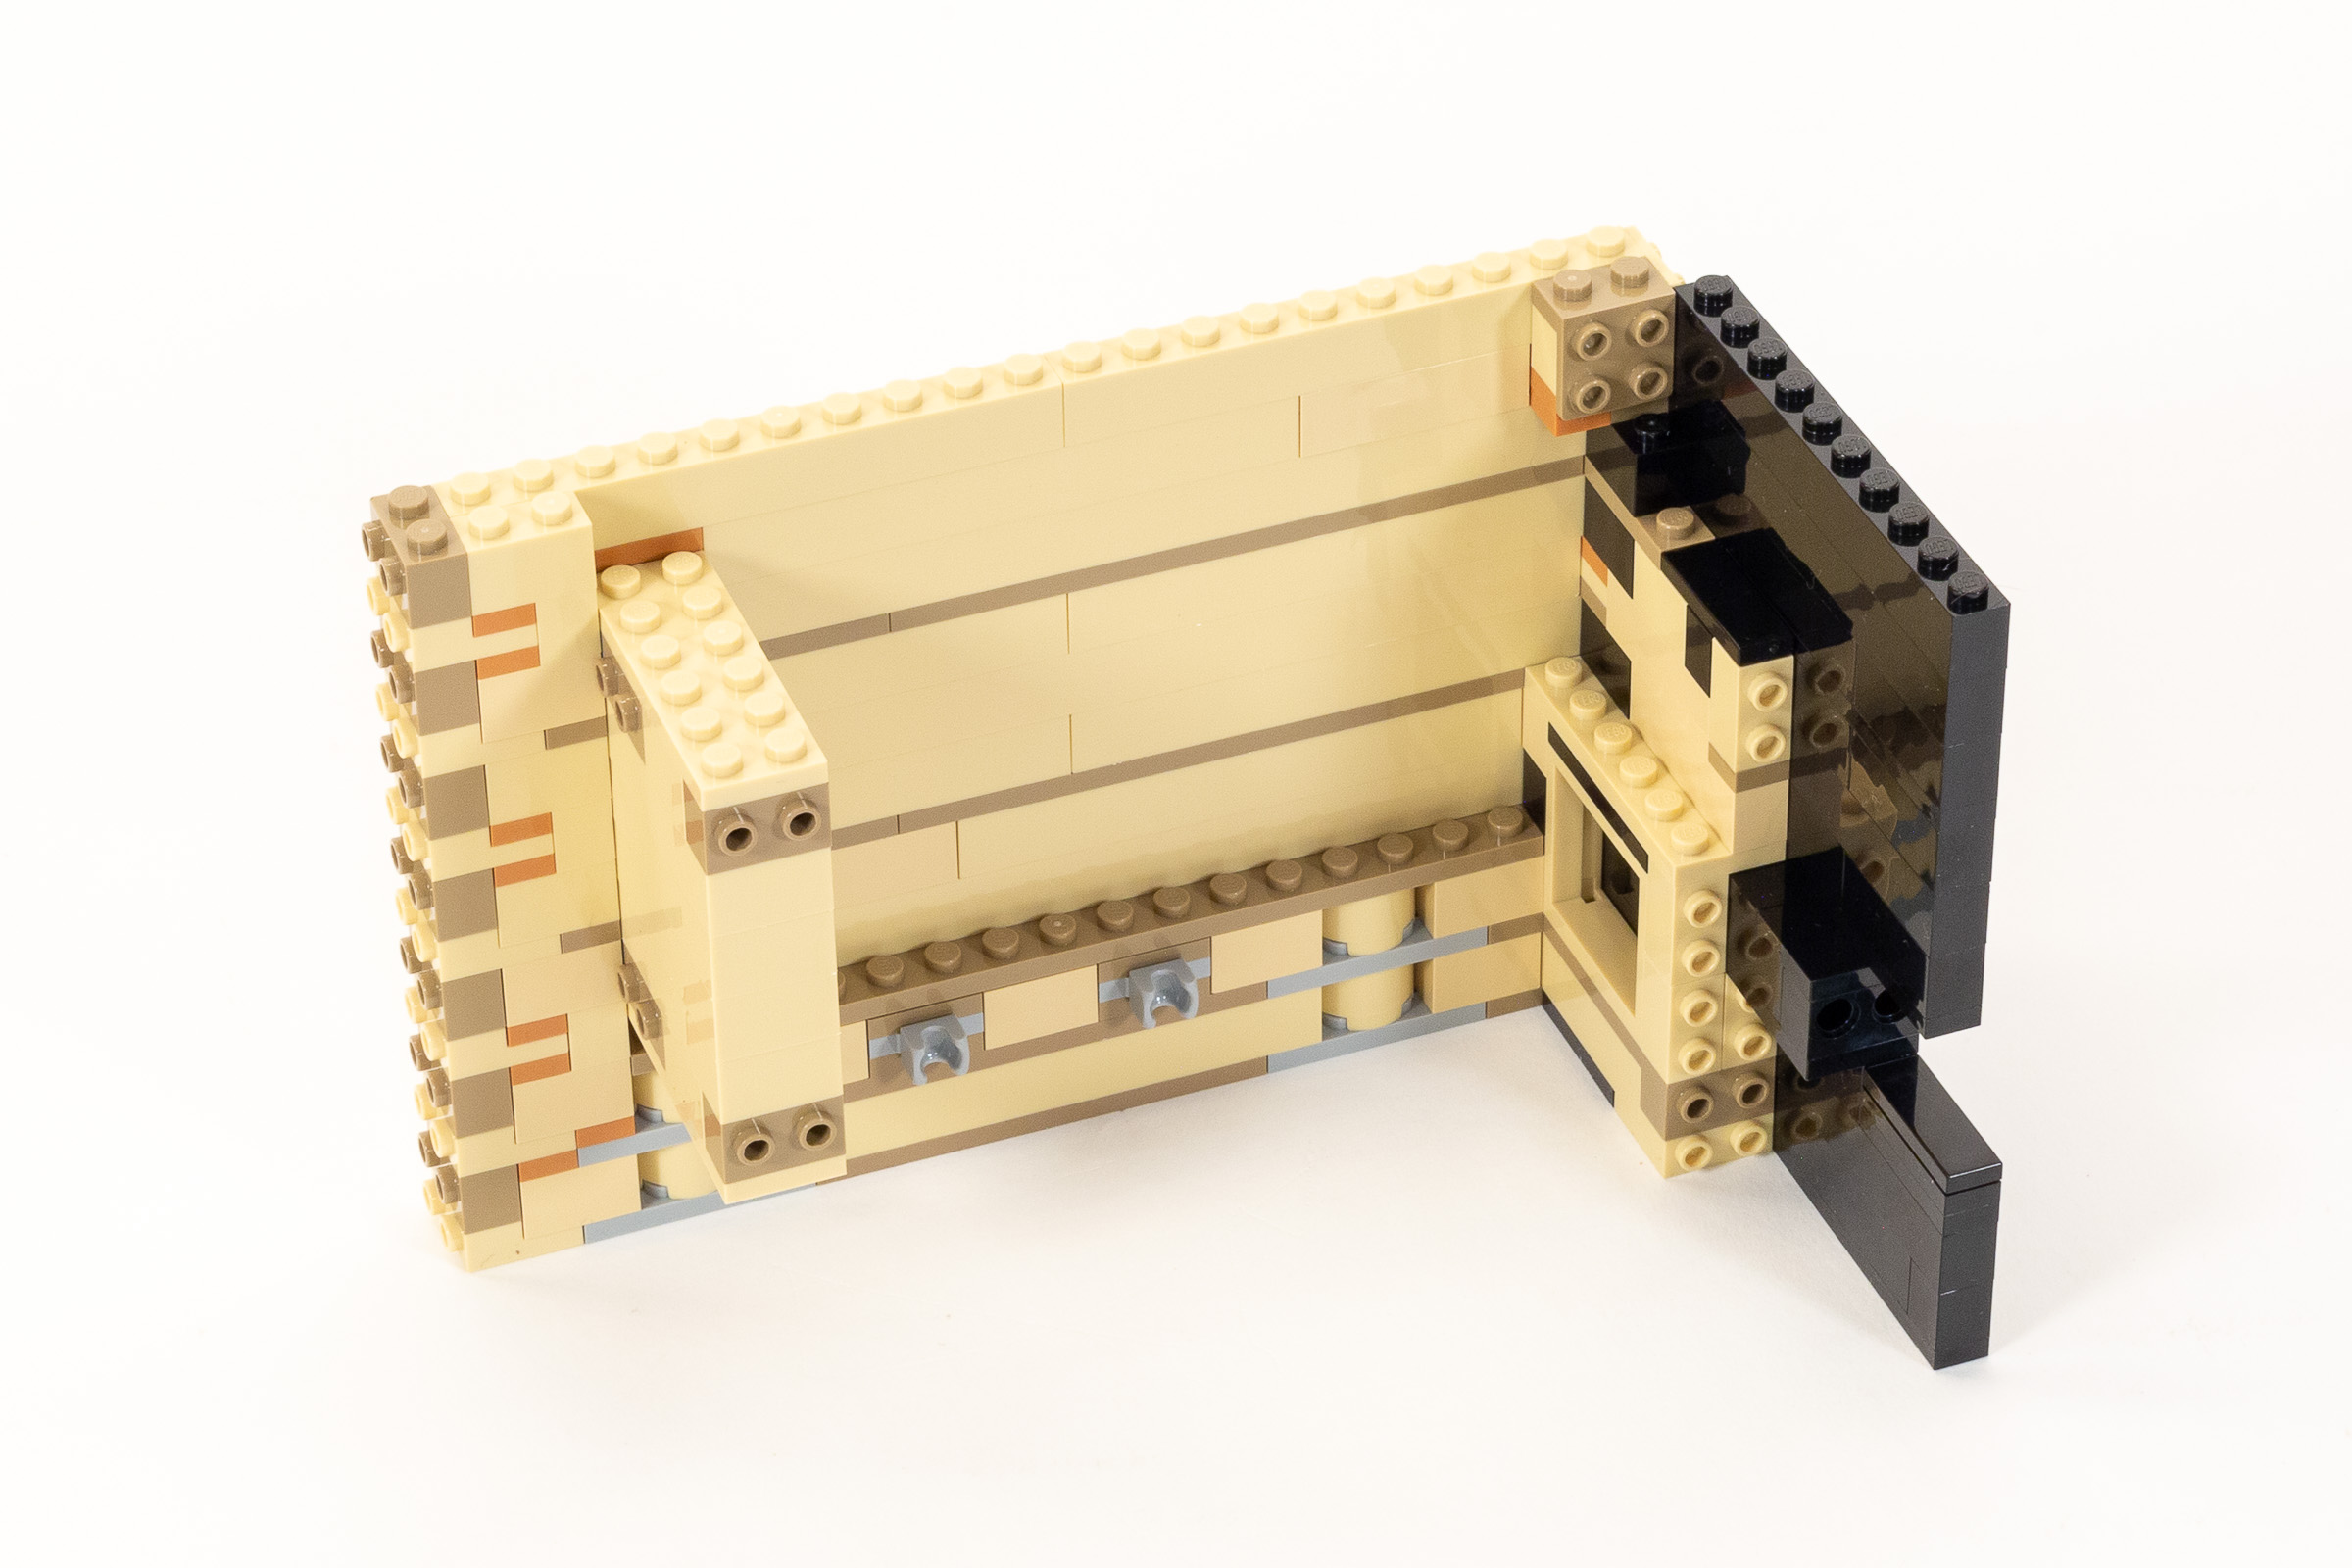
Progress at the end of Stage 1.
Things get a little more interesting in the second bag, as we quickly finish the L-shaped brick-built frame, then move on to an intricate Technic assembly. It involves a central axle with 1×2 Thin Liftarms (part 41677) attached in three different orientations. To make this easier to assemble, each orientation corresponds to a different color, with liftarms pointing forward in 21Bright RedRed, pointing down in 1White and pointed backwards in 23Bright BlueBlue. This is especially helpful since we build two of these assemblies on separate 16L Axles, as the color-coding makes it easier to ensure they are connected in the same orientation.
Progress at the end of Stage 2.
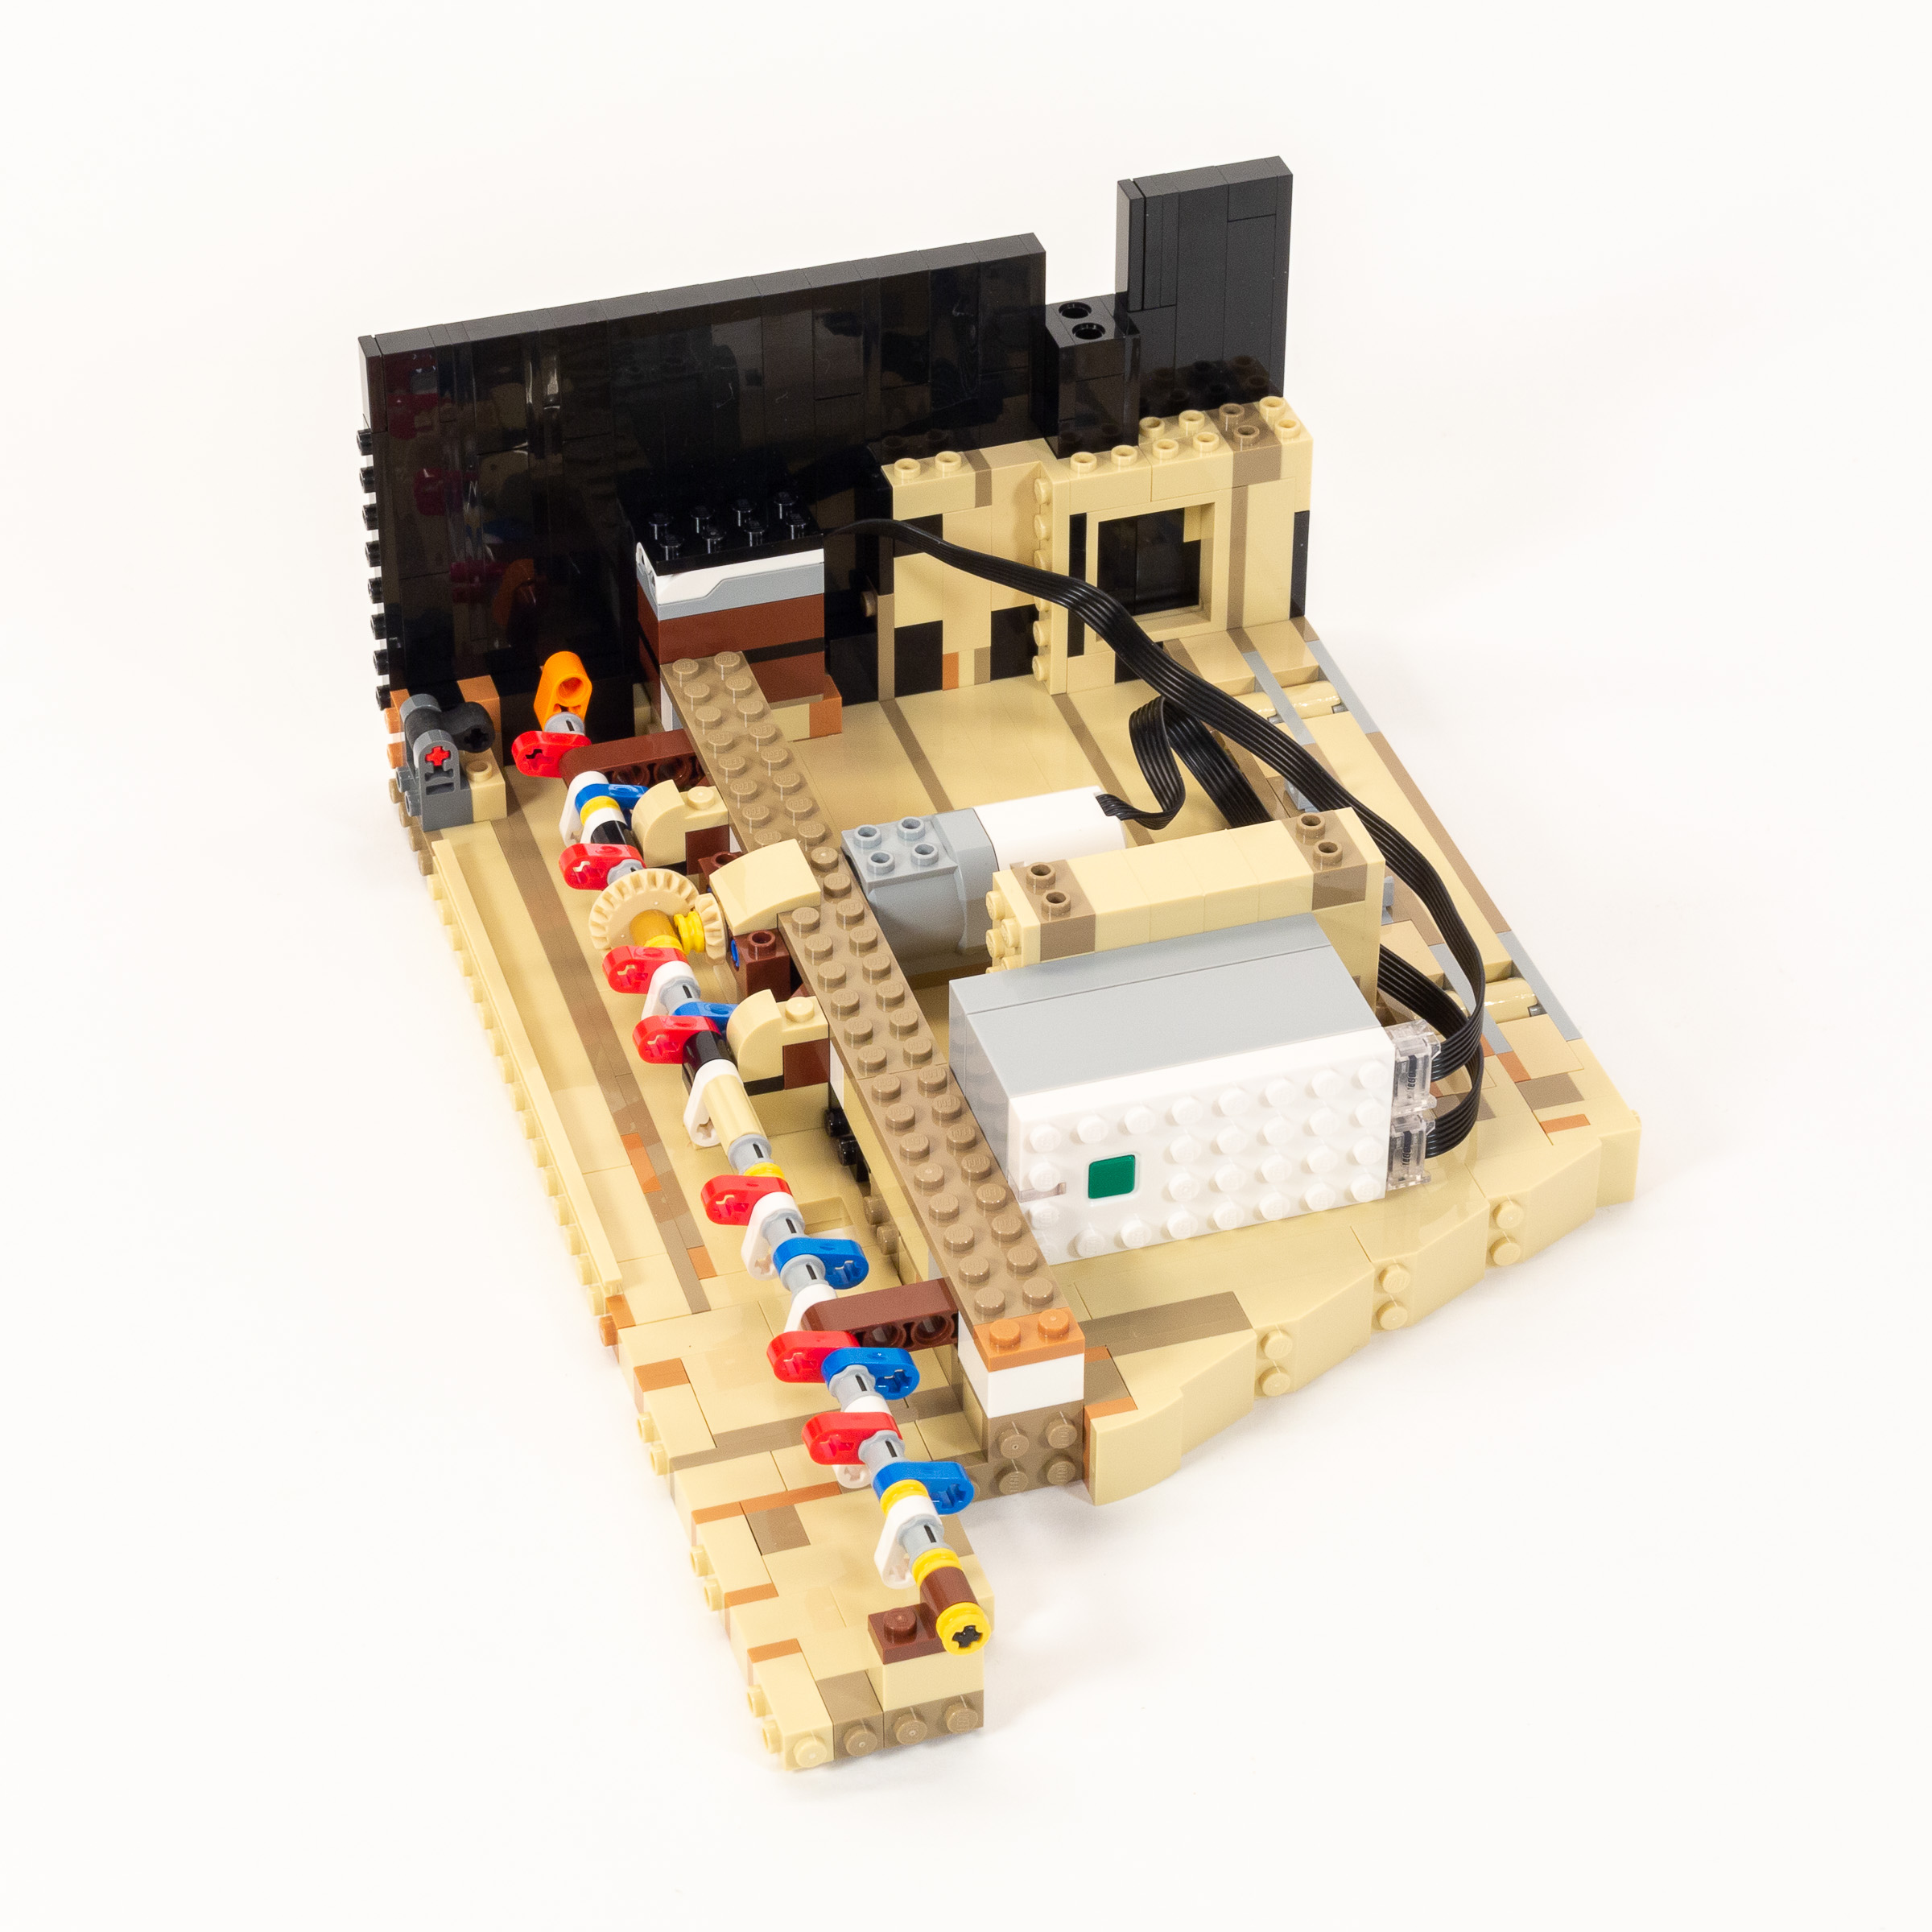
Also surprising, we waste no time connecting a Technic motor and sensor to the Power Functions hub; don’t forget six AAA (rechargeable) batteries, and a tiny screwdriver to open the battery box. I’m a bit more eager to keep going since I’m hoping we will continue to see how it works in the next bag.
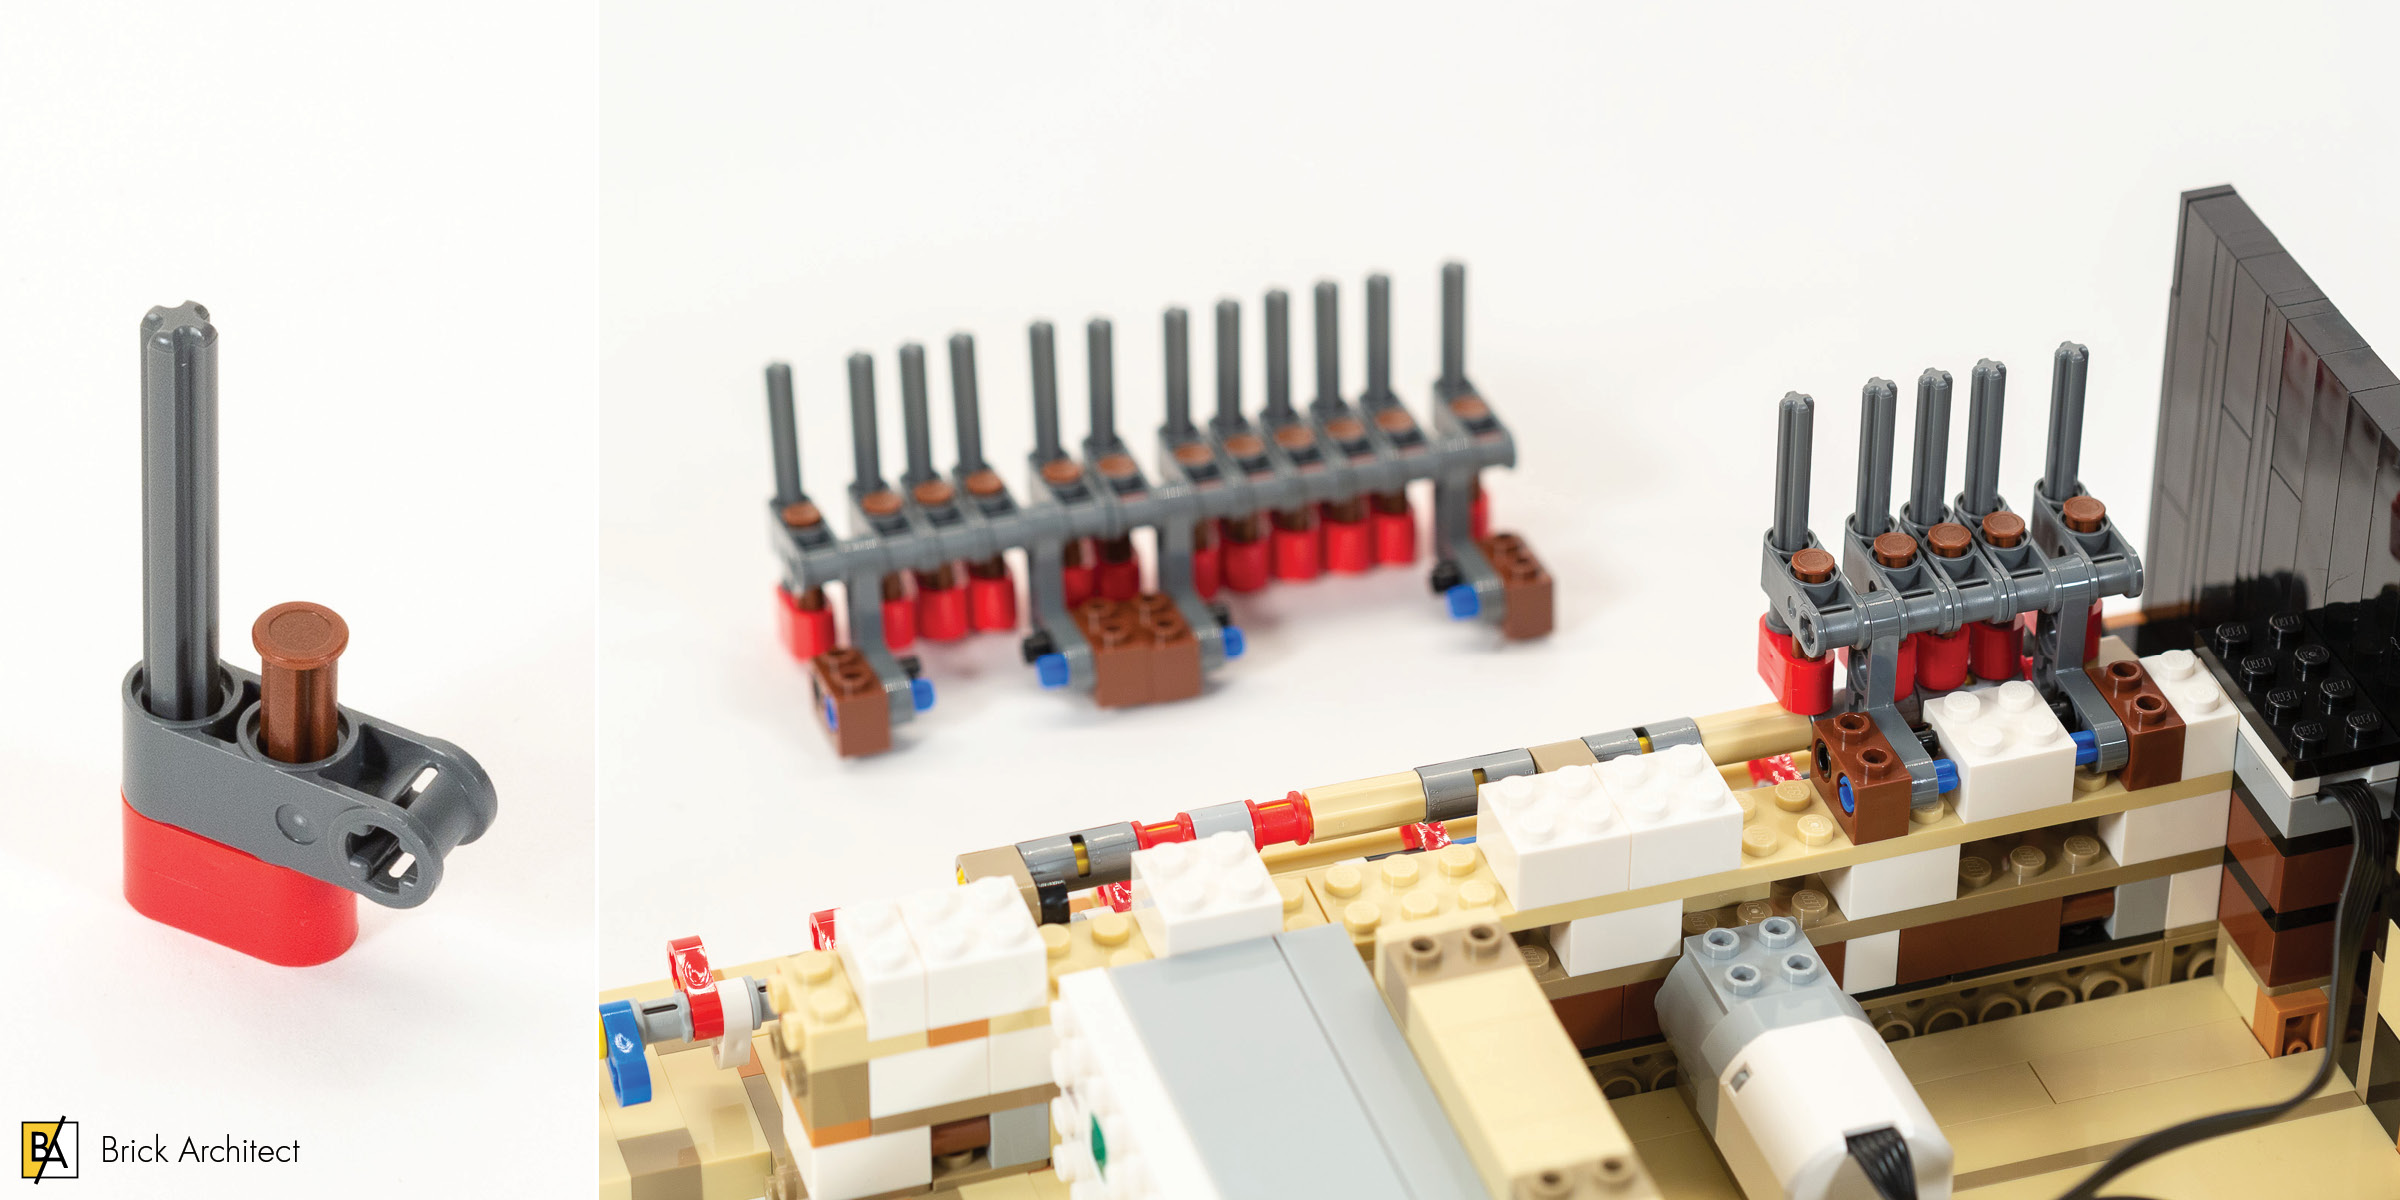
Adding 17 of these modules in stage 3.
The third bag only includes one large bag, and it isn’t all that full, so I had expected a quick stage. Instead, I got a very repetitive but somewhat intricate addition of 17 identical Technic modules that rest on a long axle that pivots up and down about 1 stud in height. These modules are mounted into three larger assemblies. The left and right assemblies are identical, containing 5 modules each, and the center assembly contains 7 modules. Without having seen the final model, my best guess is that these connect to a foot pedal. (Remember, I only have a basic understanding of how a piano works.)
Build time: 70 minutes. (Stage 1: 20 minutes, Stage 2: 30 minutes, Stage 3: 20 minutes.)
Stages 4-5: Soundboard
The fourth stage builds the literal soundboard using Technic frames for a sub-structure, with large LEGO plates on top of it. It is topped with a layer of 5Brick YellowTan tiles, which are arranged in a staggered pattern that closely mimics how large panels of wood are made by joining smaller pieces together. The light color resembles that of lighter colored woods. Upon further research I learned that spruce is the most common wood used to make the soundboard, which makes sense since it is a light-colored wood.

Assembling the Soundboard.
The soundboard is built as a separate assembly and attached in the last step of this stage. While it does not offer any particularly interesting building techniques, I did appreciate the attention to detail which uses both 1×3 and 1×6 Tiles to achieve a very clean, evenly staggered appearance.
Progress at the end of Stage 4.
Progress at the end of Stage 5.
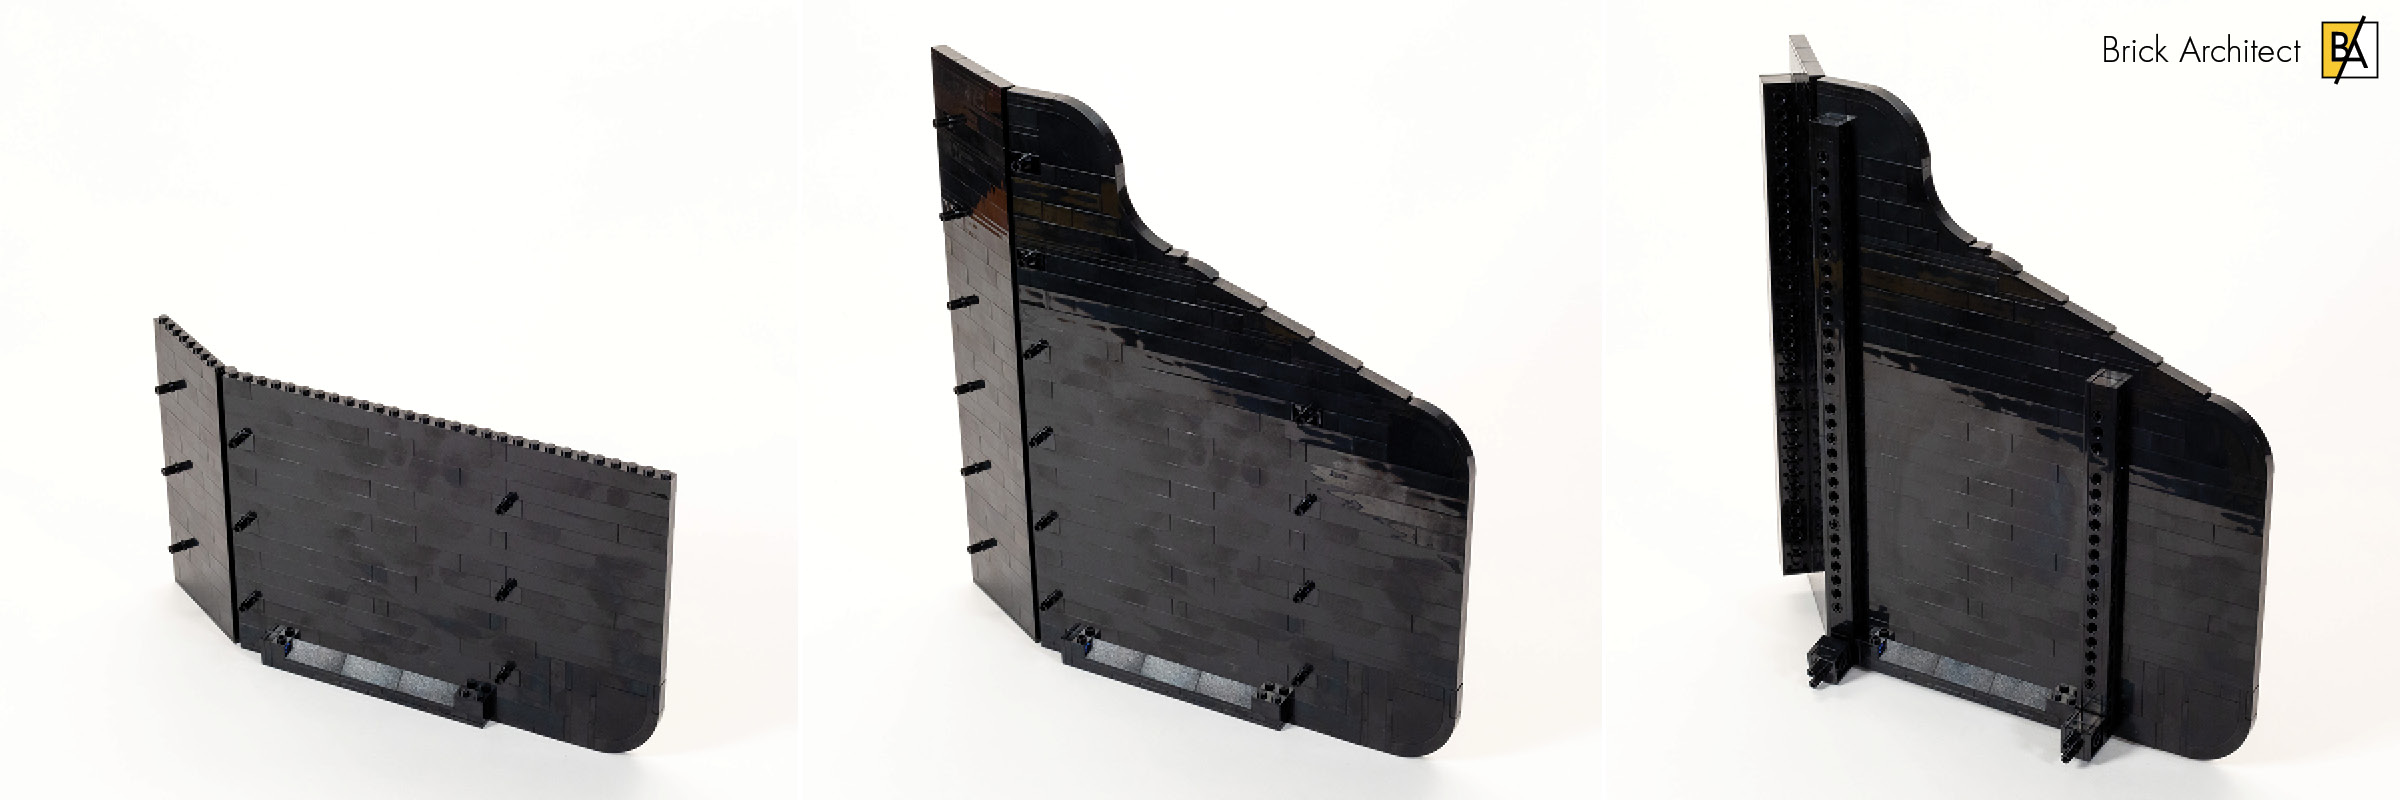
The fifth bag adds another 4 studs of depth to the soundboard, and wraps the rear exterior with a whole lot of 26Black curved parts and tiles. The sheer magnitude of the set is really starting to make it’s presence known!
Build time: 55 minutes. (Stage 4: 20 minutes, Stage 5: 35 minutes.)
Stages 6-9: Cabinet front & strings
The sixth stage is pretty straightforward… Just a simple U-shaped assembly constructed using mostly basic bricks, with a SNOT assembly along the corners and some technic connections in the back. The back is a mix of beige hues with 26Black on the left and right side.
Progress at the end of Stage 6 (left) and Stage 7 (right).
Stage 7 continues where we left off, adding about six more layers of 26Black bricks. This goes very quickly.
After the previous stage, Stage 8 is a substantial-feeling moment in the build, as we marry the module created in the last two stages with the large assembly we had already built. This goes together neatly, since the SNOT elements lined up perfectly in my model. It doesn’t feel all that sturdy, but perhaps we will reinforce the connection in the stages to come.

Marriage of the front and back assemblies during Stage 8.
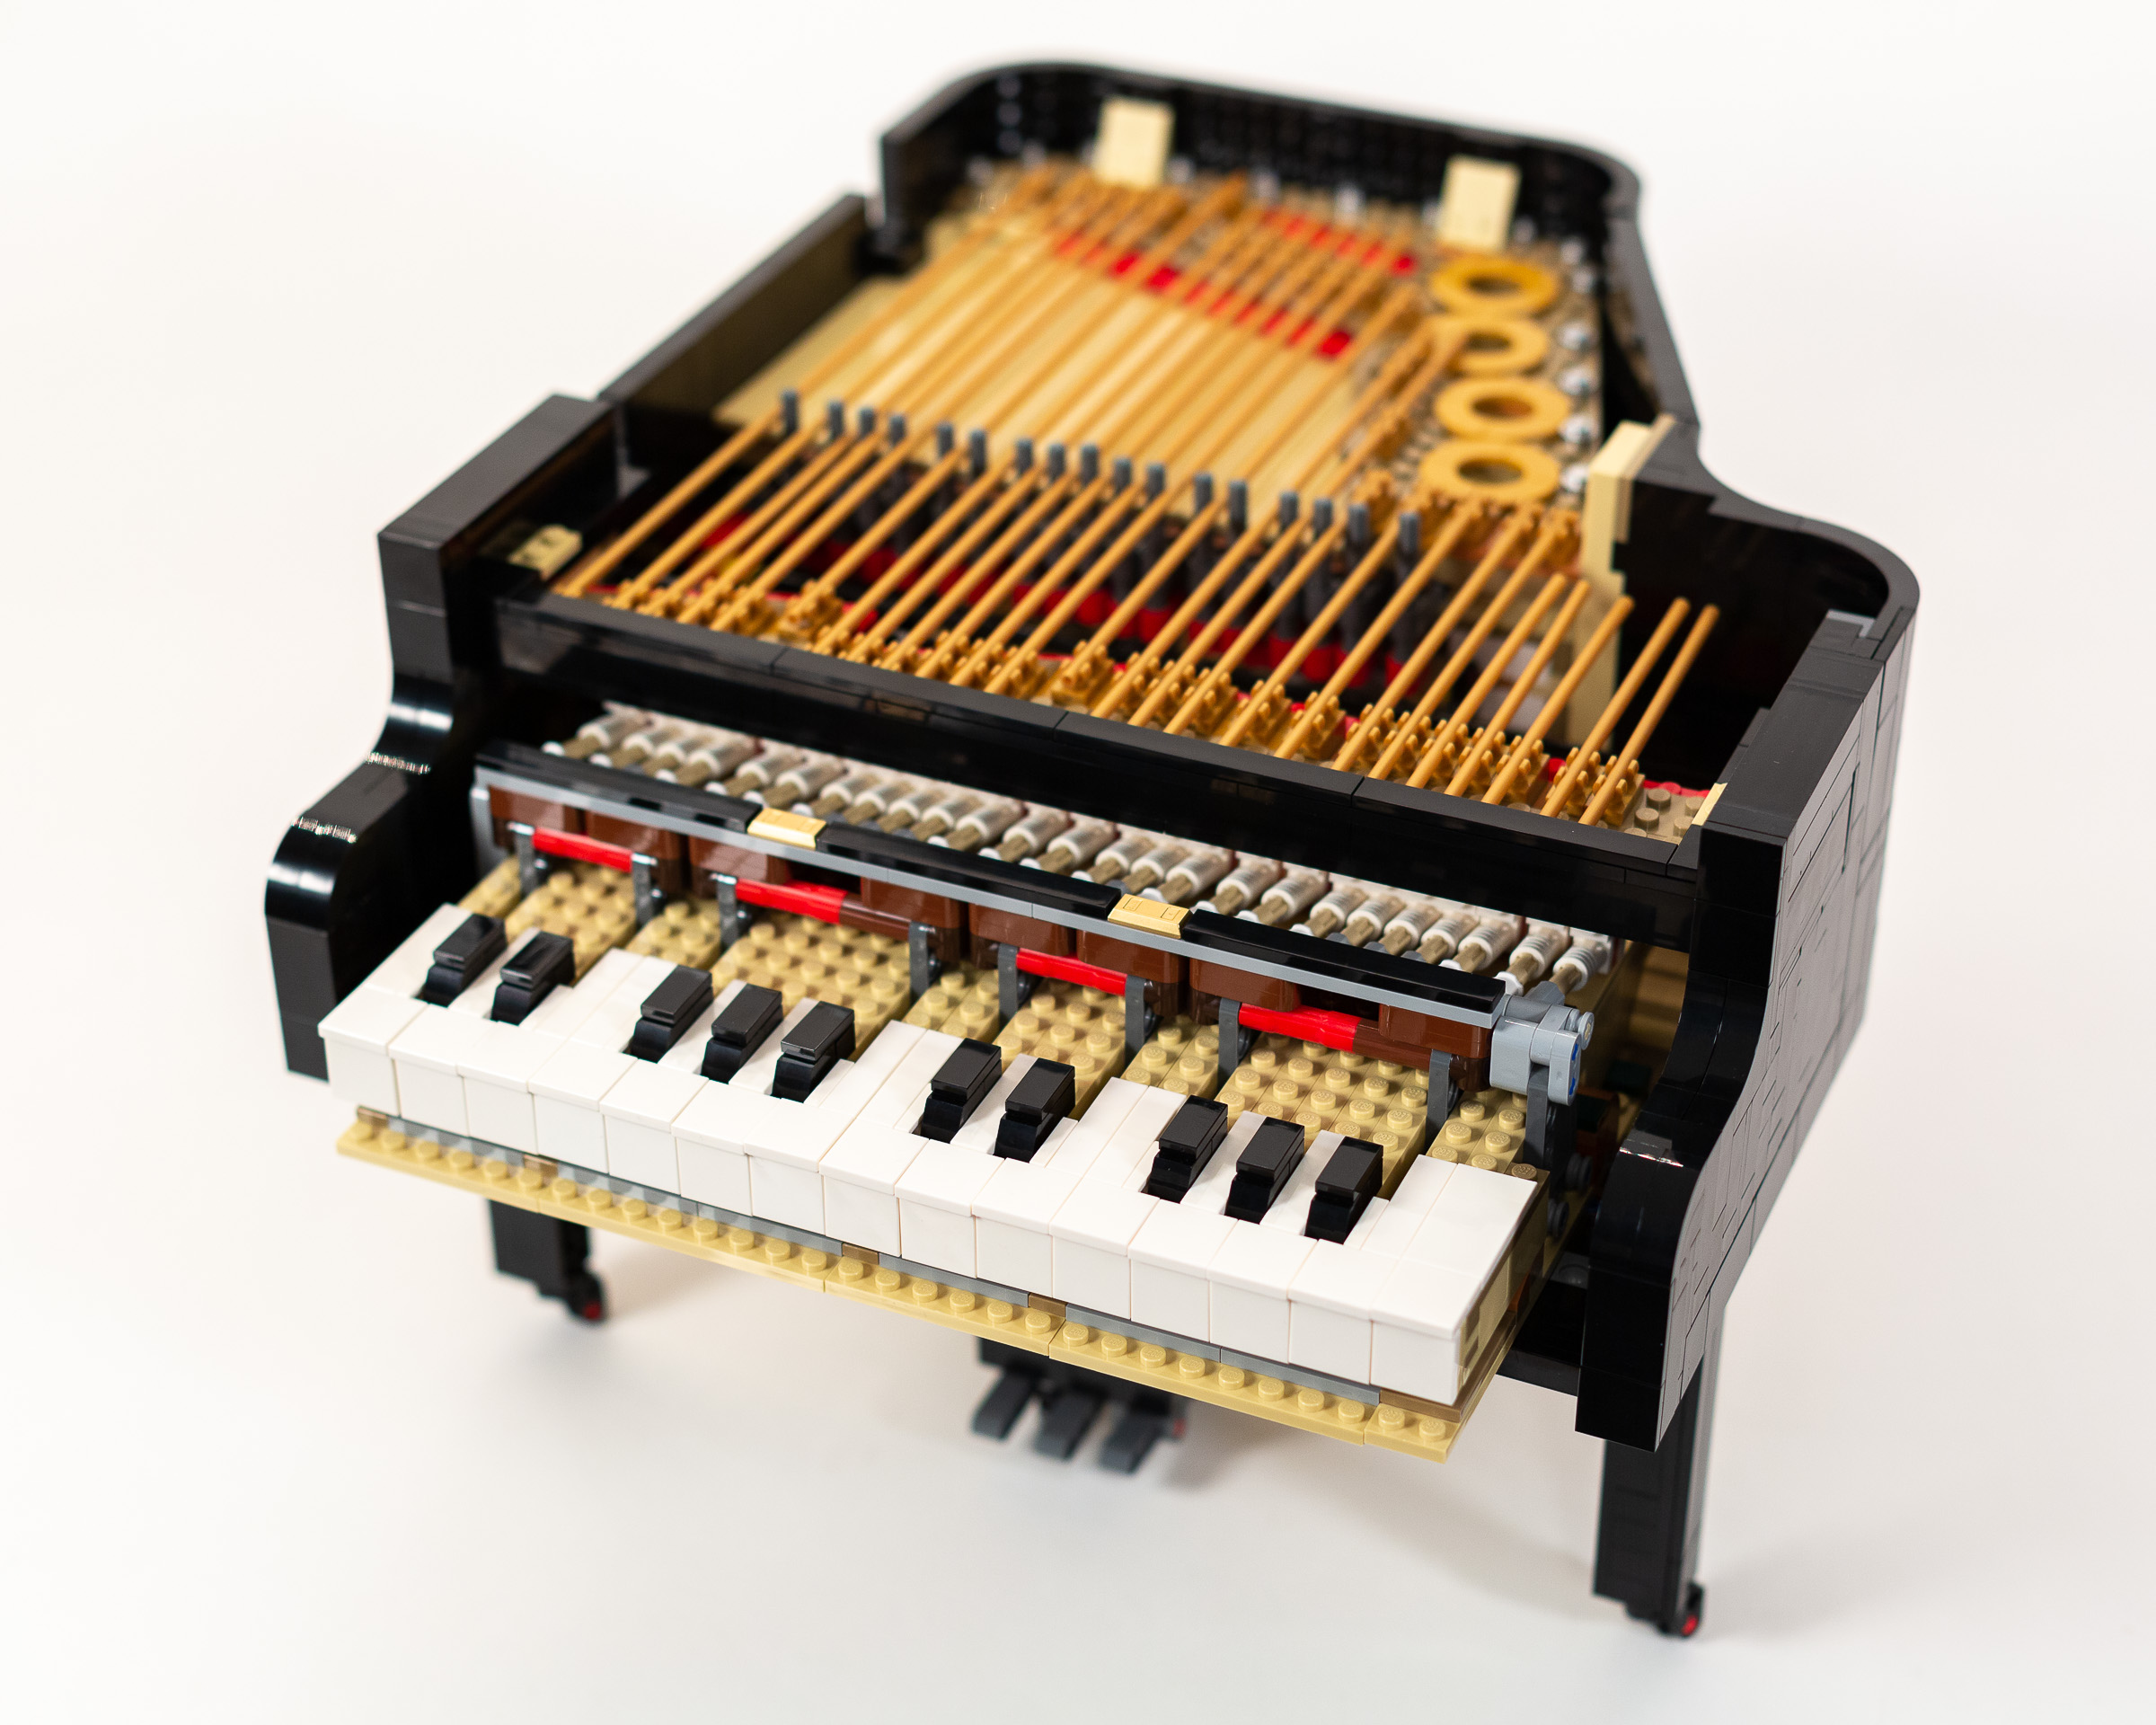
This is followed by building the front edge of the piano, which includes no fewer than 49x 1×1 Clip, Top (part 15712) in 297Warm GoldPearl Gold that need to be carefully aligned. Afterwards, we connect the “strings” which are actually four different lengths of Flex Tube, also in 297Warm GoldPearl Gold color. Finally, we carefully lace the “strings” between all of the Technic components in the first assembly, and attach the strings to the clips on the other side. This is a very satisfying step, which I enjoyed a lot despite my ambivalence for this set.
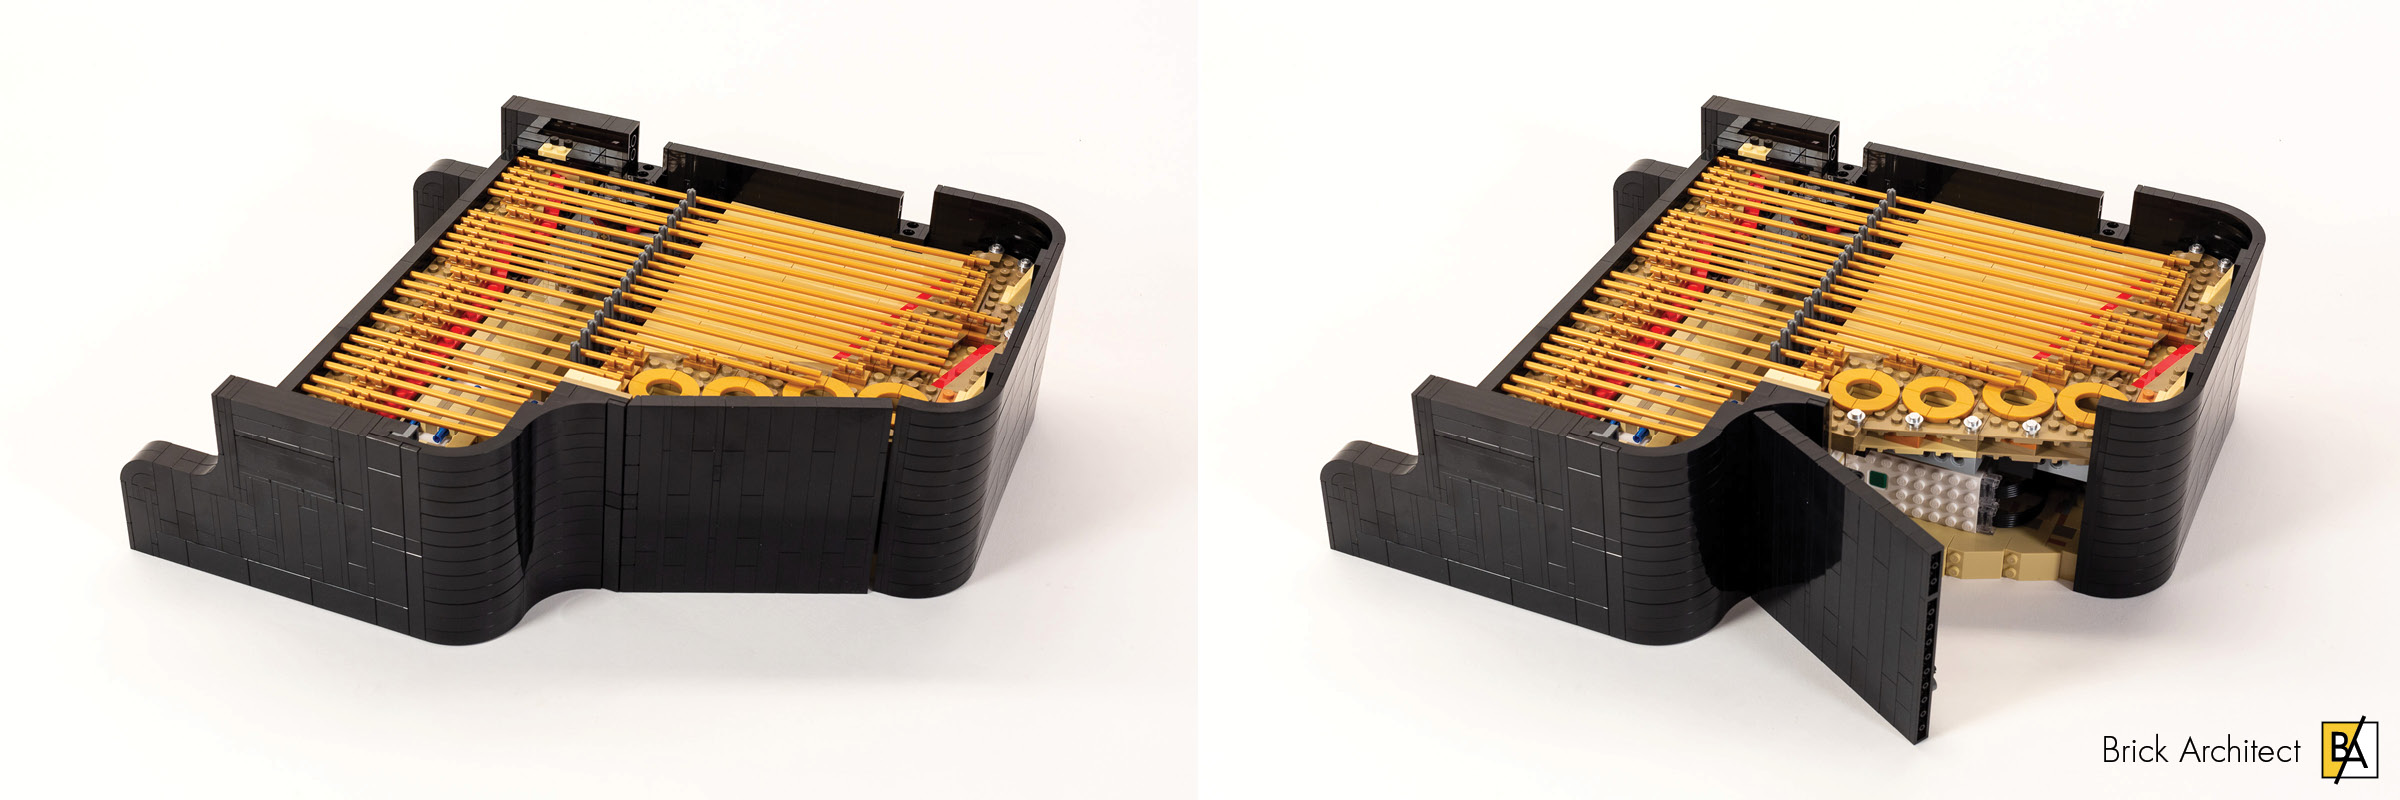
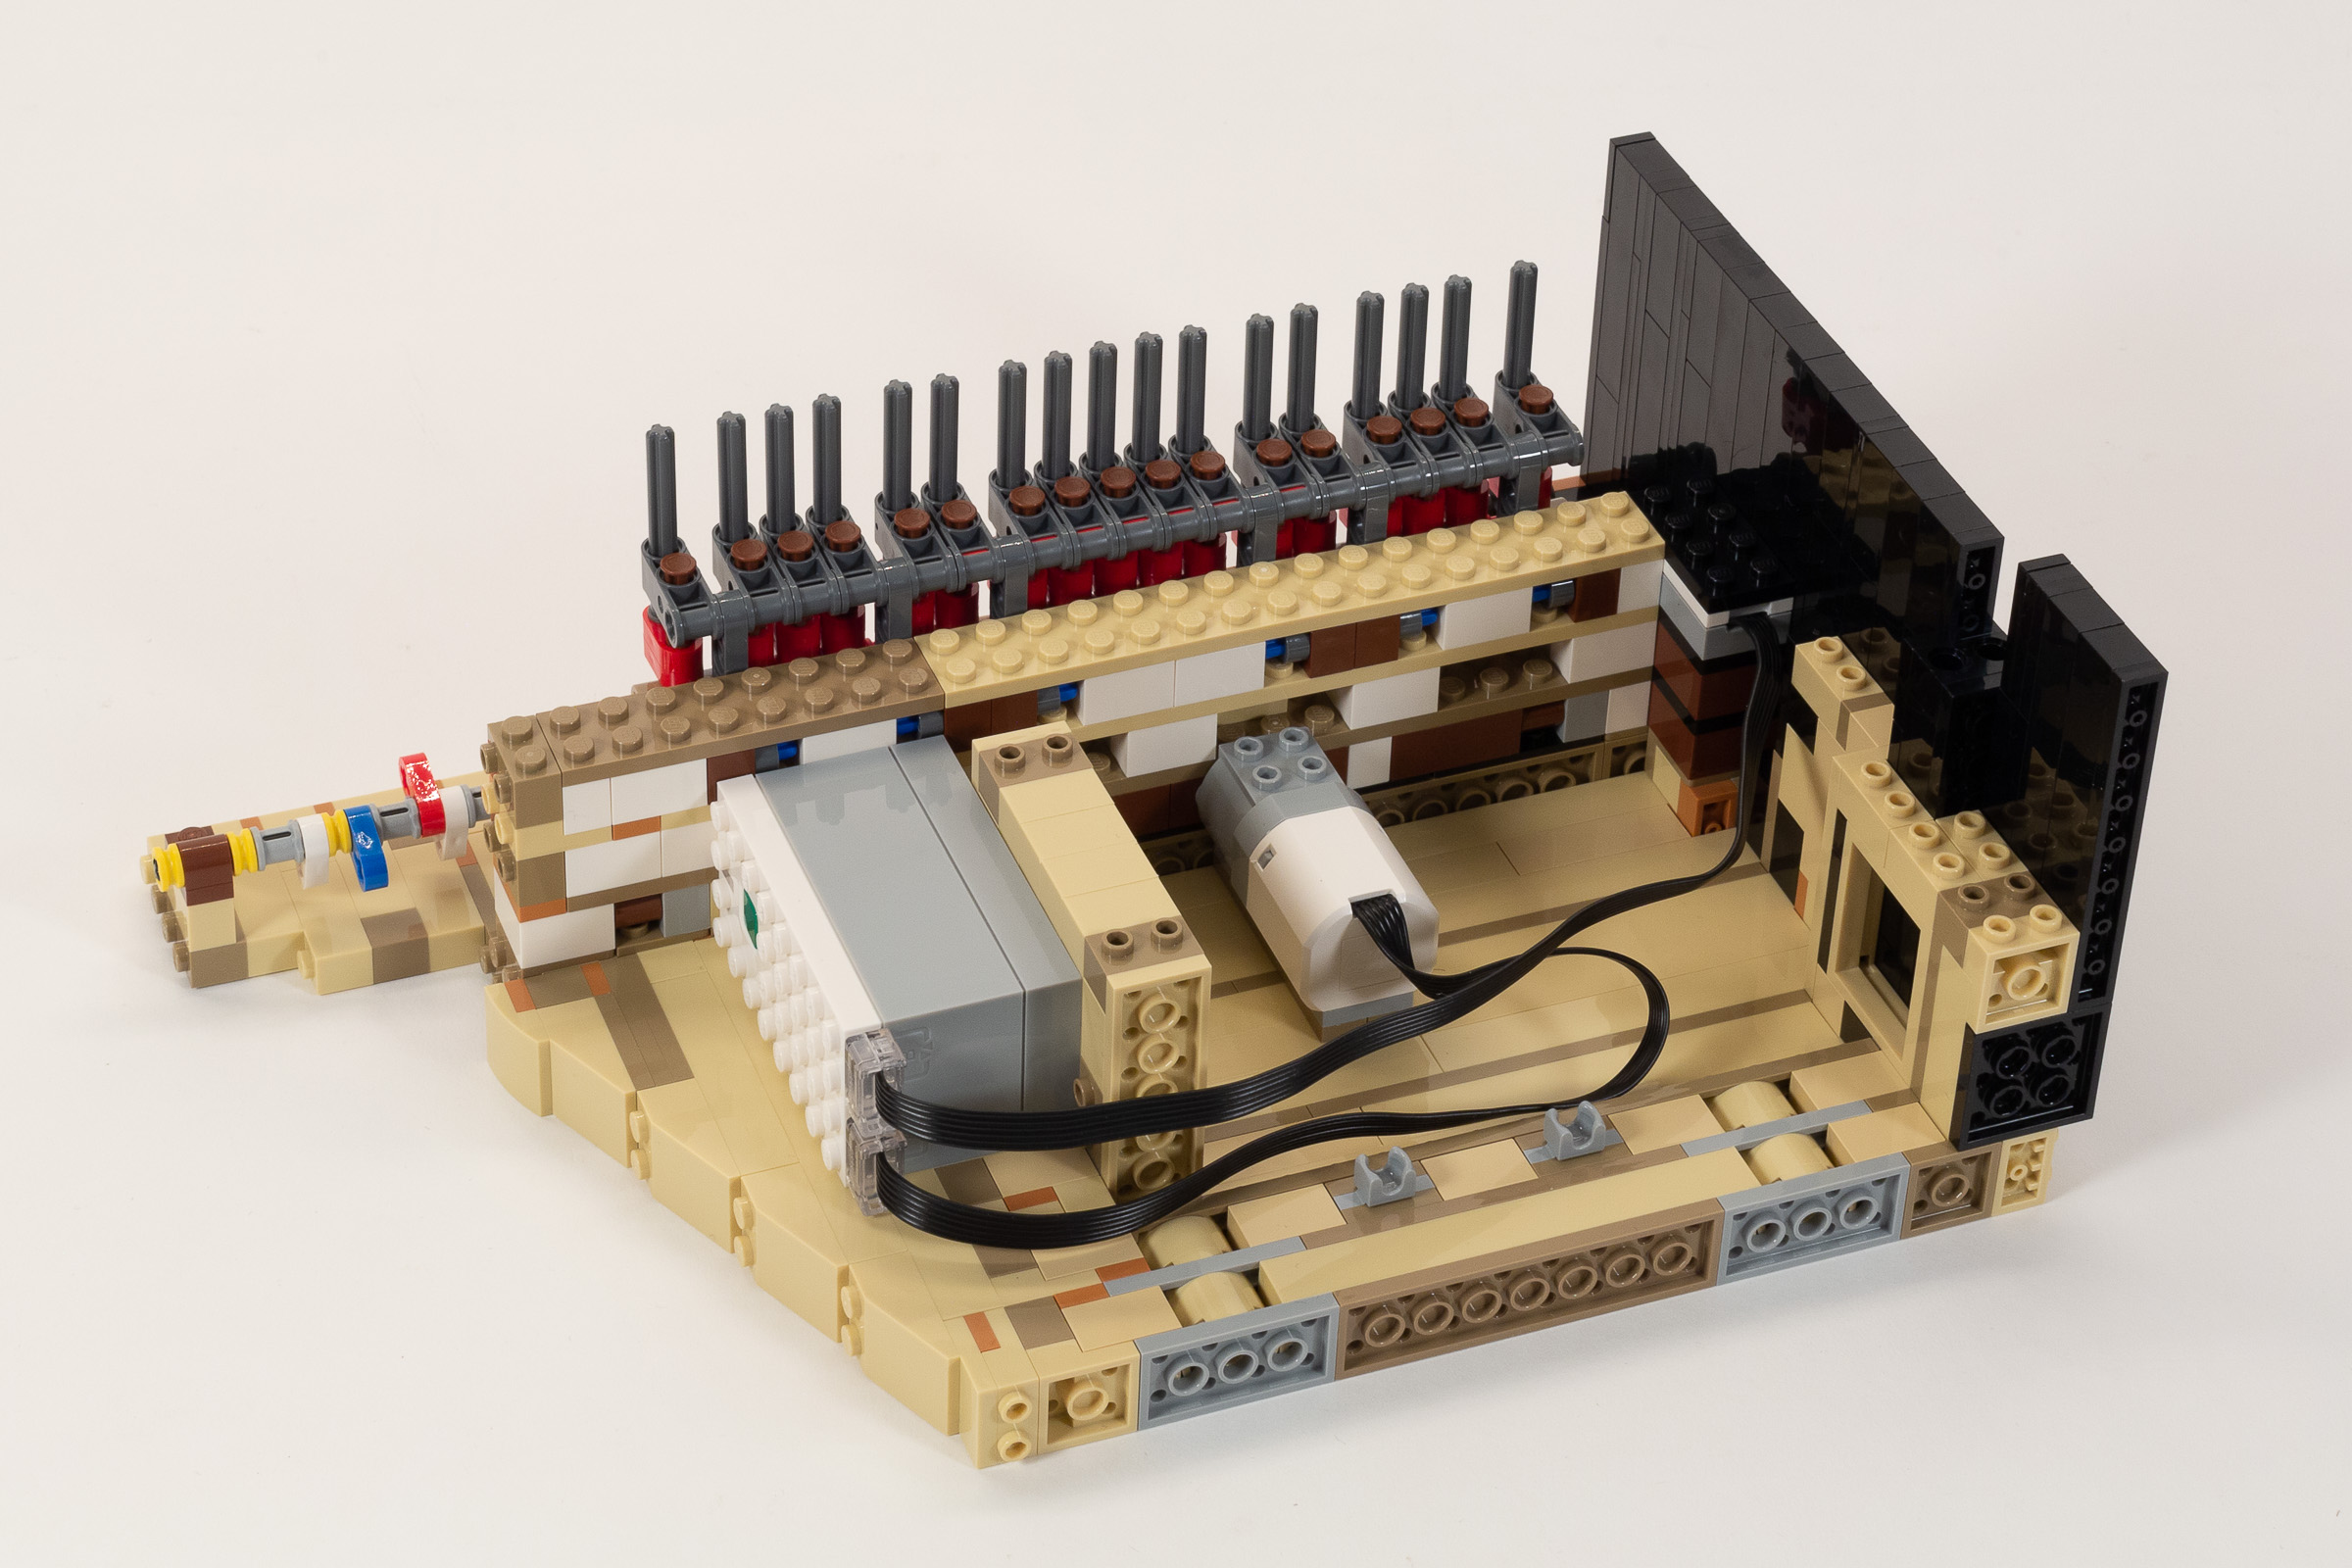
In stage 9, we add the rear-right of the piano, including a flap to turn on the Powered Up hub.
Stage 9 finishes this section of the model by carefully wrapping the rest of the exterior with black tiles. This involves both convex and concave shapes on the back right side of the model, and a straight section which is hinged to allow access to the power button.
Build time: 75 minutes. (Stage 6: 20 minutes, Stage 7: 10 minutes, Stage 8: 25 minutes, Stage 9: 20 minutes.)
Stage 10: Legs
This model has legs, or at least it will by the end of this stage… But first, we need to assemble the foot pedal and support, which attaches to Technic elements that remain exposed through the base of the growing model.
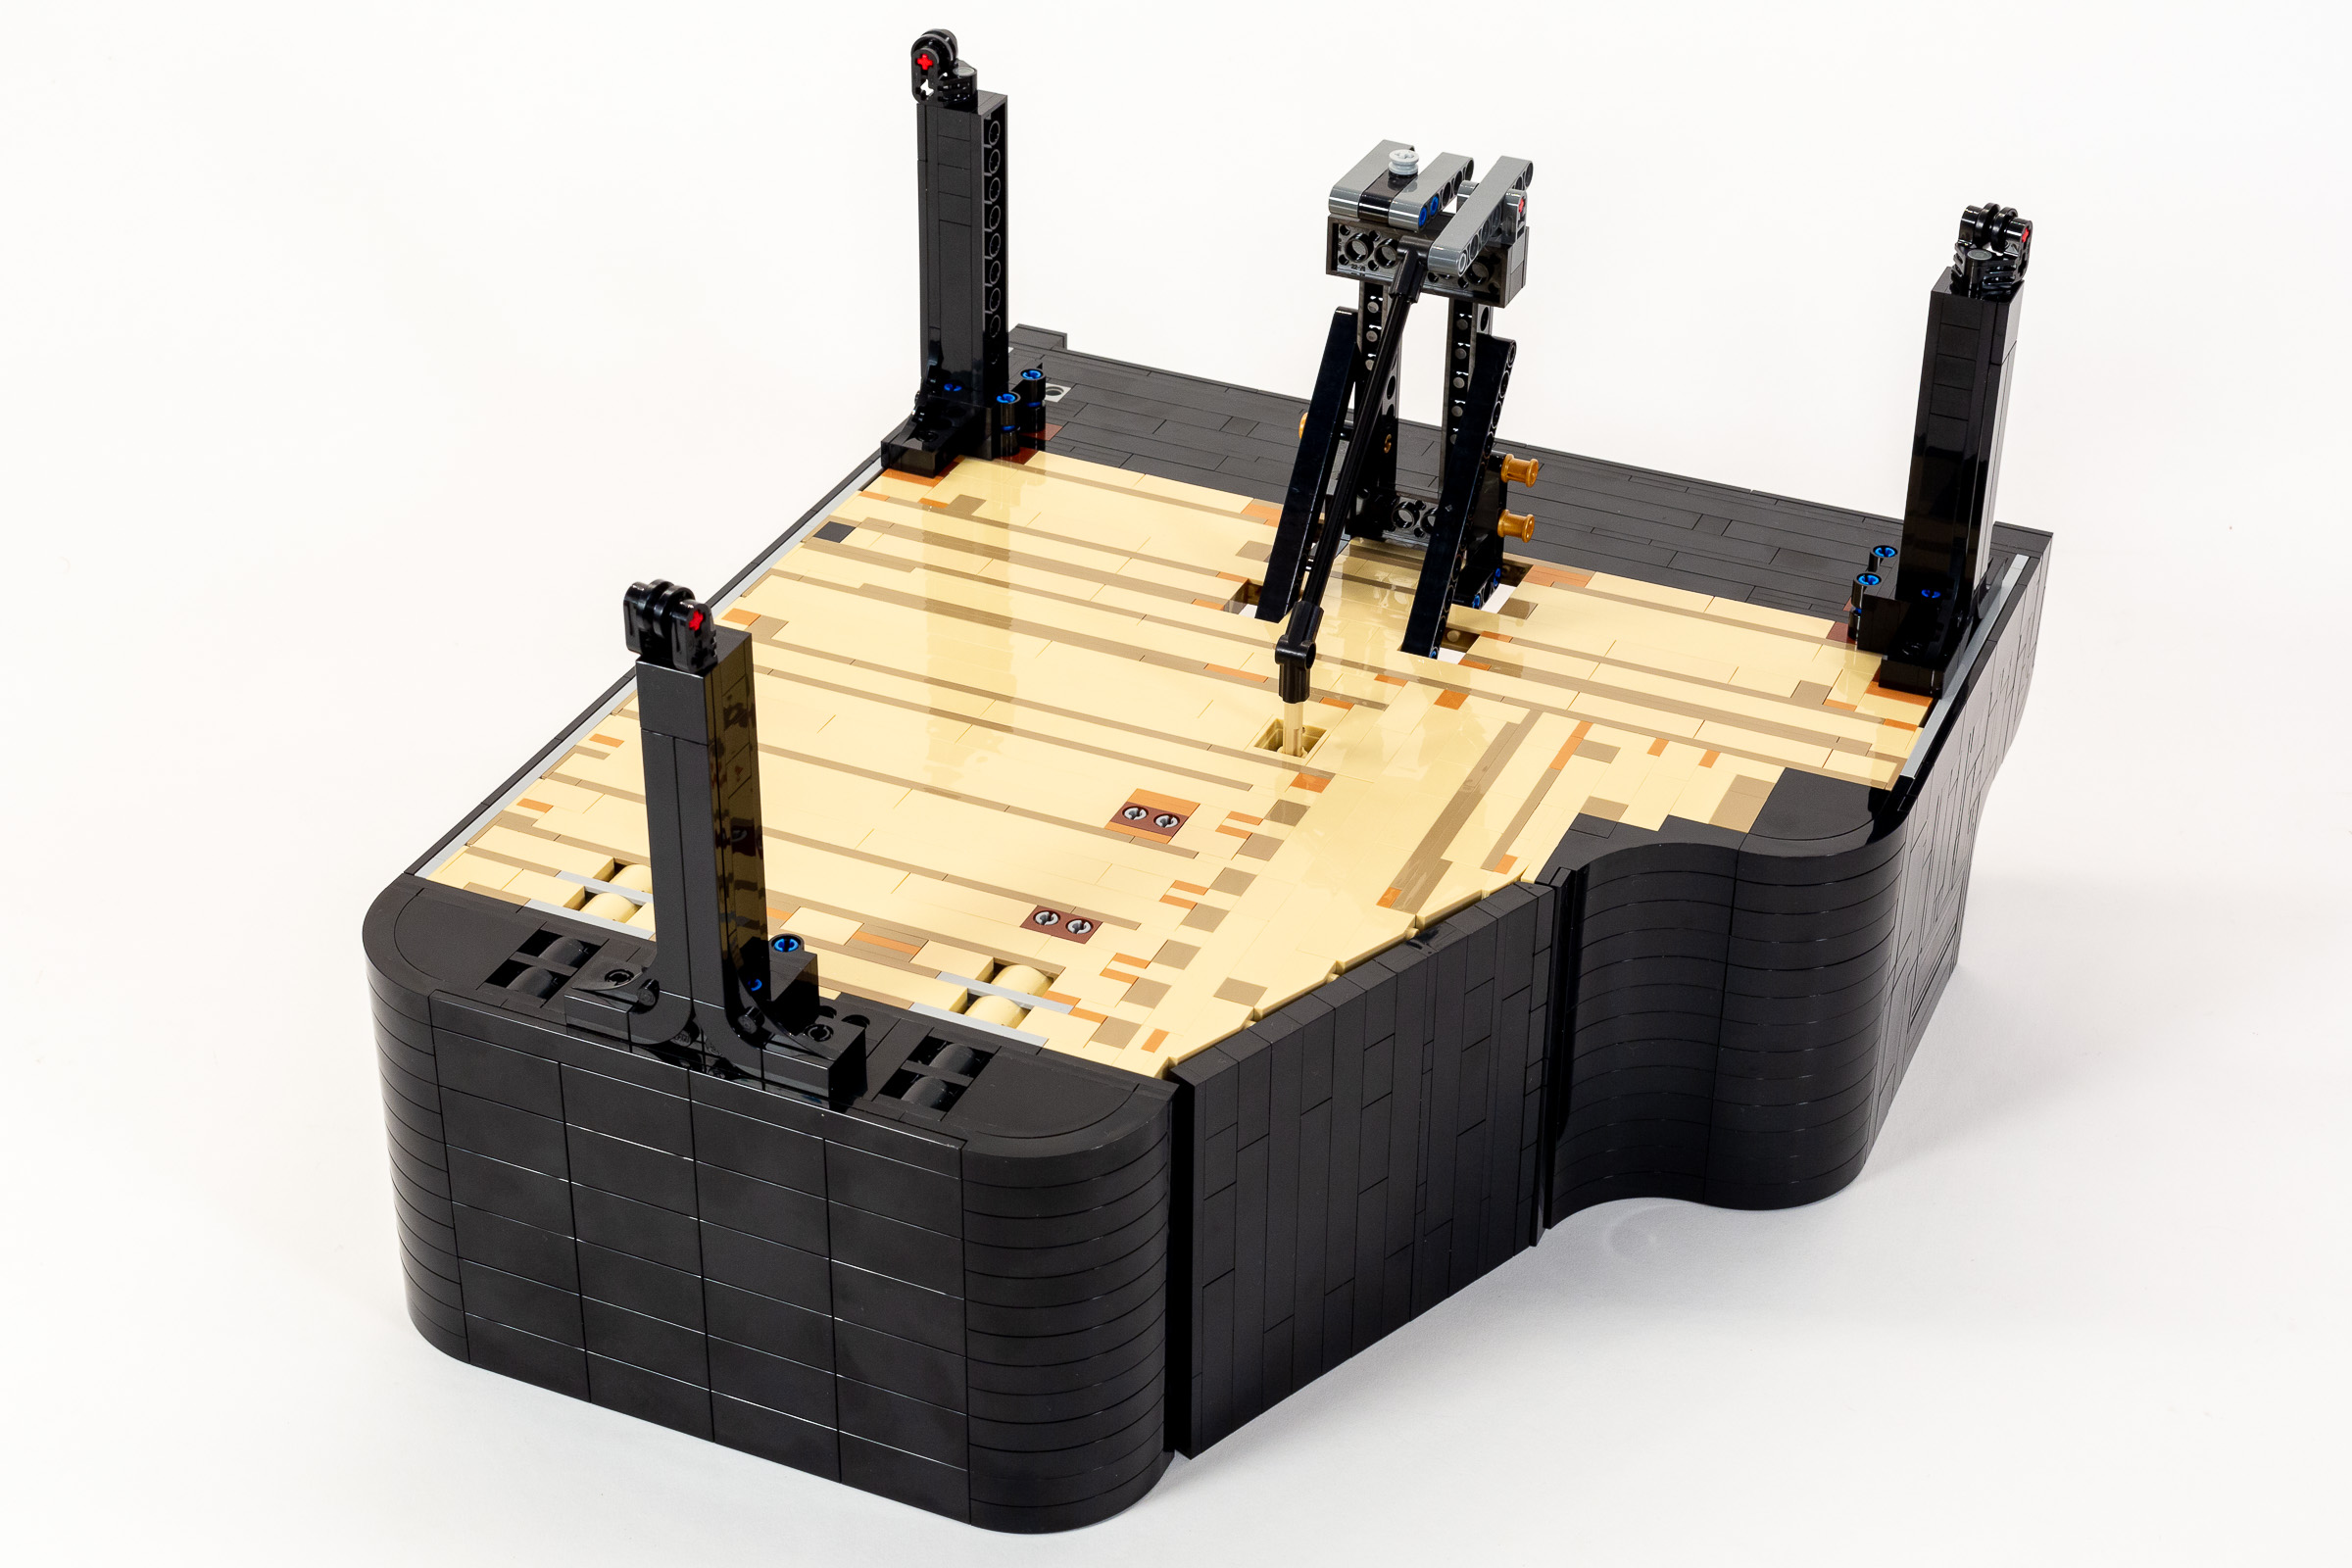
Adding three identical leg modules and the foot pedals in Stage 10.
This is followed by three identical modules which form the three feet of the piano. They have a slightly sculptural form, with curves where they attach to the piano and round feet to allow it to roll slightly on a table.
Stage 10: 15 minutes.
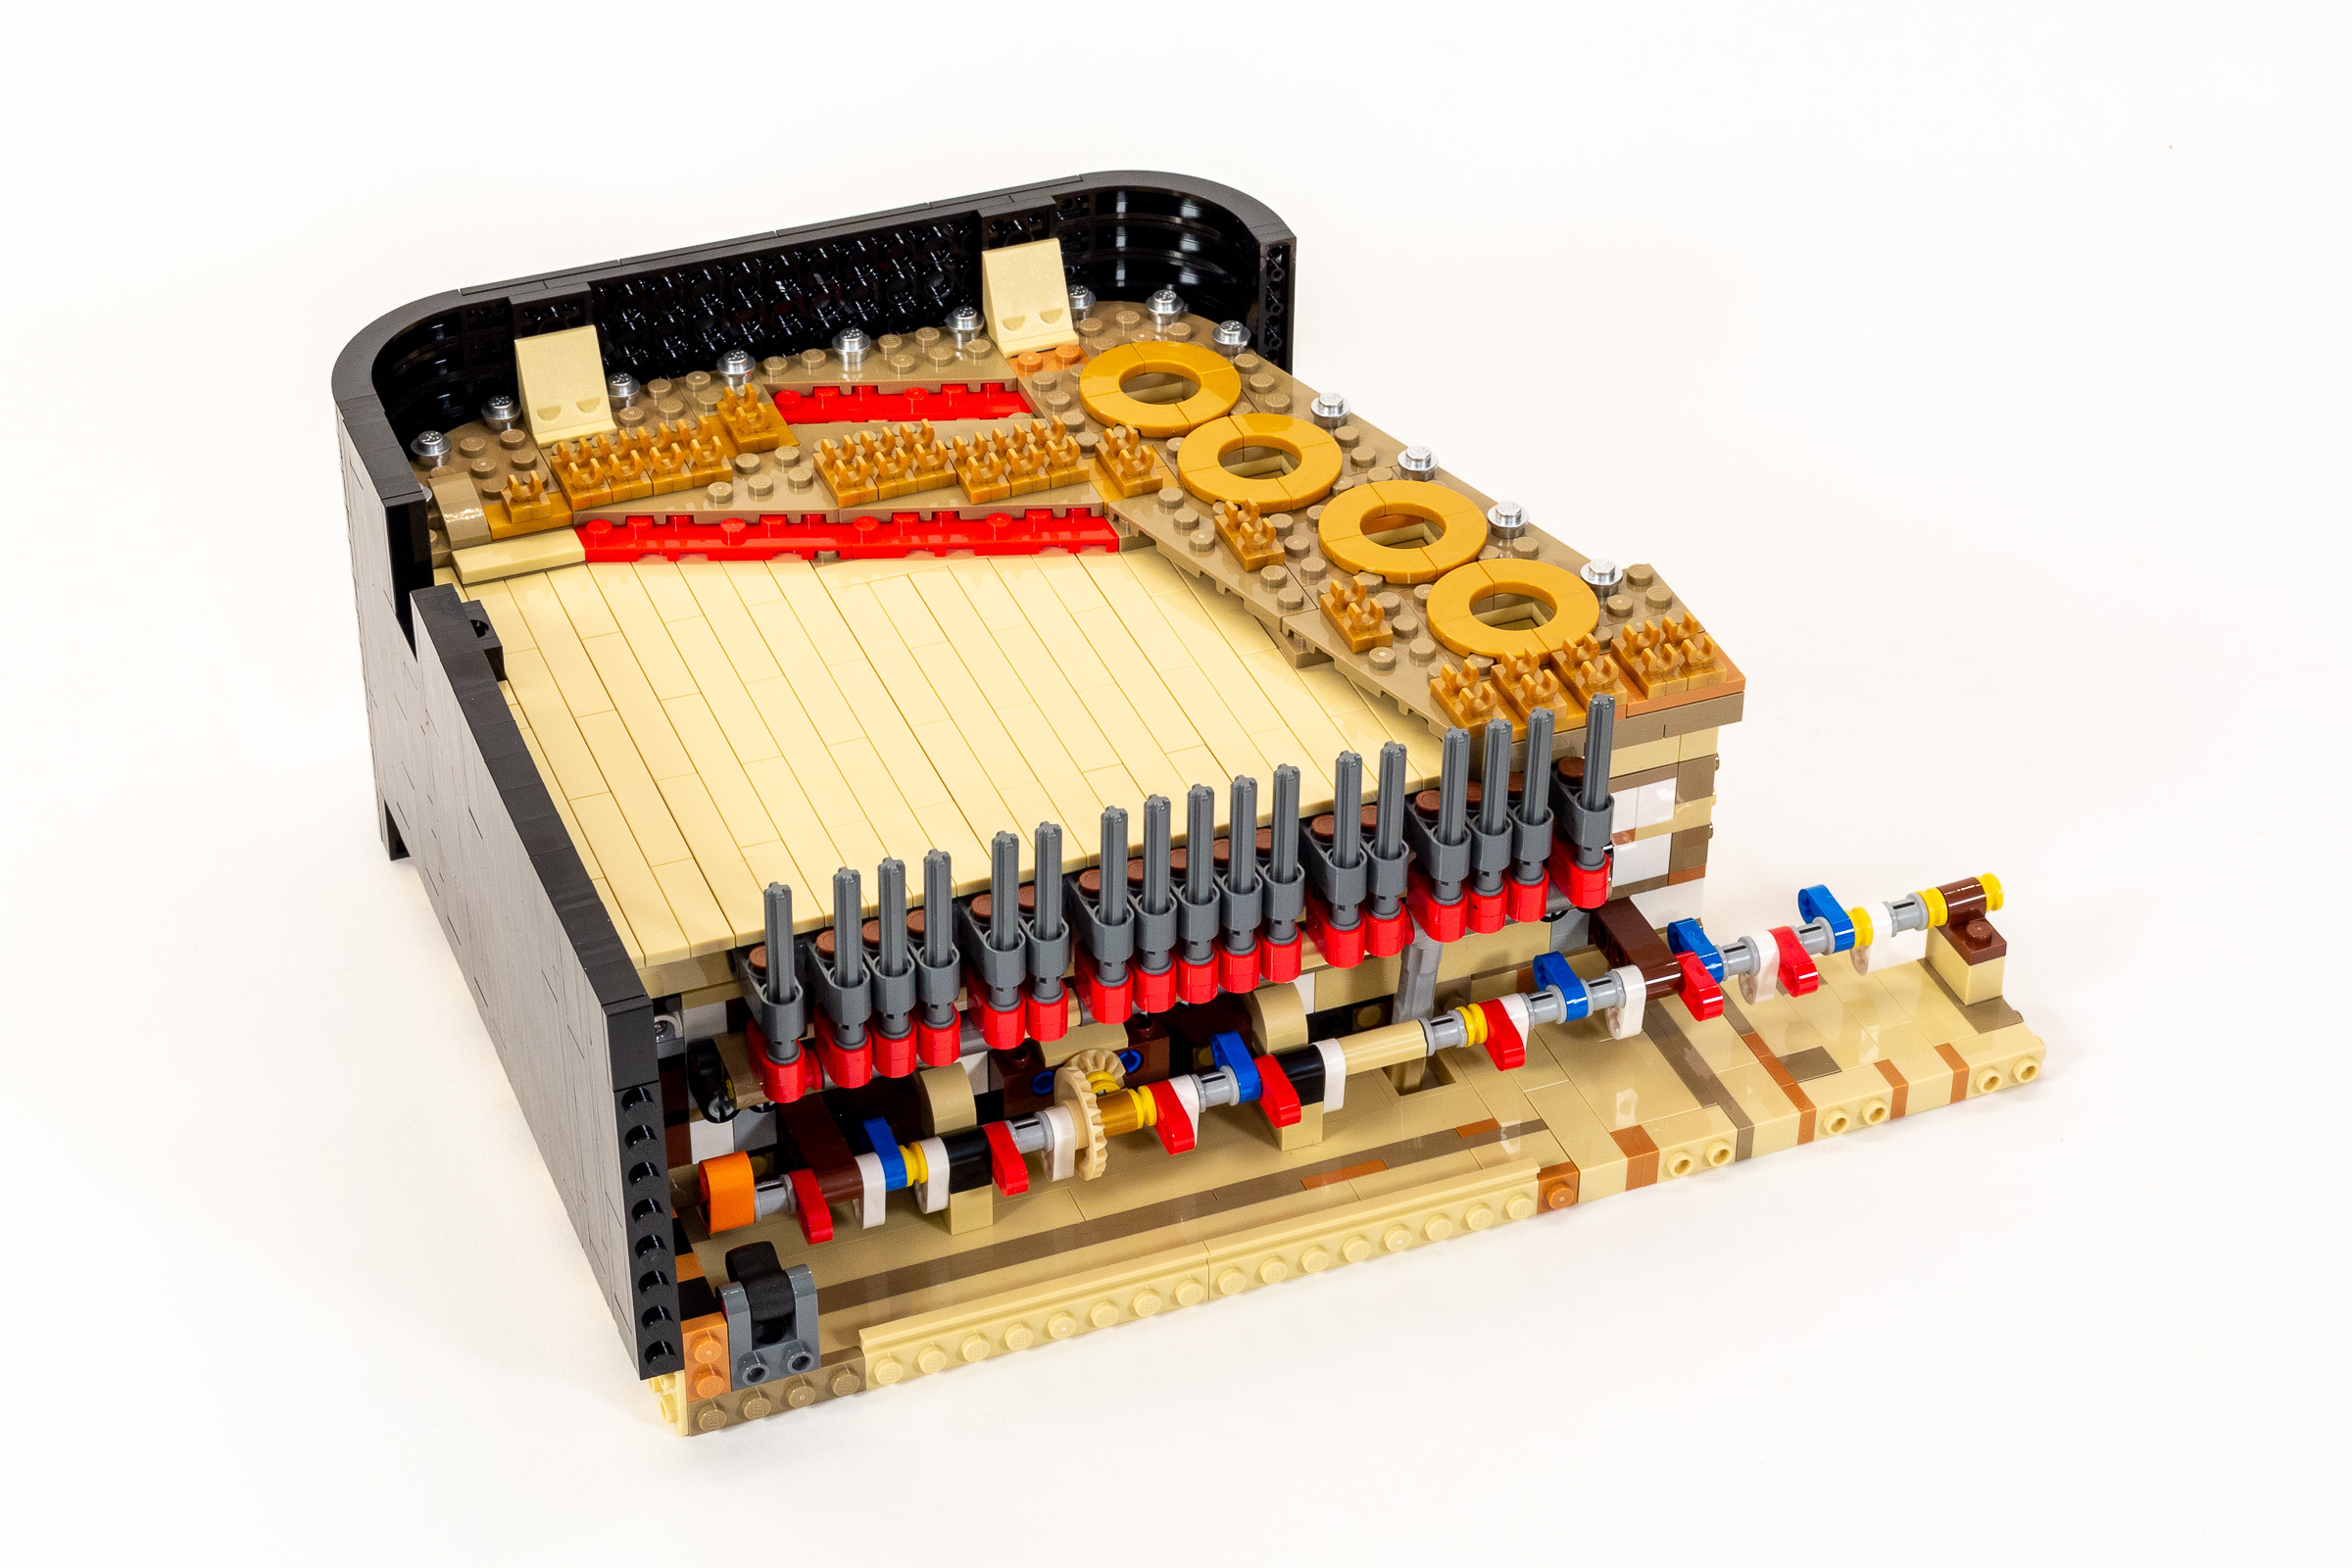
Stages 11-15: Piano Keys
Every really large AFOL-oriented LEGO set that I’ve built has a super repetitive and kind of boring bit. I’m guessing that the next five bags will be just that, as it’s time to build a lot of black and white piano keys, which I anticipate will slide into the opening in the front of our Piano.
Each stage creates modules containing piano keys, which are snapped together using Technic pins. The first of these modules is 8 studs wide and includes four white keys and three black keys. At two studs wide, they are not radically smaller than the keys of a real piano!
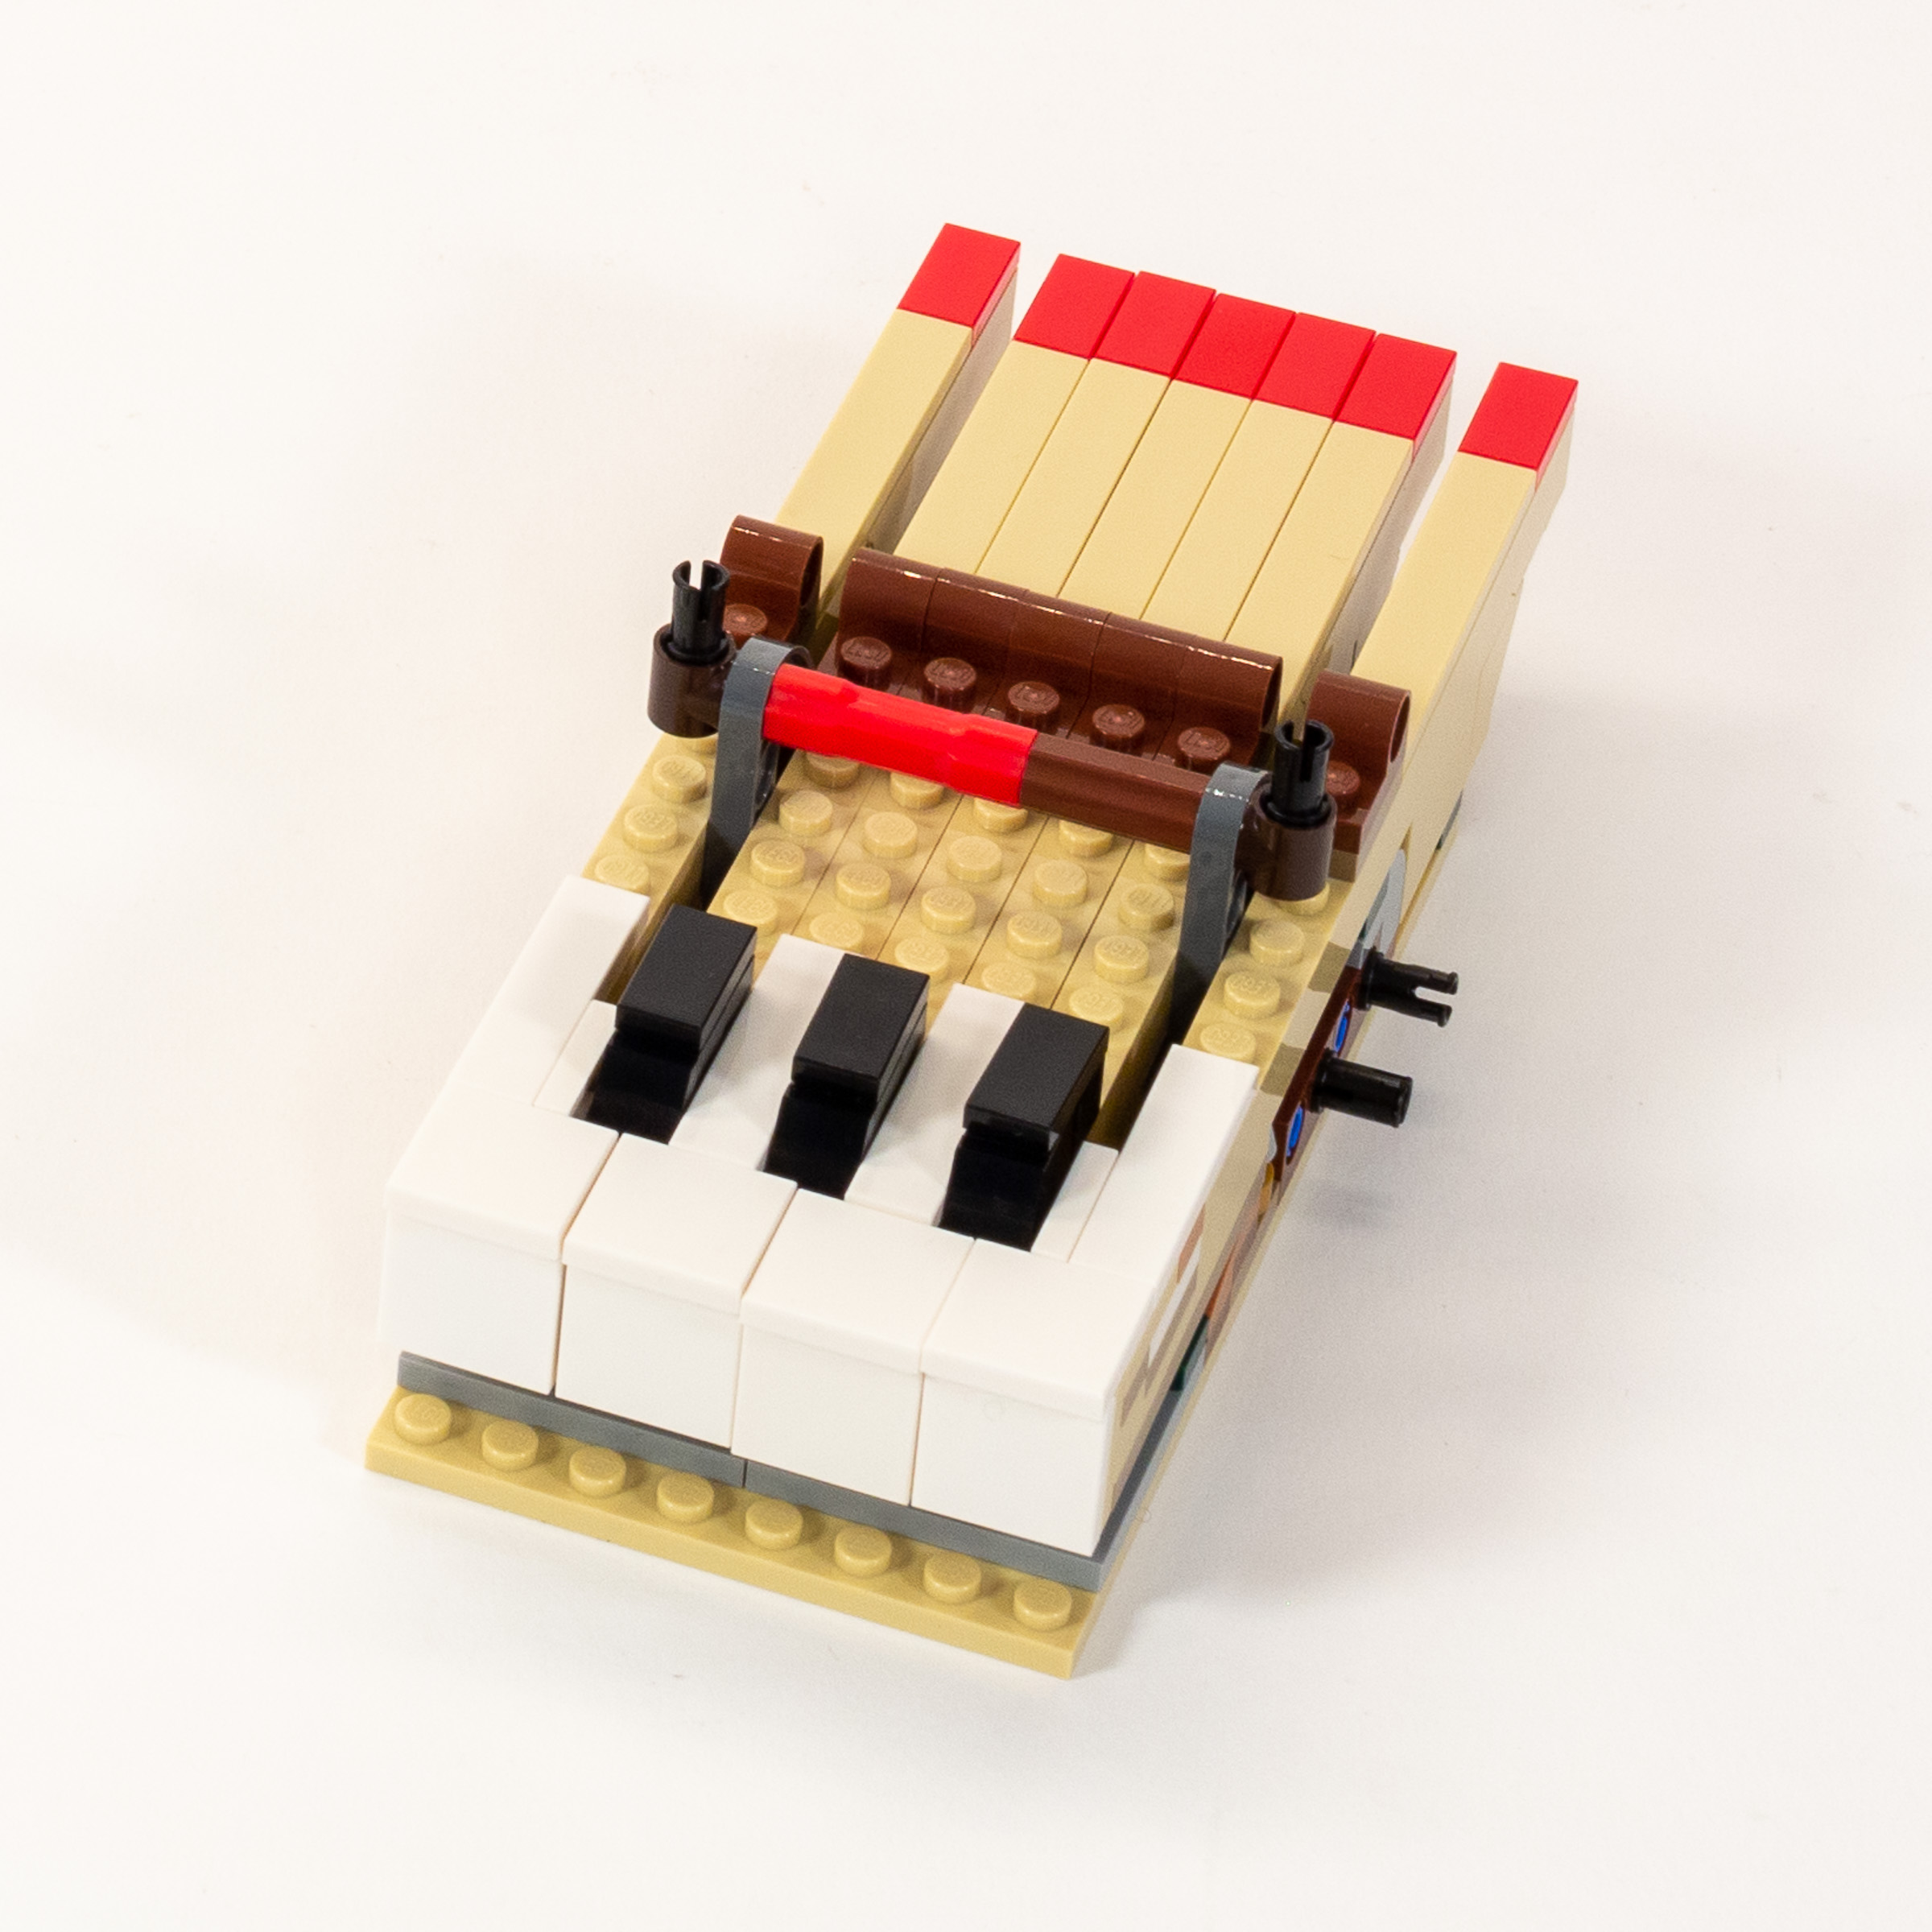
Building the first keyboard module in Stage 11.
Interestign techniques are used to make space for the black keys, especially those white keys with a black key on either side. The required 1/2 stud offset is achieved using clips. The white keys look almost perfect, down to the small lip on the front edge. The black keys look a bit clumsy in comparison, but don’t stand out.

Building the keyboard in stages 11-14.
In the last of the piano keys stages, we build a single last key on a 2-stud wide plate, creating a great and simple showcase for how the piano key mechanisms work. This confused me for two reasons. 1) If they wanted to showcase exactly how the piano keys work, why not do it as the first step for a better building experience, and 2) why not do one of the other assemblies on an 8-stud plate so we didn’t need to add this sliver at the end.
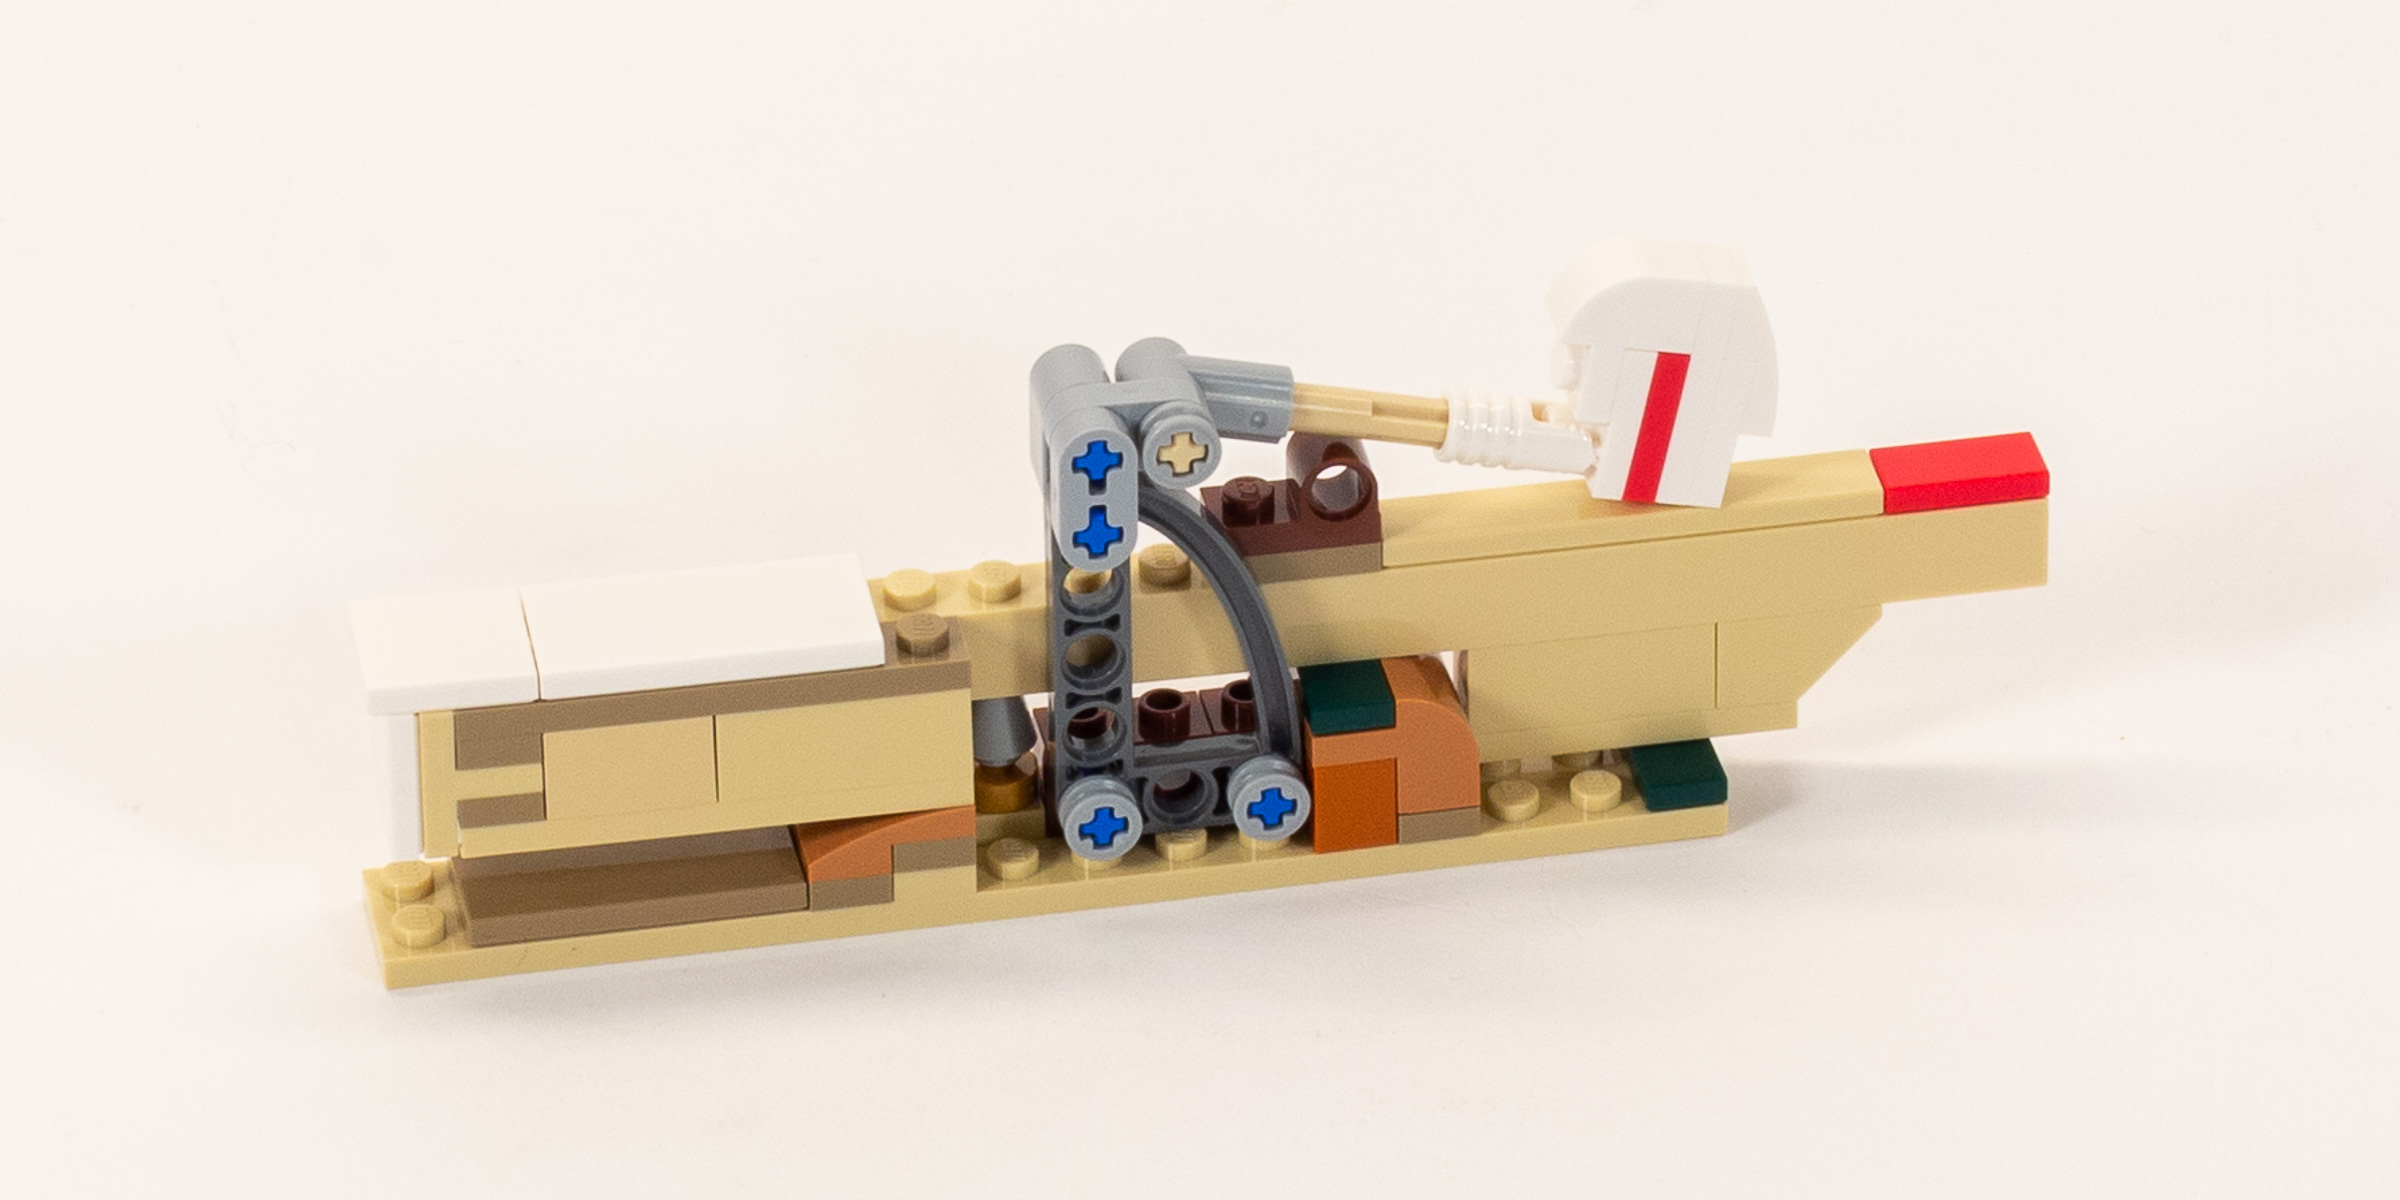
Finally in Stage 15, we build a single standalone key which illustrates how the mechanism works.
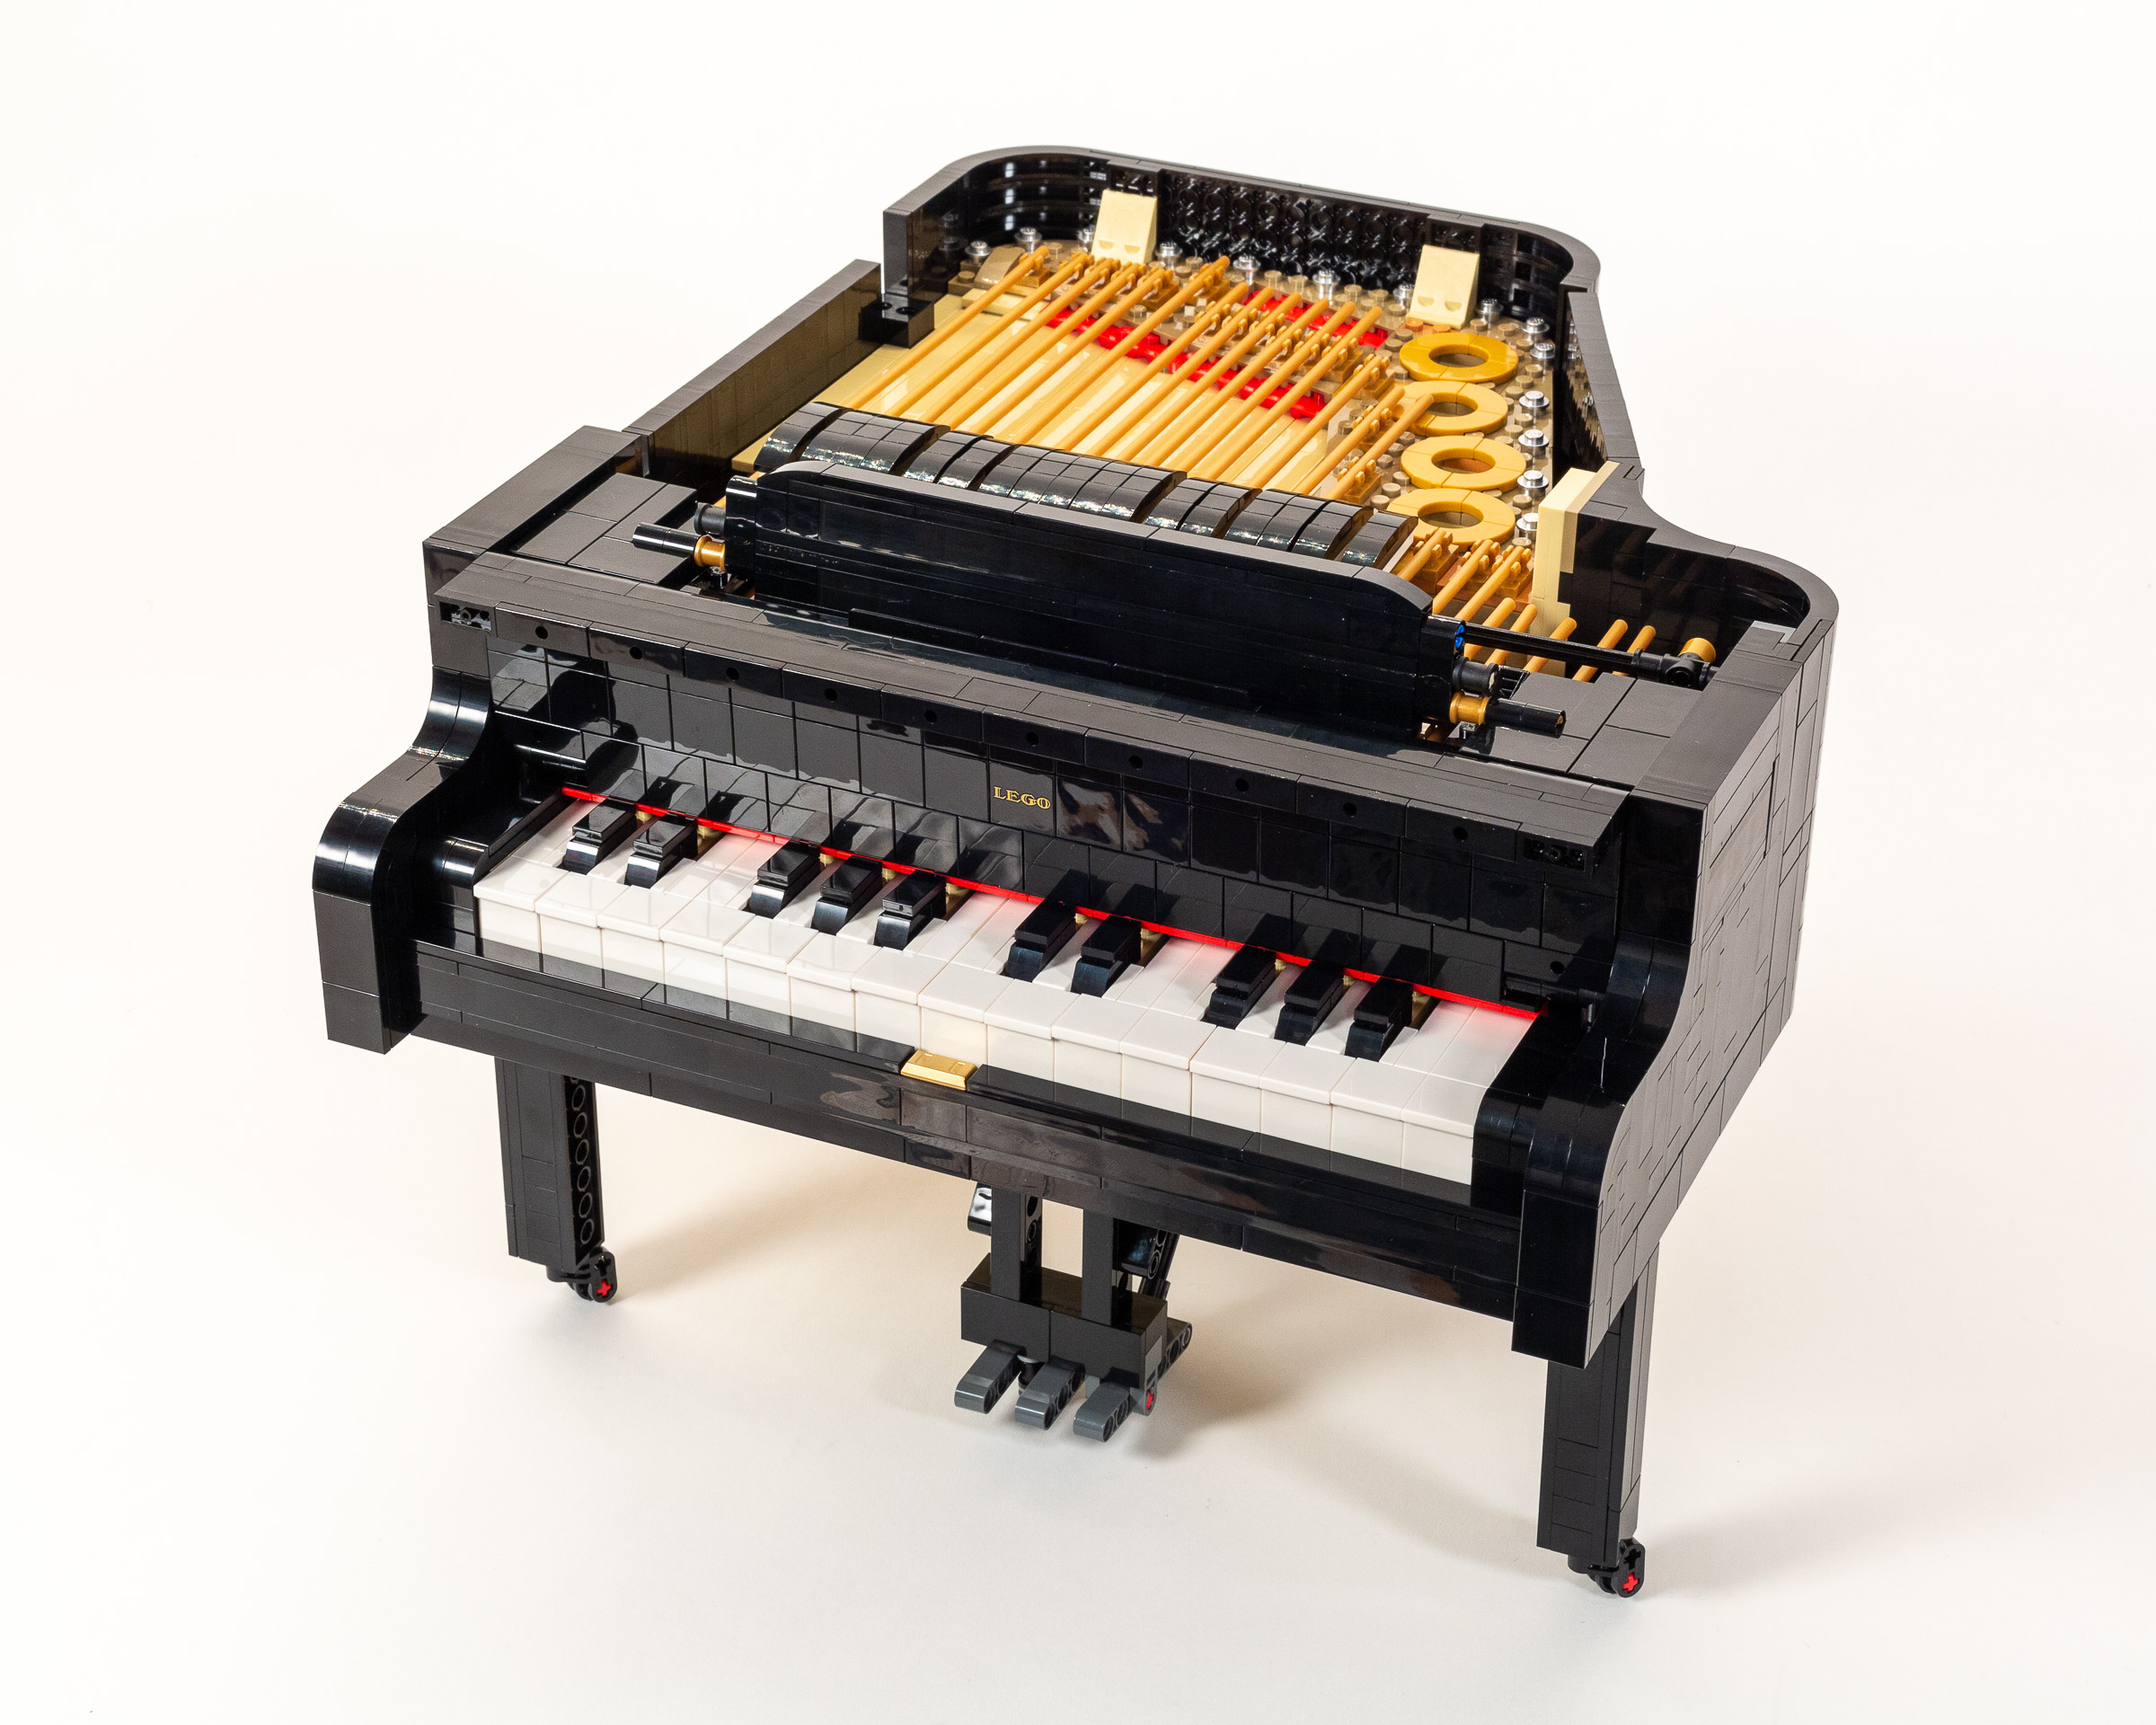
Aside from the one random key, we also create an assembly that wraps around the edges of the piano keys and locks them in place. Actually sliding the keyboard into place, and locking it in place is pure LEGO magic—while the LEGO piano is far smaller than a real Grand Piano, they keys are large enough to press easily. The magic falls apart slightly since they don’t make sound when you press them, which I almost expected to happen since the model looks so good.
Sliding the completed keyboard assembly into place near the end of Stage 15.
Build time: 110 minutes. (Stage 11: 20 minutes, Stage 12: 30 minutes, Stage 13: 25 minutes, Stage 14: 20 minutes, Stage 15: 15 minutes.)
Stages 16-17: Fallboard & Music Rack
Stage 16 is straightforward, a smooth nearly studless flap covering the keys which is pretty much as simple as a sandwich of smooth tiles on top, basic plates, and 2×2 Inverted Tiles (part ####) on the bottom. It’s attached using just two Technic pins, one on each side.

The fallboard opens and closes to protect the piano keys.
Stage 17 begins by quickly (and repetitively) assembling 17 identical dampers that sit above the strings—pressing the foot pedal lifts them off the strings. (As I learned, just like in a real piano, only the longer strings in the LEGO piano have dampers.) This is followed by a panel that attaches above the piano keys, which includes a small stand where you can place your sheet music.
Adding the Music Rack in stage 17.
Build time: 30 minutes. (Stage 16: 15 minutes, Stage 17: 15 minutes.)
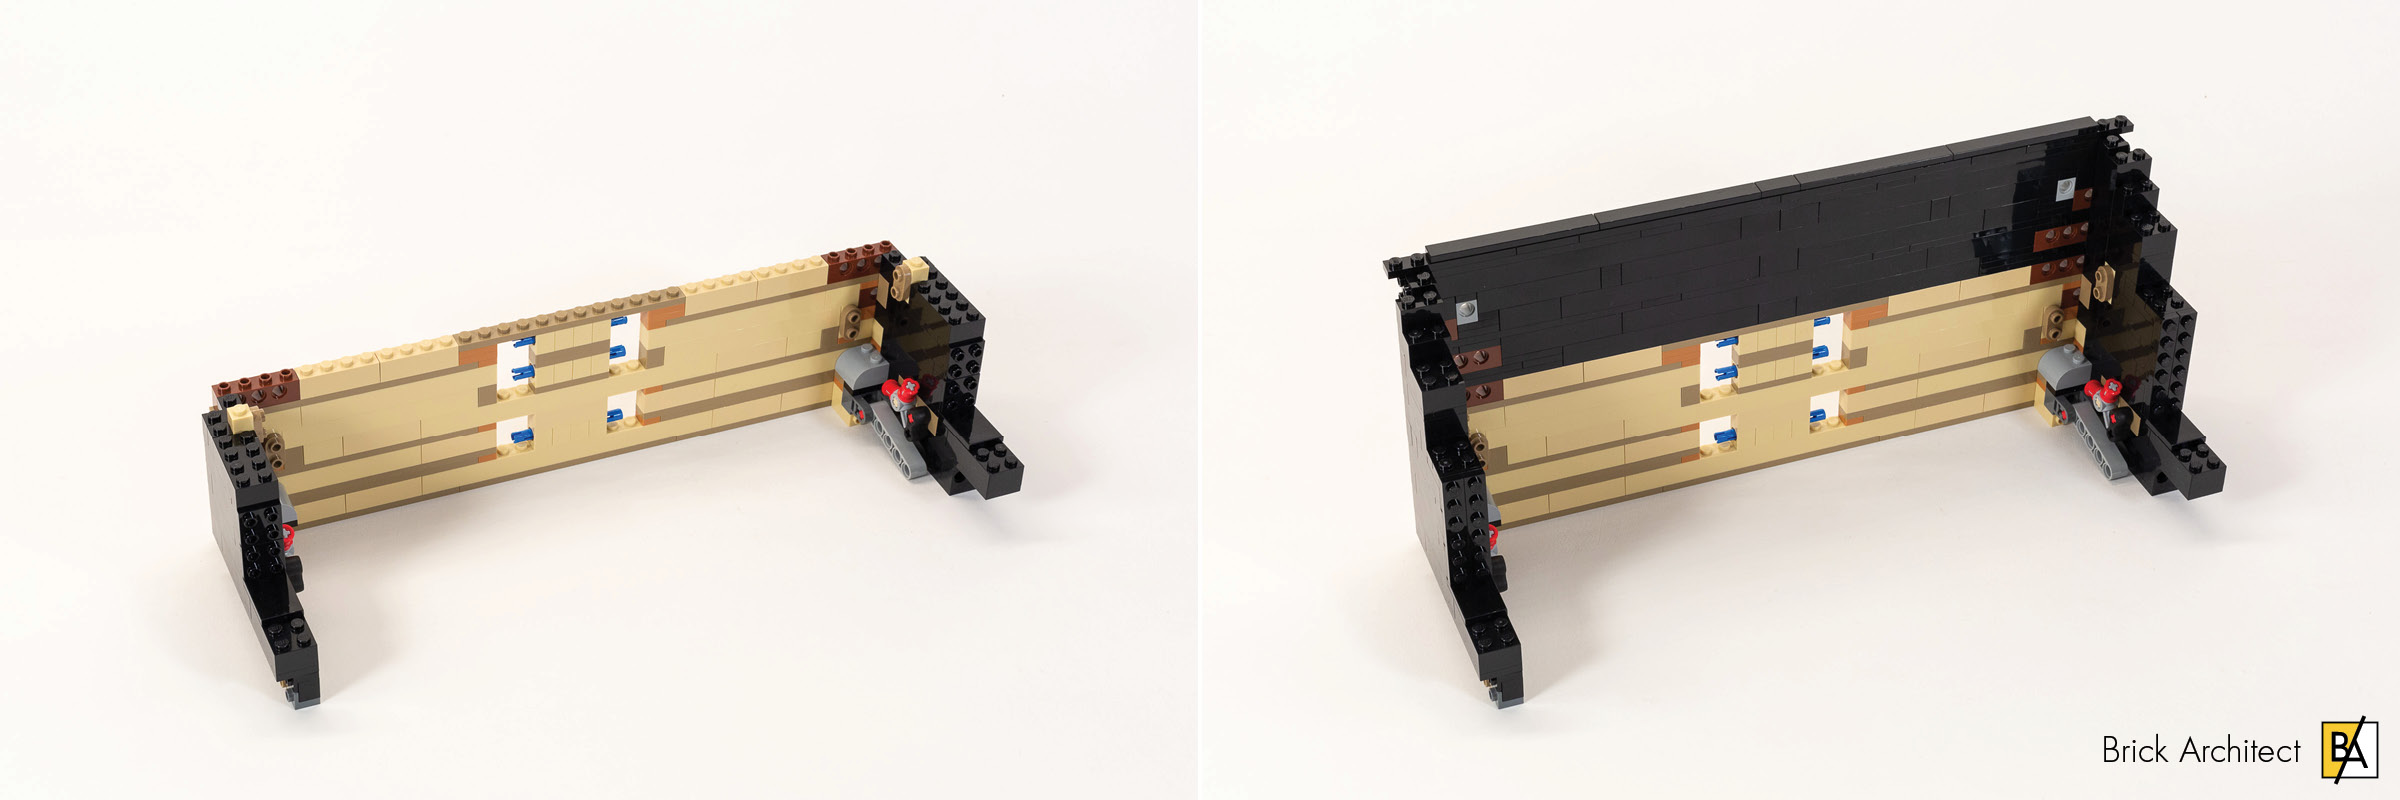
Stages 18-20: Lid
Here we go, building a very boring wall of [black] bricks with a hinge in it. This includes a lot of really large 1×16 Bricks, which makes the process go pretty quickly. Stage 19 continues right where we leaves off, adding another bag of height to this giant black wall, which gently curves as it tapers toward the tile-covered top edge. That’s a pretty large module to have virtually no visible studs!
The piano lid is built across three very quick stages.
A very quick stage 20 adds lateral supports to the lid, and attaches it to the rest of the model using hinges. It’s quick work, but the finished product is looking great.
Build time: 30 minutes. (Stage 18: 15 minutes, Stage 19: 10 minutes, Stage 20: 5 minutes.)
Stage 21: Piano Stool
While it feels strictly optional to include a stool in this Grand Piano set, this final stage is surprisingly packed with interesting building techniques. This centers around an intricate scissor mechanism that allows the height of the stool to be adjusted by spinning the black knob on either side. The mechanism is smooth, and allows you to adjust the height by a little less than the height of two bricks.
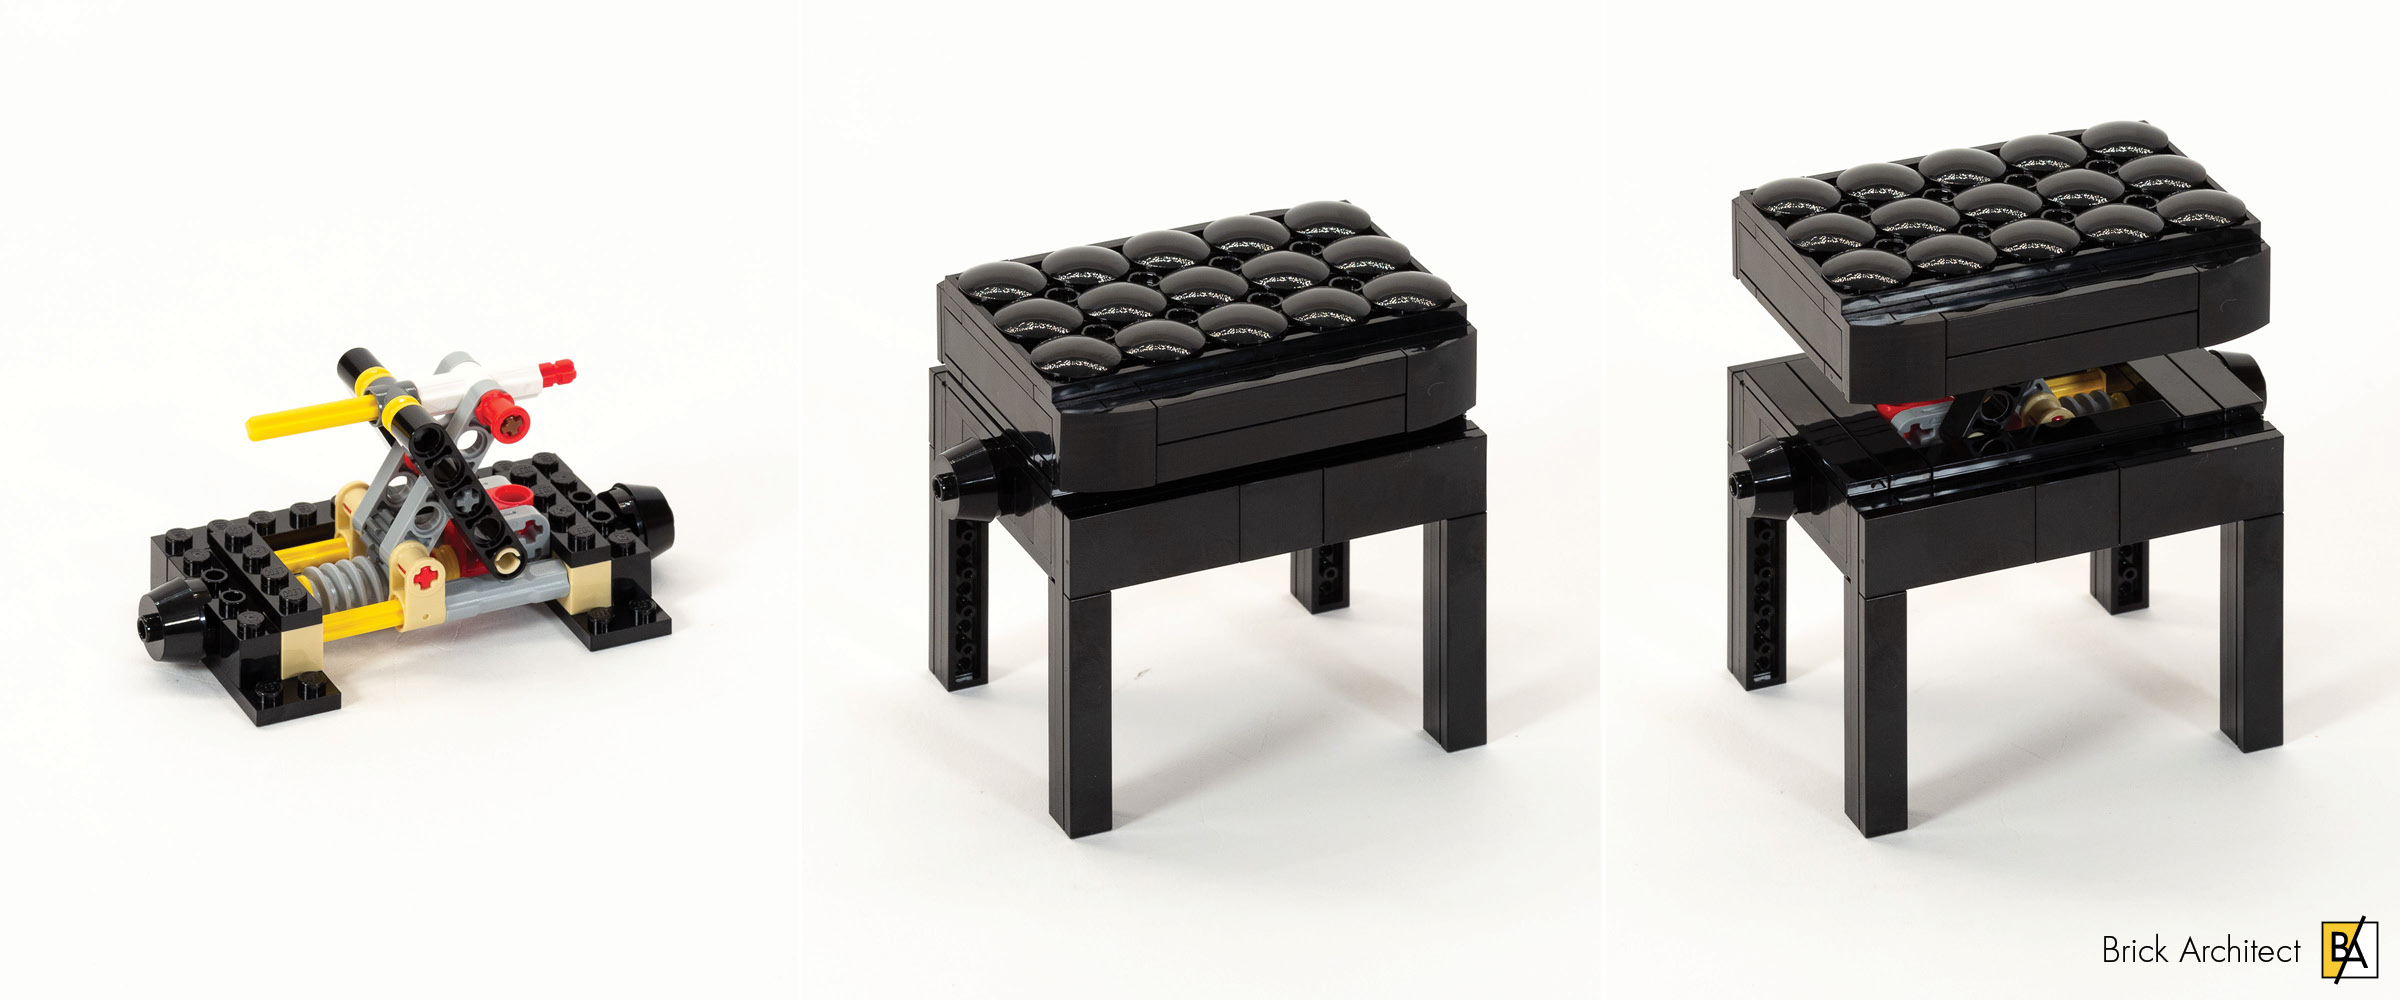
Finishing the project with an adjustable piano stool.
Stage 21: 15 minutes.
Conclusion
I did not expect to enjoy this model as much as I did! It wasn’t as enjoyable for me as building a top-tier Architecture set, the massive new Colosseum set, or even the Technic Bugatti Chiron, but I was genuinely impressed with the appearance of the finished model.
In fact, the realistic piano keys and beautifully detailed exterior is part of the reason that this set doesn’t earn my very highest marks—It just begs to be played and it’s disorienting to press on the realistic and large keys and not hear a sound. To be fair, there is a mode in the app where you can “play” music by pressing keys on the piano, but it just triggers the next sound in the selected song no matter which key you press. That’s because there is just one optical sensor which detects when any key is pressed.
#21323 Grand Piano is an excellent set for discerning, well-heeled music lovers.
Despite my ambivalence towards pianos, it is a genuinely striking model, and the electronic functions offer some fun. It also includes some interesting building techniques in the piano and the small stool that keep the build engaging. Lastly, it offers a pretty good value for a set with Powered Up components. That’s why it earns our “Excellent” (4/5 star) rating for the target audience of Adult Fans who also love pianos.
Honestly, there’s only one thing keeping this from earning a 5/5 rating… I wish that it could detect which key was pressed, so the app can play the right sound. If the piano actually “worked” as expected, this would be one of the most impressive LEGO sets ever created.
Post your reviews on Eurobricks! 😉
I sometimes post an excerpt of my reviews on Eurobricks, but it isn’t worth the time to post the full length article in two places!
Haha, when I post my reviews on different places all I do is copy and paste 😛 All it takes is about 2 minutes 😀