
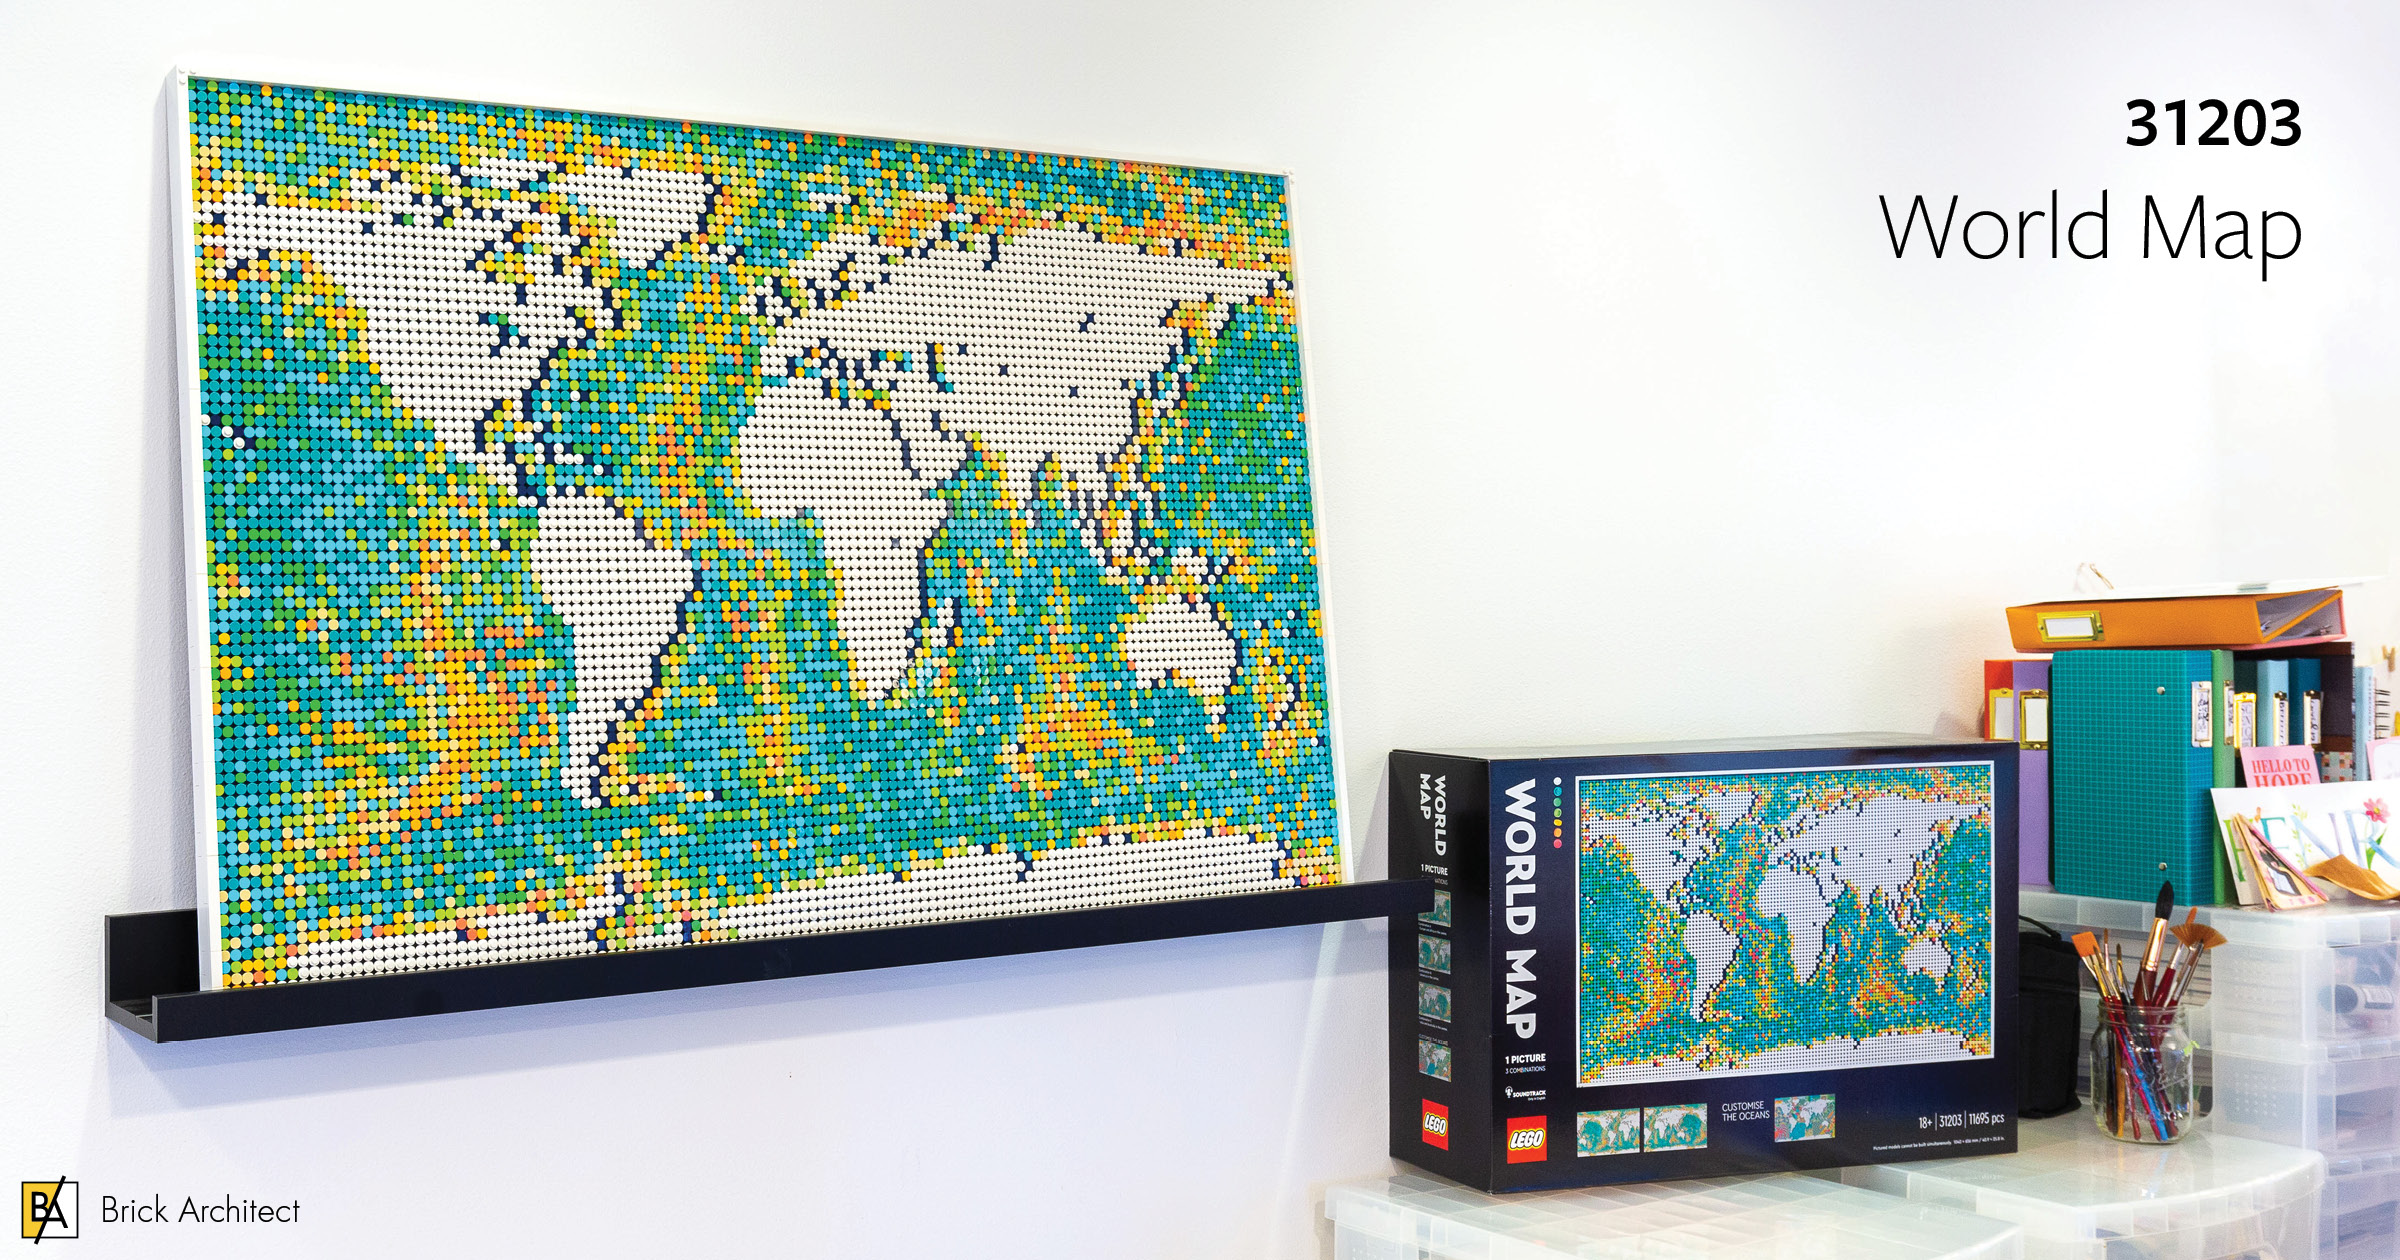
Review: #31203 World Map
A map of the whole world is the new largest LEGO set—at least by part count! (And it’s a great price, too!)
#31203 World Map is $249.99 (249.99€ / £229.99 / 349.99 CAD / 399.99 AUD), 11,695 pieces, ages 18+. With so many pieces, this set comes to just $0.021 per piece in the USA; well below the common benchmark of $0.10 per piece. (To be fair, more than 10,000 of those pieces are 1×1 Round Plates & Tiles.)
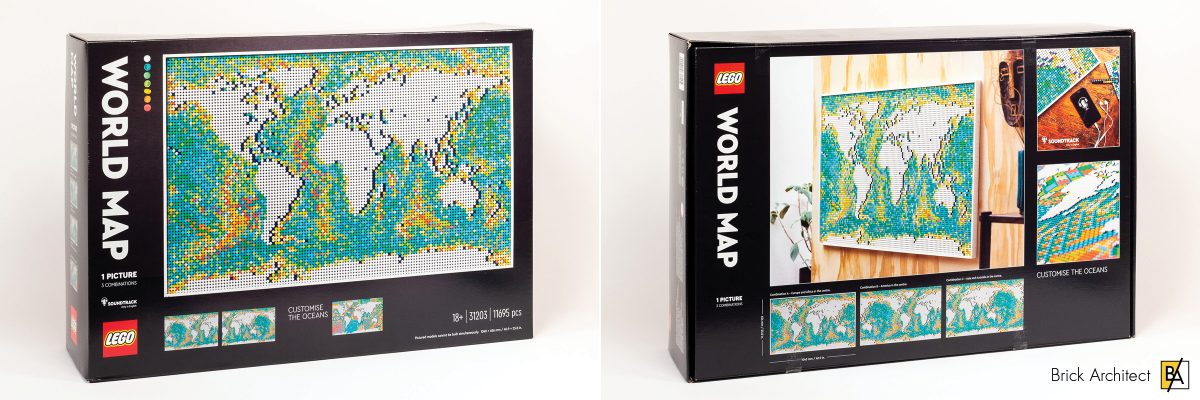
#31203 World Map – Box Front and Back
The set will be released worldwide on Tuesday, June 1, 2021 at LEGO.com and LEGO-Brand Retail Stores.
First Impressions
Even before opening the unmarked brown package, I noticed how heavy this set is! I quickly learned why— with a whopping 11,695 pieces, this has the largest part count of any LEGO set ever released!
Unfortunately, my other immediate impression was that it is kind of ugly. I was expecting a more traditional world map, with water represented as shades of blue, and land masses represented using white for snow, dark green for forests, light greens for grasslands, and light or dark tan for deserts.
#31203 World Map – Back of box
Instead, we have a stark white landmass with a technicolor ocean. To help the white land mass stand out, they made an artistic choice to include a 140Earth BlueDark Blue tile on the right side of land areas, creating a sort of drop shadow effect.
Although it is not explained anywhere on the box, my best guess for the white background is to encourage people to decorate the map to reflect the places that they have visited (or want to visit soon)! As someone who has traveled extensively, I was curious to see how easy it will be to triangulate geographic locations onto this flat map projection.
Contents
I already mentioned that this is an unusually heavy box for it’s size. The reason becomes apparent when you open the box… it’s packed pretty tight with bags containing more than 10,000 round 1×1 plates and tiles, forty carefully stacked 16×16 LEGO Art panels, and the parts needed to create the brick-built frame.
- Box Size: 55.5 x 38 x15.5 cm (21 7/8” x 15” x 6”)
- Box Weight: 5.4 kg (12.2 lbs)
- Box Density: 5400 grams / 32.7 Liters = 165 g/L.
Denser than #10292 The Apartments (Friends), which is only 128 g/L. - LEGO Parts Weight: 4.02 kg (8.86 lbs)
- Weight per part: 4020 grams / 11695 pieces = 0.34 g/piece
- Price per part: $249.99 / 11695 = $0.02 per part
- Price per gram: $249.99 / 4020 = $0.06 per gram
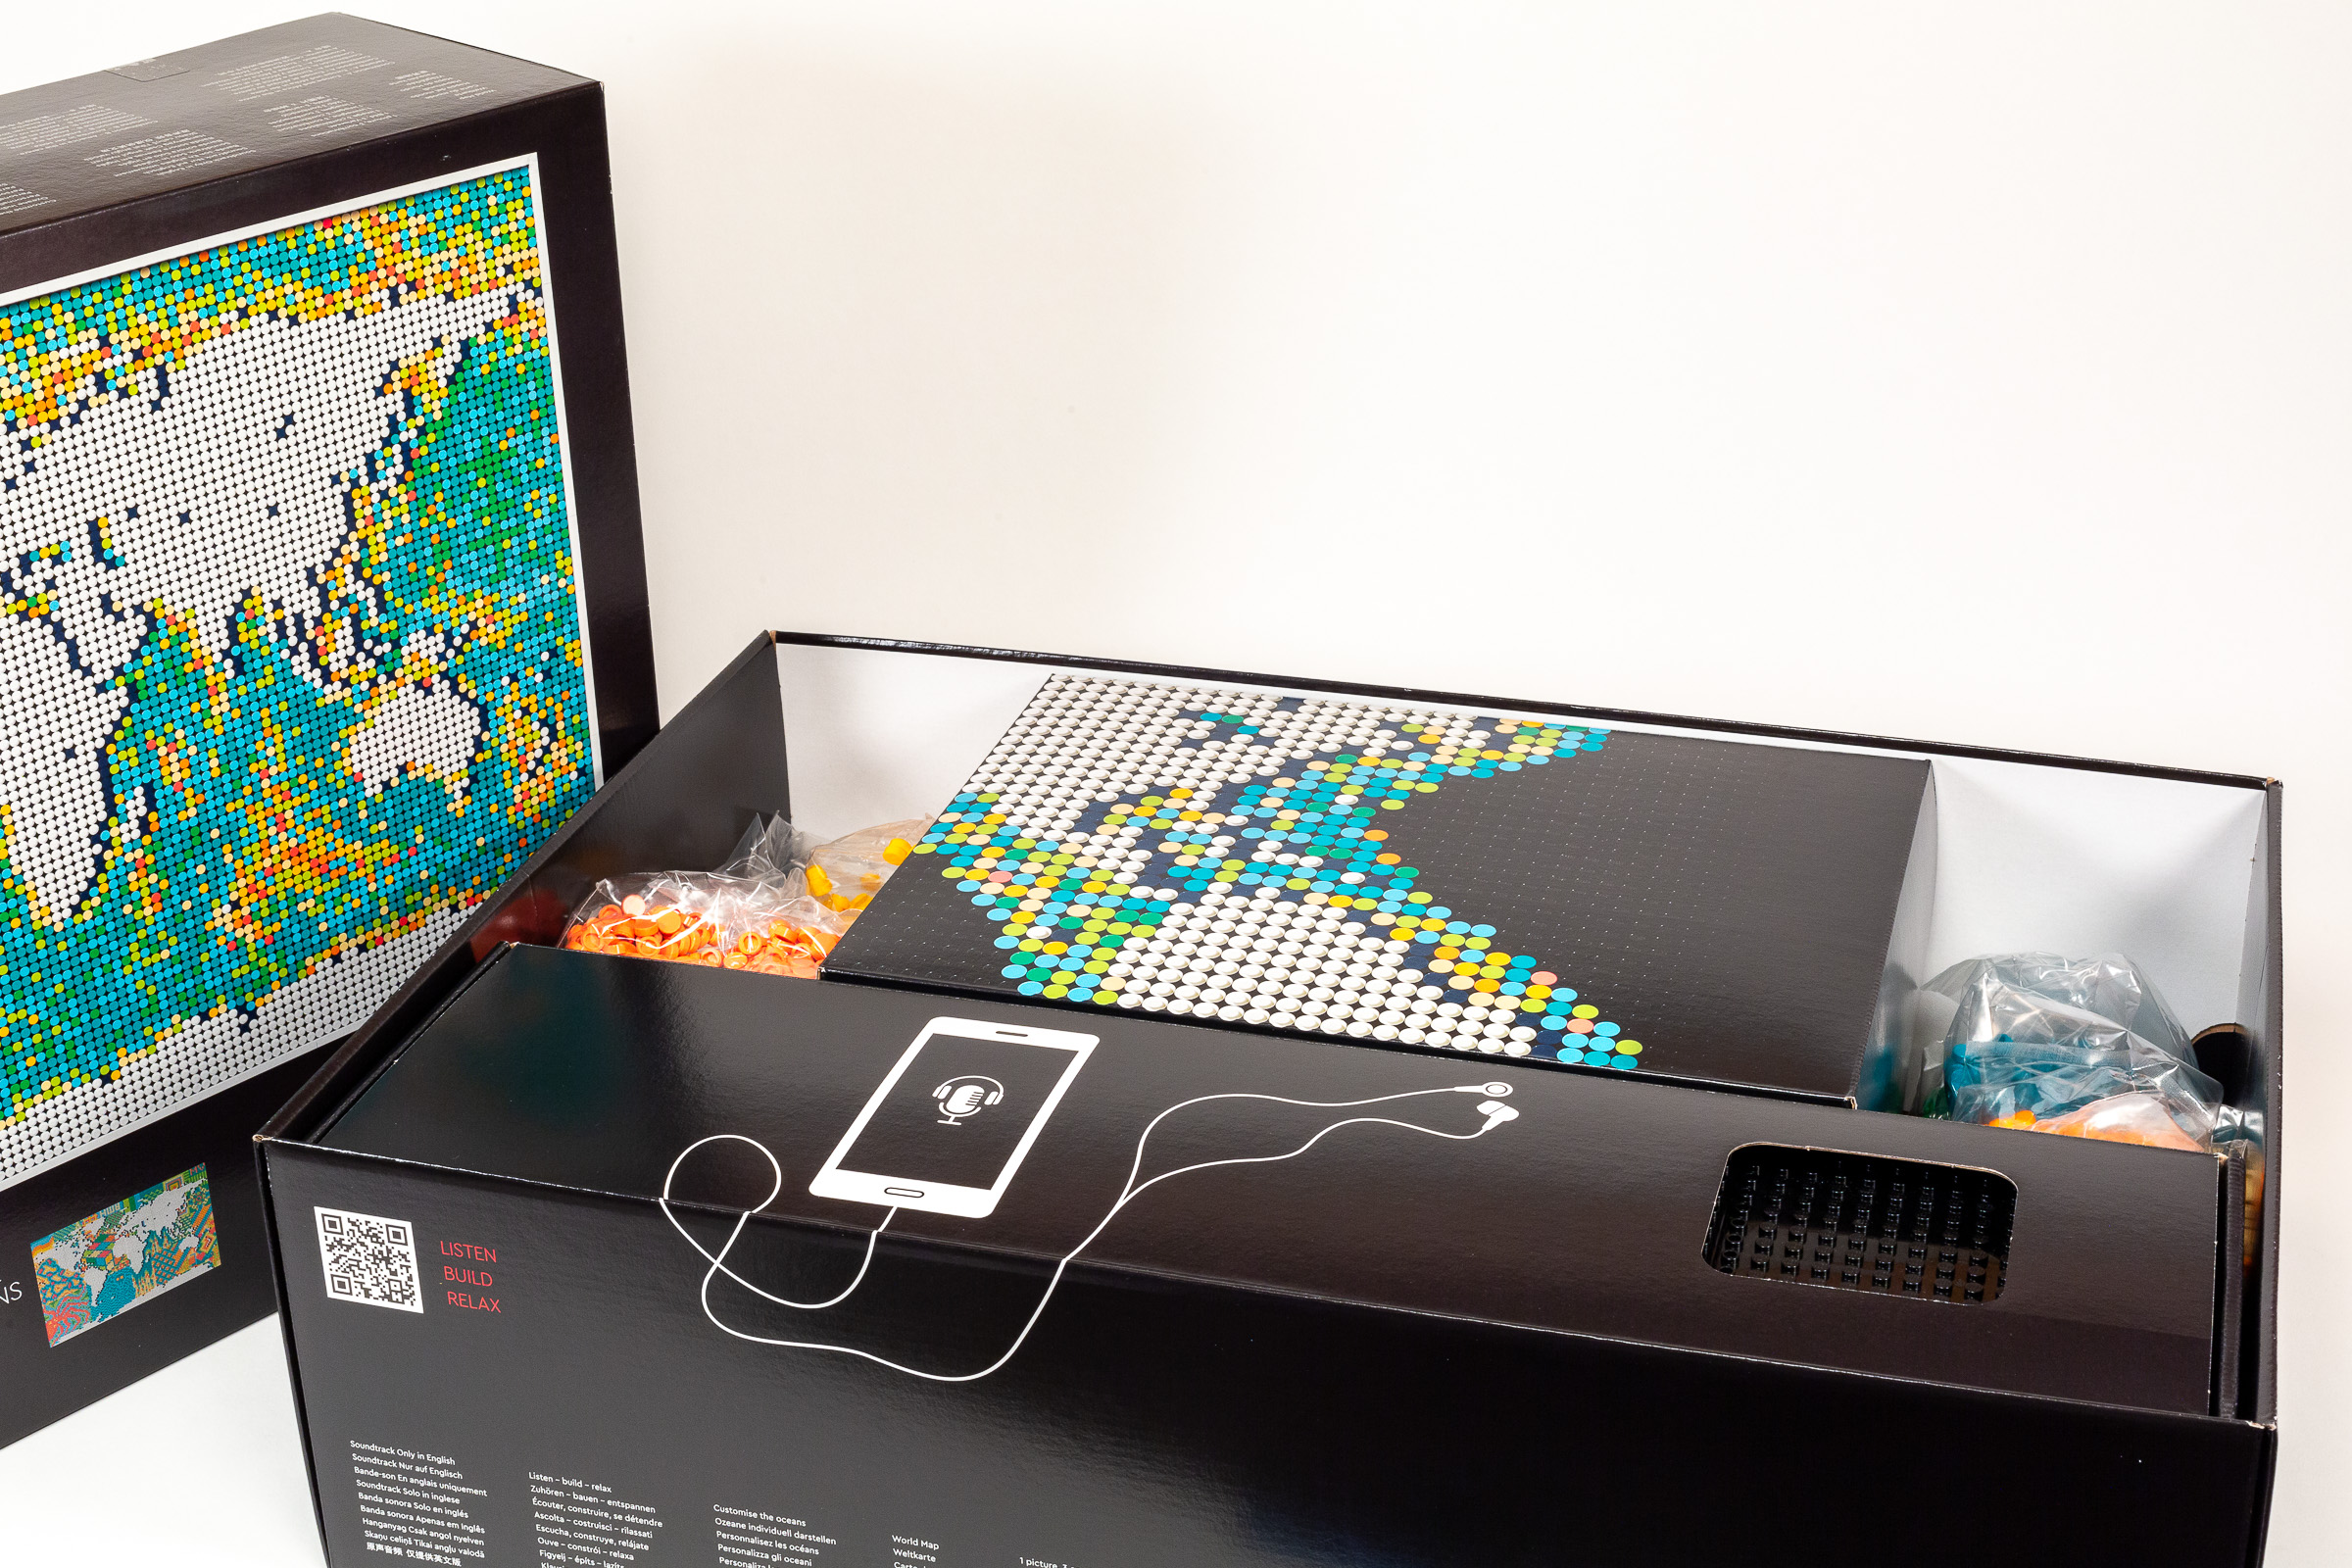
The box contains two smaller boxes, plus many bags of round plates and tiles.
Loose in box – Left Side:
- 3x Medium bags containing 1×1 Round Plates in 1White.
- Medium bag containing 1×1 Round Tile in 119Bright Yellowish GreenLime.
- Small bag containing 1×1 Round Tile in 191Flame Yellowish OrangeBright Light Orange.
- Small bag containing 1×1 Round Tile in 353Vibrant CoralCoral.
- Smaller bag containing 1×1 Round Tile in 140Earth BlueDark Blue.
Loose in box – Right Side:
- 2x Medium bags containing 1×1 Round Tiles in 107Bright Bluish GreenDark Turquoise / Teal.
- 2x Small bags containing 1×1 Round Tile in 322Medium AzurMedium Azure.
- Small bag containing 1×1 Round Tile in 106Bright OrangeOrange.
- Small bag containing 1×1 Round Tile in 37Bright Green.
- Small bag containing 1×1 Round Tile in 5Brick YellowTan.
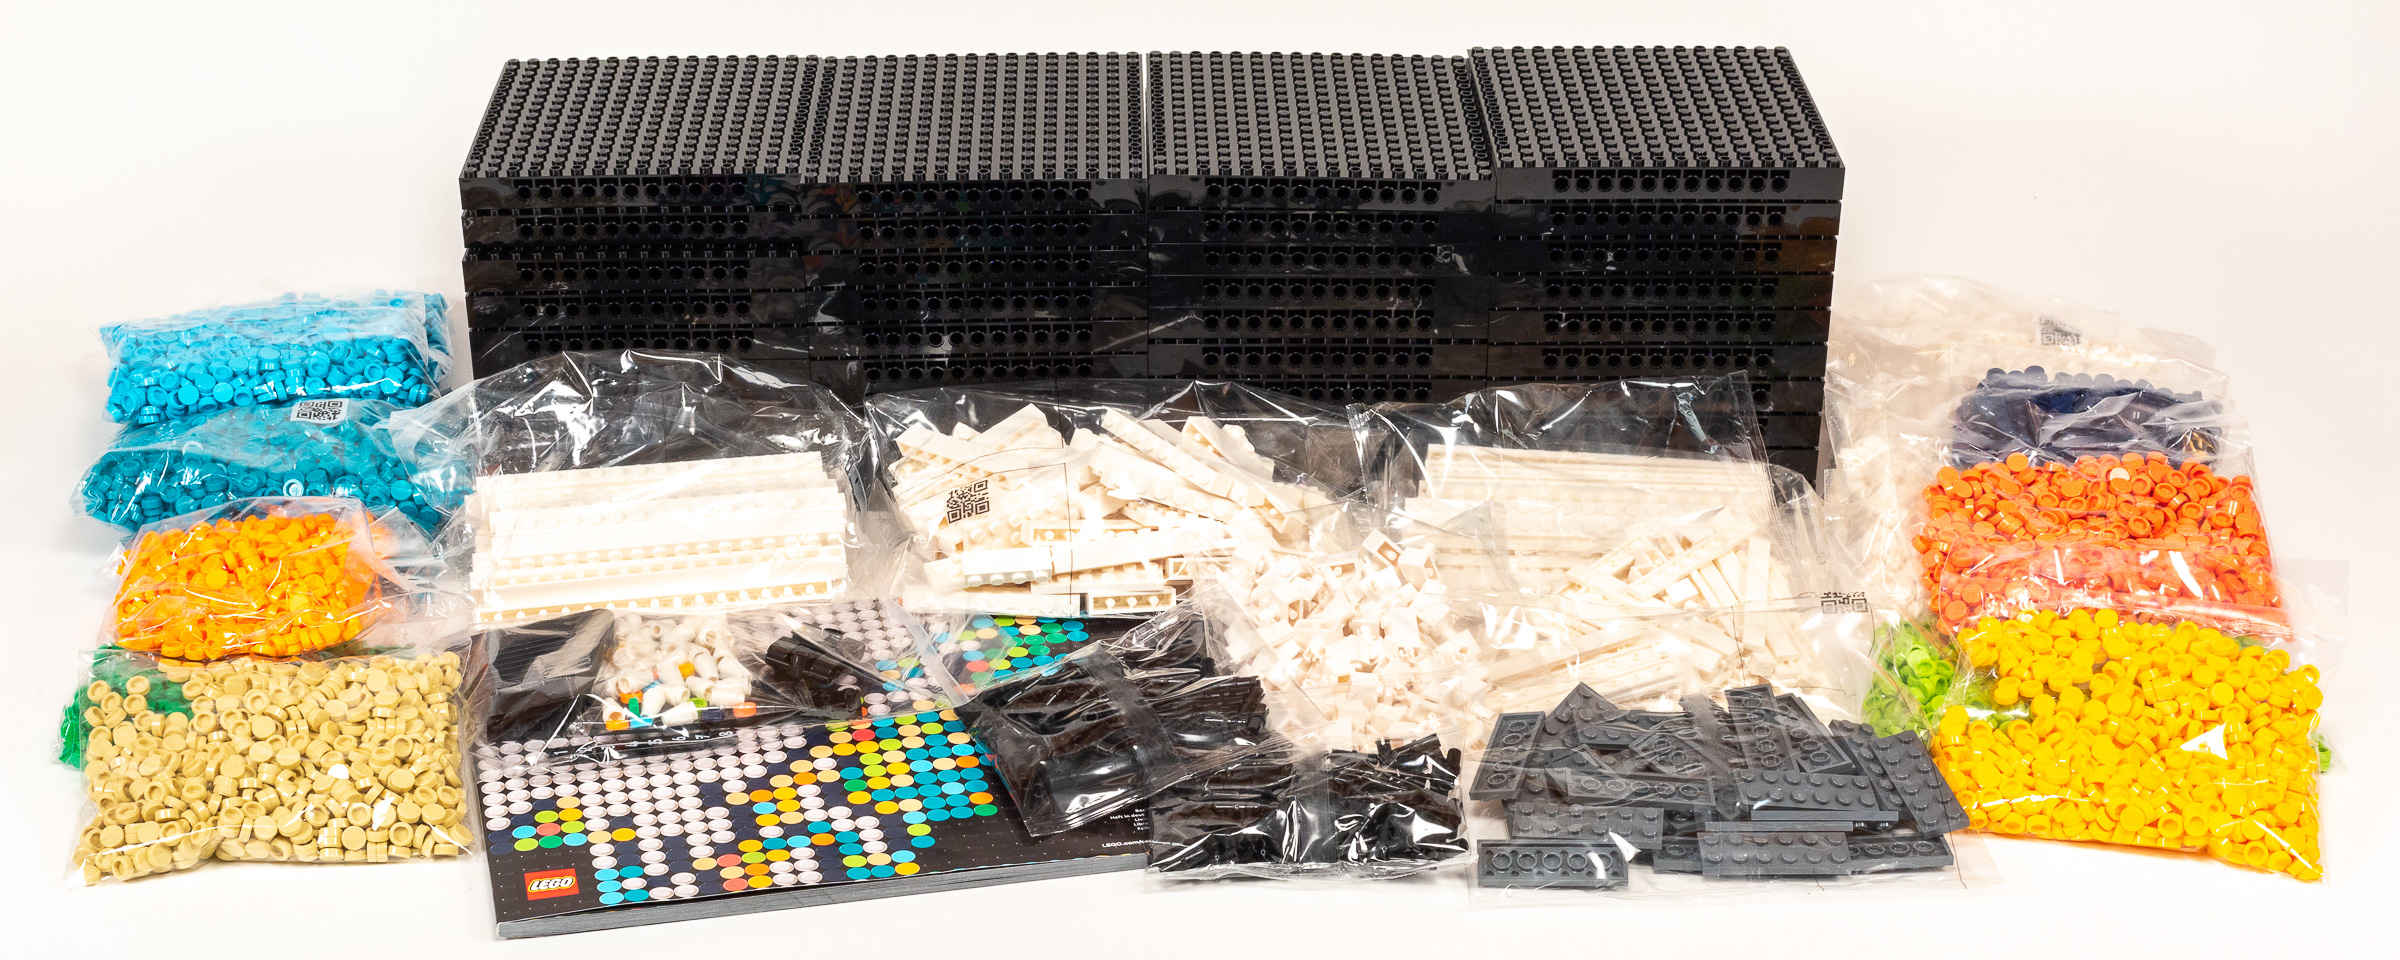
Complete box contents.
Long box with podcast icon:
- 40x – 16x16x 1 1/3 Technic in 26Black.
Inner box with dots pattern:
- 160-page instruction booklet. 27 x 19.3 cm (10 5/8 x 7 5/8”).
- Medium bag containing 1×16 Bricks in 1White.
- Medium bag containing 2×16 plates in 1White.
- Medium bag containing white parts, including 1×8 bricks.
- Medium bag containing white parts, including 1×8 Tiles.
- Small bag containing white parts, including 1×2 Brick w/ Pin.
- Medium bag containing 2×6 plates in 199Dark Stone GreyDark Bluish Gray.
- Medium bag containing two 1×8 printed parts, loose parts, and a large brick separator.
- 2x Small bags containing Technic Friction Pins in 26Black.
Build Process
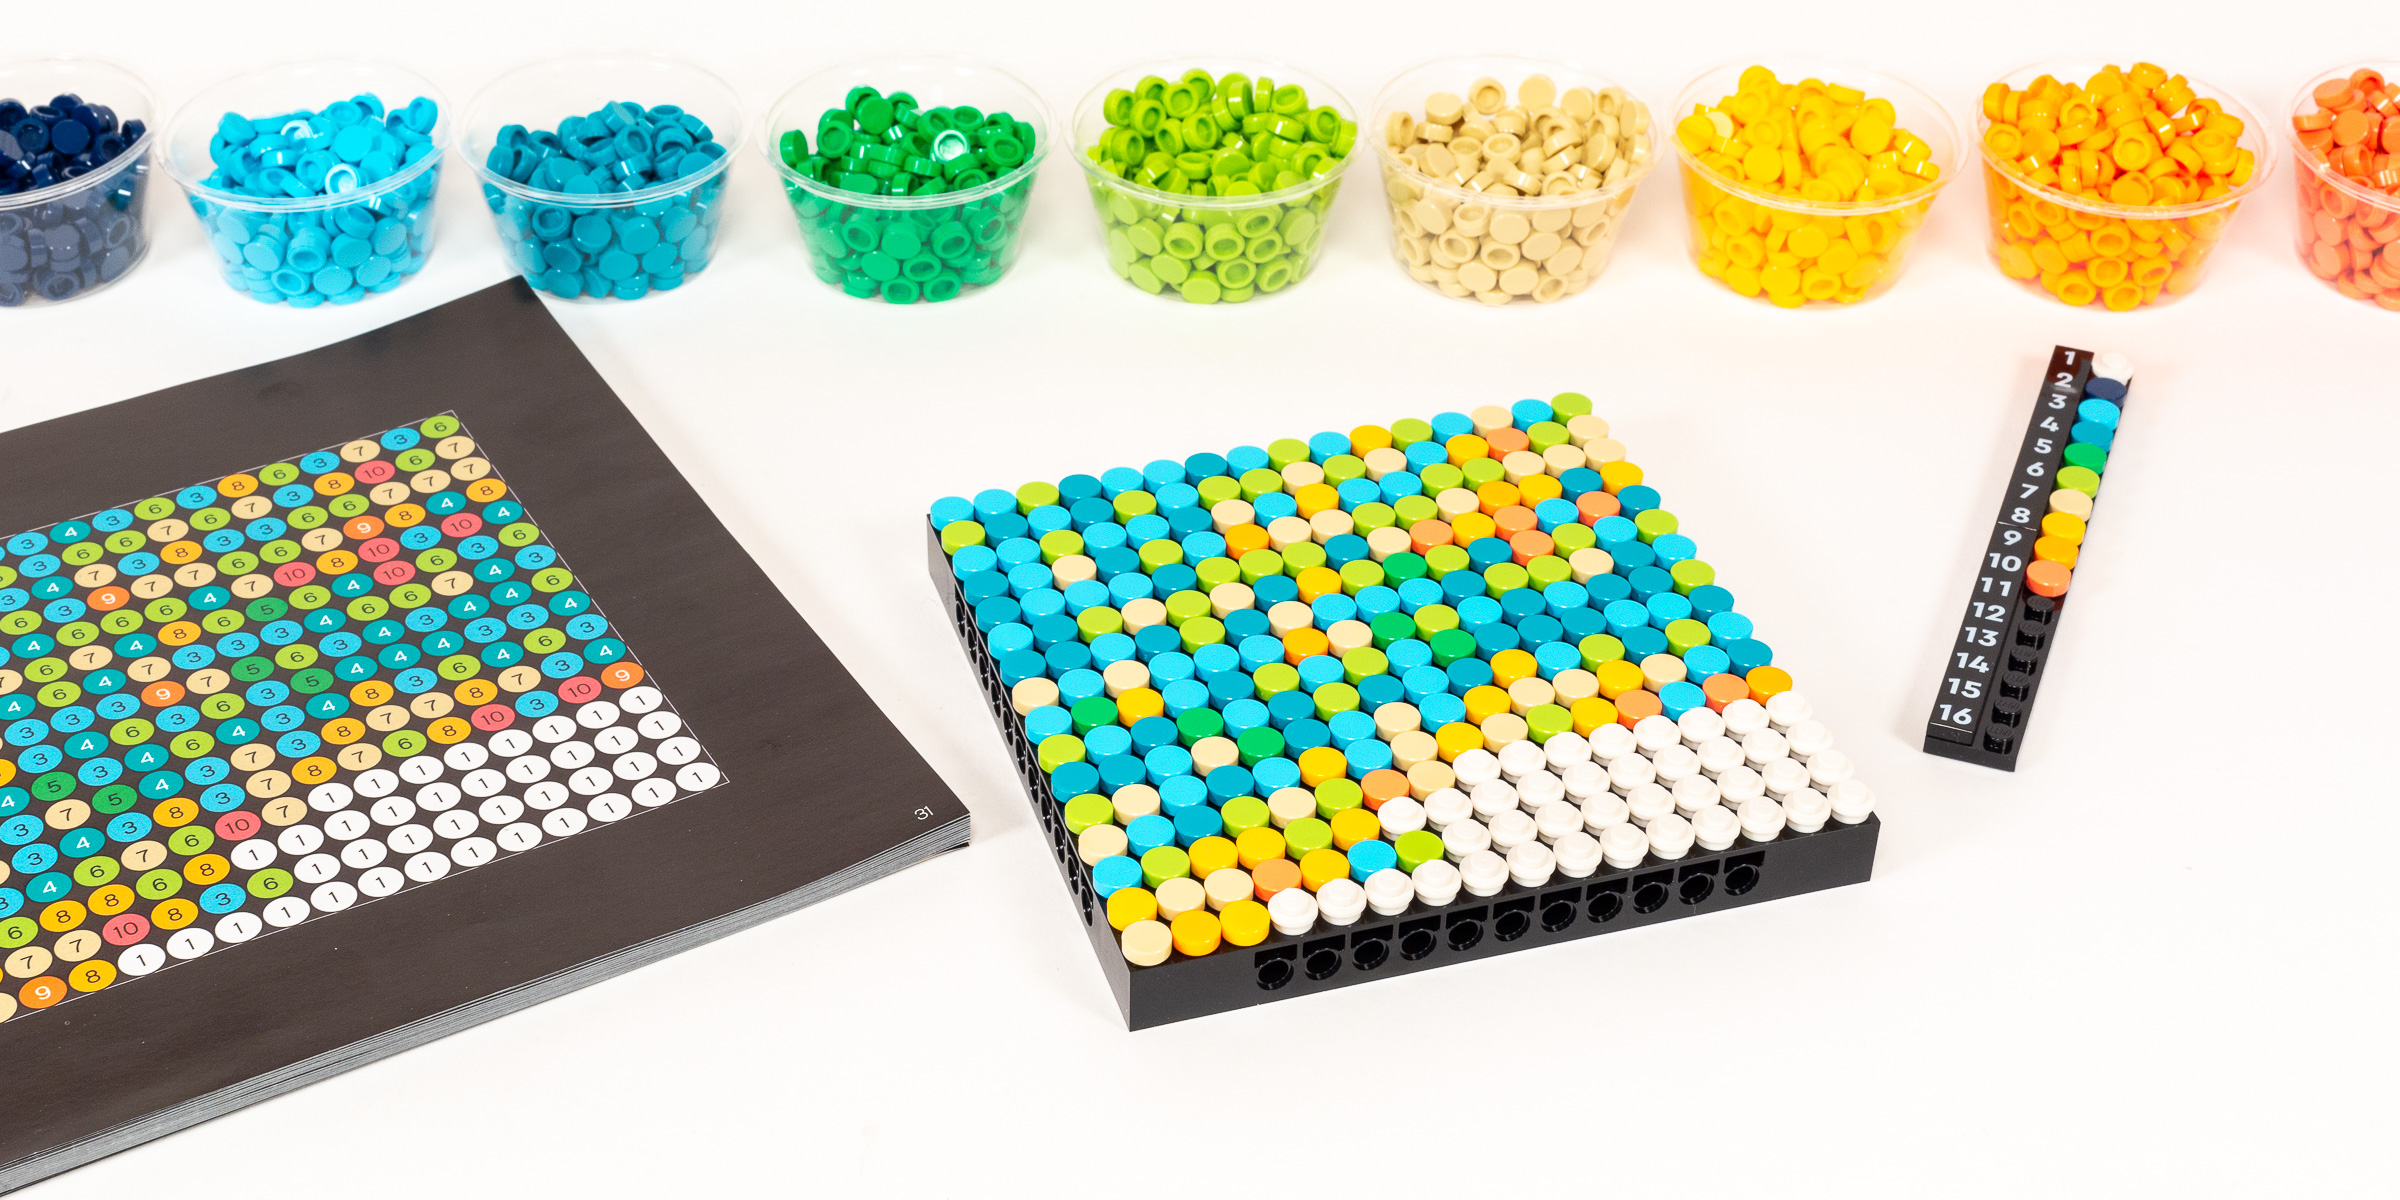
Stage 1 – Western North America
Built using ten (of the forty) baseplates, the western portion of North America is where we begin our journey. Each panel is assembled using a single two-page spread in the instruction booklet. On the right side, you will find a 16×16 grid where each cell is both numbered and colored — a literal brick-by-numbers.

Finishing the first of eight columns (showing Alaska and Hawaii).
What I had worried when I discovered the sheer scale of the set is definitely true… this is going to be very repetitive and take a very long time. The build process goes in five-panel tall columns from left to right. Finishing just the first of eight columns felt like an achievement!
The second column of five panels went a bit more quickly than the first. This was due, in part, to my decision to stop aligning the 1×1 plates with the word “LEGO” oriented upward. The other optimization came from general productivity improvements, including the use of smaller parts cups (with extra parts nearby to refill them), and moving from doing one row at a time to doing two rows at a time. General ergonomic improvements and increased fluency at flipping the parts around in my hand have probably helped as well.
The map of North America finally began to feel recognizable when I married the first two columns together. The bathymetric coloring in the ocean continues to distract me, but the stark white landforms stand out pretty well – inviting decoration based on the places I’ve visited.
Build Time: 162 minutes.
Stage 2 – South America, Europe, and Africa
For such a monumentally large LEGO set, I am already running out of things to say about the build process. Each of the forty panels involve aligning 256 colored dots on a 16×16 stud panel. The scale of the model is large enough that it can be difficult to recognize what you are building as you go—I found myself simply trusting that it would look recognizable when I put the panels together later!
I have, however explored a few different techniques to add variety to the process. After doing the first 10 panels one row at a time, I switched to doing two rows at a time. I tried working strictly from left to right, and I tried working on one color at a time. I also have tried adding the white studs for land before, after, and at the same time as the colored tiles. Nothing caused a significant improvement in build time or made it much more fun to build. I guess that I’m not the target audience for large paint-by-numbers projects.
Build Time: 280 minutes.
Stage 3 – Asia and Pacific Islands
The best thing about this final stage is that we are almost done! The most enjoyable sections of the whole build are those that create recognizable land masses, and the third stage includes some more interesting panels including a tiny but recognizable rendition of Japan and the western edge of Australia (including the island of Tasmania).

Using Sticky Notes to reveal exactly four rows at a time.
I have continued to refine my building technique, which allowed me to build a bit quicker, too. Instead of assembling just one or even two rows at a time, I started using sticky notes to reveal four rows of the instruction booklet at a time.
This is a narrow enough band that I can complete one color at a time, especially when that section includes a lot of just one or two colors, most commonly 322Medium AzurMedium Azure or 107Bright Bluish GreenDark Turquoise / Teal. Once a lot of the 4-row strip has been blocked out in the most common colors, it becomes even quicker to drop in the remaining colors in just the right place. In fact, the very last panel was my quickest one at just 11 minutes!
Build Time: 137 minutes
Stage 4 – Connecting and Framing.
The last stage of the build is to connect the three large panels, reinforce them, and add a brick-built frame around the edges.
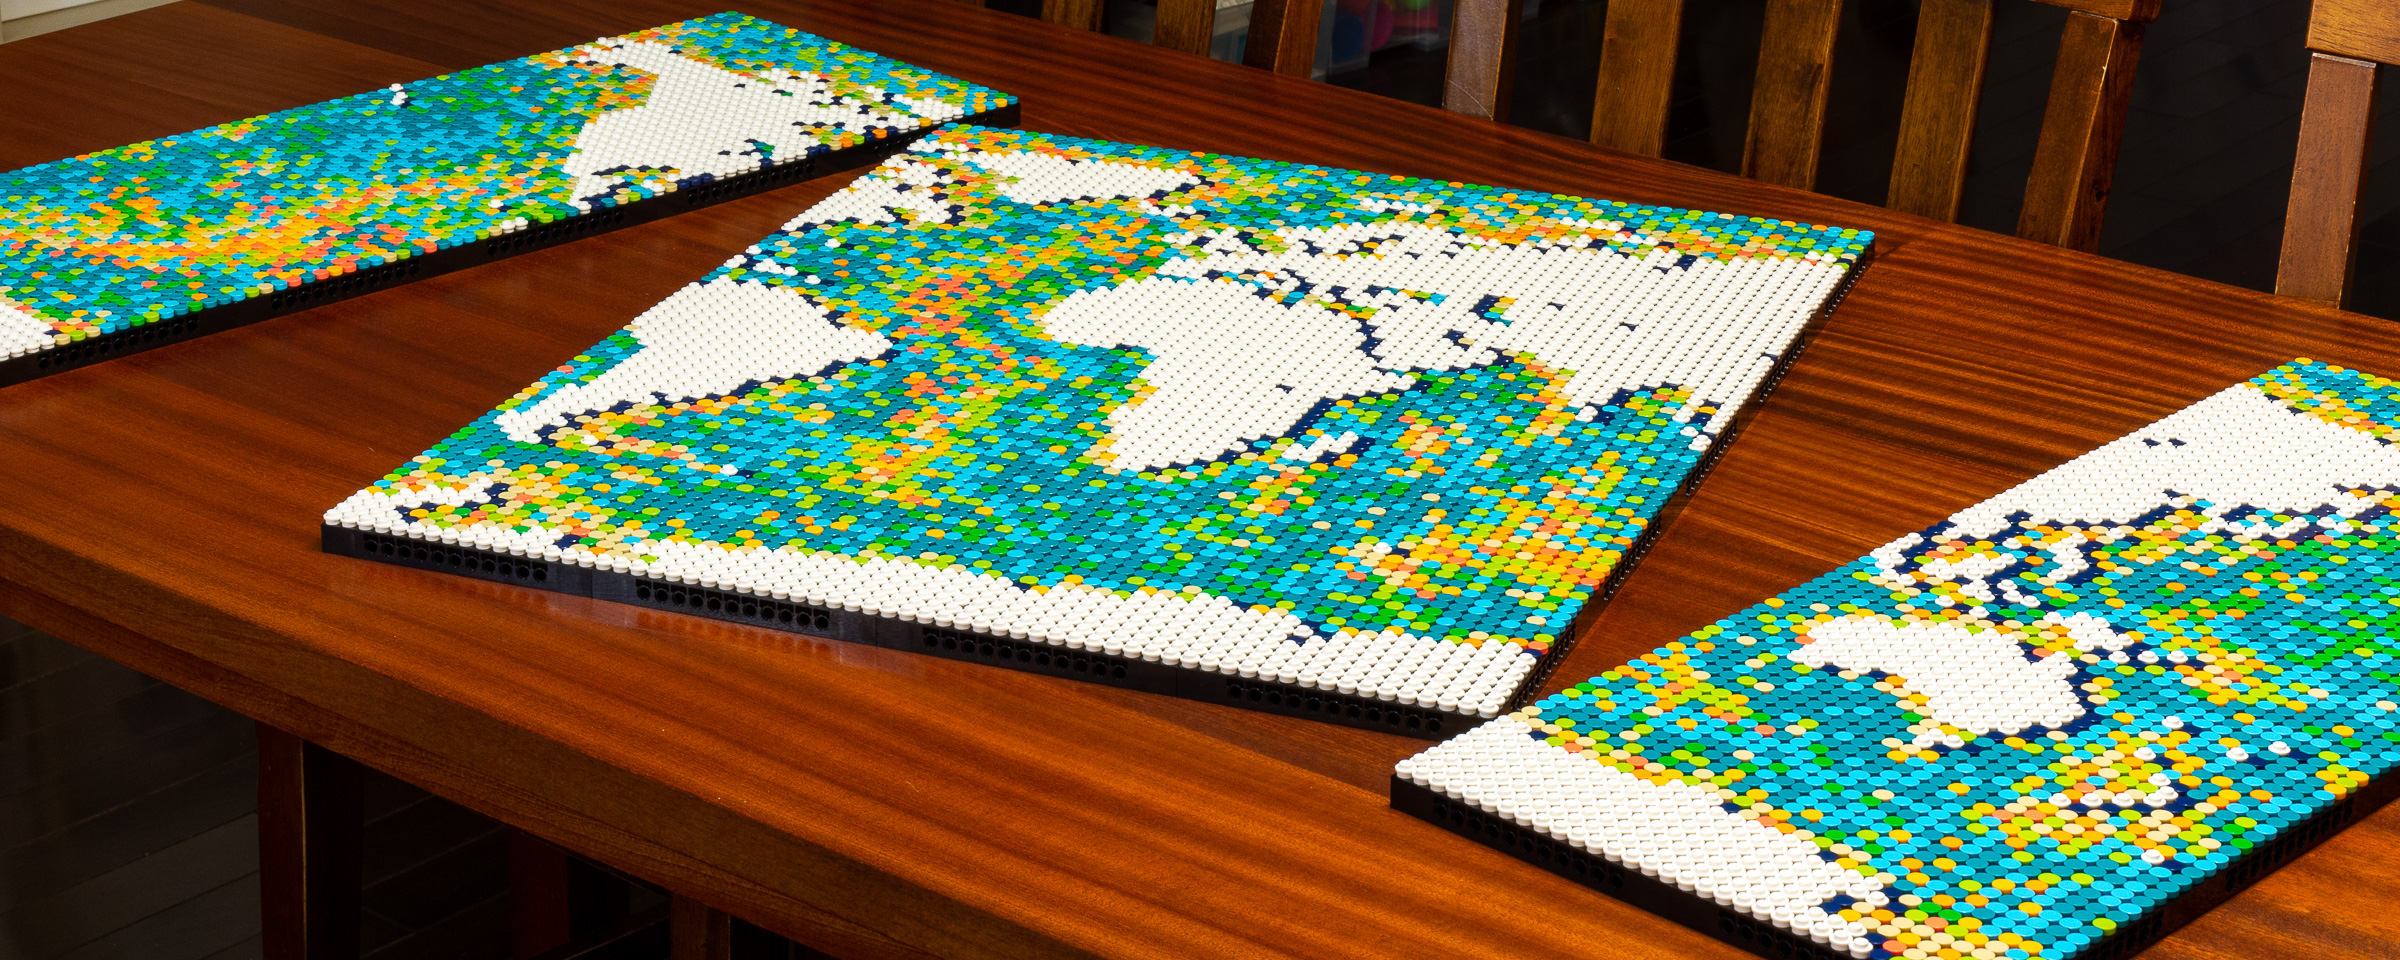
You can decide how to arrange the three large panels.
What they failed to realize when designing the building instructions is that it is very difficult to flip the map over, especially before you have reinforced it appropriately. I’m also worried about damaging my table by dropping it, since the only table large enough to assemble it was our nice dining-room table. You can finish the model by only flipping it over twice (front to back, then back to front at the end), but the building instructions ask you to flip it two more times at the end to add the picture hanging hooks.
Another annoyance related to flipping the map is on pages 141-142. They encourage you to attach the 1×2 w/ Technic Pin (part 2458) before flipping the map over, but you should definitely flip the map over first. Otherwise, those parts will spin around when you flip the map, potentially damaging your table and you will definitely need to re-orient them afterwards.
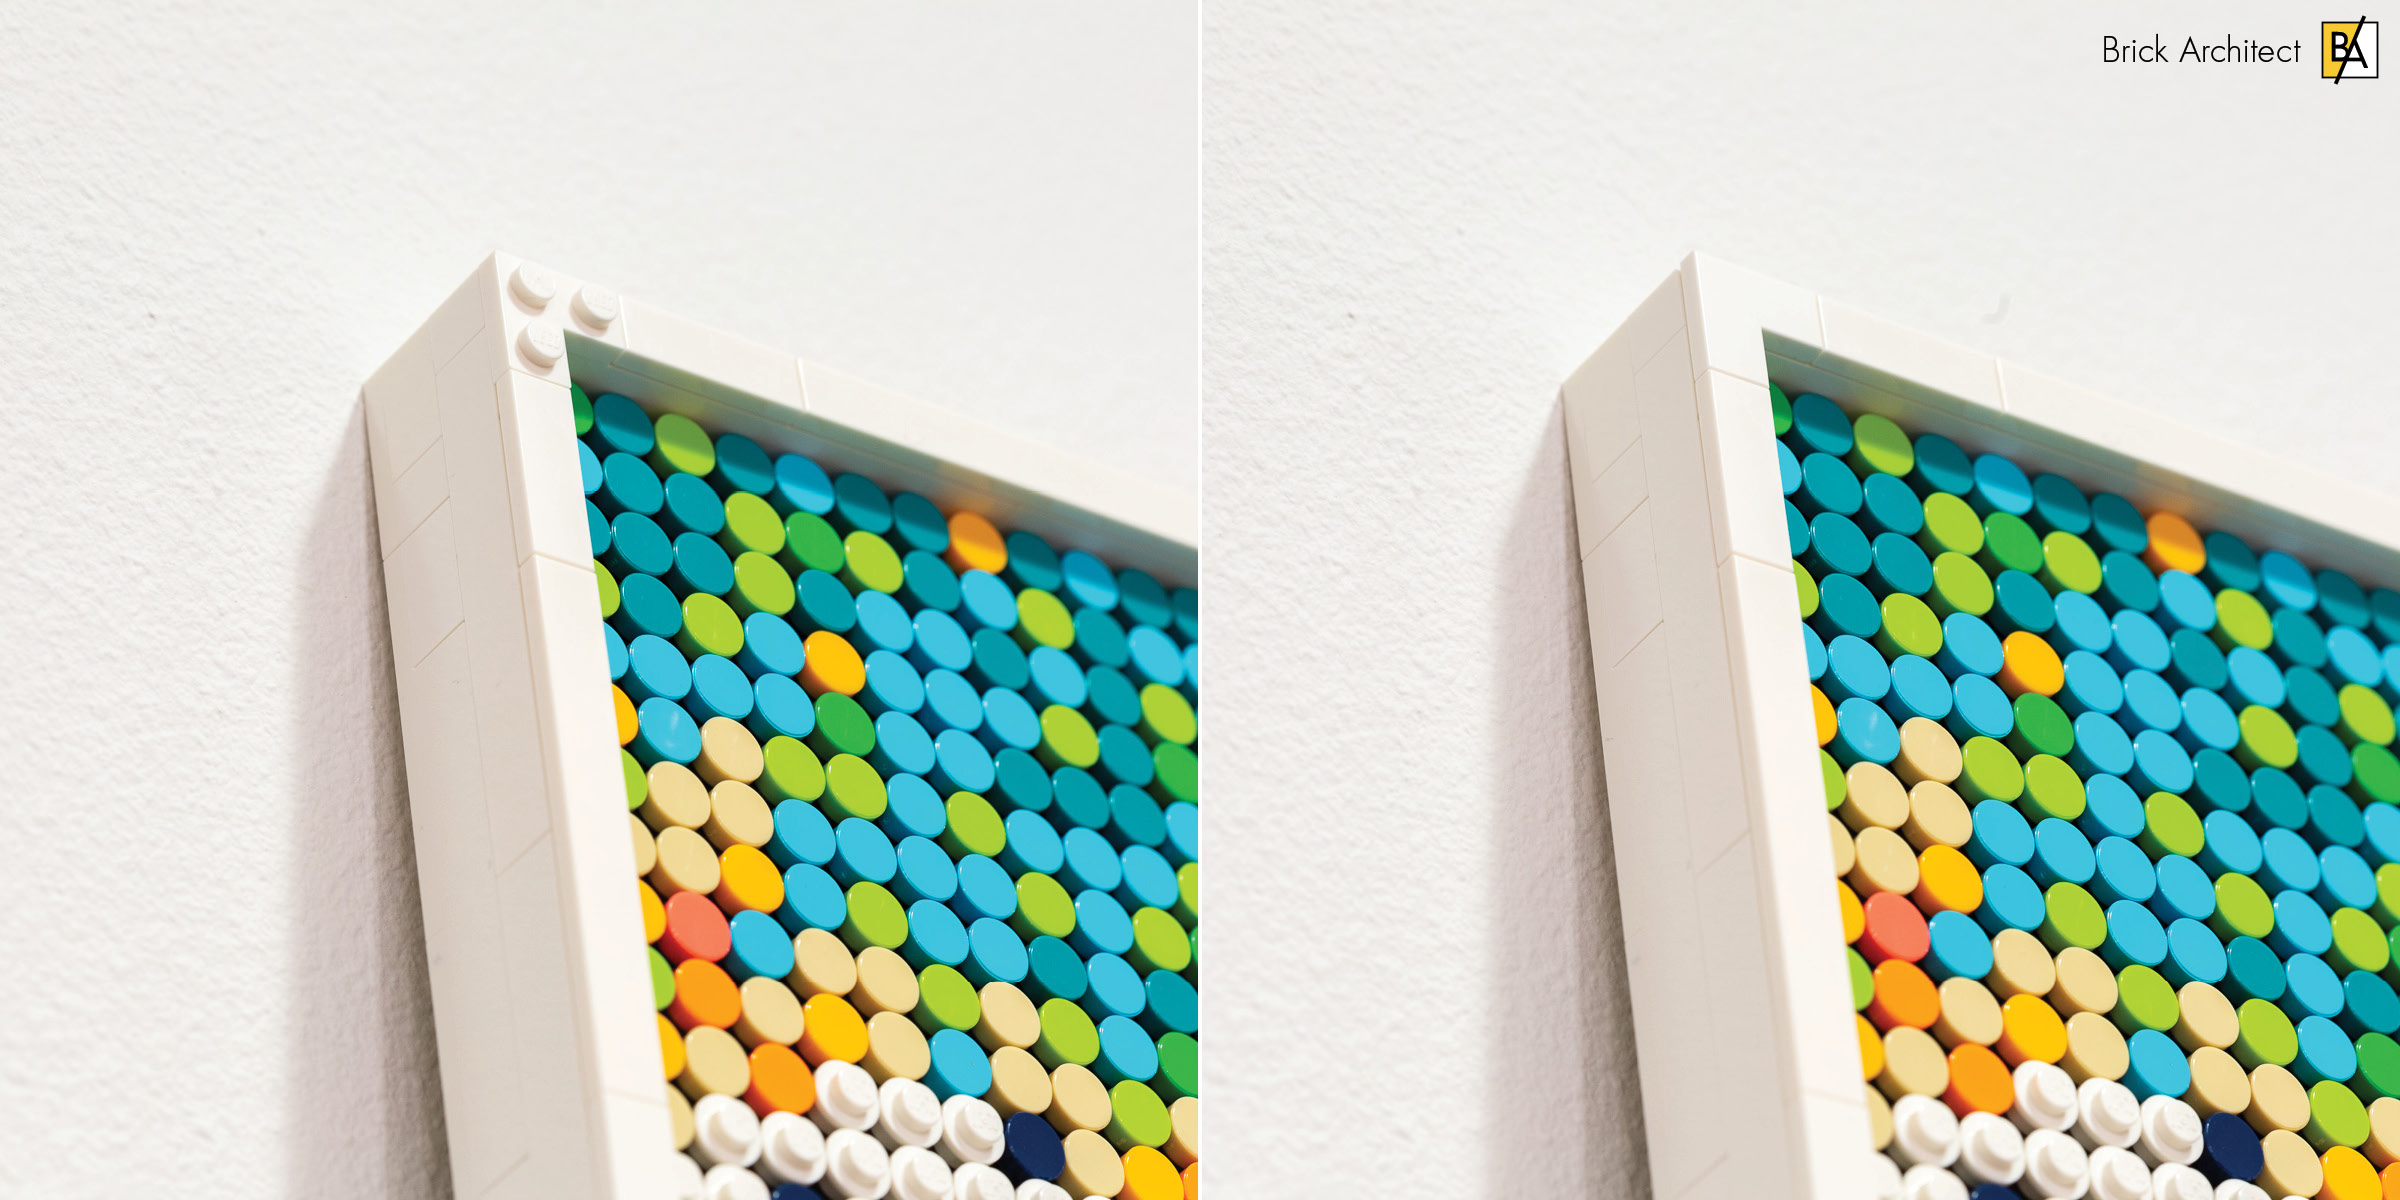
The model comes with studded corner plates, but smooth corner tiles look a lot better!
Lastly, I cannot get on board with the studded 2×2 corner plates. I’m sure this is an artistic touch to reinforce the fact that even the frame is made out of LEGO. At least to me, it really looks a lot better with 2×2 corner tiles, so I swapped them with parts from my collection.
Build Time: 34 minutes.
Parts
There isn’t much to say about the selection of parts in this set. In fact, there are only 32 unique parts in the set, despite the massive 11,695 piece count. In fact, the only new parts in the set are two printed plates—that’s why we will focus on the parts value instead!
New printed parts:
- 1x – 1×8 Tile (part 4162) in 26Black with numbers 1-8.
- 1x – 1×8 Tile (part 4162) in 26Black with numbers 9-16.
Value
Price-per-part
On the other hand, there’s a lot that we can say about the value of the parts in this set when put in the hands of a motivated LEGO artist. At $250 for nearly 12,000 pieces, this set is only $0.021 per part. This represents the lowest price-per-part of any set that I have reviewed! (Two other sets that come to mind are 2018’s #41597 Go Brick Me at $0.042/piece, and 2020’s #10276 Colosseum at $0.061/piece.)
I also wanted to compare this set to the six other sets in the LEGO Art Series which are all based on licensed themes and cost $119.99. They are built on a square base that utilizes nine of the LEGO Art panels (versus the forty in this set).
- #31199 Marvel Studios Iron Man – 3167 pieces, $0.038/piece.
- #31197 Andy Warhol’s Marilyn Monroe – 3341 pieces, $0.036/piece.
- #31202 Disney’s Mickey Mouse – 2658 pieces, $0.045/piece.
- #31201 Harry Potter Hogwarts Crests – 4249 pieces, $0.028/piece.
- #31200 Star Wars The Sith – 3406 pieces, $0.035/piece.
- #31198 The Beatles – 2933 pieces, $0.041/piece.
The numbers clearly bear out that this set is a better value on a price-per-part basis, but perhaps less so than I might have expected. In particular, the Harry Potter set looks like a good value, since they needed to include a lot of extra parts since the set allows you to build all four of the Hogwarts crests, which use significantly different color palettes. Nonetheless, this is a better value with more than 4 times as much surface area for about double the cost.
Tons of tiny pieces make for a fantastic price-per-part.
Price-per-weight
On the other hand… is 2 cents-per-part a good deal when 90% of the pieces are just 1×1 plates and tiles—maybe?
When it comes to BrickLink prices, this set looks like a really good deal. At an average of $3.50 each, the forty 16×16 LEGO Art panels w/ Technic pins alone are worth $140 – more than half of the set’s $250 price tag.
I also did a preliminary exploration of the price of this set per weight as compared to the recently released #10292 The Friends Apartments set, which we also highlighted as a good value. (These weights are for just the LEGO set and the extra parts – packaging and instructions not included!)
- #10292 The Friends Apartments: $149.99 / 1.78 kg (3.93 lbs) = 84.3 $/kg (38.2 $/lb)
- (This set) #31203 World Map: $249.99 / 4.02 kg (8.86 lbs) = 62.2 $/kg (28.2 $/lb)
Even though most of the parts are suspiciously tiny, we can see that this set also represents a good value by weight. (Maybe we will use this as part of our value assessment in future articles too!)
Customizability
Two things come to mind when I imagine customizing this map: marking the places you have visited and changing the aesthetics. I will explore each of these opportunities, since the very nature of a huge map just begs to be customized.
Pinning your favorite places
If the map was more aesthetically pleasing, there’s a good chance that we would have incoporated it into our family travel traditions. There’s something satisfying about marking the places you’ve been on a map—I even created a custom National Park Checklist for this very purpose many years ago.
The option included in the box is pretty basic and not very satisfying… They include a handful of 1×1 cones in 1White which you can decorate using the same brightly colored round tiles that come with the set. Unfortunatley, this approach doesn’t stand out as well as you might want, since the pins are harder to find when they match the colors used for the ocean.

Three different ways to mark your favorite places on the map.
I have also experimented with using flags and other 1×1 elements. If you have access to a high-quality custom brick printer, you could explore designing custom printed 1×1 round tiles for your favorite places. (If it weren’t for the 140Earth BlueDark Blue drop shadow used along the coast, 26Black tiles with white text or images would be perfect.)
Aesthetic improvements
I’m afraid that I barely finished this review in time, so I wasn’t able to modify my map yet. That said, I’ve created a list of potential changes you should consider before beginning to assemble this giant map. (It would be much easier to make changes before you start building!)
- Removing the drop shadow – With such bright colors used for the oceans, the White studs used for the land masses already stand out. By removing the drop shadow, you can use darker colors to decorate the map with the places you’ve been.
- Re-coloring the oceans – Maybe my perception is colored by the large roll-up maps from my childhood, but oceans should be blue. I would love to explore using shades of Blue and/or Azure to represent depth, but would also be interested in seeing how the map would look with a single light-blue color for the entire ocean.
- Coloring the land masses – I’m also eager to see how the map would look with the lightest available hues used to represent different land types. Even just three colors might be sufficent. (ex: 326Spring Yellowish GreenYellowish Green for forests, 226Cool YellowBright Light Yellow for deserts, and 1White for Glaciers.)
Map Projection
At first glance, I thought this was the classic Mercator projection from my childhood. On closer inspection I see that Greenland is vertically squished, so it is clearly based on an alternate projection. I thought it might be a Cylindrical equal area projection, but the northernmost and southernmost sections of the map do not appear to be squished enough.
After staring at a lot of map projections, my best guess was that this is based on the Miller Cylindrical projection, but with some of the north and south pole removed. Because I couldn’t be sure, I asked The LEGO Group to confirm which projection system it’s based on.
We spent a long time working through which projection we could use that would show the highest level of accuracy possible…
When consulting with a geo-scaping expert, the map projection that is recognizable to most people is the Equal Earth projection. We based our LEGO design on the Equal Earth projection but we had to take some creative license to ‘square’ out the sides so that we could offer consumers the option to build the map in sections, and therefore arrange the map in one of three possible ways depending on how they see the world. … For this reason, we say the world map was inspired by the Equal Earth projection, rather than replicating it.
What we feel we have as a finished result, is an artful interpretation of the World Map that allows our fans to represent their own vision of the world they live in. We hope our fans see it as a playful blend of art and science – designed to be enjoyed visually – as well as functionally and creatively.
Thanks to The LEGO Group for providing answers to my questions!
Conclusion
#31203 World Map is huge and brightly colored, and will dominate almost any room that you put it in. It’s also a massive undertaking—I built it as fast as I possibly could and it still took more than 10 hours! You will also find that represents a very good value, no matter whether you assess value on a price-per-part, price-per-weight, or even a price-per-hour basis (assuming that more time is better).
The biggest question when considering building this set is something that only you can answer. Some people find it relaxing to painstakingly follow the instructions to complete a paint-by-numbers project, a cross-stitching pattern, or one of the other LEGO Art mosaics. Others (like me) find this to be extremely tedious.

Even though the map is huge, Europe is only vaguely recognizable due to the distracting colors and poorly handled shadow effect.
Whether you think it is beautiful or garish is also ultimately up to you. I already spoke about my preference for a more traditional color palette for the oceans and land masses, but you might really like the brightly colored bathymetric representation of the oceans, with stark white land masses just begging to be decorated. (The good news is that my impression of the finished project matched my impression of the box art and photos – if you like what you see online, you will likely also like how it looks in your home.)
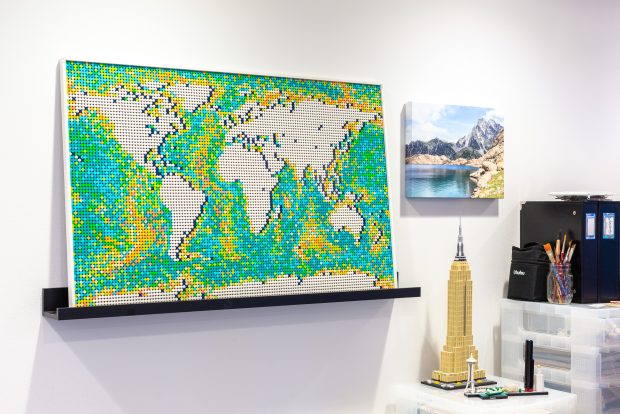
#31203 World Map as displayed in our home.
Lastly, you might decide to simply purchase the set for the parts. At $250, it is an expensive parts pack, but it’s an excellent way to buy a lot of 16×16 LEGO Art / Technic panels since the set has 40 of them! If you happen to like building mosaics in a Pop Art style, the selection of brightly colored 1×1 Round Tiles included in the set might be perfect.
Ultimately, this set disappointed me on all fronts except price. I did not find it fun to build, but you might. I find the color choice very displeasing, and my wife doesn’t even want to display it in our home. It’s challenging to correlate real cities to positions on the map, and it’s hard to make the places you’ve visited stand out since the background is so bright.
For these reasons, #31203 World Map only earns our Acceptable (2/5 Star) Rating for the build experience and finished model, despite being a great value as a parts pack. I’m sure it will still fly off shelves, because I know there are plenty of people who enjoy paint-by-numbers style projects, and a lot of copies will end up scrapped for parts (or to restock a BrickLink store).
Its bigger than it seems
I was planning to do the same as Jim: build using the white only. I was then wondering if I could build a second map by buying a few flat baseplates and only filling in the ocean pieces from the original build.
I think the colored ocean tiles are to represent topography of the ocean.
That’s right – In a bathymetric map like this, the different colors represent ocean depth. (It’s similar to a topographic map, but for water depth.)
—Tom
I plan to build it without filling in the oceans, for a black/white finished product as shown on the Lego site. That will result in a much faster build and a removal of the odd ocean colours. Then those ocean tiles can be used to colour in the land with places I’ve been and such. Perhaps I’ll install little micro builds of landmarks or maybe add some cheese slopes for mountain ranges. I love that Lego left the land masses as a blank canvas of exposed studs for this.
I haven’t yet read a review of this set that mentioned what the audio soundtrack is. World music? Interviews with cartographers? Ocean sounds?