

Review: LEGO #10305 Lion Knights’ Castle
Castle is one of the three classic themes introduced in 1978 alongside the iconic LEGO Minifigure — but long-time fans haven’t seen castle or knights kingdom as a theme since 2013! Can this intricate new set possibly live up to our impossibly high expectations?
A beautifully detailed and imposing castle fit with historically accurate details and packed with minifigures, what more could you want.
#10305 Lion’s Knights’ Castle will be released worldwide on August 3 (with VIP Early Access). It costs $399.99 (399.99€ / £344.99 / 499.99 CAD / 599.99 AUD) for 4514 pieces, ages 18+.
At that price, the set comes to $0.089 per piece in the USA, which is not great for a large unlicensed set, but a lot better than some other new releases. Bear in mind that there is an upcoming LEGO price increase later this year, so our pricing expectations may need to be adjusted moving forward. This set also includes 22 minifigures across three factions, and a lot of animals which add a lot of value for some collectors.
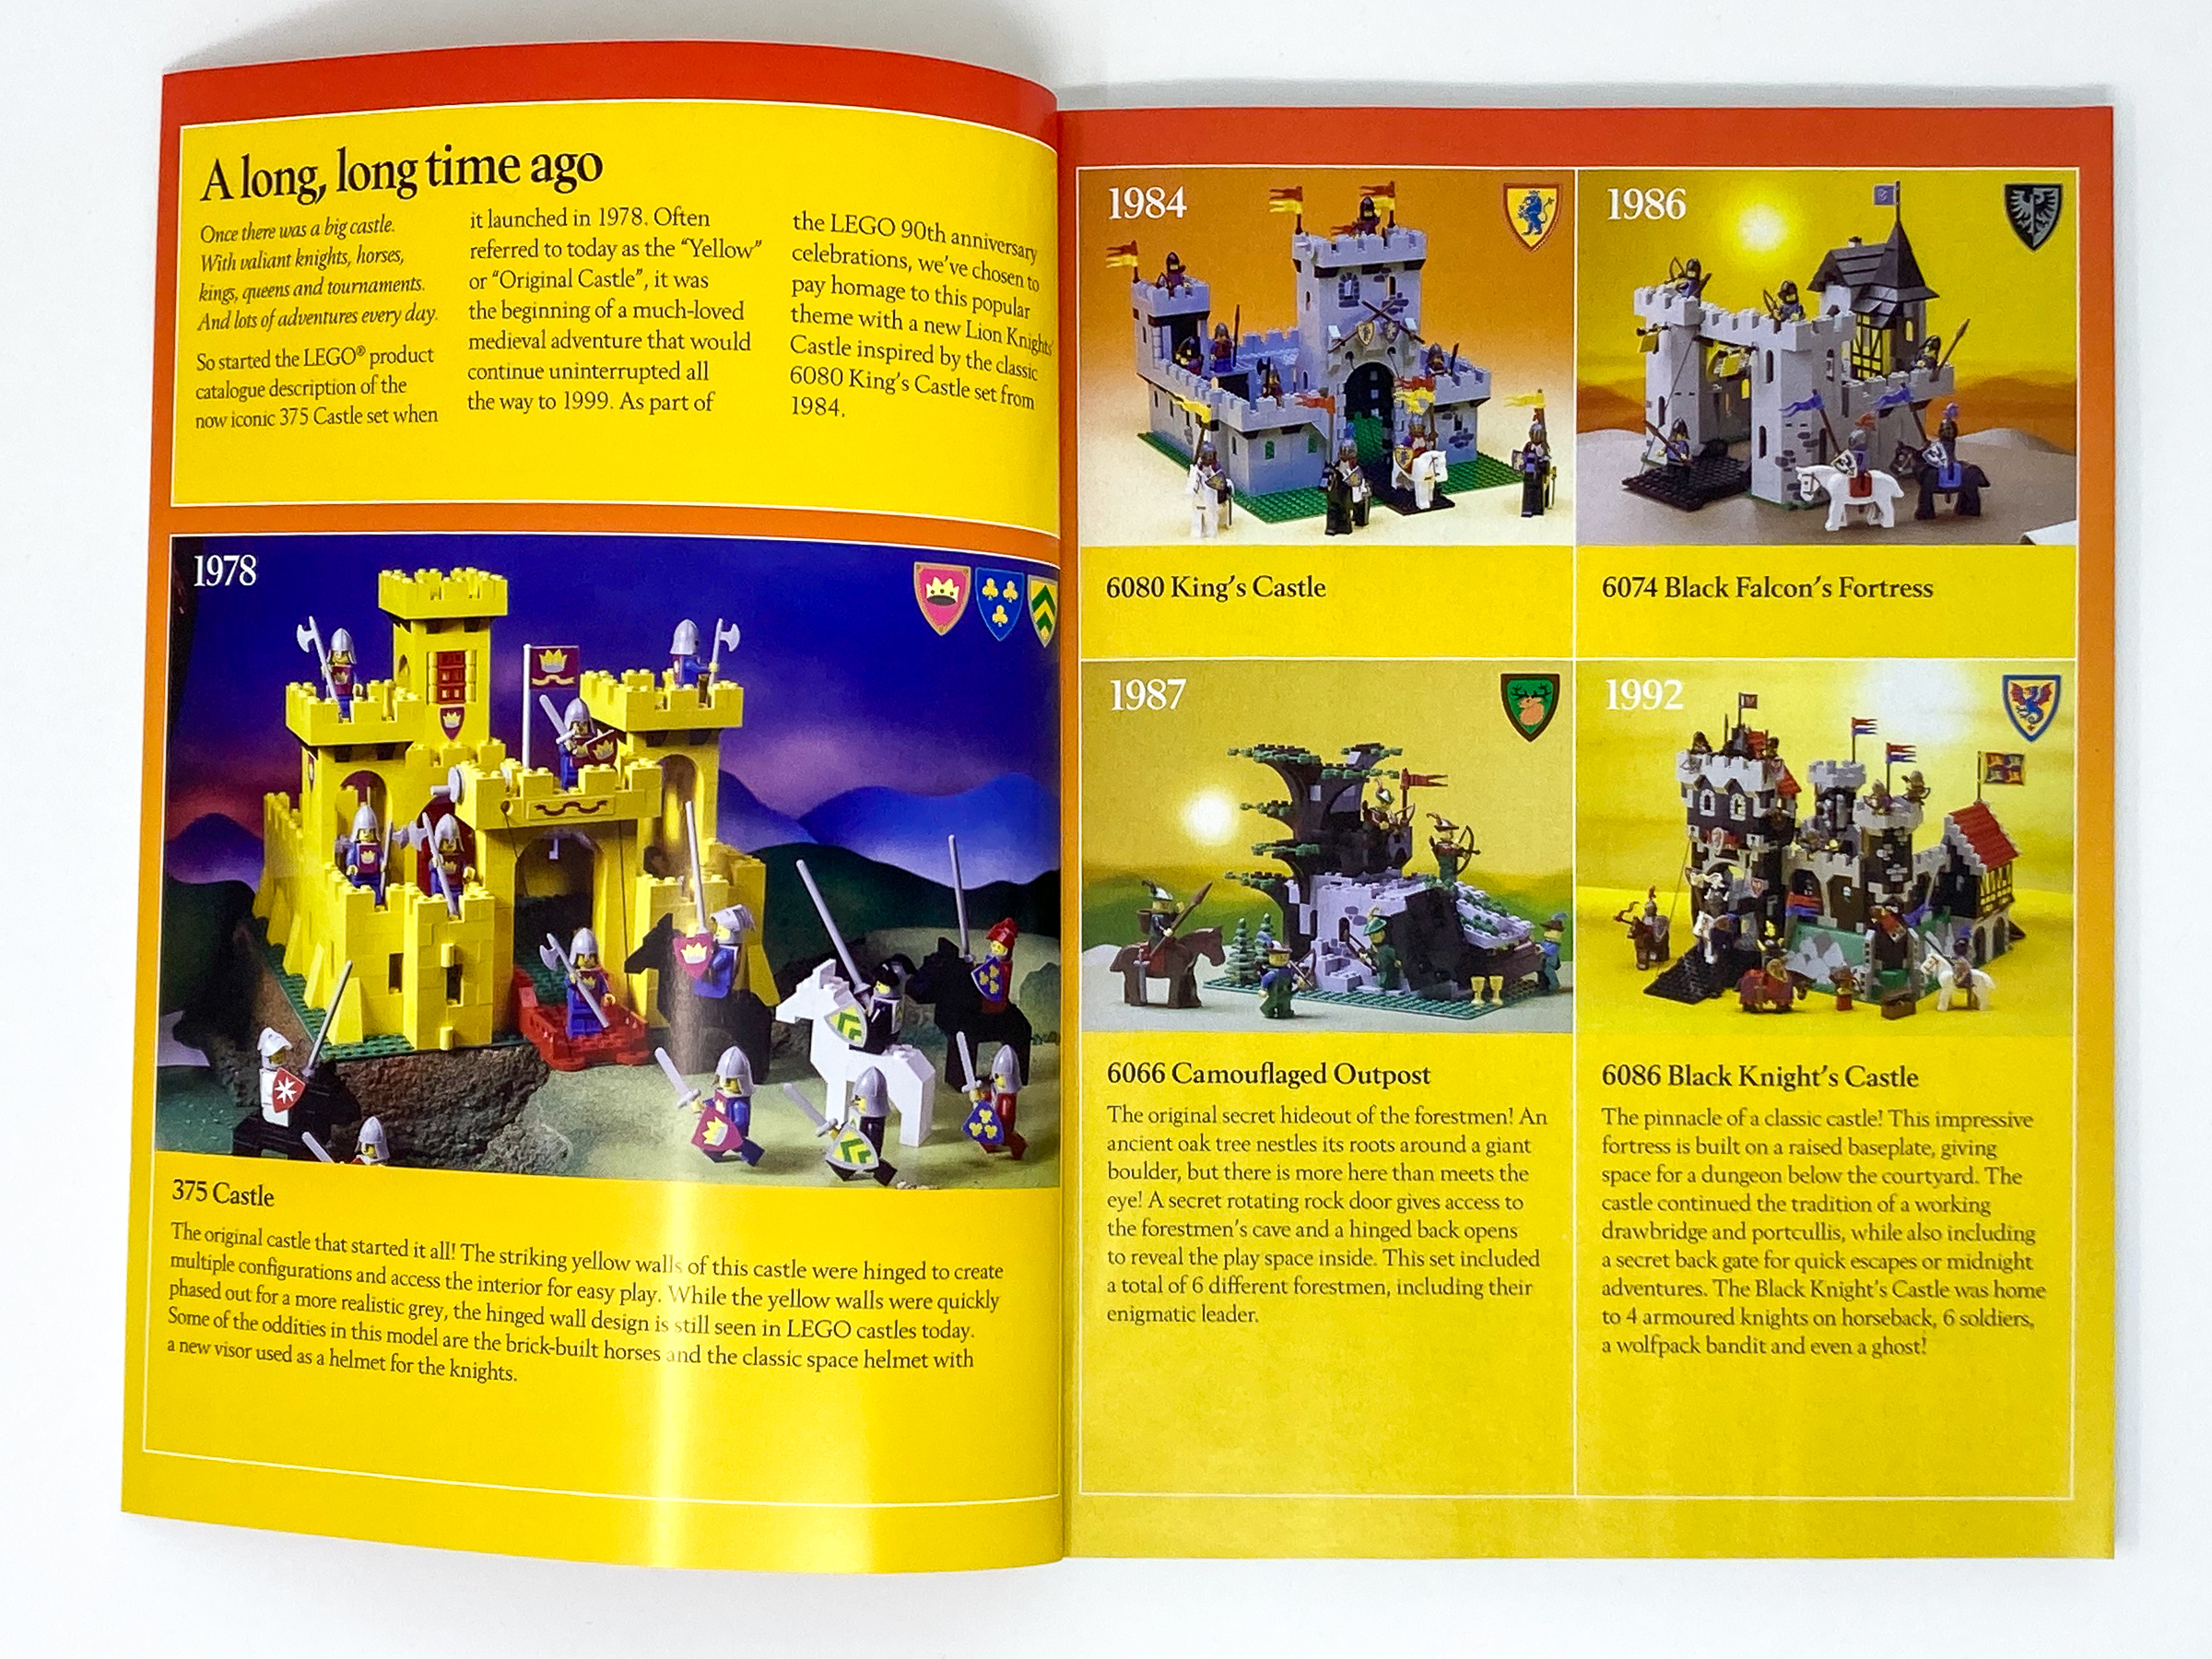
#10305 Lion’s Knights’ Castle was released as LEGO’s 90 years of play line which commemorates LEGO’s 90th annniversary. This set was first announced on June 18th and immediately drew the attention of LEGO fans including myself immediately. I was fortunate enough to be provided with a review copy of this set so lets spend the rest of this article seeing whether this set meets my expectations and how a modern remake of some iconic LEGO sets plays on people’s nostalgia of the past. The designers of this set even included an insert in the instructions highlighting all the iconic LEGO castles that have been built over the ages (in a classic style for that era).
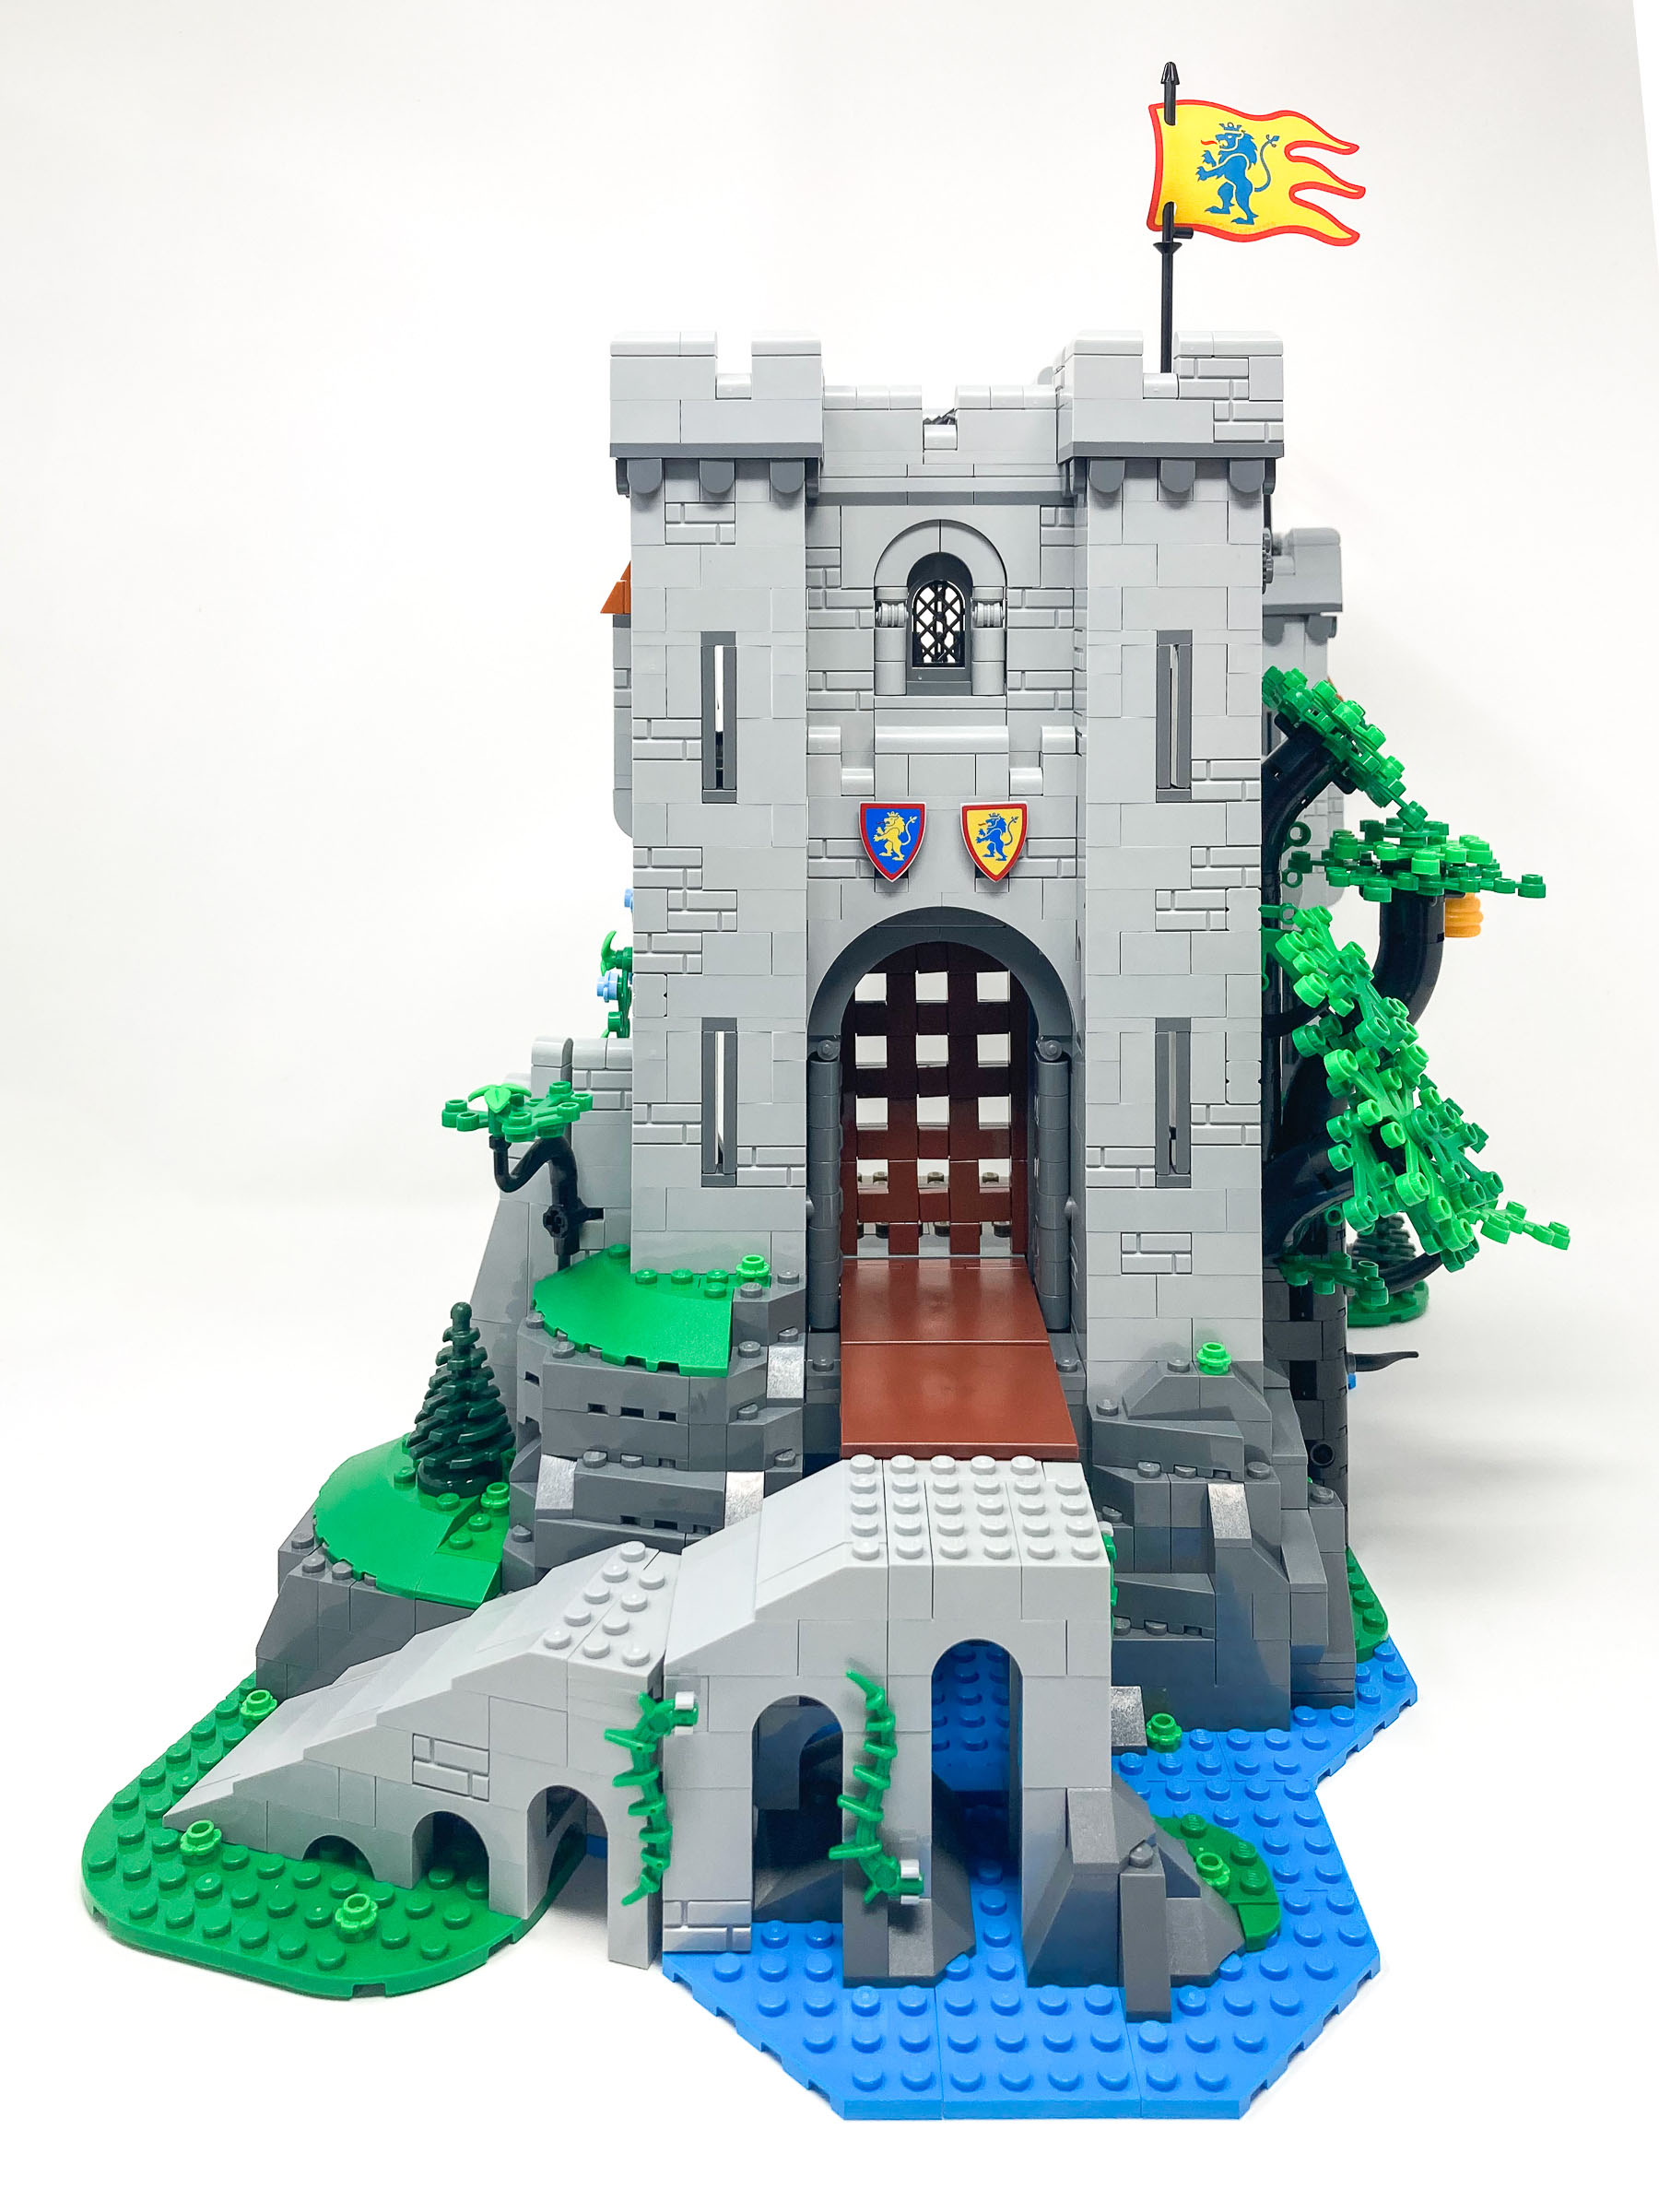
Note the Coat of Arms in the top right for each faction. Look for them throughout the castle.
Contents and packaging
When looking at the piece count you would think the box is much larger than it is is so it is important to break the set down to not just price per part but also price per gram. With LEGO increasing the prices of sets price per part is not always the best indicator. Listed below is some key weight, density and price points for this set. Later in this article we will review how this value compares to other similar sets.
- Box Size: 52.4 x 47.9 x 21.6 cm (20 5/8” × 18 7/8” × 8 1/2”)
- Box Weight: 6000 grams (13.2 lbs)
- Box Density: 6000 grams / 54.21 Liters = 111 g/L
- LEGO Parts Weight: 3265 grams (7.2lbs)
- Price per piece: $399 / 4514 pieces = $0.089 per piece
- Price per gram: $399.99 / 3265g = $0.122 per gram
When closed, the completed model measures over 14 in. (38 cm) high, 17 in. (44 cm) wide and 12 in. (33 cm) deep, but it grows significantly when you open it up to reveal the interior.
The set contains a whopping 26 stages built using parts contained in one or two numbered bags. The build process is split into two halves, each with their own instruction booklet.
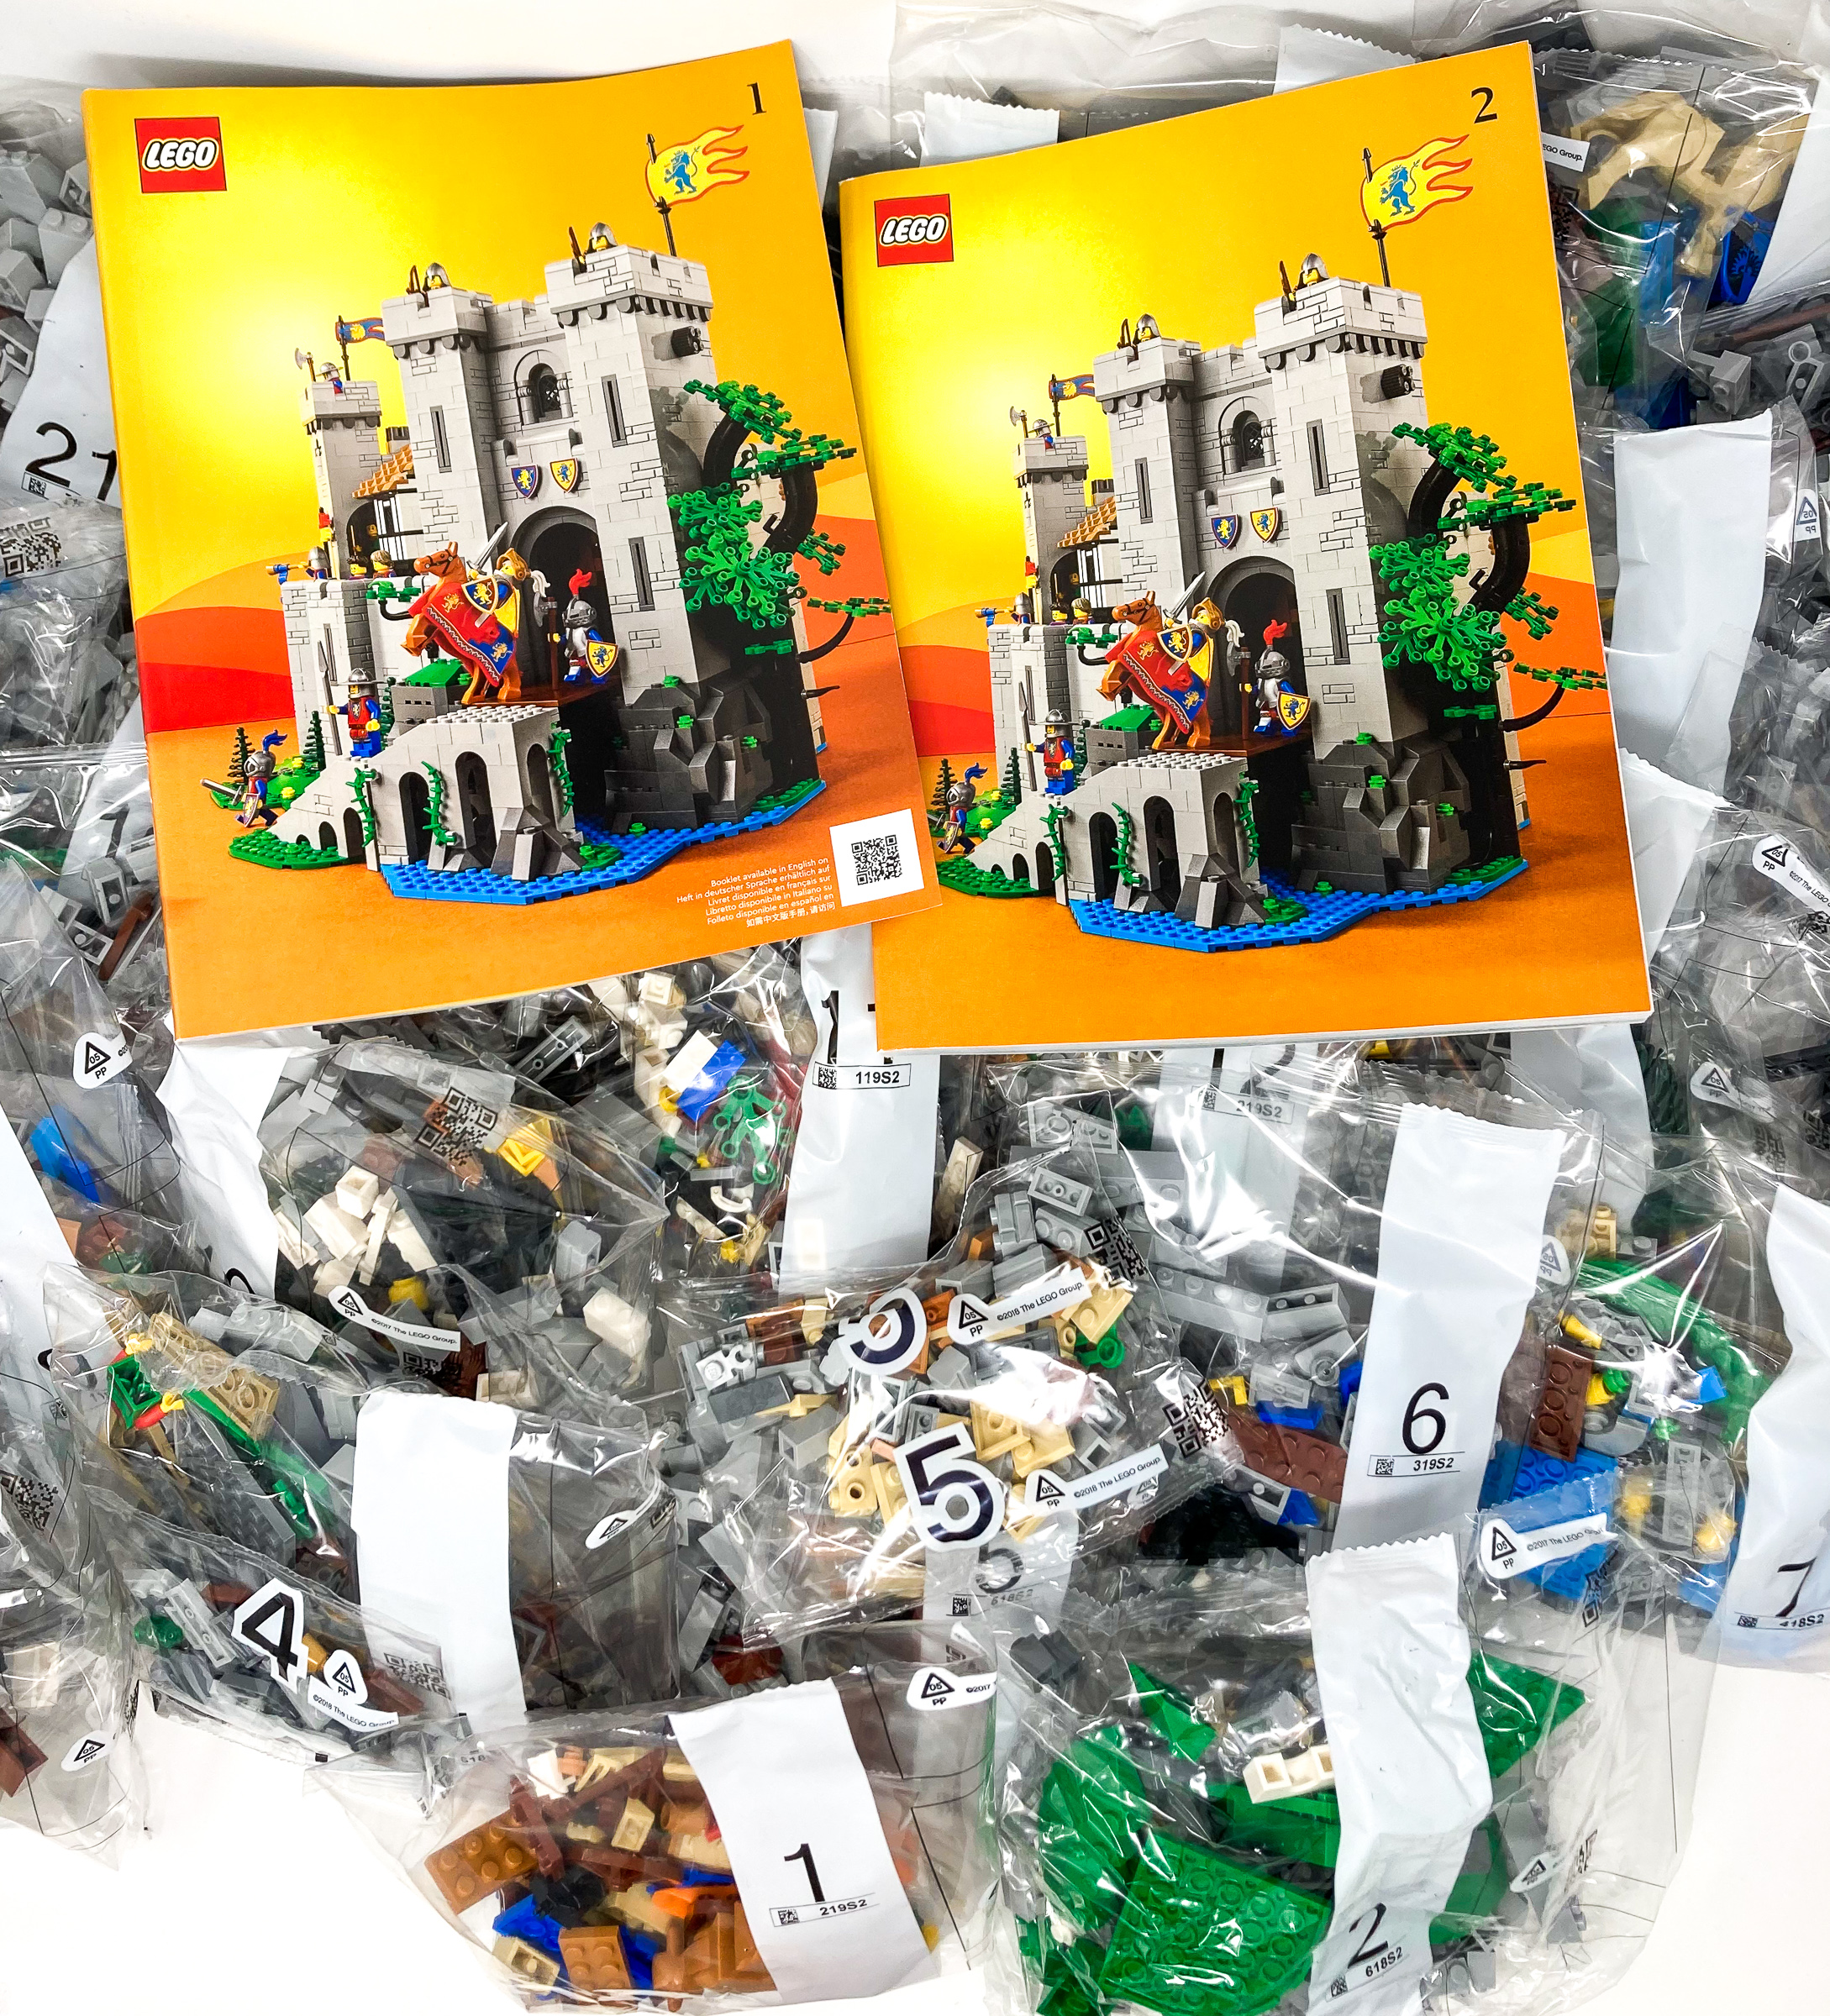
Two thick LEGO instruction manuals and 26 sections. Just opening the box already lets you know that this is going to be a long build.
The box also came with a pamplet introducing LEGO’s goal to reduce single use plastics in their packaging however I was disappointed to see that despite this notice every bag of pieces in this set came packaged in plastic. My assumption is that LEGO is slowly using up their existing supply and phasing out single use plastics otherwise that pamplet would be a little redundant. That said, the set comes with a small cardboard box which holds all the cloth pieces included in this set: two flags and one cape. I was overjoyed to see that this set did not come with even a single sticker sheet. (I was expecting some stickers given the price point and level of detail included.
First Impressions
When opening the box, I was immediately hit with a wave of nostalgia. From the yellow box to the font used for the set number and part count, the packaging really tickles the nostalgic nerves of AFOLS who grew up with classic LEGO Castle. The side flaps contain a bit of history about the different heraldic houses of LEGO Castle over the years.
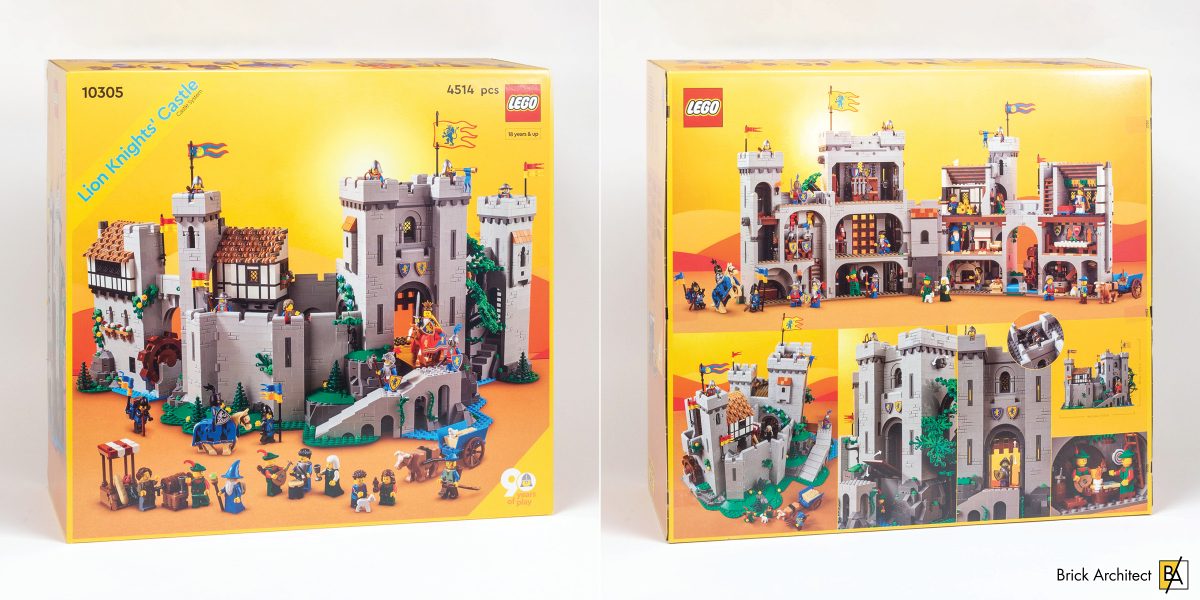
#10305 Lion Knights’ Castle – Box Front and Back. (Photo: Tom Alphin).
Large sets often include many minifigures, however this set contains a whopping 22 minifigures which exceeded my expectations. I noticed that they steered away from knights being all male — many of the figures are female, including the choice to have a Queen (rather than a King) leading the Lion Knights. (We will be exploring the minifigures in depth later in the article.)
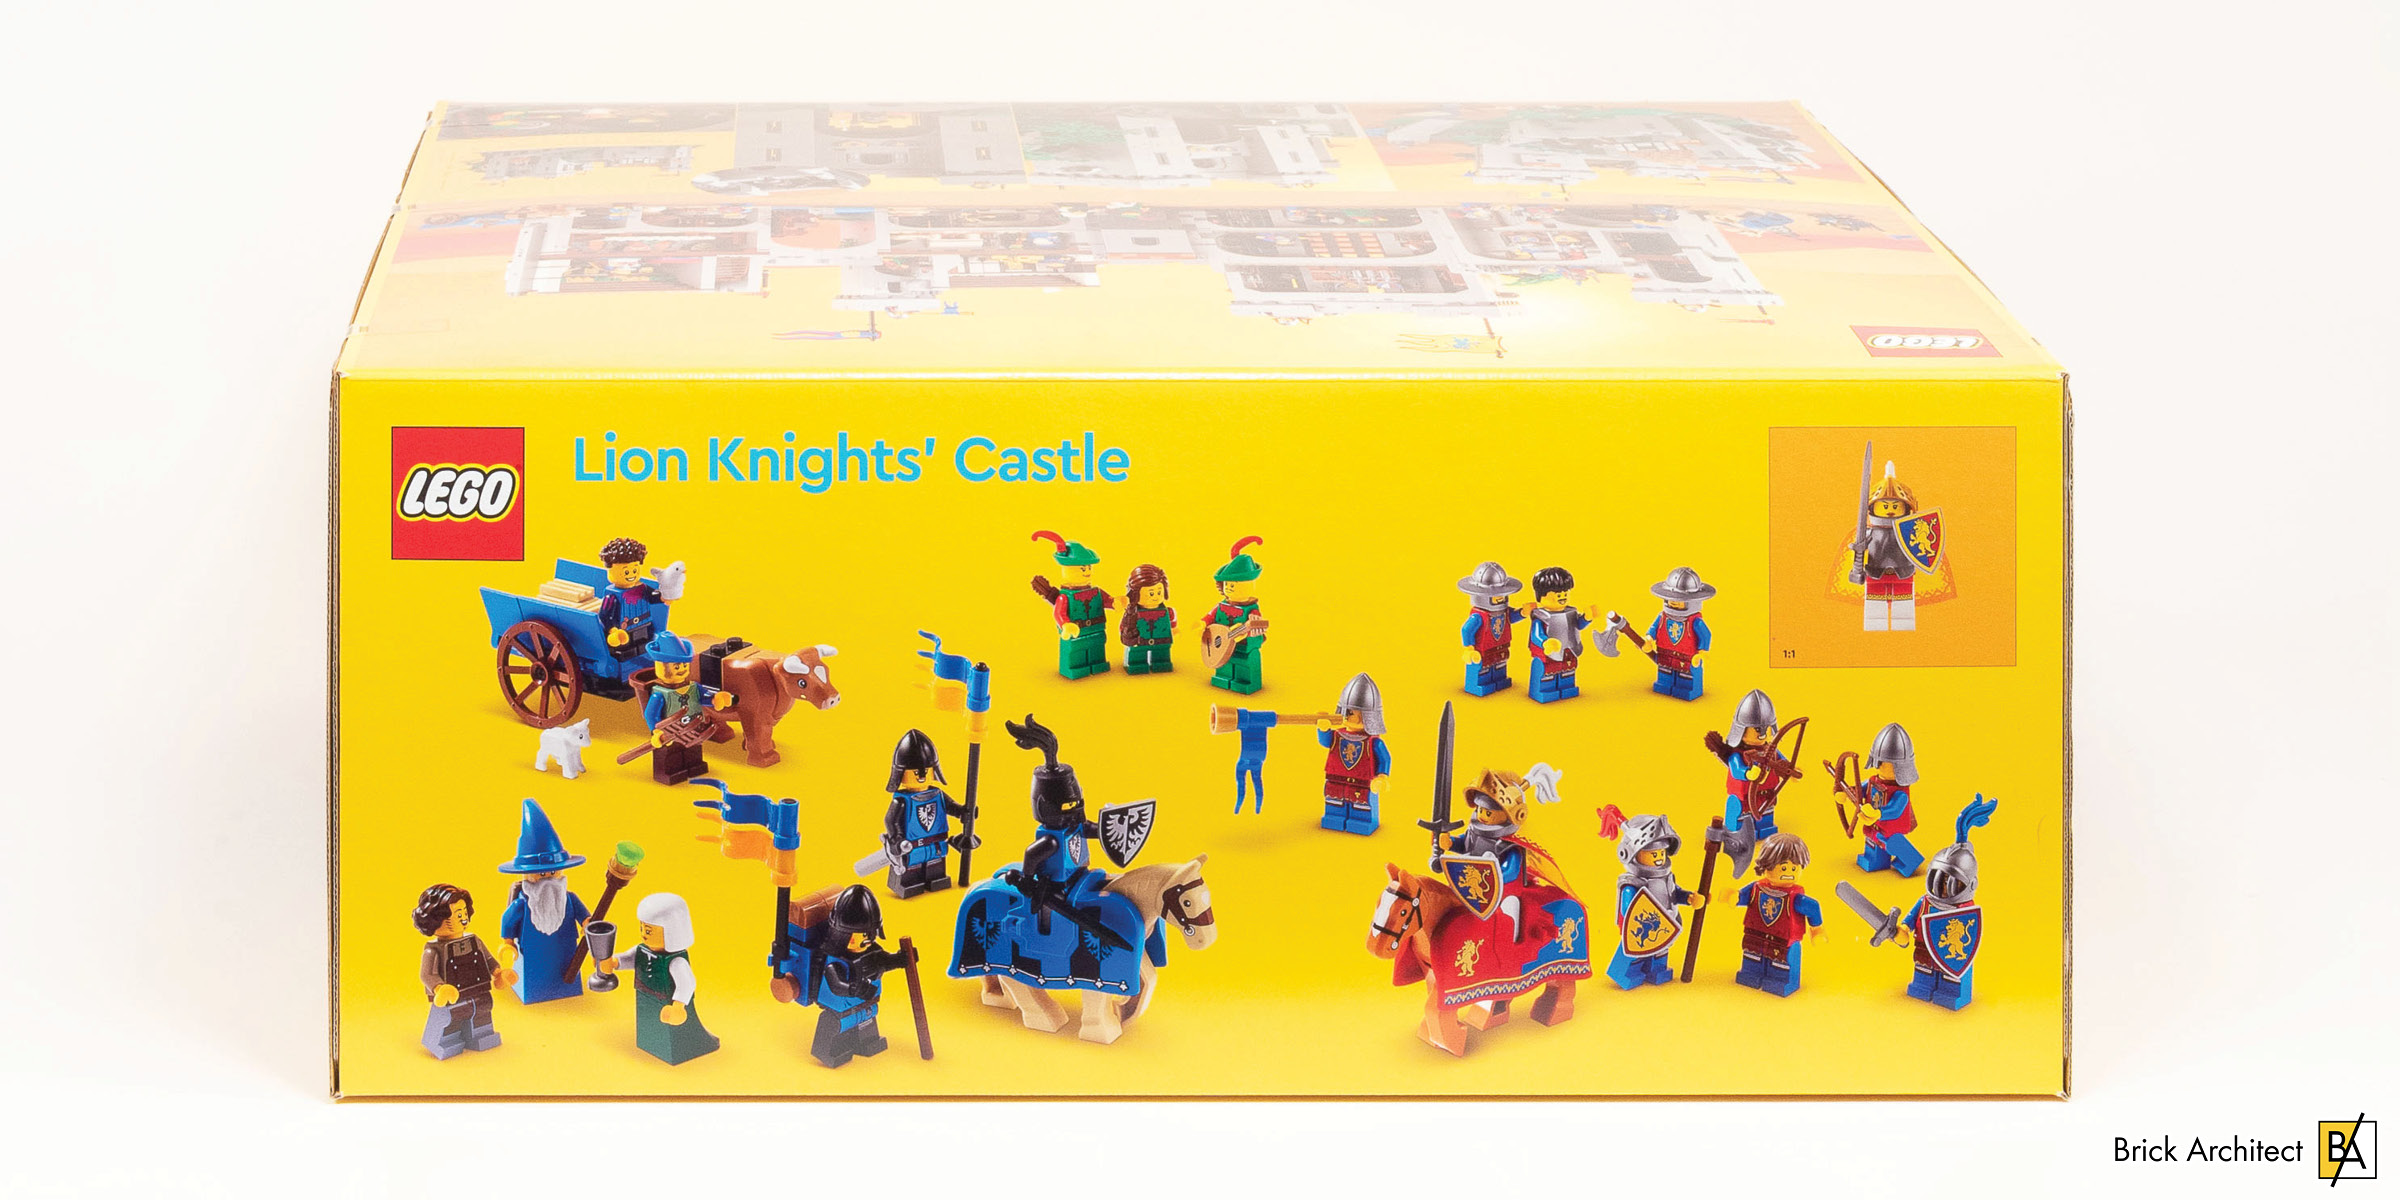
#10305 Lion Knights’ Castle – Minifigures and animals on box top. (Photo: Tom Alphin)
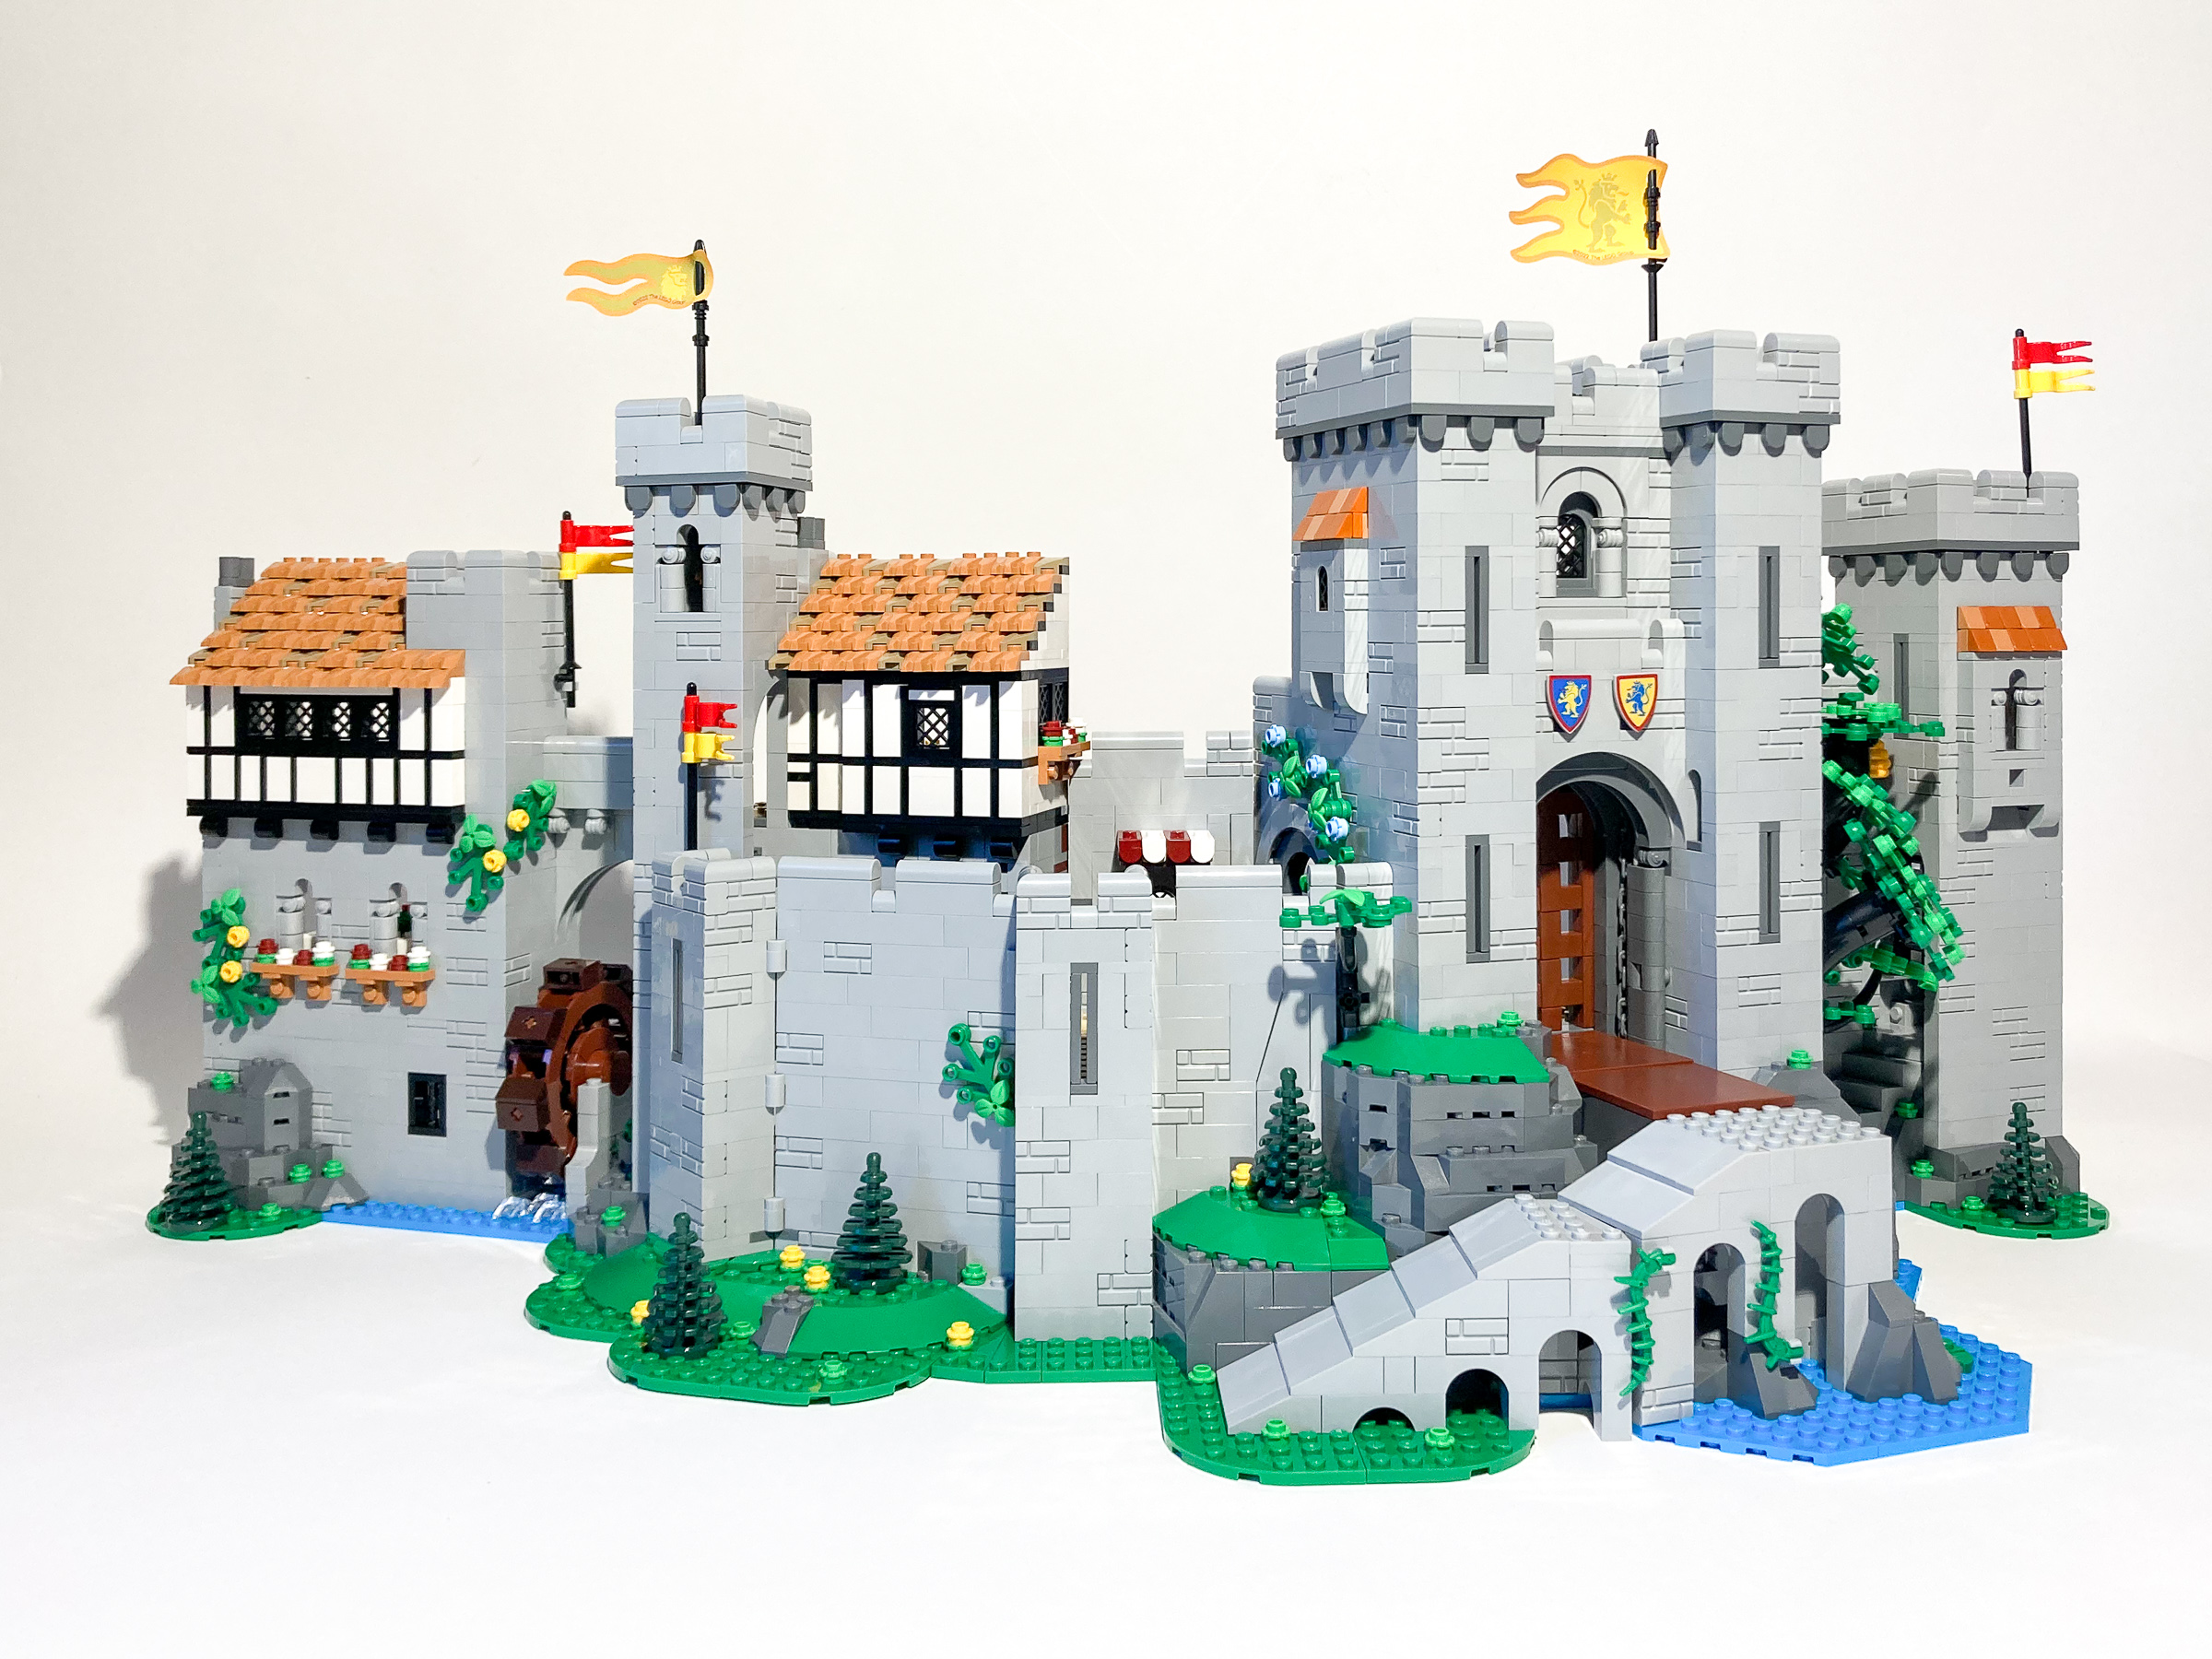
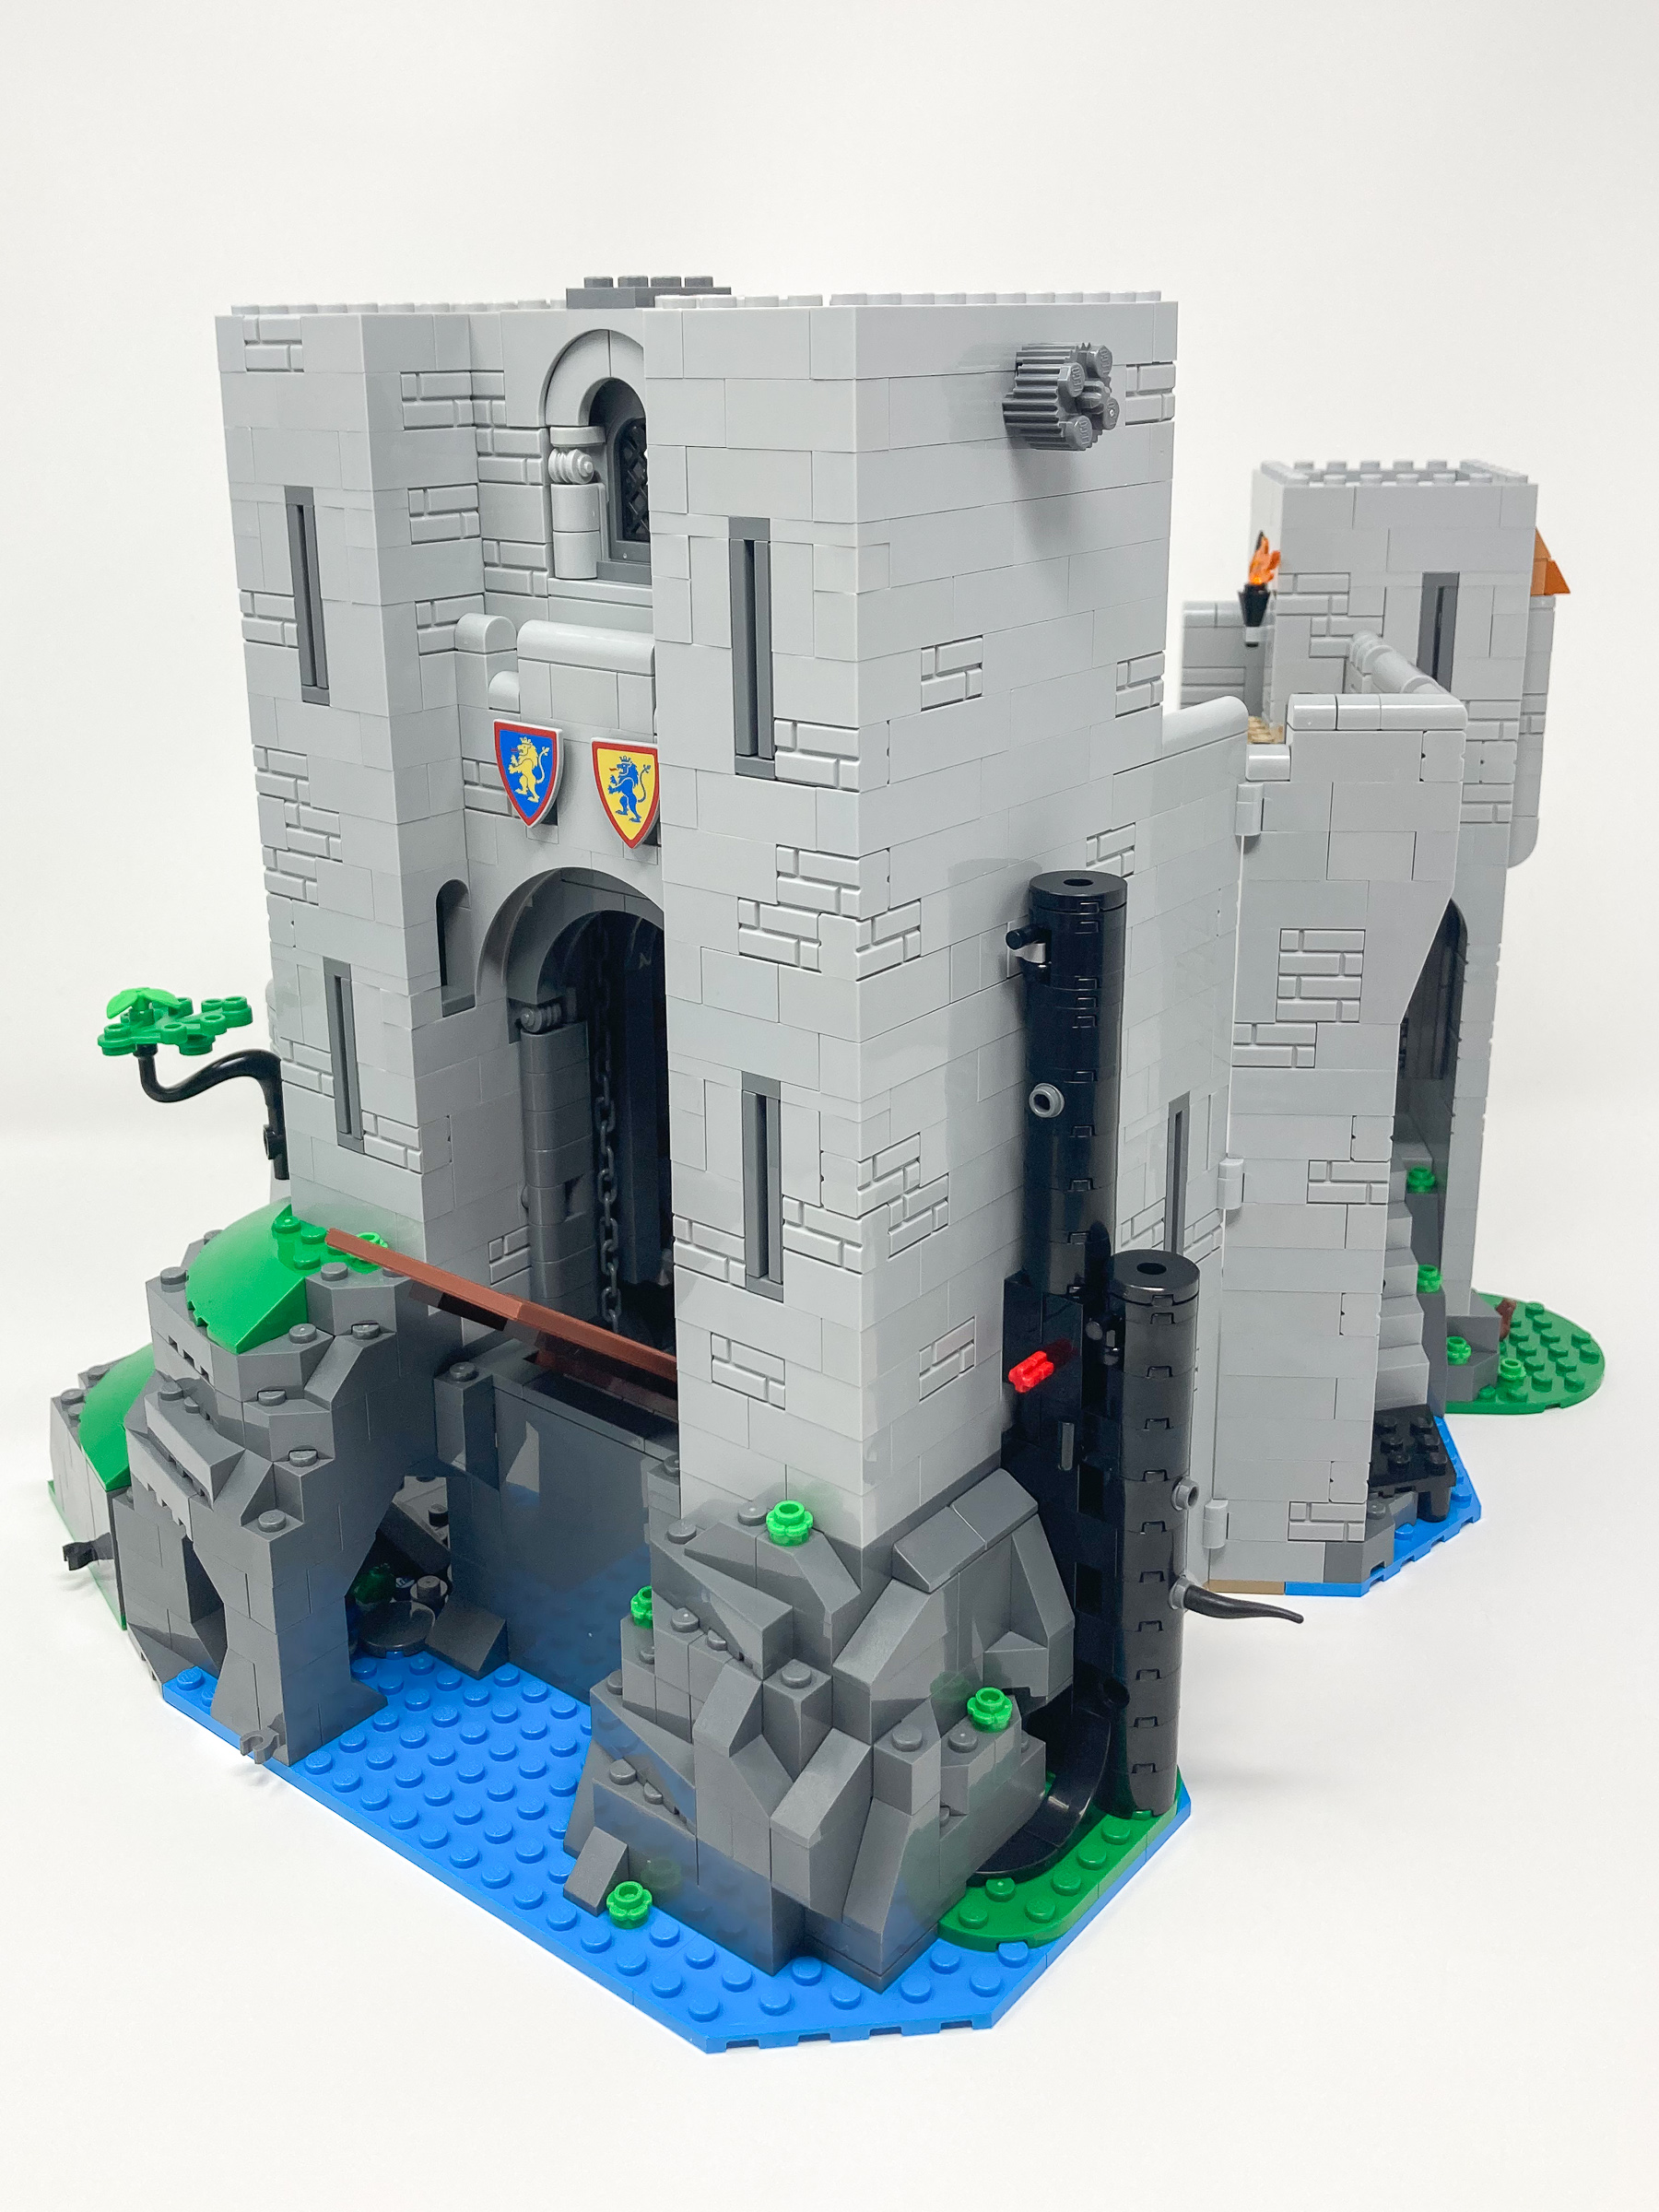
This set looks packed with details, unfortunately a dense build and a smaller box size often means lots of small pieces which can impact the perception of overall value. Despite the modest size and high price, the set appears to be packed to the brim with details! From the castle’s drawbridge and portcullis, hidden passages, a dungeon, all the way to a waterwheel, this set has all the staples of a medieval castle.
Build Process
As noted earlier, this build process is split into two halves with their own instruction manuals. We will be going through each of the bags, highlighting the key features and notable building techniques used throughout the build.
Stage 1 – Farmer’s stall and wagon
In the first stage, we build a market stand and cow drawn cart. The small but simple stand uses creative techniques such as using studs with holes to connect the awning to the rods that make up the supports. Another is the decision to angle the food stand to rest crops on it for easier display. Unlike normal stands where bread is just placed on the stand for it to easily fall, we this time clip the bread so it is sturdily attached.
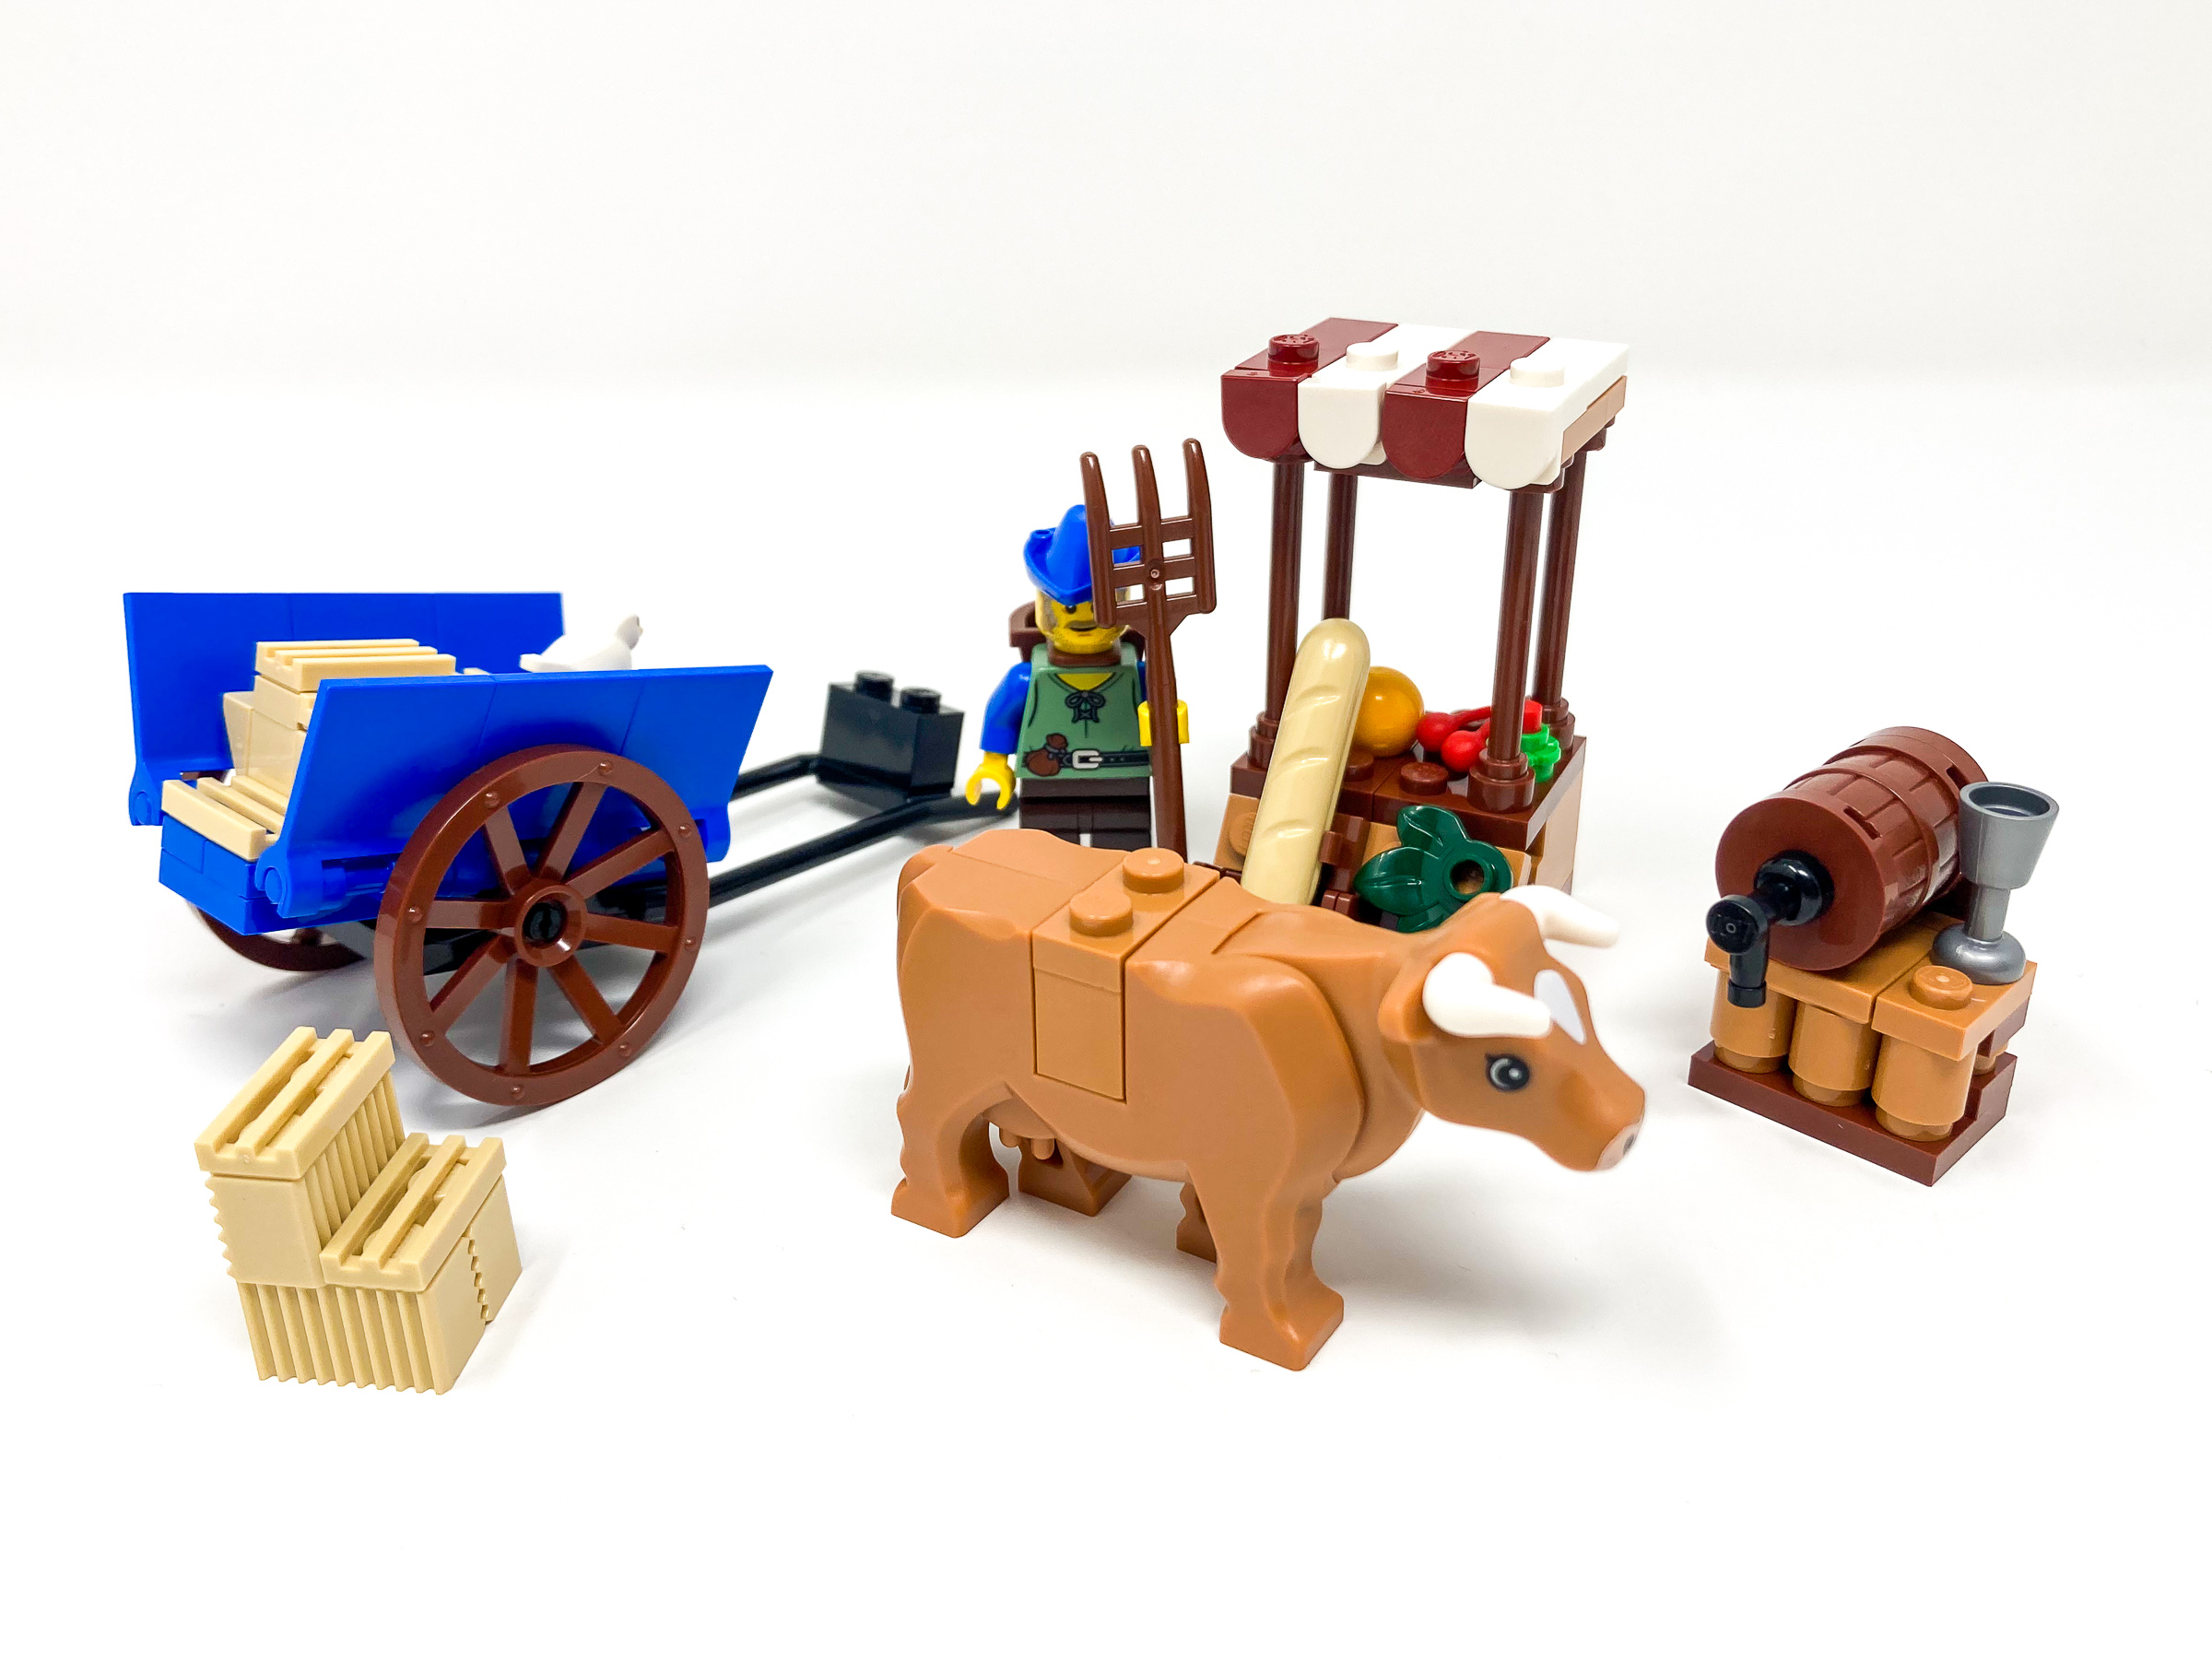
This small build could be a set of itself, packed with details this fits right into the marketplace we build later in the set.
The instructions also show f many fun messages that designers have included to enhance the building technique. Some of the messages left behind even go into details about design decisions that architects took when designing their castles.
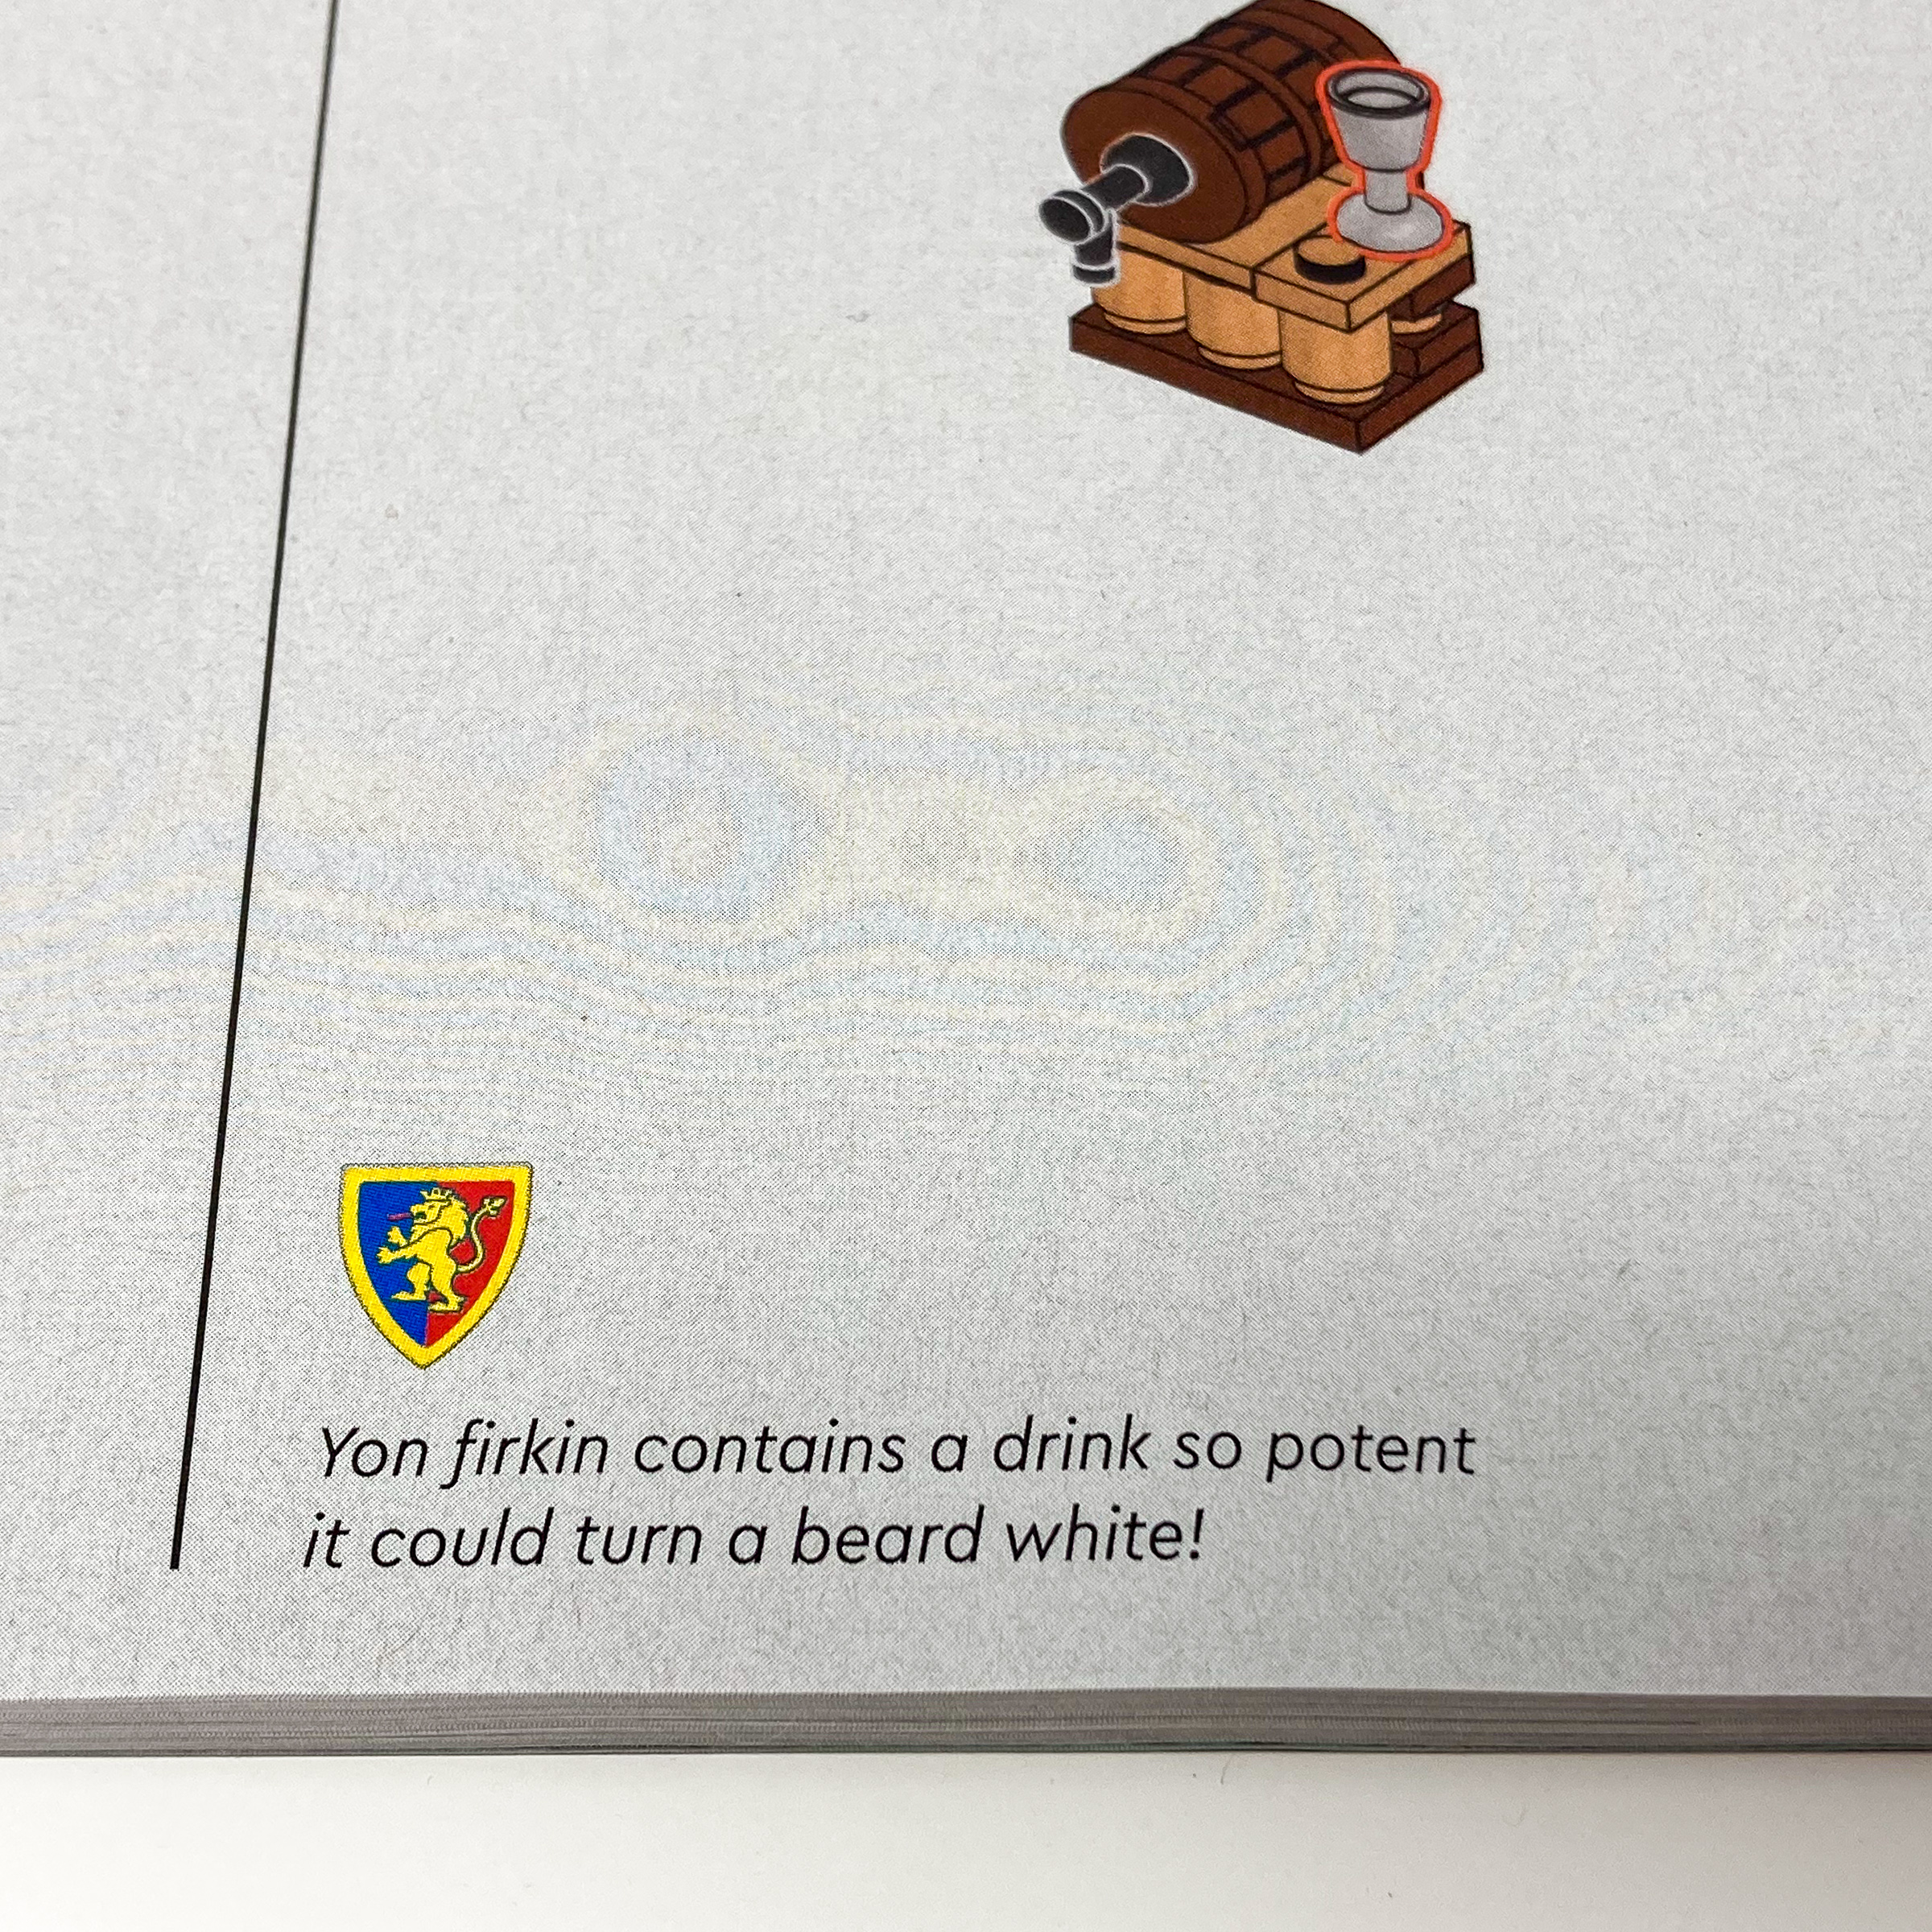
Almost every page in the manual comes with a quirky comment or fact about castles, some of them are very informational and educate you about medieval architecture as well!
Stages 2-13 – Lion Knight’s Castle Living Quarters
The first set of instructions starts with building the first half of Lion Knight’s Keep. Each half can be clipped together to form a whole castle. The castle is designed in a way such that the castle can be closed to show the dense but detailed exterior or can be opened dollhouse style to display all the interior details.
Bag 2 – Castle foundations and kitchen
The castle’s foundation and the kitchen are the first things we build. The round textures of all organic elements in this base compared to the jagged sharp corners of the castle’s structure is a stand out contrast accentuating the build. This set uses 2 stud high pieces which allows for creative innovative design decisions to be made as we now have an extra height that was not previously available. The varied height in combination to the sharp angles allow for very varied shapes to be made.
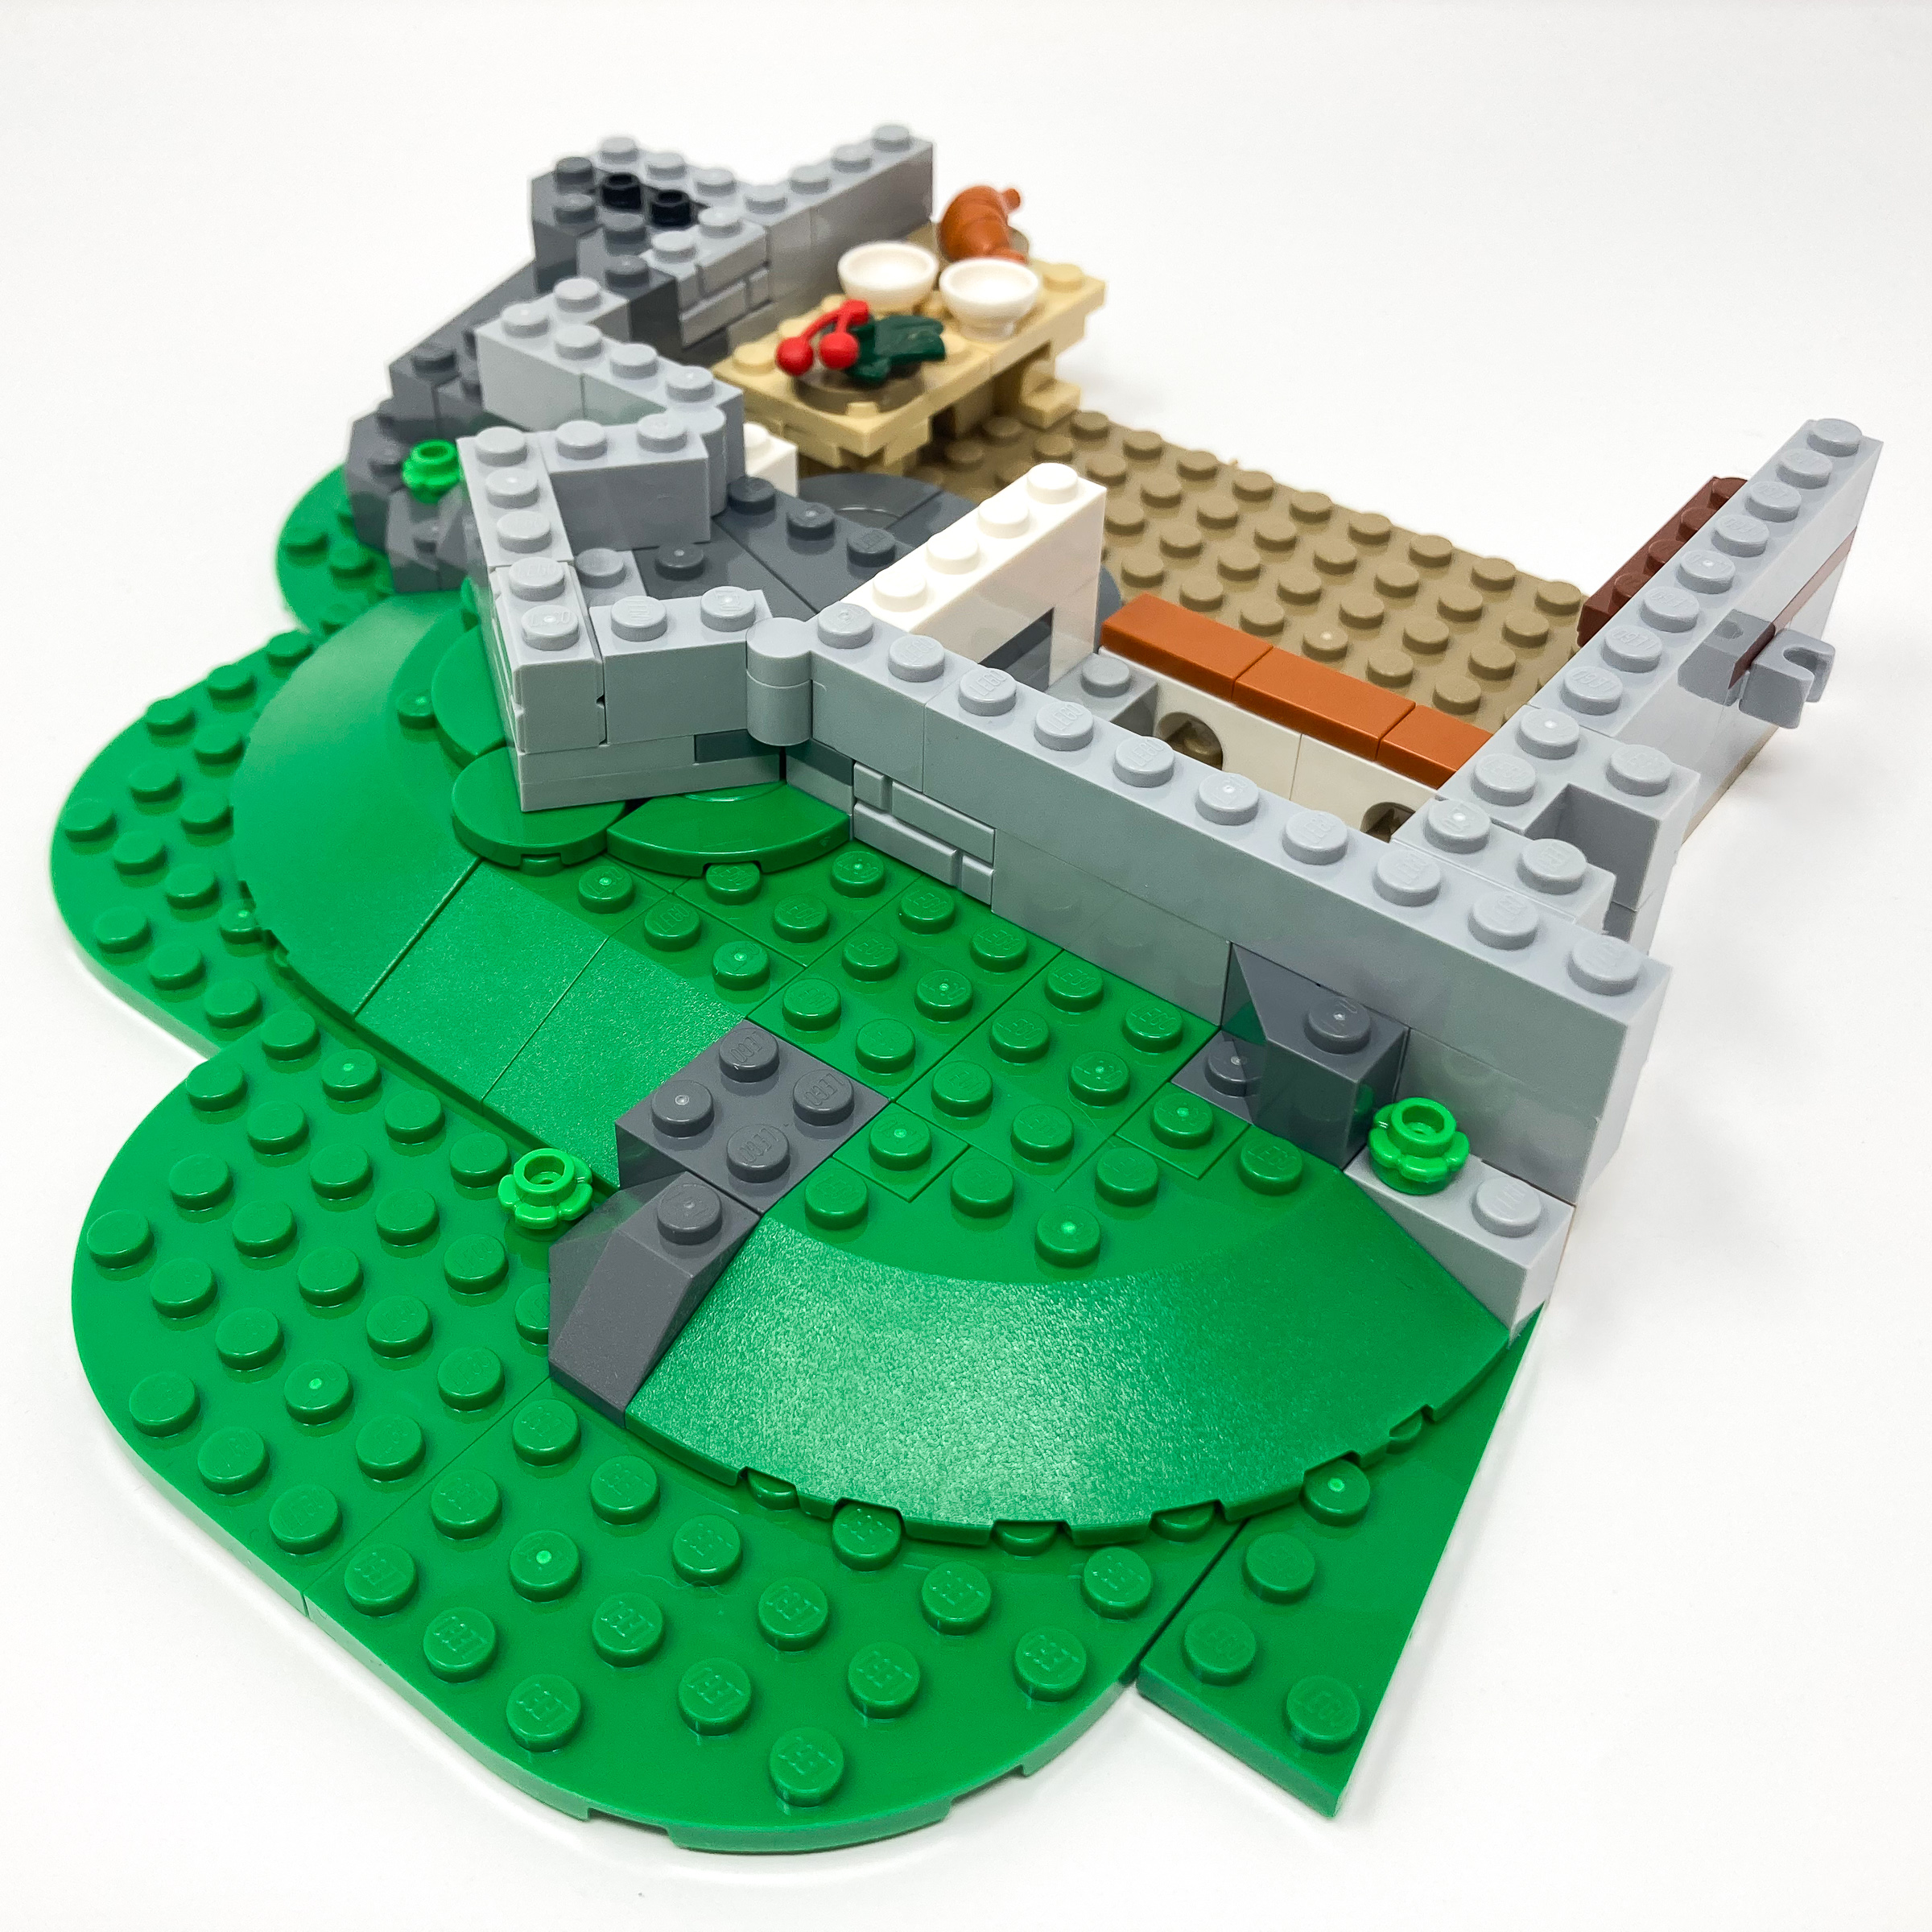
The rounded curves and slopes of the organic structures contrast against the blocky jagged edges of the castle.
Wedge plates allows for interesting shapes to be made; this lets the set have more angles beyond the blocky square shapes that previous castle sets had. By angling four wedges in the way they did we were able to align wall edges together to be at angles of about 45 degrees.
It is amazing how using four wedges connected at various angles allows you to build out irregular shapes and structures. This adds a great layer of complexity and irregularity that adds details to the castle’s shape?
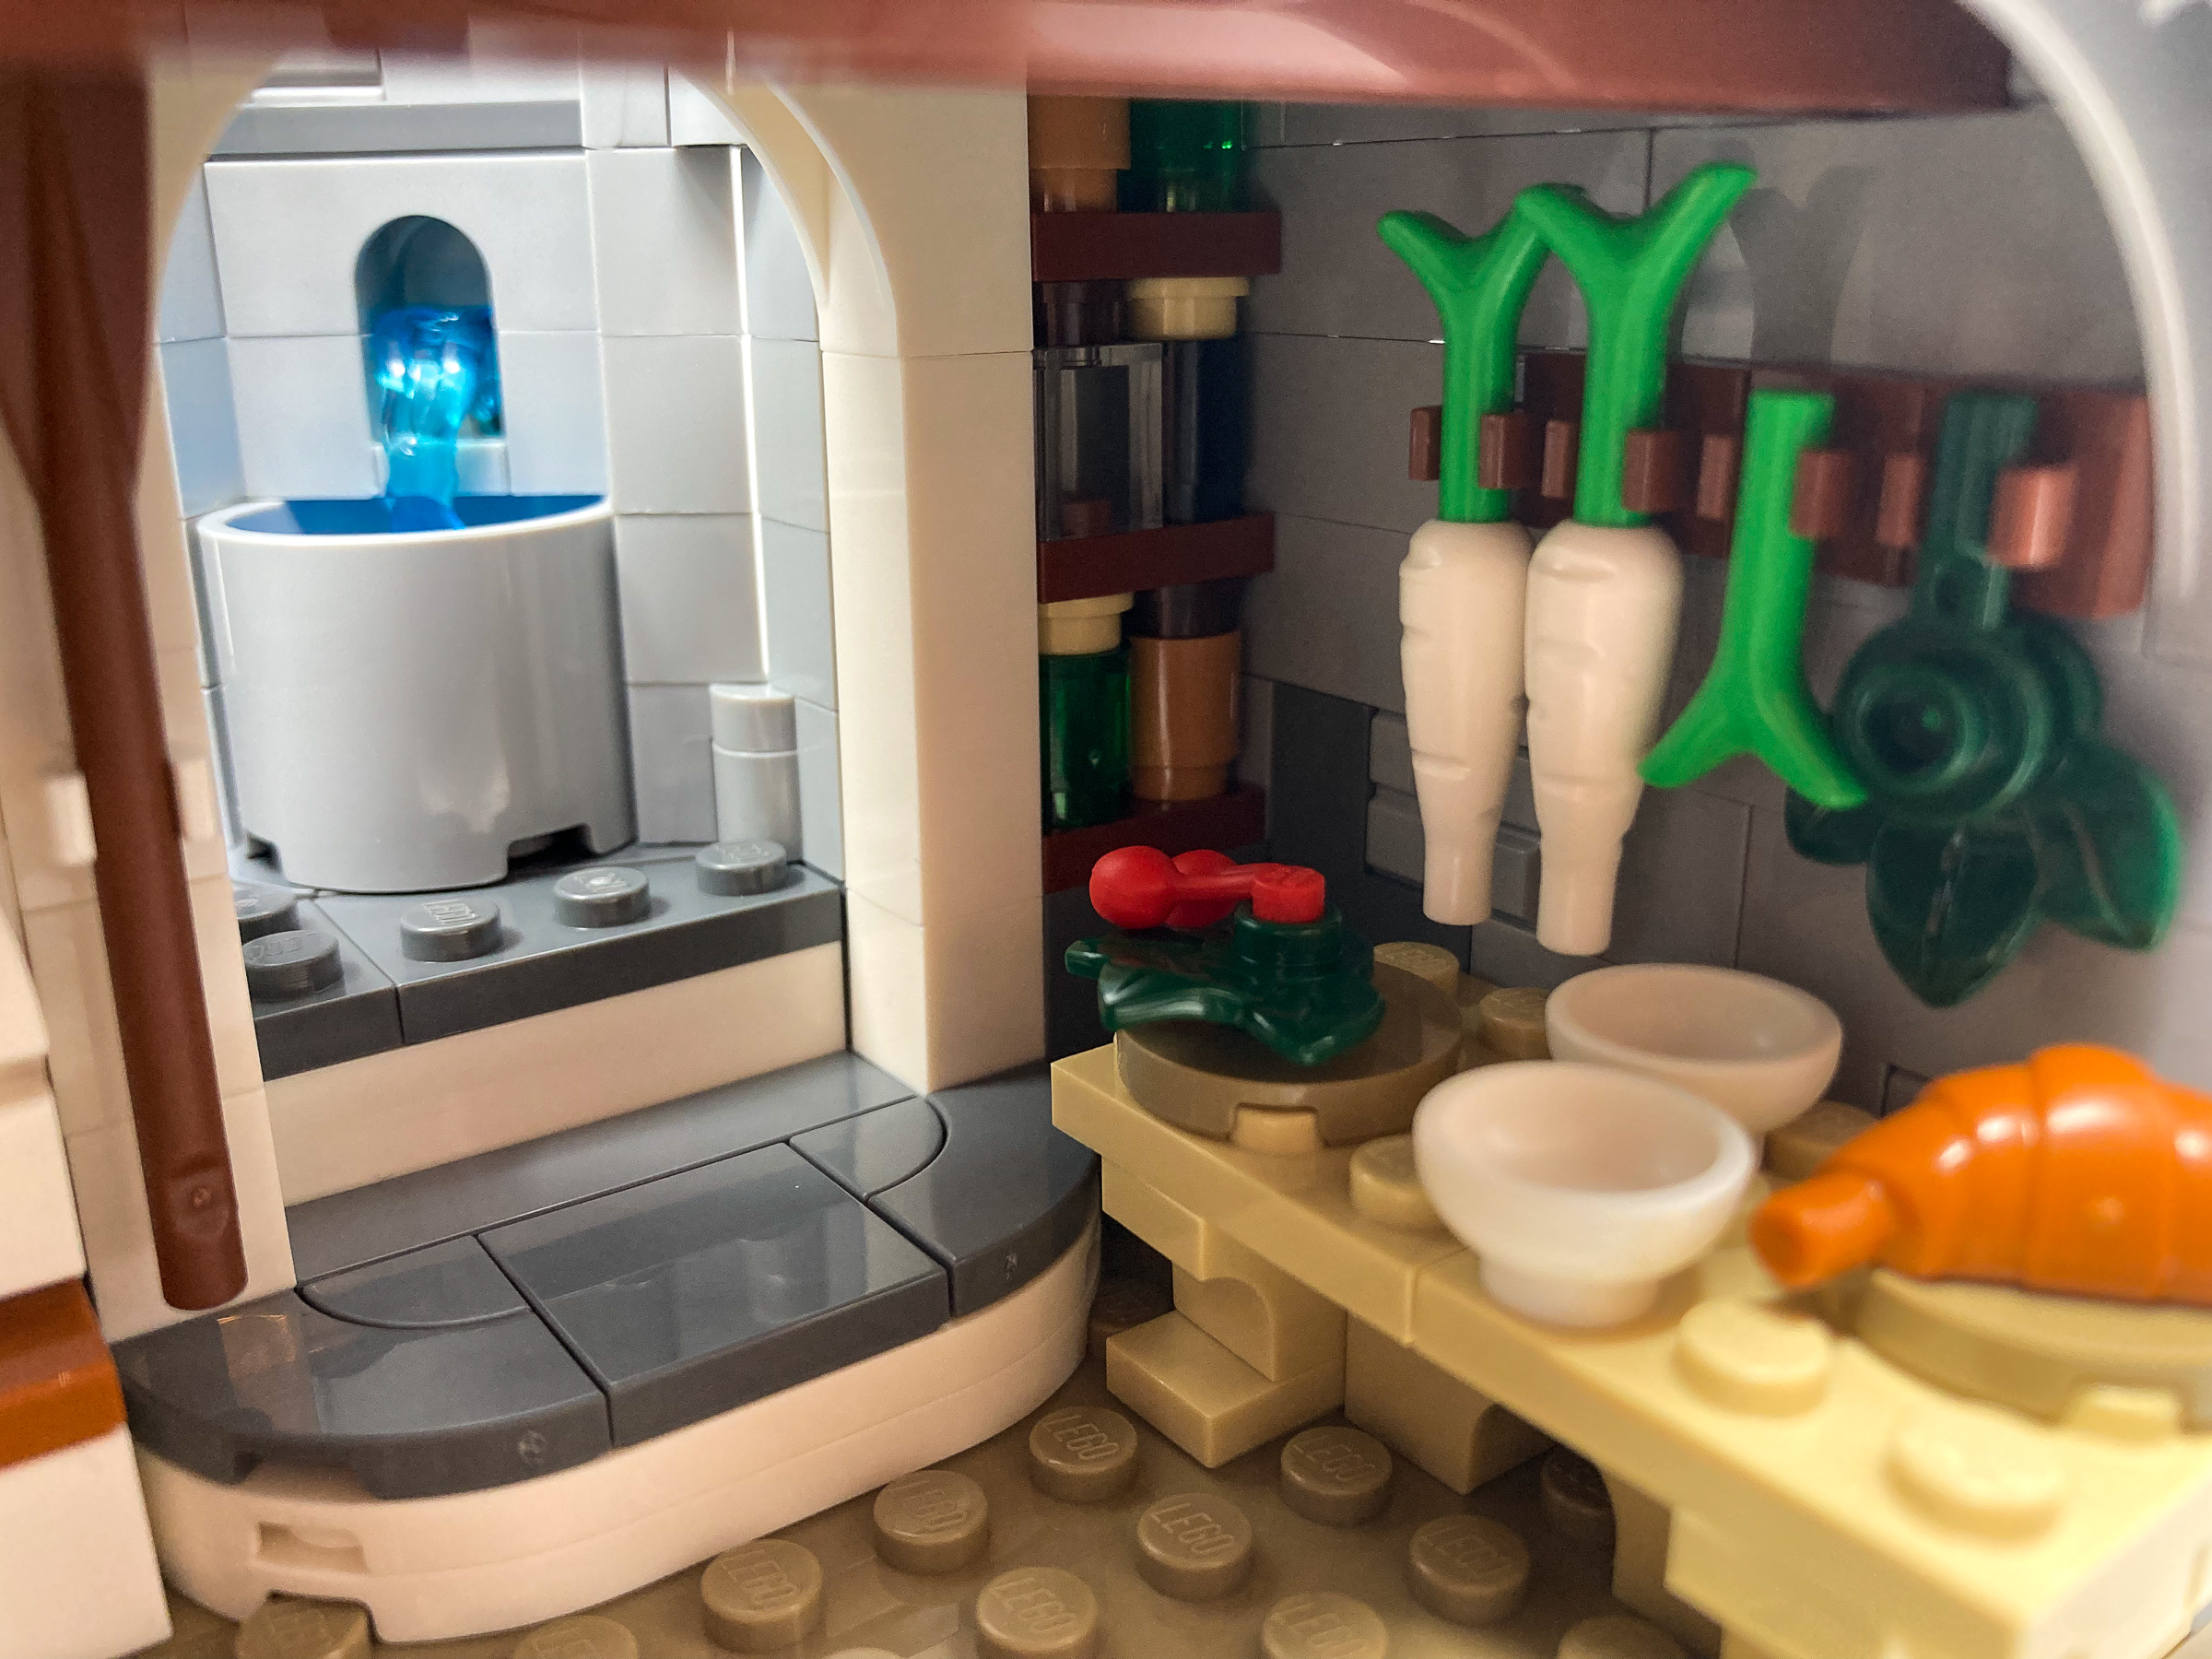
Bag 3 – Completing the kitchen
The first room we build is the kitchen and wow does this start strong. The designers did not skimp to pack the kitchen with details, everything from packed shelves to hanging produce to an oven. Around the back is a large pot of water in a corner with flowing water running into it. To accomplish this an arch was added and a clip holds a transparent blue superhero power action piece to emulate flowing water. An odd decision was to use 1×1 cone pieces in transparent orange rather than flames for the flames in the oven, however given how deep it is this is difficult to notice.

The kitchen is packed with details but with a lack of windows some of the details are missed in the darkness.
Around the back we build a set of stairs connecting us to the second level opening us up to more rooms higher up. As we add a roof, we notice that this set is not modular however so the only way to see the interior will be to open the set dollhouse style, as we see in more detail later.
Smooth steps is the start of the designers’ decision to try and avoid exposed studs wherever possible in this set with the exception of flooring.
Of all the produce included in the kitchen it is interesting to note that everything is historically accurate adding to an extra level of realism.
The designers took heed of what food was common and historically accurate for this time period to stock the shelves with.
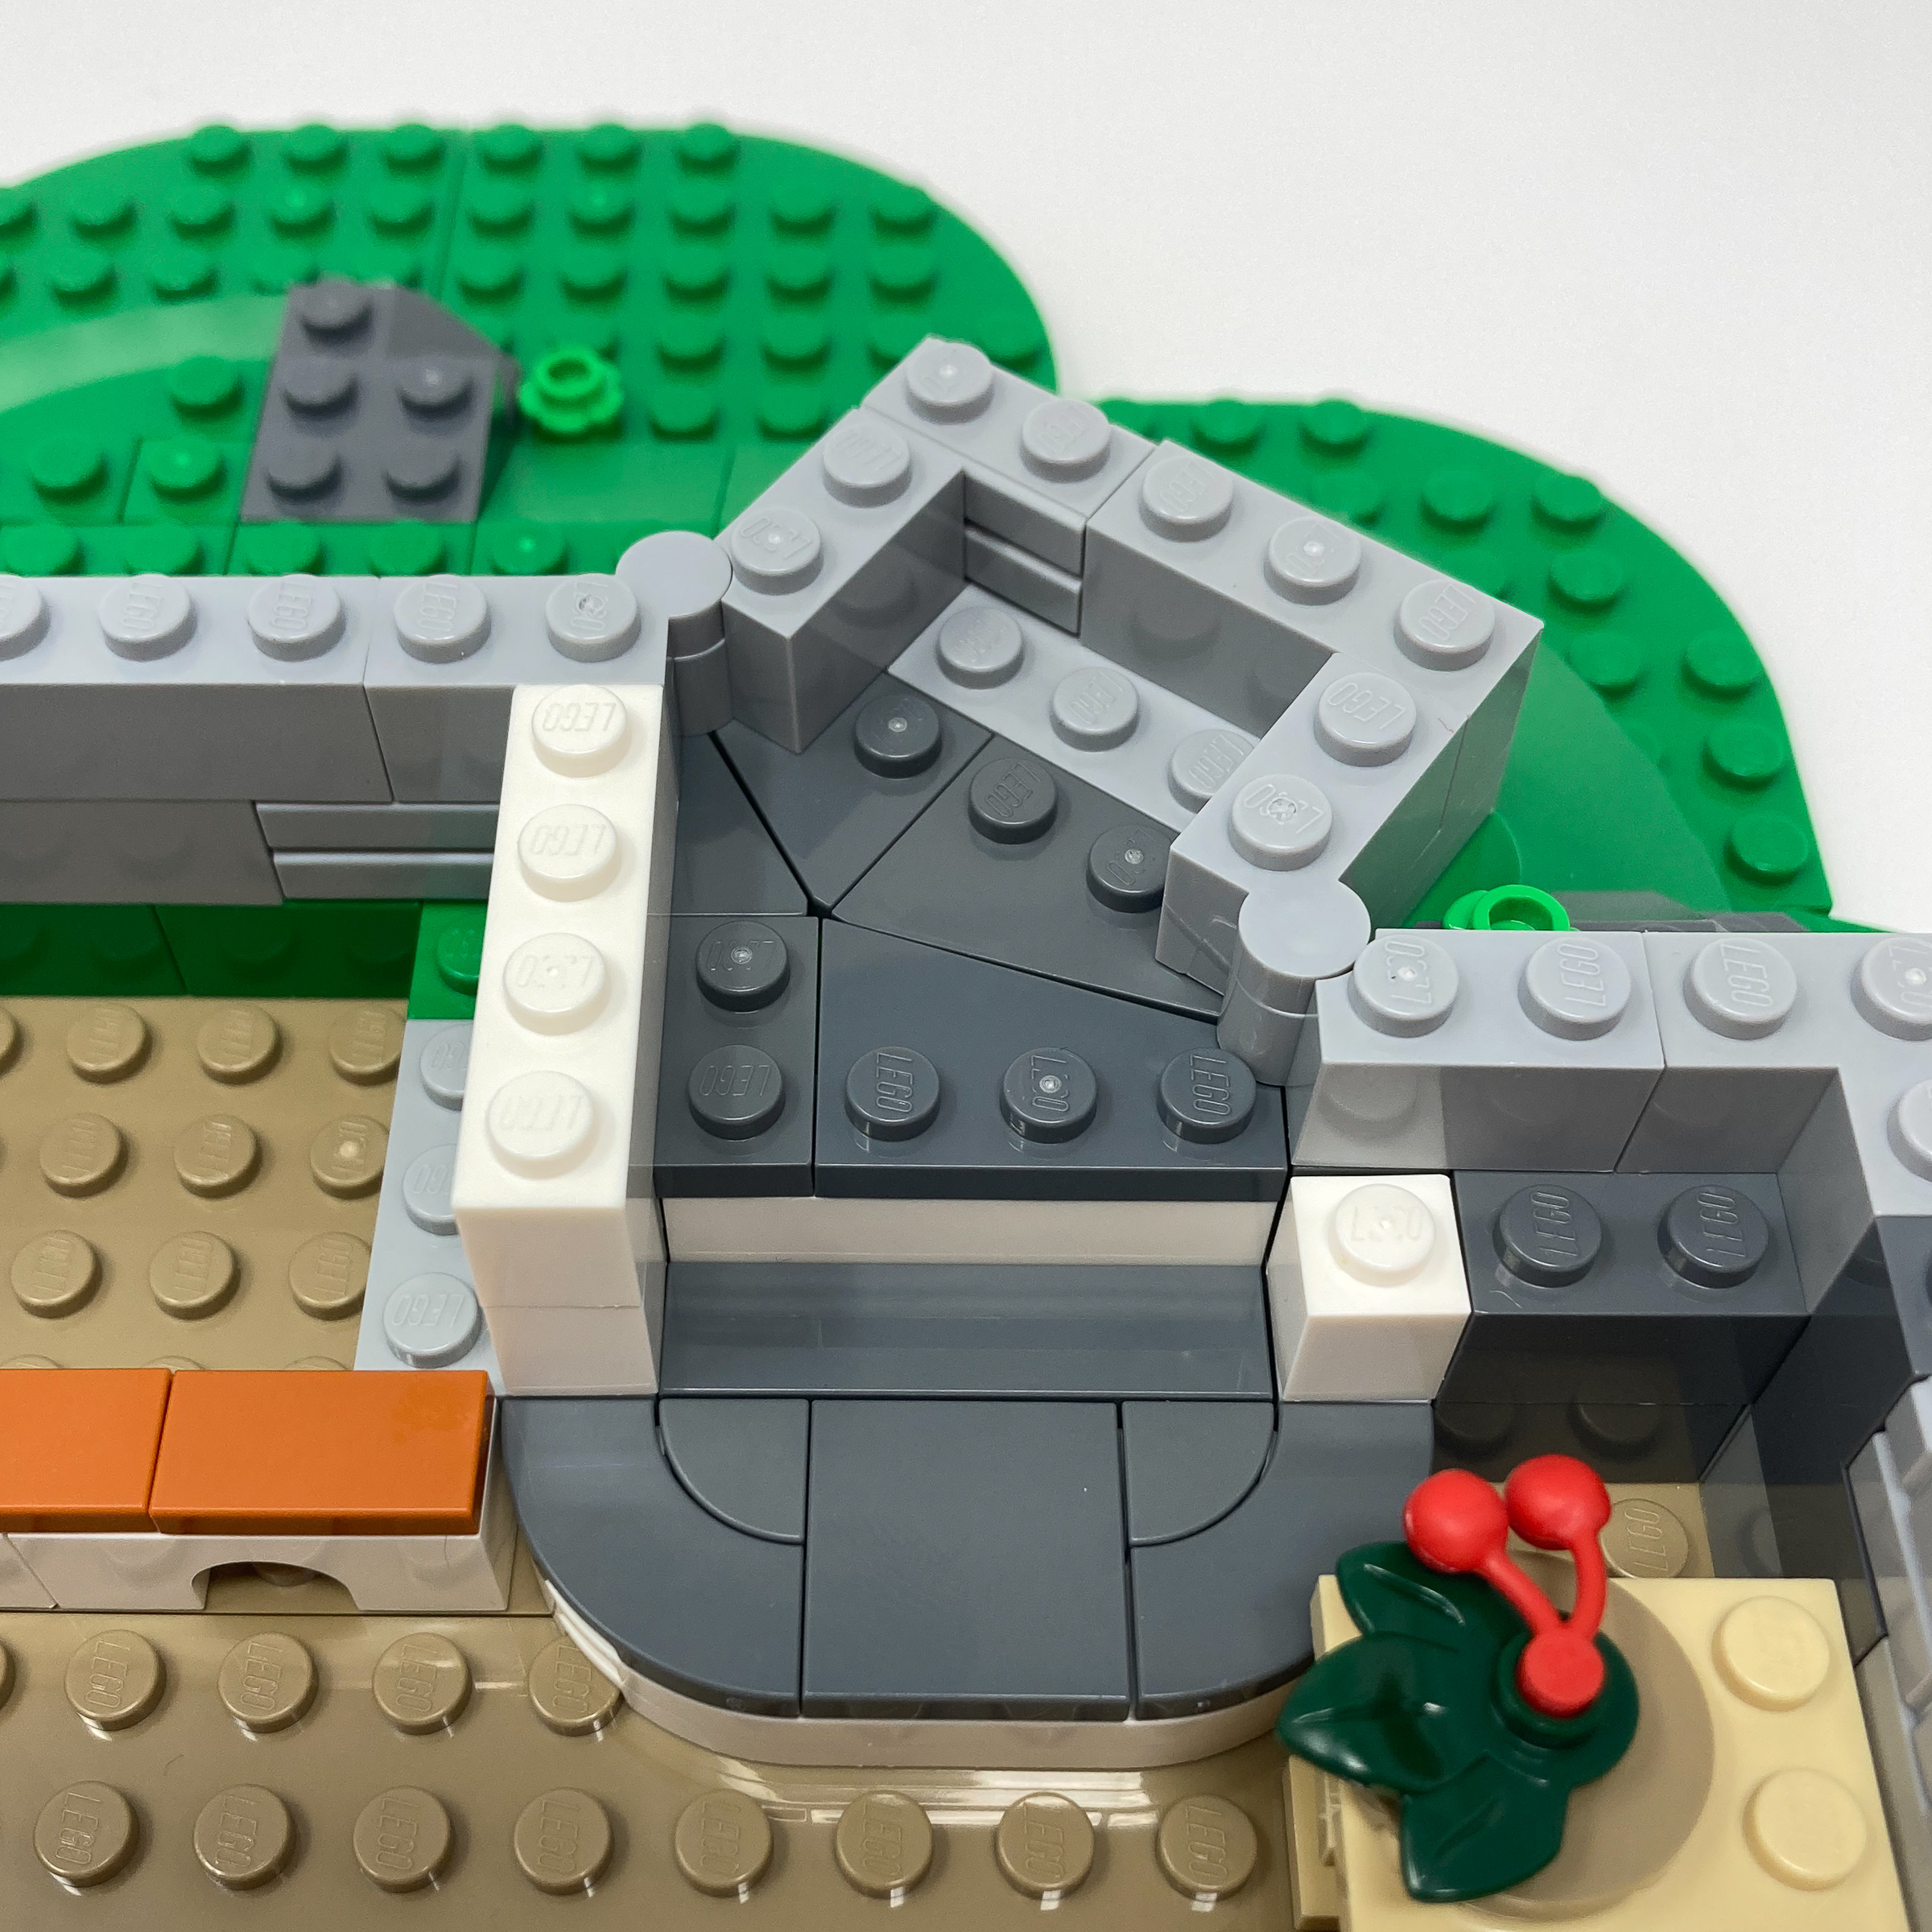
Bag 4 – Forestmen’s hidden lair
Next, we build the Forestmen’s hidden lair. Built directly into the basement the designers made sure to emphasize all the rocky outcroppings and roots digging into the den. By using sharp jagged edges and varied colors of grey the natural feel of this cave stands out very well. The trapdoor at the top making this the only entry point to this room emphasizing its secrecy. This lair connects to the kitchen using clips and sticks out at an angle showing us again how the designers try to curve this castle to make it not look blocky.
A hidden trapdoor on the market level hides the Forestmen’s hidden lair.
The lair is packed with details, everything from weapons to a map on the ground. Unfortunately, my target on the wall was misprinted with all the rings being misaligned which is a shame, hopefully if you pick up this set your copy has this corrected and this was a printing defect with just my set.
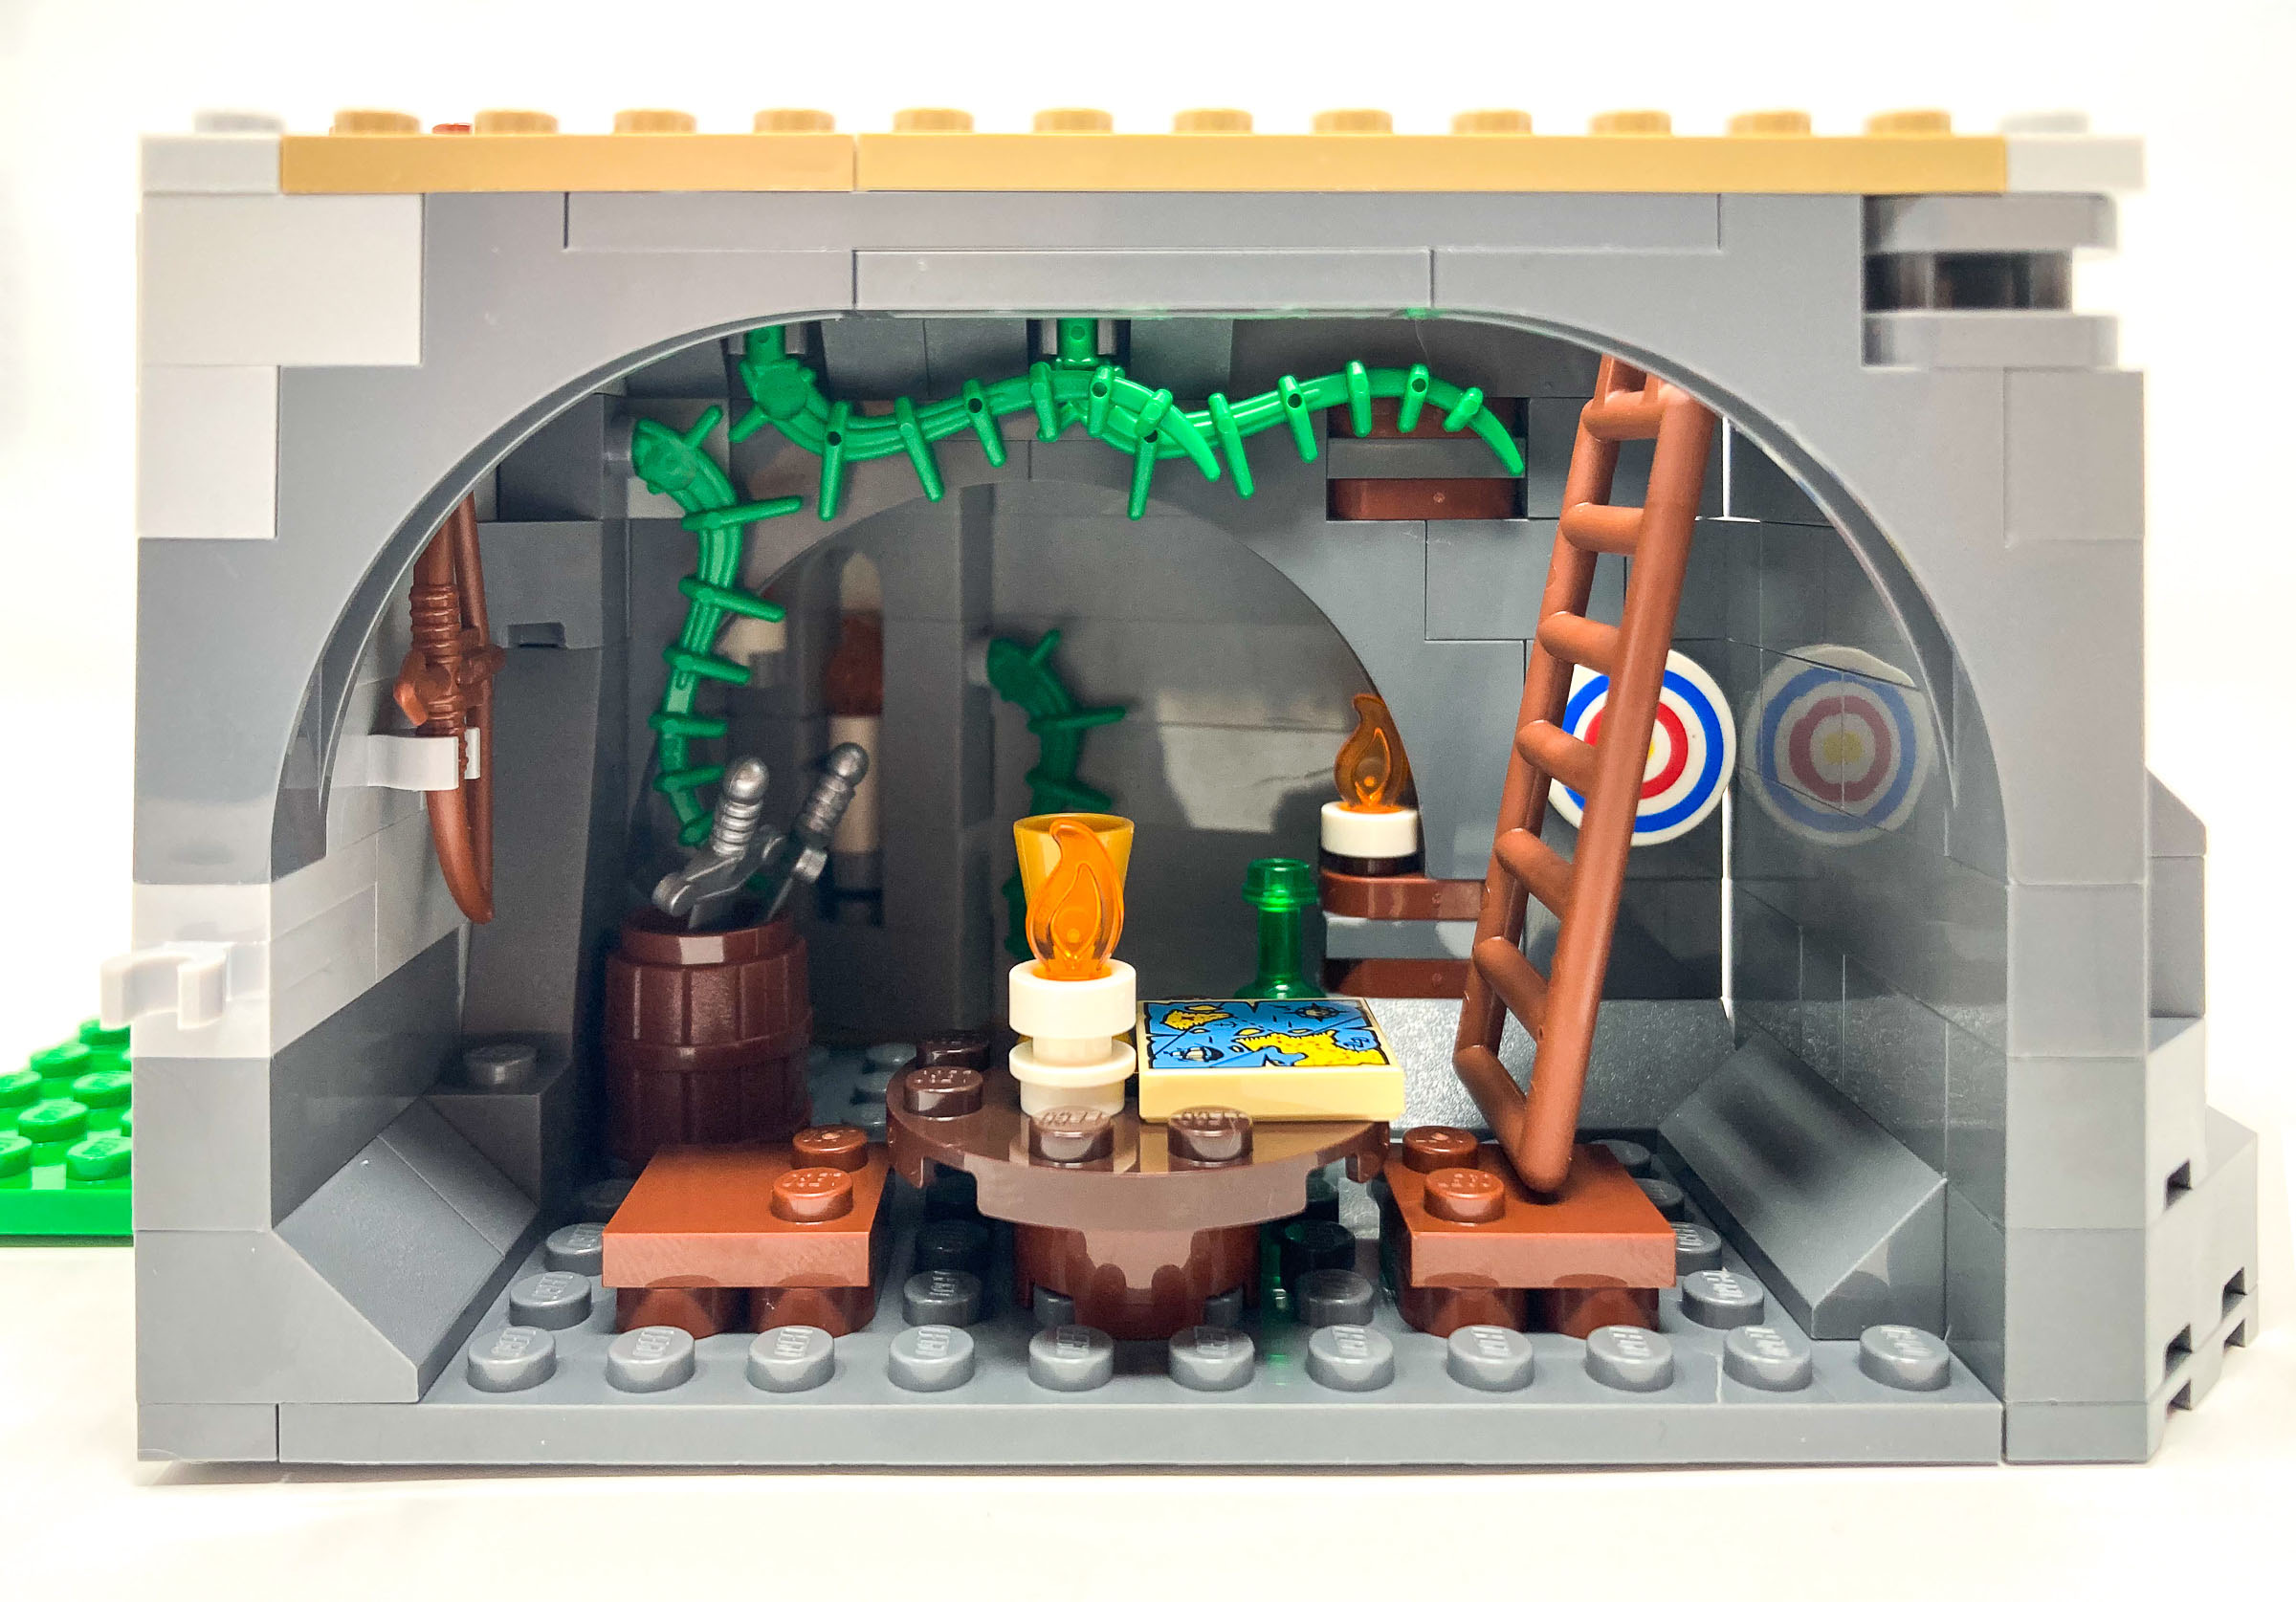
It is odd that we see roots digging through the rock when there are no trees above the lair, albeit a creative use of pieces there are some questions we ask here.
Bag 5 – Castle walls and entertainment room
As we move up in the castle, we start to build the exterior structure. By using 1×2 brick pieces in combination to flat bricks we get varied textures along the sides. The foliage growing along the sides helps add an extra layer of depth showing how nature encroaches upon synthetic structures. To add a defensive layer the windows in this set are mere slits in the wall. This was accomplished by placing tiles alongside stud on edges pieces to ensure that the distance between window edges is a merge one third brick width.
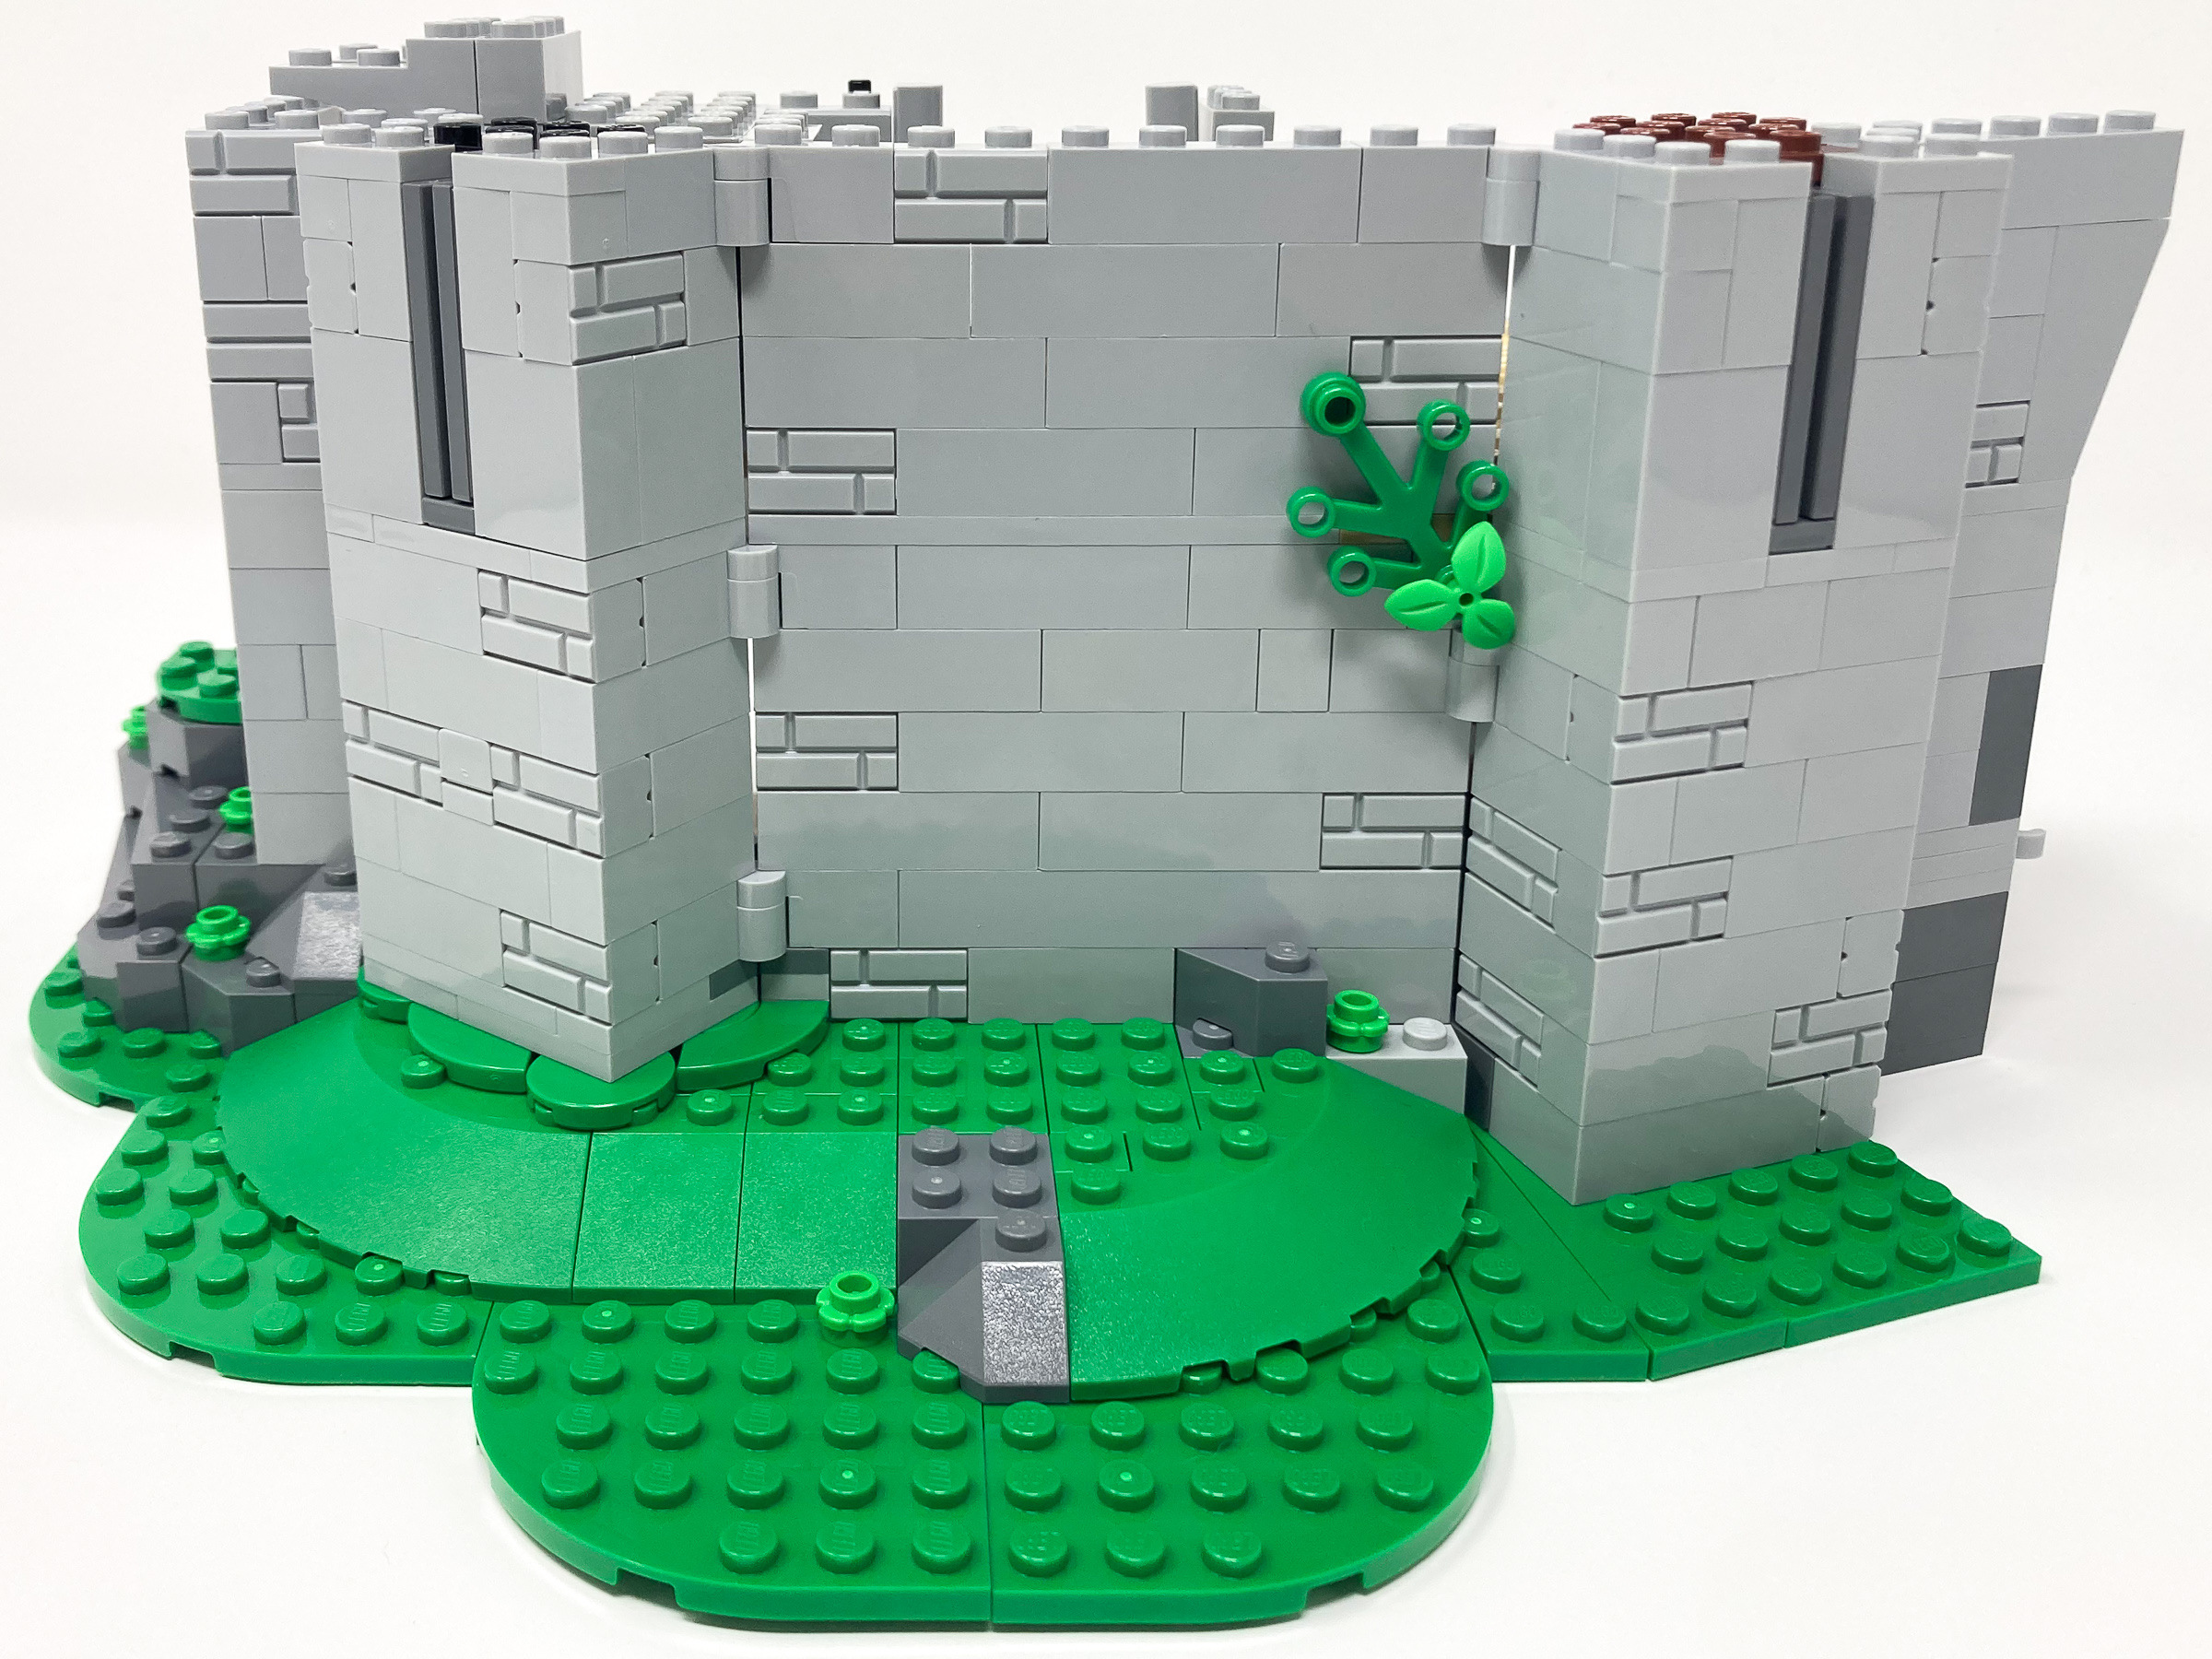
The castle walls are built up and through use of a variety of different length and textured bricks we give the walls a worn and weathered feel.
In contrast to the grey exterior the interiors are adorned with ornate tile colors and arches and pillars signifying wealth. In this entertaining room we build a fireplace and a gorgeous harpsichord which uses a printed piano keys tiles piece to add added details. Like the oven built previously we once again do not see flames used in the fireplace instead once again opting for transparent orange cones.
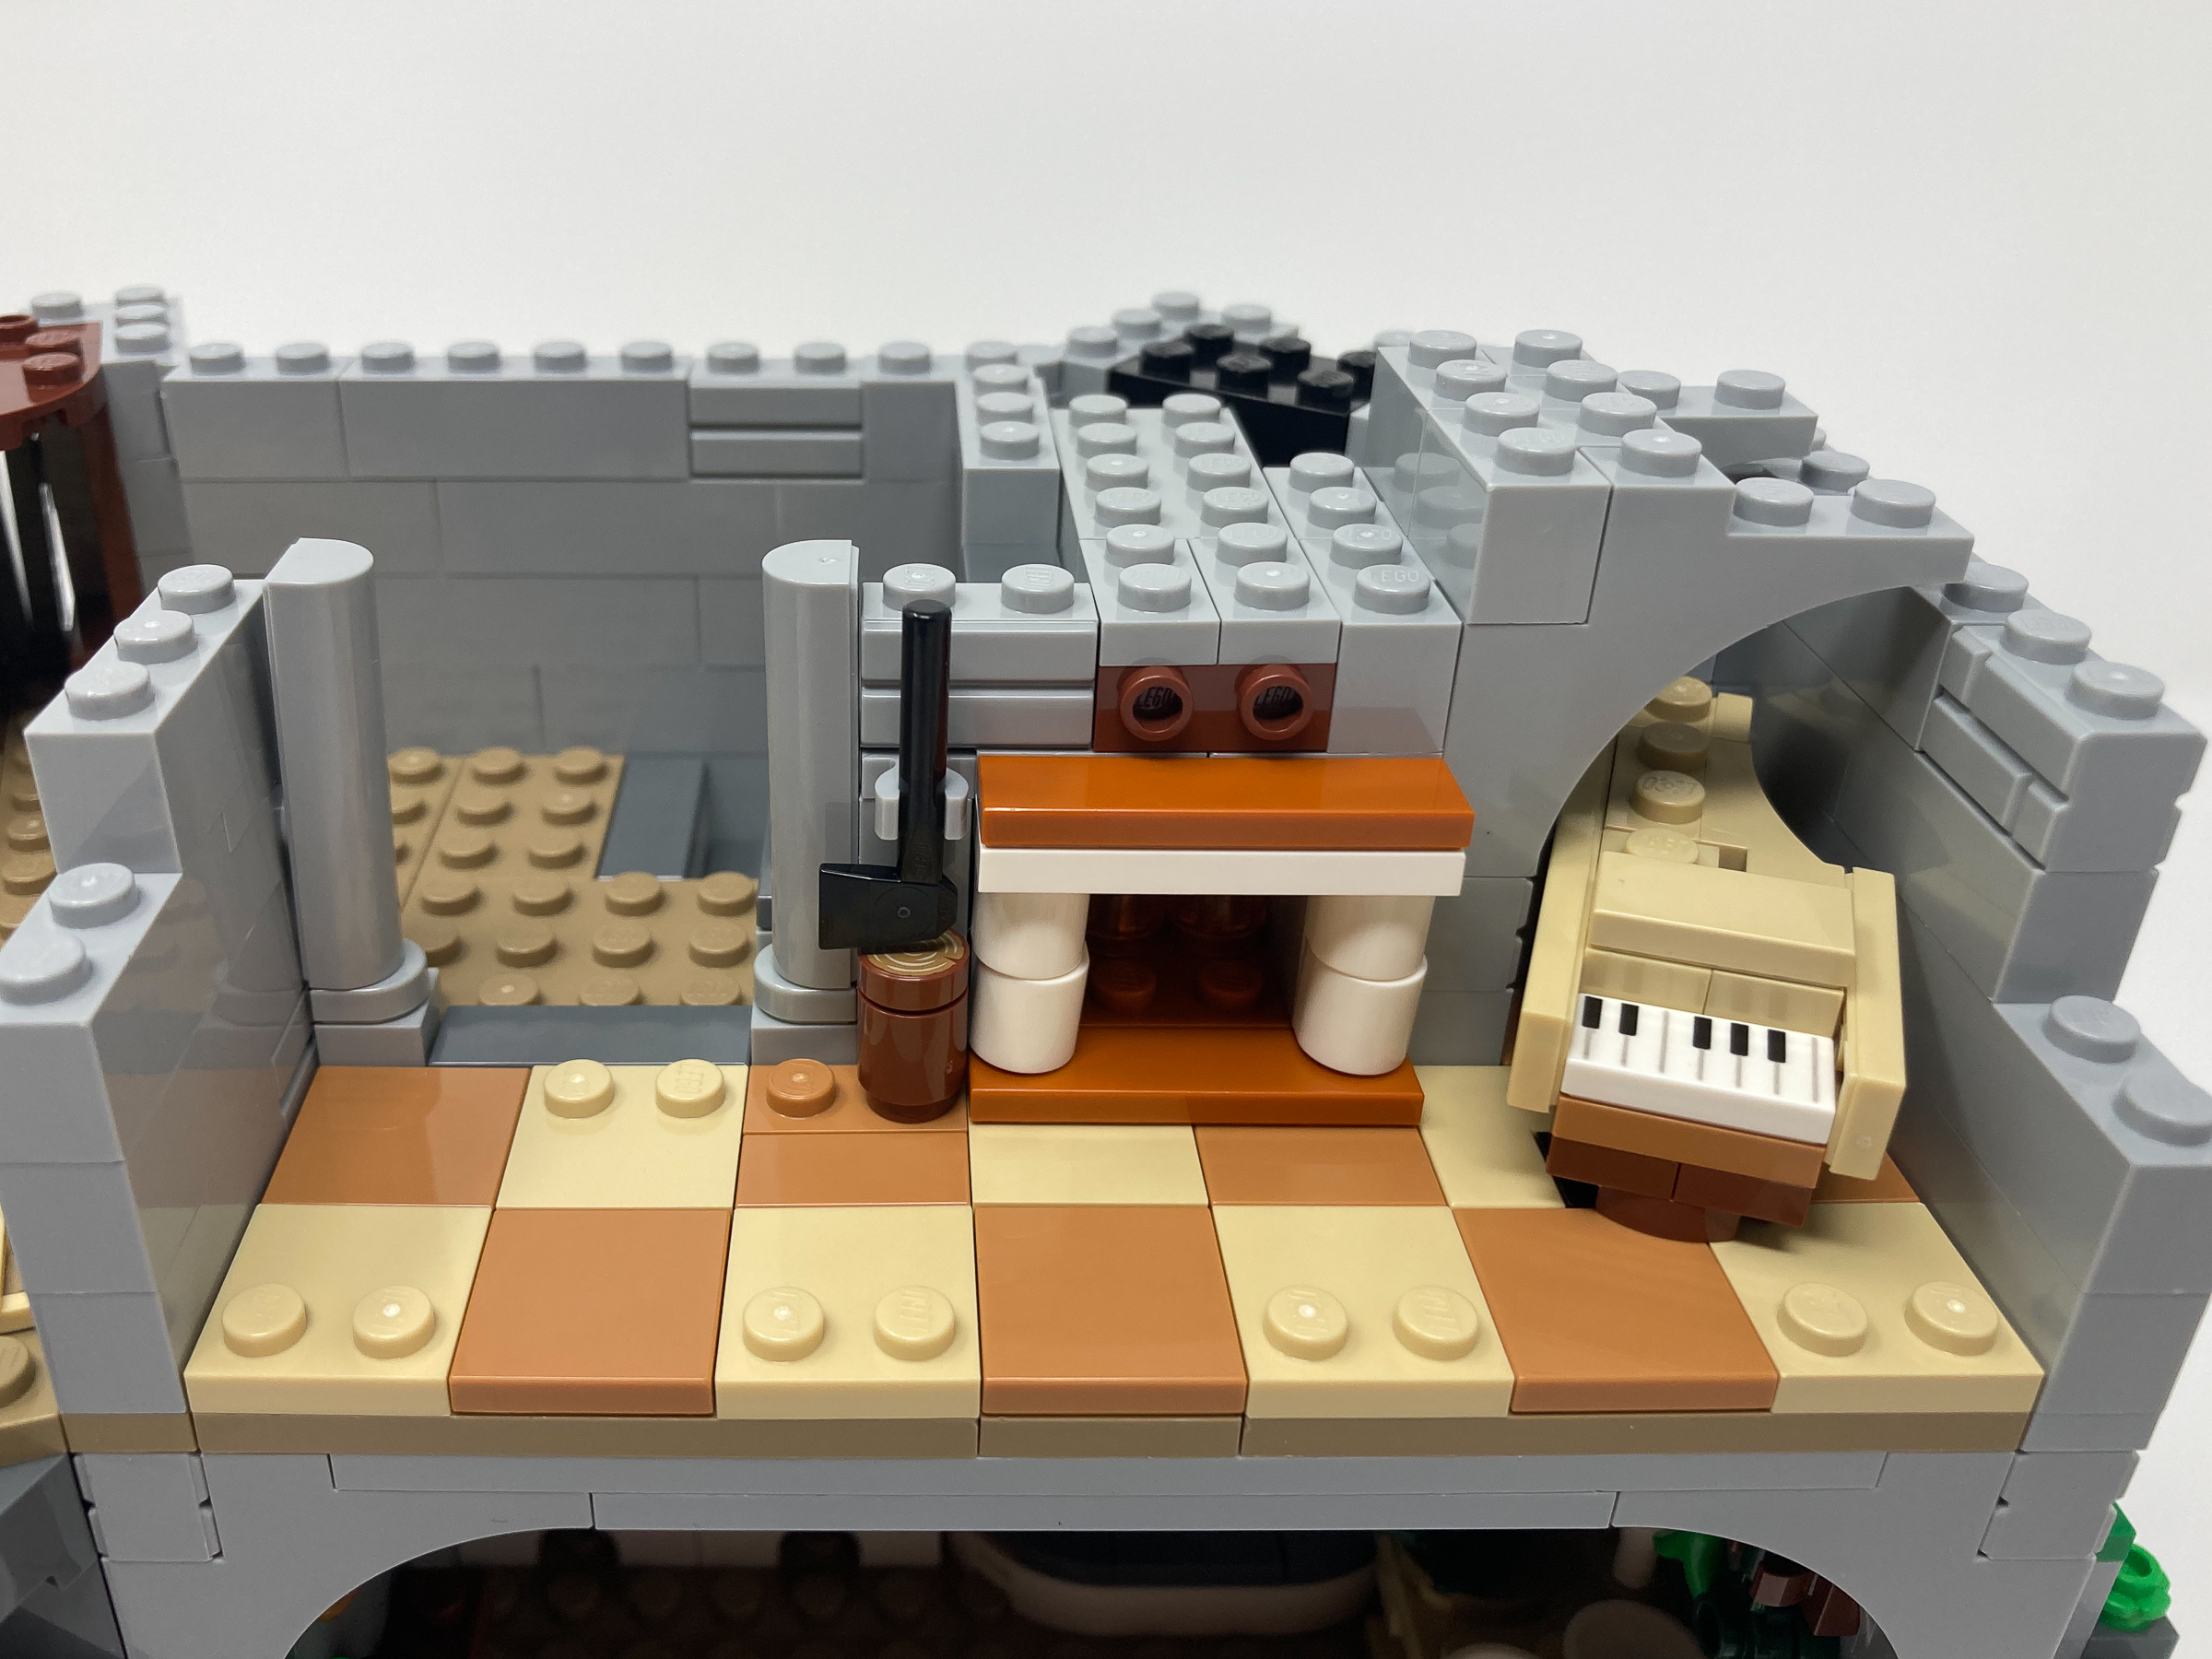
A brick-built harpsichord is tucked in the corner; it is a shame that a lot of the details get hidden by the arches.
Bag 6 – Castle walls and market
As the third level comes to a close, we see the first of the battlements being built. The designers highlight how far LEGO has come as we move away from exposed studs at the top to rounded off edges. This contrast causes the castle to stand out and gives it a wow factor as we have such varied textures and shapes.
The window slits make it easy to see out of and shoot arrows through while making it difficult for invaders to return fire, a historically accurate choice for windows.
The designers ensured to not only make the castle dazzling but also accurate with the combination of both merlons and embrasures allowing soldiers to hide defensively and fire arrows through the walls. Each of the corners of the parapet also has standing points where minifigures can be placed along the edges of the castle.

There are jumper plates placed at key strategic points along the battlement for minifigures to stand on to look over the walls.
In the interior a wooden beam runs across the room for structural support. Just behind it we see banners of the royal colors which stand out very well against the grey of the castle walls. The yellow and blue of the Lion Knight’s royal colors give the castle a warm and homey feel. In the entry way we see a combination of pillars and ornate finishes signifying the wealth that the royal family has.

I wish they had used flame pieces to create a roaring log fire but given space constraints it looks like they just went with cones instead.
Bag 7 – Mill foundation
The next build brings us back down to the foundation as we build a wheat mill. From the outside we build more rocky foundations that the castle is built on. This time i we also build a stream with running water. Unfortunately, the water has studs exposed which contrasting to the tiled water of the Ninjago City line makes it feel less smooth. Cheese wedge pieces are used to create a flowing water effect as waves run through this stream. As this room is built on the ground level and light is difficult to come by there is a barred window included in the castle walls. The choice to use jumper pieces attached to tiles on the side and a lipstick piece to hold together two more jumper pieces really highlights the creative decisions designers made to build such detail in such a small space.
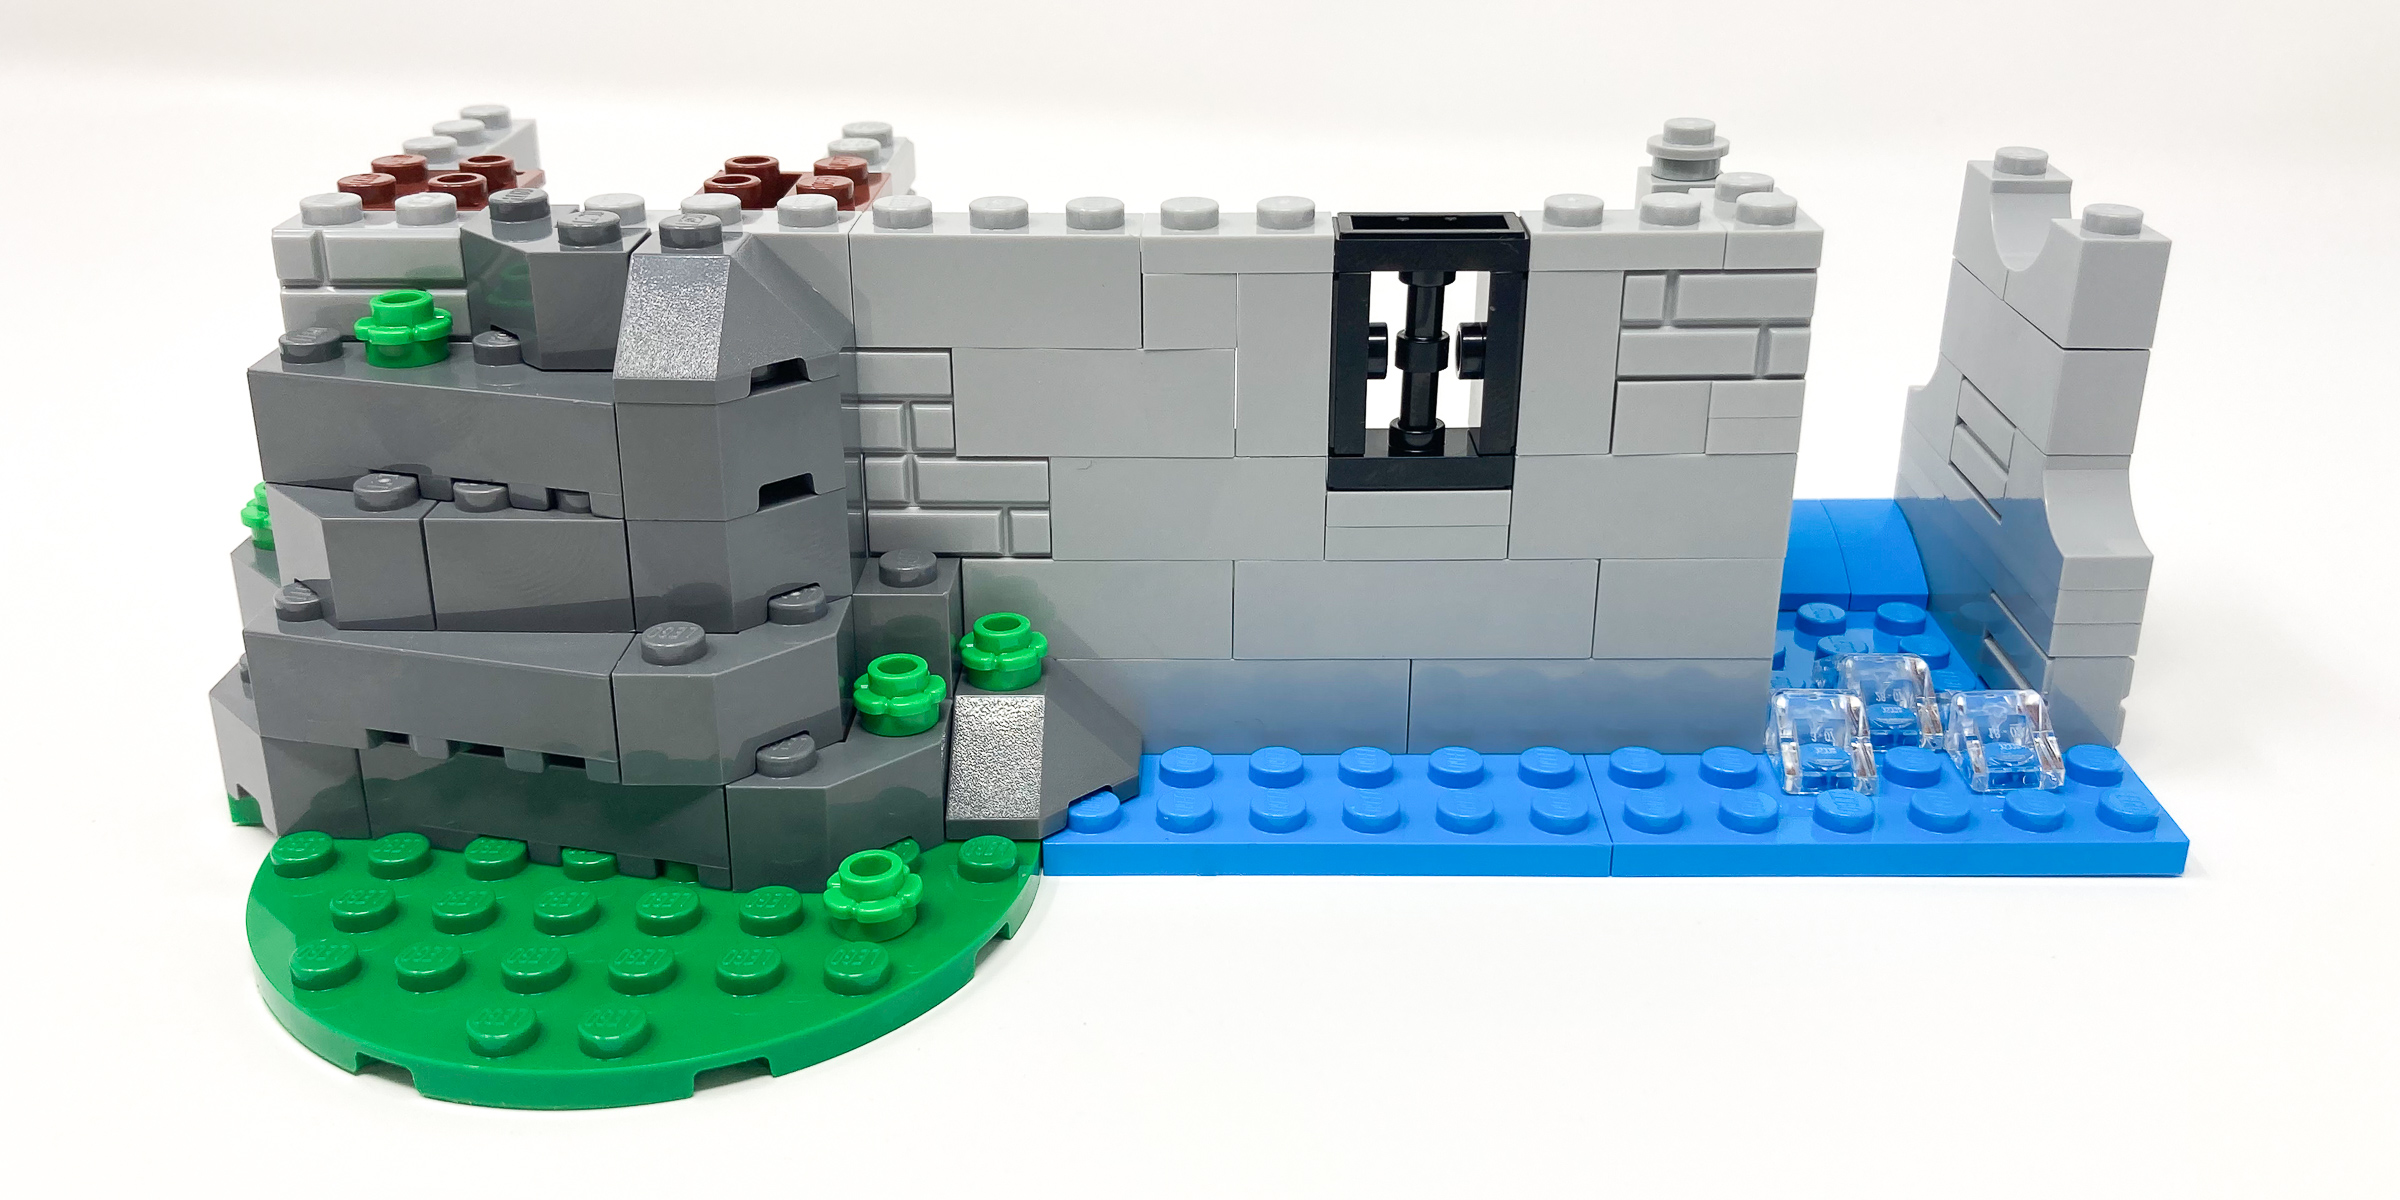
The window technique used almost makes the window look like a jail cell window.
In the interior we see the foundations of the mill and a bread storage room. Nothing to stand out can be seen here but as we build up the mill further, we will see details added not just to the exterior but the interior as well. The choice of using tan plates underneath the grey grinding stones was a smart decision as it helps highlight the flour collecting in the bin and the pieces that have spilt over the sides.

The millstone looks exactly like it would in real life, fit with spilt flour along the sides.
Bag 8 – Flour mill and water wheel
The second set of bags to build a mill are phenomenal. Everything from a spinning wheel that turns the grindstones, to a hopper to minute details like a bird’s nest are included within this section. By using a superhero action piece in brown allowed the designers to create an angled hopper that “pours” wheat directly onto the millstone to grind it into flour. The water well on the side powers this millstone and can be turned to build a moving play piece for this section. To the right in storage the designers used a fur boa piece on a 1×1 rounded stud to build a bird’s nest fit with an egg. Such small and simple piece decisions to create such an impact.
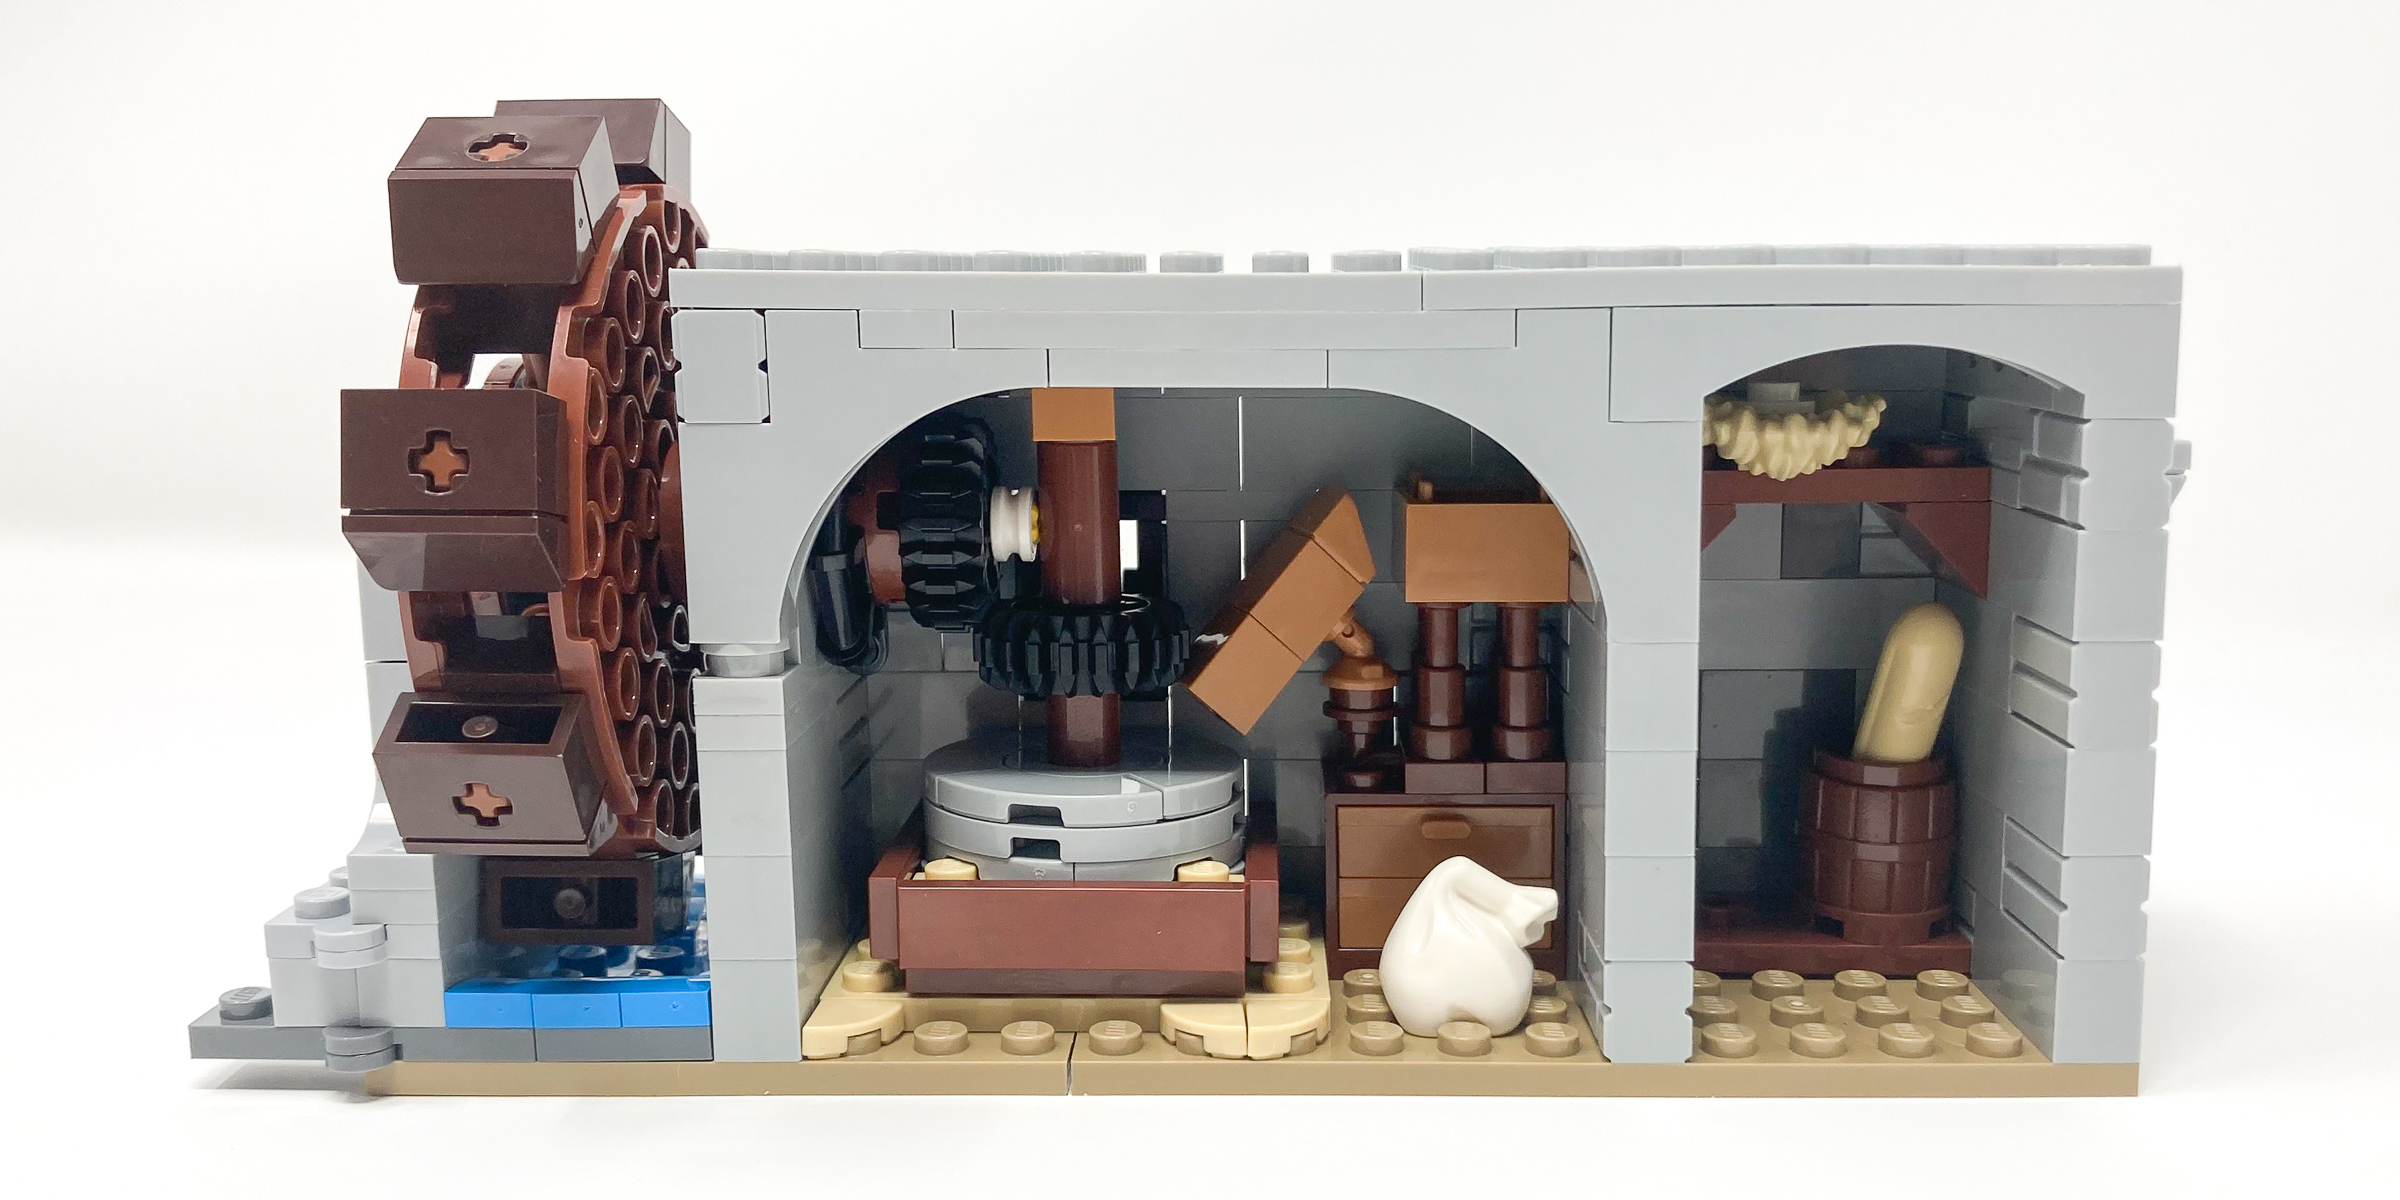
So many details are packed into such a small room.
From the exterior you can see the waves previously added are now created by the water wheel wadding that little bit of detail to give this set more realism. By placing the rounded brick of the mill on an inverted arch piece on the side of the mill was also an aesthetically appeasing decision as the piece slots together so nicely making everything feel intentional. Unfortunately, due to their only being one small window in this entire room the mill is a little dark so some of the finer details added are a little difficult to appreciate.
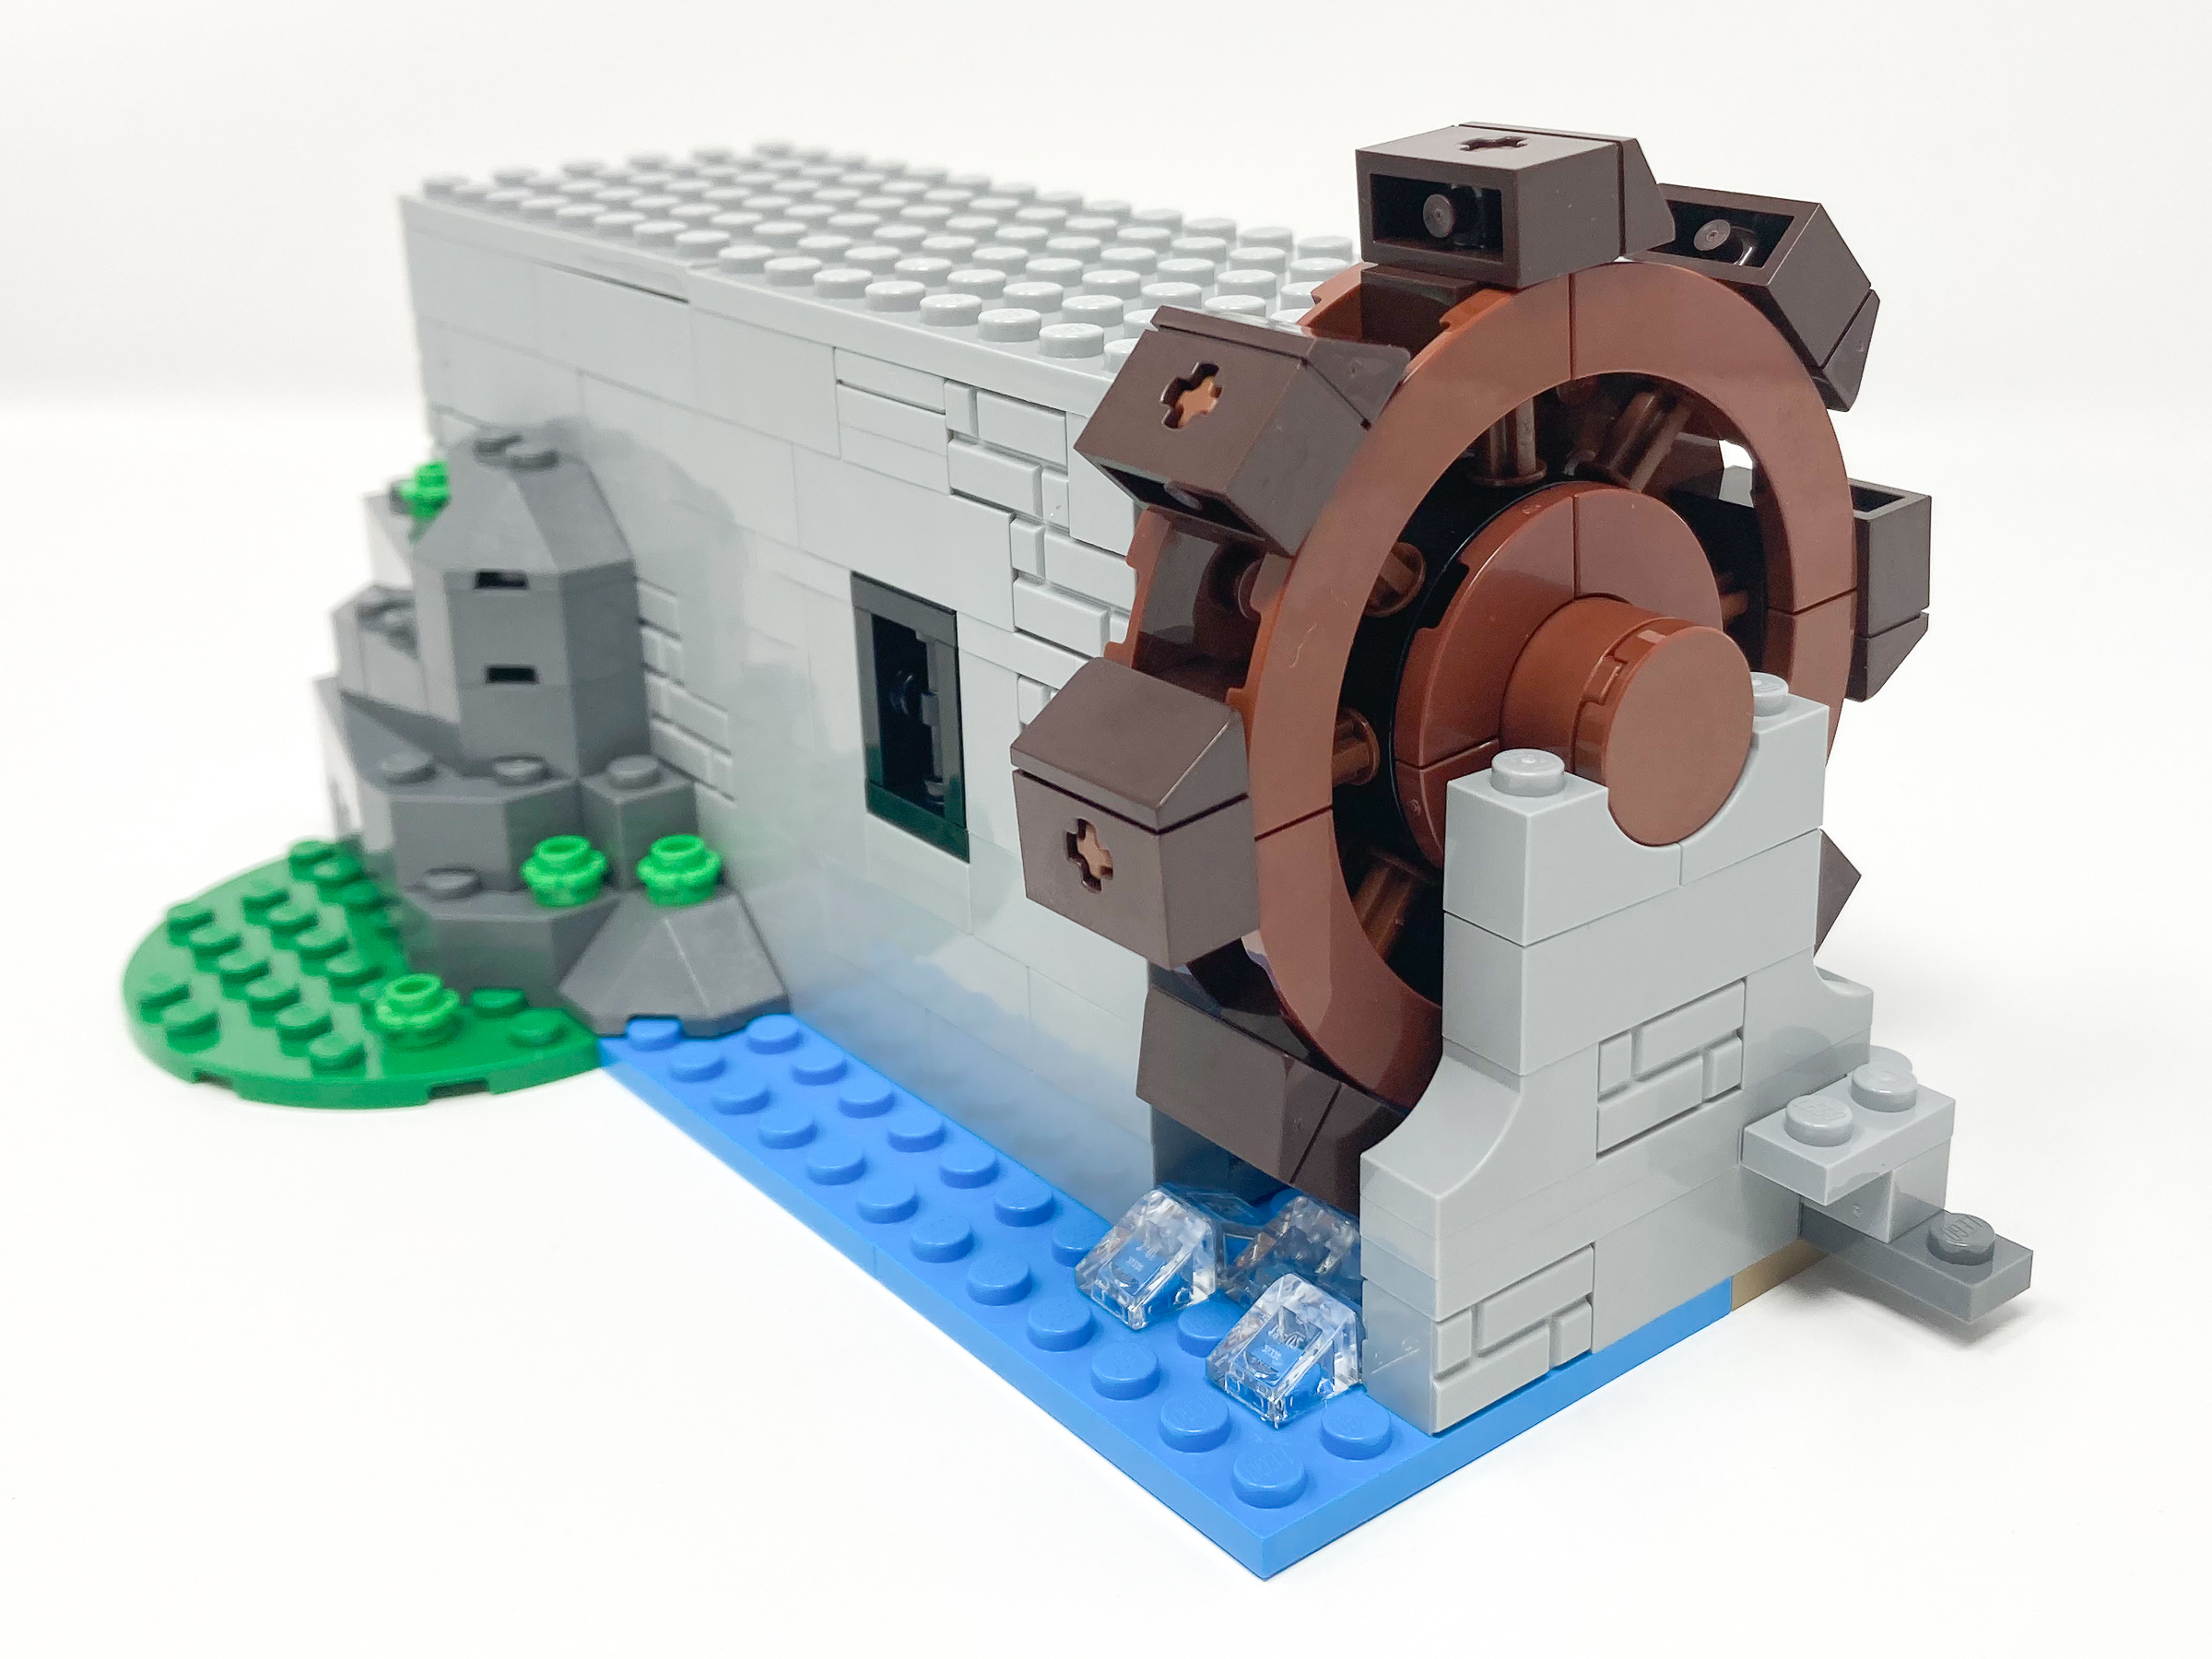
The water wheel spins as you turn it, turning the millstone in the process.
Bag 9 – Dining Room
Above the mill is a dining room. This dining room despite small is packed with details, everything from regal wooden chairs to frilled tablecloth is built in this small, packed space. Running along the walls is a series of shields printed with the different coat of arms of either inhabitants or guests and allies that the Lion Knights plead allegiance to. With each being quite different in shape and color it adds a fun set of variety to the décor in the room.

More coats of arms printed on shields from historic Castle theme factions line the wall of the dining room.
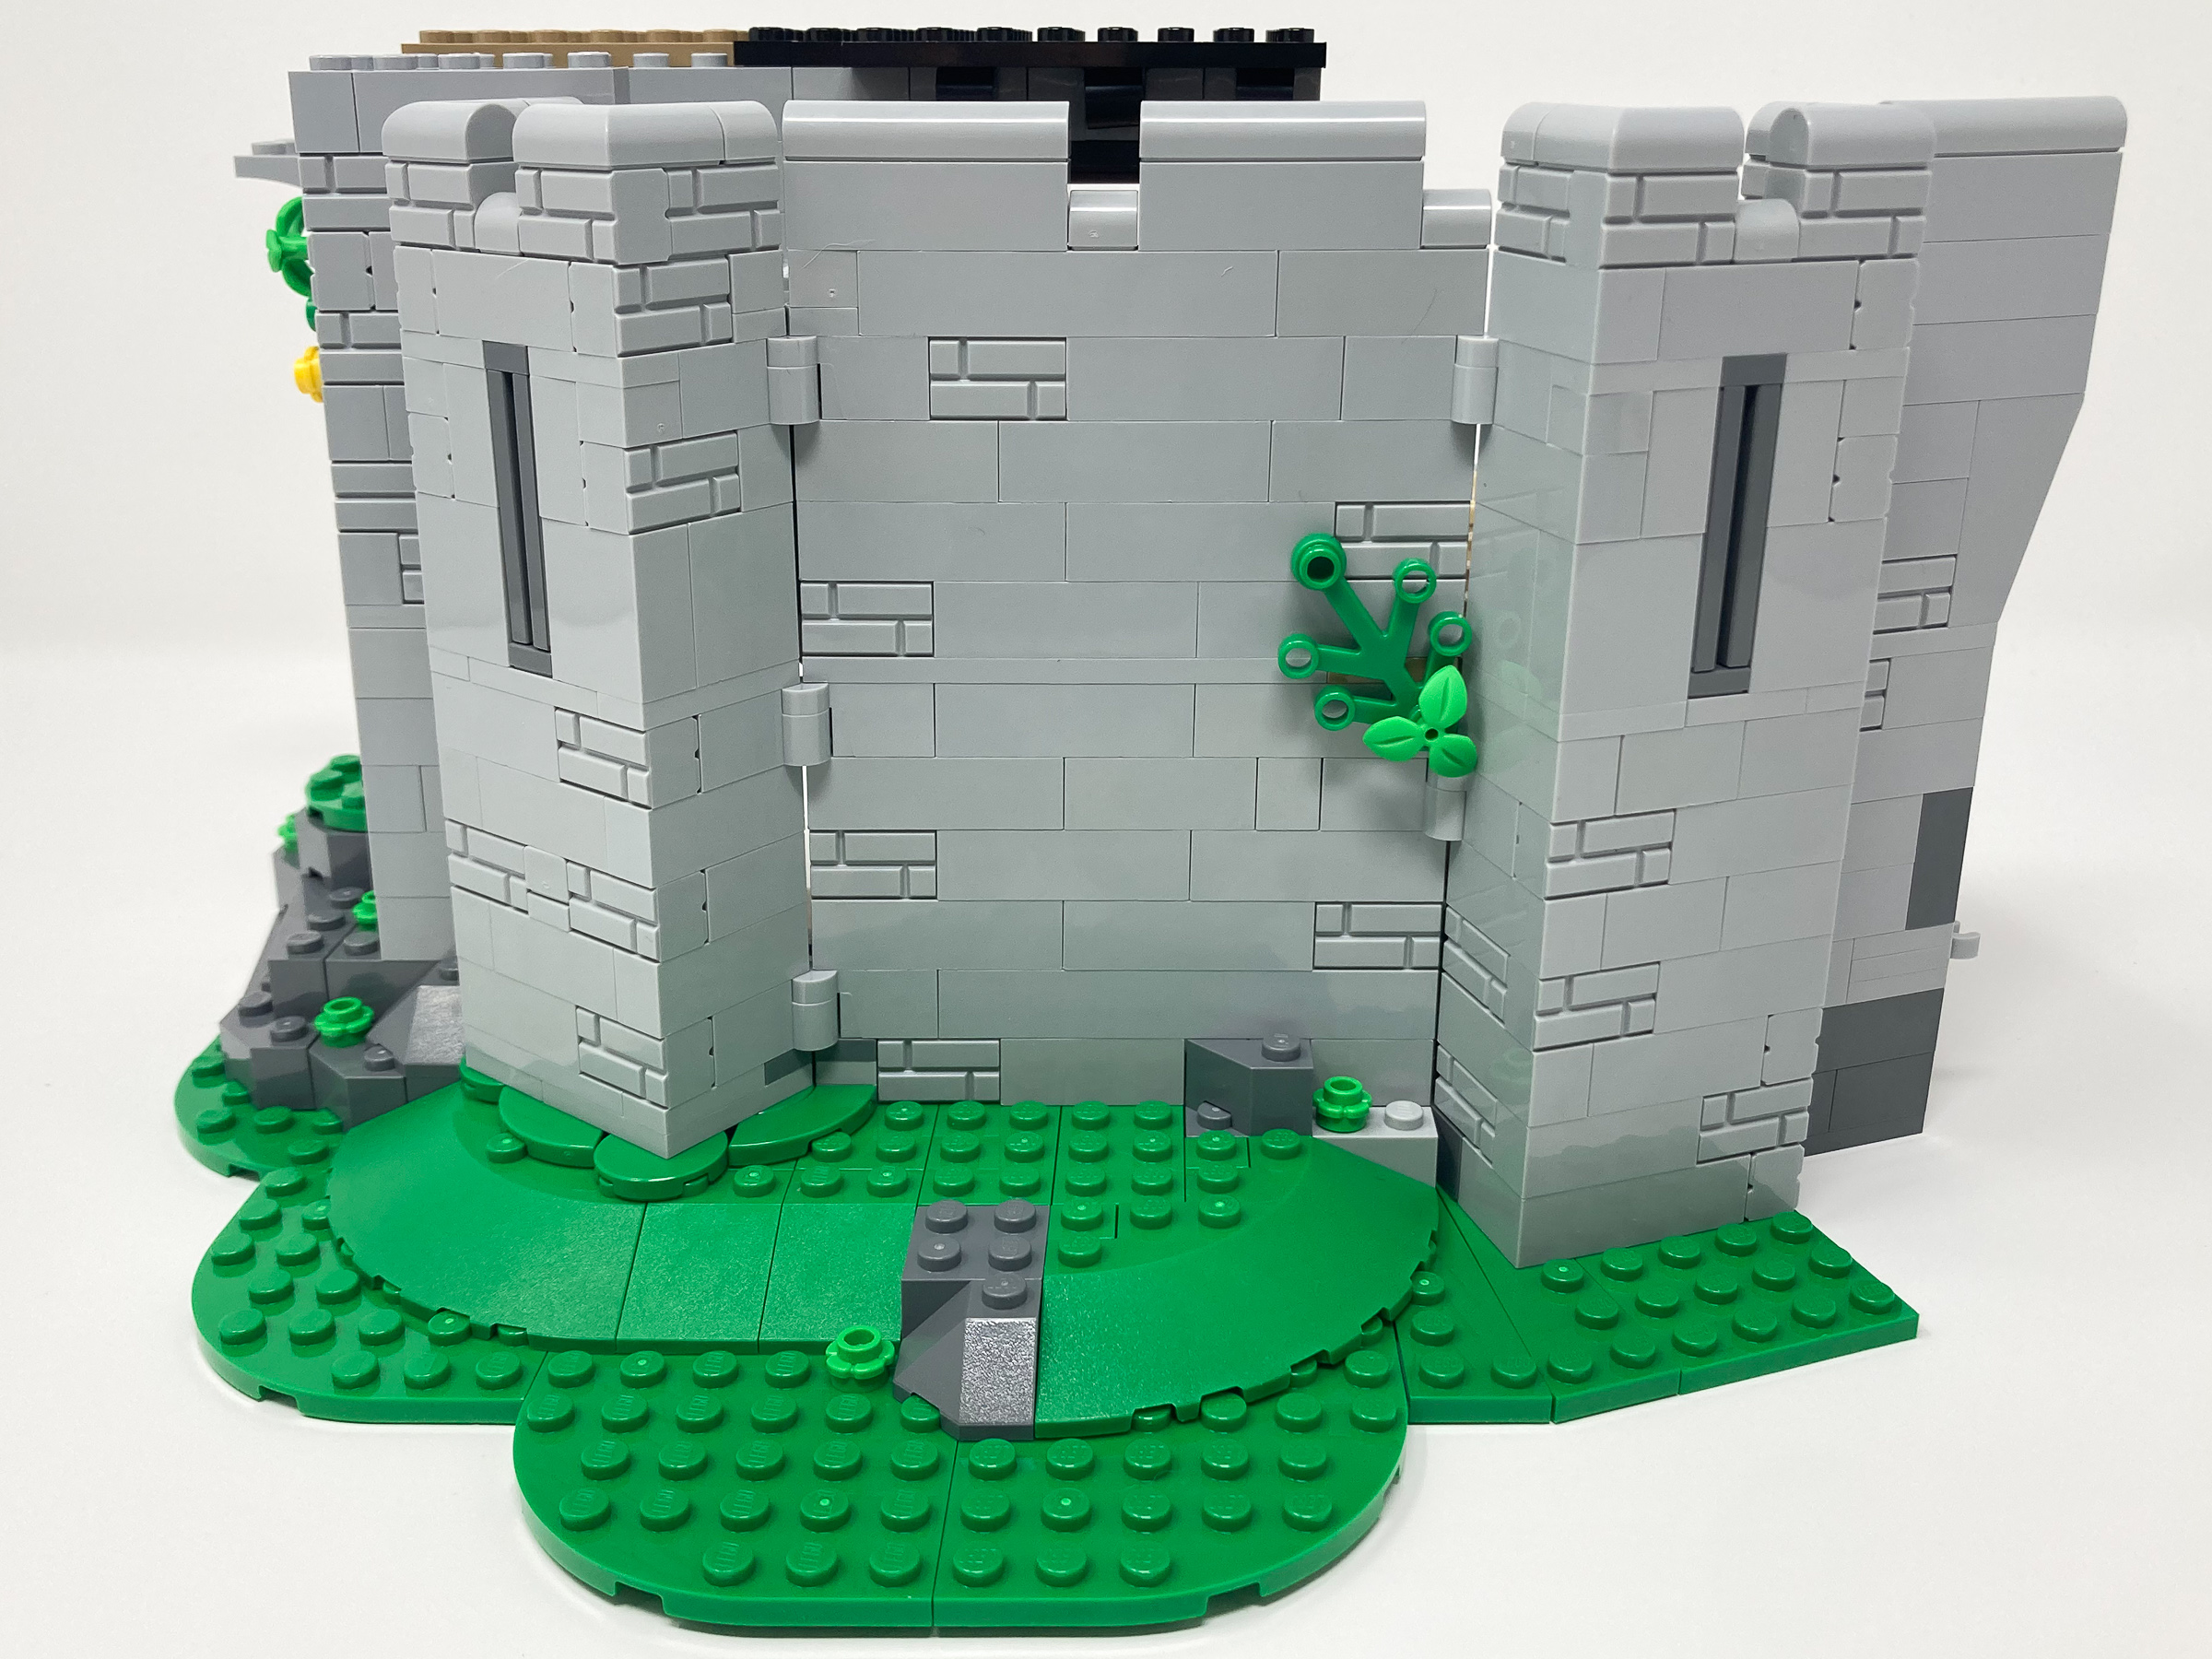
Unlike the windows of the front facing castle walls the dining room windows are a little less defensive, each allowing more light into the room and designed to be more ornate. On the outside we even see a flowerbed placed under the windowsill. In contrast to the bar windows of the mill below we can see the difference in classes of the castle’s inhabitants. A variety of vines growing along the side of the castle which adds more depth, feel and character to the castle walls.

More coats of arms printed on shields from historic Castle theme factions line the wall of the dining room.
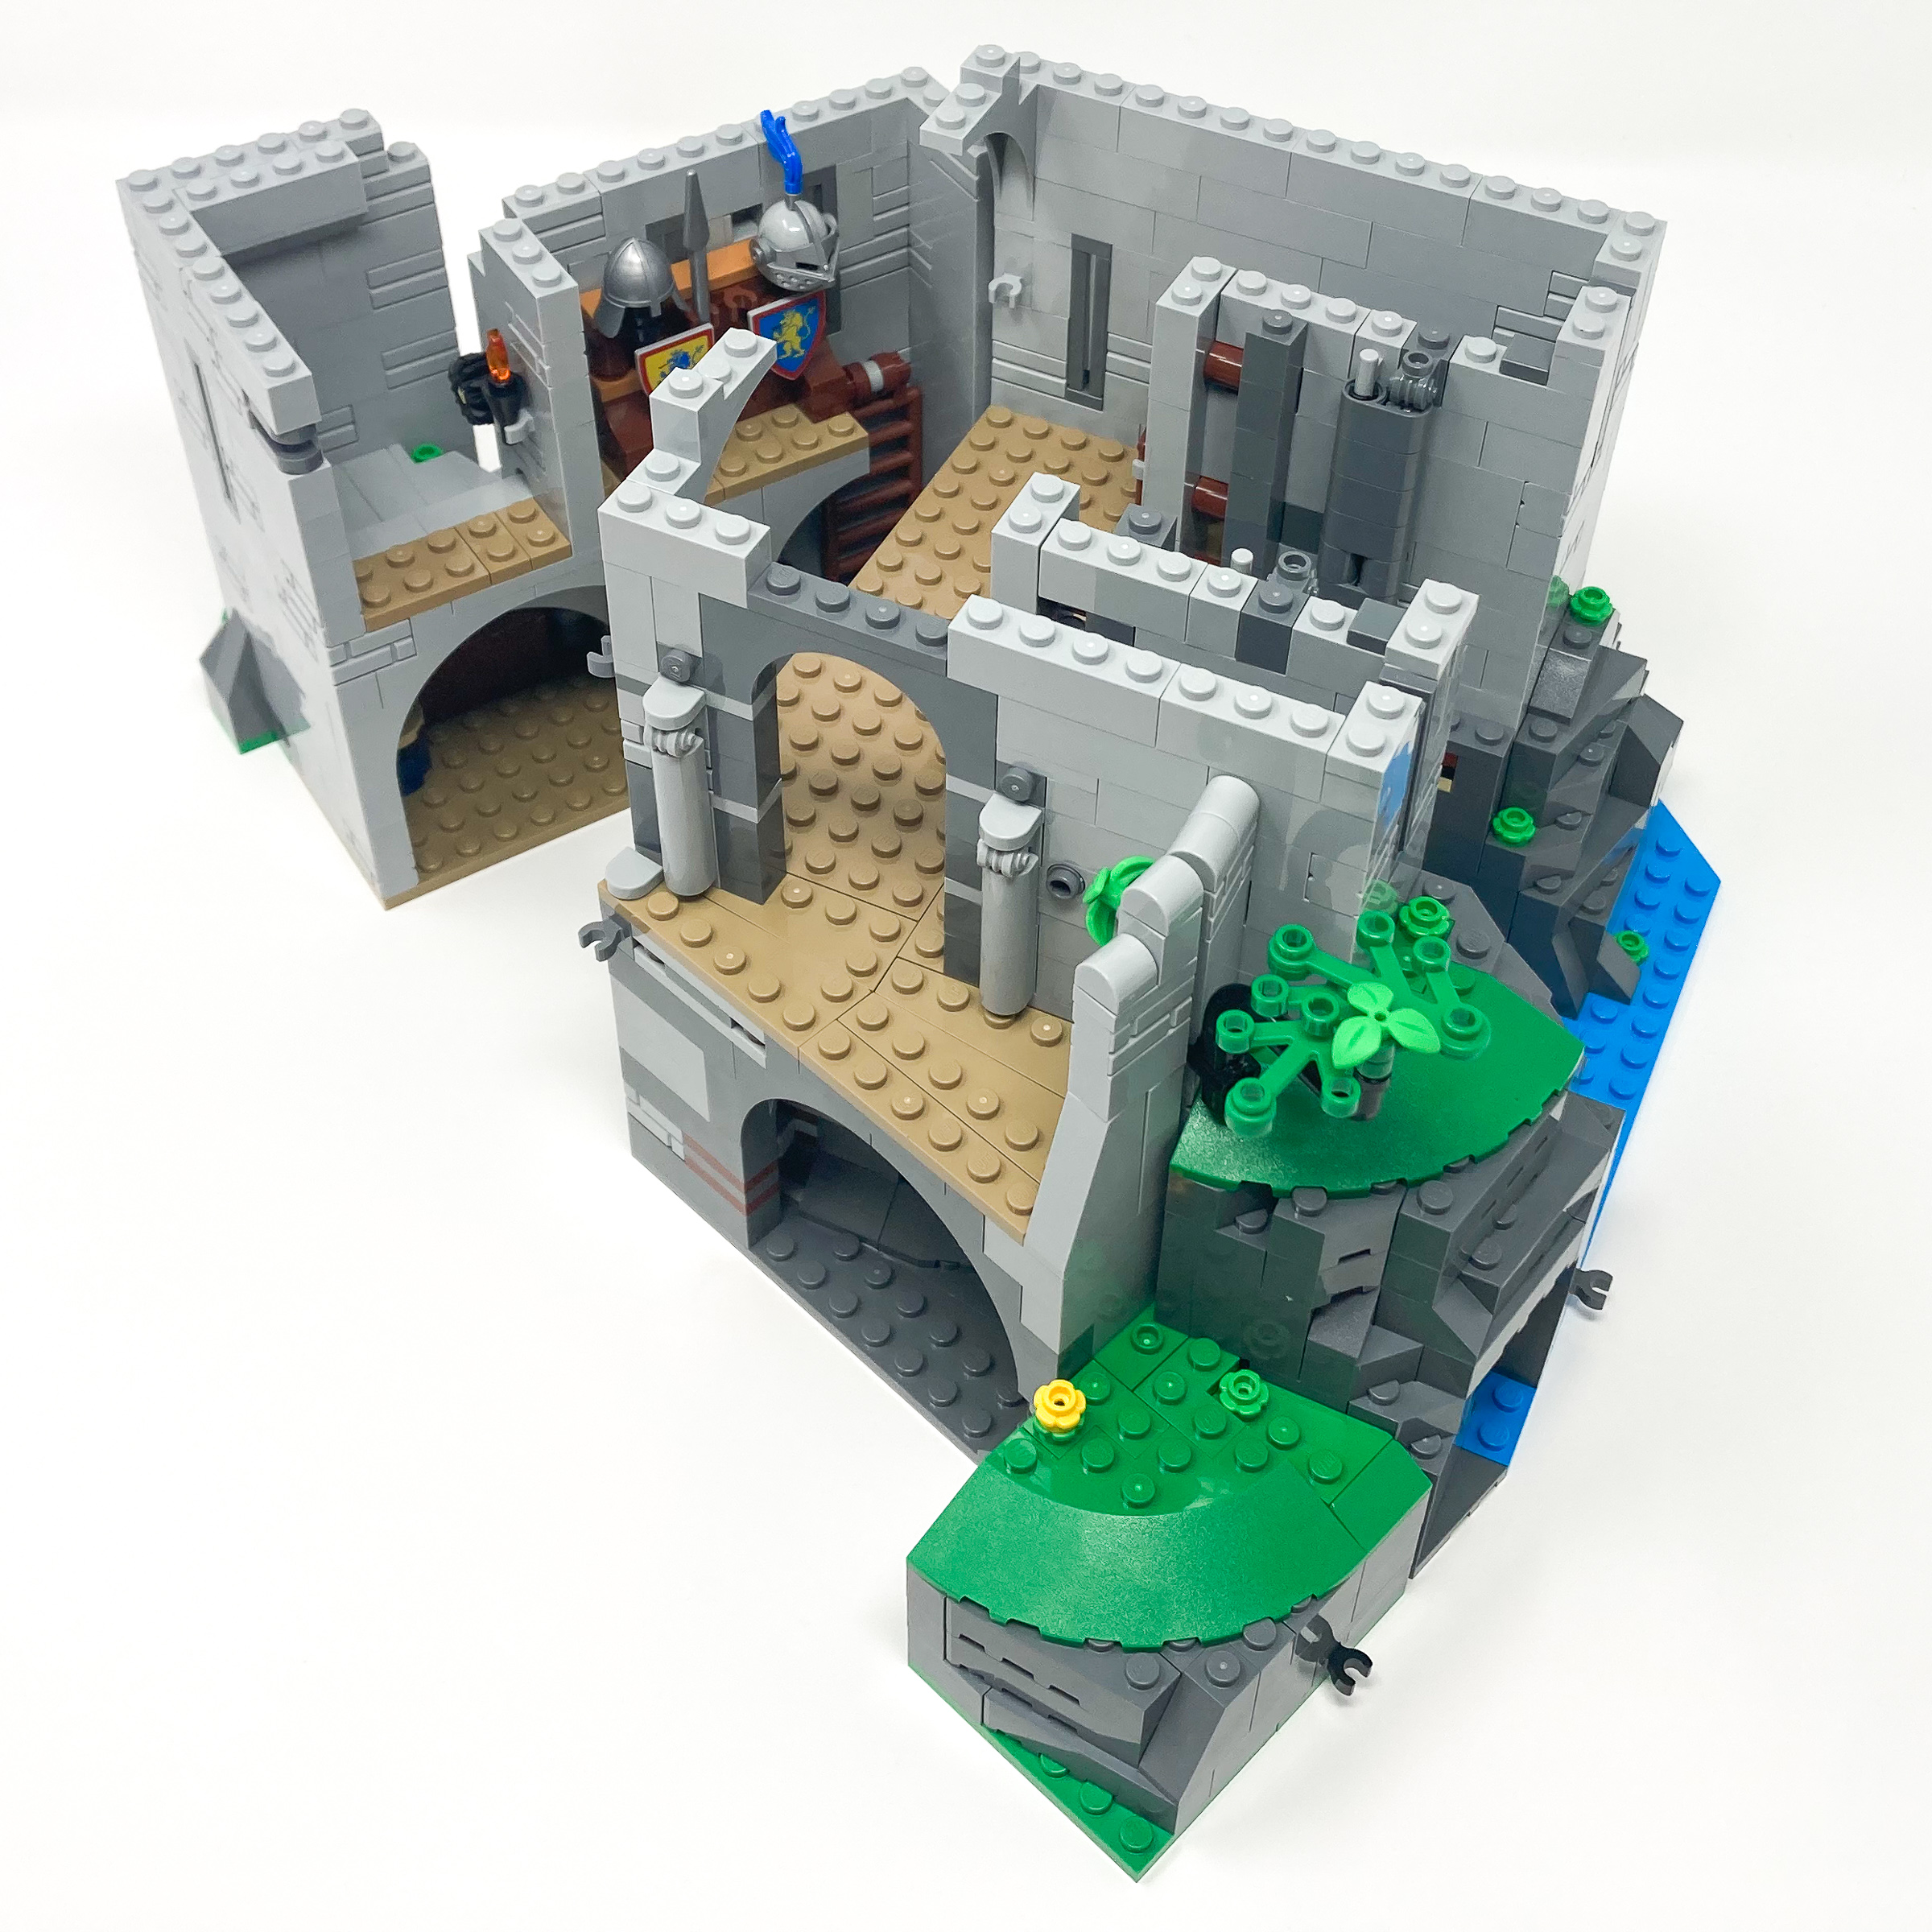
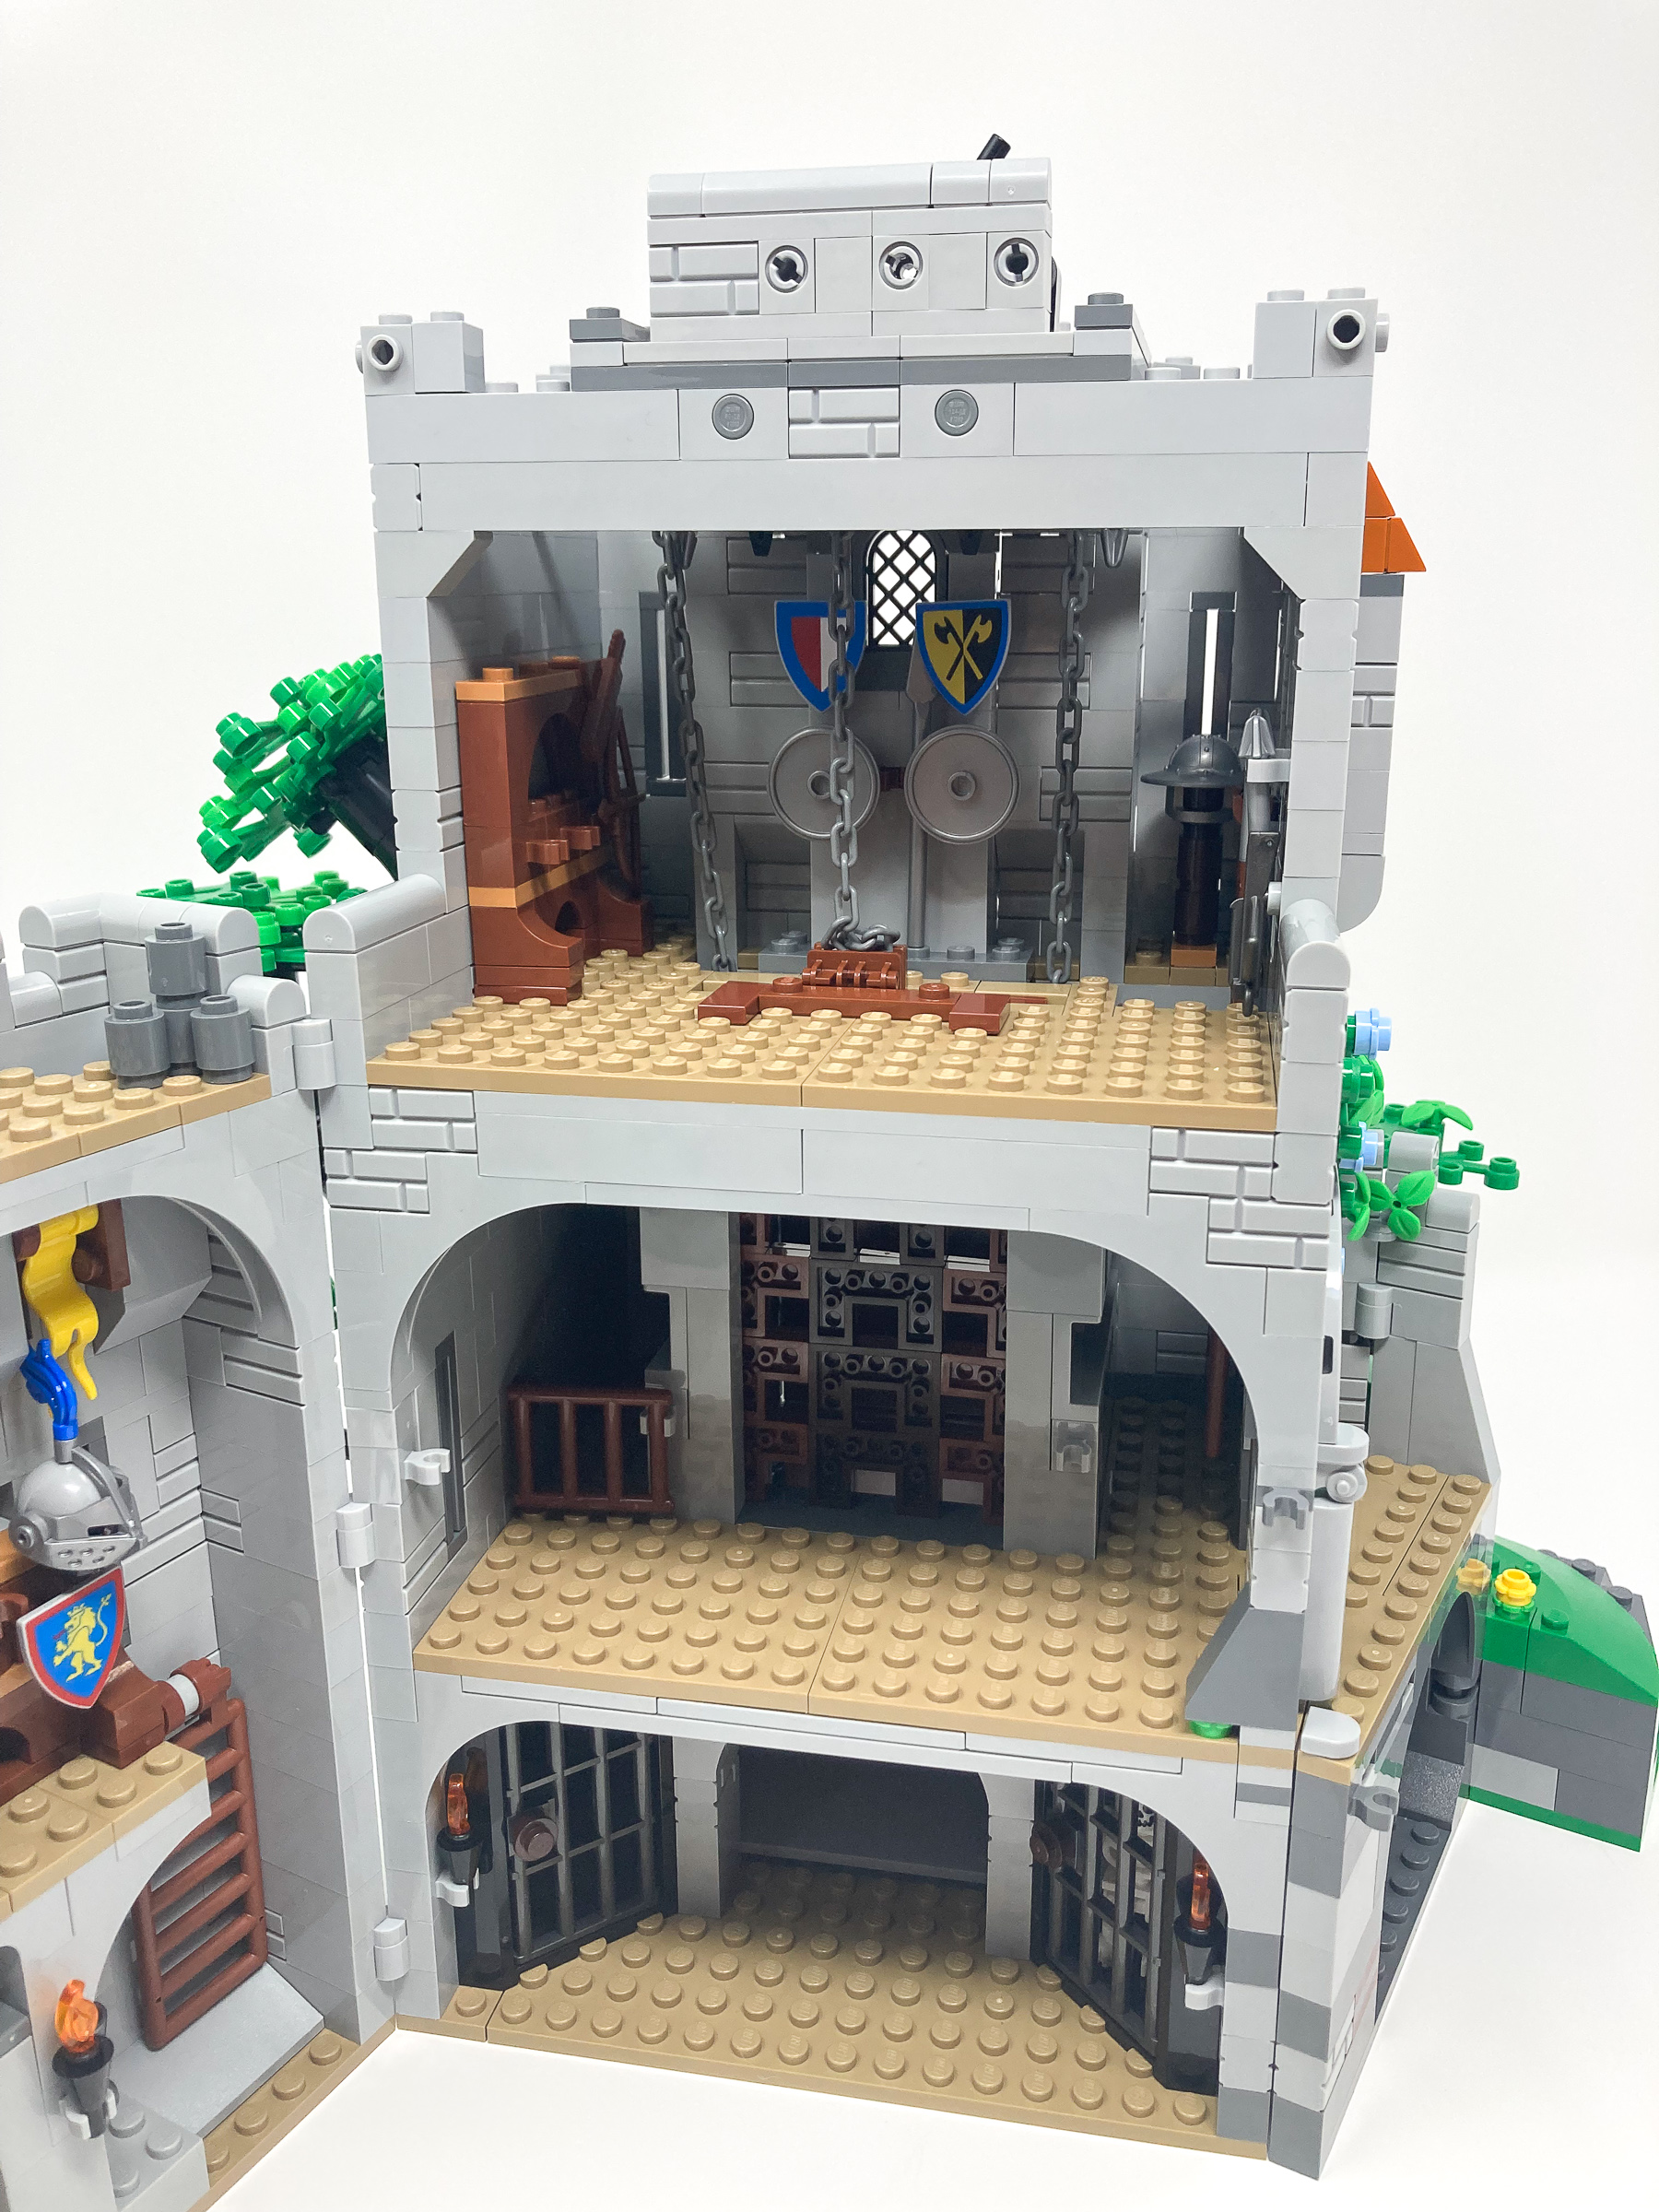
With this half complete we see the first of the dollhouse come into play. We can open the castle to see the interior and see how the entertaining and dining rooms connect along with the mill and kitchen. With the stairs we had built in the other half of the castle we now see how all the rooms are cleverly connected so every room can be accessed from the other. It would be great if this were also built in a way such that the levels could be removed so we can see a bird’s eye view of the rooms connected however the doll house approach designers took gets the same goal across.
When connecting both halves together you can open and close the display in a dollhouse fashion.
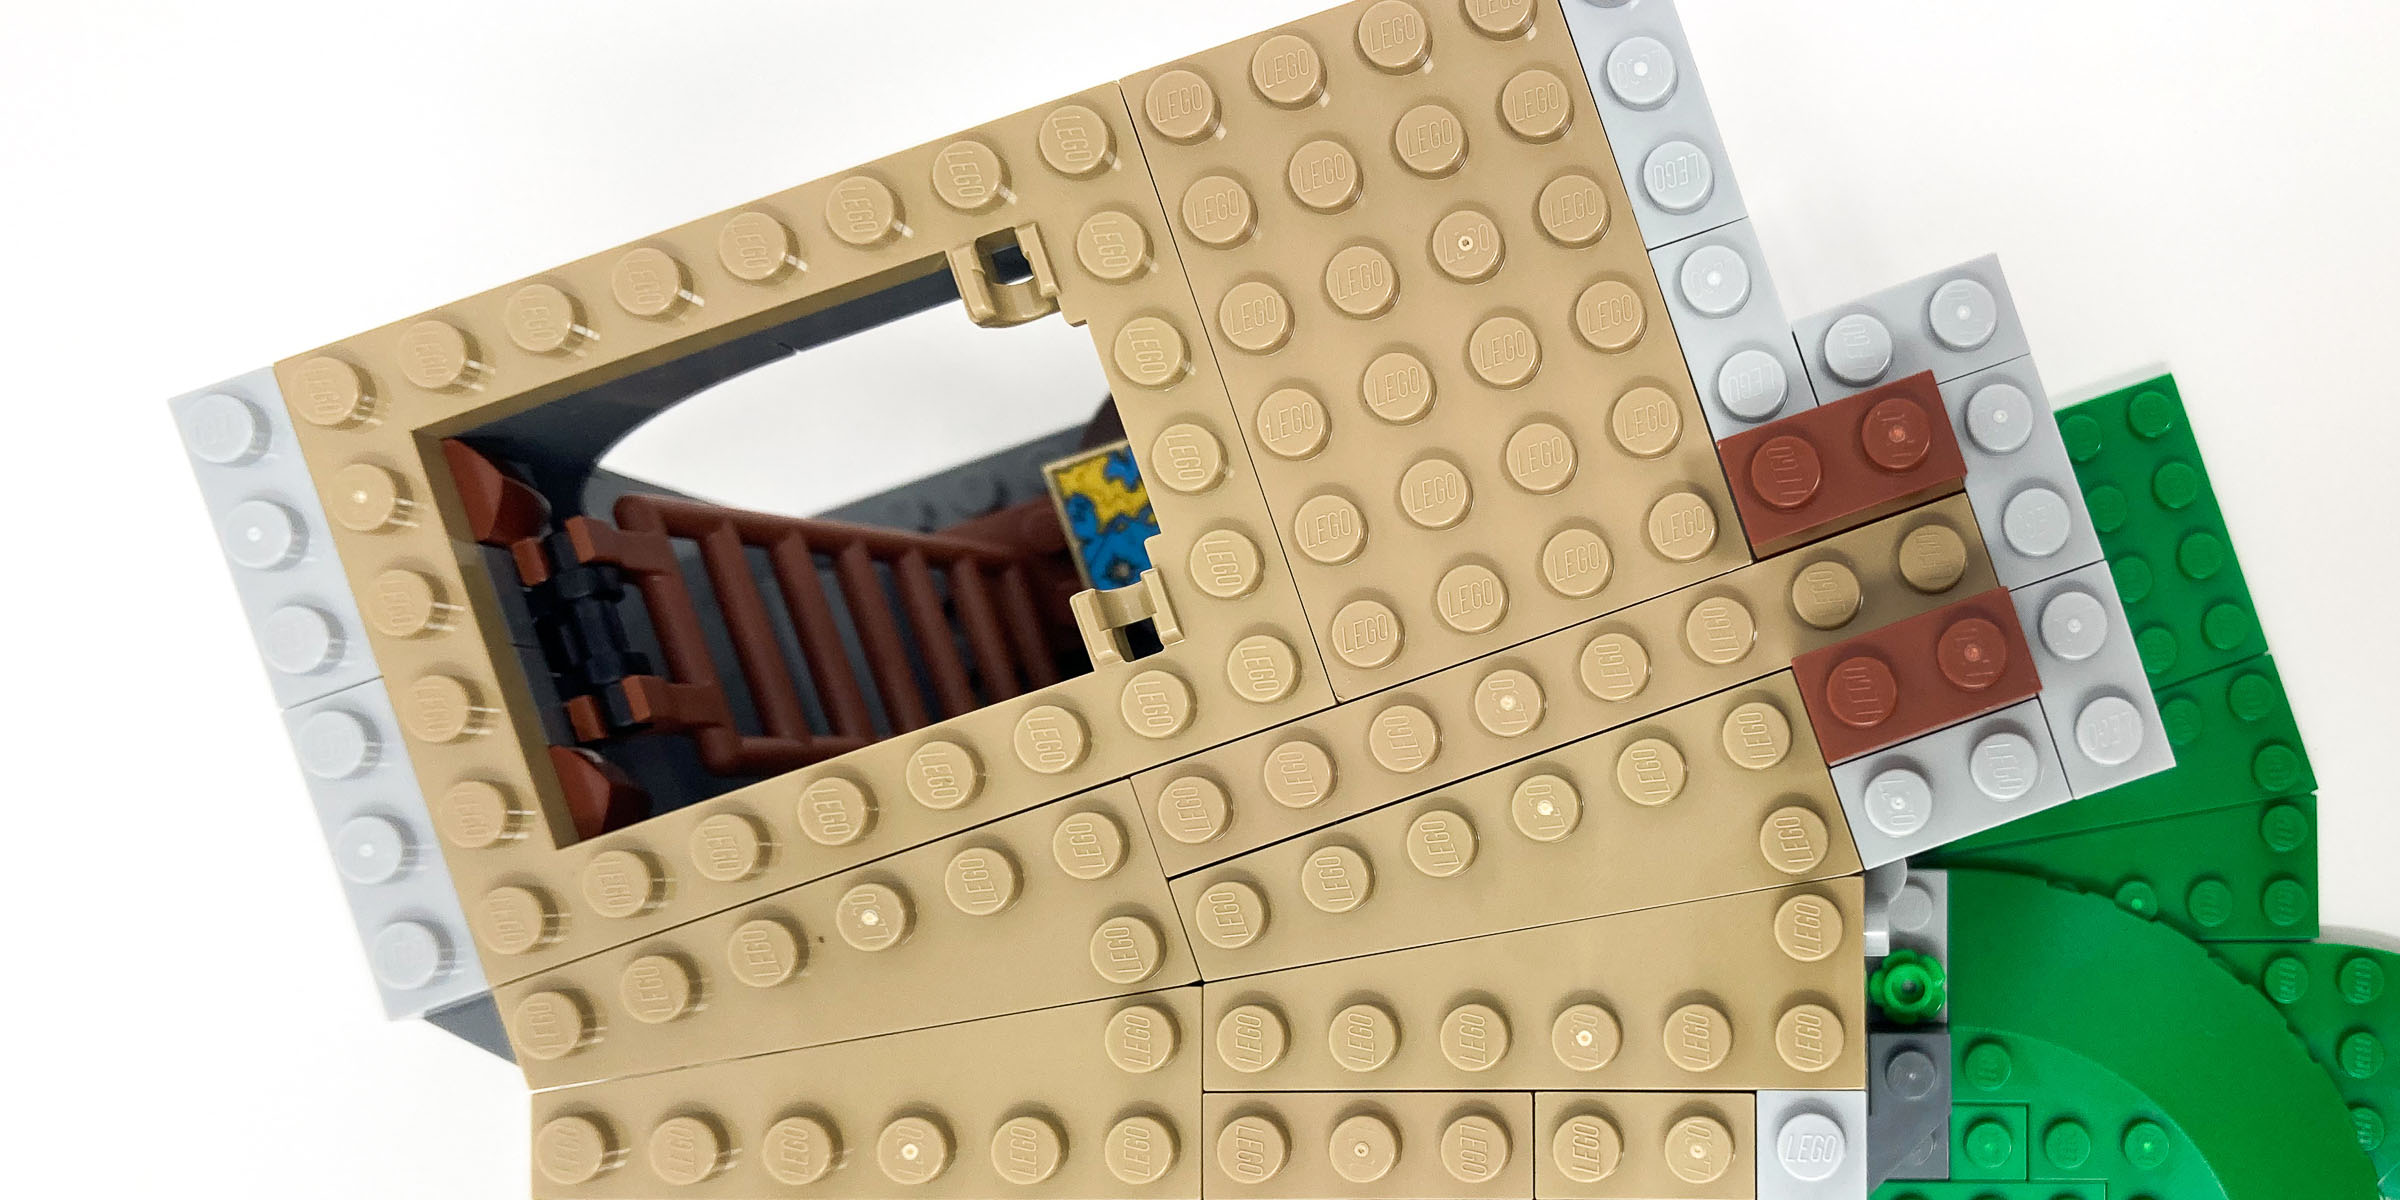
Bag 10 – German Fachwerk style bedroom
Above the dining room is a child’s bedroom. The first half has us build a playroom, fit with a LEGO model of the iconic #6075 Yellow Castle that was released in 1978. Despite using very few pieces this castle is immediately recognizable highlighting how simple some of the older sets were.
The yellow 1978 castle on the floor is not to minifigure scale but is an iconic build nonetheless.
Turning the build around we see the beautiful ‘Fachwerk’ architecture design used to build a German styled dwelling. To build the thin vertical beams the walls of this room are built horizontally rather than vertically. During building the walls were a little fragile however once everything was put together things were sturdier. The white and black of this room along with the orange and yellow roofing tiles contrast with the castle walls and look gorgeous as it stands out.
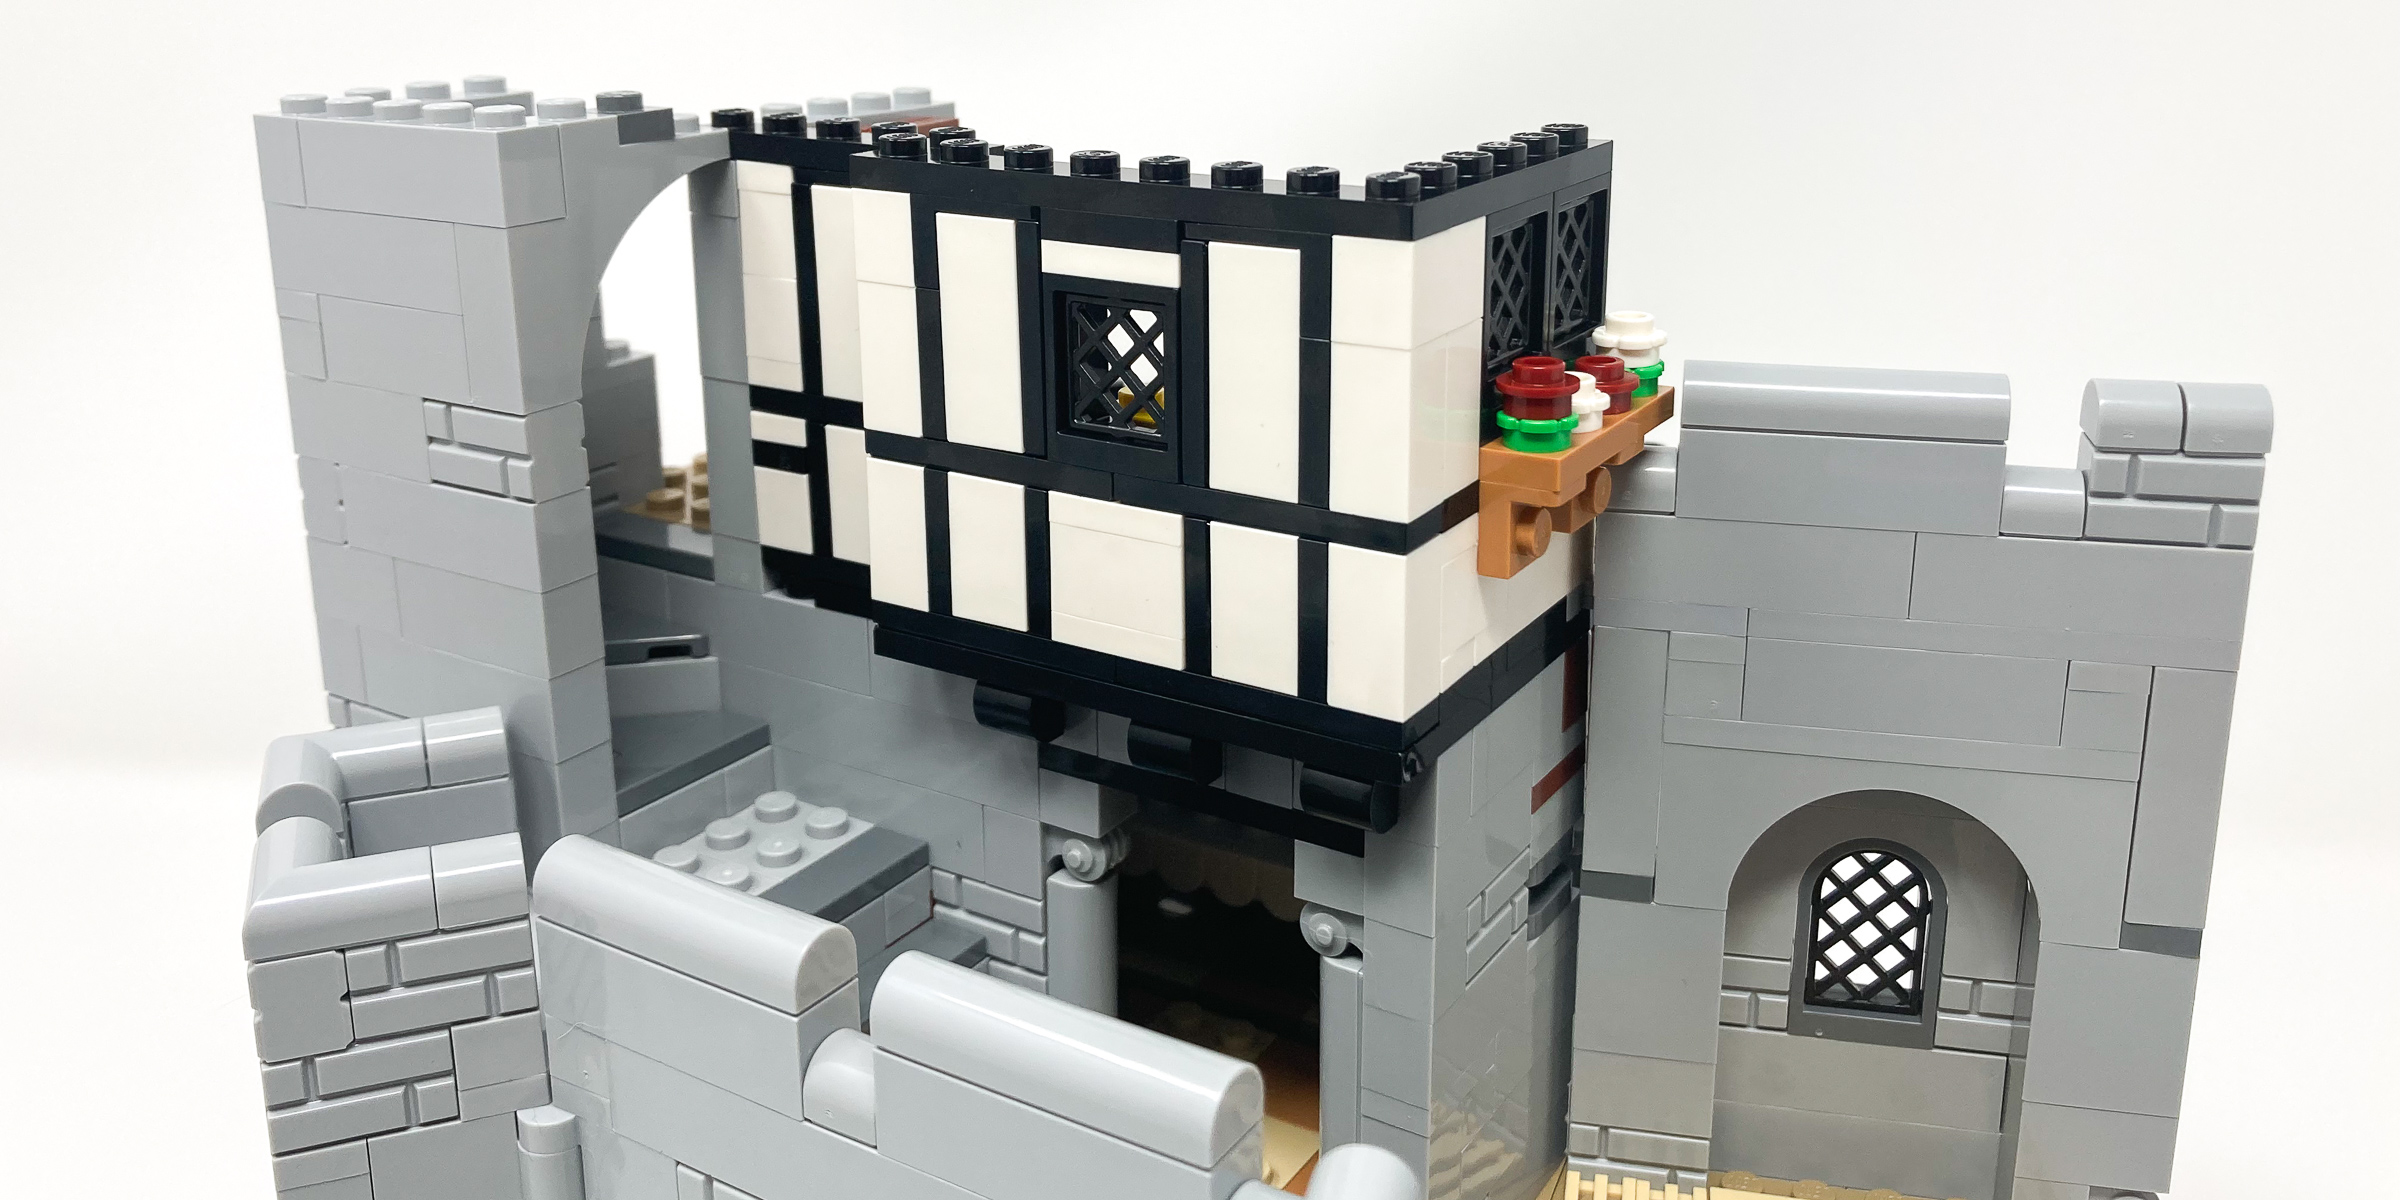
It is incredible how unlike the walls that are built vertically this entire room is built horizontally.
Bag 11 – Child’s bedroom
The other half of the child’s room is the bedroom. Similarly, as it is the same room, we use the same bricks on side building techniques to build up the walls once more. In the room is a bed (with a questionable pillow clip), a fireplace and a desk with ink pad. Once again, this fireplace has no flames however given that a child lives here this might be a good decision this time.
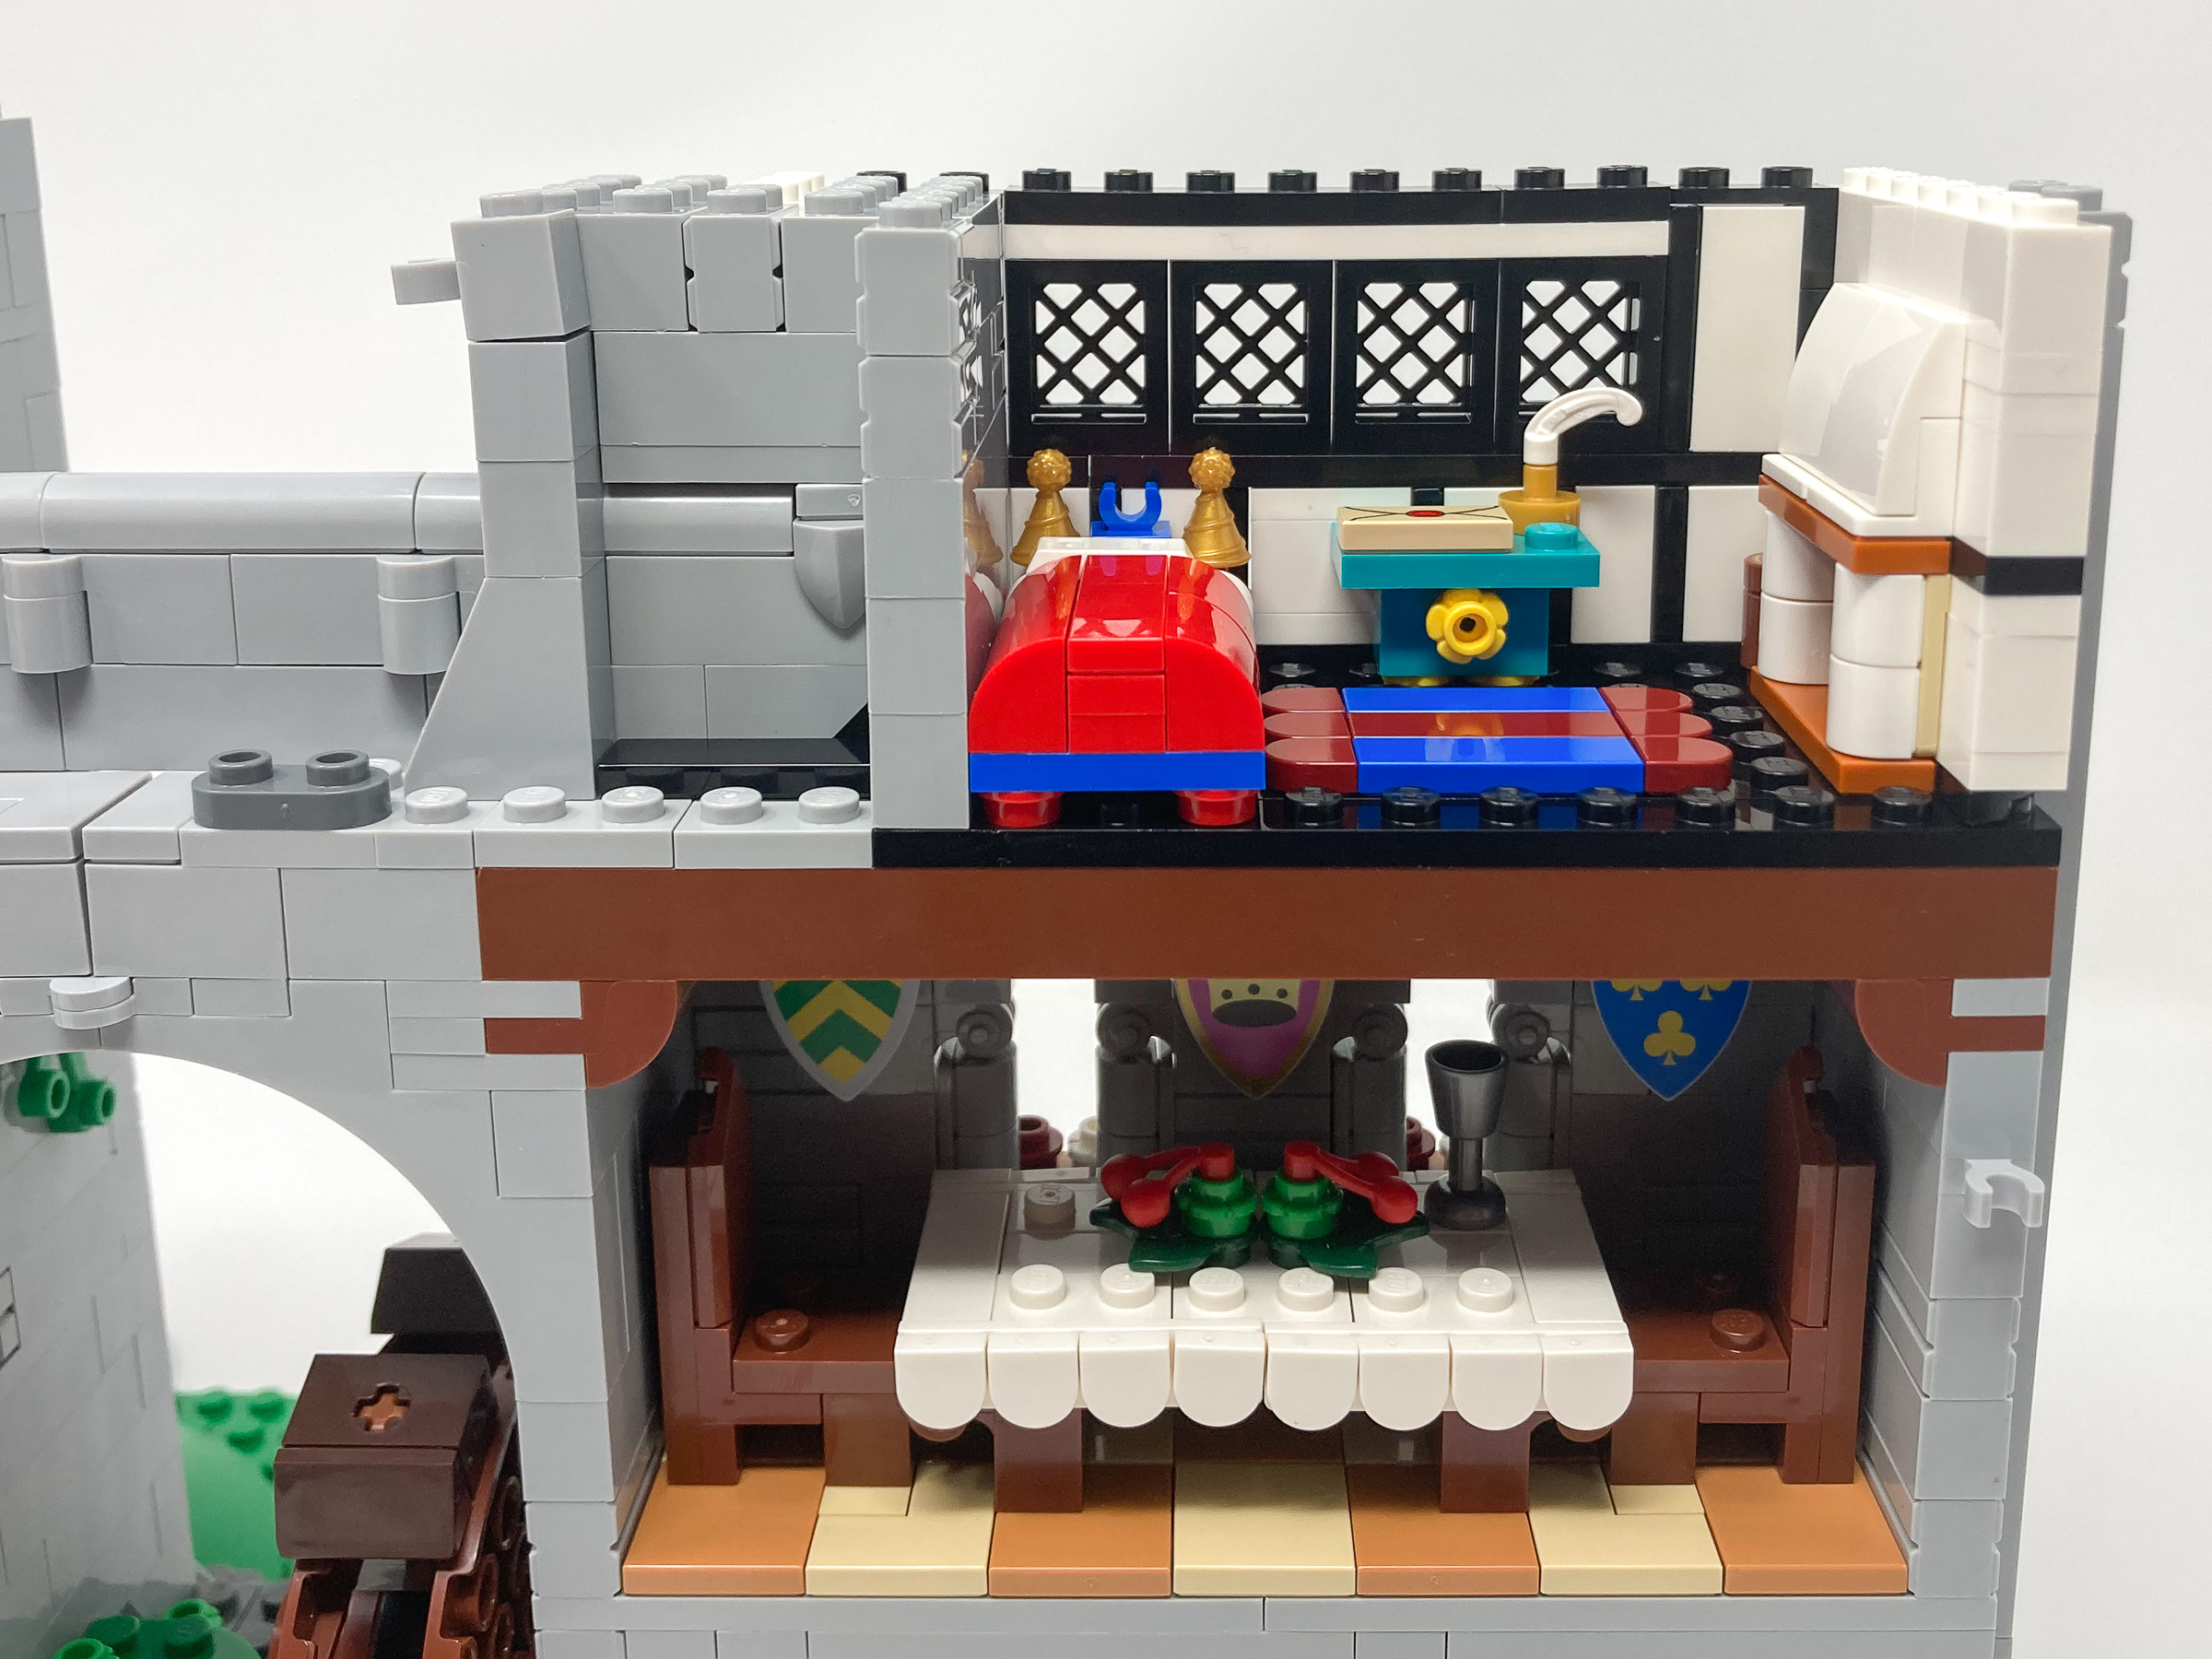
The red and blue colors of the Lion Knights is integrated into their décor design decisions as well.
As this section includes battlements the designers had to be creative with how they were able to connect two halves but still have a rounded battlement. Of all the design decisions made this must be one of my favorites as they used a series of hinge pieces that slide in and out of a hidden compartment to either make this a straight wall when opened or a square when closed. This is one of the many considerations the designers had to make to ensure that this set is displayable from a variety of angles without looking odd.

Wonder why there is a golden frog hidden behind the sliding wall mechanism.
Bag 12 – Straw roof
To top off the bedroom we build up a straw roof. Despite looking very much like straw and being creative with the use of pieces this section was the most repetitive of the sections. Layers upon layers of similar rows are added to create the thatched straw roof we see on the roof. Despite the repetitive nature of this it was still a pleasurable build as we got to use more of the two studded high tiles to build varied heights to build the overlapping straw feel.
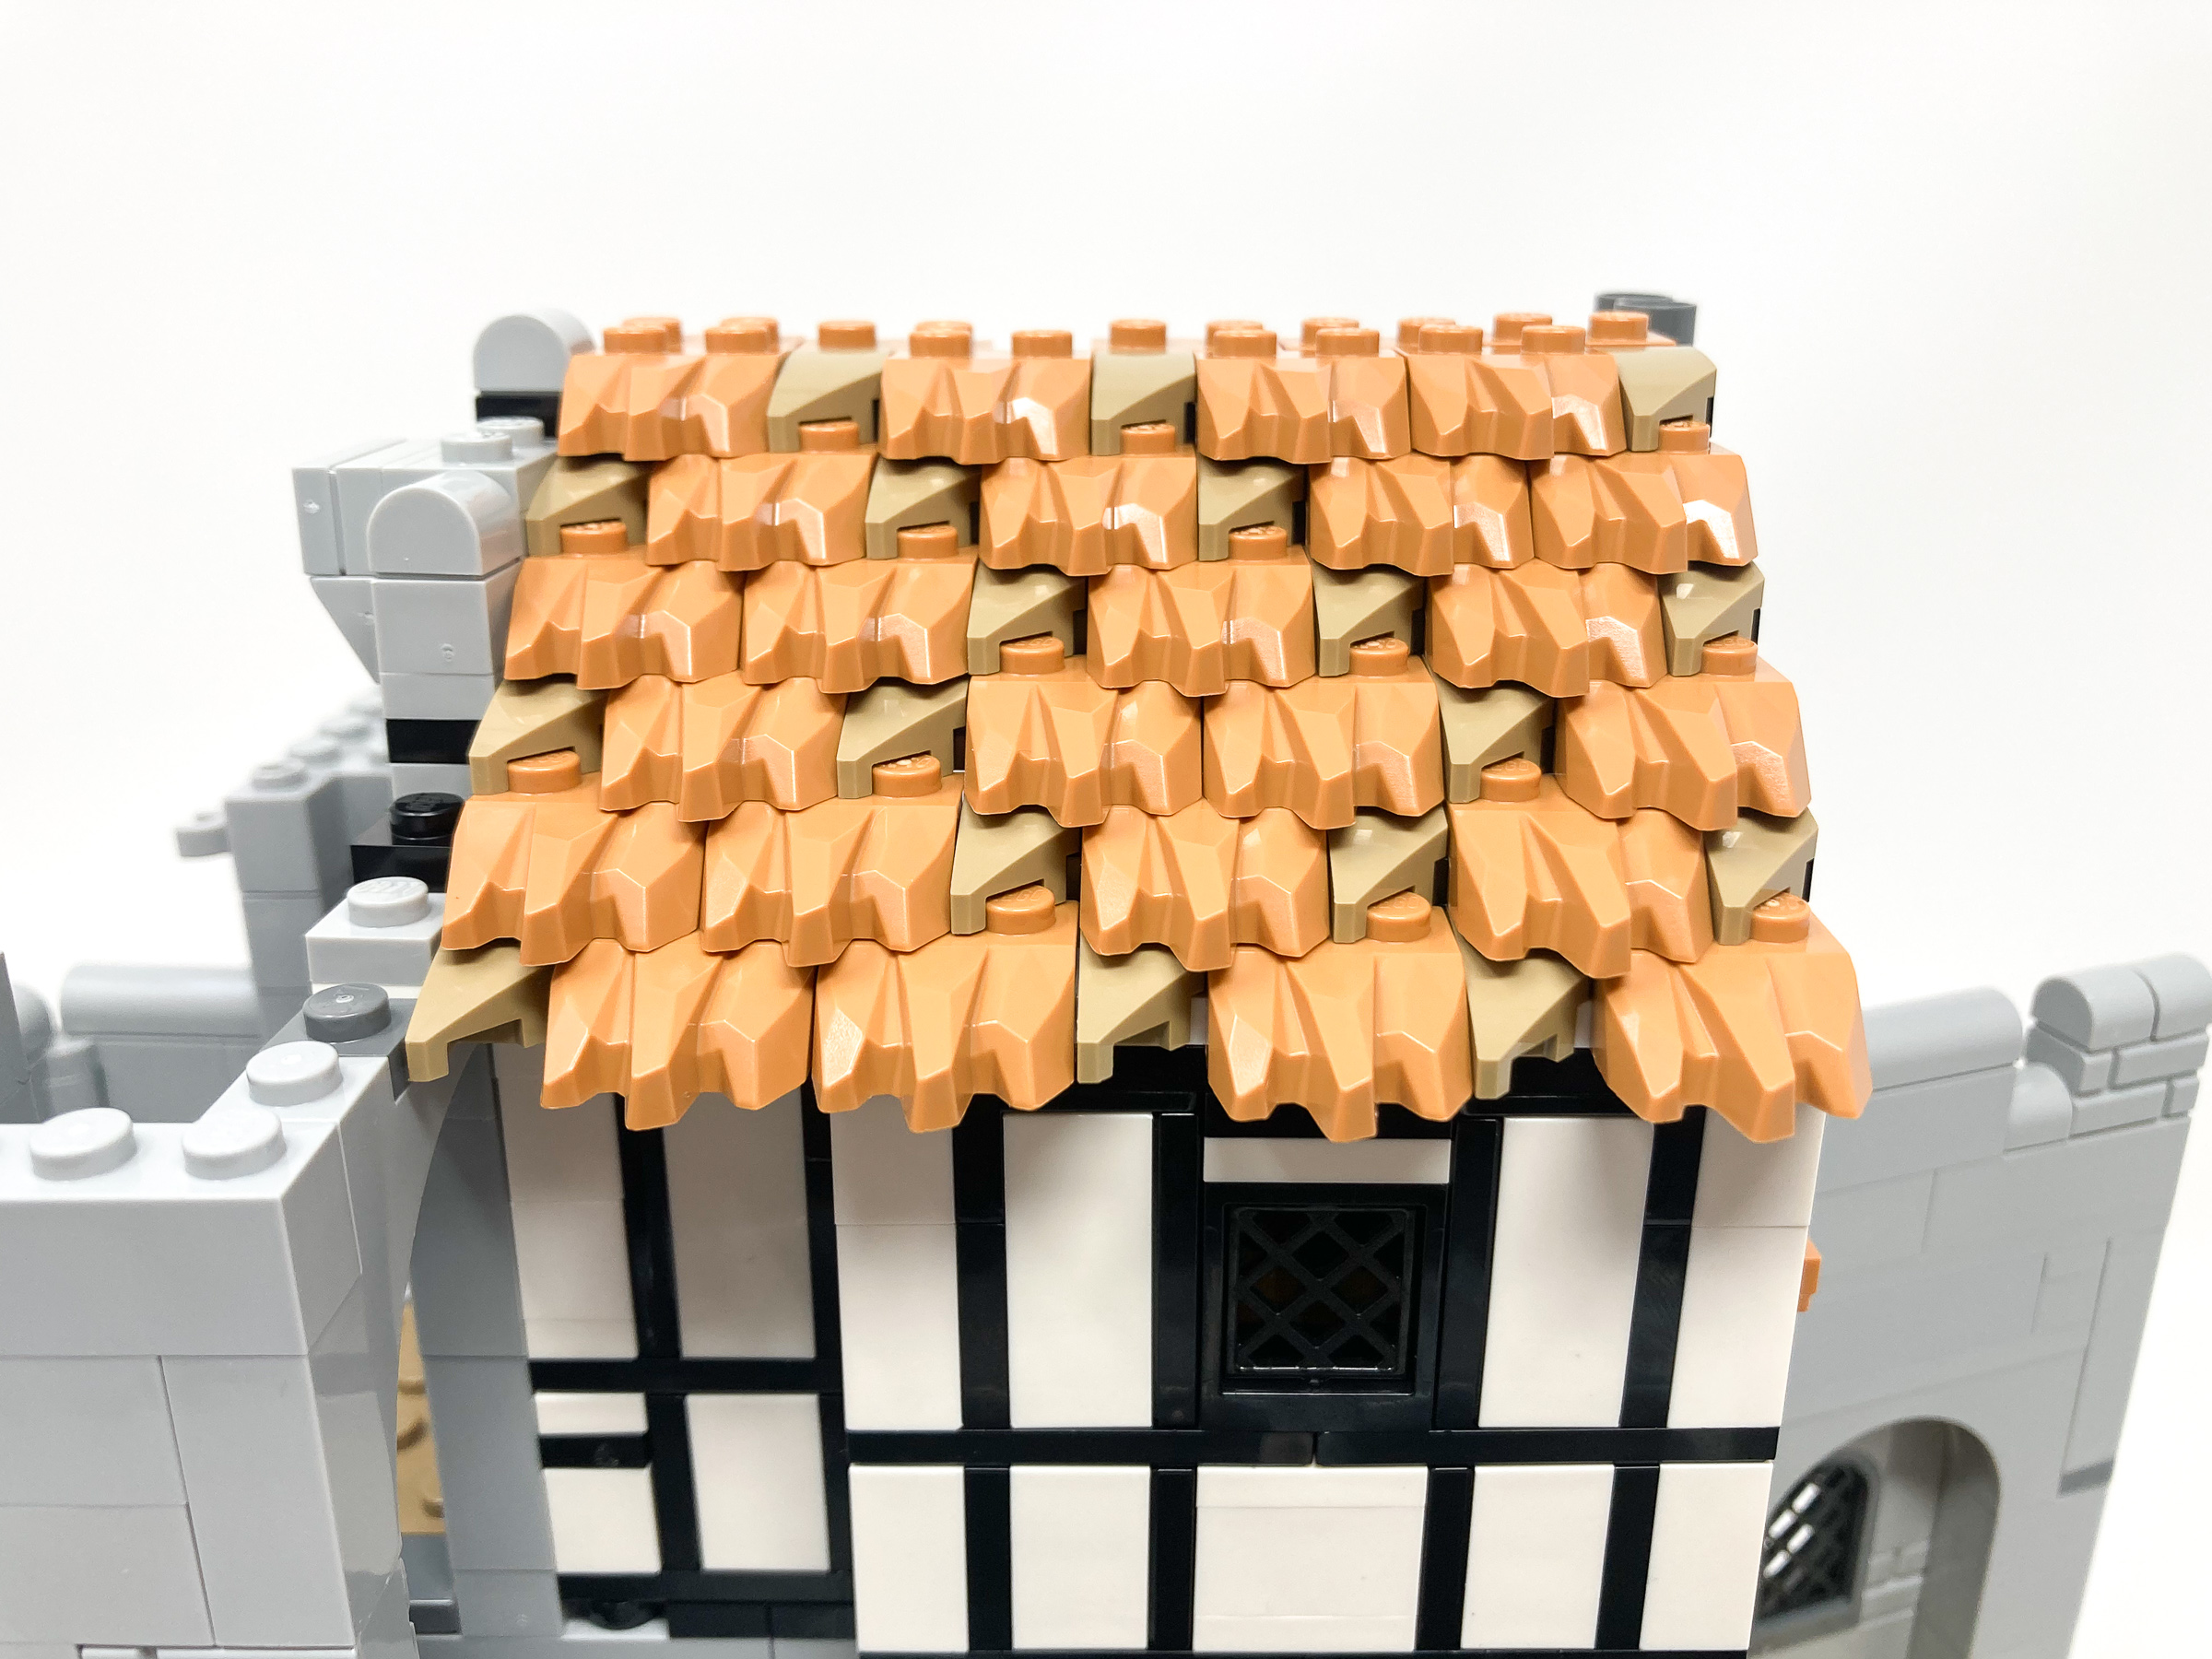
By interlaying different colors the roof looks more like straw like as there is dead straw between the fresh ones.
Bag 13 – Finishing off the first half of the castle
At the end of the first half, we add the final details to this half of the castle. More curved merlons are added and a final tall tower is built to act as a watchtower for the keep. This watchtower also houses a bell that is rang throughout the keep. The windows in this tower use the same pillars and arches used in the dining room window rather than the slits which makes the bell easy to see. As with all the other final changes on the castle’s perimeter there are no exposed studs with 1×1 curved tiles placed on their side adding a finishing flourish and depth to the tower. Adorning the towers, we also add our first cloth piece with the sigil of the Lion Knight’s flying high in the form of a flag.
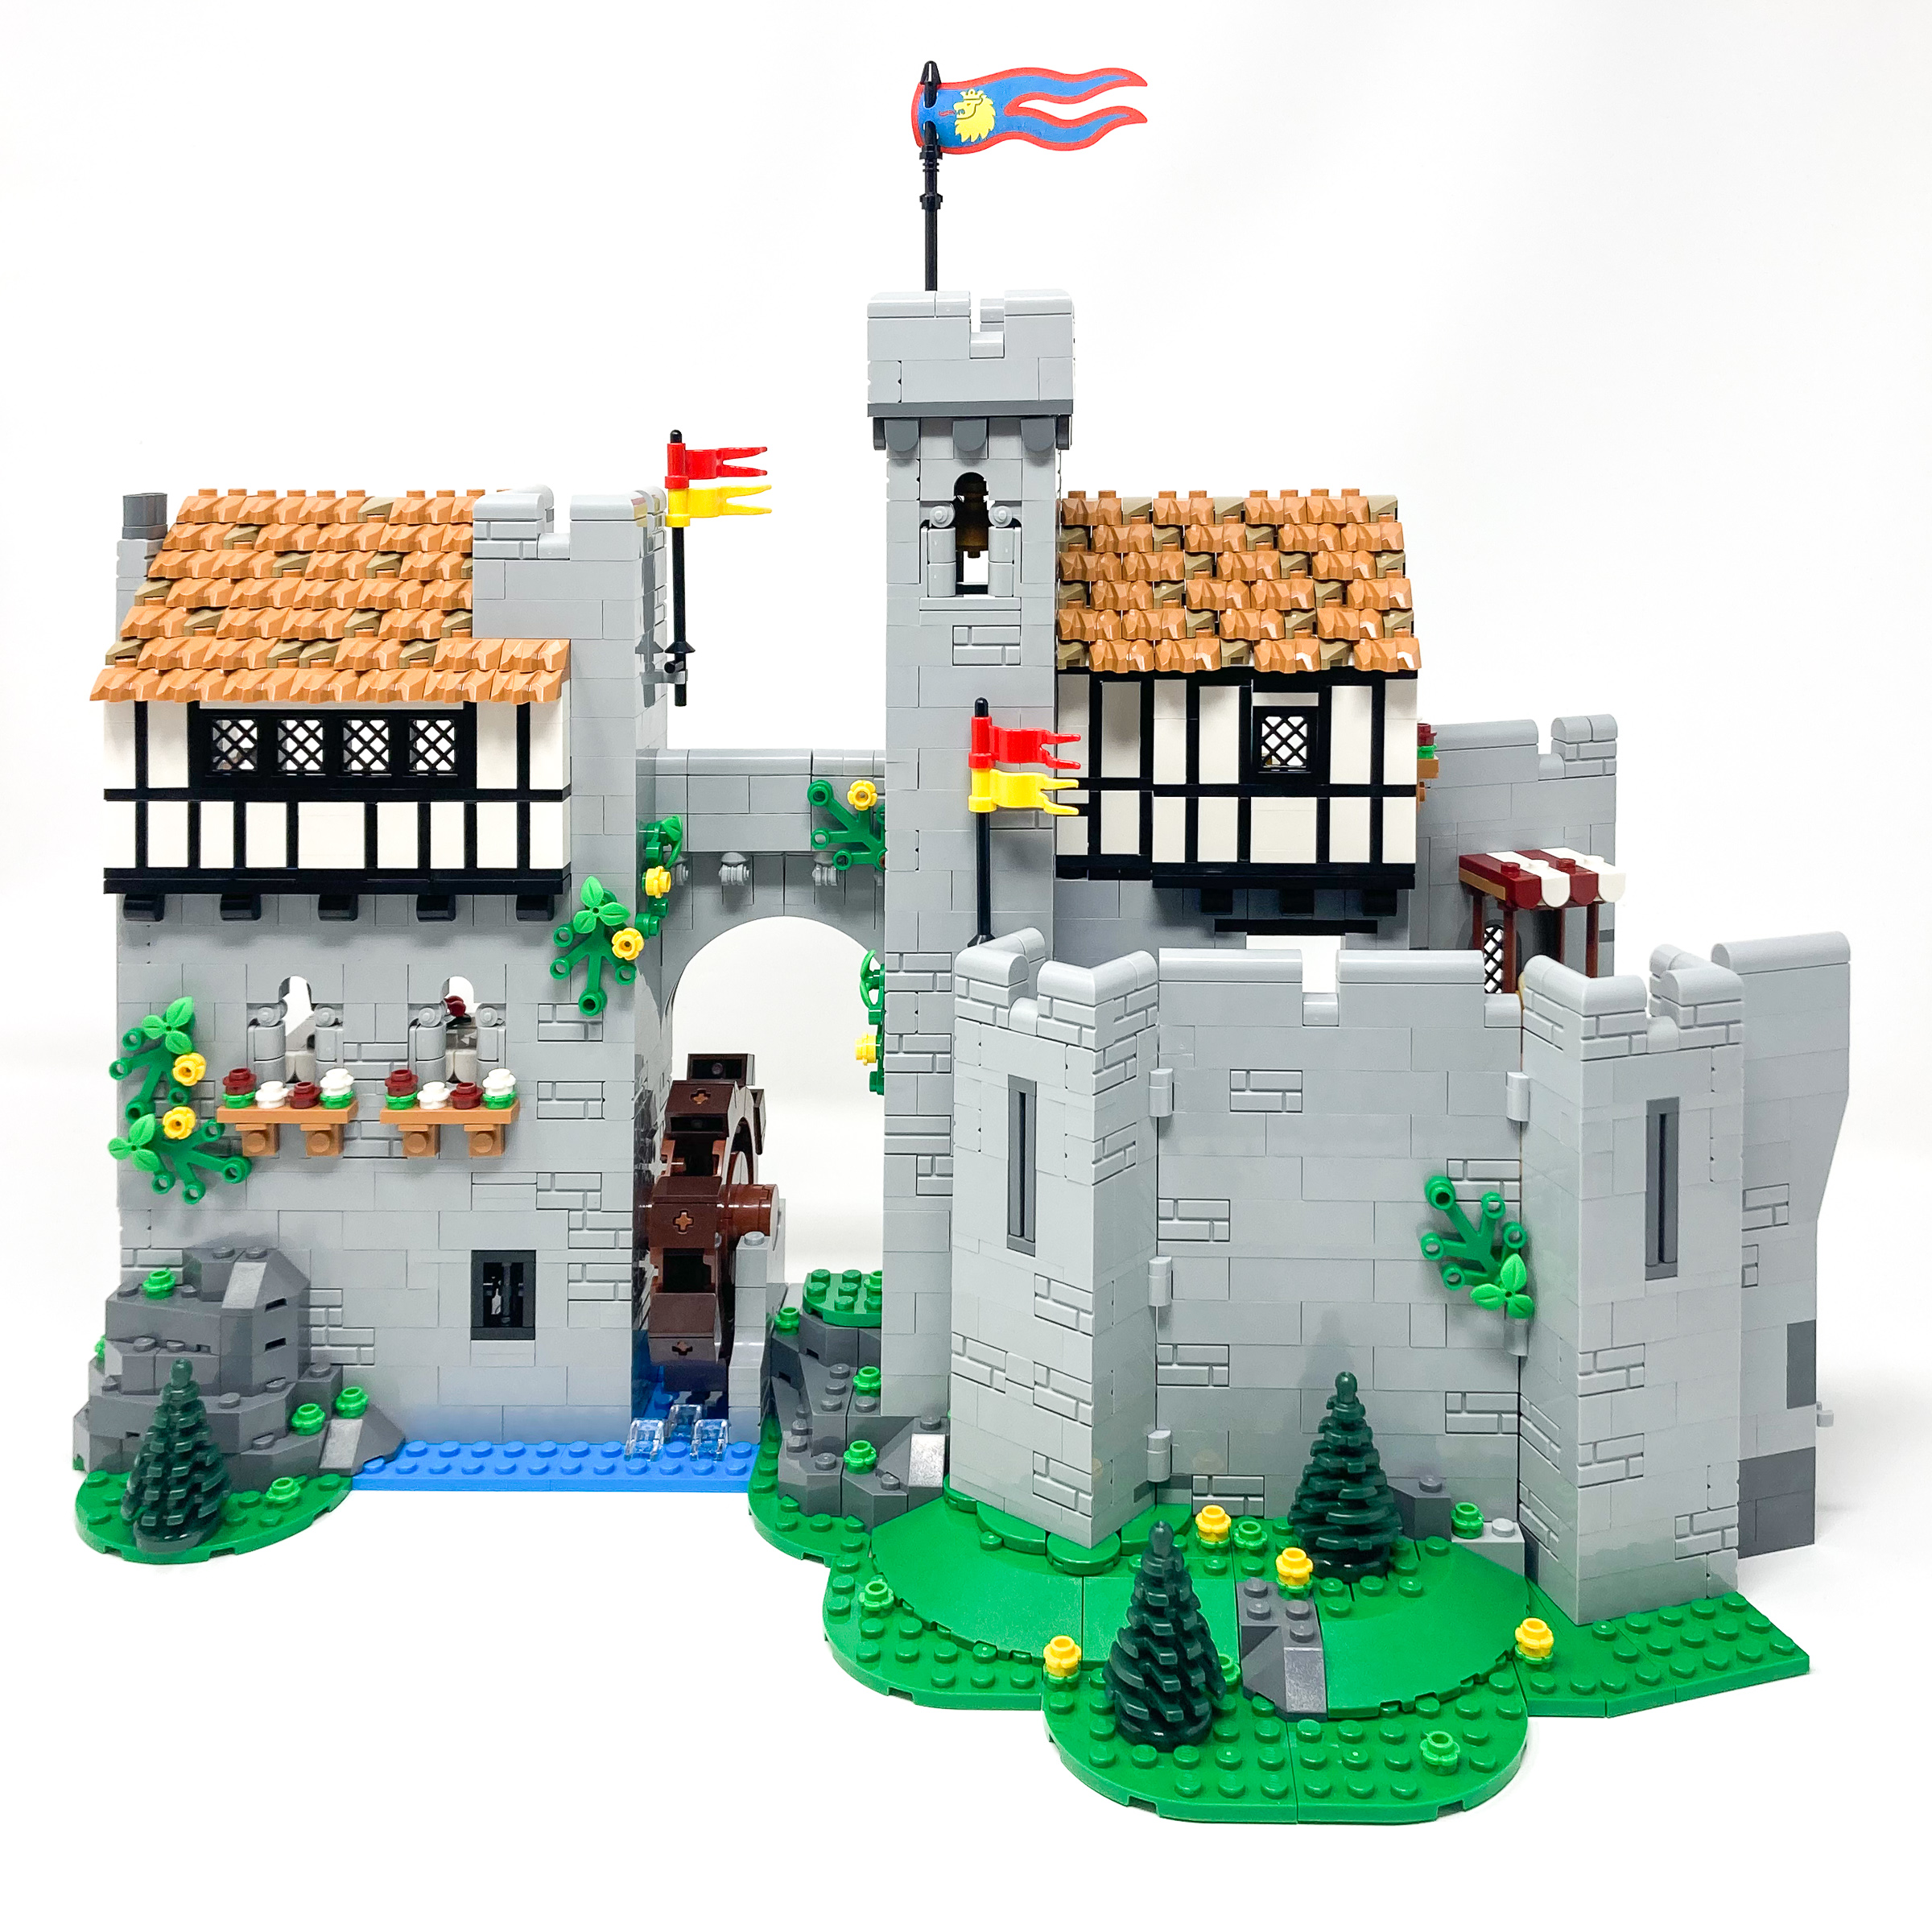
Despite being a dense packed castle we can open it up to make it look bigger.
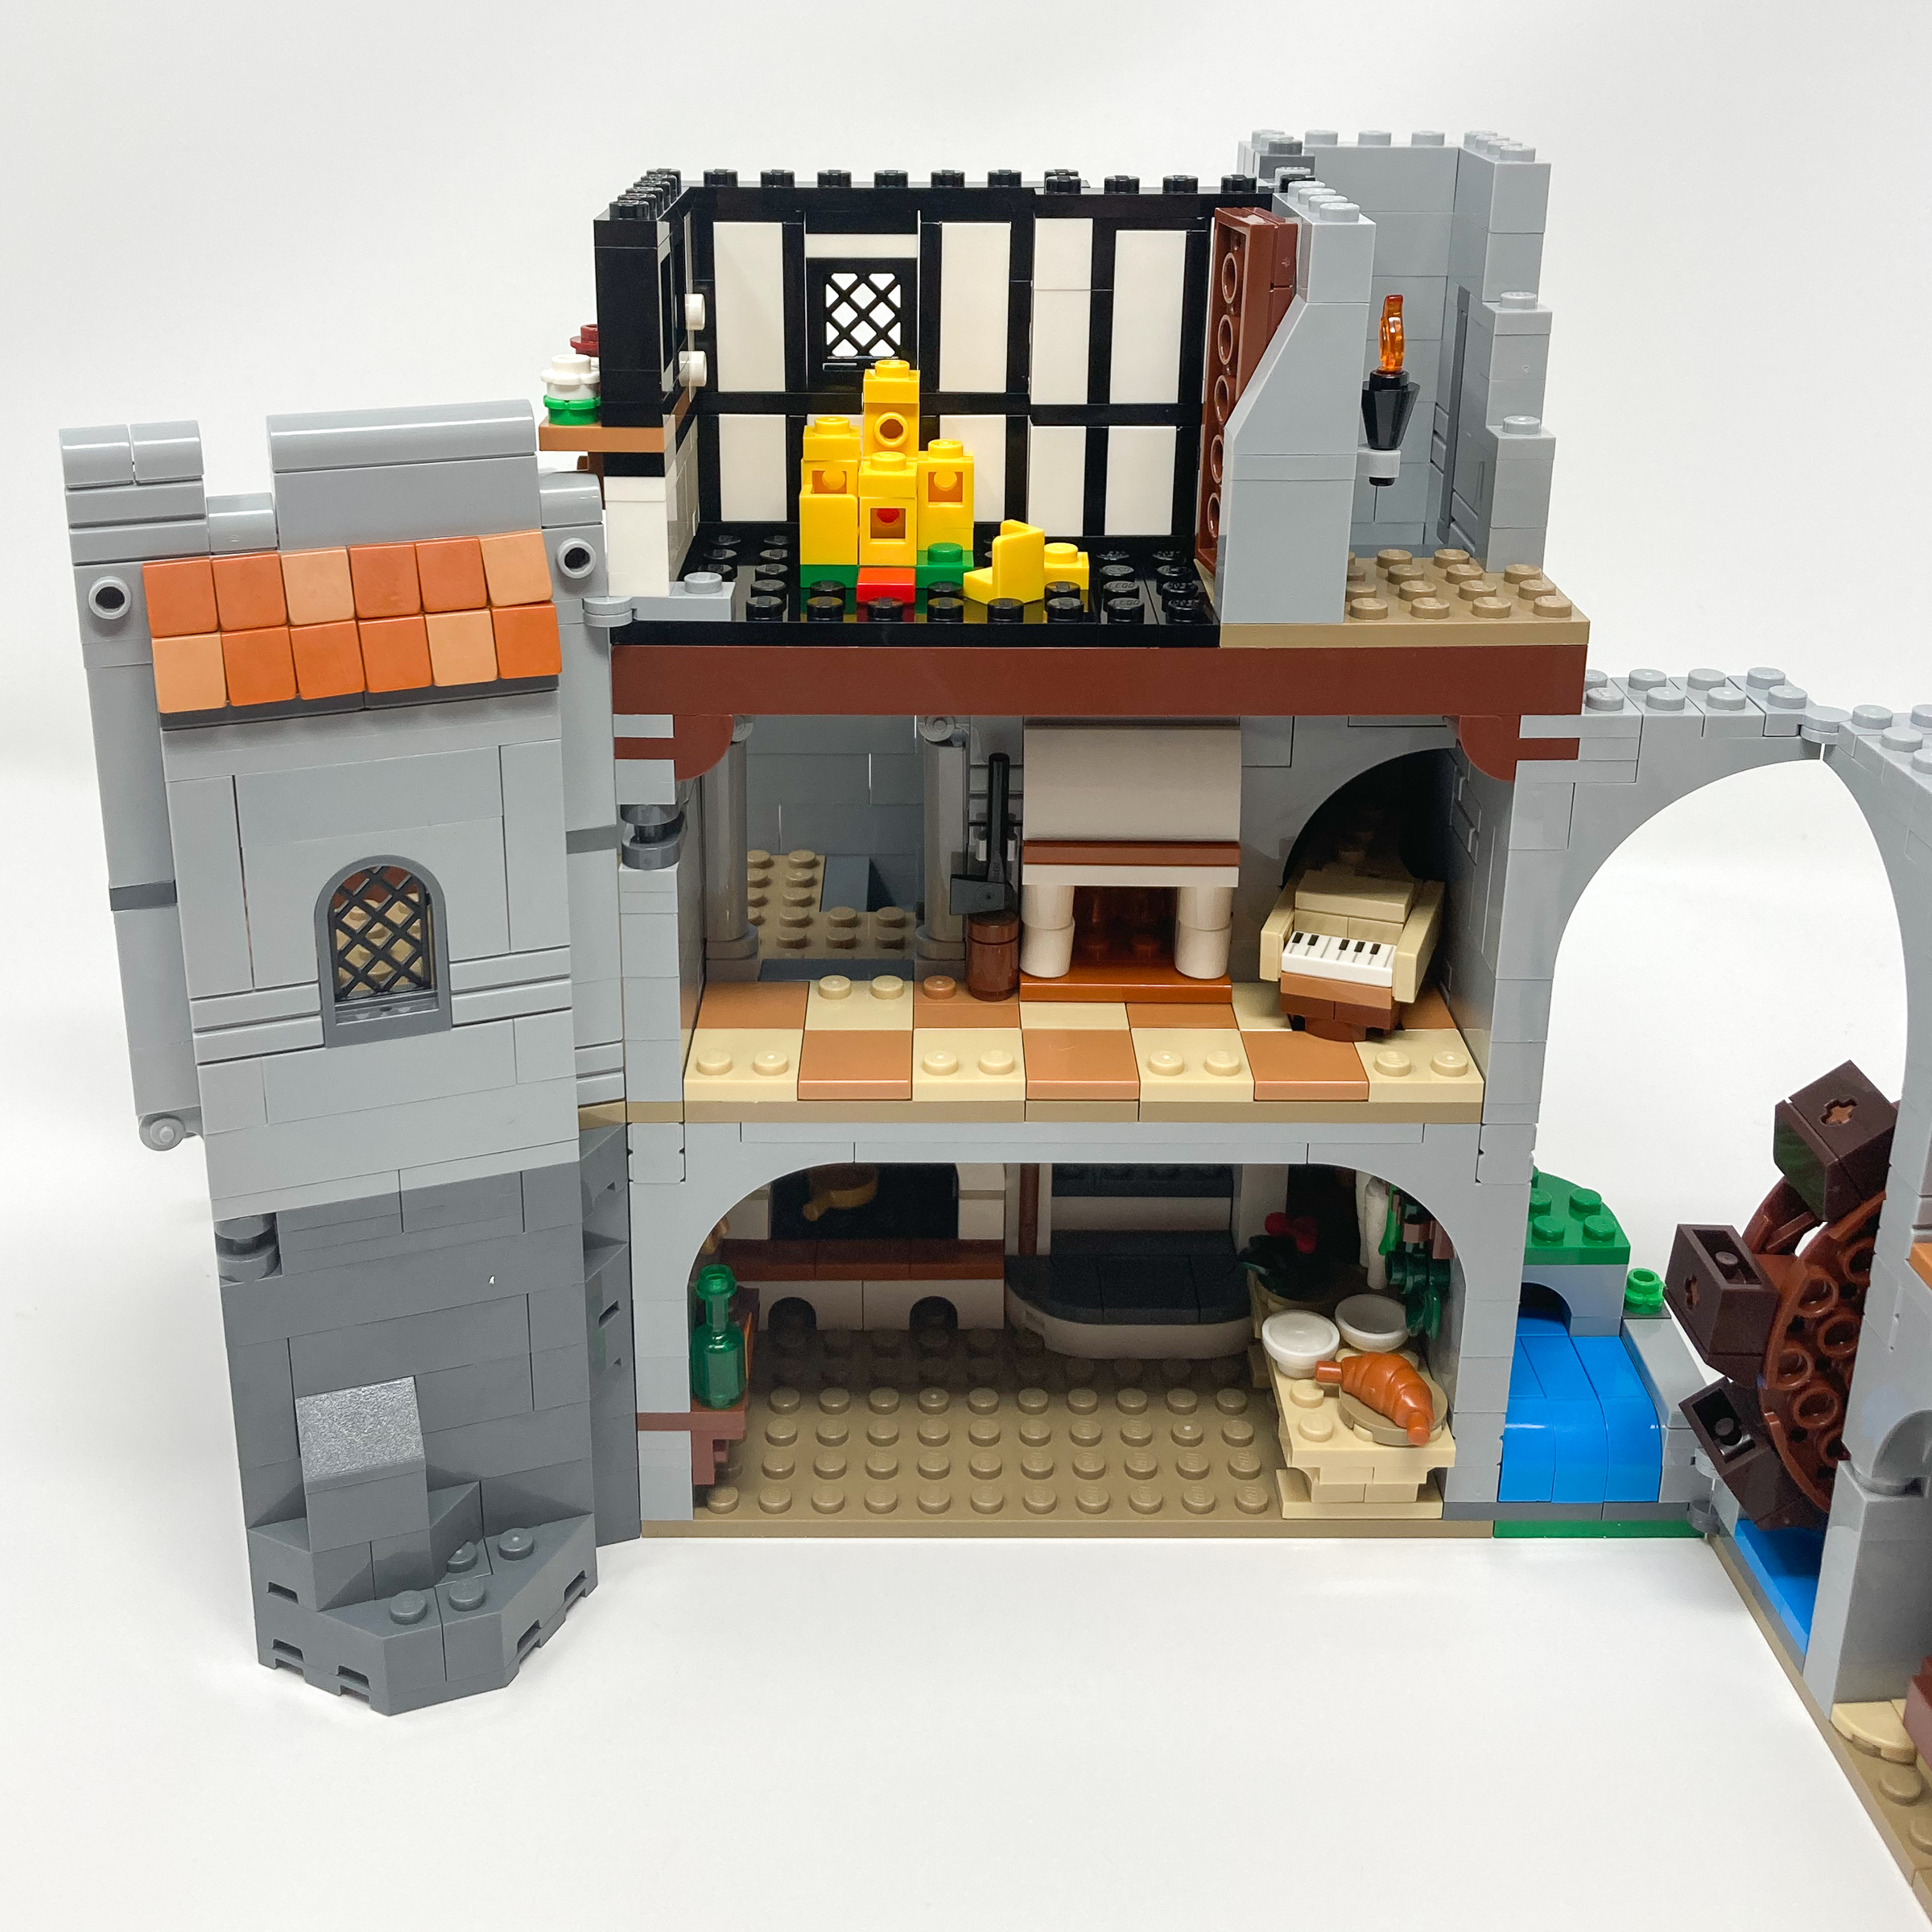
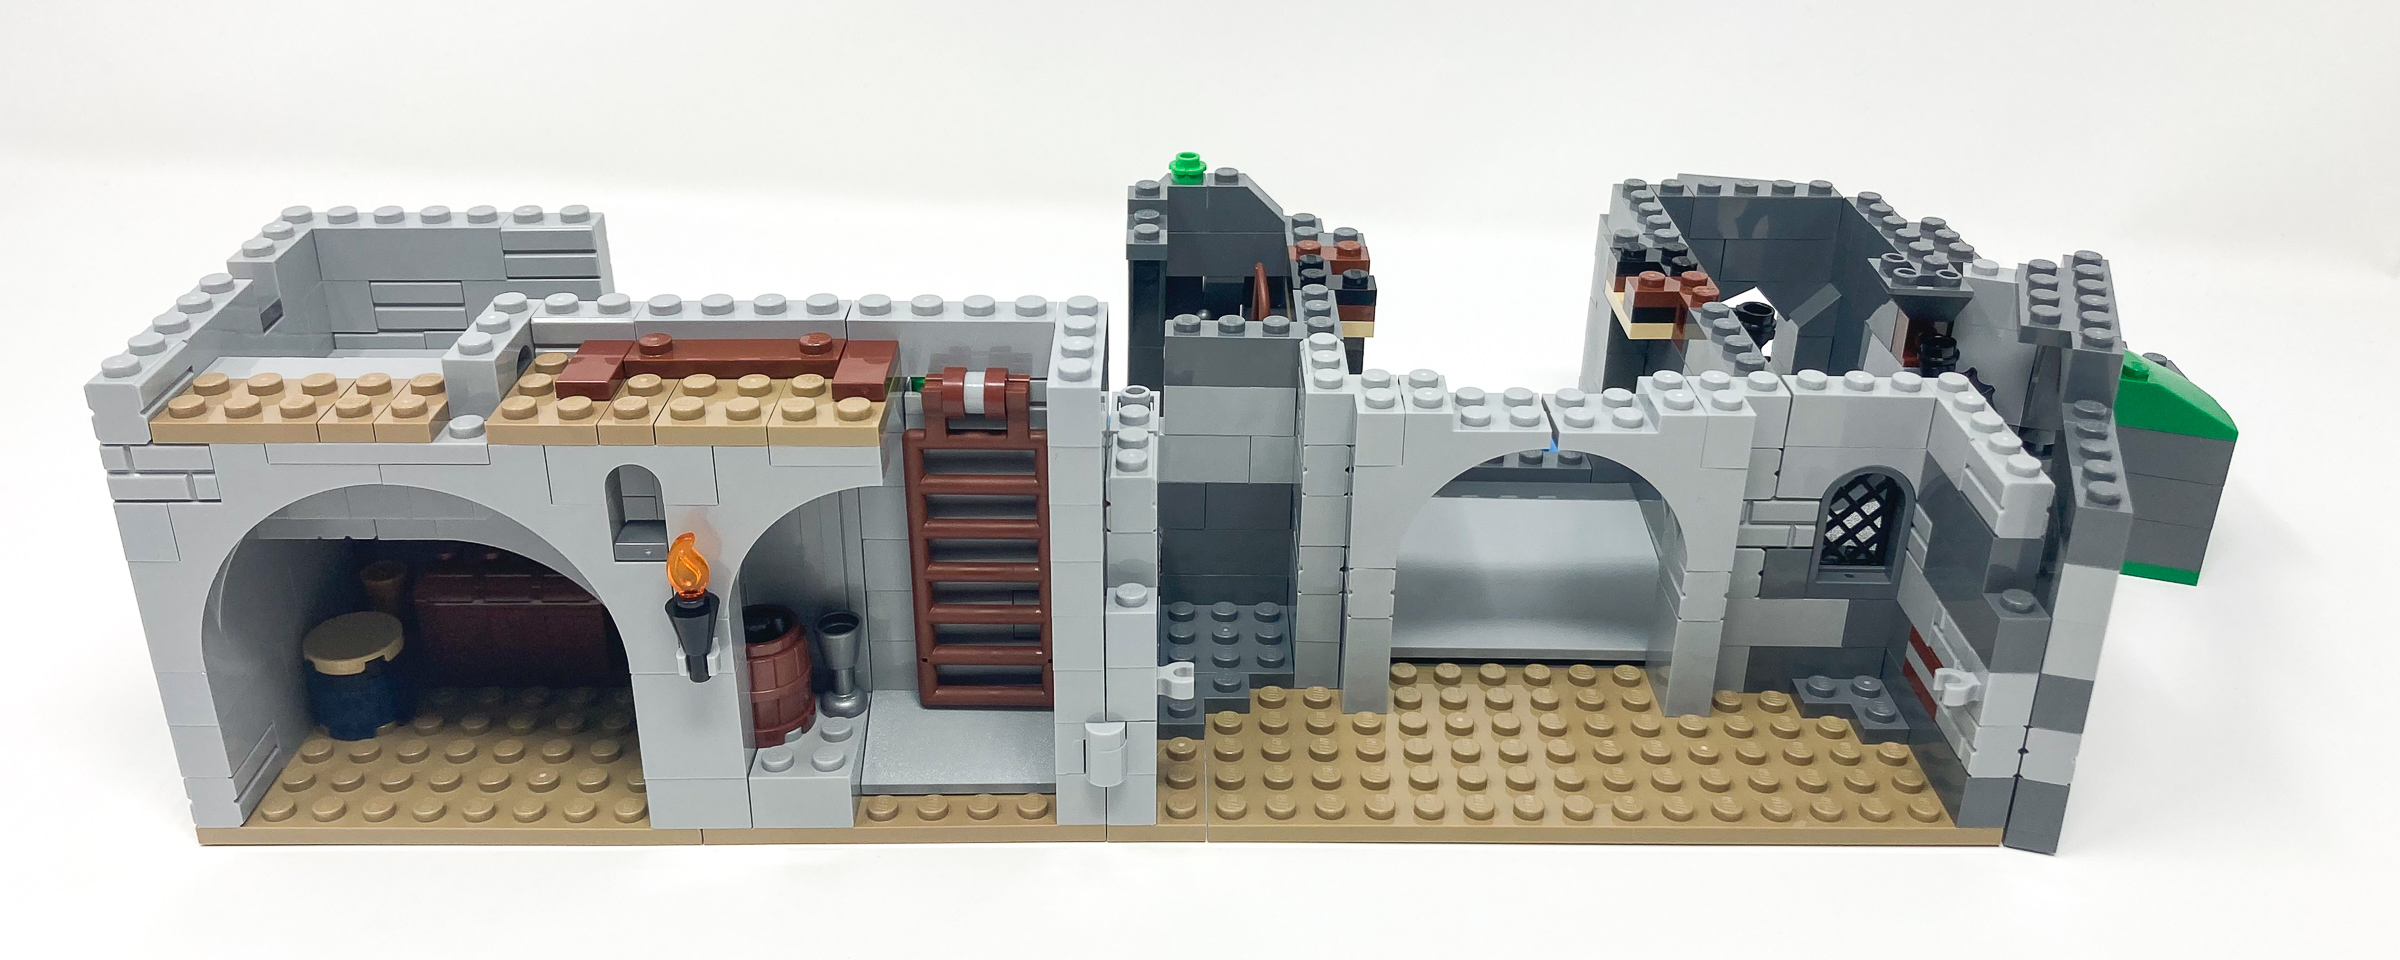
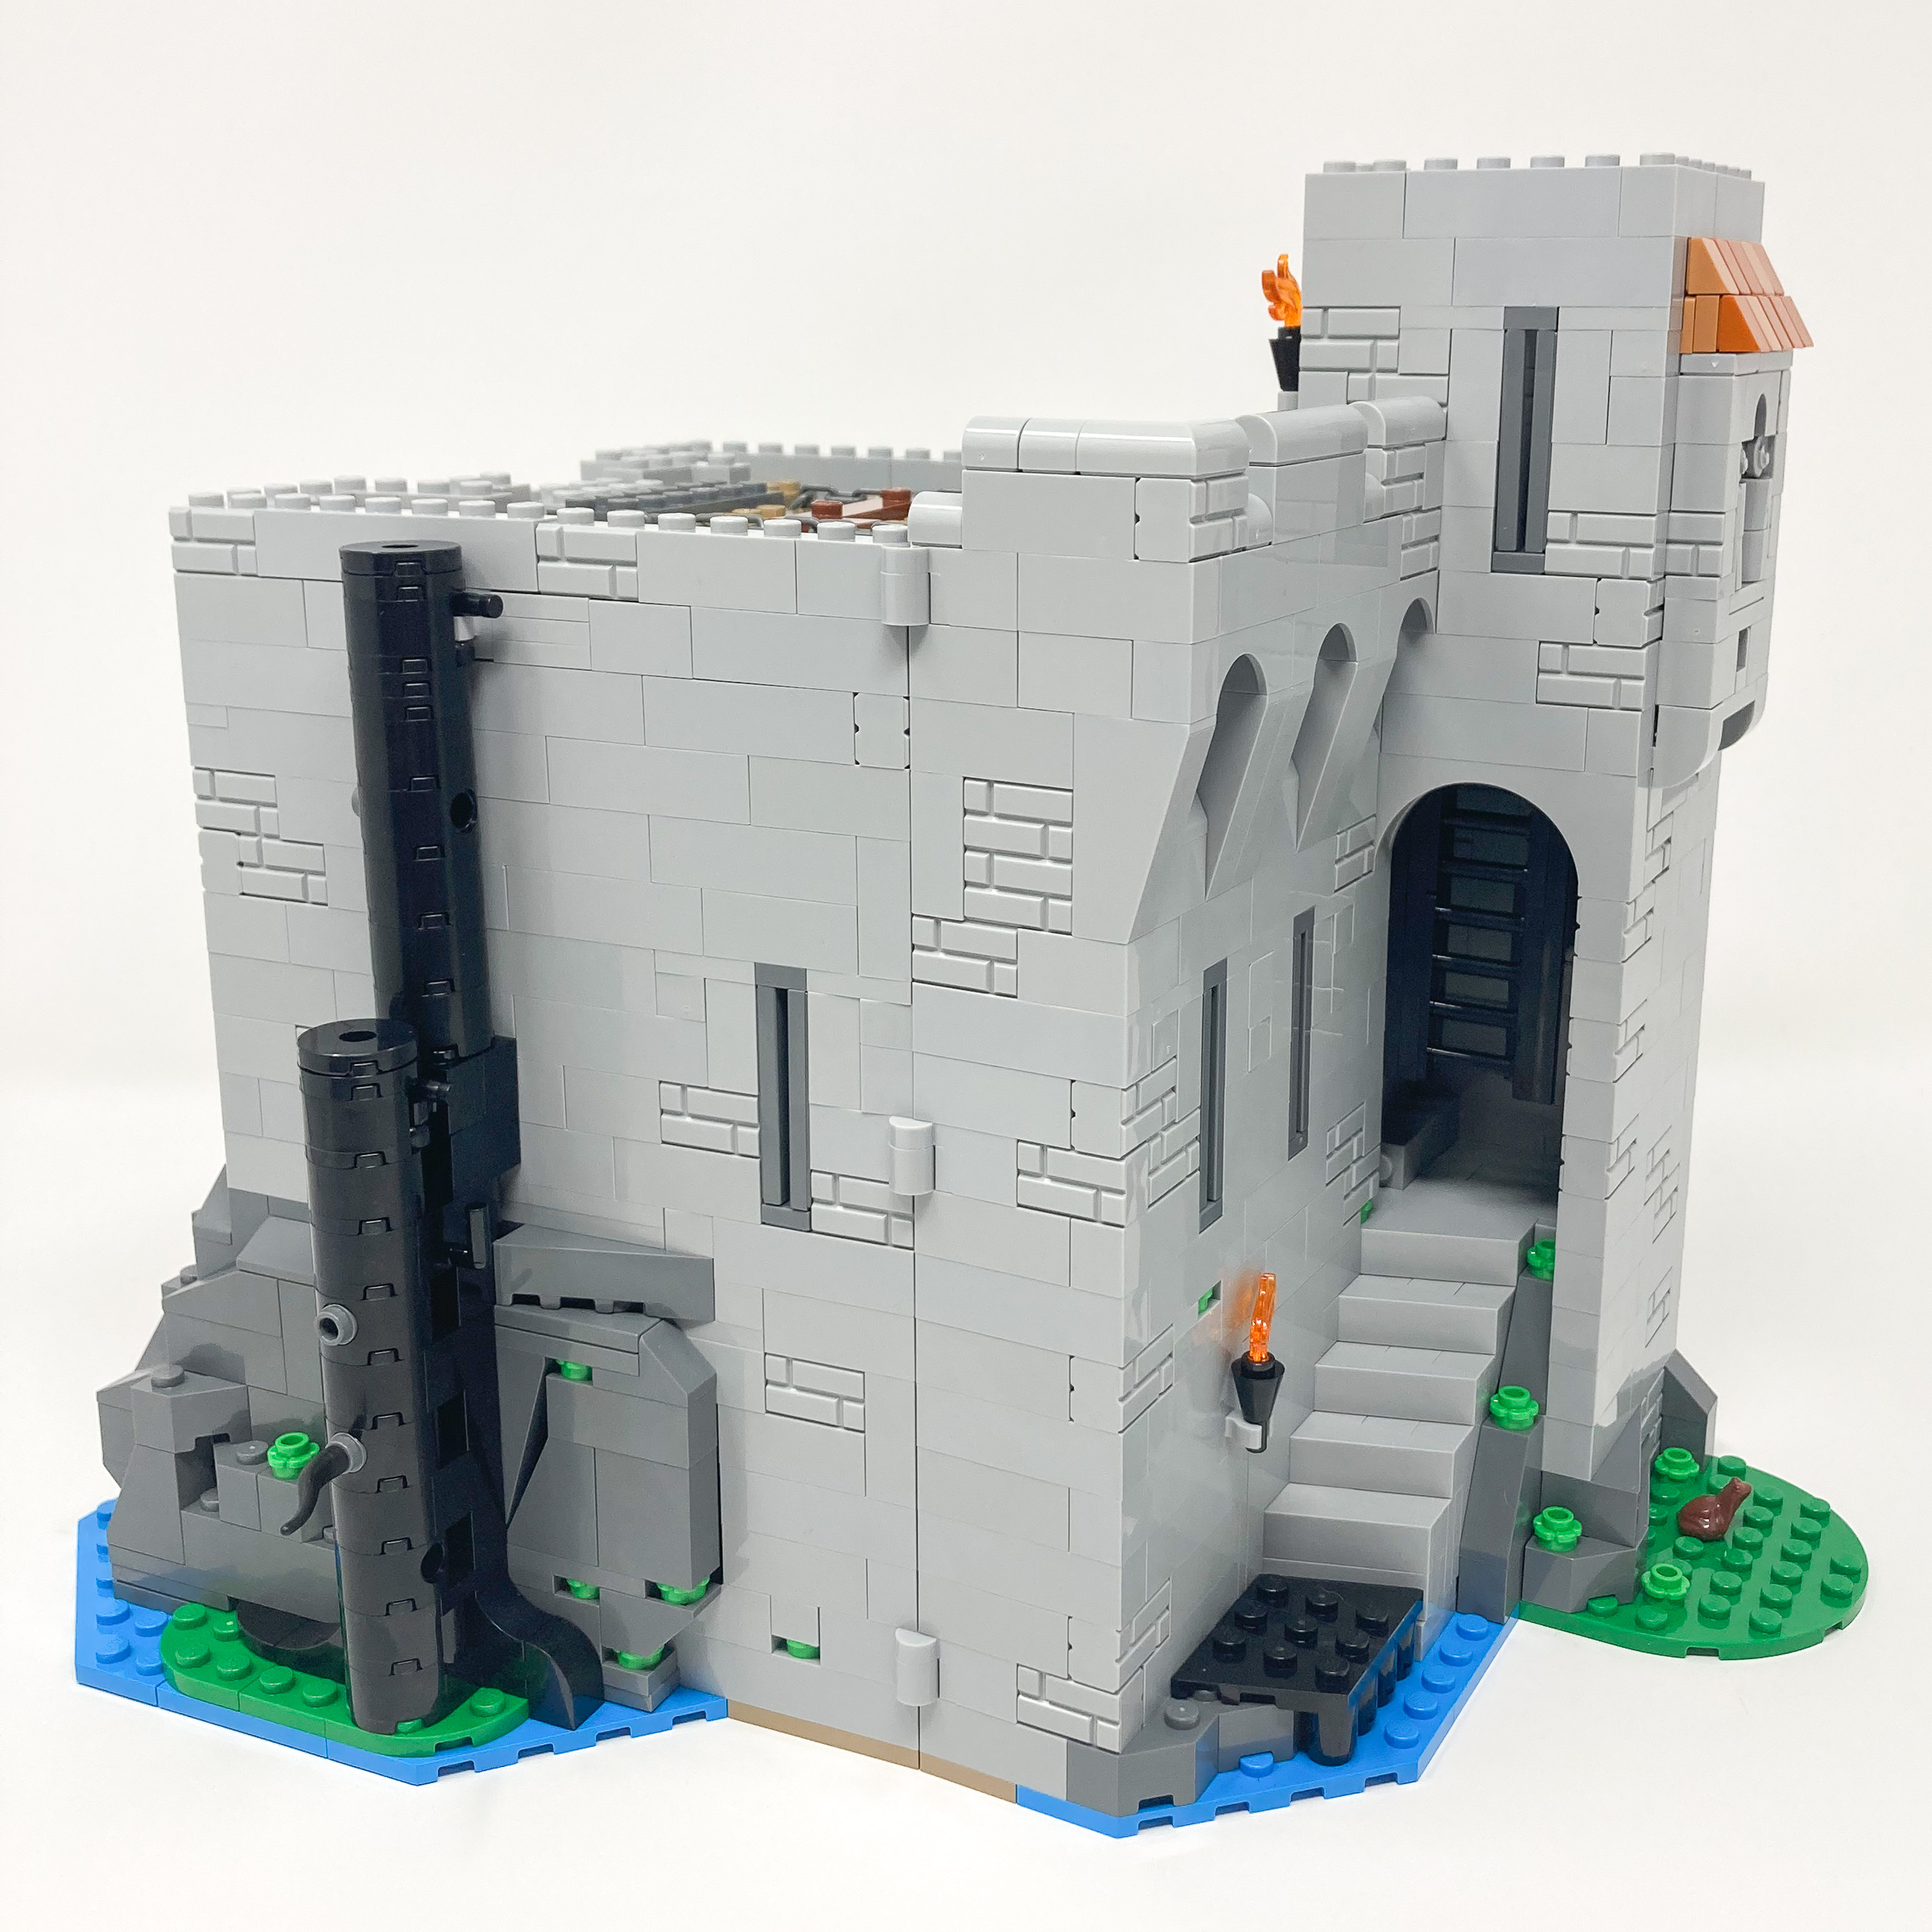
When the castle is closed together you see how dense everything is as the market, living quarters and alleyways are all tightly packed together. The farmer’s stall that we build in the first bag also fits nicely into the alleyway as citizens walk between the levels and safety within the castle. From the side we can even see the hidden lair built under the castle.
From the side cutout you can see the market and the hidden hideout underneath the castle.
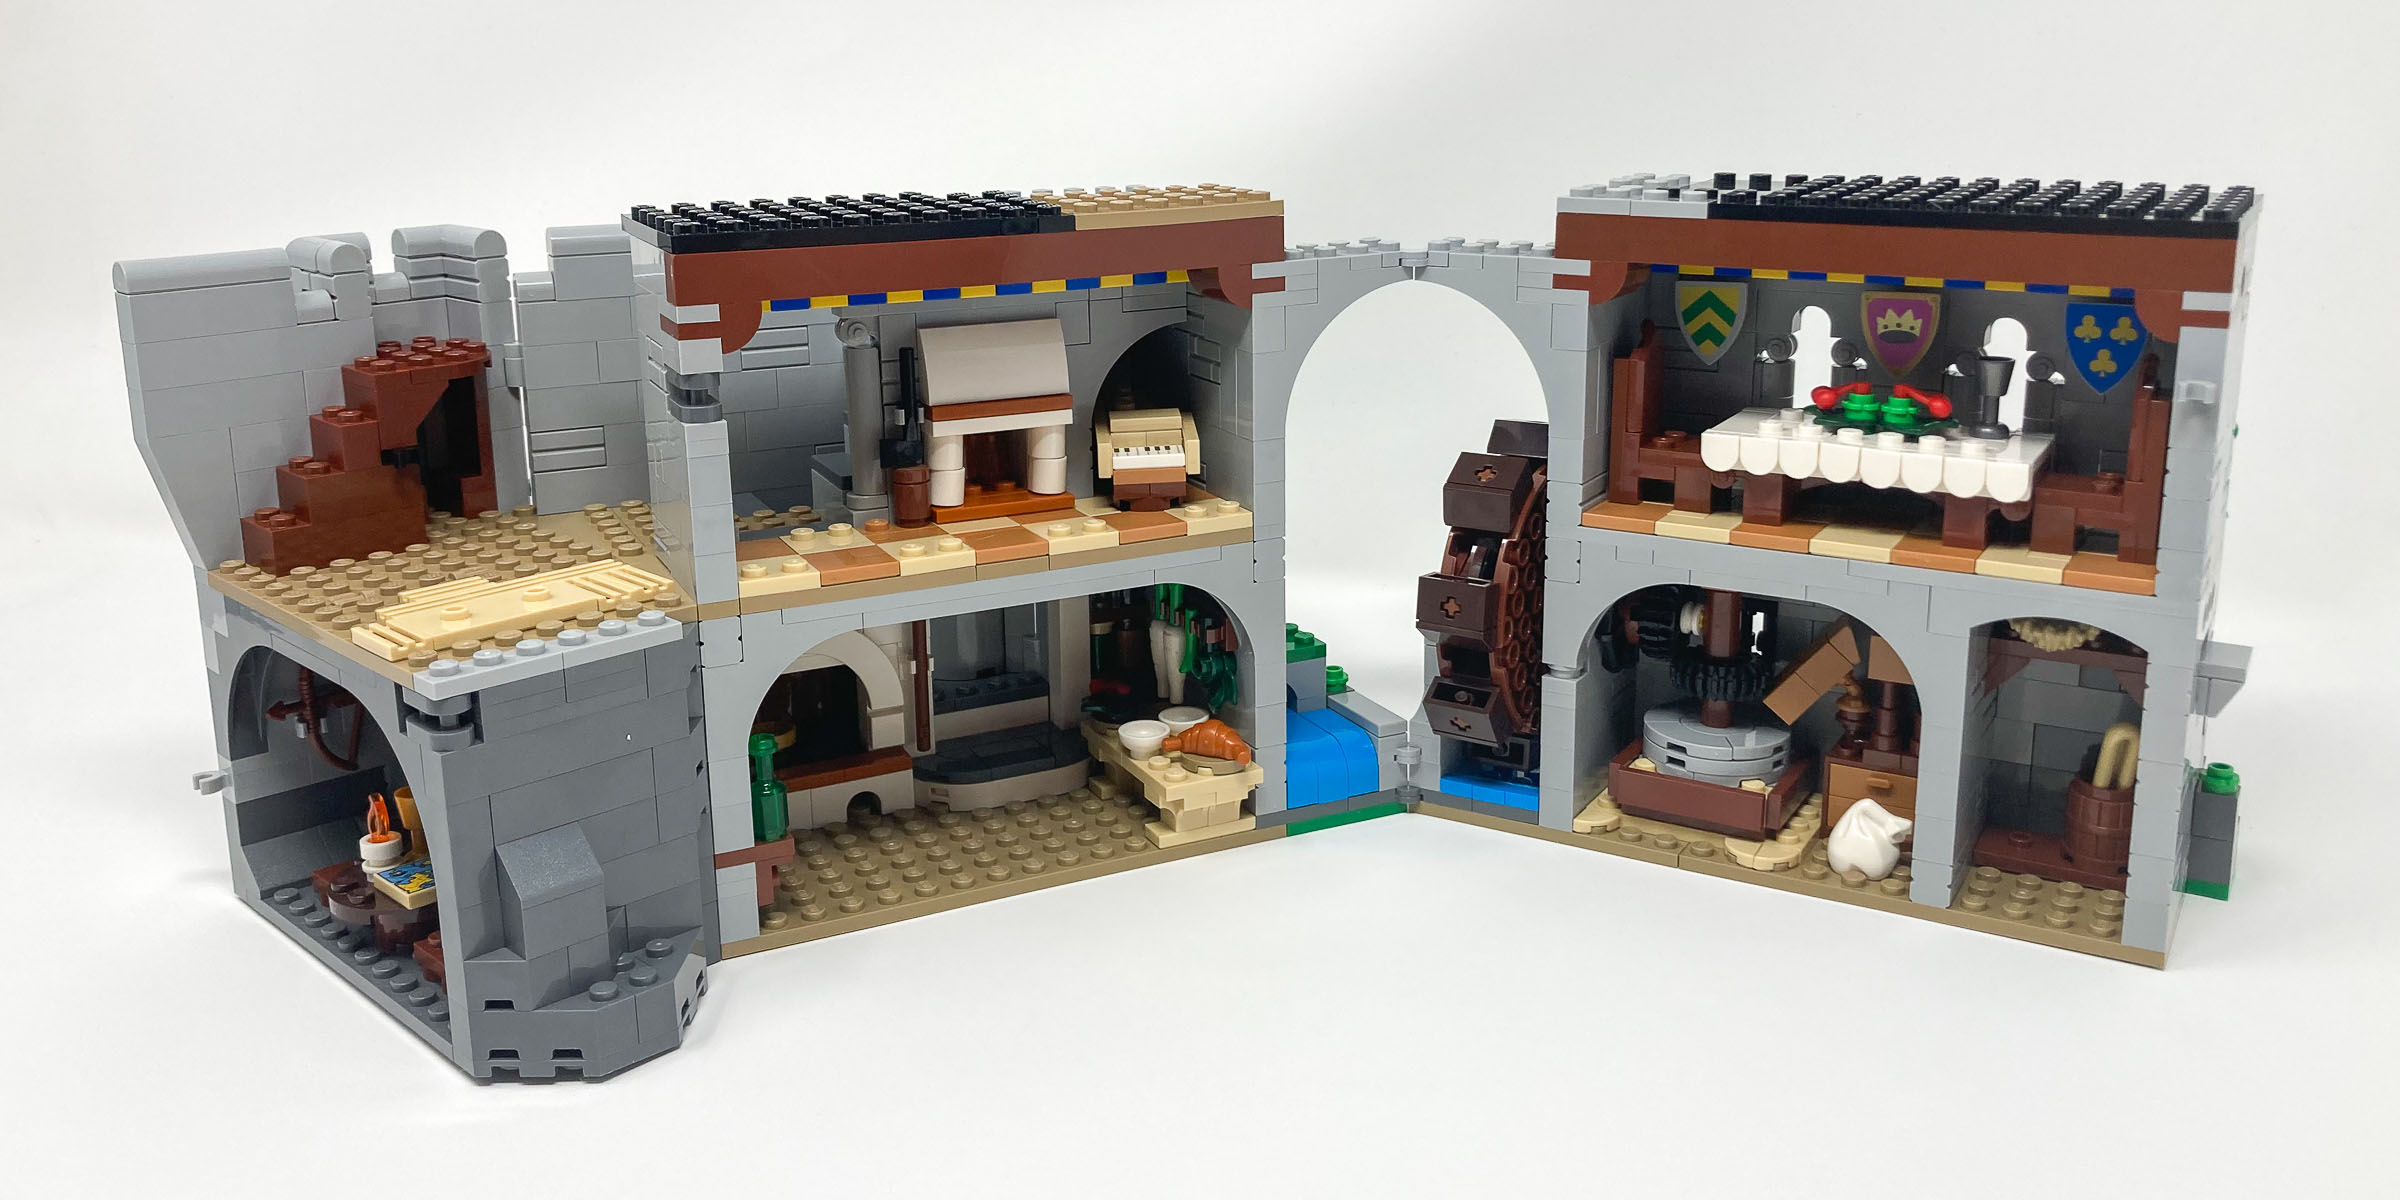
It is amazing how the castle looks so great when displayed both open and closed. The sense of scale and size of this set feels much larger when opened and rather than building high we build wide. Each of the hallways and rooms we build when looked from outside almost makes two halves of the same space look as two separate rooms which was creatively designed with arches connecting the two halves.

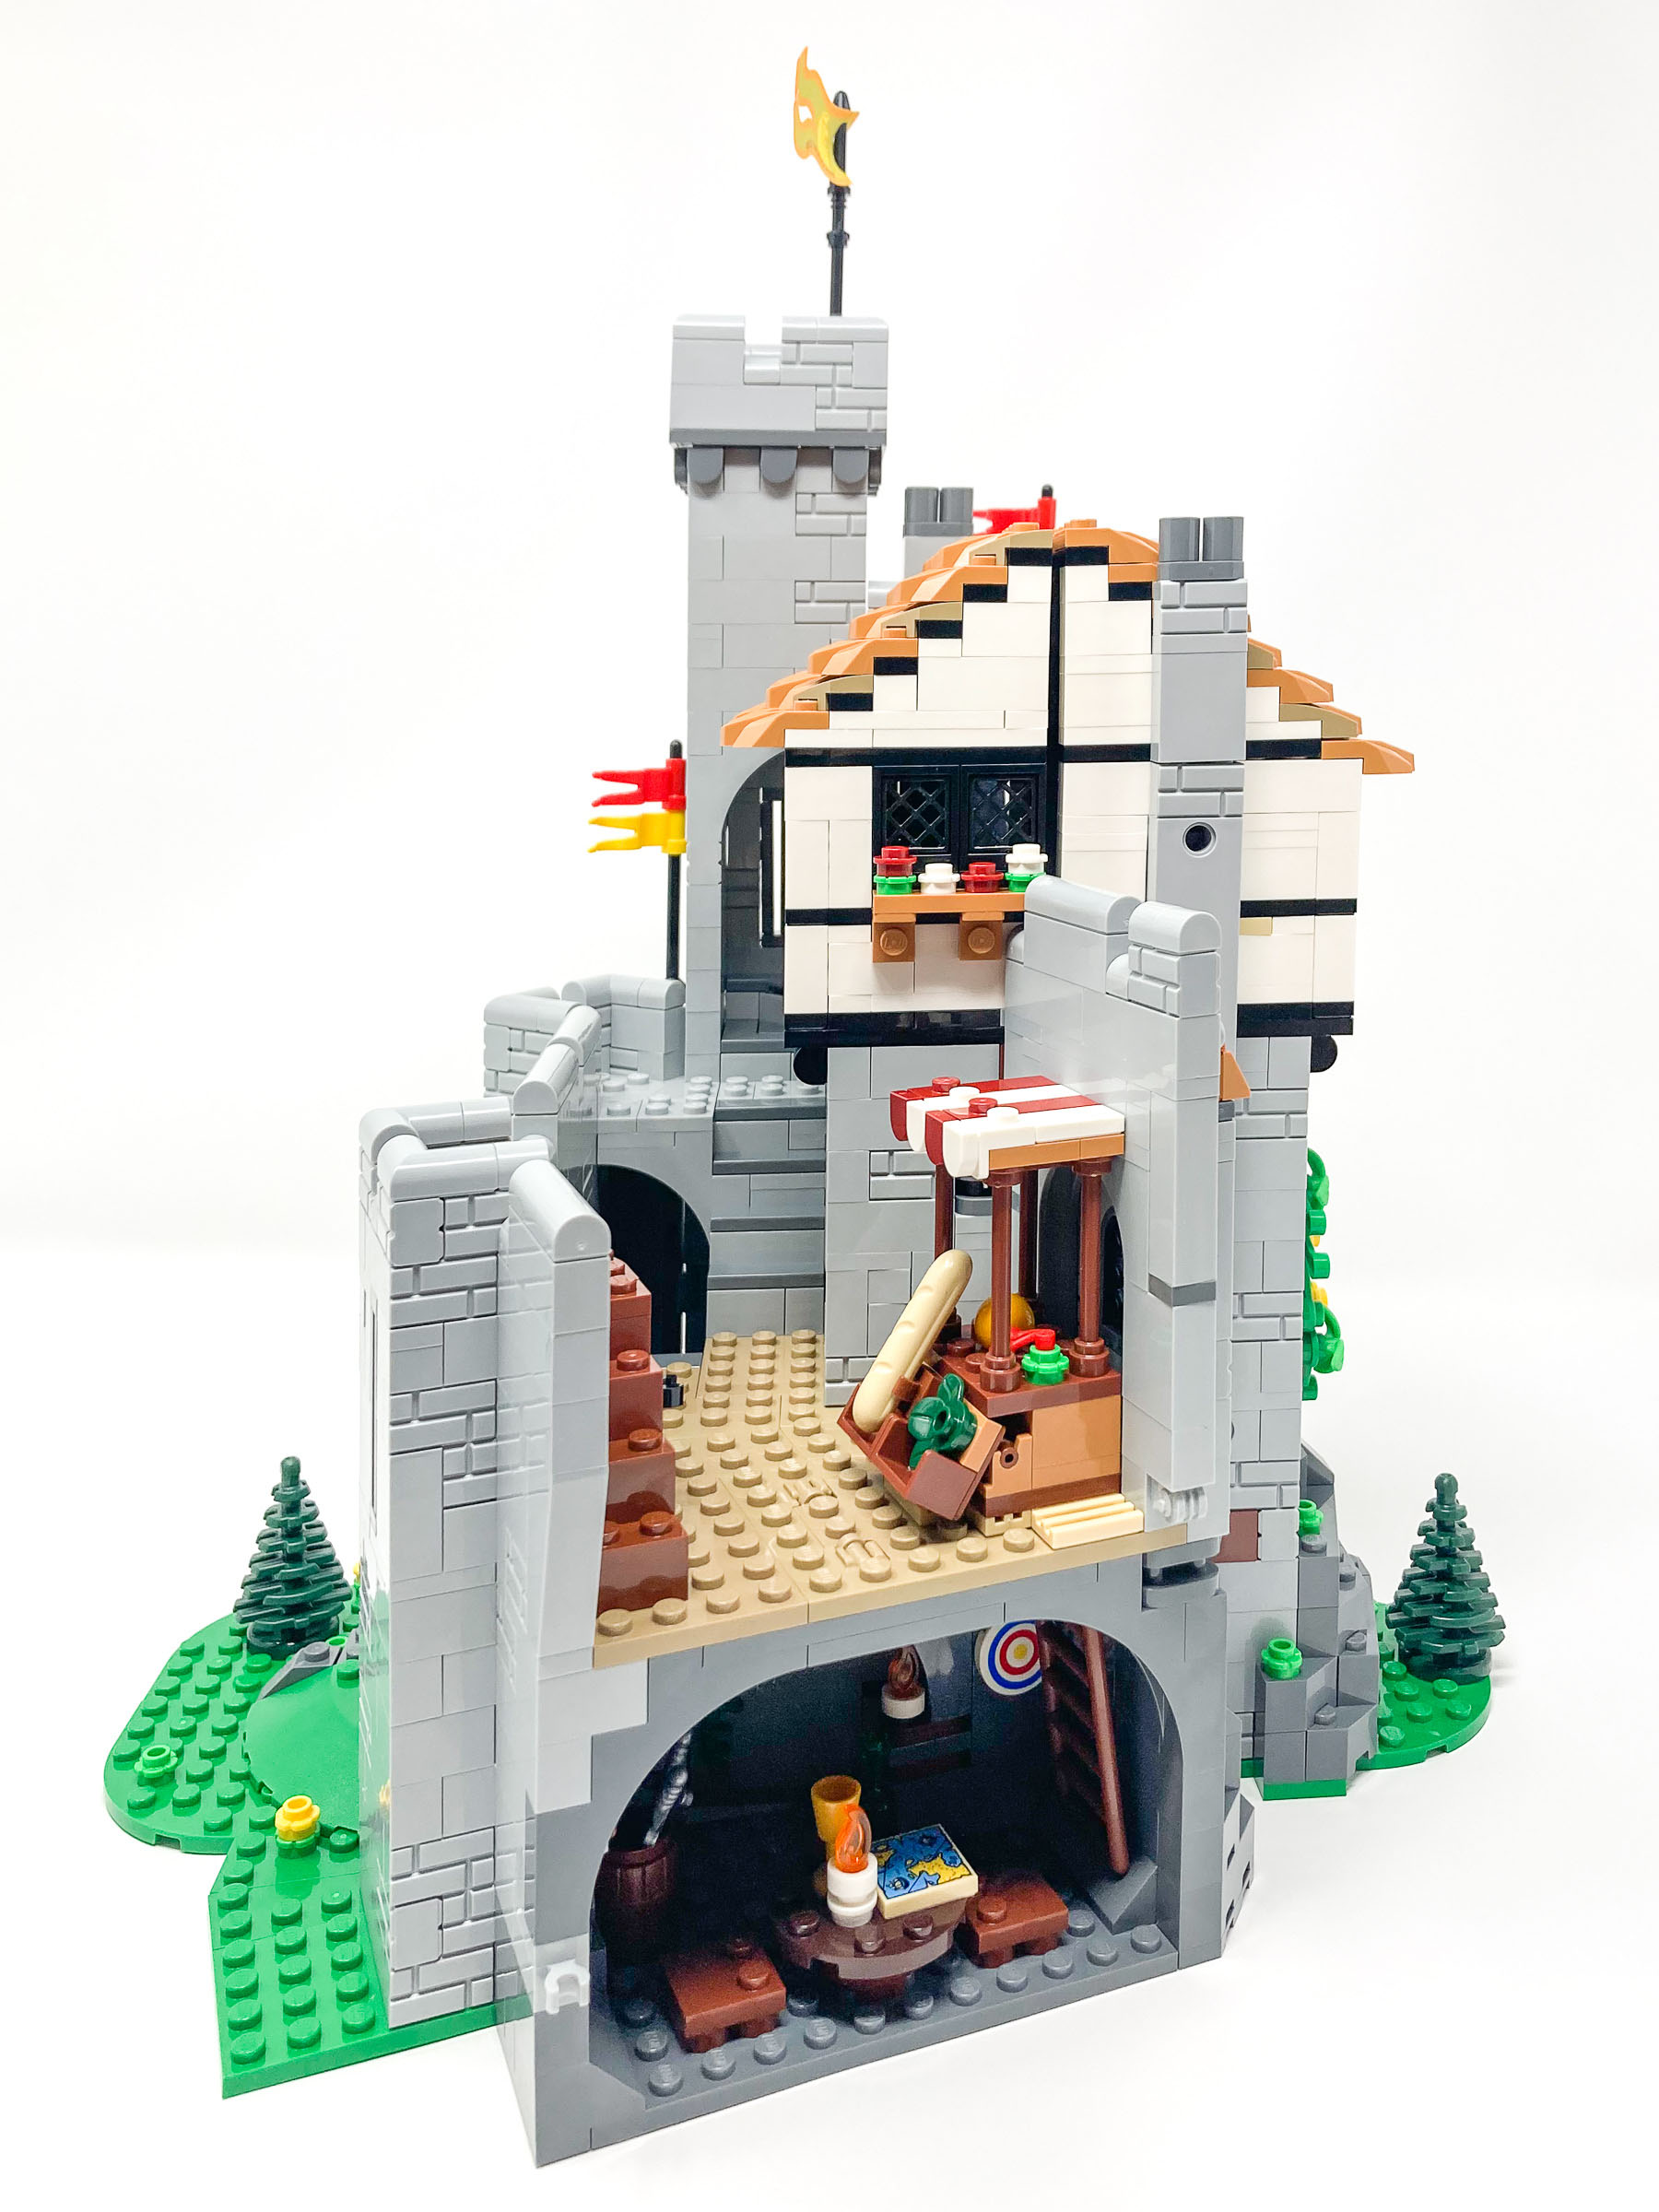
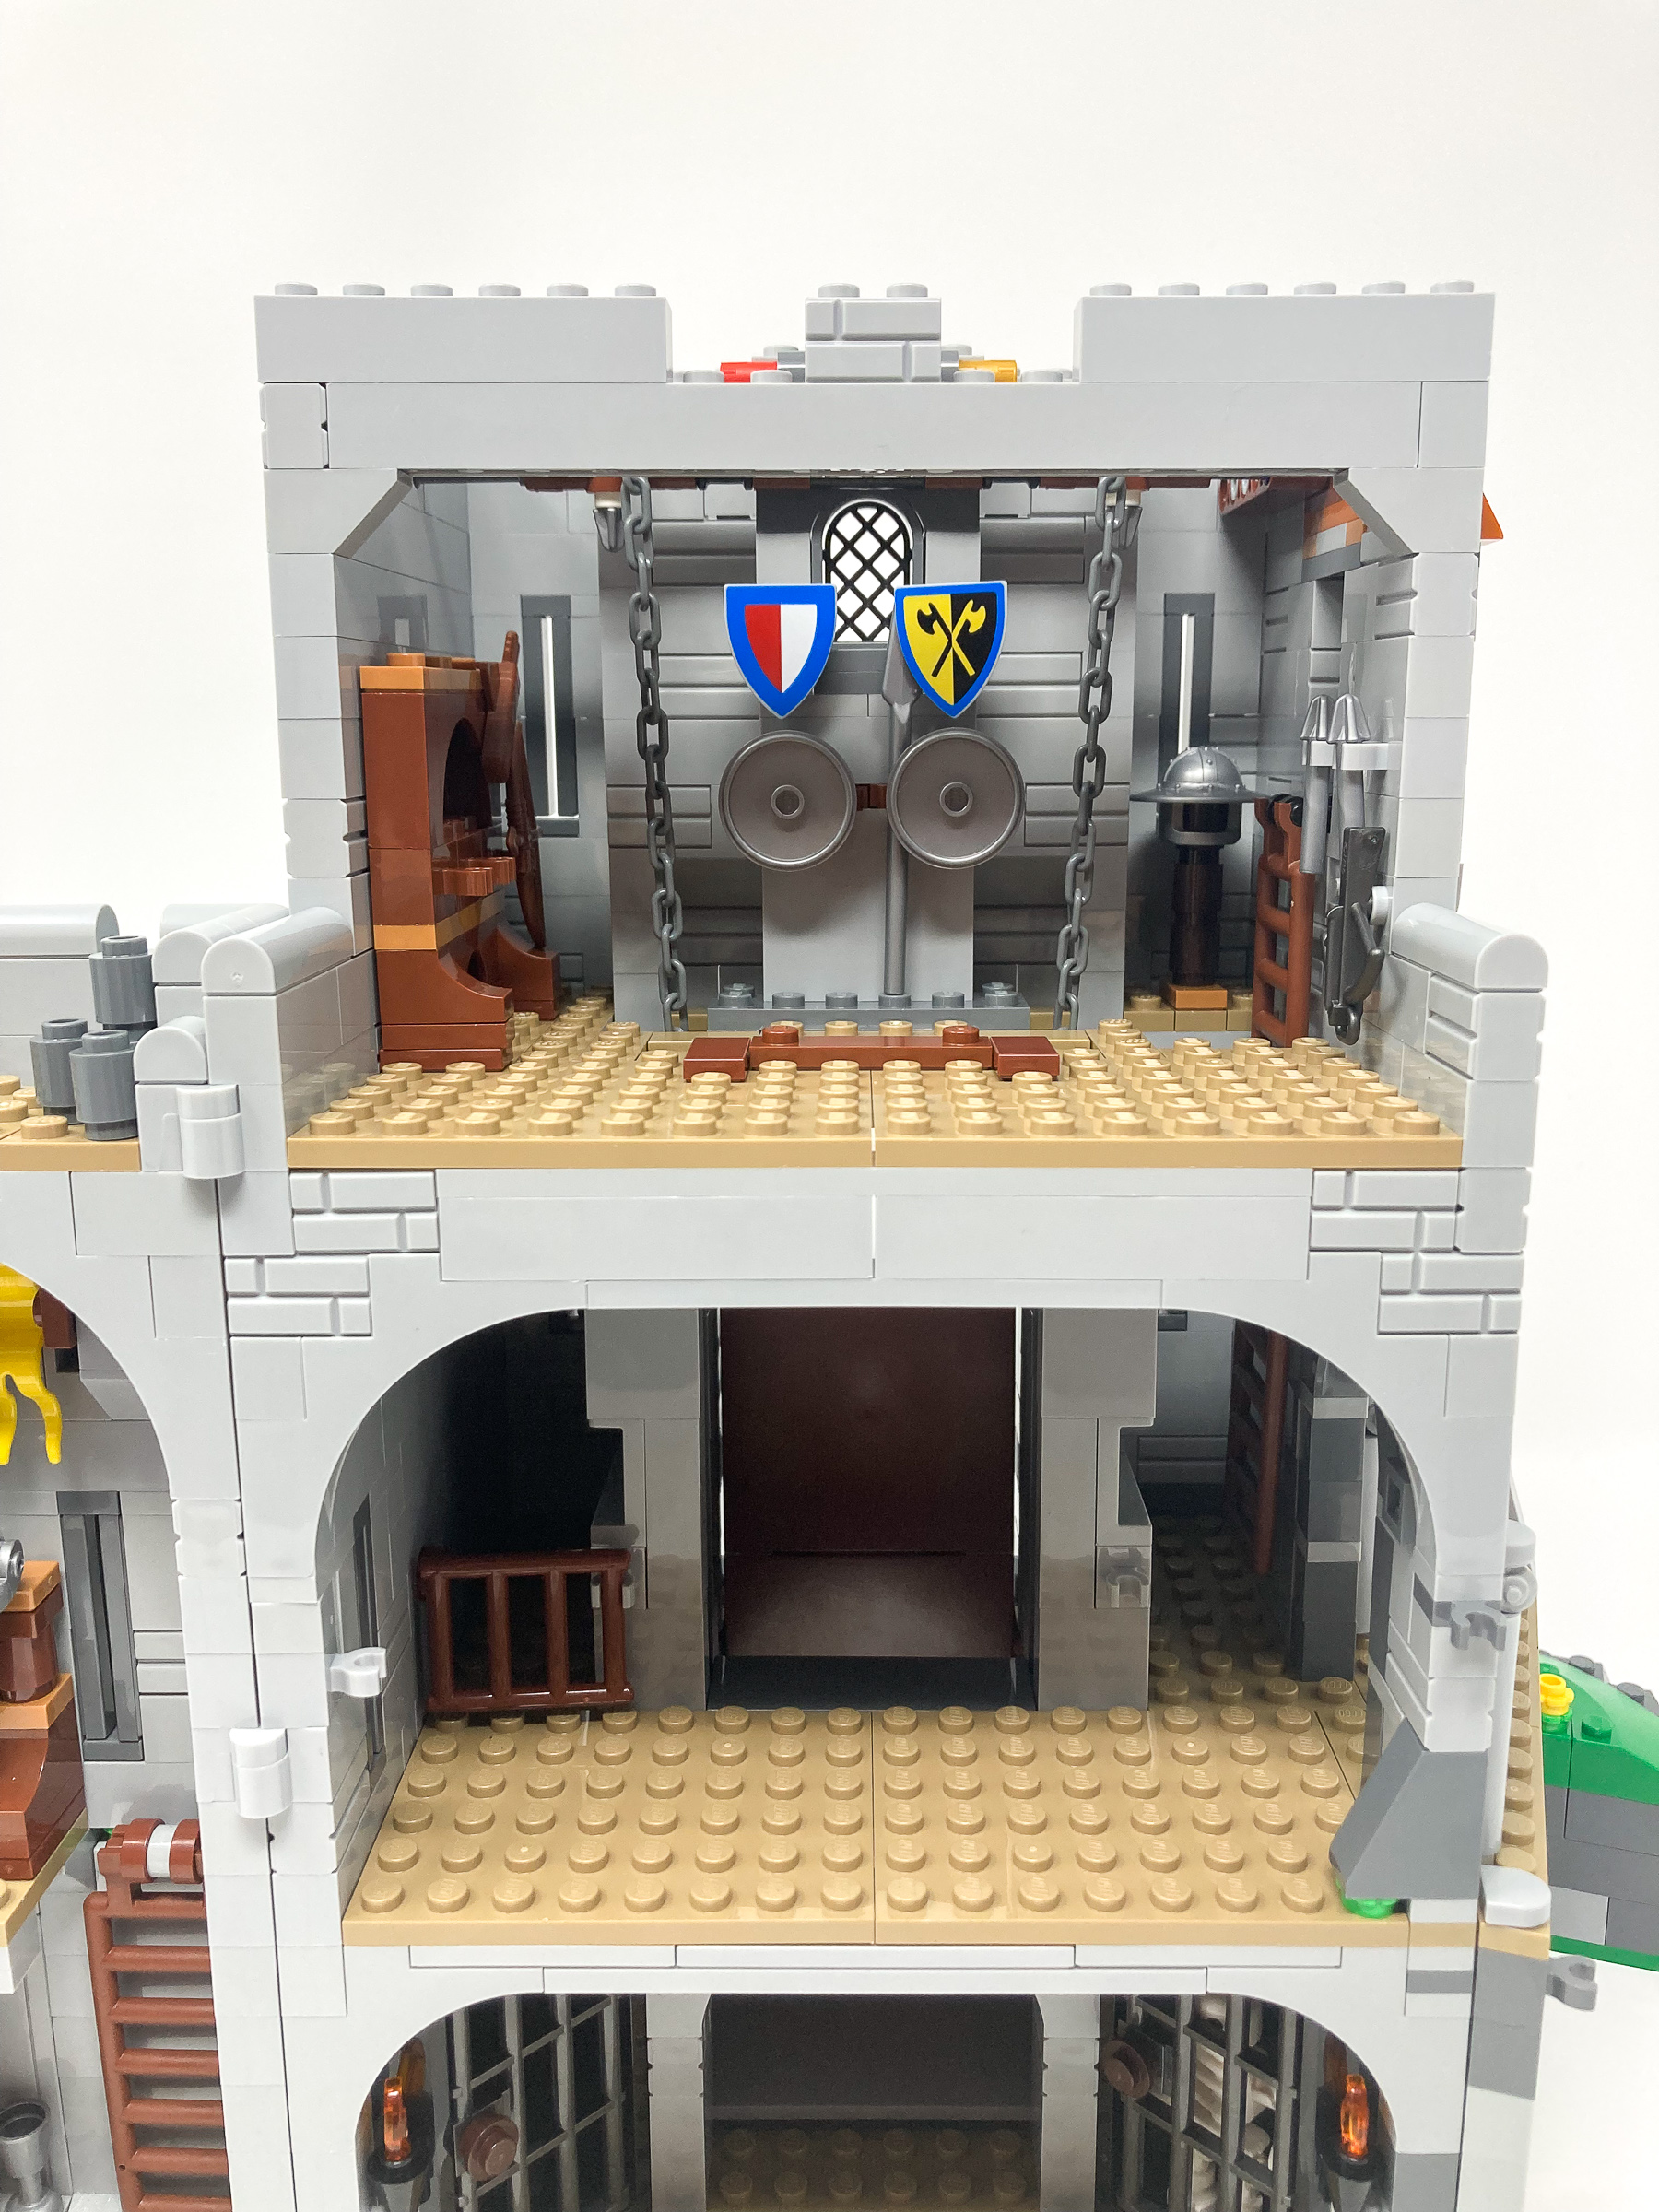
From the back we can see all the details of the rooms within and see how each room we built in each half connects to the counterpart in the other half to make a whole room.
From the inside we see the dollhouse in full affect as each of the three levels is built in such a way that we can see the entire room, both interior and exterior but in two halves while at the same time splitting up the halves in such a way that it could be two separate rooms. With so much color variety on the inside and differing looks there is so much variety in his build. No stone is left untouched as everything feels very intentional and well put together.
Stages 14-25 – Lion Knight’s Castle Keep
As we start the second book of instructions, we begin the other half of the build we steer away from the living quarters and start building up the main militaristic base of command for Lion’s Knight’s Castle. Just like the first half of the castle this castle is built in a dollhouse style such that you can open it up to see all the details hidden within.
Bag 14 – Dungeon foundations
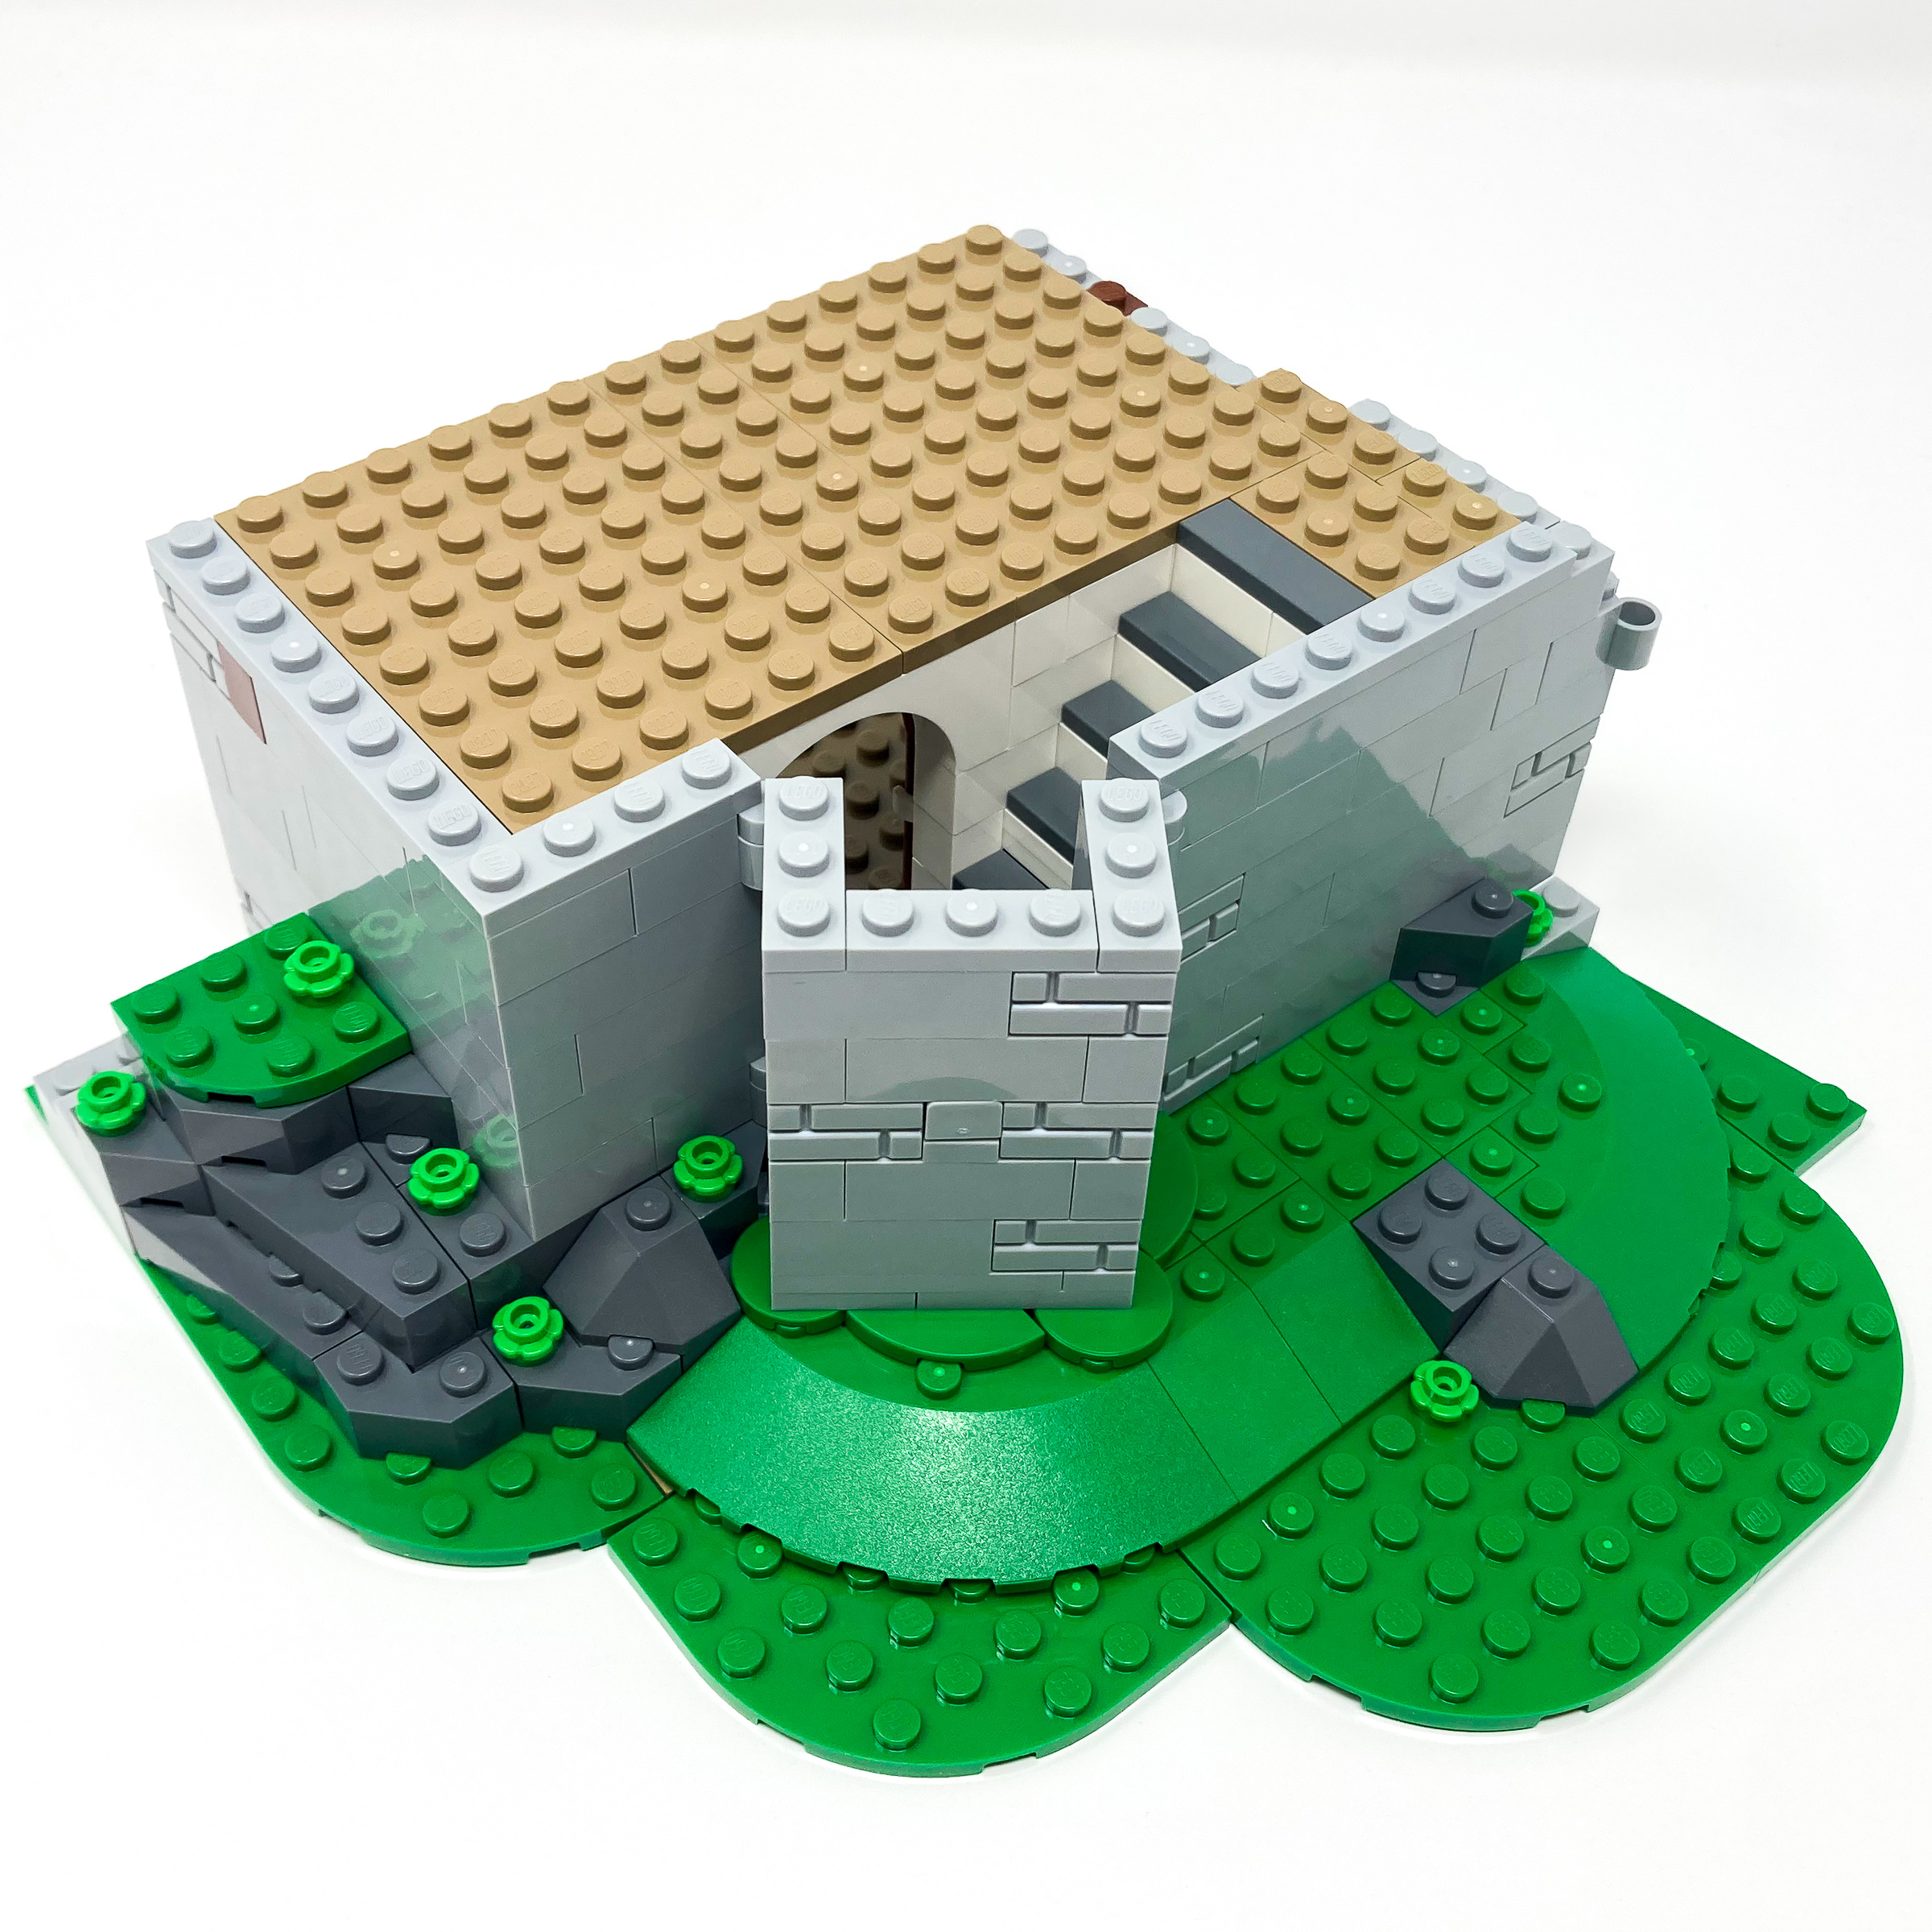
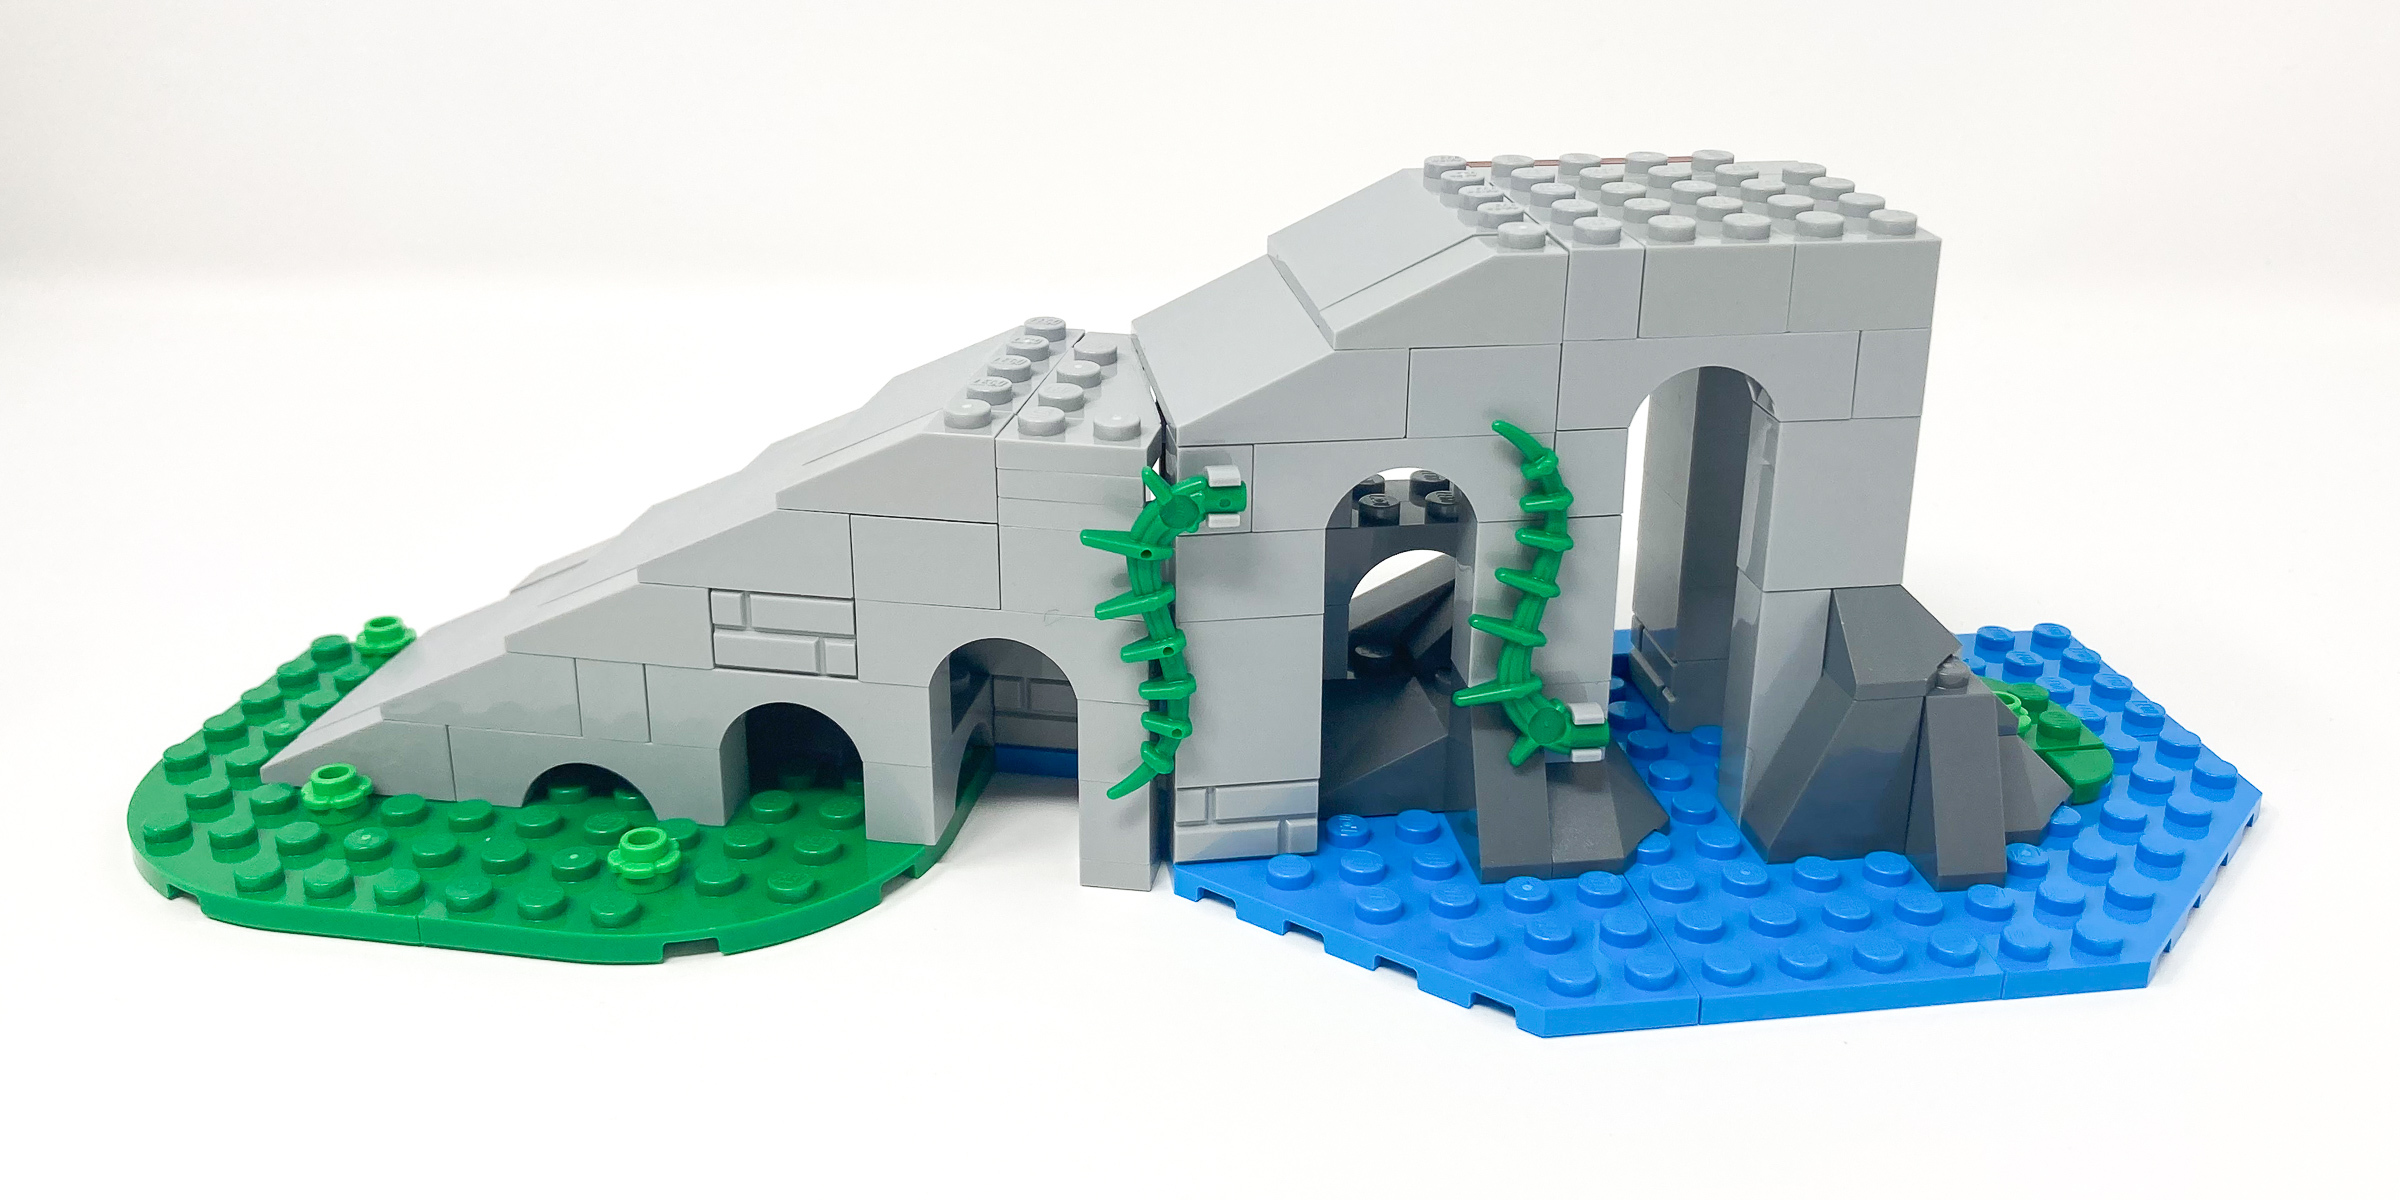
Like the foundations of the first half of the Castle we use the same sharp angles technique to add unique shapes to the base of the castle. Once again, the designers use plate wedges to accomplish the angled base. This time instead of the castle sitting on land it sits on a shallow pool of water. Off to the side of the dungeon we start building up the root and base of a tree which uses a half round piece to curve off the trunk to give it a more organic look and feel to it.
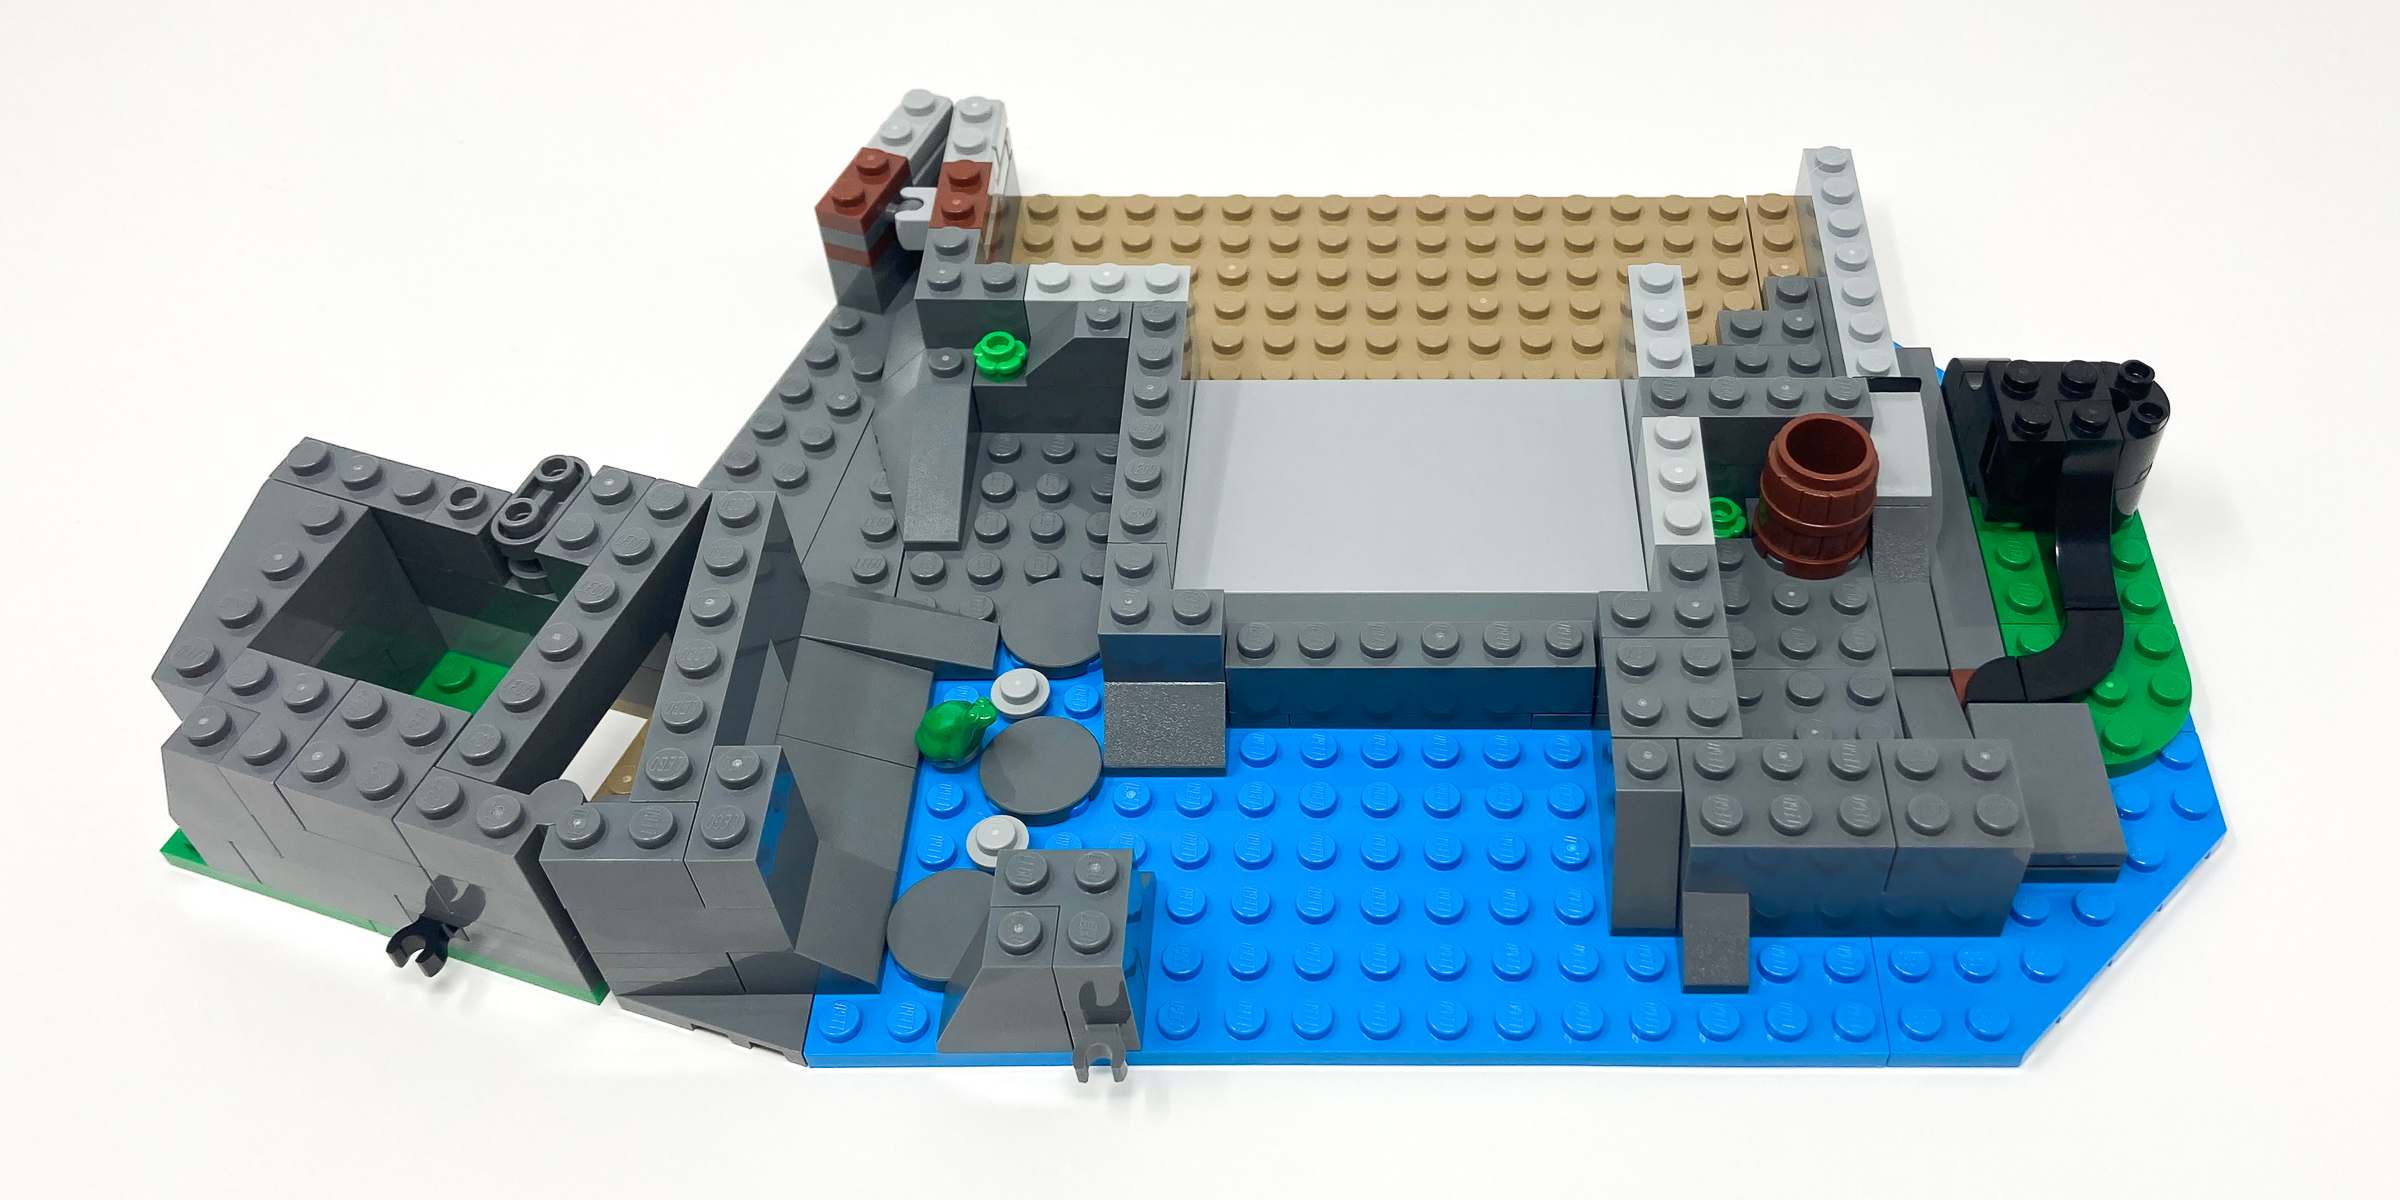
The dungeons are built on the banks of water giving the castle an extra layer of defense.
You can see that the castle is built directly into the rocky ground with darker sharp and jagged pieces being used for rock formation and more square bricks in a lighter shade of grey for the actual castle walls. The use of arches is very prevalent in this dungeon contrasting the rounded curves with the sharp corners.
The rounded arches juxtapose the jagged rock edges allowing it to stand out.
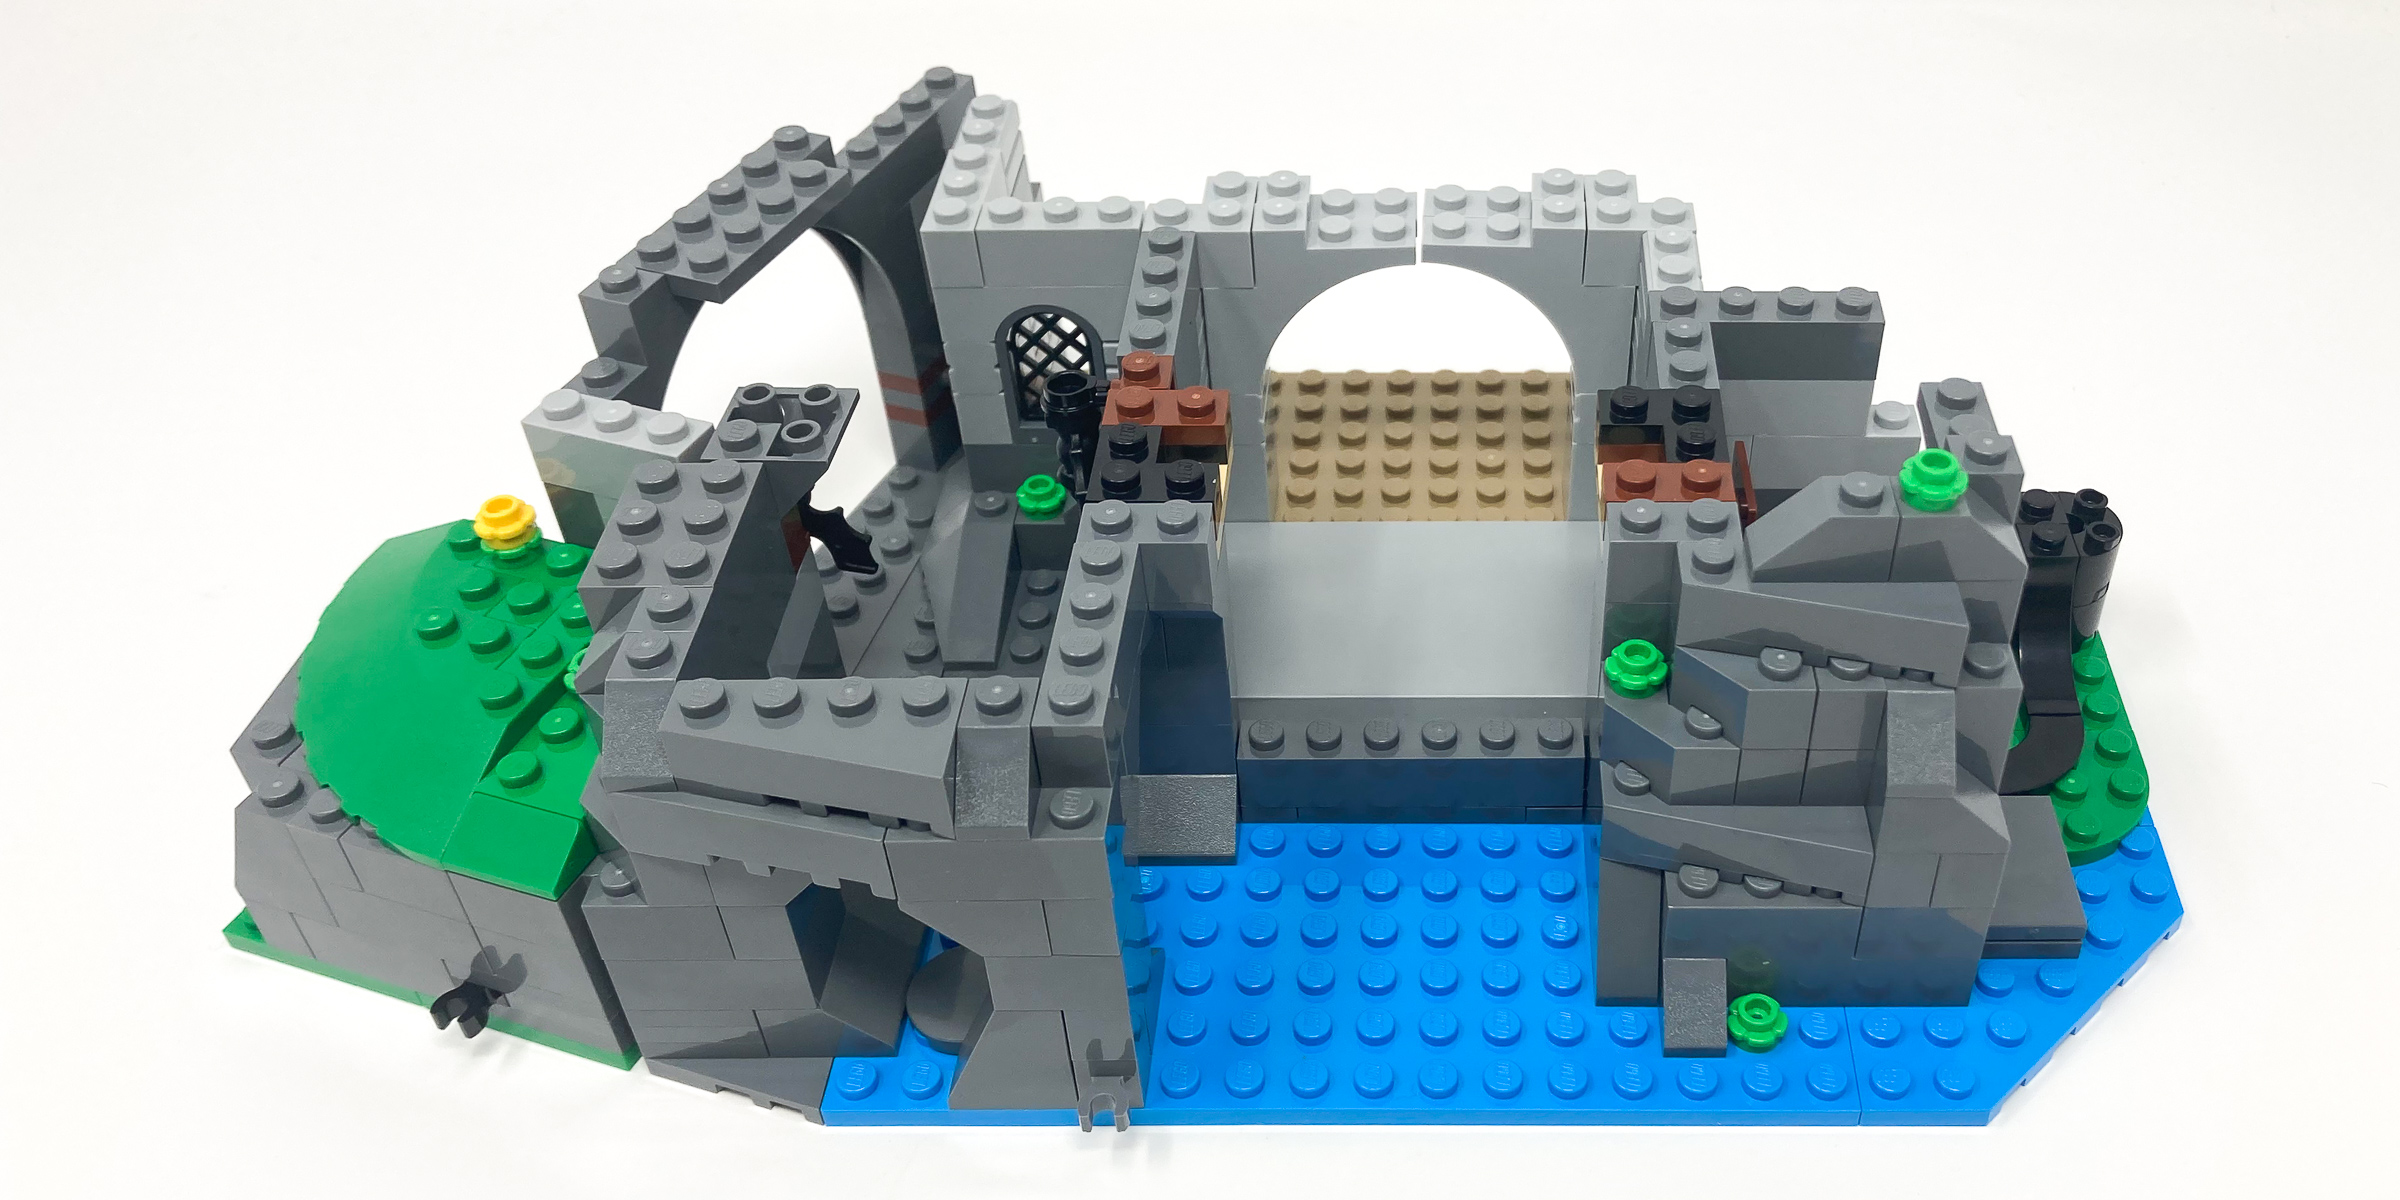
Off to the sides we have winding tunnels. That capture the dark depths of a dungeon very well. Moss growing on the base is a nice touch highlighting the dampness of the space. Off to one of the sides is a hideout for the Forestmen. Like the hidden room in the other half of the castle this opens theories over what their true role in this castle is given that they have a hidden cache of weapons under the castle. My favorite item in this cache is the shield with a stag on it, such a beautifully printed piece.
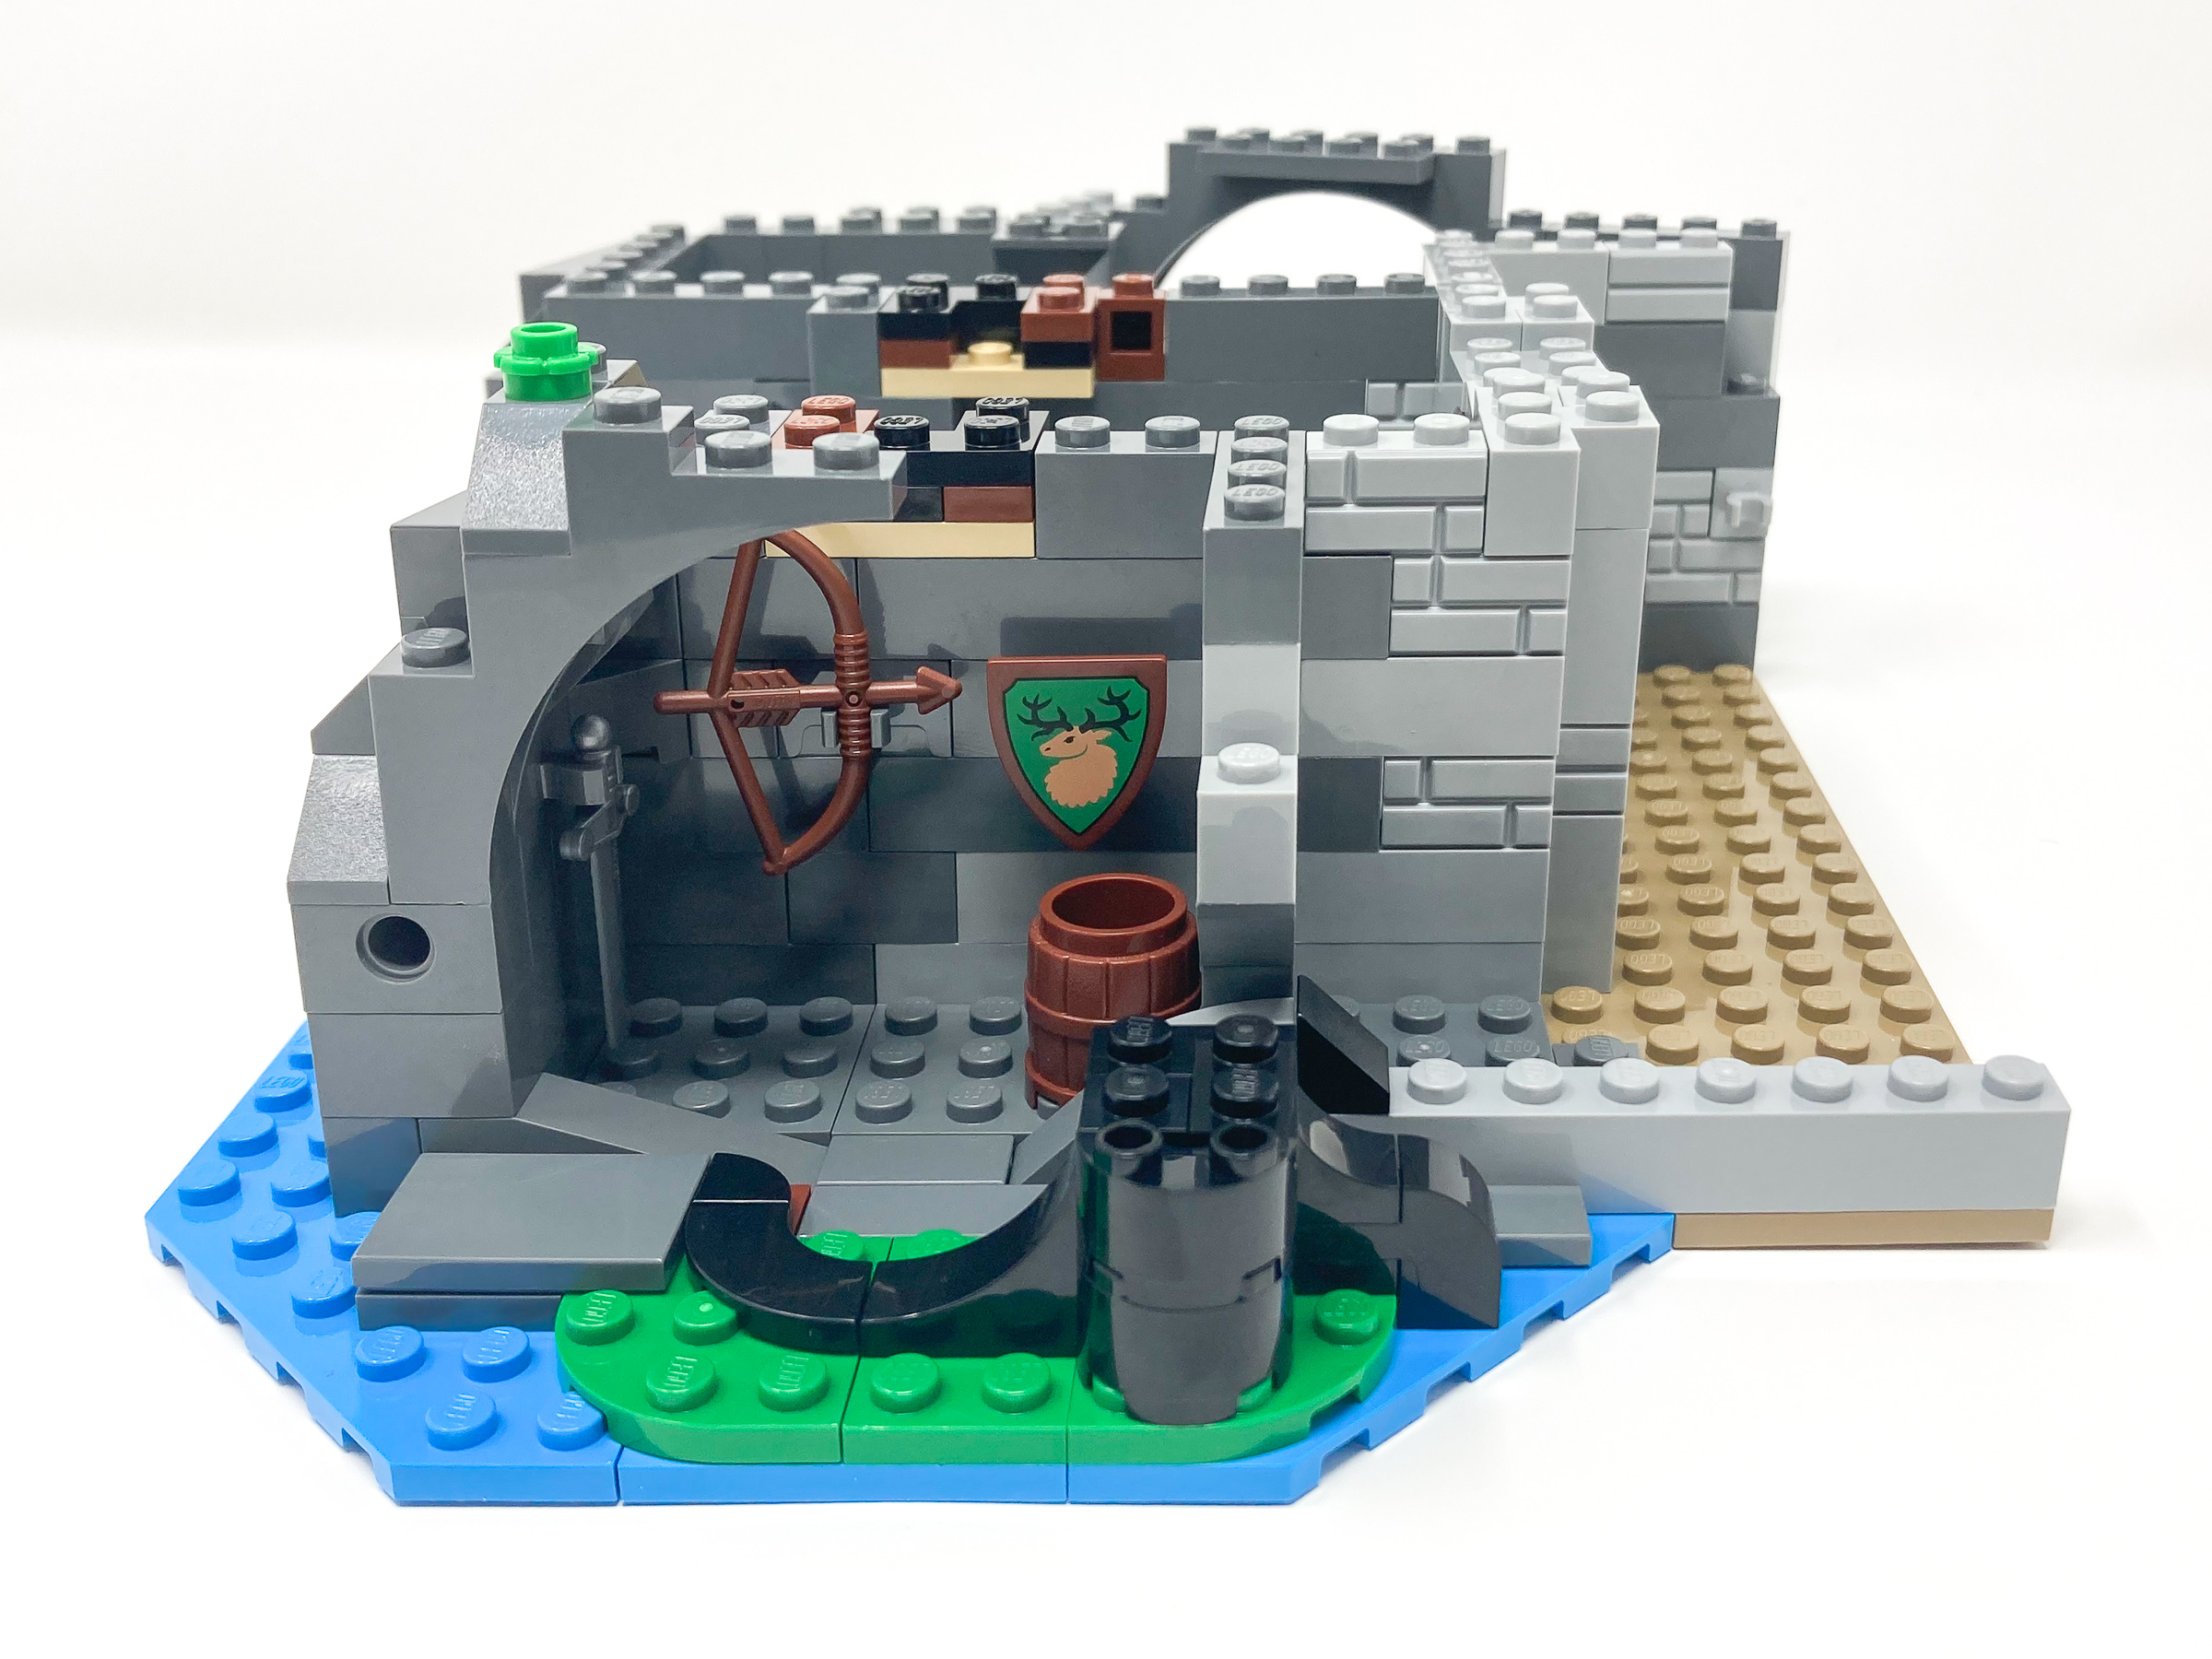
Another Forestmen’s hiding space can be found along the side of the dungeon, this time fully stocked with weapons as well.
Bag 16 – Treasure room and postern gate
We build up the treasure room in this bag and build up the base of more castle walls. The interior of this is plain with the standard bricks and arch combinations building out the synthetic depths of the castle. As there are no windows in this section it does get very dark down here which unfortunately means it can be difficult to see some of the details tucked underneath in the dungeon. The treasure room connects to the dungeon using the same dollhouse hinge pattern allowing us to either close or open this space to expose all the internal details.
Tucked in the corner of the dungeon is all of the Castle’s treasure!
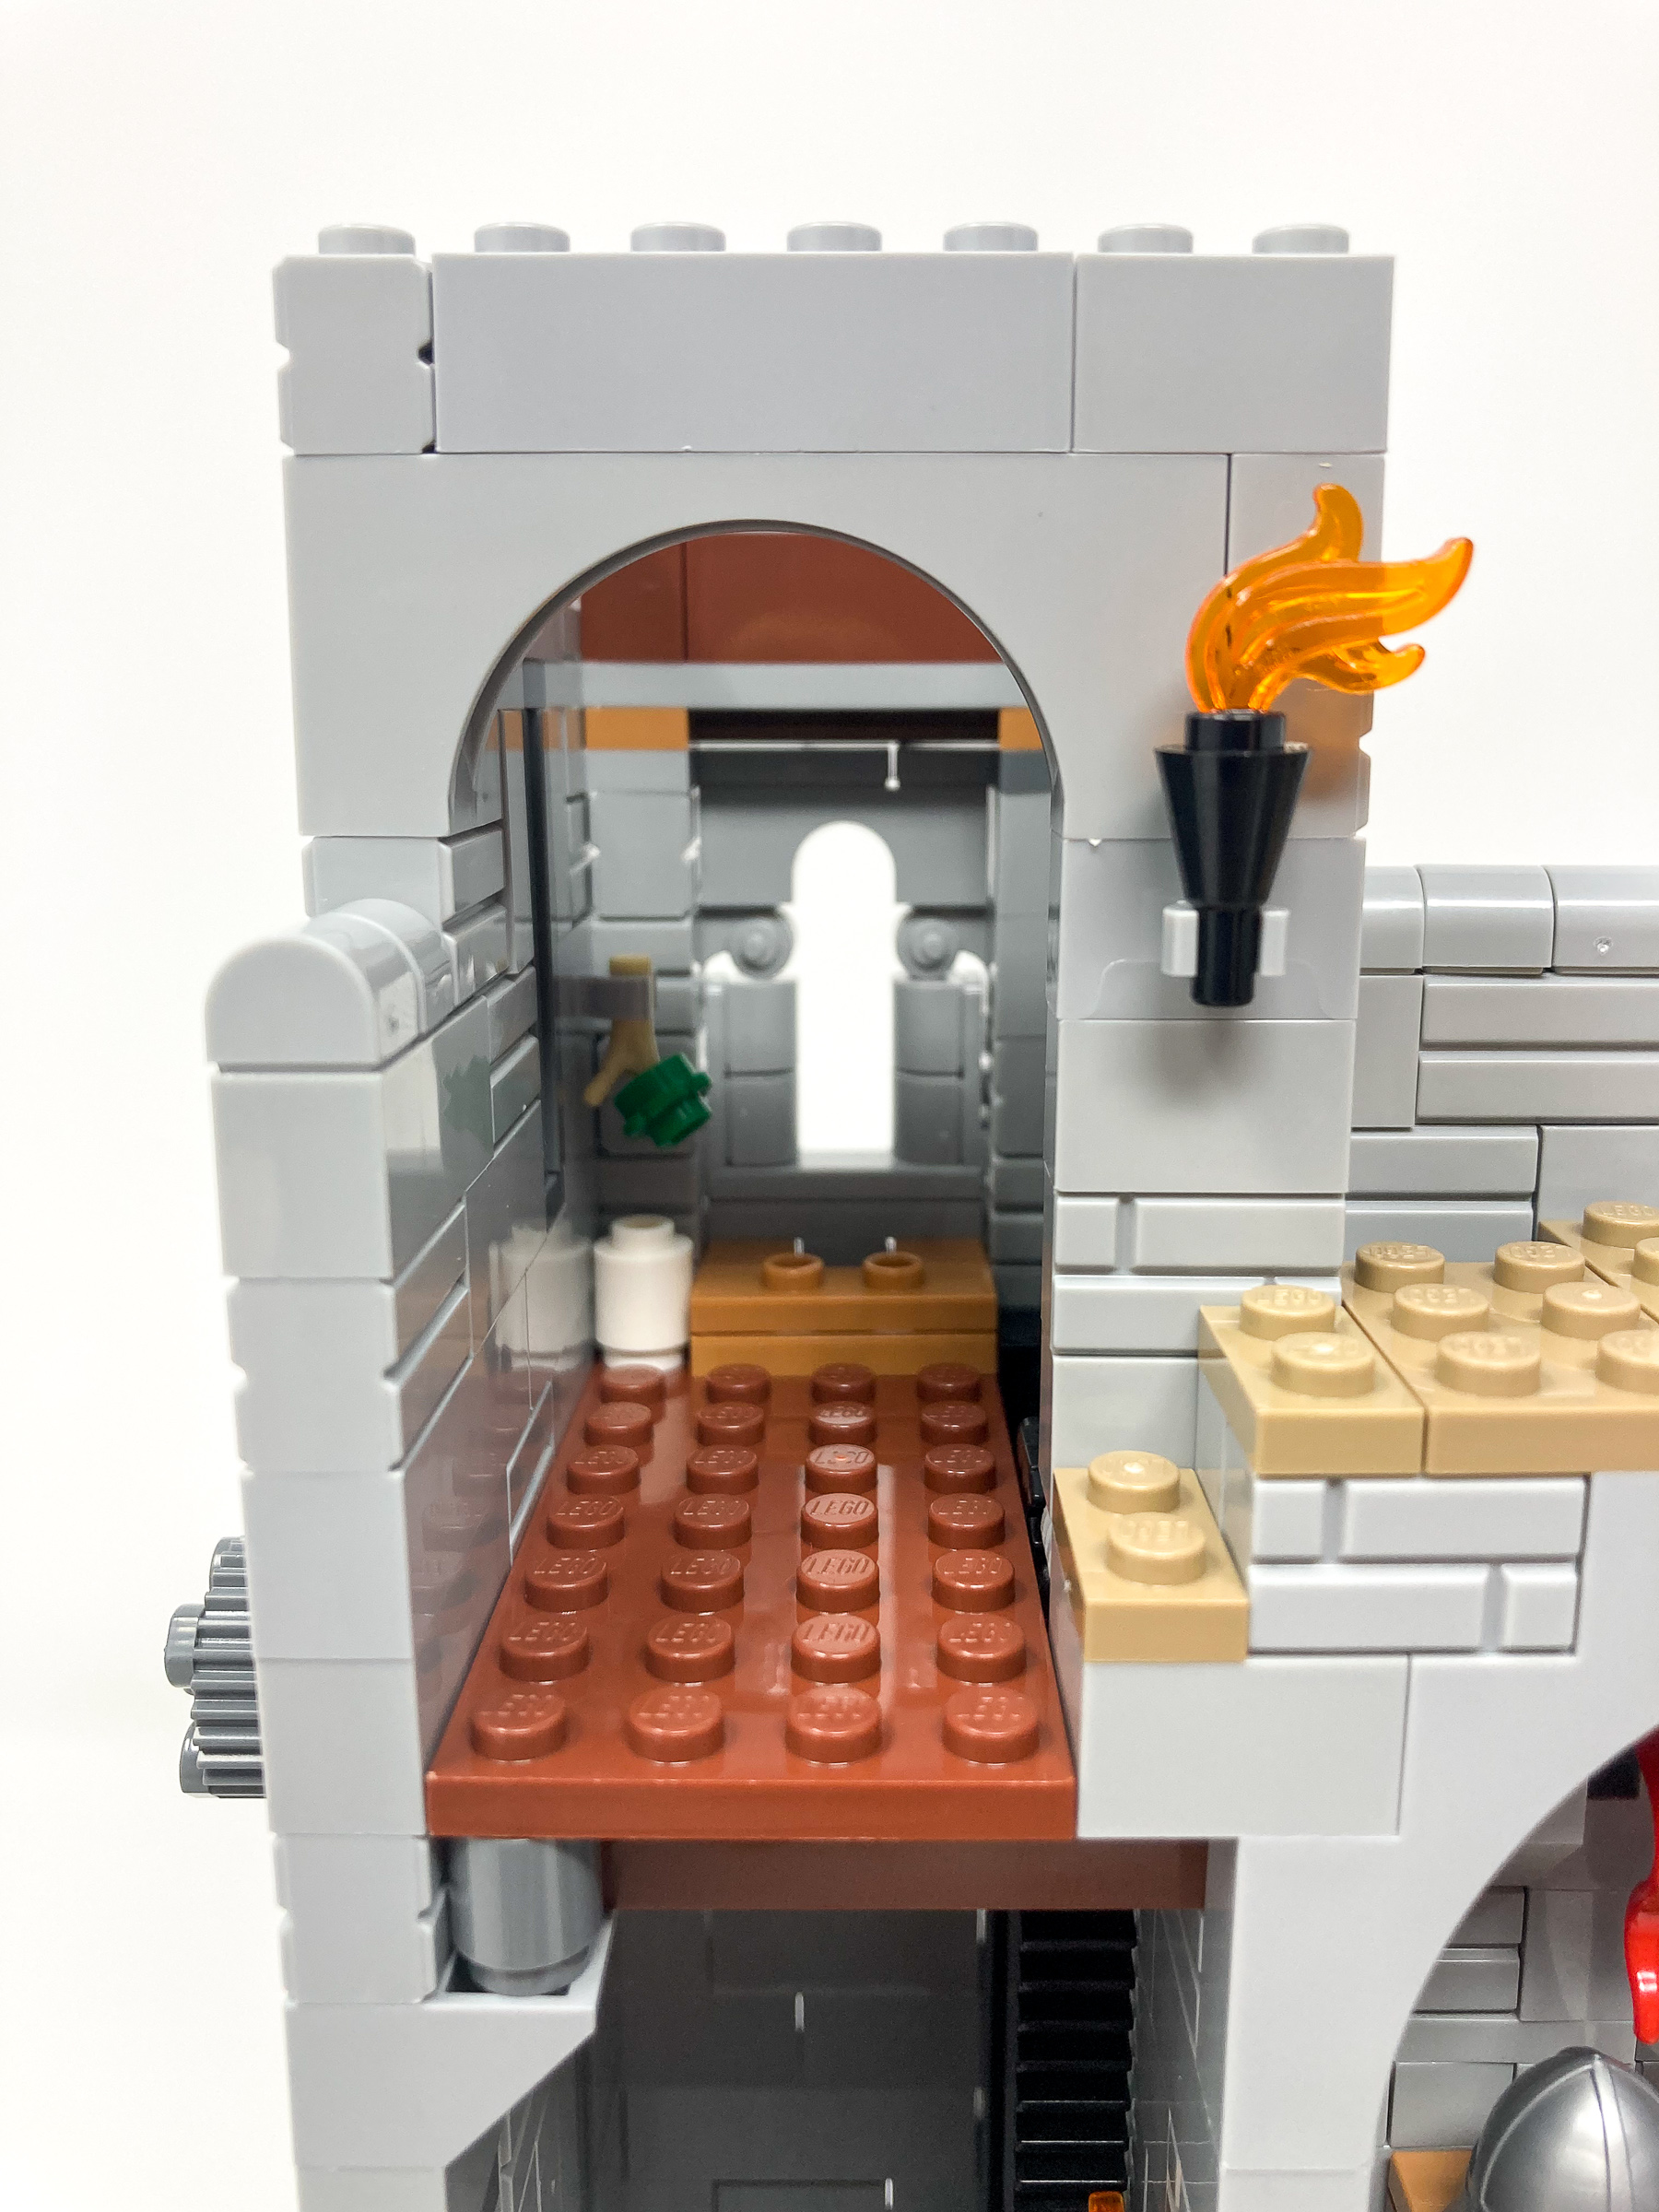
Despite the plain interior we build up beautiful steps and a postern gate around the back exterior of this section of the castle. This gives the castle’s inhabitants a quick and easy escape from the castle if things turn sour. Continuing with LEGO’s decision to not have exposed studs where possible the designers built up the stairs by placing LEGO bricks on their sides to create smooth edges from every direction as they were able to vary depths using tiles and plates. Built directly into the rocks the smooth step in light grey contrast the jagged sharp dark grey rocks that they are built into. This clean smooth feel almost makes them look like slippery steps which would make sense given the steps come directly up from the dock at the back of the castle. Unlike the fireplaces built earlier the torches in the exterior of the castle do use flame pieces which builds up the flickering torch feel that the exterior lighting systems aim to build.

The postern gate along the back makes for an easy escape if things turn sour.
Bag 17 – Finishing off the dungeon
With the dungeon complete we now start building up the first level of the castle. The first notable difference is the color of plate used for flooring. Rather than being built directly into the rocky floor we instead use a combination of tan and brown pieces to show that this level has wooden floors. As this level has a lot of sharp angles to add shape the designers opted to use ball and socket joints to hold together sections of the build for added support. This was a good decision as after this was added the build felt a little less fragile and was easier to pick up.

There are many holes in the rocks underneath the castle, this could explain how people snuck in and built hidden caverns.
It is interesting how the dungeon can be accessed through the water, almost rendering gates useless as there is a way for people to sneak into the castle. Torches and finishing details such as dungeon doors and a neglected prisoner (now a skeleton) are locked in the dungeon emphasizing the dark nature of this space. By angling the doors of the dungeon by 45 degrees it makes the space look very inviting and easy to see while allowing designers to use the space behind it for the rocky outcrops.
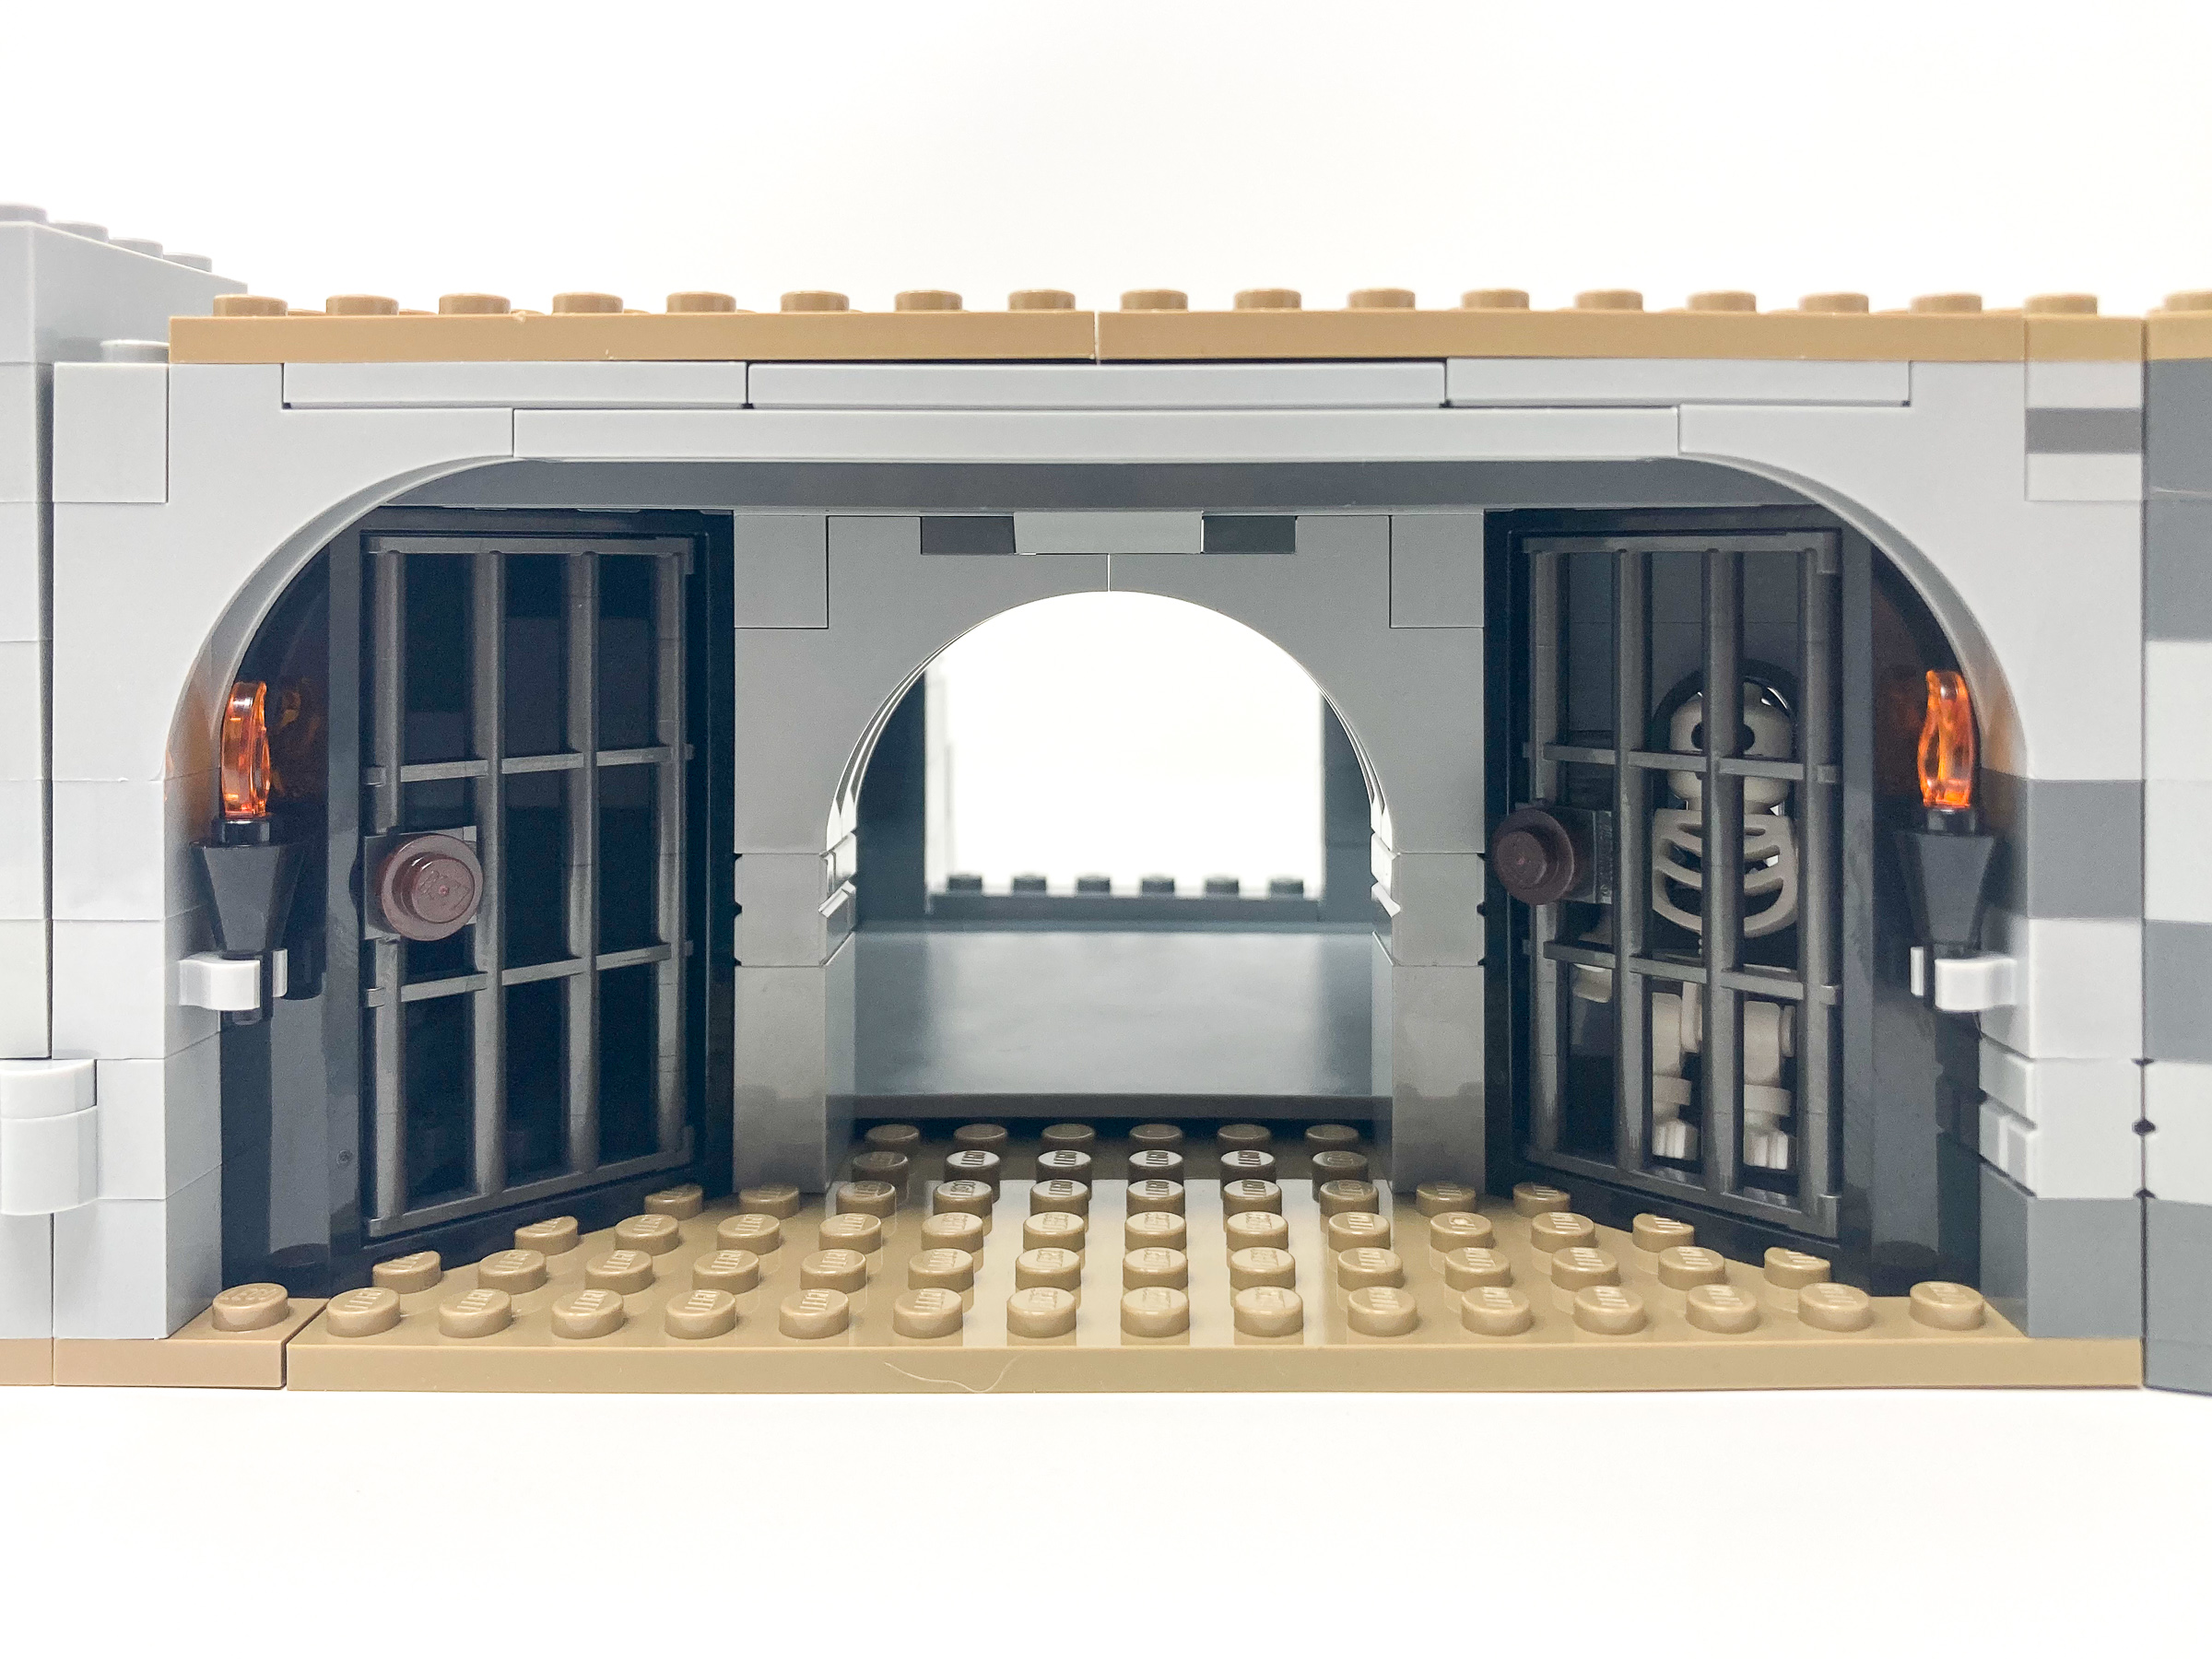
This prisoner must have been forgotten about as their sentence is definitely done.
My favorite section of the entire build so far is the way the Forestmen’s hideout we built earlier is hidden. The rocky outer wall behind the tree can be popped open sliding away the wall and giving an entry way into the castle from the outside. It is fitting that their hideout is built directly into the base of the tree. When the rocky opening is popped back into place is difficult to notice that this is even a hidden space highlighting how well hidden this entry point is.

This hidden weapon cache is very well hidden behind the rocks.
Bag 18 – Castle entrance and keep
As we continue building up the castle walls, we use the same techniques we previously built with brick patterned bricks interlaying flat bricks for the exterior walls for texture and slitted windows. From the inside here despite looking nice there is nothing special being built up, but this is just foundations as space for details to rest in the nooks and crannies of the castle.
It is fitting that the Forestmen’s hideout is located next to a large tree.
A touching detail that is included here is the use of ornate pillars. By continuing the tradition to place rounded tiles and curves on their side we build up rounded pillars that extend out from the castle walls to give added depth and character. The capital of the pillar being ornate and patterned crowns this entire micro build even more. I really hope LEGO continues to use this technique beyond just this set as it looks a lot nicer than using rounded bricks stacked to create the pillar aesthetic.
Pillars lining the side of castle walls add an extra layer of detail to an already detailed surface.
Bag 19 – Castle entry way and market passage
This bag focuses primarily on adding additional height to the castle structures. Similar building techniques are used as the levels prior with arches rounding off the entry ways. We continue seeing more windows built using the window slits technique to maintain consistency throughout the build. We also see the first glance at where this half will connect to the other half with clips and rods being built into the structure to connect the halves together.
Despite starting as a blocky room, we now use wedge plates to add angles to the structure.
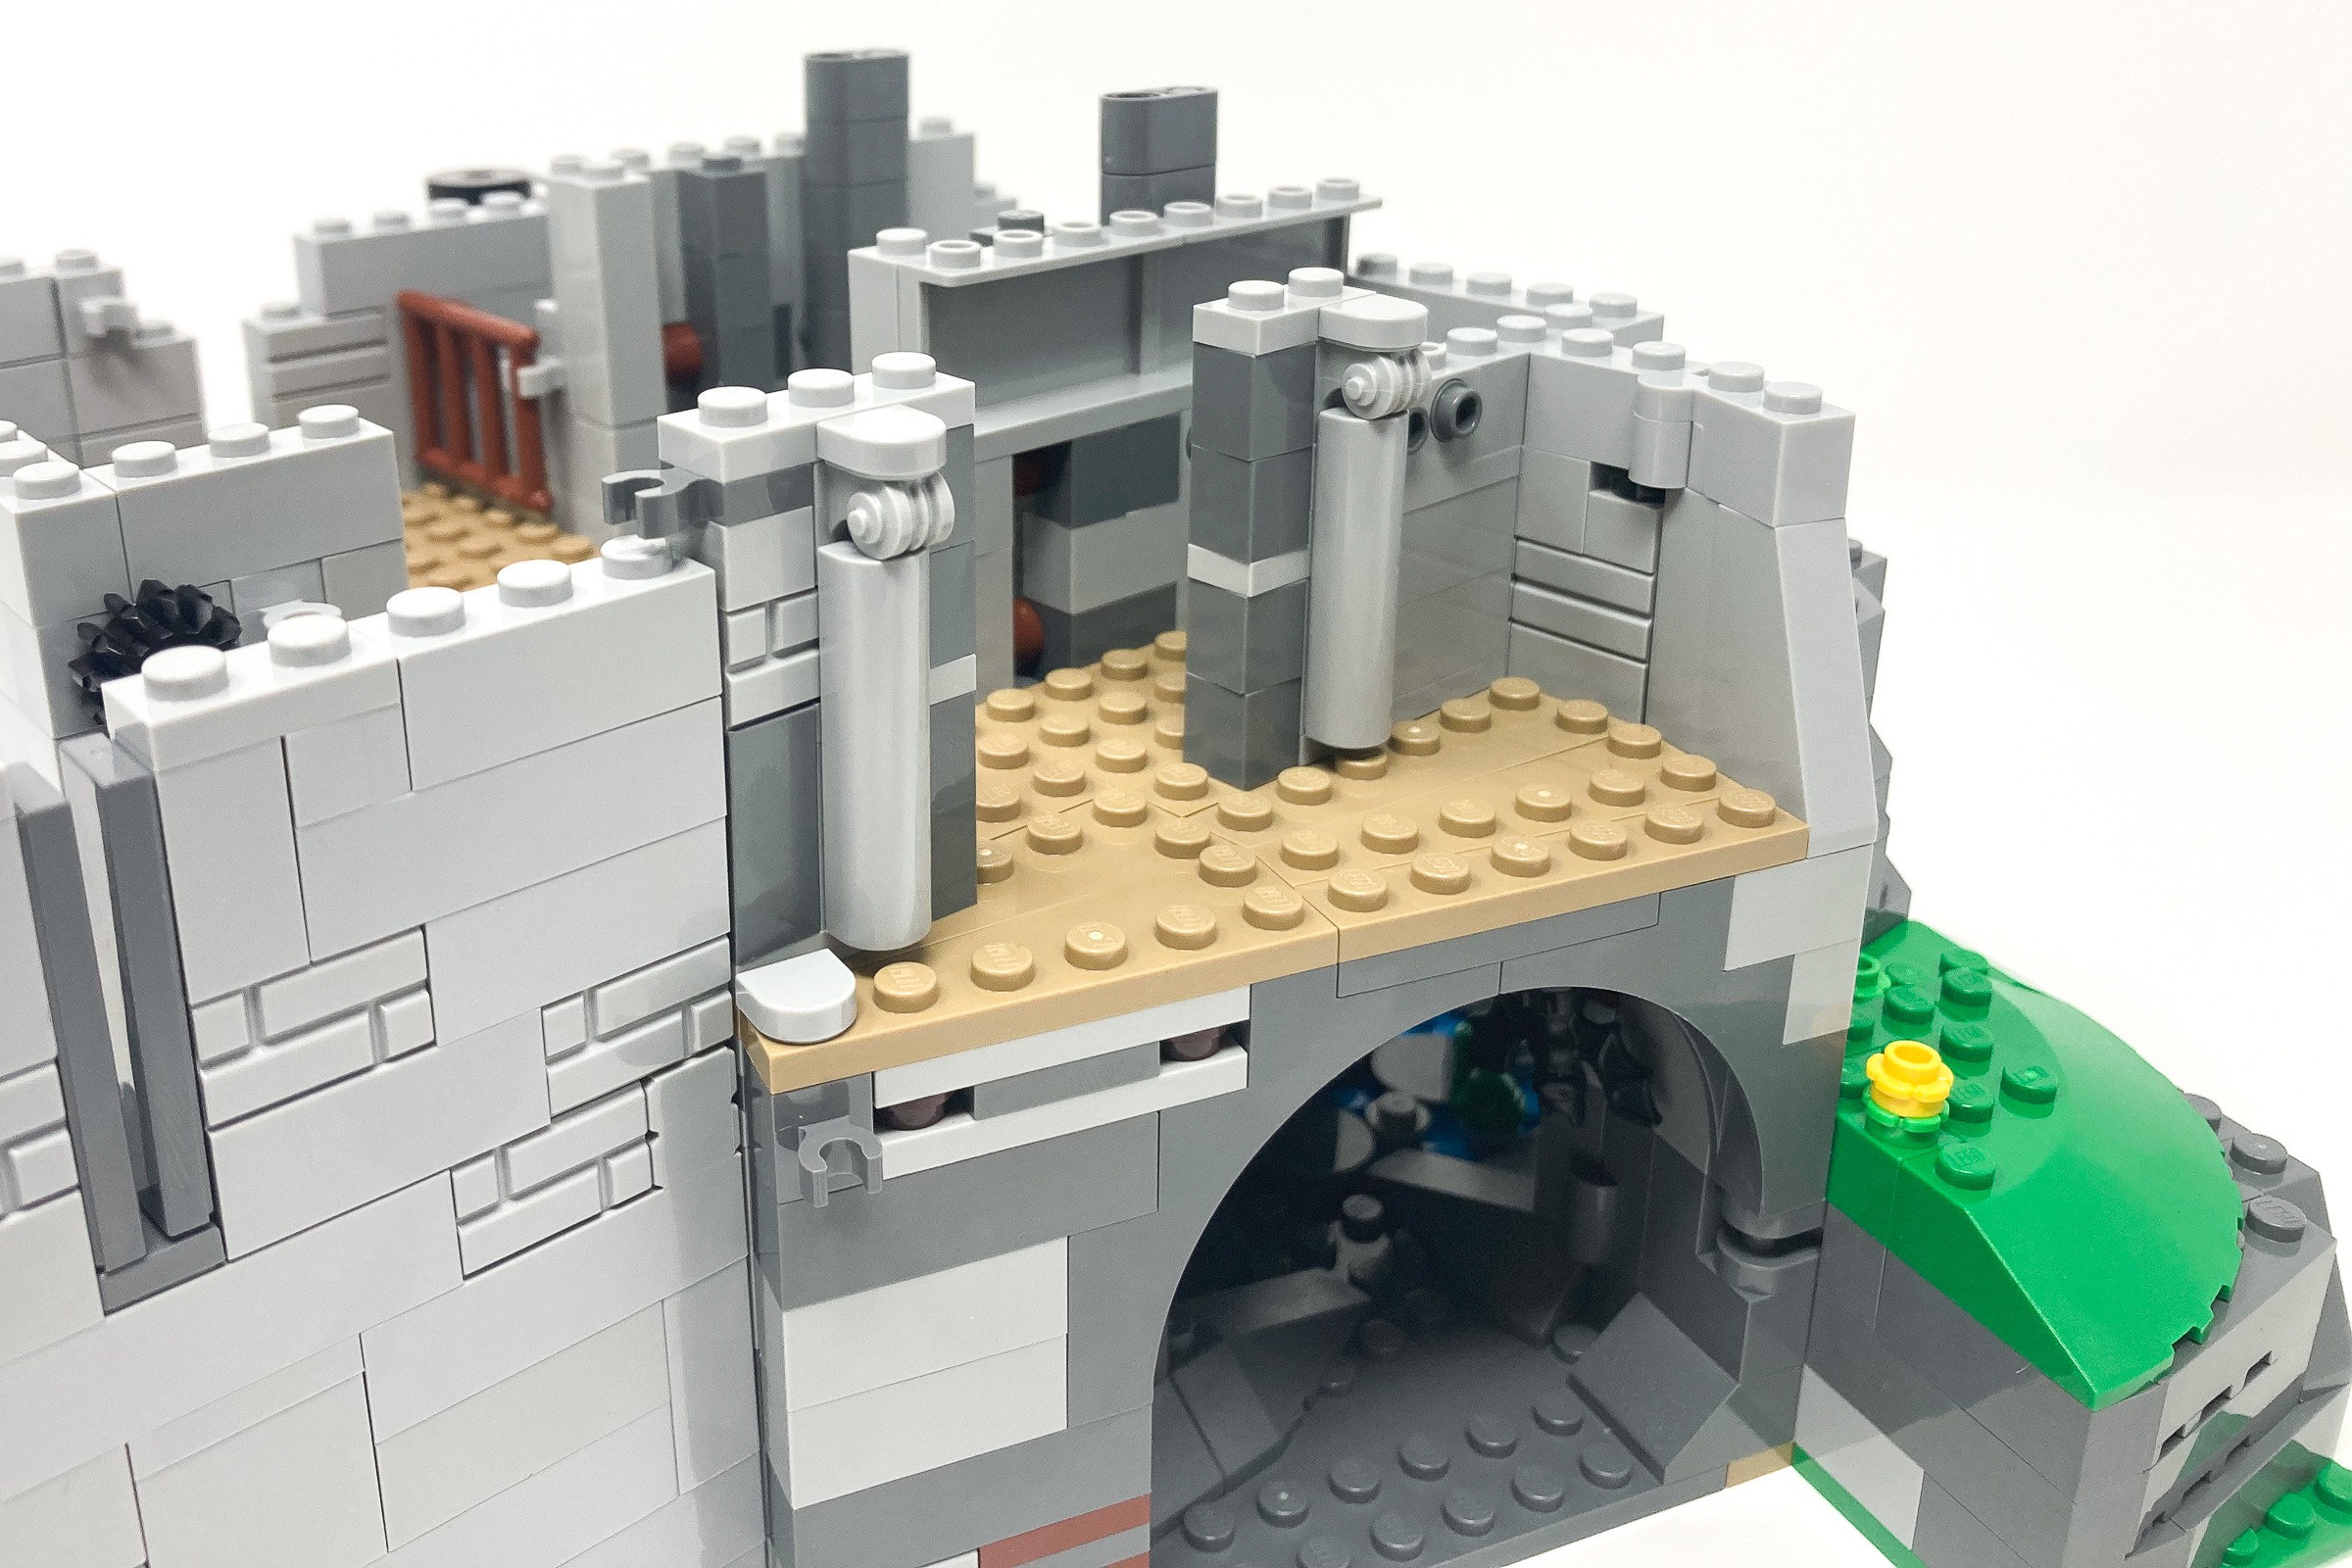
From the front we see the entryway into the castle with the space for a drawbridge. Built with a surrounding moat the raised castle would have an added layer of defense from invaders were it not for the fact that the dungeon can be easily accessed through the water. The front of the castle sports a similar stone pillar with an ornate capital at the top as a beautiful focal point when looking at the castle from the front. On the interior we start building up details to fill out the space with the first build being an armor rack fitted with printed shields helmets and weapons, a perfect space to soldiers to arm themselves as they are about to leave or defend the castle.
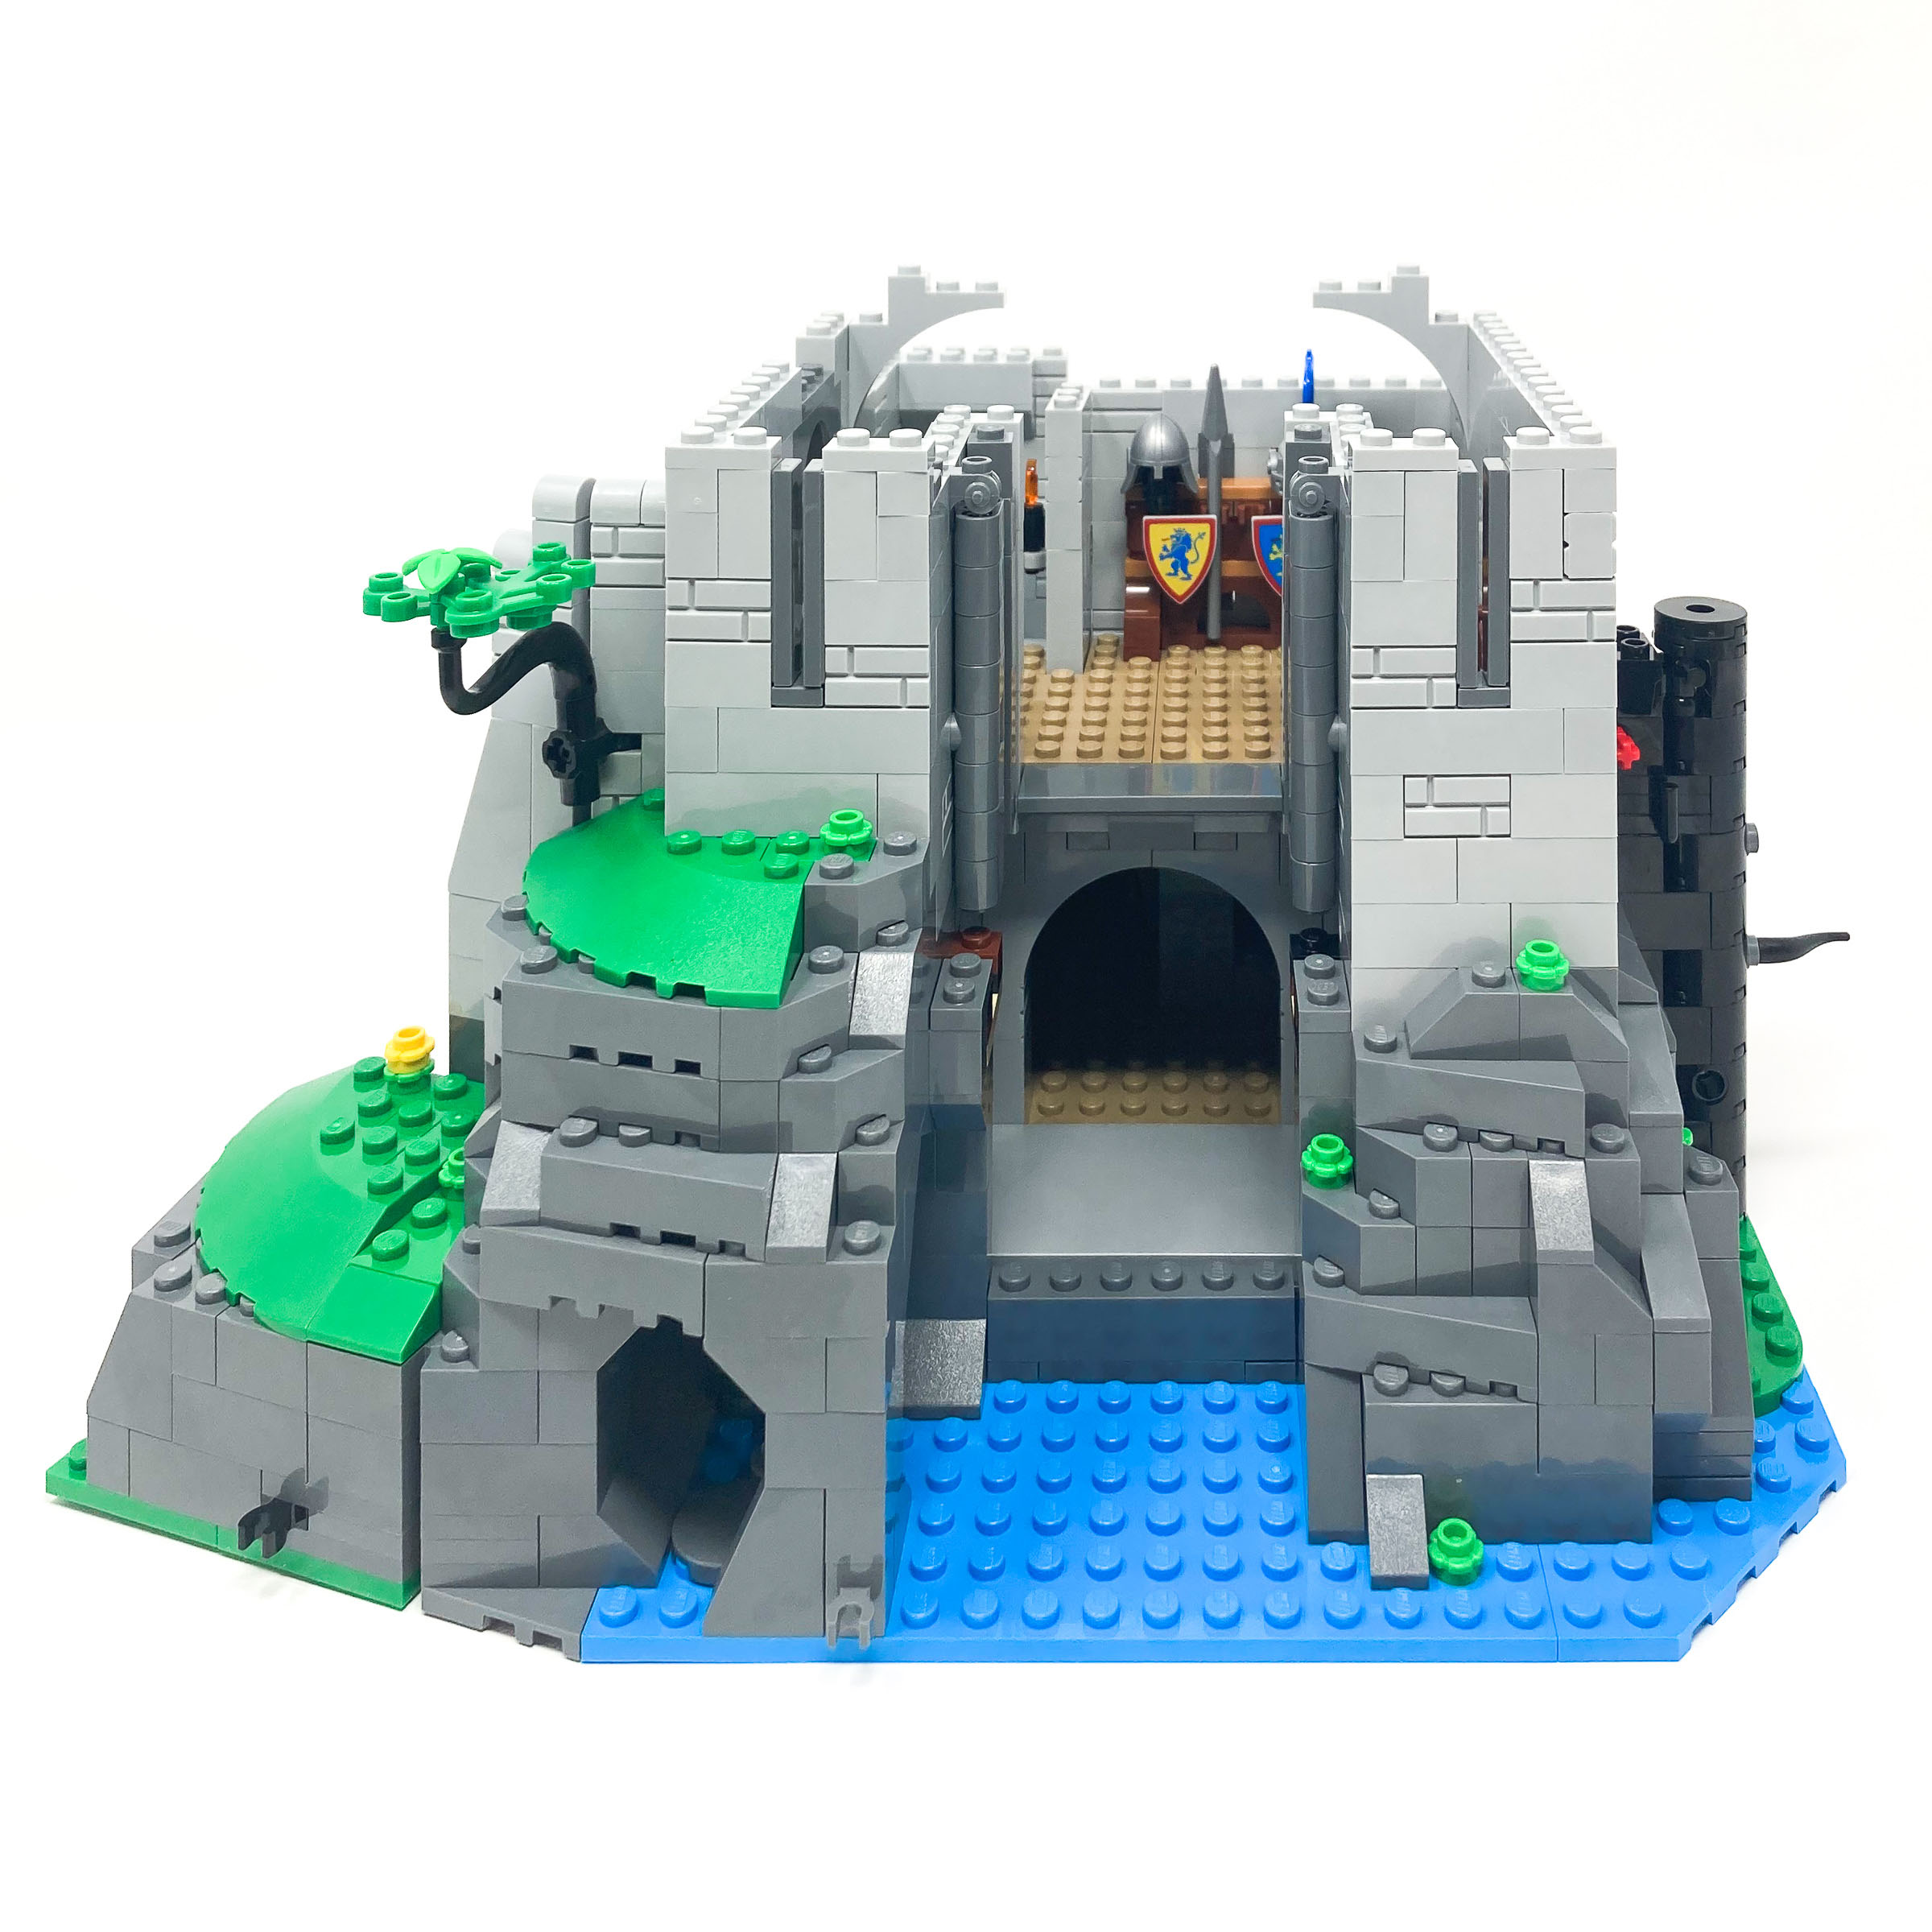
From the front you can see the main entrance room of the castle, once the drawbridge and portcullis are added however is it not as visible.
Bag 20 – Completing the keep’s first level and the drawbridge
Even though this bag continues to add structure this time it feels very varied and different as rather than focusing on just building height we focus on the details and finishings on the other surface. Using curves tiles placed on top of bricks with exposed side tiles we can add a level of depth above each of the arches giving it a layered feel. The differing colors of greys used for both the inner and outer arch layer continues to accentuate the arches further. Growing along the side of the castle walls are also a series of vines and plans adorned with colorful flowers adding color to what would otherwise be a very grey surface. As with before the edges of the castle battlements do not have exposed studs so each of the wall’s surfaces are covered up with tiles to either give it a rounded or flat finish to smoothen out the structure.
On the front not only do we cover up the entrance to the dungeon, but we also build up a drawbridge that can be opened and closed using a built-in action feature. The draw bridge is built and lowered down behind the front pillars and when the chain is pulled due to how the chain is connected to the bridge it will either lower or raise. This massive bridge when raised even acts as a second door to protect the entrance to the keep.
On the front not only do we cover up the entrance to the dungeon, but we also build up a drawbridge that can be opened and closed using a built-in action feature. The draw bridge is built and lowered down behind the front pillars and when the chain is pulled due to how the chain is connected to the bridge it will either lower or raise. This massive bridge when raised even acts as a second door to protect the entrance to the keep.

The drawbridge can be raised and lowered at will.
The drawbridge mechanism despite being built as part of this section does not get connected for a few more bags. As a result, it constantly sits behind the castle walls making the set a little difficult to close fully. As the drawbridge needs to be lowered before upper walls are built there was no other effortless way to go about this so those building this set will just need to accept this unfinished look for a few more bags until we finally put it all together. When this chain is pulled the drawbridge lowers and when released it sprints back and is raised.
Bag 21 – Building up the keep’s second level
The third level is packed with details. The first difference is the use of inverted slopes to create an extended layer above the walkway that allows soldiers to drop stones down the machicolations onto incoming invaders. Not only is this defensively sound but it breaks up the rigid blocky feel of the castle’s exterior walls to create an arch that sticks out from the castle. On the side of the castle, we continue building up the tree and continue using rounded 2×2 or semicircular 1×2 bricks to build up the organic tree trunk. The side entry way also comes with a play mechanism that allows you to lower a gate to block of all entry way from this space by using similar techniques that other sets have used to create a climb ladder.
A metal gate can be raised and lowered blocking off entrance and exit through the back entrance.
As the citizens of the castle are human and the body has its needs this castle also includes a built-in toilet. As proper sanitation systems were not prevalent in this time all the waste falls out through the side of the castle walls onto the ground below. Right below the toilet opening on the outside ground is a brown LEGO frog. We hope that this is just a frog, and that the designers are not implying that this is bodily waste, however with a suggestive comment made in the instructions we may have to assume it is the latter.
As toilet paper was not invented the citizens instead need to use a branch and leaves to clean up
On the outside of the toilet there is an open ornate window lined with pillars and an arch and a thatched colored roof. Despite this section of the castle being blockier than the other half the protruded tower adds some more variety to the shape of the castle. This section also makes use of placing 1×2 arches upside down to create a rounded support finish holding up any extended structures. When building this the stud of the piece rests on top of another piece which is flimsy but when the surfaces around it are built up it locks into place and cannot move. Previously this may have been a questionable building technique but now that we see if officially used in a set, we can be more creative with how inverted curves can add more details and textures to the base of buildings.
Is that a brown frog underneath the toilet release hatch or is that something else?
Bag 22 – The armory
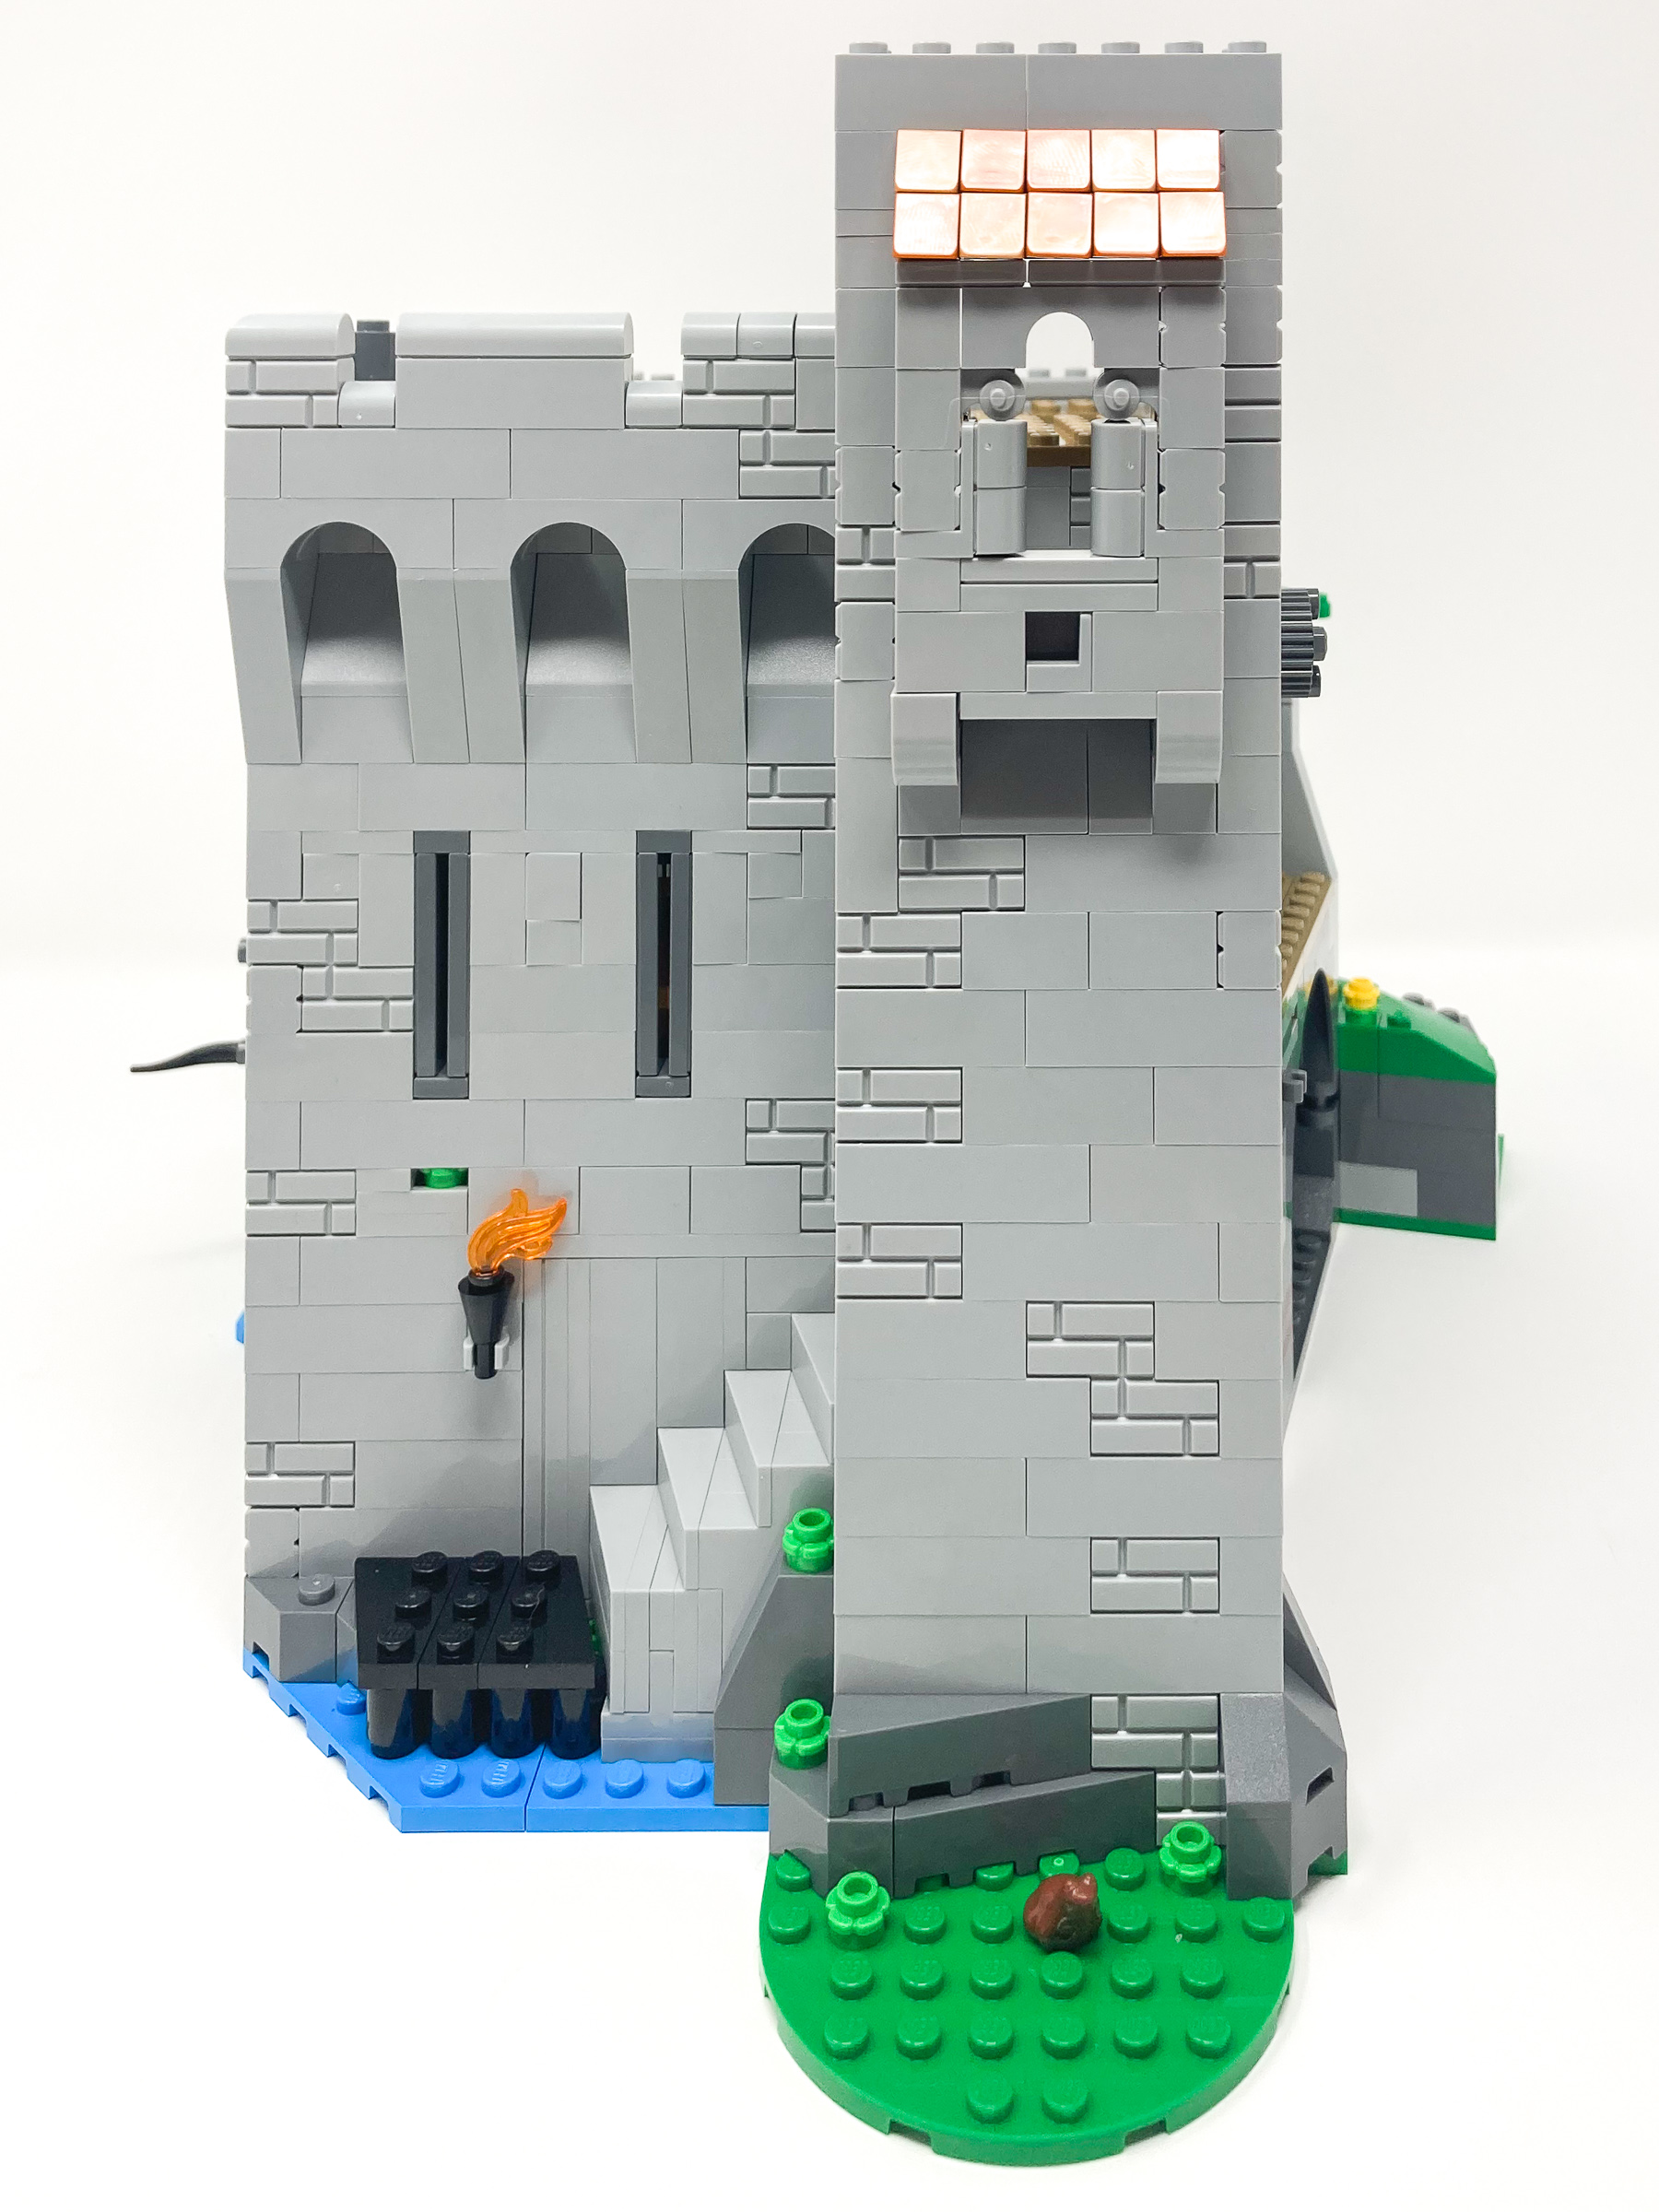
This next bag instead focuses again on adding added height to the front of the castle and rounding off any exposed edges that are now complete. The chain for the drawbridge is still not assessed and now that the back has flooring this piece can no longer hang between the walls as that prevents us from closing the castle up. On the inside we build up racks of weapons and an armory where soldiers can arm themselves. A minute but nice touch here is how the crossbow and its bolts are accurately stored highlighting the detail and historical accuracy placed into the design of this set. As is the case with all the levels on this half, there are no stairs to access the space and all entry points to the levels are done through the back half of the castle we previously built.

The armory is stocked to the brim with weapons and armor.
When looking at the front we can start to see the keep come together very nicely as the coat of arms of the Lion Knights is displayed at the front of the castle and the varied textures, windows and curves accentuate the castle. With us working through the final few levels this is unfortunately a reminder that this set is almost complete which is a shame as so many fun additions and secrets keep getting added with each bag. As we build up the castle more, we see the contrast between the green, blue, and dark grey of nature to the finished polished light grey stones that make up the castle more which looks beautiful

Shields adorning the Lion Knight’s coat of arms are on display at the front of the keep.
Bag 23 – Fortifying the castle entrance, portcullis and armory finishing touches
After countless bags of not addressing the drawbridge mechanism we finally build up a mechanism that holds up the draw bridge. By turning an action piece on the side of the castle we can lower or raise the drawbridge below and have the bridge be out of the way of the castle’s interior. The chains hanging down through the armory looks very in place for a medieval keep. On the back wall of the armory, we see that there are more printed shields adorning the wall. Something that is interesting to note is the variety of heraldic shields included in this set. Each room that has a shield on the wall whether inside or outside uses a different print giving it a lot of variety.
Finally we attach the drawbridge mechanism with dangling chains giving it a very medieval feel to the armory.
Looking at the front we once again see the arch and pillar technique that is used elsewhere in this keep adorning the front visage of the main upper window. When looking straight at it this window contrasts the slit style windows used at the level below which makes it stand out even more. By using rounded plates wedges in a two-brick deep system we can get ever so slight depth to the arches and windows which emphasizes it even more. By ensuring that the pattern of bricks is not symmetric looking at it from the front we continue to ensure that there is variety in the wall structure and gives the castle a more historic worn feel to it. I am glad that the designers used a variety of shades of grey as you can immediately see all the different contrasts and depths this way which makes the castle face look more detailed even though it is just a color difference.
The round brick on the side of the castle can be turned to raise and lower the drawbridge.
Bag 24 – The Forestmen’s tree
As part of the final few bags, we finally get to finish off the tree that we have been gradually building on the side. Now that the branches and leaves are added what previously looked like a large tube looks like a tree. Compared to other trees built in other sets this tree has a very distinct and unique style that is reminiscent to the style used to create trees in some of the older castle sets. Once fully foliaged the tree does a fantastic job at hiding the hidden rock entrance at the base of the tree that the Forestmen hide in. Next to the rigid rocks at the base and the square solid castle walls the fluid motions of the tree does not only just stand out due to its contrasting color but also because of its organic round shapes.

With the tree in full bloom the hidden lair is even more hidden than before.
Behind the drawbridge we build a portcullis that can be raised and lowered using a knob built into the side of the castle. At the top of the castle a locking mechanism is built into place allowing the builder to lock the portcullis as various heights then with the flick of the switch can send the gates come swinging down. The lattice like pattern when looked at both the front and the back is built very rigidly and looks and acts like a sturdy castle defense. When looking from above you can see all the mechanisms that were created to lock the door and lift and lower the drawbridge however each are well hidden such that they do not ruin the aesthetics of the castle.
The lattice patterned portcullis looks sturdy and reinforced.
Bag 25 – Finishing off the castle wall details
This bag handles the finishing details on the castle walls. A series of 1×1 curved tiles litter the side of the wall to create beneath the battlement to add a final detail of texture and illusion of support. The rounded crenelation adorning the castle parapets add the finishing rounding that we have seen on all the castle’s walls giving the worn rock feel to the castle. This gives the castle a clean and polished appearance. Flying high above the keep and towers are the royal flags. Donning the colors red, white, and blue and bearing the Lion it is immediately apparent what faction rules this castle.
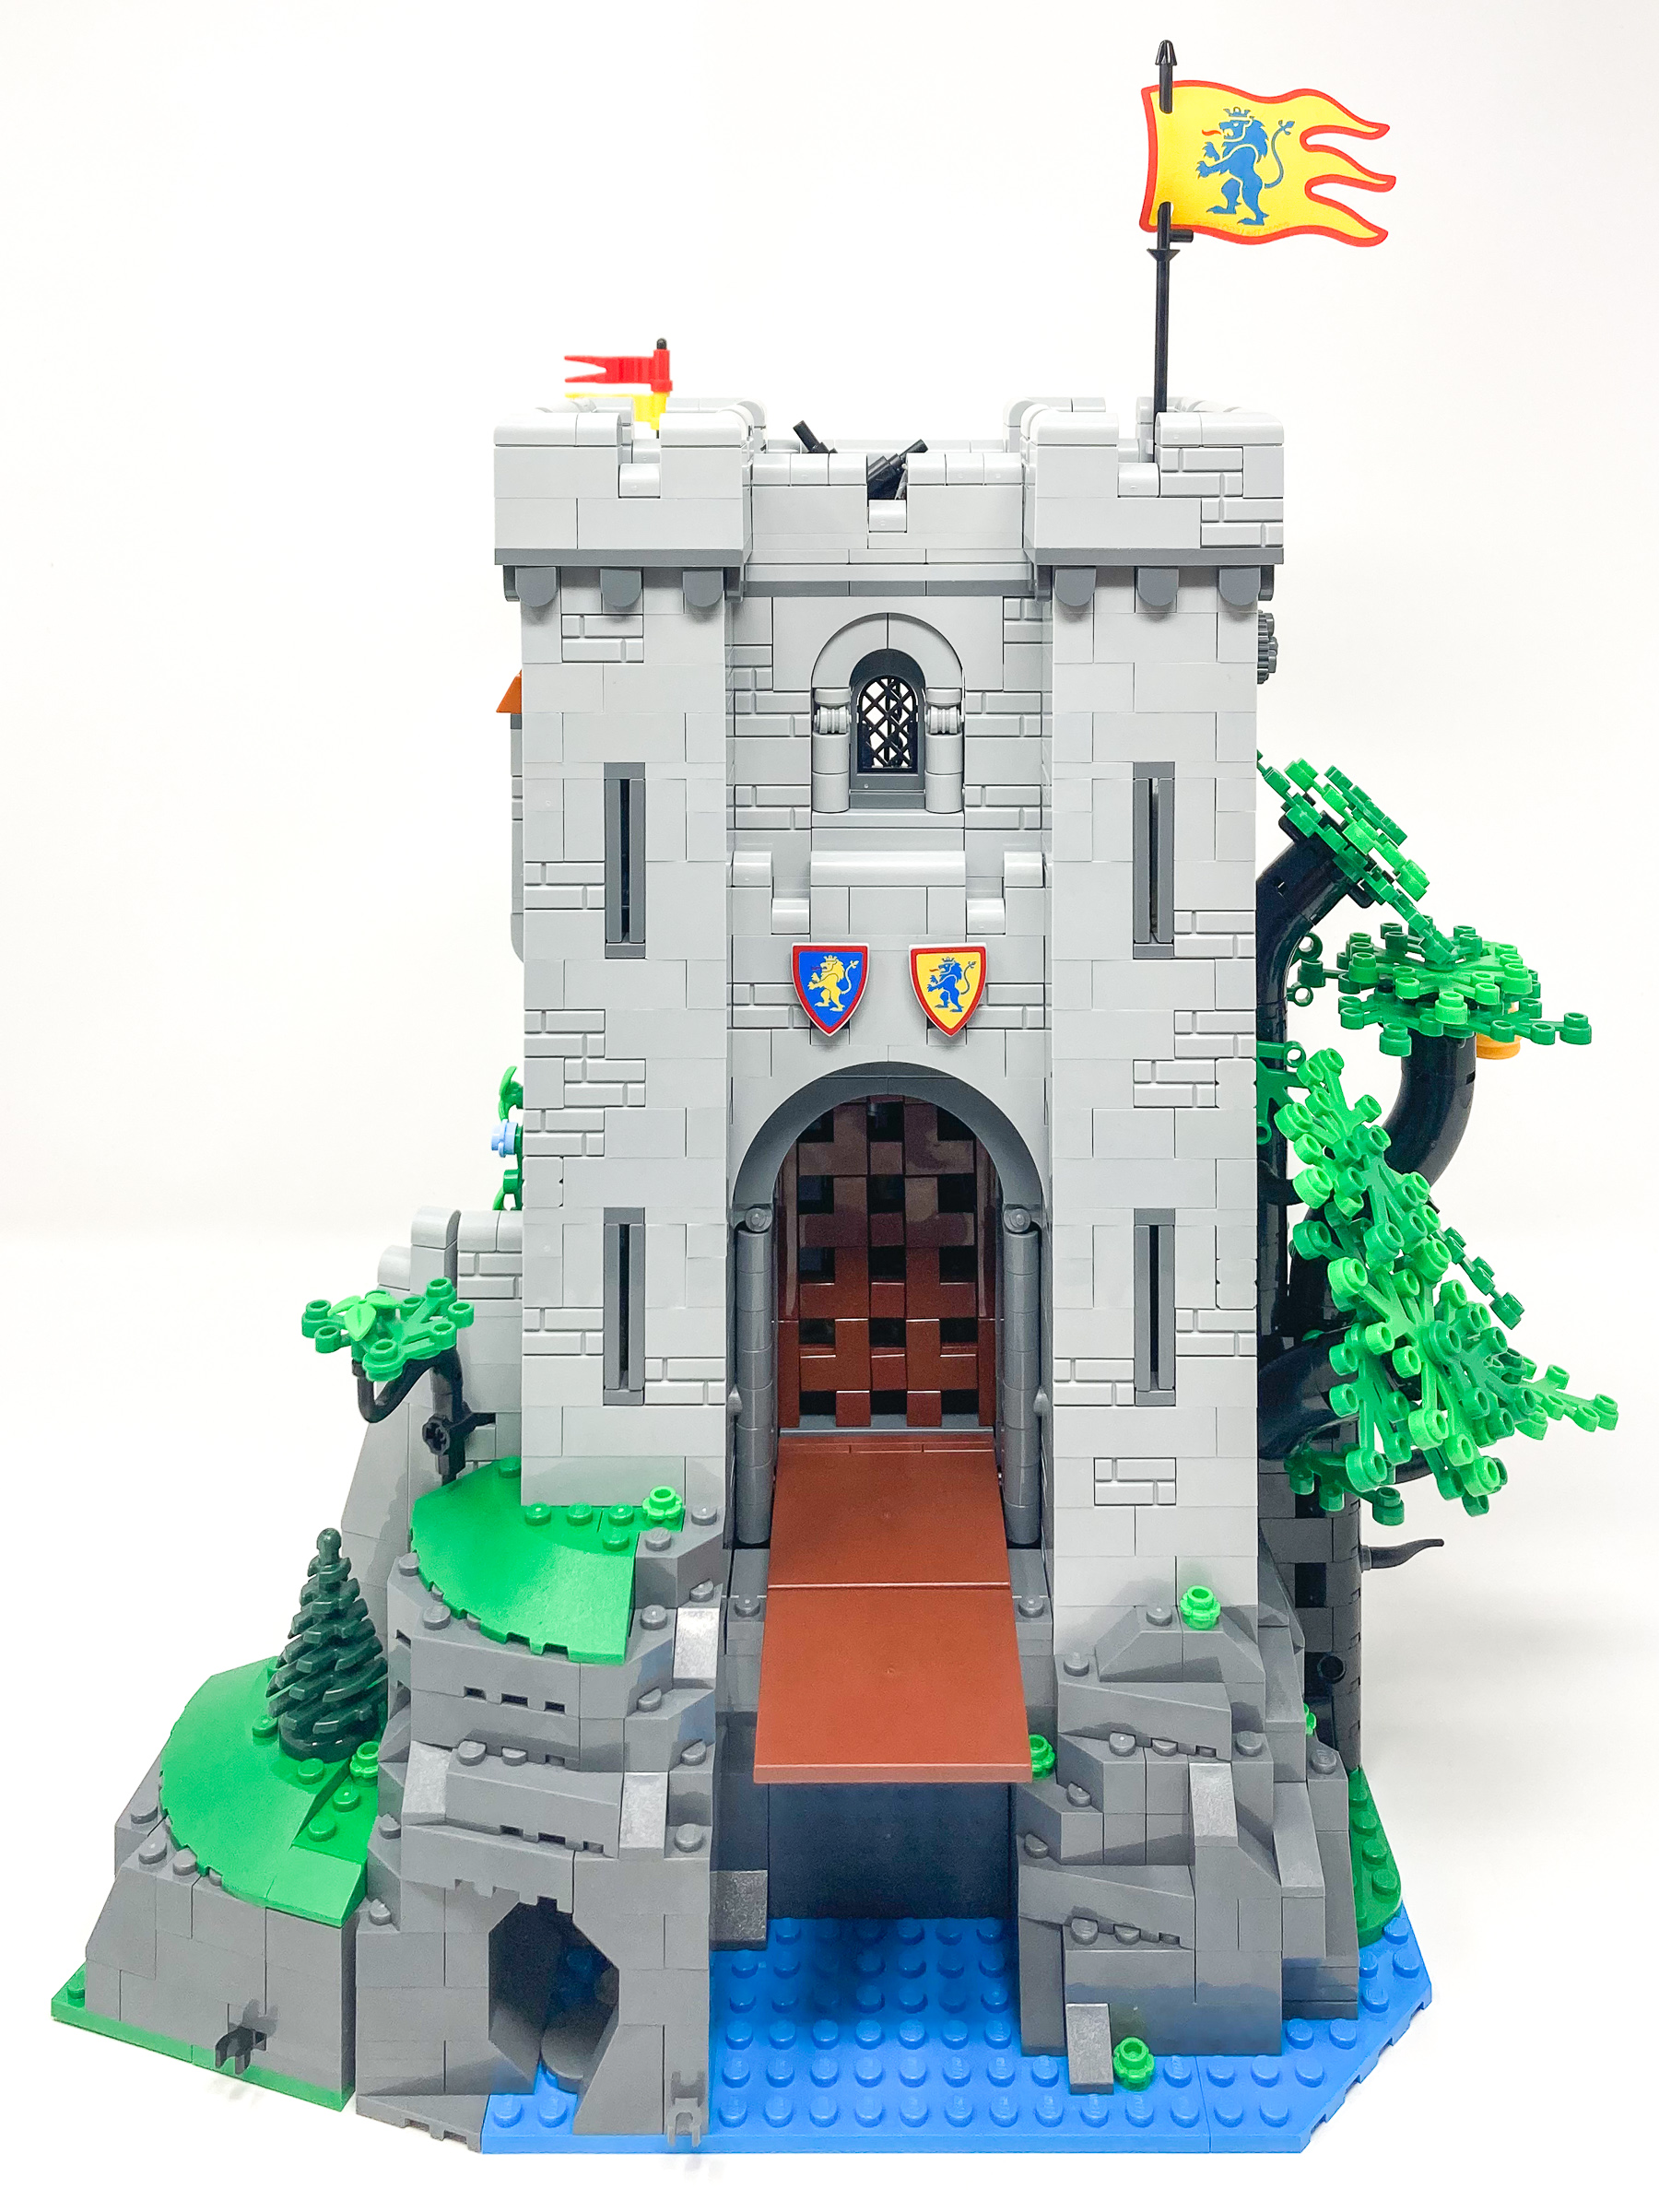
The flag flying high lets everyone know who lives in this castle.
Stage 26 – Castle entry ramp
The final thing we build is the ramp leading up to the castle this ramp is slightly angled which is the final crown on this castle once again showing how varied but slight angles can accentuate the set so much more. The use of slopes, arches and a variety of bricks makes this bridge feel exactly like a historic bridge all with structural support alongside aesthetic appeal.
The ramp is partially submerged in water which contrasts the other half being in the grass.
To connect the ramp to the rest of the castle the designers once again use a clip piece to attach it to existing rods on the base of the stones which connects everything together so well. The drawbridge rests perfectly on the edge of the bridge acting as the entryway into the castle and a wonderful final build in this set. Once put together you can appreciate and see everything put in place.
Connected to the main castle we finally have an entry way to get into the castle.
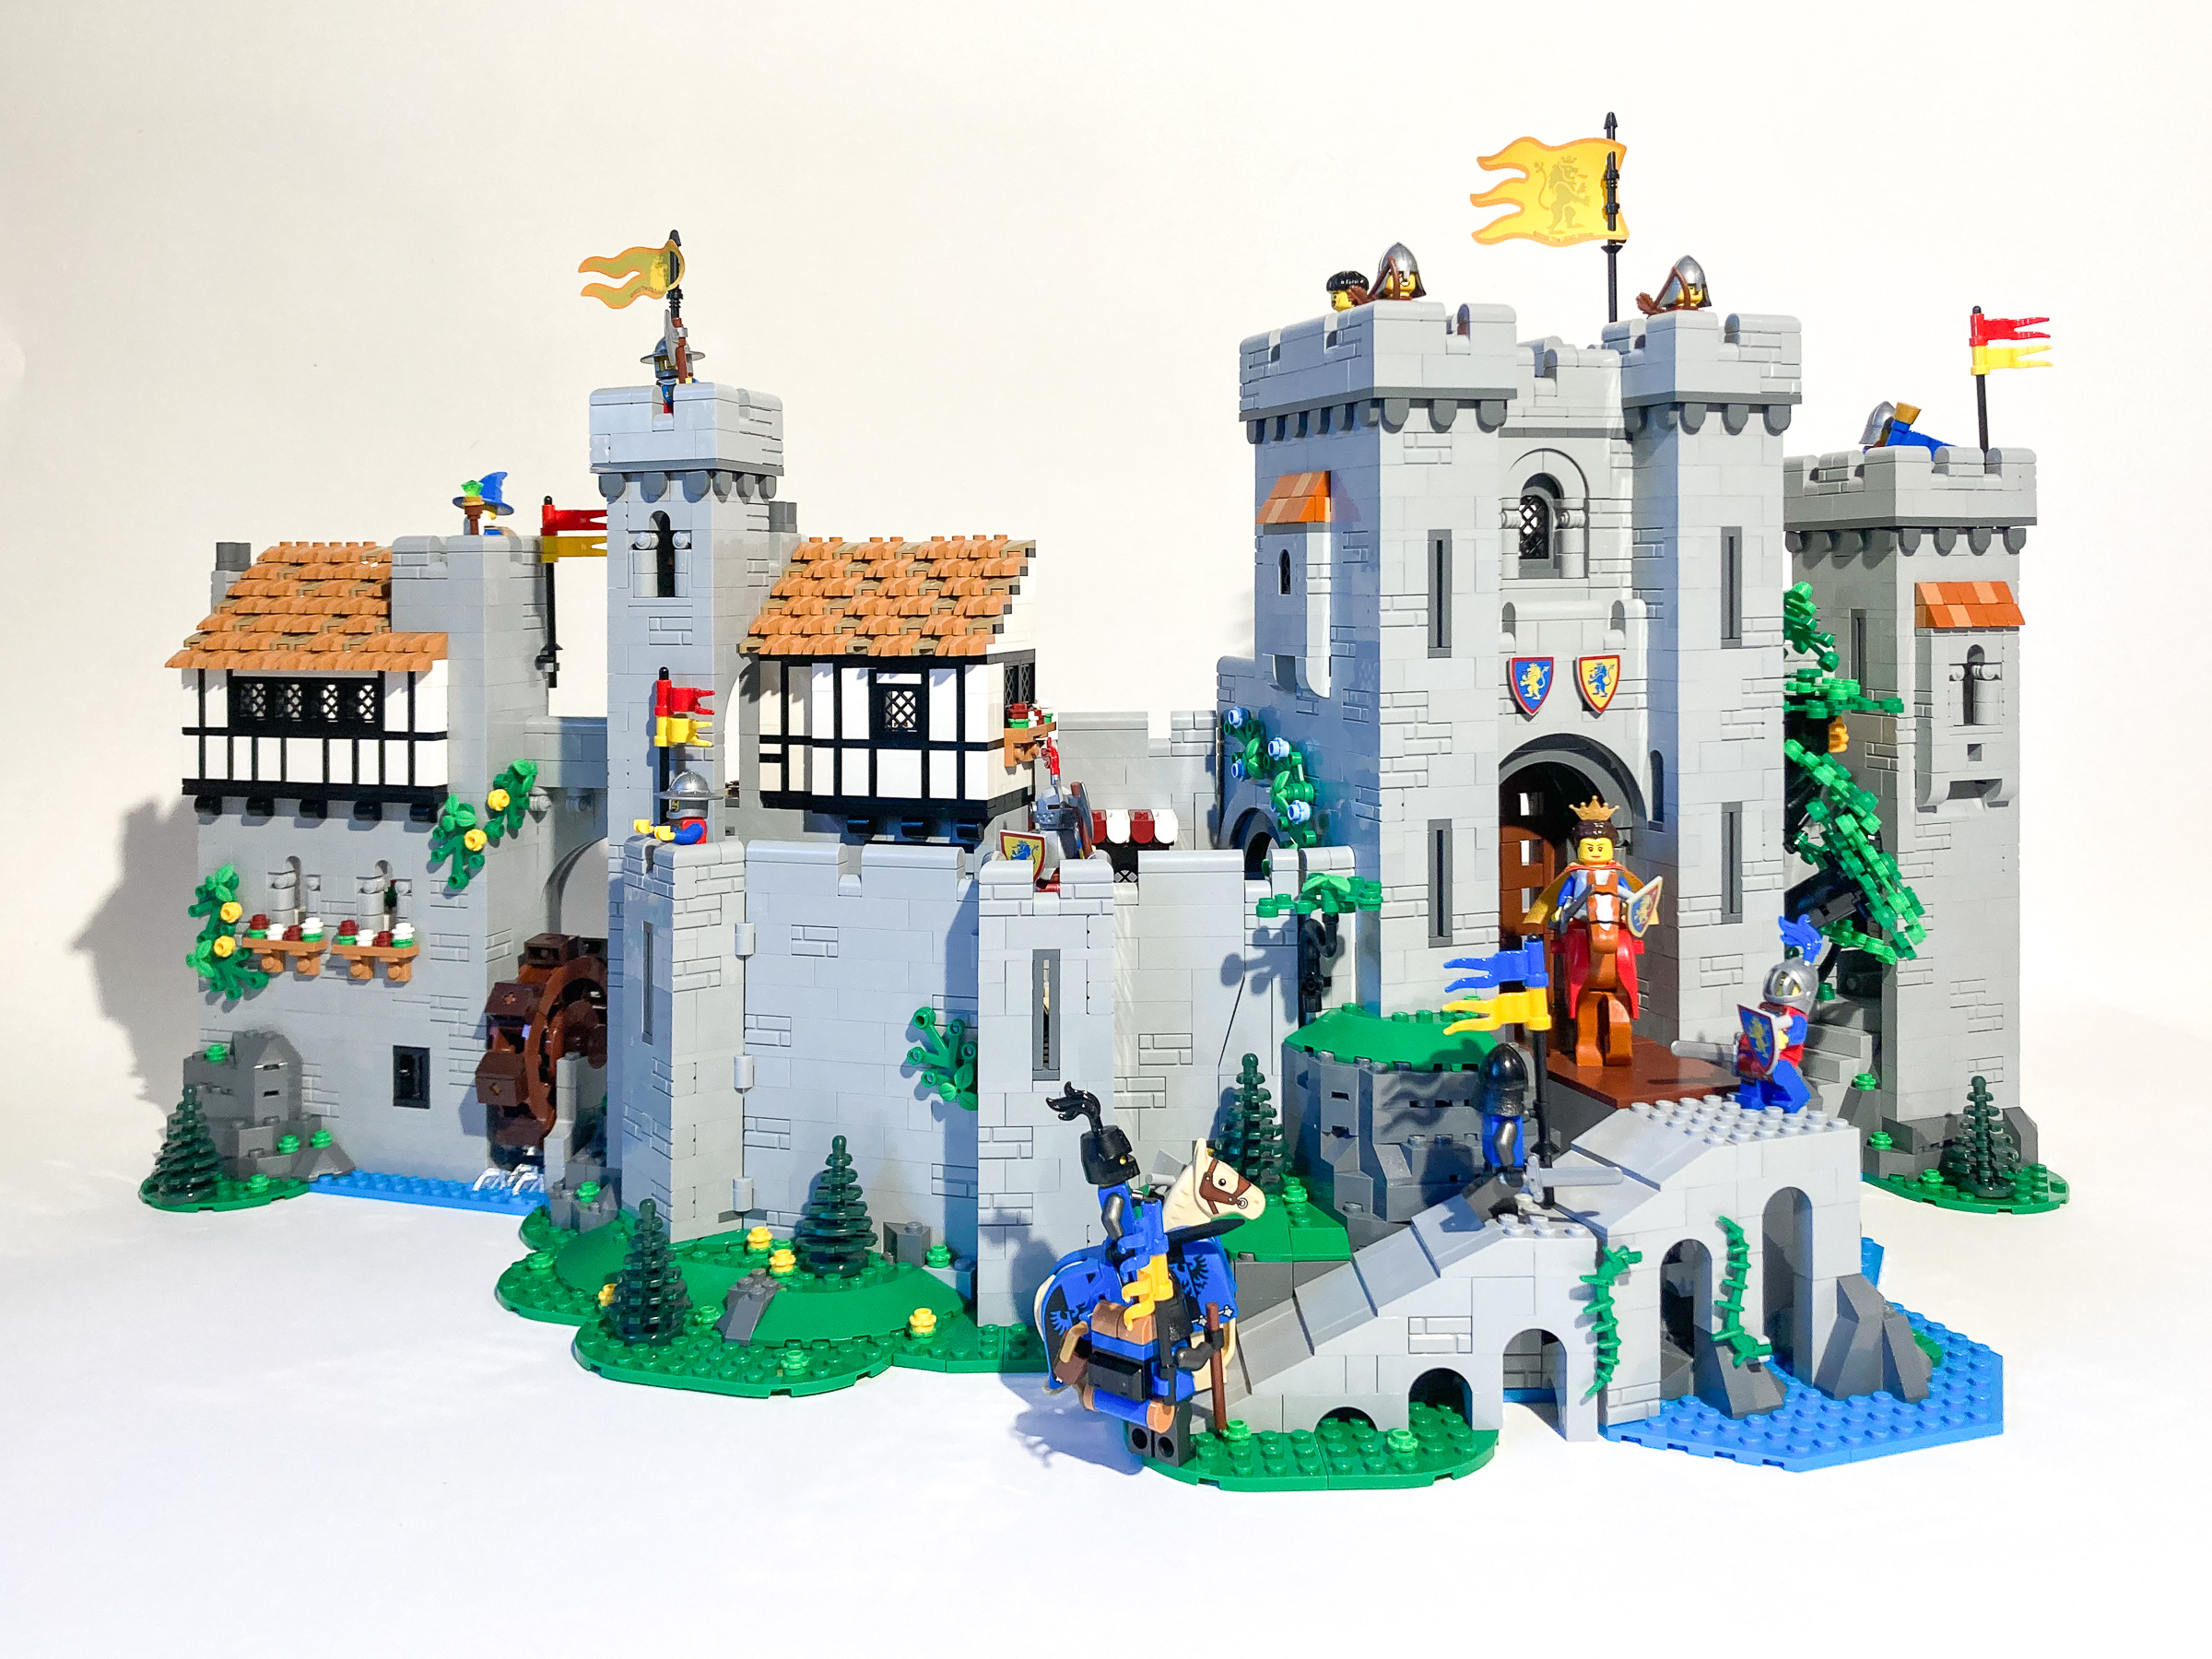
Connecting the halves
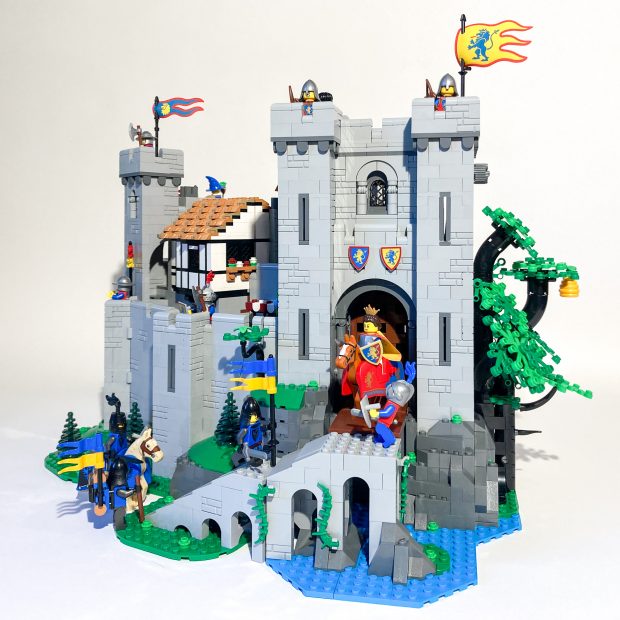
As the two halves have been fully built, we can attach them using clips and see everything in its full glory. From distinct varied colors and angles to the contrasting shapes this castle is wonderfully appeasing to the eye and is full of volume and shape. The castle when closed does not feel large, however is very densely packed with a ton of details hidden within the castle walls. The castle can however be opened up to expand it further but in my opinion the closed feel makes it look more like a bustling busy castle fortified to protect those living within its walls.
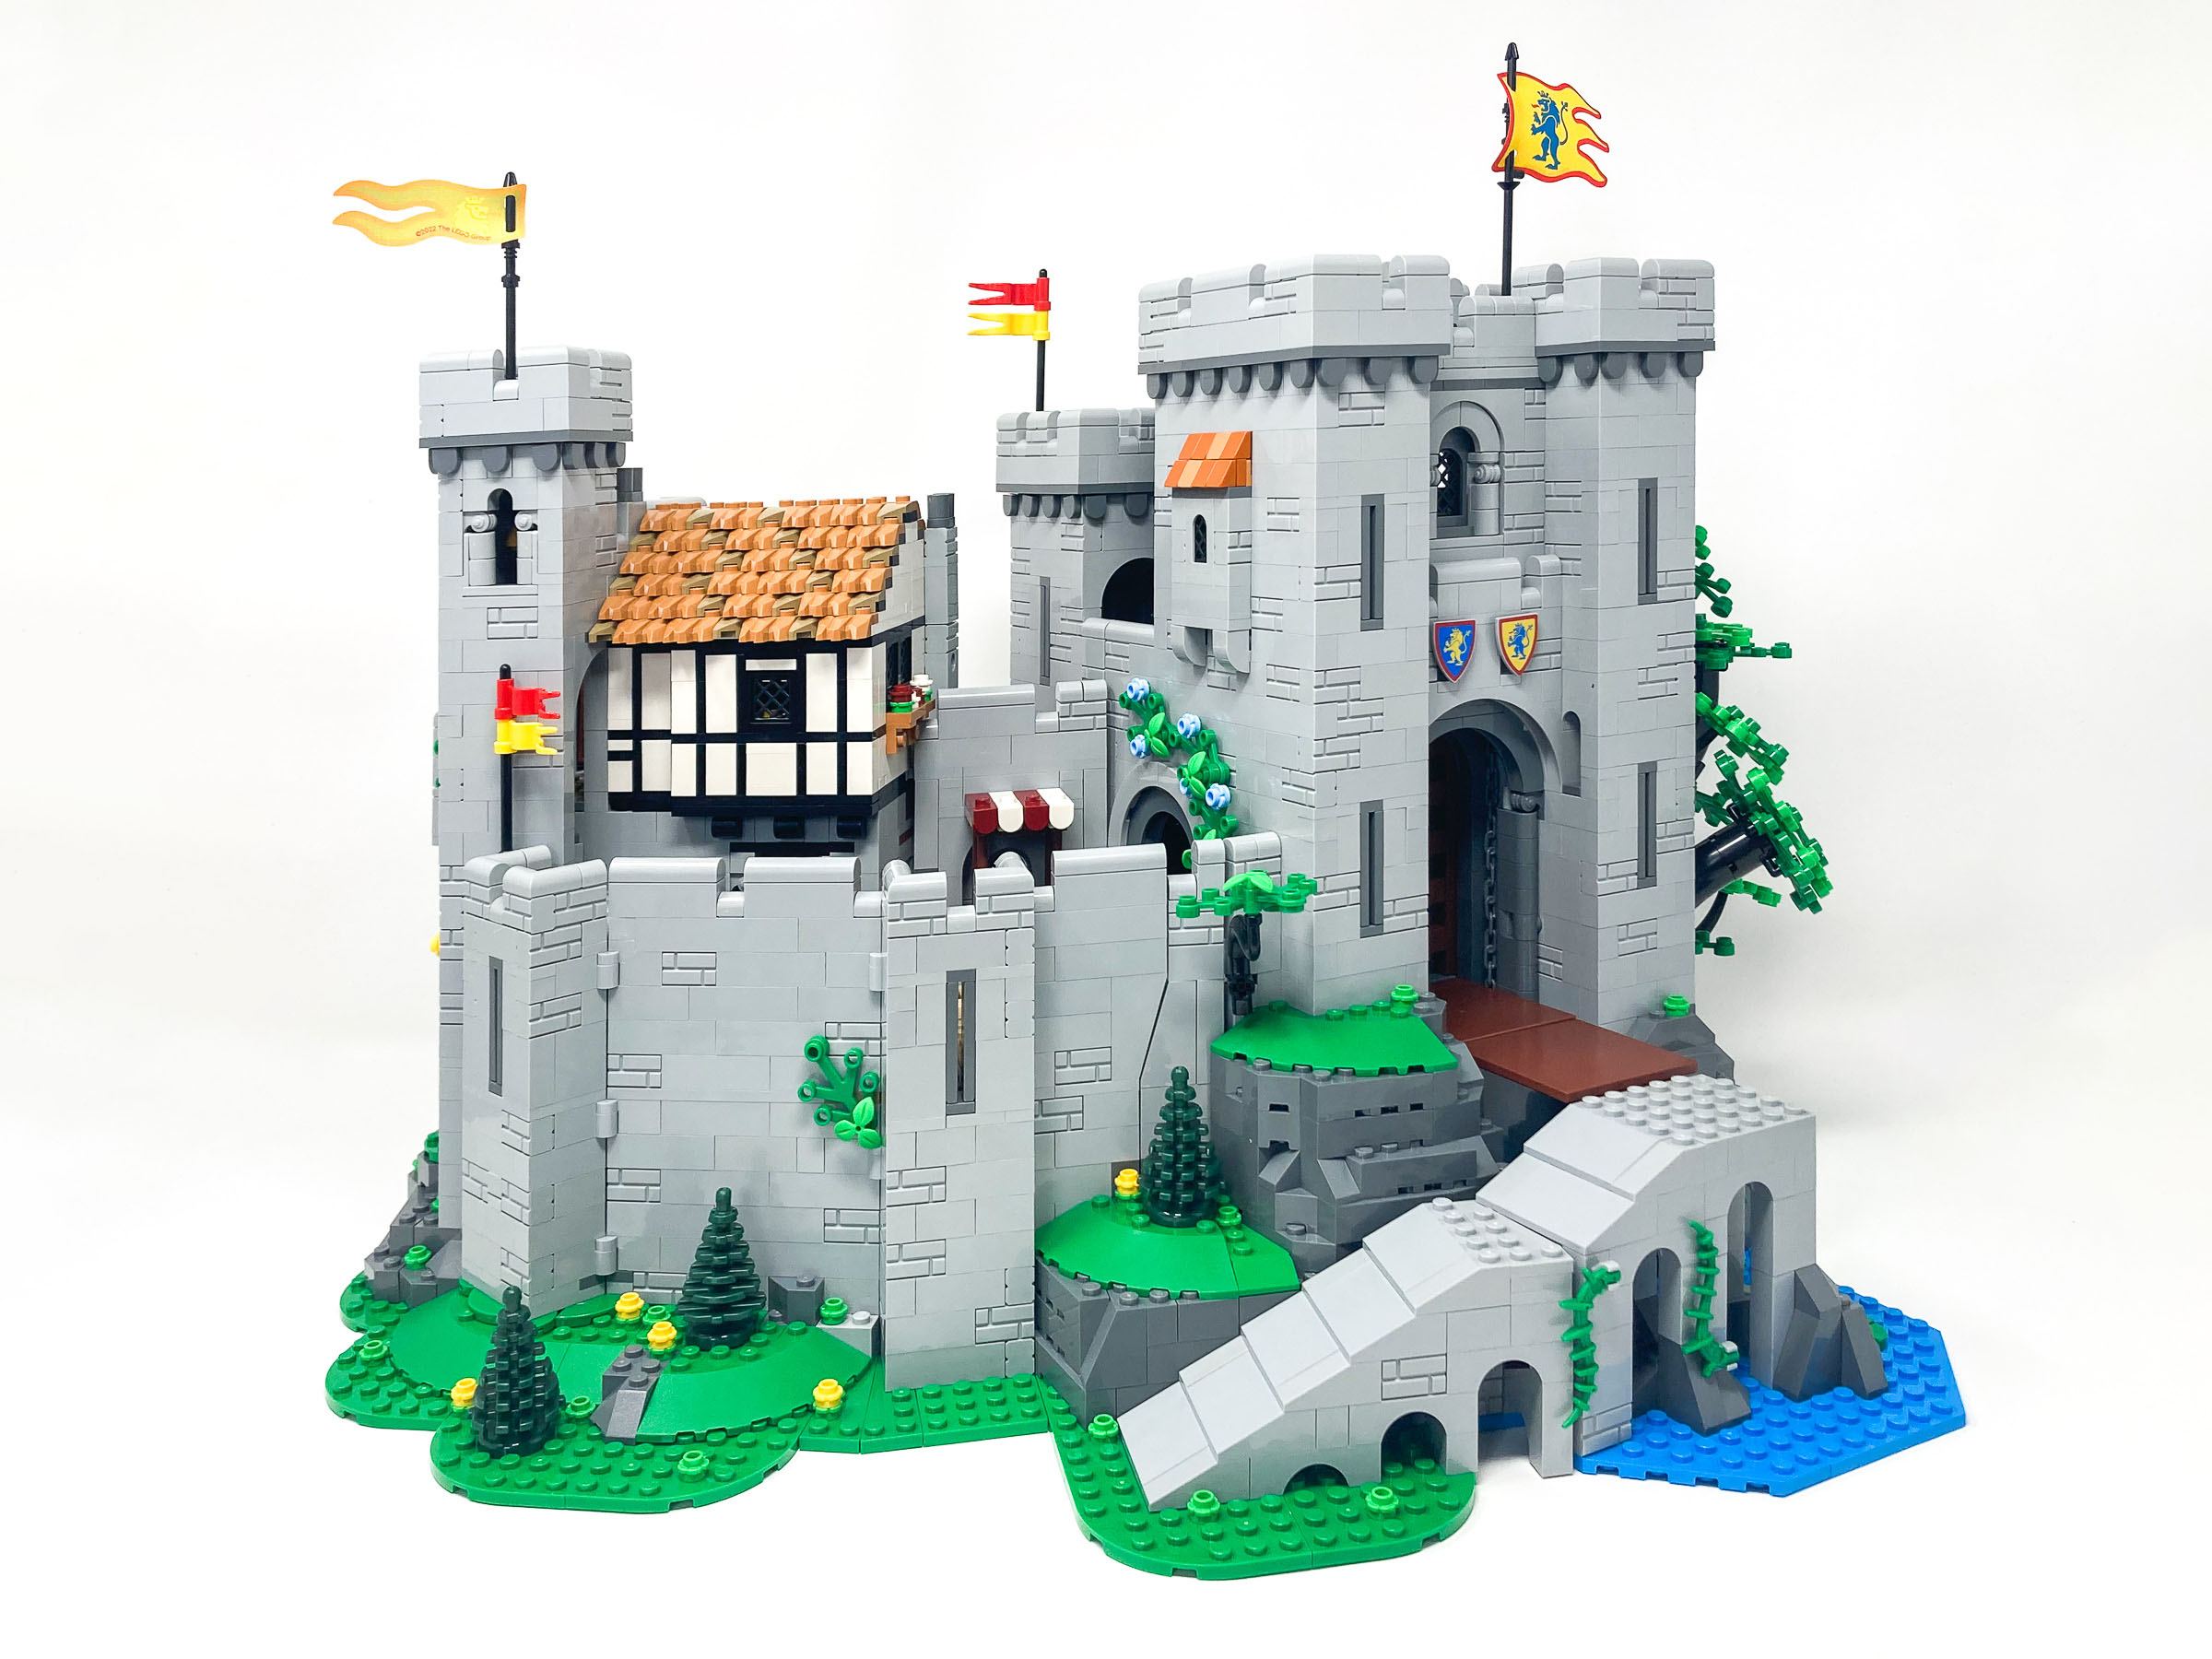
When finally put together we can see how the two halves build out a fully fleshed out castle.
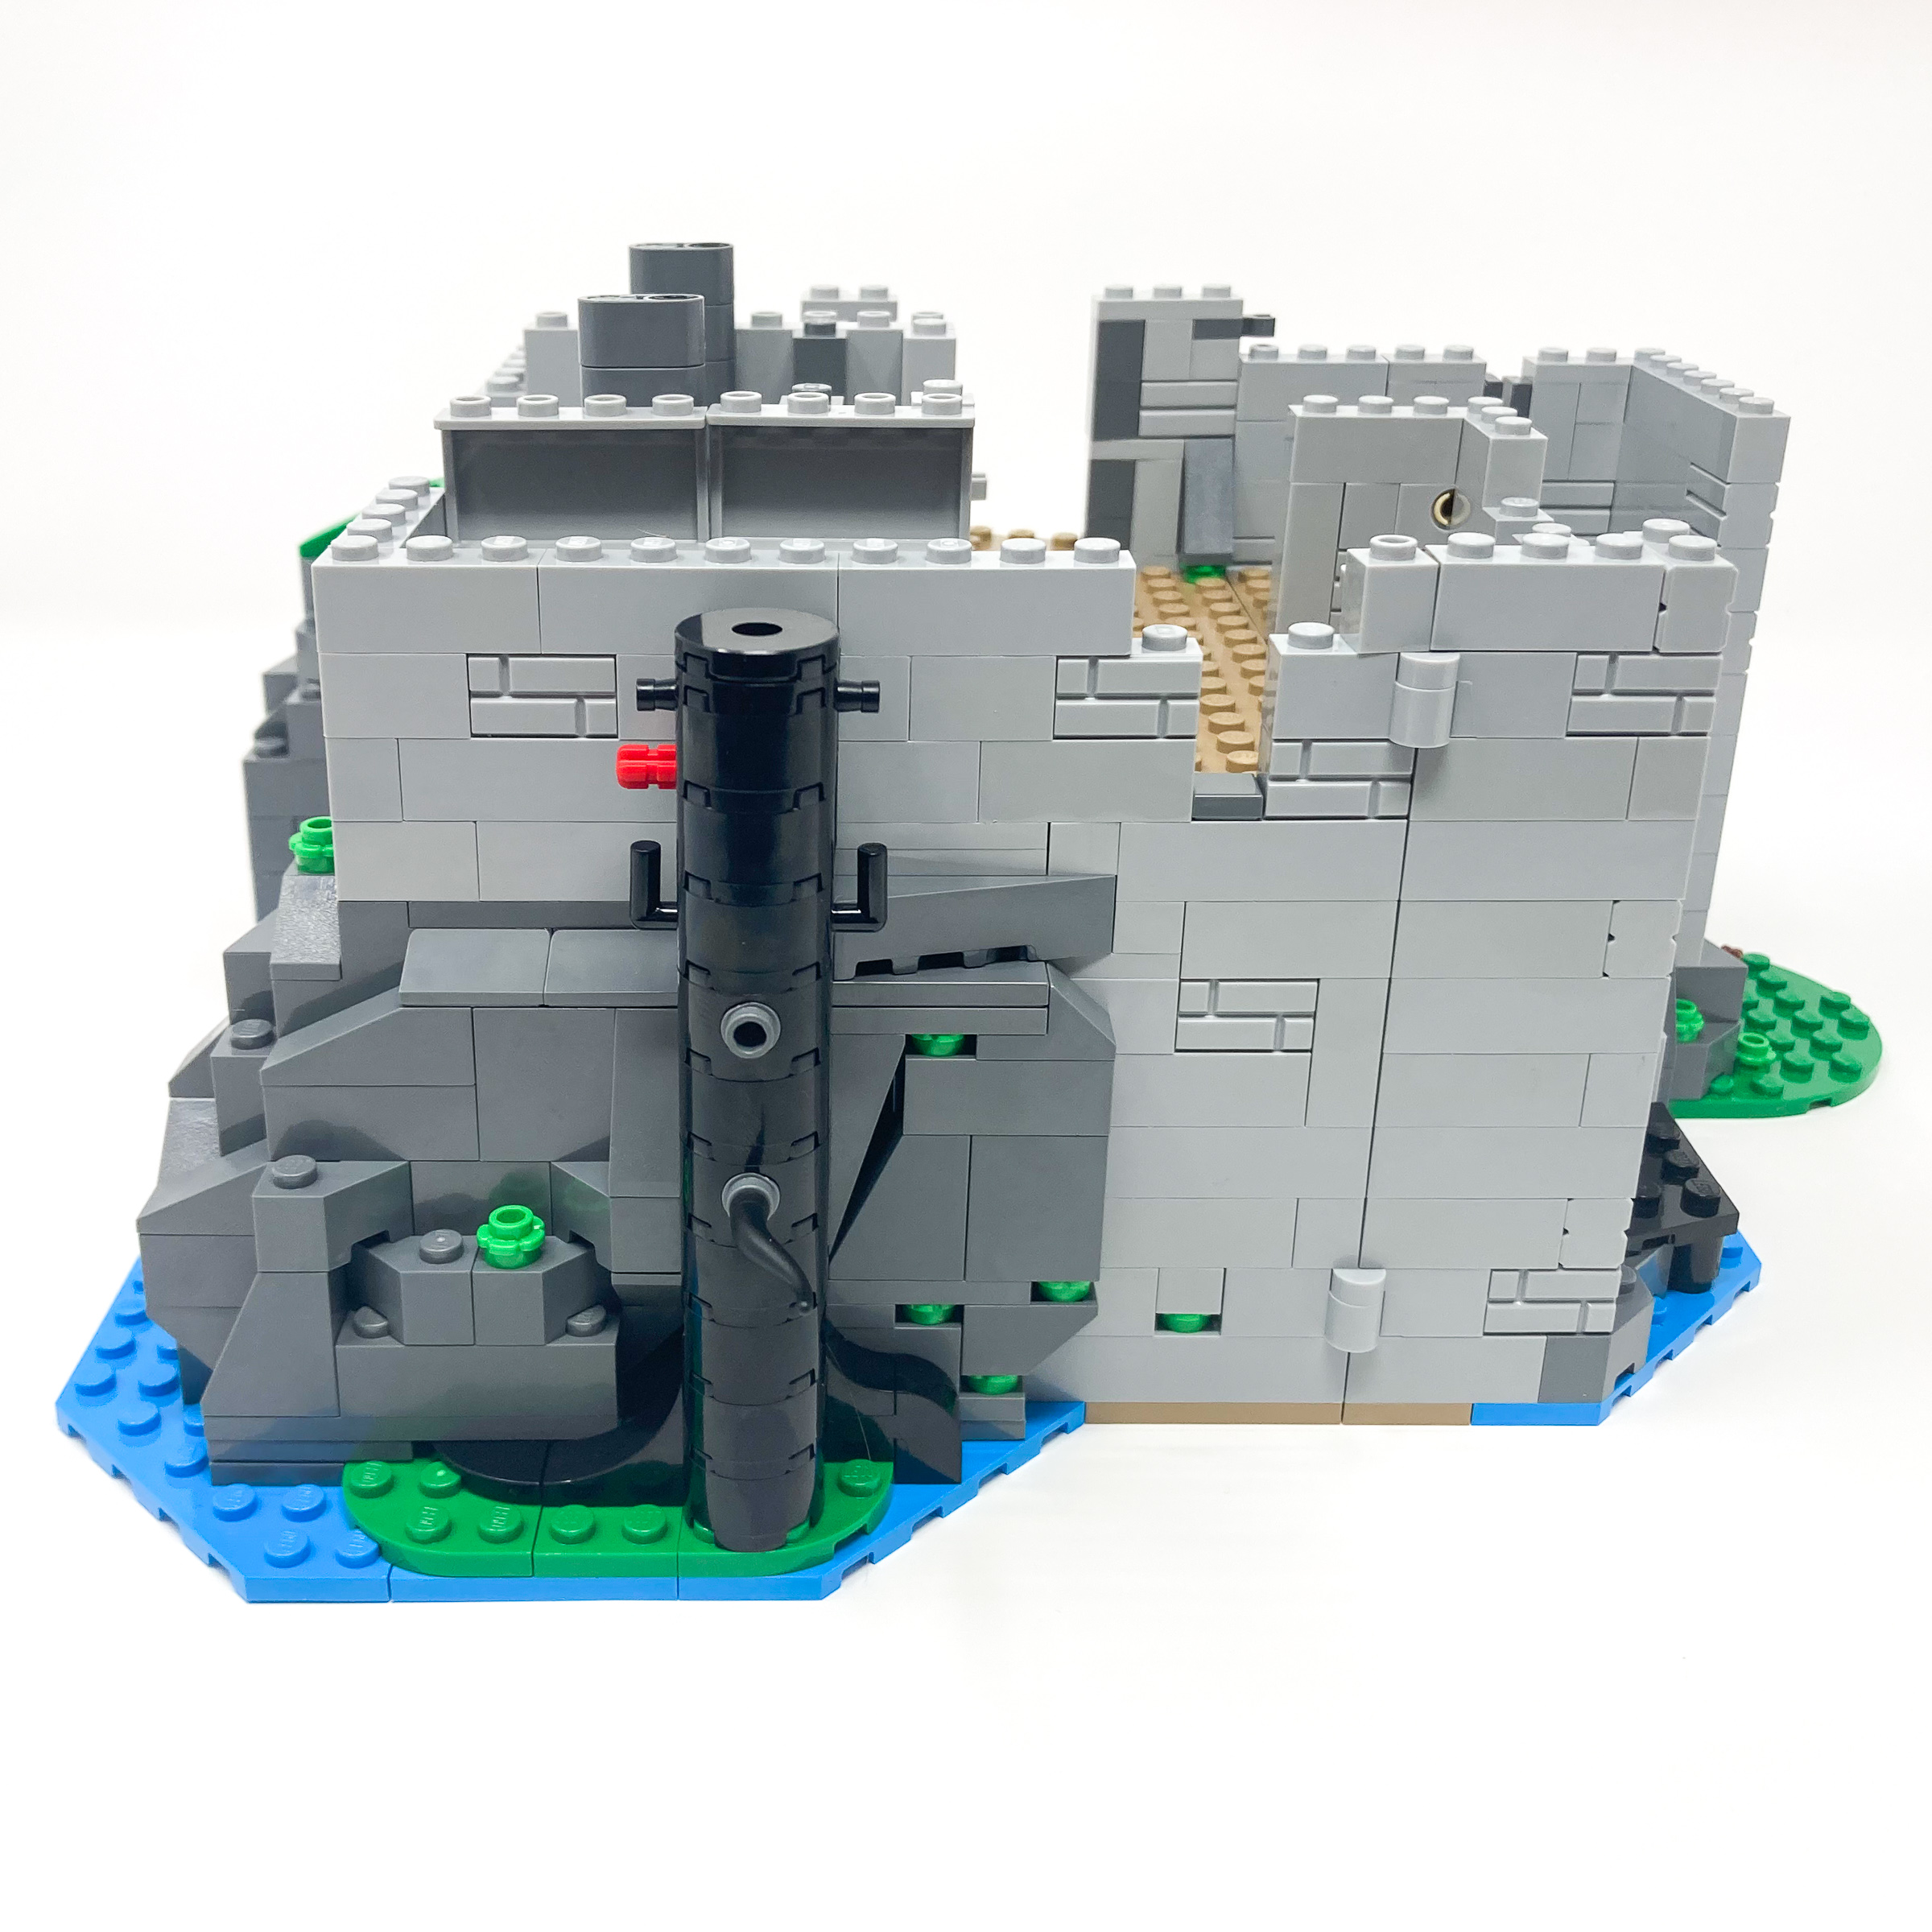
When spinning the castle around we can see even more details in the back reminding us that the designers did not cut corners when designing this and intended it to be displayed from every direction and angle. Every section is thought out to ensure that no matter what direction you display this set from it looks fully thought out and detailed.
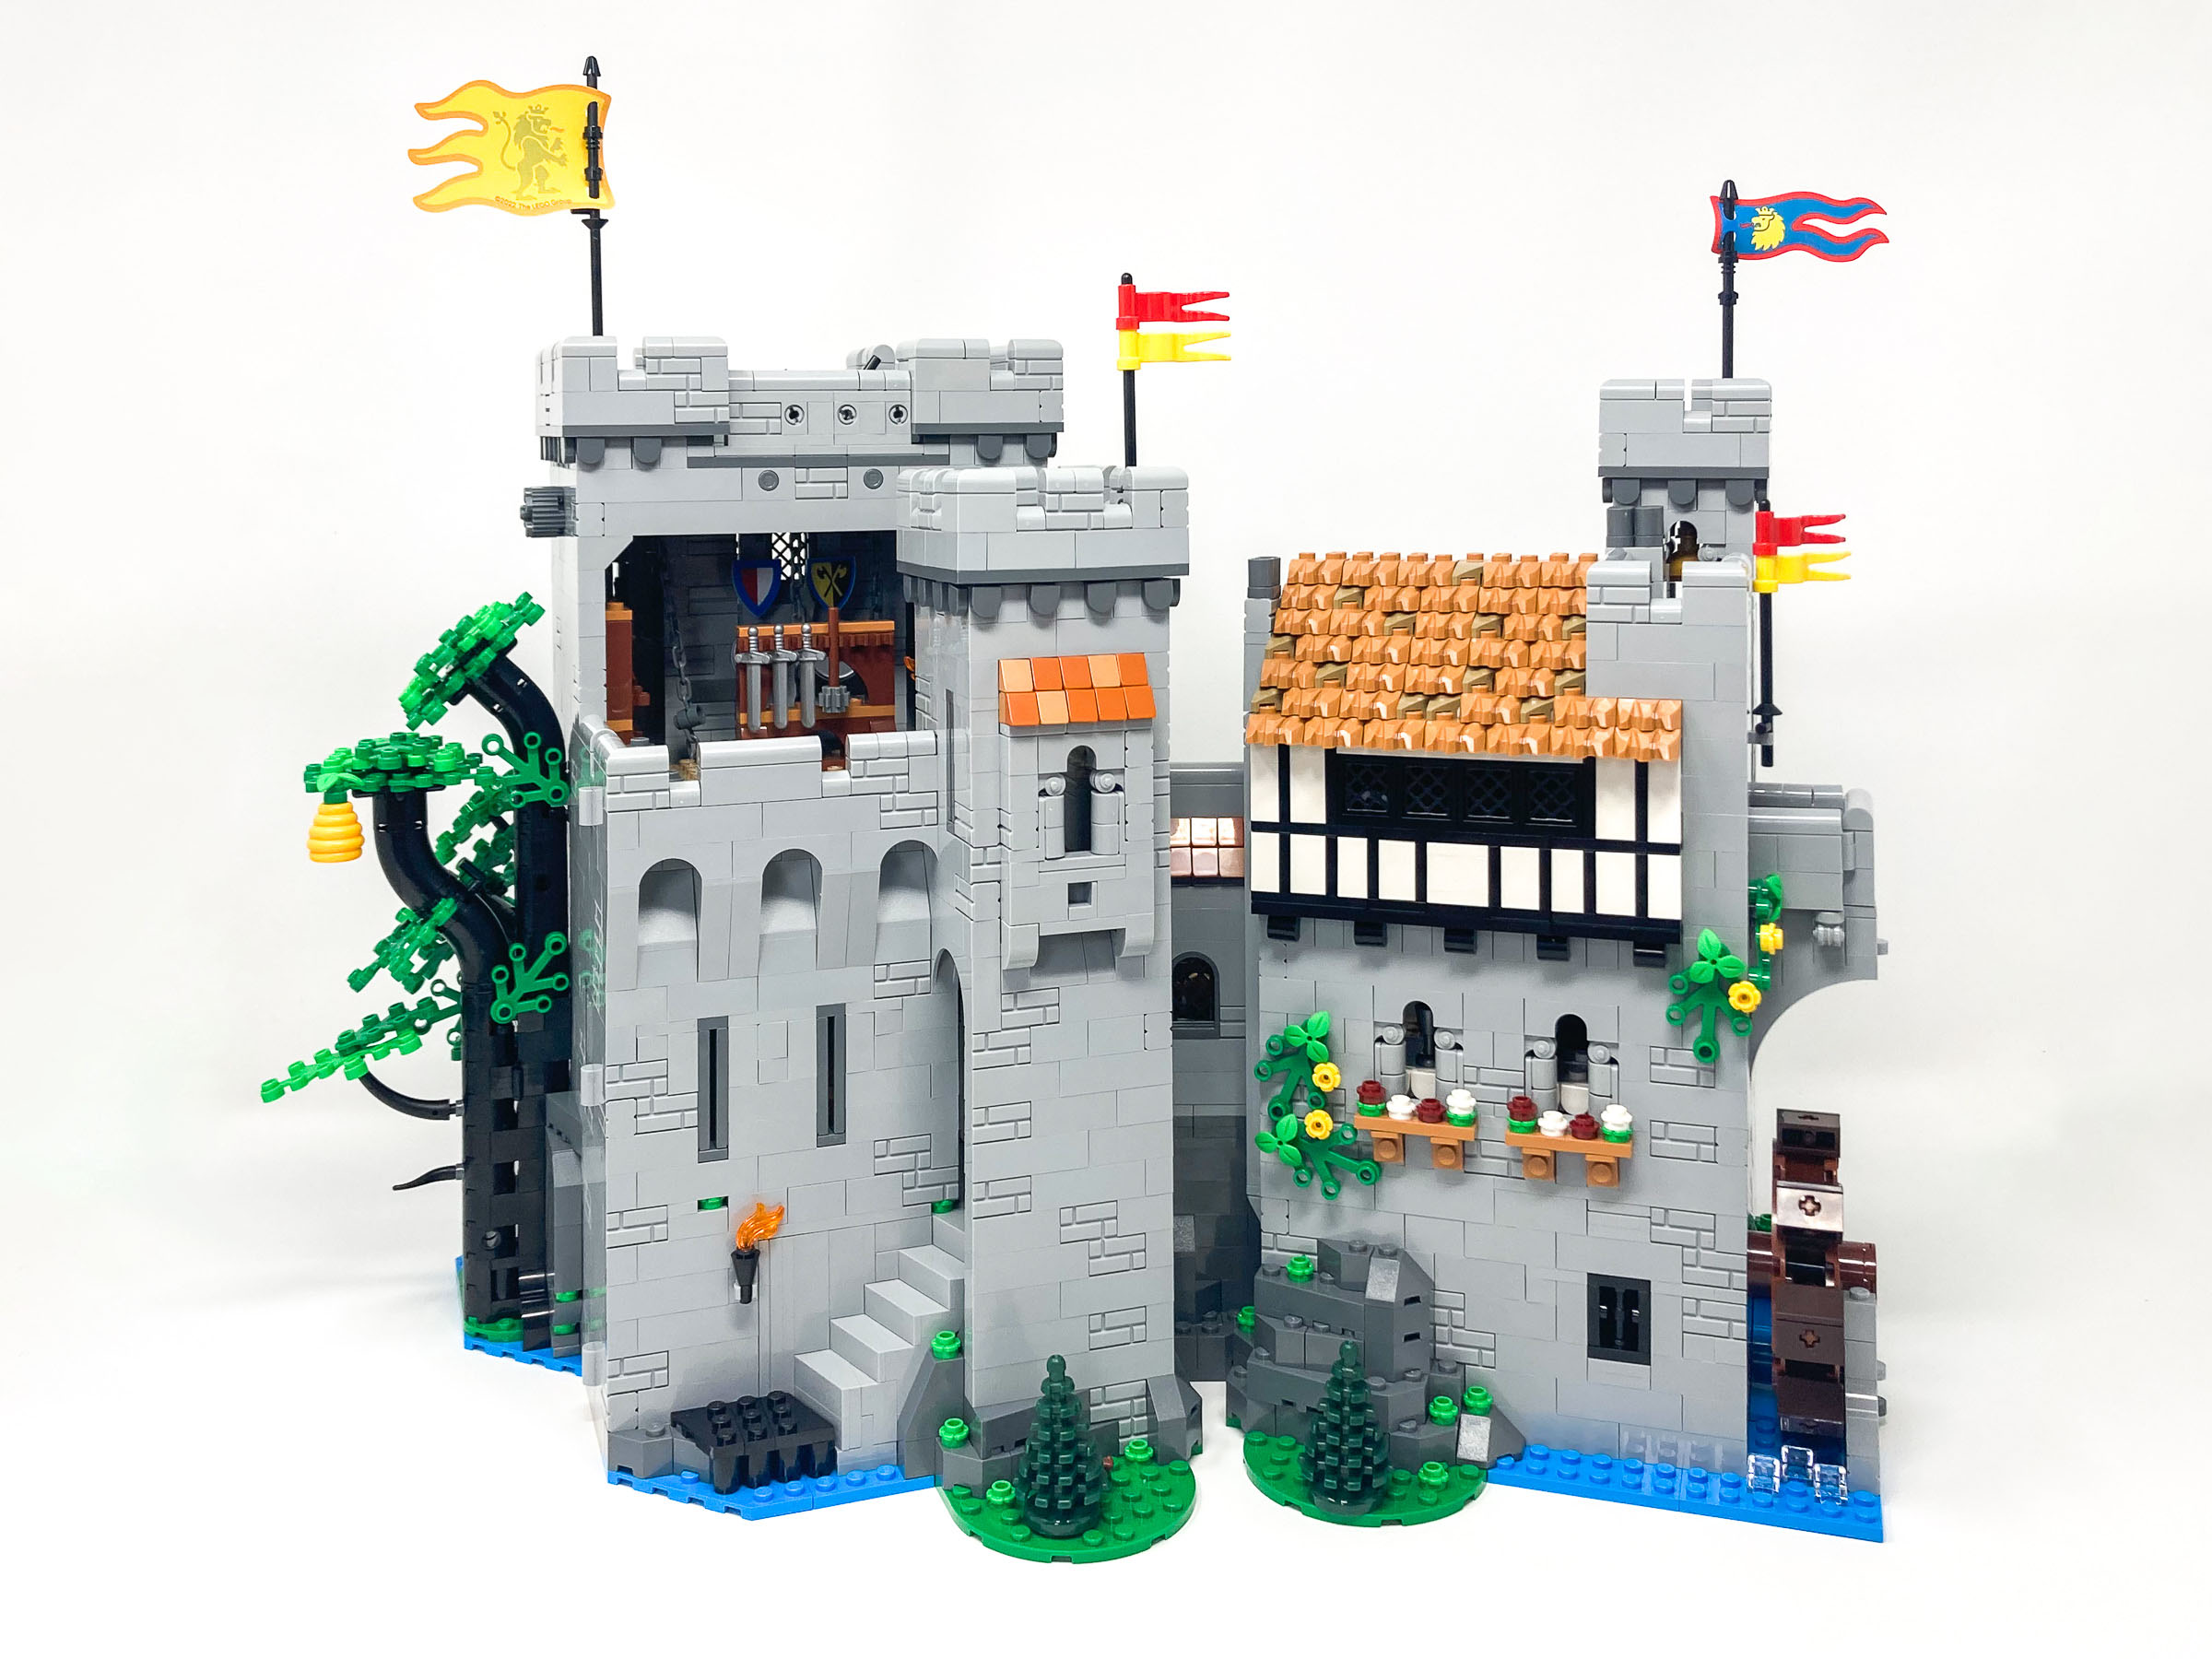
There is a high level of detail when viewed from any angle.
Minifigures
This set comes with a whopping 22 minifigures and 4 animals. In particular, the addition of desirable animals adds additional value as can be expensive to purchase separately. The minifigures represent three factions: Black Falcons, Lion Knights, and Forestmen. In addition to these factions, the set includes several additional inhabitants of the castle. It’s nice to see that all of the figures come with both front and back printing, and several have dual-printed heads.
The visitors to this castle are the Black Falcons. These figures come with three soldiers, one female and two males, one of whom comes riding on a horse. These minifigures come with banners and a brick-built backpack. This backpack is far more detailed than any of the molded backpacks LEGO has offered and includes a pail that is either used by the soldiers as cooking on their journey (or perhaps for hygiene purposes).

The traveling Black Falcons are outnumbered (but come as friends).
Despite being named the Forestmen, we actually get two female minifigs and just one male. These minifigures come bearing their iconic quivers and a lute, suggesting that this faction has come to the castle under the guise of entertainers, but seem to have an ulterior motive. The red feather in these figures’ cap along with the red sleeves under a green tunic accentuate the colors in these figures’ attire making them stand out, despite being a minority faction in this set.
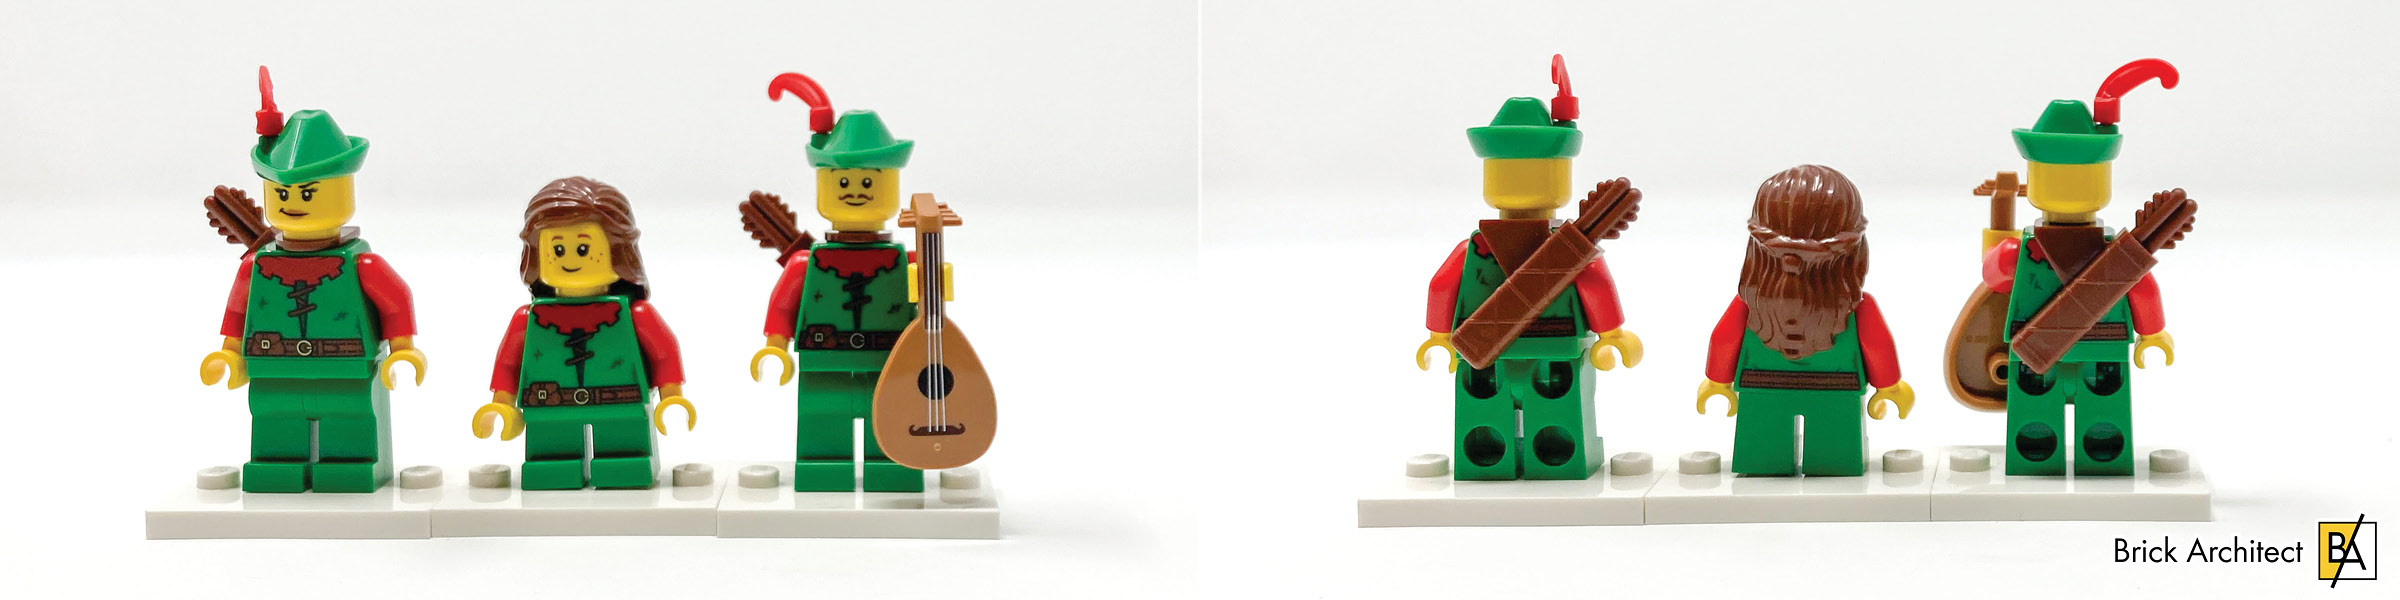
Is it possible that these ‘entertainers’ have a secret base hidden in the castle?
Aside from visitors the castle is also home to five inhabitants, these include a young boy, a wizard, a cook, a farmer, and a maiden, the former four of whom are male and the latter a female. These minifigures are vary varied in their attires and roles with each of them not only being unique but littered in detail. All that is bar the wizard. The wizard unfortunately has no printing on torso or legs and is honestly a little disappointing. Having seen printed wizard torsos both in the Build-A-Minifigure station and in Collectible Minifigures I was surprised that LEGO opted to keep this minifigure plain.
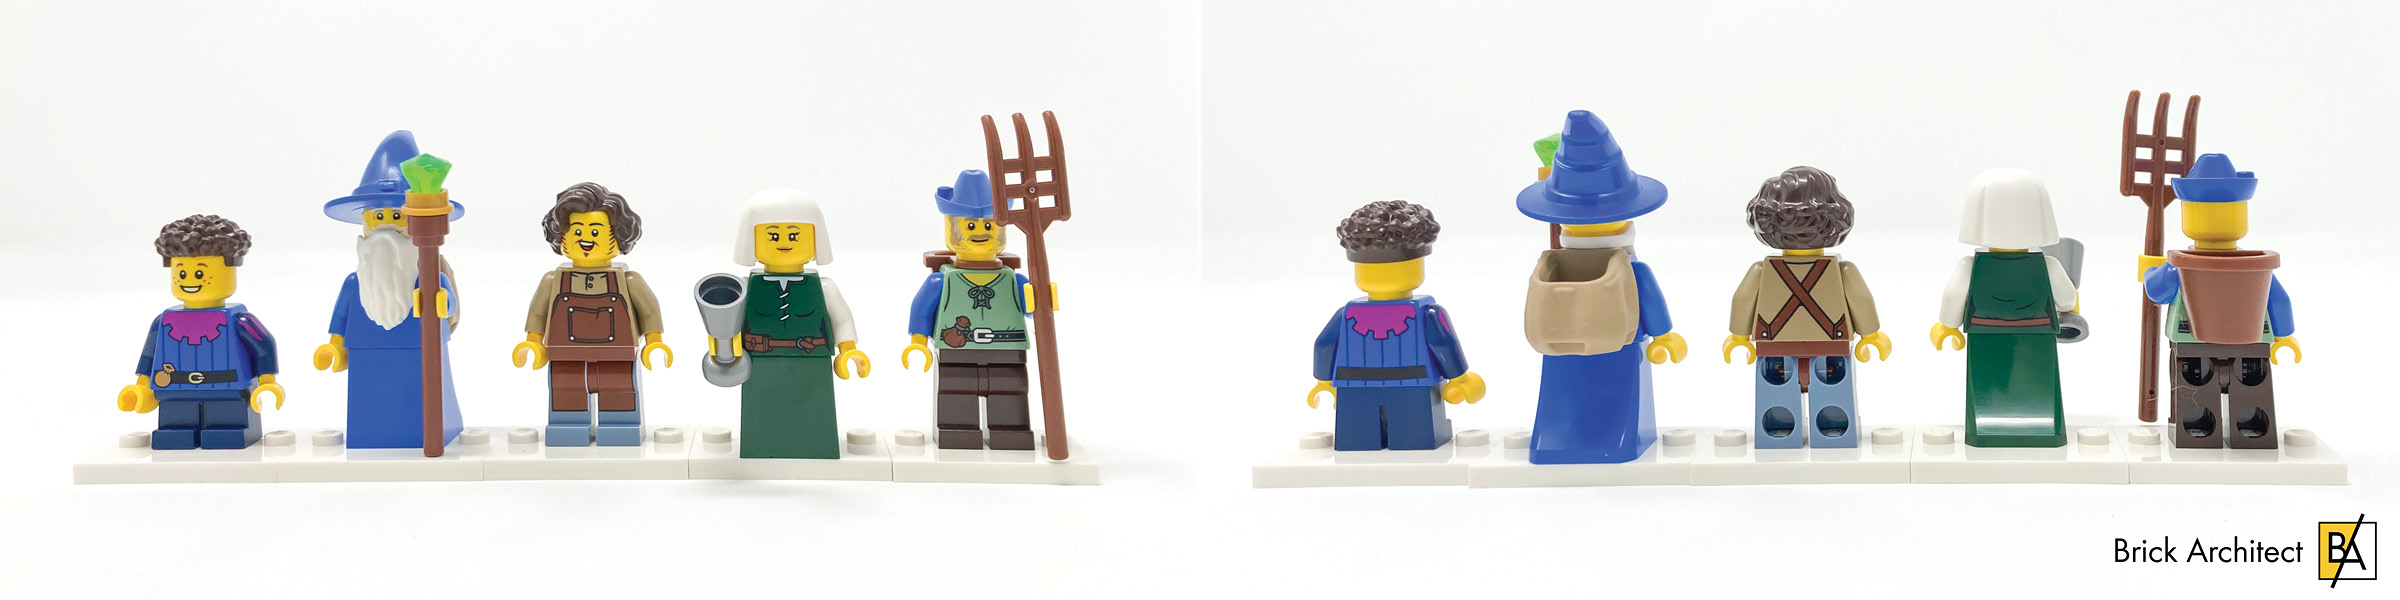
An eclectic selection of civilians are found throughout the castle.
The largest faction in this set is that of the Lion Knights. This set contains 8 Lion Knights soldiers. These soldiers are split evenly between genders and contain everything from horns-men, knights, halberds-men and archers. These figures all have the same torso and legs but using a variety of helmets, weapons, armor and shields each looks distinct and unique.
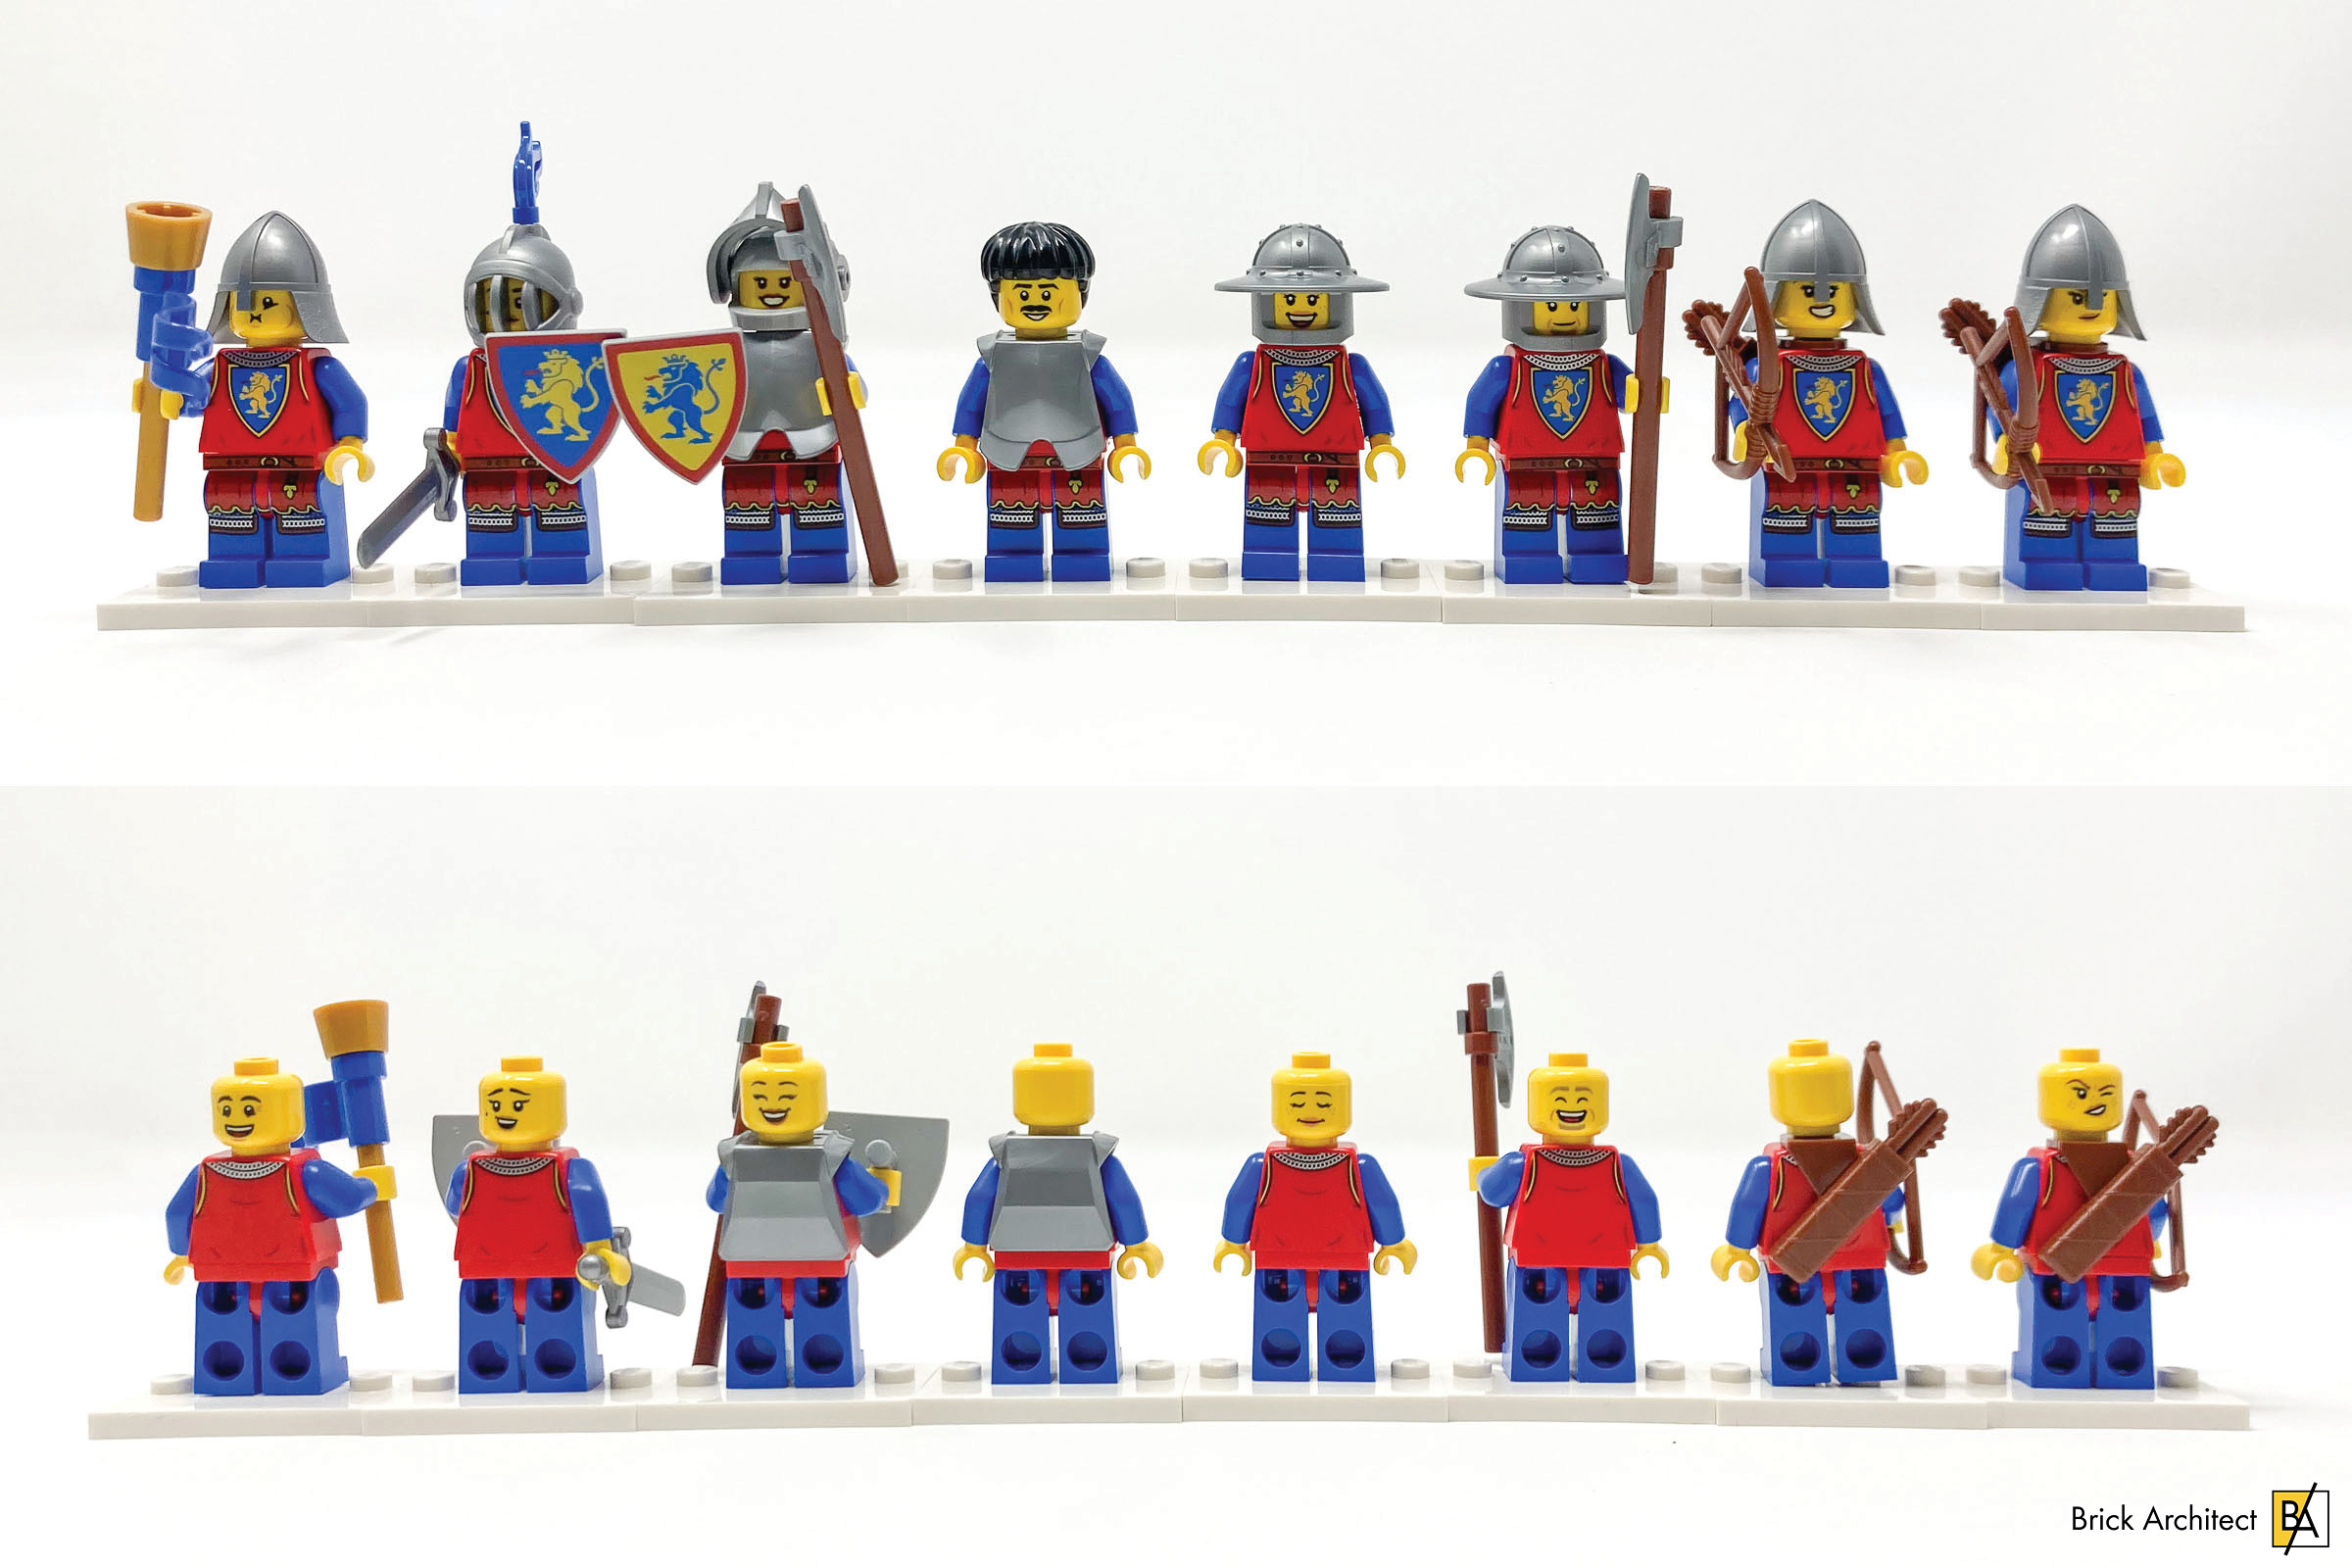
A healthy mix of male and female solders fight for the Queen of the Lion Knights.
The standout figure in this set is the Lion Knight Queen. With two helmet options, one being hair and the other a golden helmet, each option highlights the stature and power this queen has in the kingdom. Riding upon a horse adorned in royal colors, wielding a printed shield, and donning a royale cape this minifigure stands out immediately.

Whether wearing her crown or battle helmet, the level of detail included in this minifigure blows me away.
Of the major printed animals included in this set we have two horses, each in a distinct color, a cow, and a lamb. With each being custom molds and posable, bar the lamb, these are desirable and a wonderful addition to your collection.
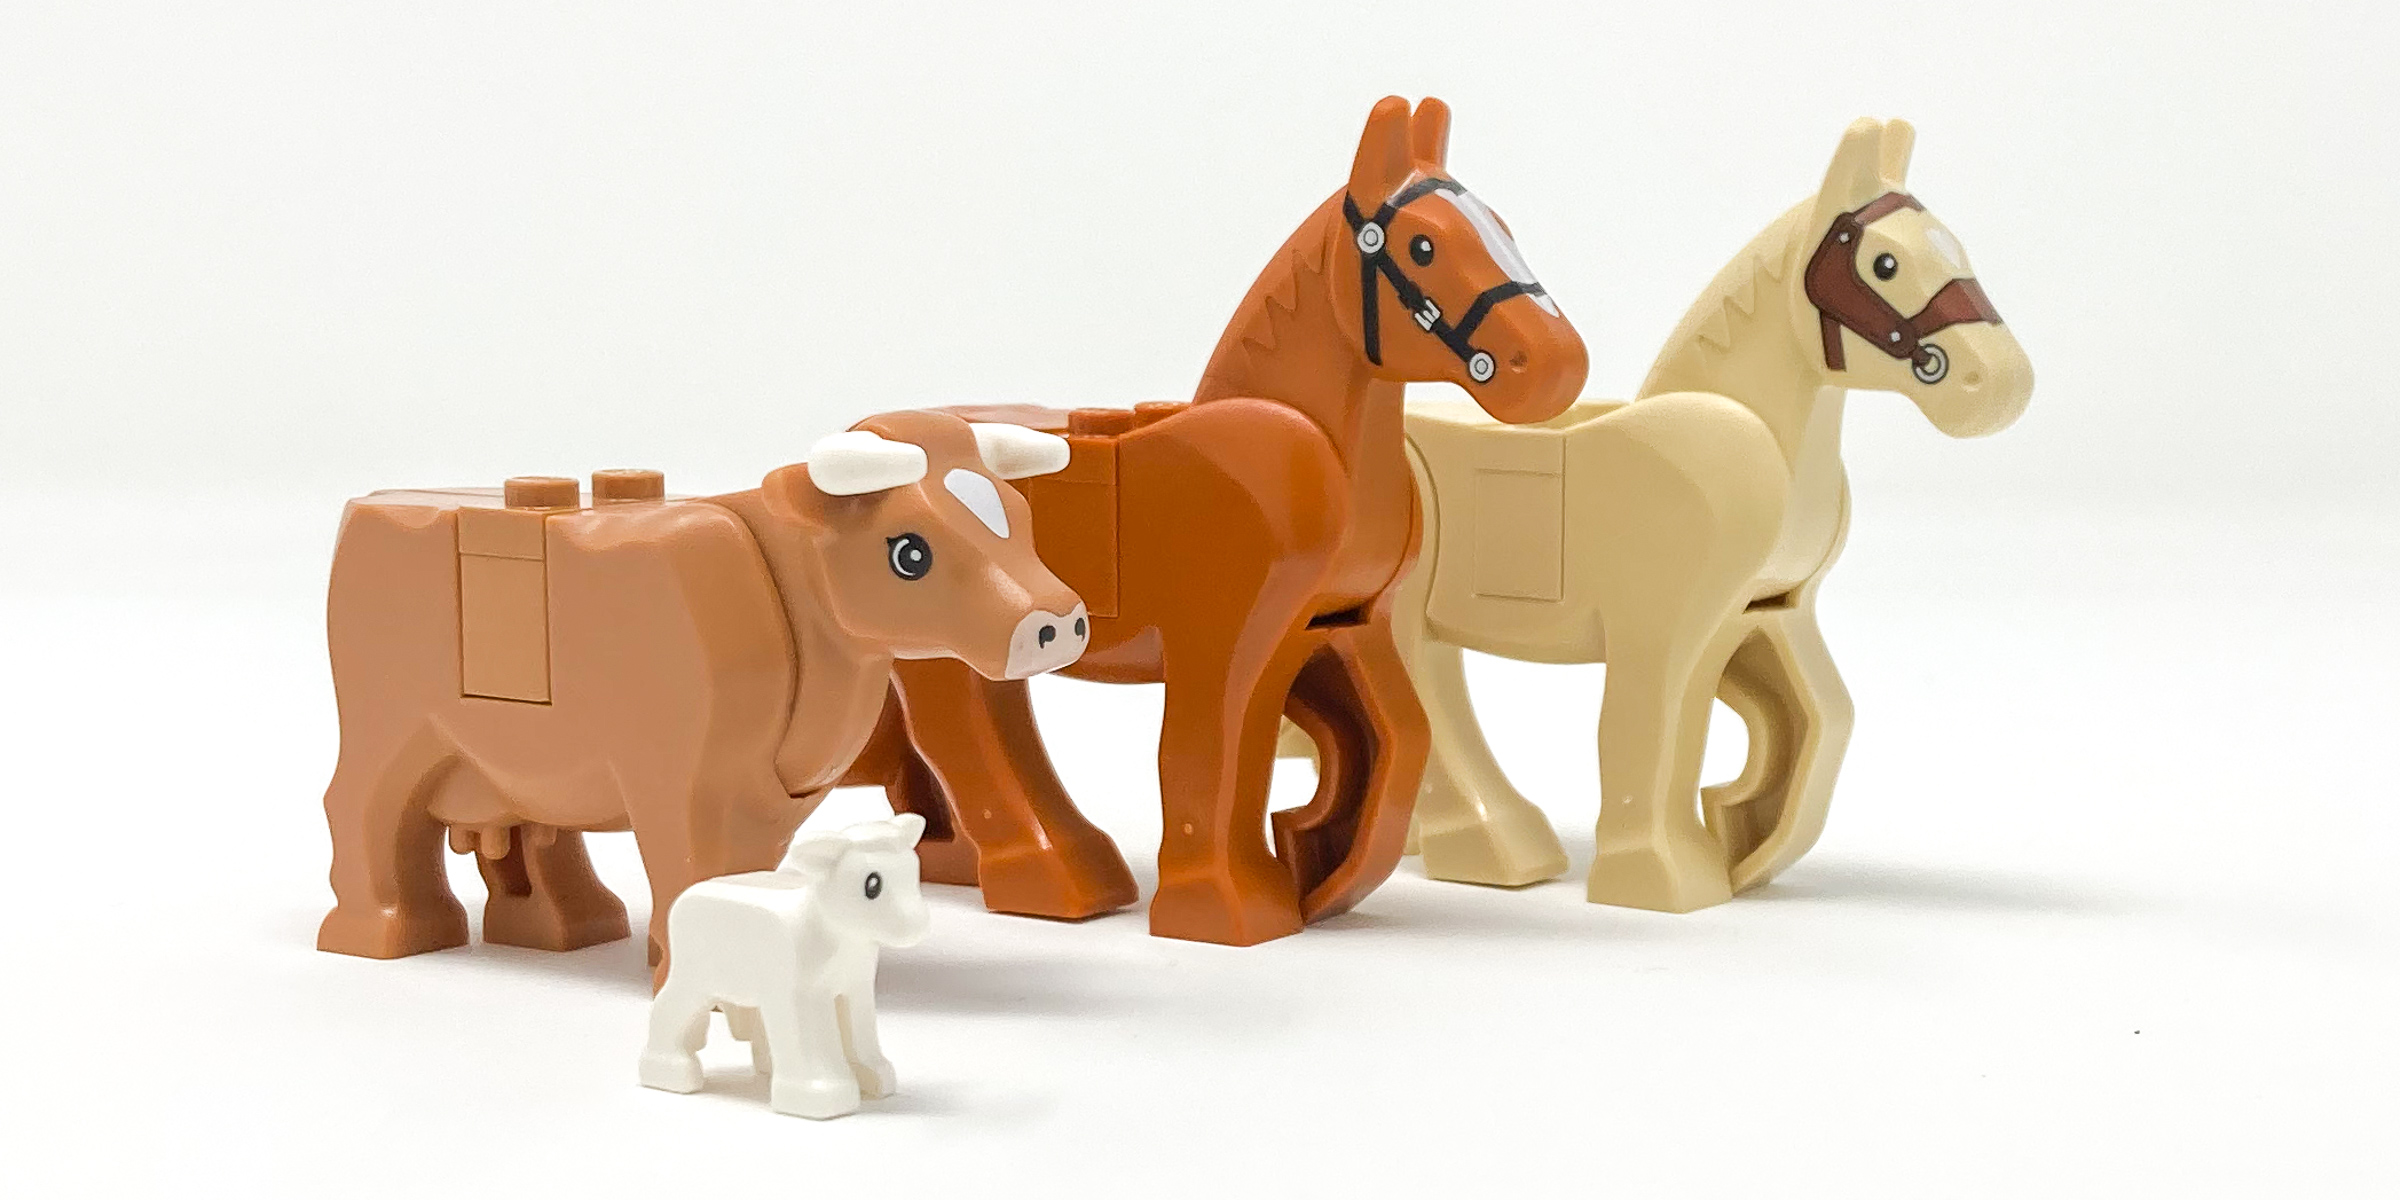
This set includes four animals with each being different to add variety.
Value
In summer of 2022 LEGO announced they will be rising prices of LEGO sets up to 20%. With LEGO announcing record profits last year and cost of living rising for many let us look at how this set stacks value wise compared to some of the other big notable sets that have come out recently. Often fans have used 10cents per piece as the benchmark for LEGO set pricing but with pieces included in sets shrinking in size with some containing hundreds of 1×1 studs or tiles it is important to compare sets by price per gram.
Assessing value compared to a selection of popular recent sets:
| LEGO Set | Price | Part Count | Price-per-part | Weight | Price-per-gram |
|---|---|---|---|---|---|
| #31203 World Map | $249.99 | 11,695 pieces | $0.021 per-piece | 4020 grams | $0.062 per-gram |
| #21056 Taj Mahal | $119.99 | 2022 pieces | $0.059 per-piece | 1811 grams | $0.066 per-gram |
| #21058 Great Pyramid of Giza | $129.99 | 1476 pieces | $0.088 per-piece | 1832 grams | $0.071 per-gram |
| #71741 Ninjago City Gardens | $299.99 | 5685 pieces | $0.052 per piece | 3719 grams | $0.081 per-gram |
| #71043 Hogwarts Castle | $399.99 | 6020 pieces | $0.066 per-piece | 4899 grams | $0.082 per-gram |
| #10292 Friends – The Apartments | $149.99 | 2048 pieces | $0.073 per-piece | 1778 grams | $0.084 per-gram |
| #10297 Boutique Hotel | $199.99 | 3066 pieces | $0.065 per-piece | 2380 grams | $0.084 per-gram |
| #10282 Adidas Originals Superstar | $79.99 | 731 pieces | $0.109 per-piece | 735 grams | $0.109 per-gram |
| (This set) #10305 Lion Knights’ Castle | $399.99 | 4514 pieces | $0.089 per piece | 3265 grams | $0.122 per-gram |
| #10303 Loop Coaster | $399.99 | 3756 pieces | $0.106 per-piece | 3189 grams | $0.125 per-gram |
With a price-per-gram of $0.122, this set ranks extremely low in value compared to other sets of comparable size and price point. Especially when compared to sets like #71043 Hogwarts Castle and #71741 Ninjago City Gardens we see this set costs 50% more per gram. Despite being beautiful, this set feels expensive at $400 and feels more like a $350 set. If we instead had this priced at $350 it would come to $0.077 per piece which would be more in line with the other sets.
LEGO fans will have to tamper expectations of price value and price moving forward as prices of an already luxury and expensive product rises as this is not the only set that seems expensive with #10303 Loop Coaster falling victim to similar soaring prices. It will be interesting to see whether this decision will affect LEGO positively in the long term or whether LEGO fans will purchase fewer sets if disposable income drops and prices continue to rise.
Conclusion
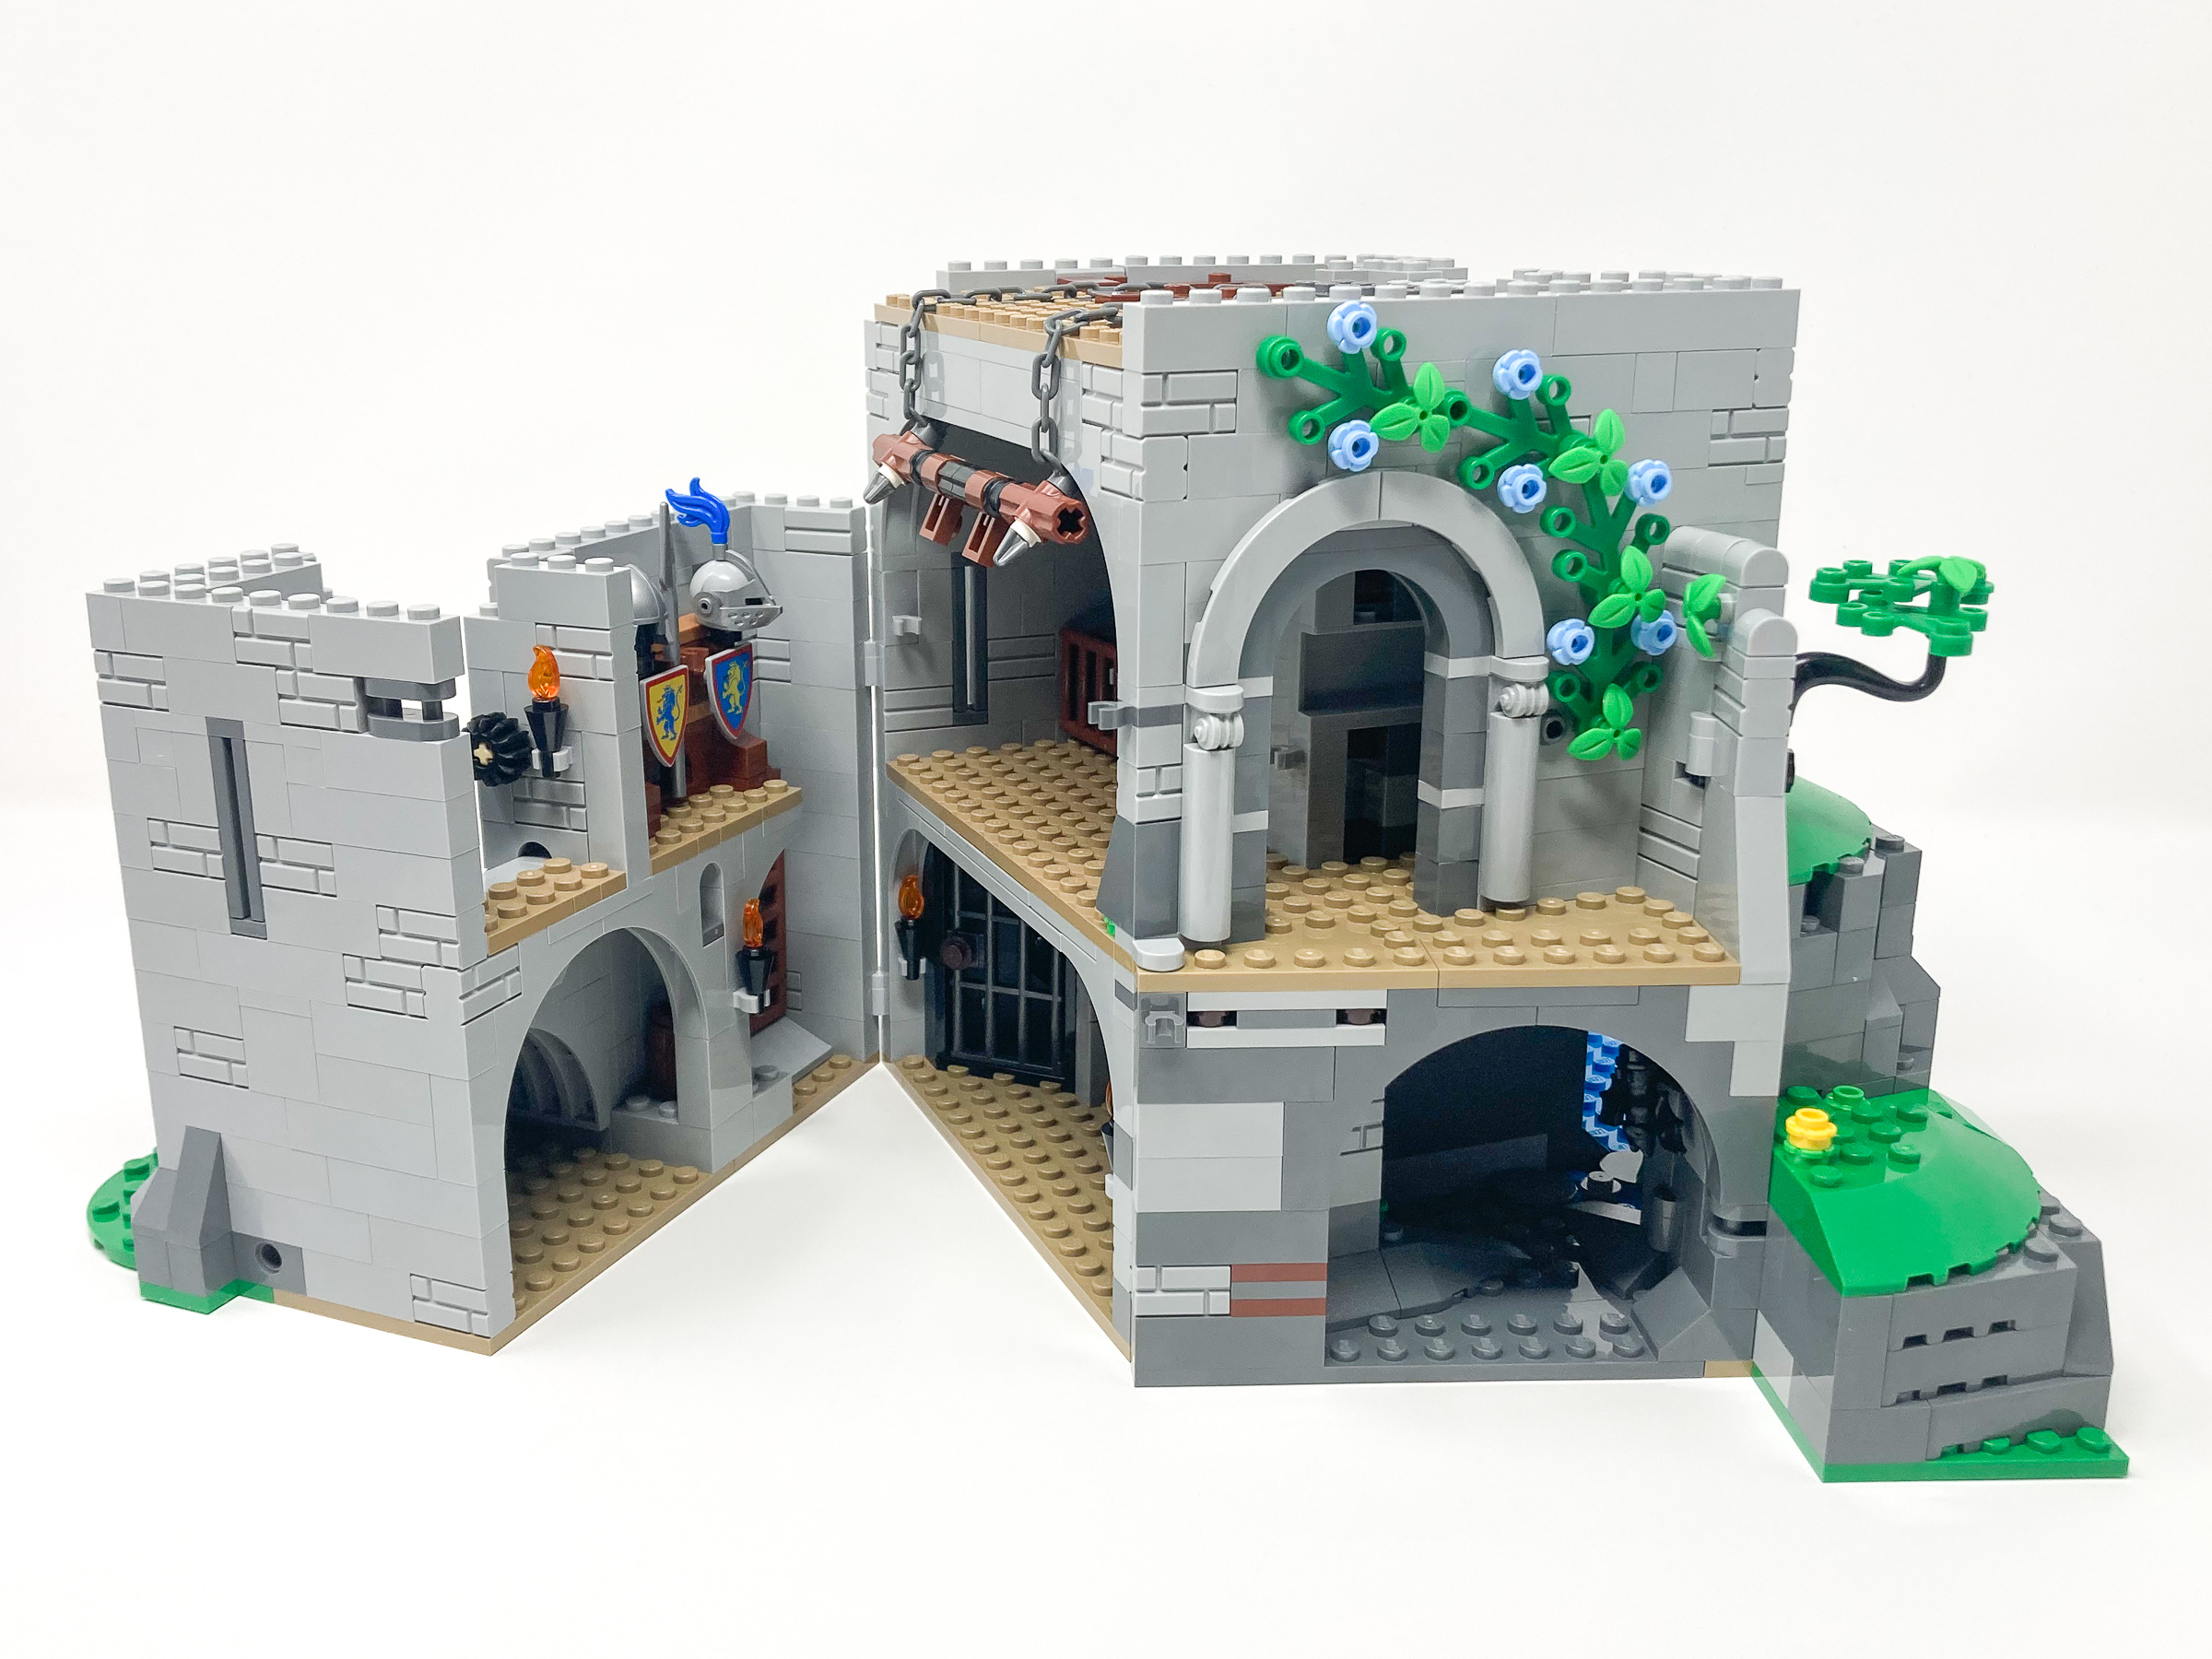
#10305 Lion Knights’ Castle set is a phenomenal set and as a set itself there is not much I can fault. With an amazing array of minifigures, beautiful external and internal details and the nostalgic factor this set will blow any builder away. Not only is this set a terrific display piece but it also comes packed with design details that makes the build process of this set varied and fun. The dollhouse features of this set allow you to expand this set to make this set cover an even larger footprint than it does closed with the designers having put thought into how displayable it is from all directions opened or closed. The opened-up castle is the best way to do the complete set justice as what previously was a dense build now feels open.
The castle can be opened up to make it bigger or closed to make it feel packed and dense.
From fun messages included in instructions to varied internal builds with such assorted colors and building techniques the build was a very enjoyable experience. From the outside the grey of the castle makes it look like there is a ton of repetition, but you will be pleasantly surprised by how varied the build is, everything from wall crenelations to windows use a variety of different techniques. This set is very displayable from all angles, whether opened or closed and with all the dollhouse like play features included in this set it is fun for the whole family whether played with or displayed.
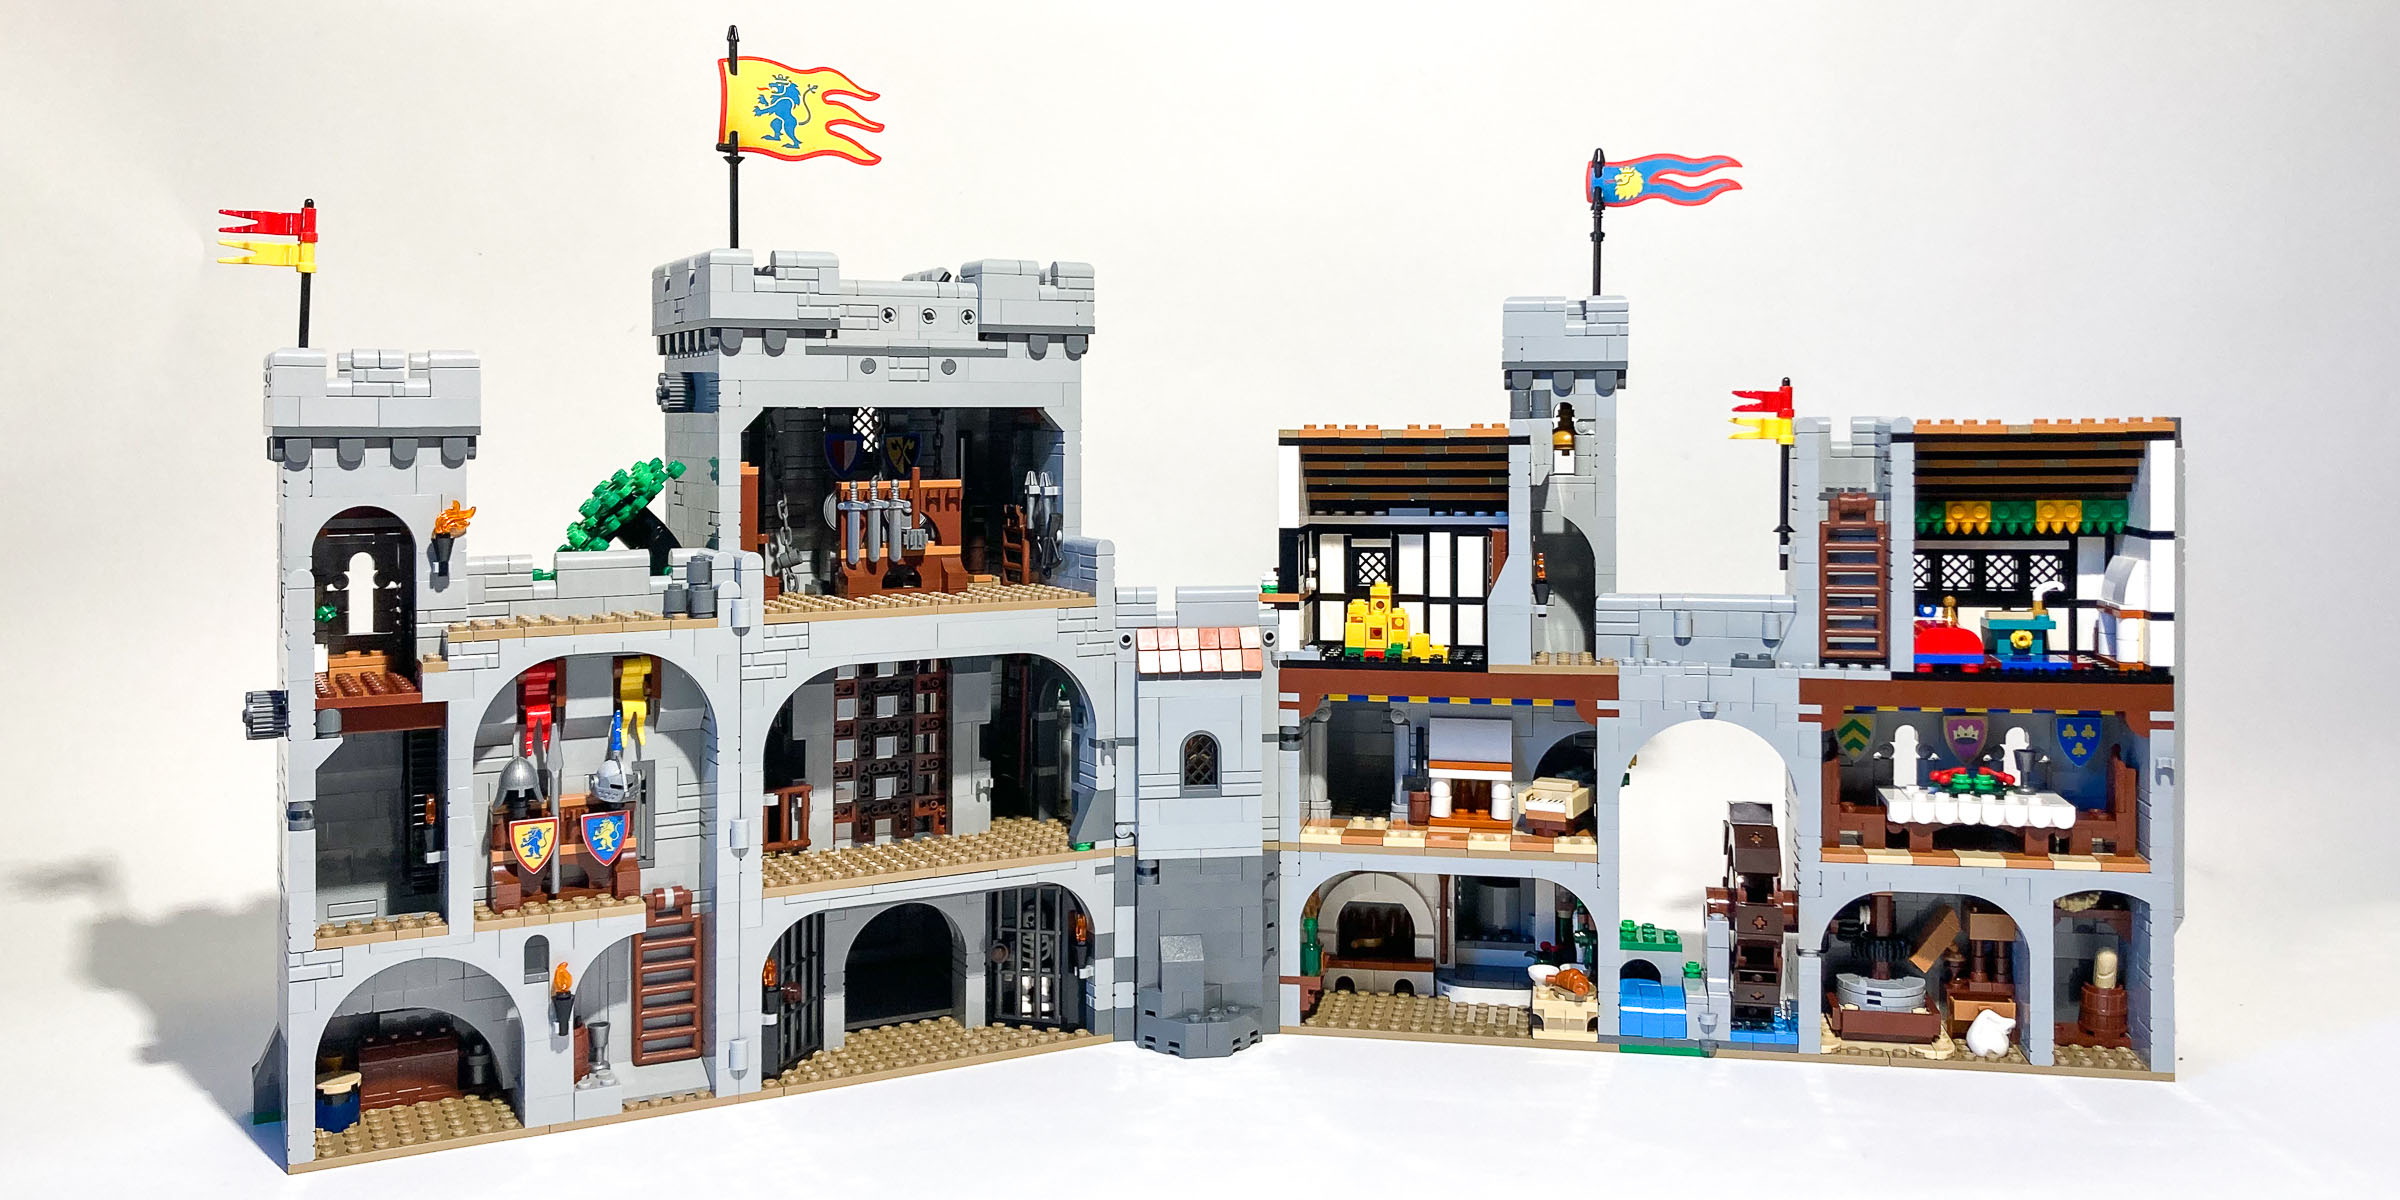
All the interior details can be seen when we open up the castle and look at the dollhouse style rooms.
The minifigure assortment was amongst the strongest of sets I have seen. Despite there being a lot of repetition in torsos this set is a wonderful way to start building your medieval army and with Build-A-Minifigure in the LEGO store for Q2 offering knights in their bin it is extremely easy to build yourself an army. The decision to add a variety of genders and ages was also a welcome change as LEGO acknowledges that not every figure in a fantasy set needs to be male helping provide accurate diversity to a toy that appeals to all ages and genders.
When closed up you get to see how densely packed this set really is.
Despite the many positives features of this set, I must reassess my initial inclination to give this set a Must Have rating by seriously considering the overall value based on the $400 price point. Having built many large sets in the Adult line (including all Ninjago City structures and #71043 Hogwarts Castle) this set feels expensive for what it is.
Had this set just been $50 cheaper that would have been enough to tip me over the line, however for the actual price point, I will give this set a 4/5 Recommended rating. (It’s increasingly difficult to justify purchasing as many large and expensive sets at the same time that many consumers are experiencing increased cost-of-living, not to mention news of record profits at The LEGO Group.)
Hi there, thanks for the review. Would you tell us each dimension (ie lenght, height and depth) of the castle in both open and closed setting? I need to figure out where to put it and I’m not sure my shelves are big enough. Thanks mate.
Without flags, how tall is the keep?
Without flags it comes approximately 32 centimeters.
Great detailed review, but I got stuck at the first sentence that says no castle since 2013. I’m ok if you skip the 2018 castle, but what about 2021’s Medieval Castle (31120)?
Oh wow that is a big oversight, not sure how i completely blanked on that 3 in 1 castle. I have since edited this.
Uhm nothing like a real English castle…definitely no for me.
That is quite the review Koen! Amazingly detailed.
I appreciate the table with value comparison. I personally think this should have been a 300 euro set, with a 10% price increase making 330. Then it would be midrange for pieces (0.073) but still quite expensive for weight (0.101 per gram) – which would be justified for the animals, bardings, prints etc.
400 euro is nothing but a hefty 20%-ish castle nostalgia tax imo 😉
Hi there, when comparing price per gram with Lego Hogwarts, it seems that you counted the whole bundle of the Hogwarts castle not the Lego part. Can you please confirm that?
Thank you for this comment, I went ahead and reweighed every set in the value section and confirmed that a few were indeed incorrect. The website I was using to get the weights were incorrectly listing some as total weight and other as part weight. I have gone ahead and reweighed the sets using a scale and updated the section accordingly. Appreciate you catching this to ensure the readers get correct information.
We appreciate your efforts!
Hi there!
Thanks for the review!! Really really detailed, I like it! I’m sorry if I missed it, but do you happen to know the size of it open? I want to try to figure if it will fit my shelf or if I need to buy a new one for it…
Thanks so much!
Just did a quick measurement and when opened this measures approximately 28 inches by 14 inches. I currently use the IKEA Bror shelving system to display mine and these have shelves measuring 33 inches by 15 inches.
https://www.ikea.com/us/en/p/bror-shelving-unit-black-wood-s19272703/
So it is deeper when open than close?!?
Yes when closed it increases in depth by about 50% due to its shape and angles.
There will be led lights for the castle?
Unsure at the time but there may be third party LED lights that are released in the future, but you would need to check with the vendors who sell these.