
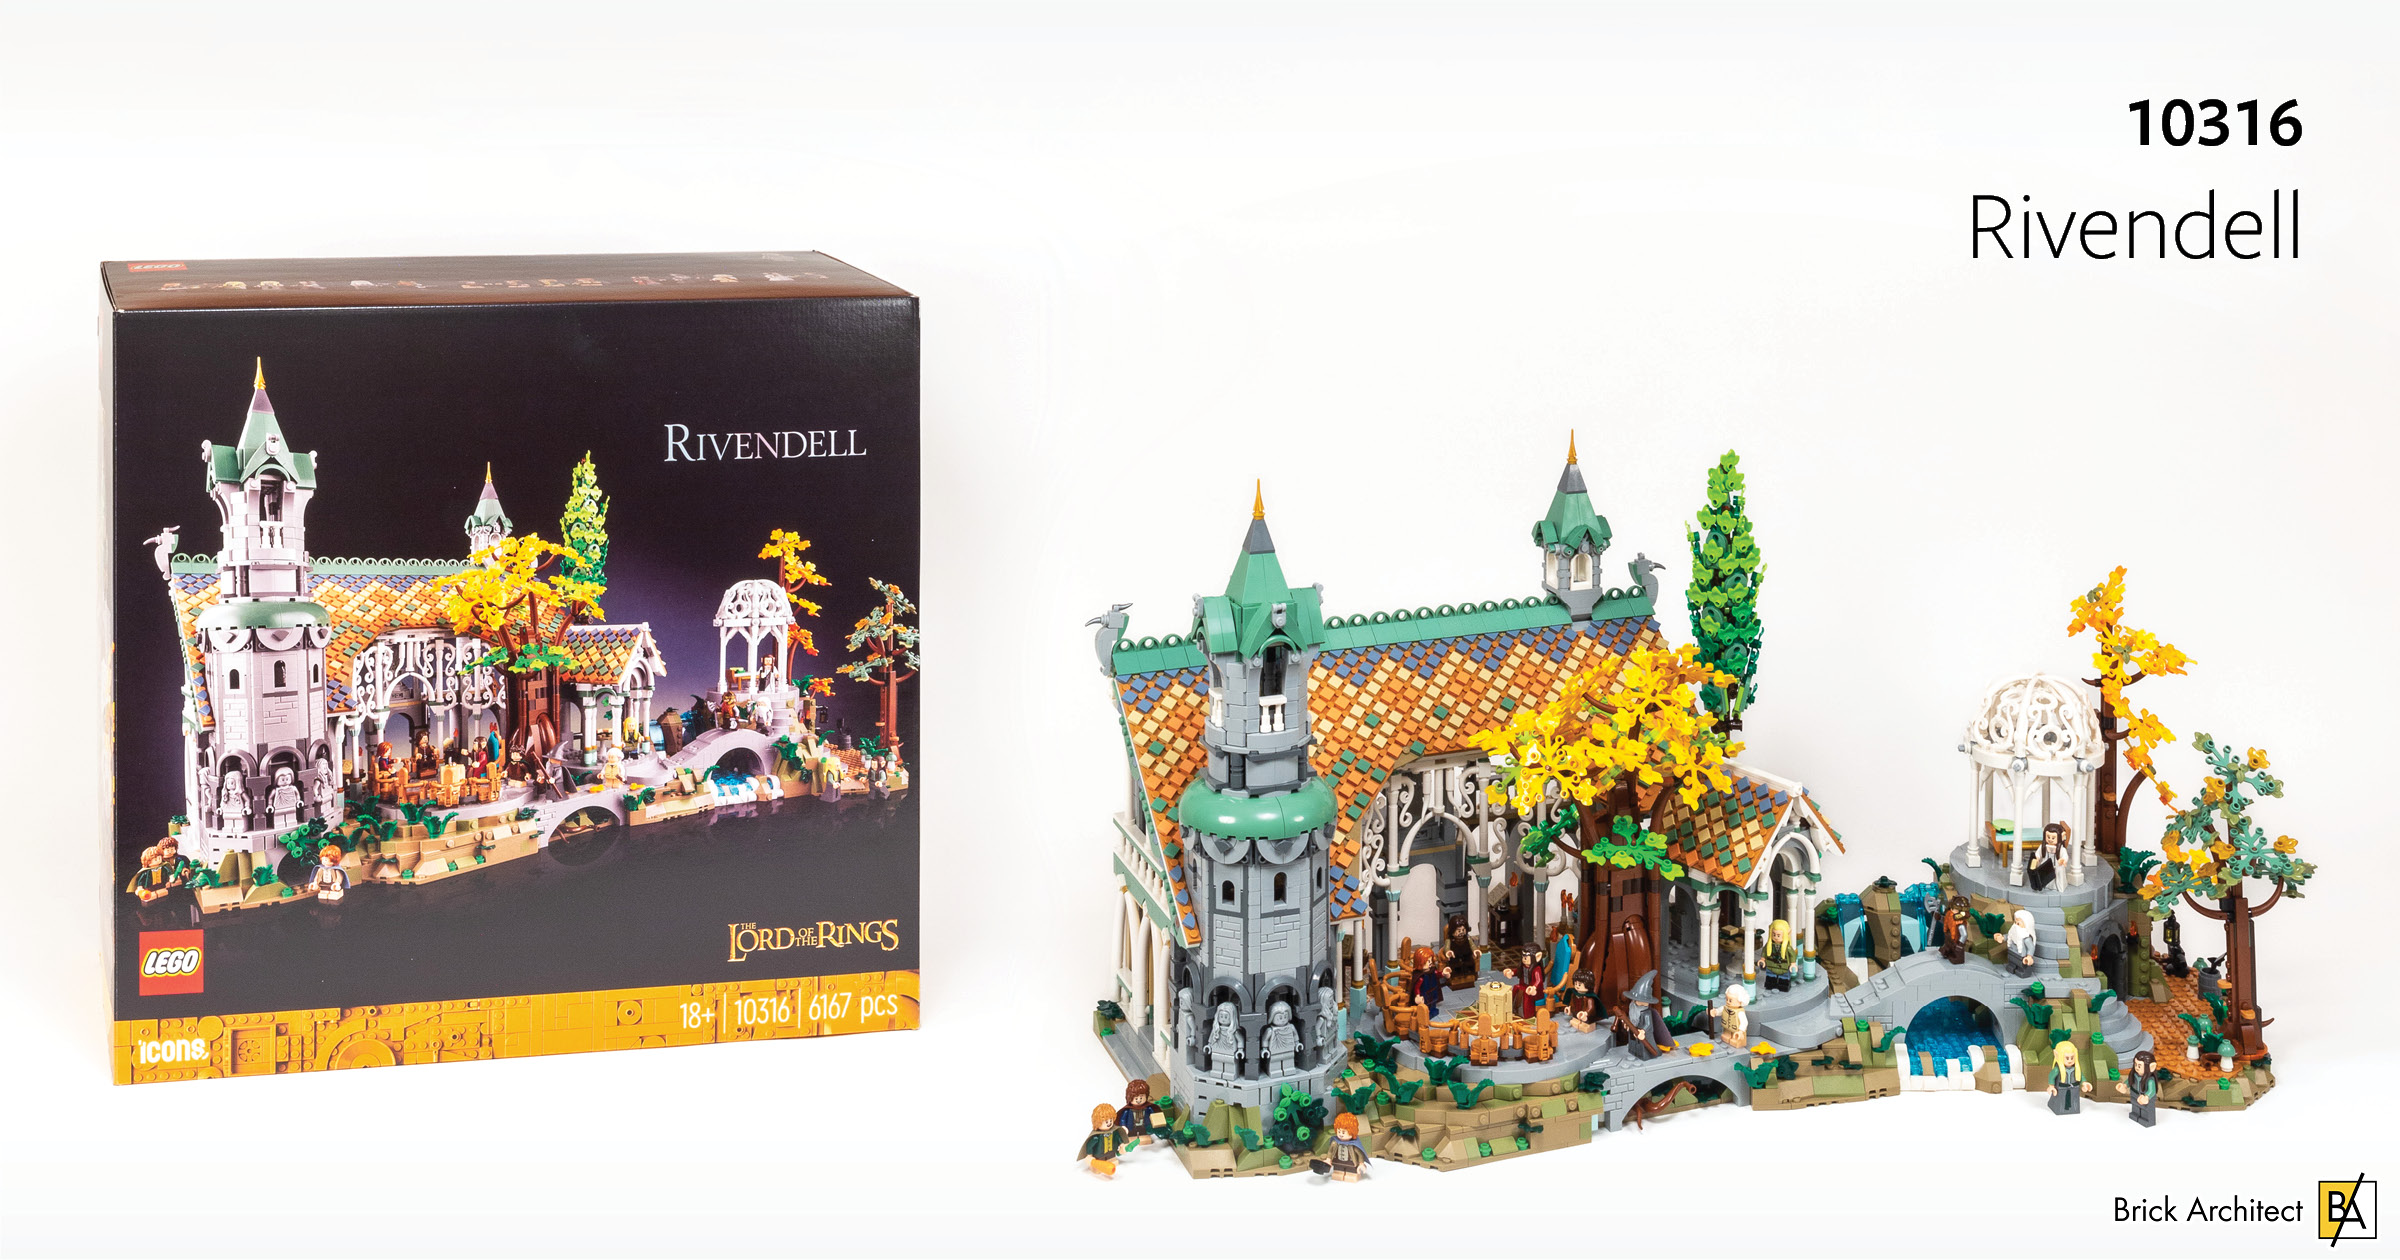
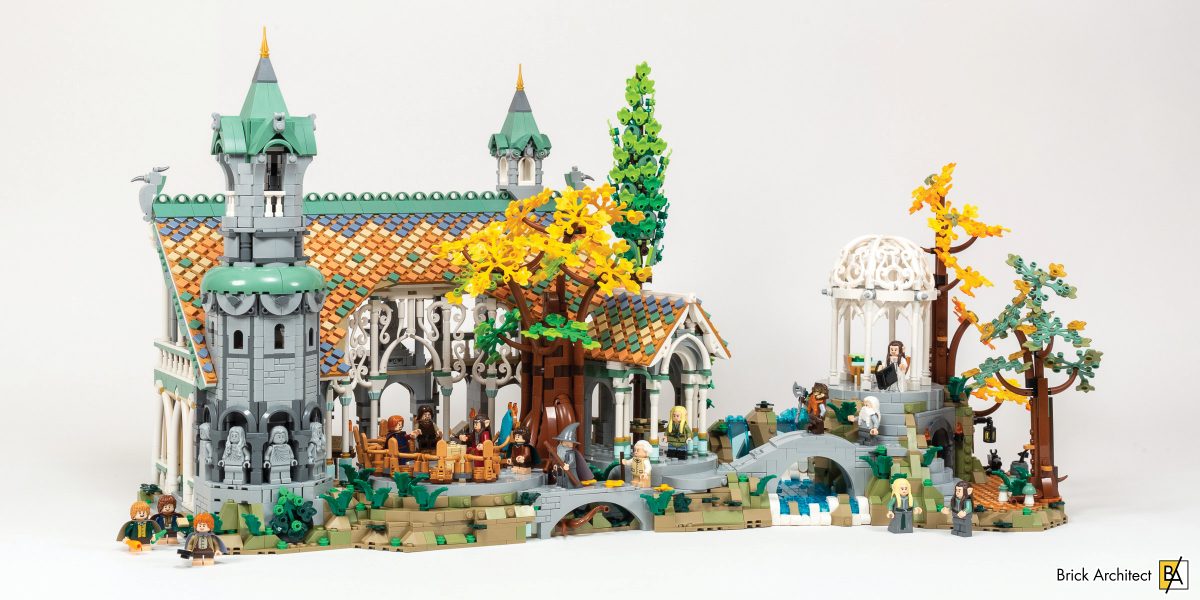
Review: #10316 Rivendell (Lord of the Rings)
This 6000-piece set is the largest Lord of the Rings LEGO model ever released, but is it the best? At $500, I certainly hope so!
Despite its steep price, the cost per piece of the #10316 The Lord of the Rings Rivendell comes out to a reasonable $0.081 when considering the license fees and the general trend of increasing LEGO prices. Later in the review we will further compare this price to other large sets. The set comes with an impressive 21 minifigures, including the entire fellowship and many memorable characters from the Council of Elrond scene in The Lord of the Rings: The Fellowship of the Ring movie.
As a huge fan of both the Lord of the Rings movies and books, as well as the expanded lore of the story, I was thrilled to have the opportunity to review this set. While I have a personal affection for the franchise, I will approach this review objectively to provide you with all the relevant details and insights to help you make an informed decision on whether this set belongs in your collection.

Packed with details and an amazing selection of figures. Letls see what awaits us in this set.
In this review, we will delve into the history of the LEGO Lord of the Rings line and examine the architectural choices made when depicting the “Elven Architecture” of Rivendell. Additionally, We will evaluate the set’s performance in terms of movie accuracy, display-ability, building experience, part selection, and minifigure selection. On the sidebar are memorable quotes from the movies or books related to the sections of the review. Can you recognize them all?
First Impressions
From when I first heard the rumors, I eagerly anticipated the arrival of the #10316 The Lord of the Rings Rivendell. When the set arrived and upon opening the box, my excitement only increased as I saw LEGO sets for my favorite literary and movie franchise once again.
For those unfamiliar with Lord of the Rings, the #10316 The Lord of the Rings Rivendell is a representation of the elven stronghold, Rivendell. This location is a key feature in the films and serves as the introduction for major characters and sets the foundation for the story.
This large set delivers on the minifigure front, featuring the entire Fellowship and several other important and new characters in the Lord of the Rings universe. With a total of 21 minifigures, purchasing the entire Fellowship from the 2013 wave would cost nearly $200, making this set an excellent value.
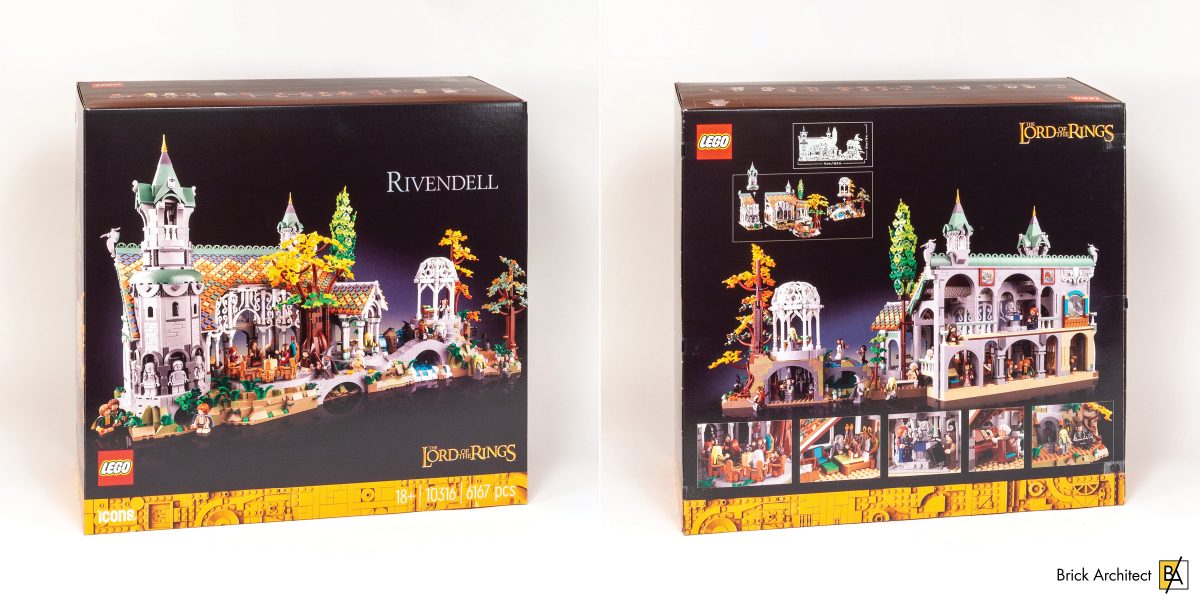
#10316 Rivendell (Lord of the Rings) – Box front and back.
The side of the box has beautiful illustrations of iconic scenes from the story in LEGO form.
Contents and Packaging
Despite the large piece count this set was smaller than expected, especially when compared to the 10305 Lion’s Knight’s Castle which had a smaller piece count but came in a bigger box. The compact design of this set makes it easier to ship and store, though. It’s also important to evaluate the set based on its price per gram and price per piece, as large sets sometimes have many small pieces for added details. To provide a thorough analysis, here are some key weights and prices for this set. These will be compared to other sets in further analysis.
- LEGO Parts Weight: 4375 grams (9.645lbs)
- Price per piece: $499.99 / 6167 pieces = $0.081 per piece
- Price per gram: $499.99 / 4375 g = $0.114 per gram
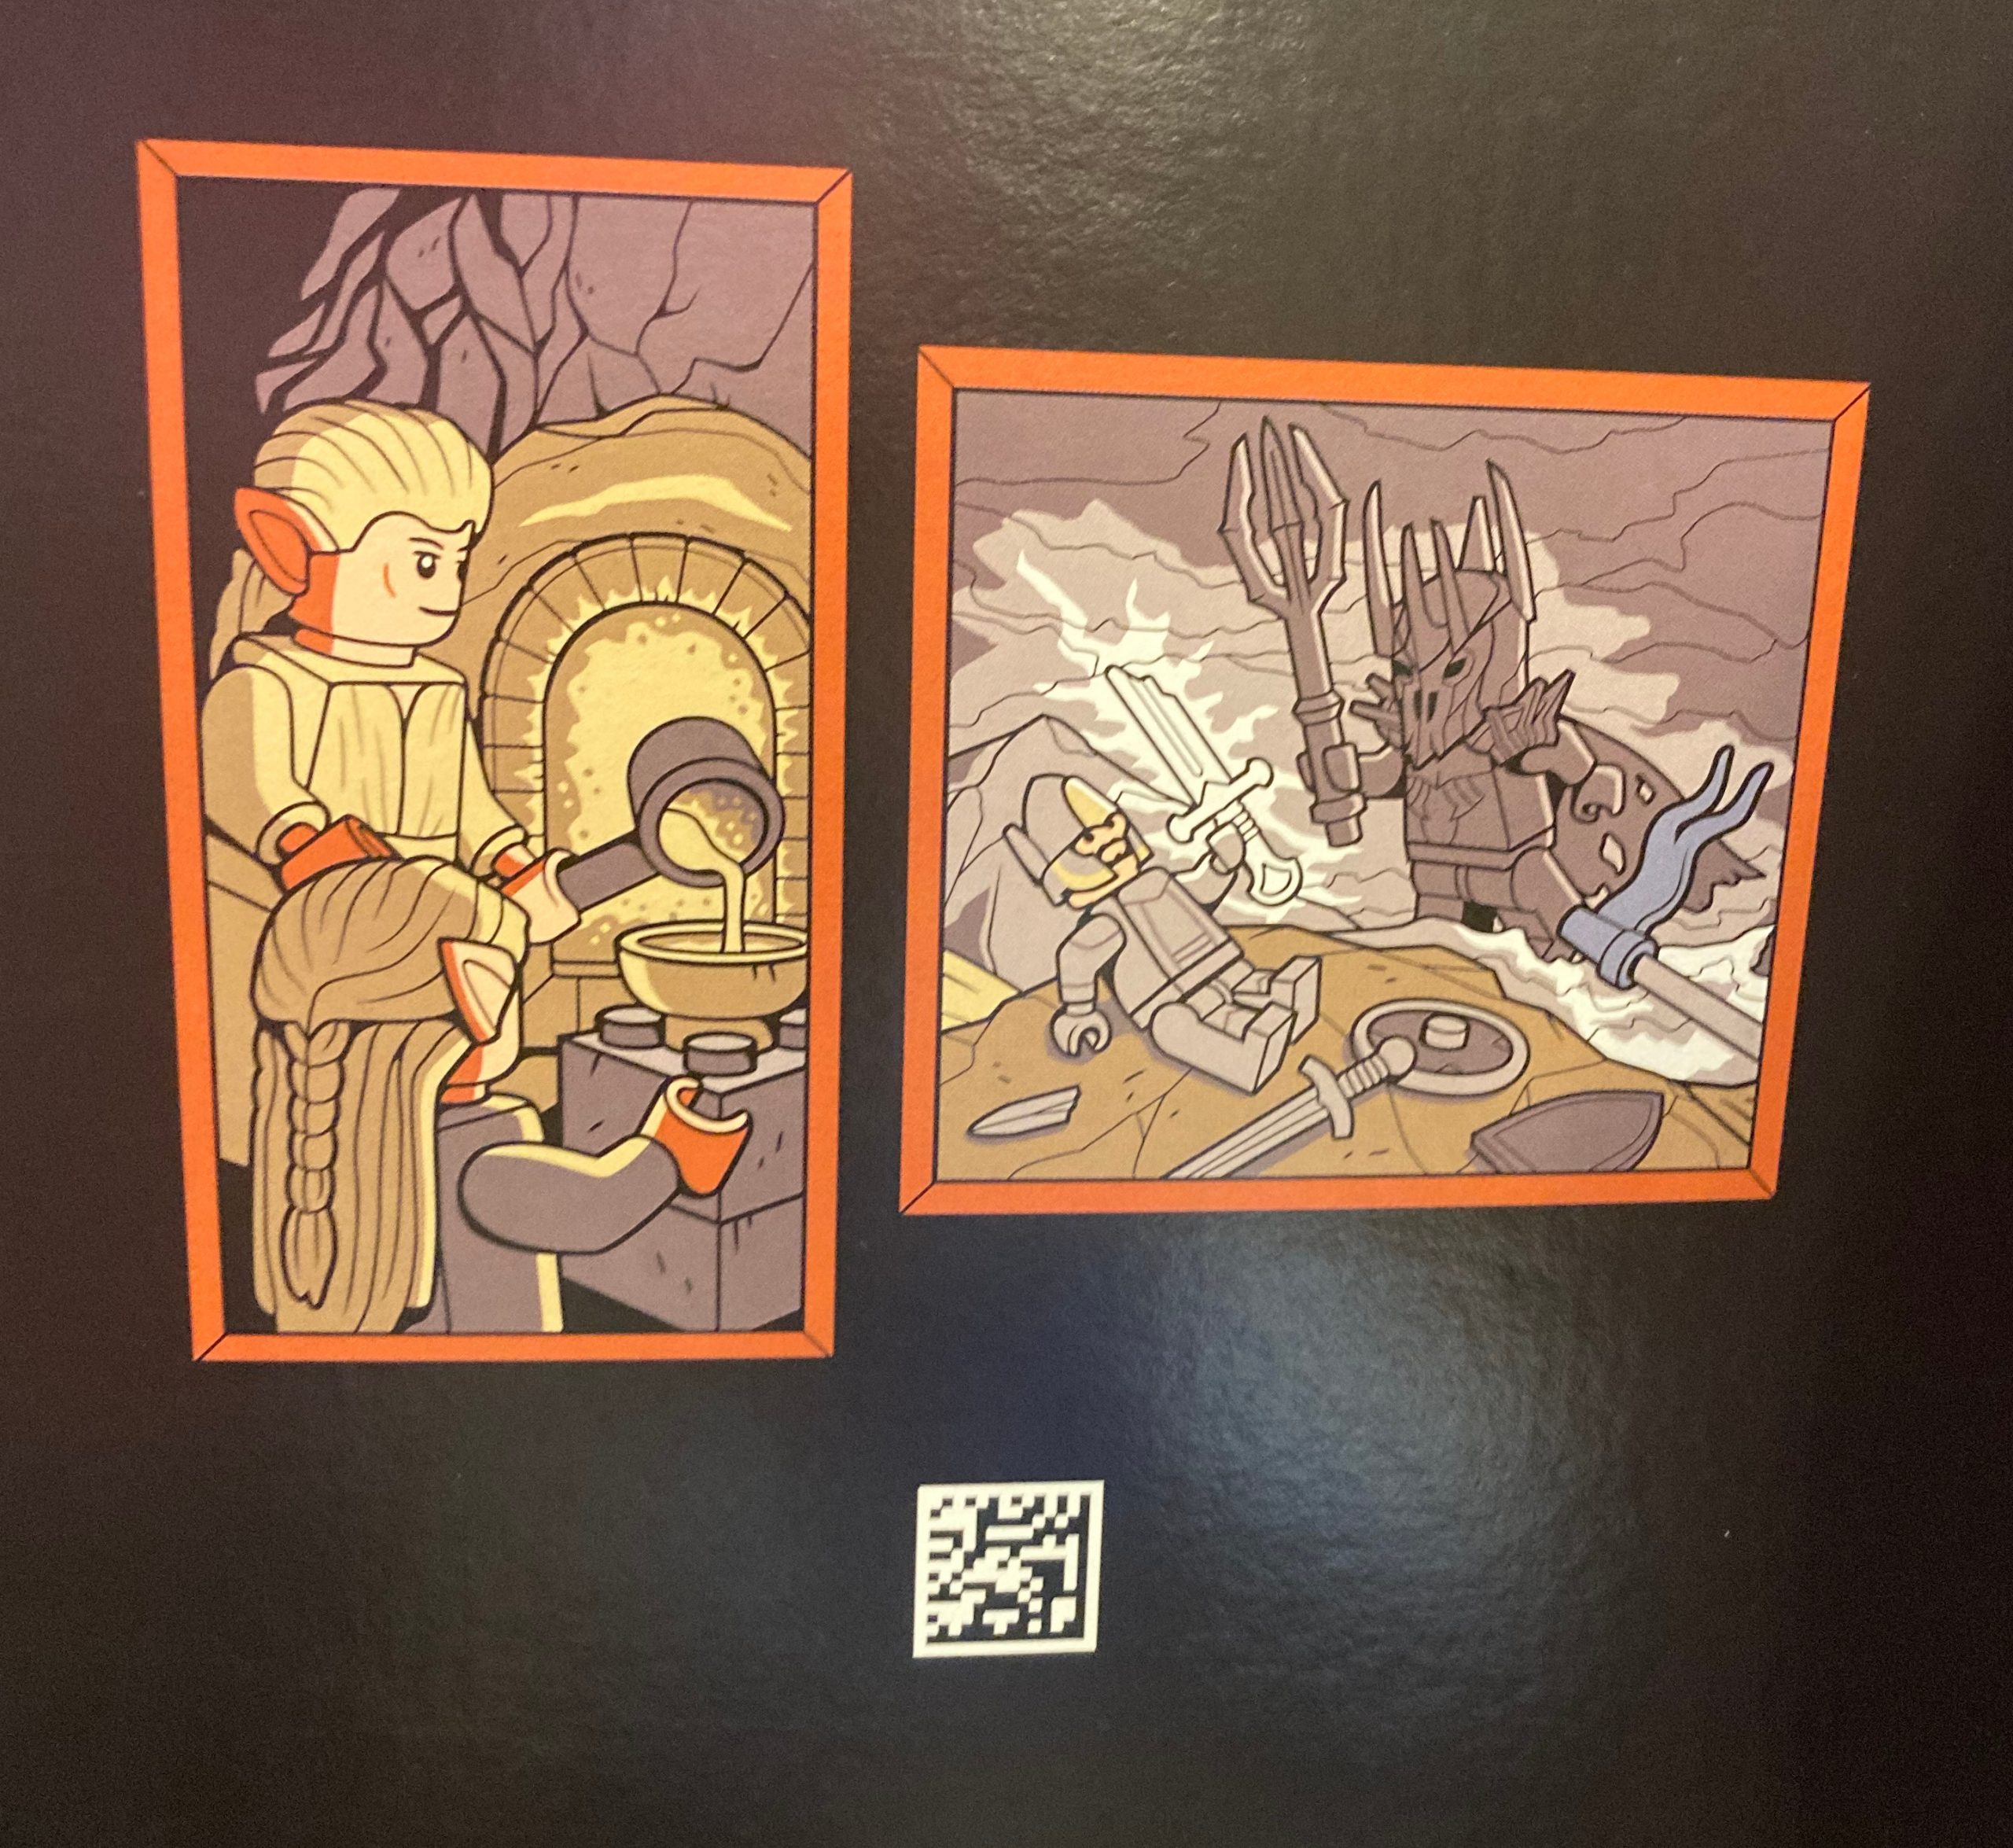
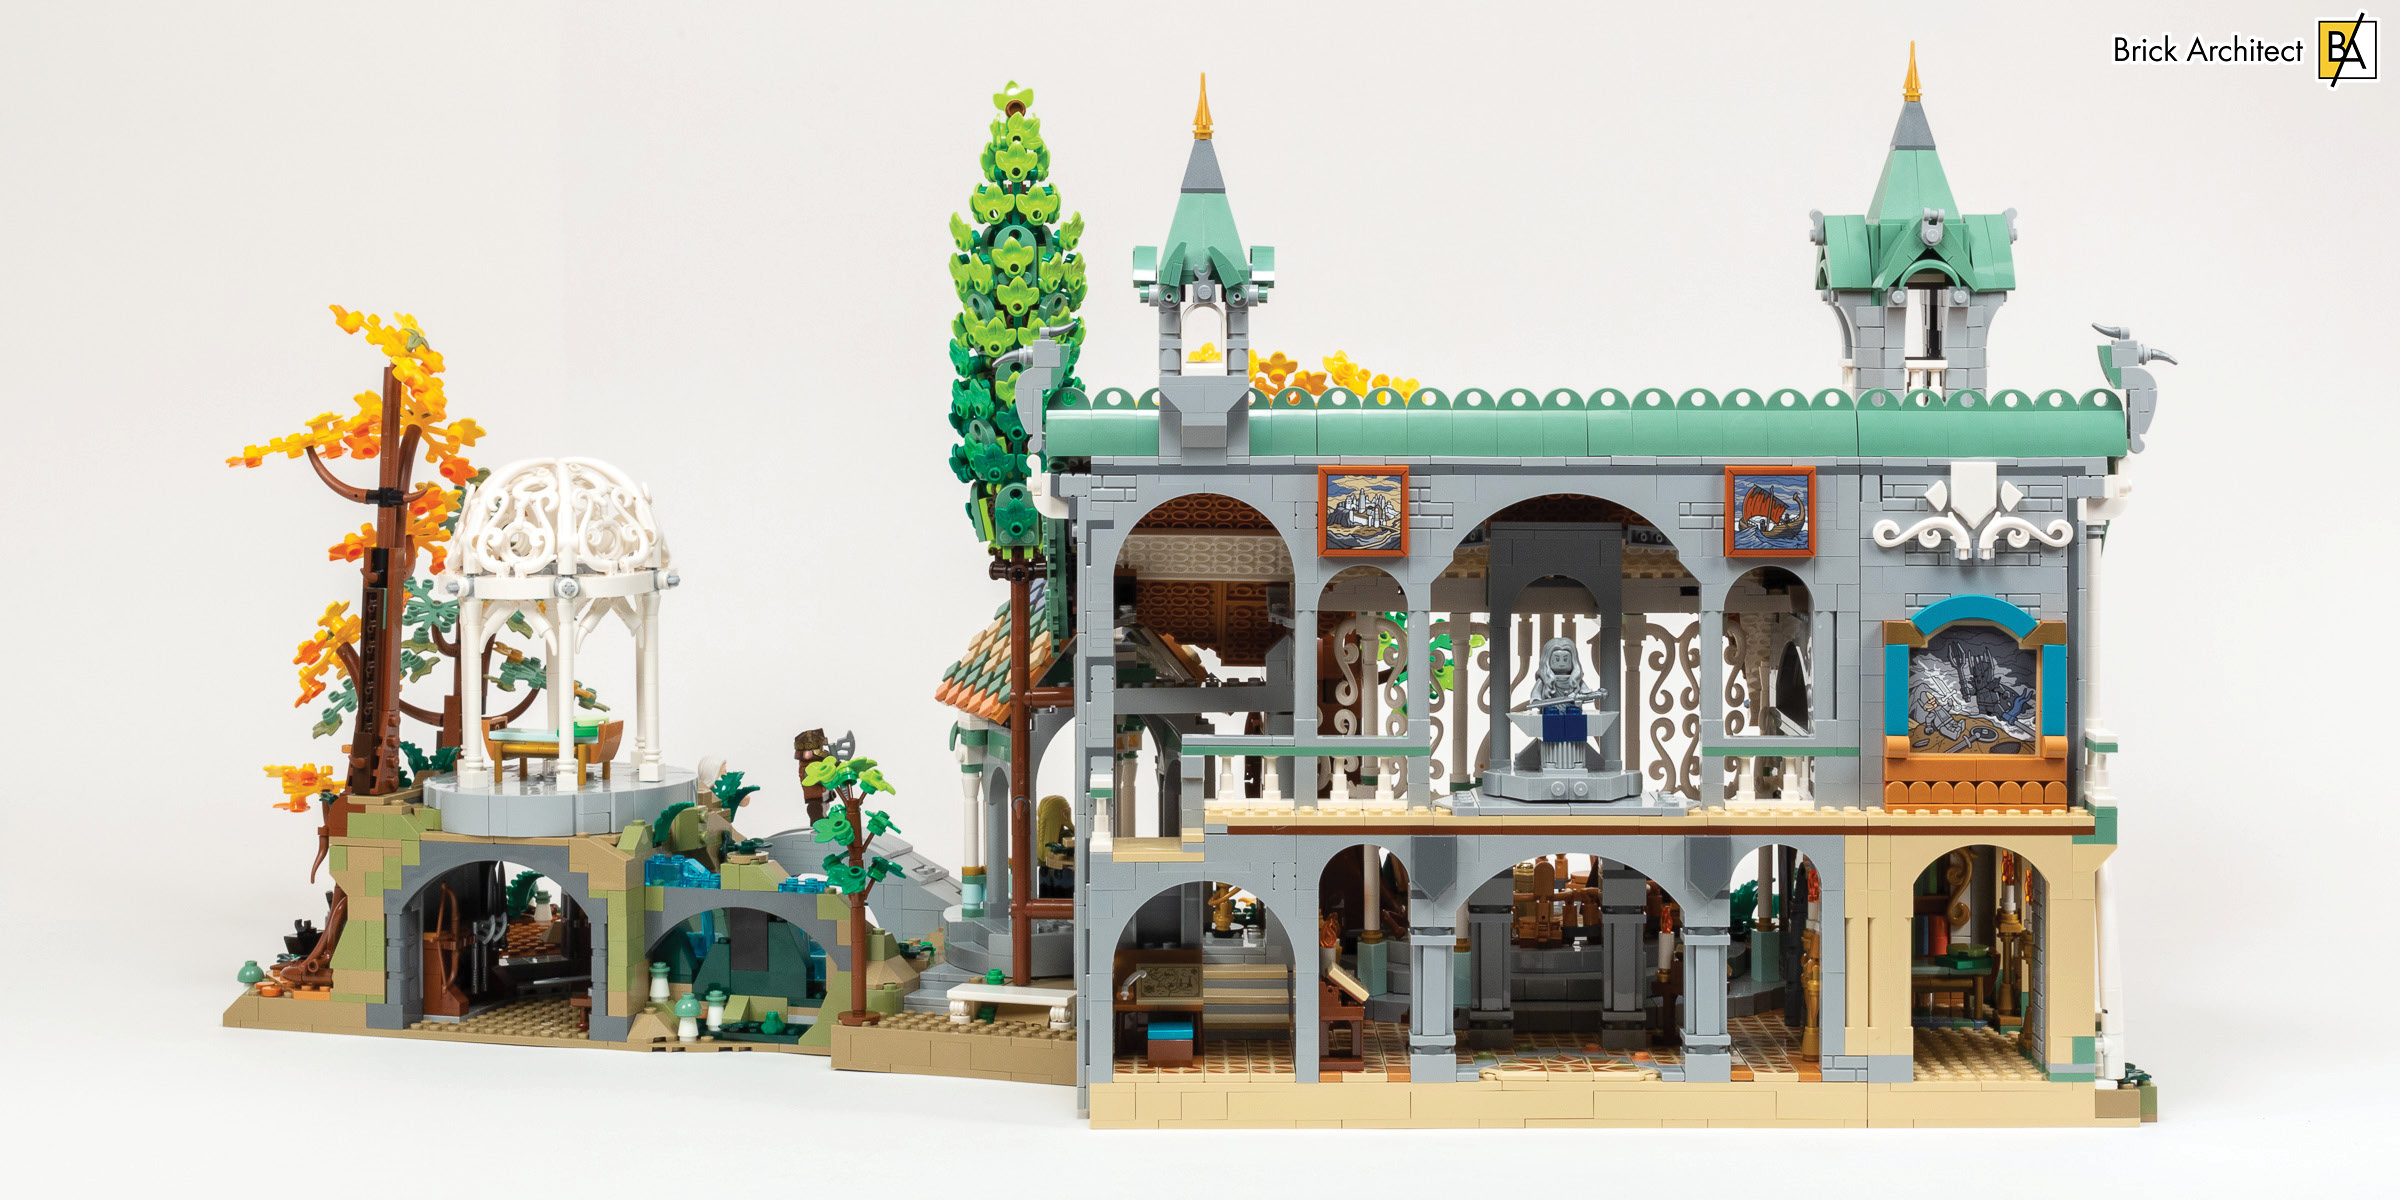
The size of the set is impressive, with three smaller builds that can be displayed separately or combined for a total width of 75cm (40in), height of 30cm (16in), and depth of 50cm (20in). The box is beautifully designed, following the LEGO Adults color palette. The back and sides are filled with details of the set and LEGO-stylized scenes from the books and movies. The set includes three detailed instruction booklets, split across 49 bags, covering each section of the build. The pieces, at first glance, look very different in color, promising a varied building experience.

10316 contains 3 beautifully illustrated instruction manuals.
History of the LEGO Lord of the Rings
The Lord of the Rings series is no stranger to LEGO depiction. In 2012 and 2013, two waves of sets were released to coincide with the release of The Hobbit. These sets captured iconic scenes from the movies, including a version of the Council of Elrond scene. The line was discontinued in winter 2014 with the end of the final wave of sets.

Lord of the Rings – 79006 Council of Elrond was released in 2013. (Photo: The LEGO Group)
To coincide with the release of the first wave of sets, Traveller’s Tales released an action-adventure video game that follows the original storylines of the three films with added humor and a LEGO twist. The game brings a unique and entertaining take on the source material, making it a must-play for fans of both LEGO and Lord of the Rings.

The LEGO Lord of the Rings videogame was released in 2013. (Photo: The LEGO Group)
2023 marks the release of a new Lord of the Rings line of sets, a decade after the original release. The first taste came in the form of Brickheadz with three sets being released. These captured the essence of Lord of the Rings but were not traditional LEGO sets. Rumors suggest that the Harry Potter line may soon come to an end, which makes Lord of the Rings a potential candidate to replace it as the new fantasy LEGO line.
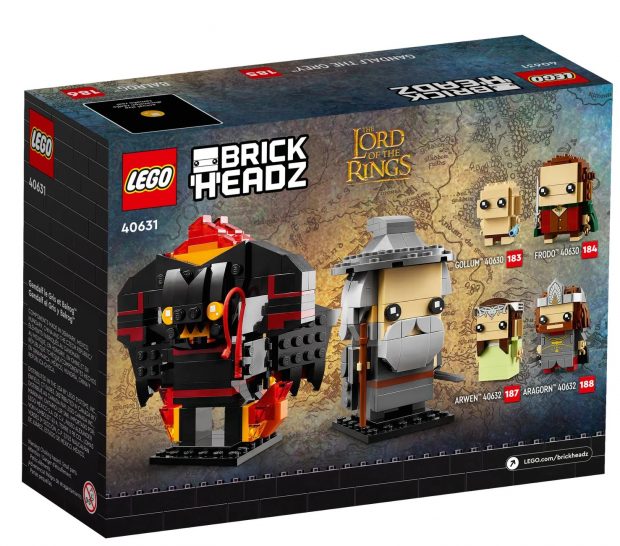
2023 marked the first Lord of the Rings set in a decade with a BrickHeadz release. (Photo: The LEGO Group)
Elven Architecture
The designers of this set drew inspiration from the films when creating Rivendell in LEGO form. They referred to the special features produced by director Peter Jackson, which explain that the design of Rivendell was a blend of Celtic and Art Nouveau styles. Concept artists such as John Howe and Alan Lee worked on the films to capture the otherworldly appearance of Rivendell through their illustrations, which eventually influenced the designers of this set.
Art Nouveau is an artistic style that flourished from 1890 to 1910 in the United States and Europe. It is characterized by its use of long, organic lines and plant-like designs. The style was created as a departure from the more rigid designs that were popular in the 19th century. Art Nouveau incorporates organic forms such as shells, grass, flames, and vine-like textures to mimic nature.
Art Nouveau architecture in Strasbourg (Photo: Stefanrevollo, CC-BY-SA-4.0).
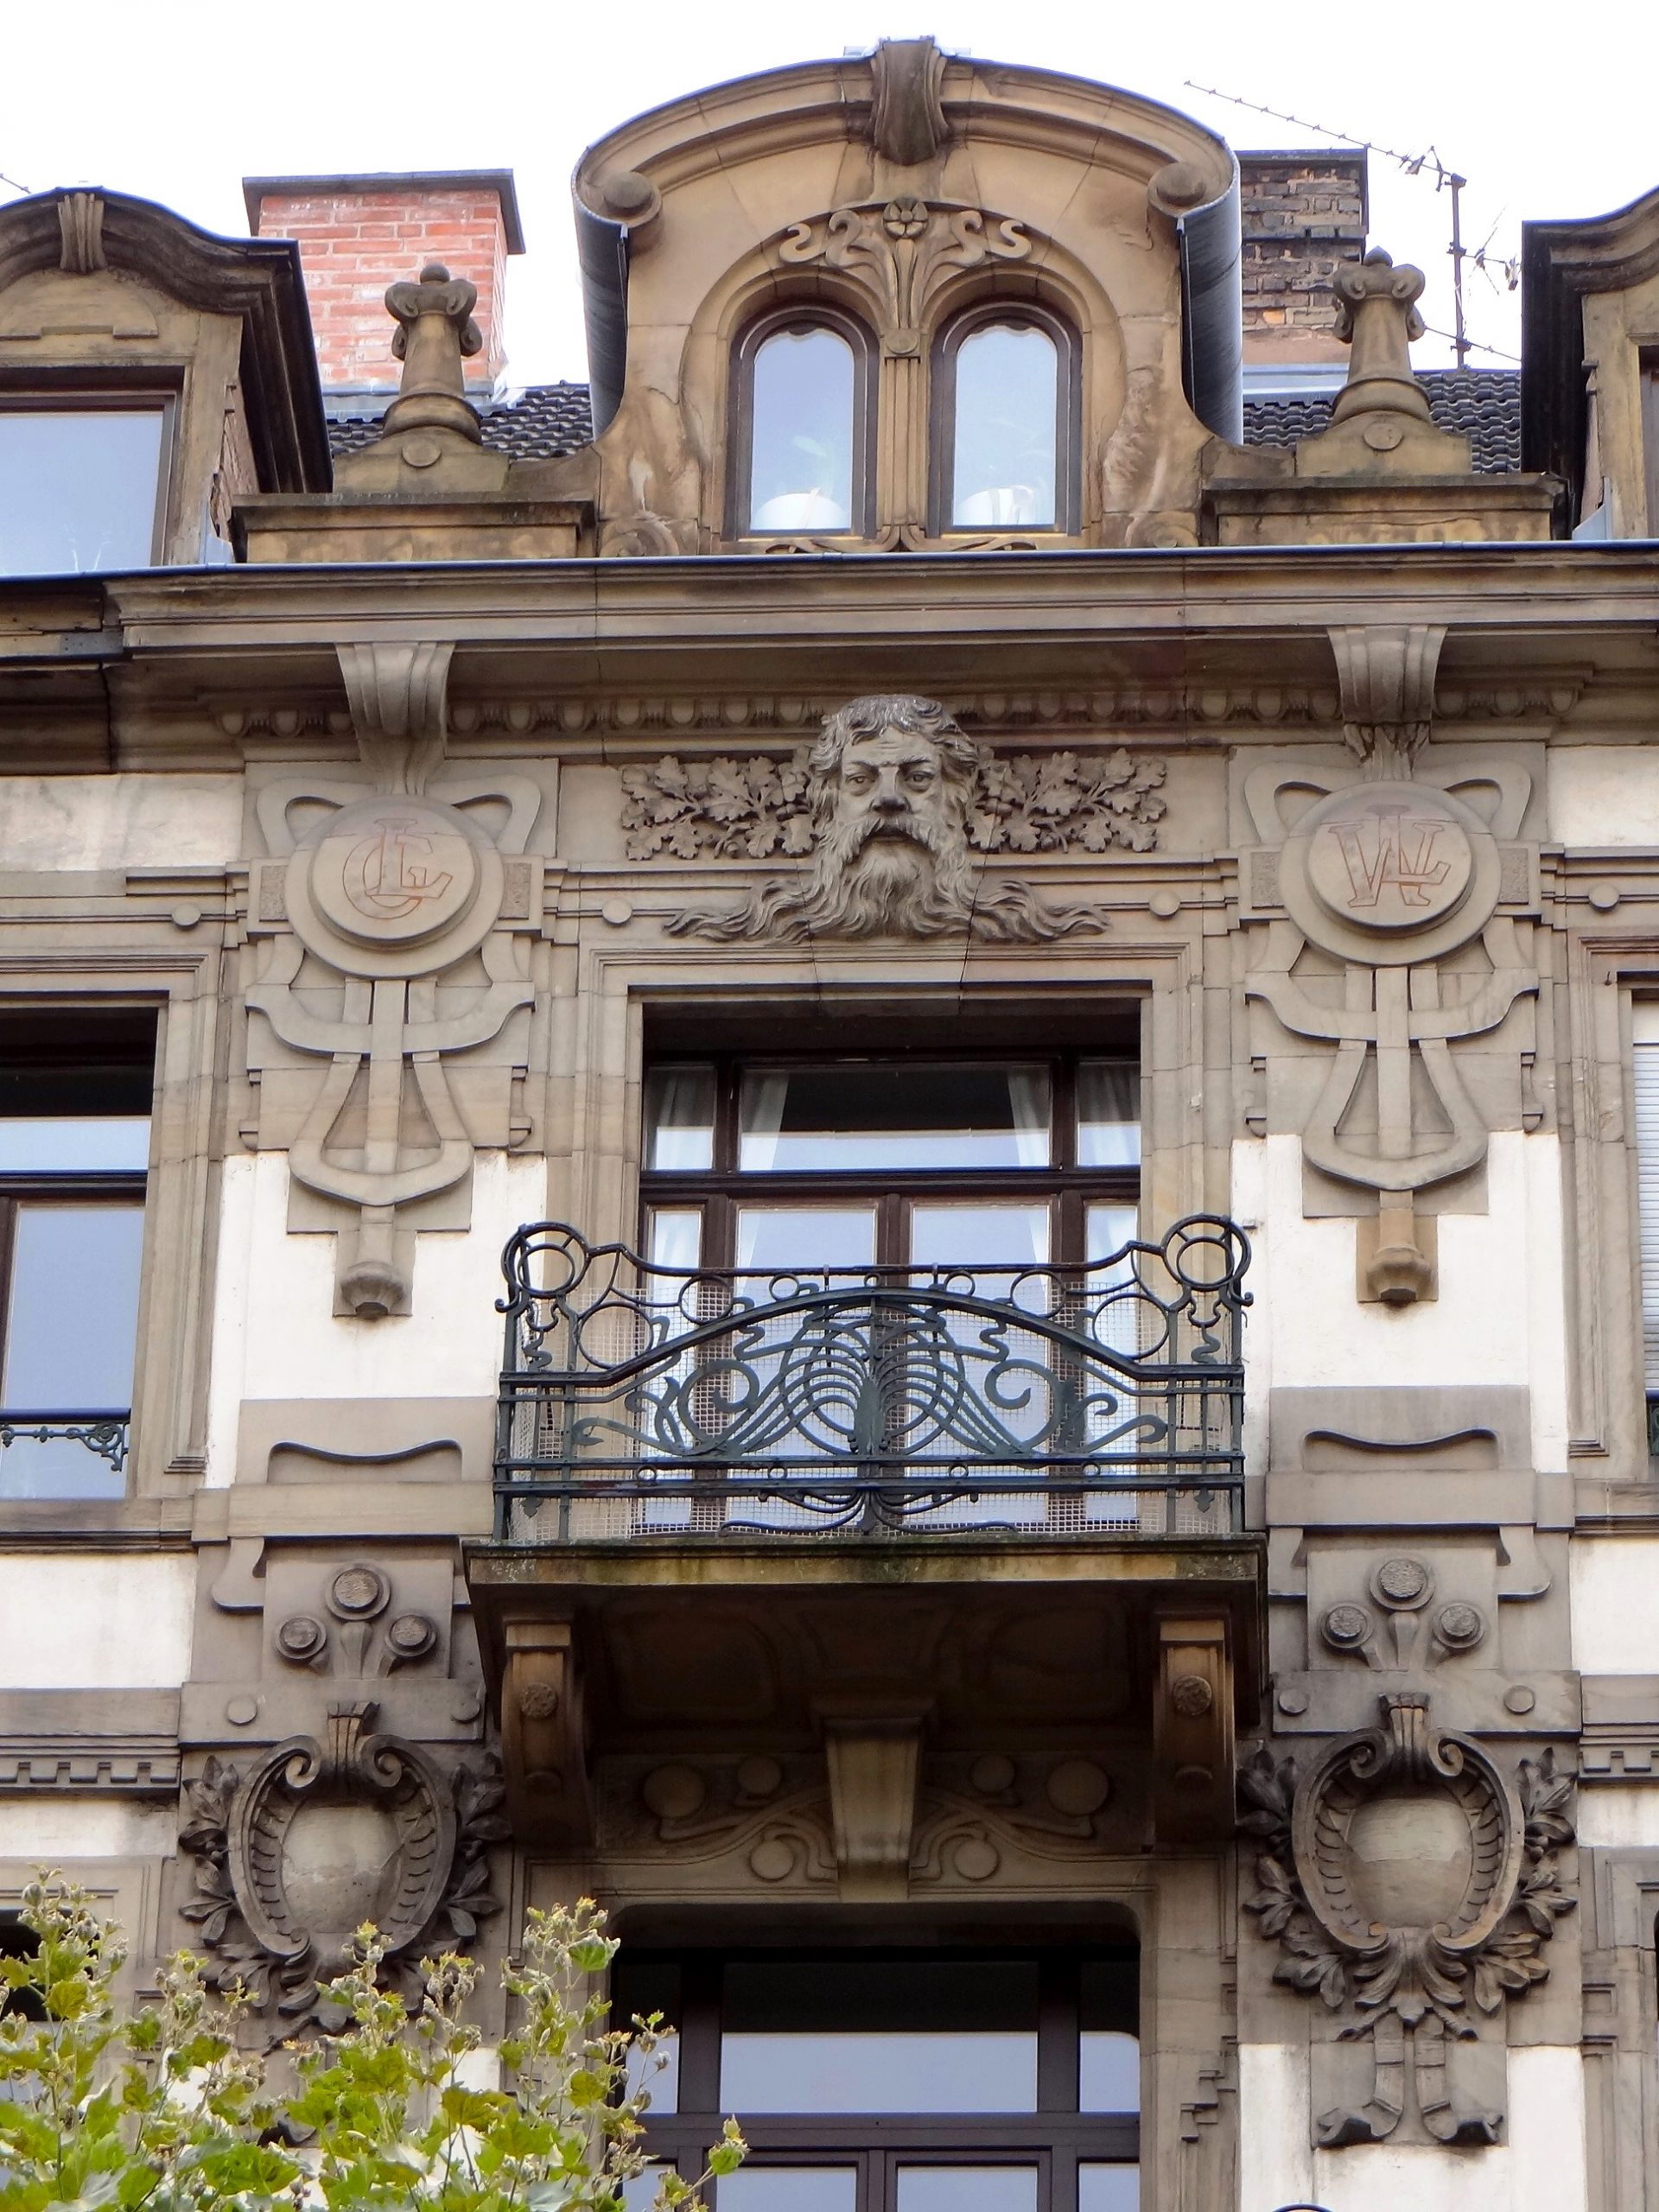
The fluid, curvy design style of Art Nouveau is prominently featured in both the LEGO and film versions of Rivendell. The tall, twisting columns beautifully capture the curves of nature and resemble trees, as the structures are seamlessly integrated with their surroundings. This embodiment of the organic forms and natural elements of Art Nouveau is what makes Rivendell so enchanting.
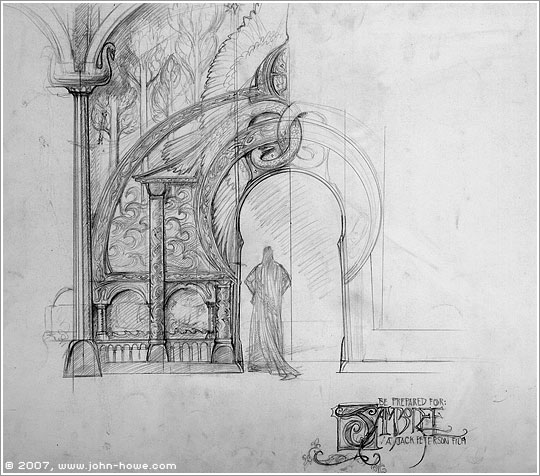
Rivendell Facade illustrated by John Howe (Photo: John Howe).
In addition to Art Nouveau, Celtic design also plays a major role in the architecture of Rivendell. Celtic influence is seen in the use of motifs, such as knots and fluid motions, in the design of the structures. Celtic design features curved and layered elements within a rectilinear framework, and the frequent use of upward-reaching arches allowing for maximum sunlight to enter the space. These elements give the structures of Rivendell a timeless, mystical quality that perfectly captures the essence of the Elven culture.
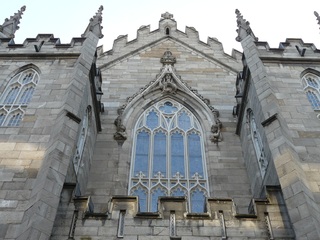
Celtic architecture in a chapel (Photo: PxHere, CC0-1.0).
Rivendell showcases a mix of Celtic and Art Nouveau styles, particularly in the details of windows and railings. The repetitive Celtic designs add stability to the fluid Art Nouveau patterns, resulting in a unique look that blends medieval rigidity with fragility.
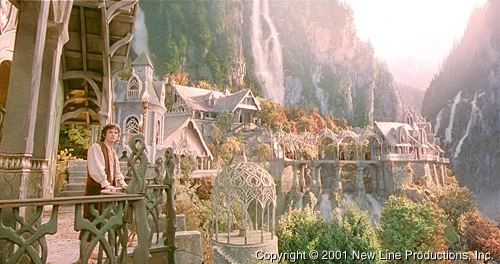
Rivendell as depicted in the movies (Photo: New Line Productions, Inc).
Build Process
The build. for Rivendell is split into three instruction manuals, each covering a different part of the location. These sections can be displayed separately or combined to create the full Rivendell. The building experience can be shared among multiple builders as each section can be built independently. The build captures several iconic scenes from the films, providing a fun challenge for fans to spot as they build.
Section 1 – The Tower
The first section we build is the tower where Bilbo stays during his time in Rivendell. It showcases an array of shapes and contrasting colors and introduces a new roof building technique. This section sets the tone for the rest of the build and provides glimpses into the level of detail and creativity that went into the design of this set.
The tower is split into 11 bags, making it the smallest of the three builds, but it’s still a stunning piece. The attention to detail and beauty are evident despite its smaller size.
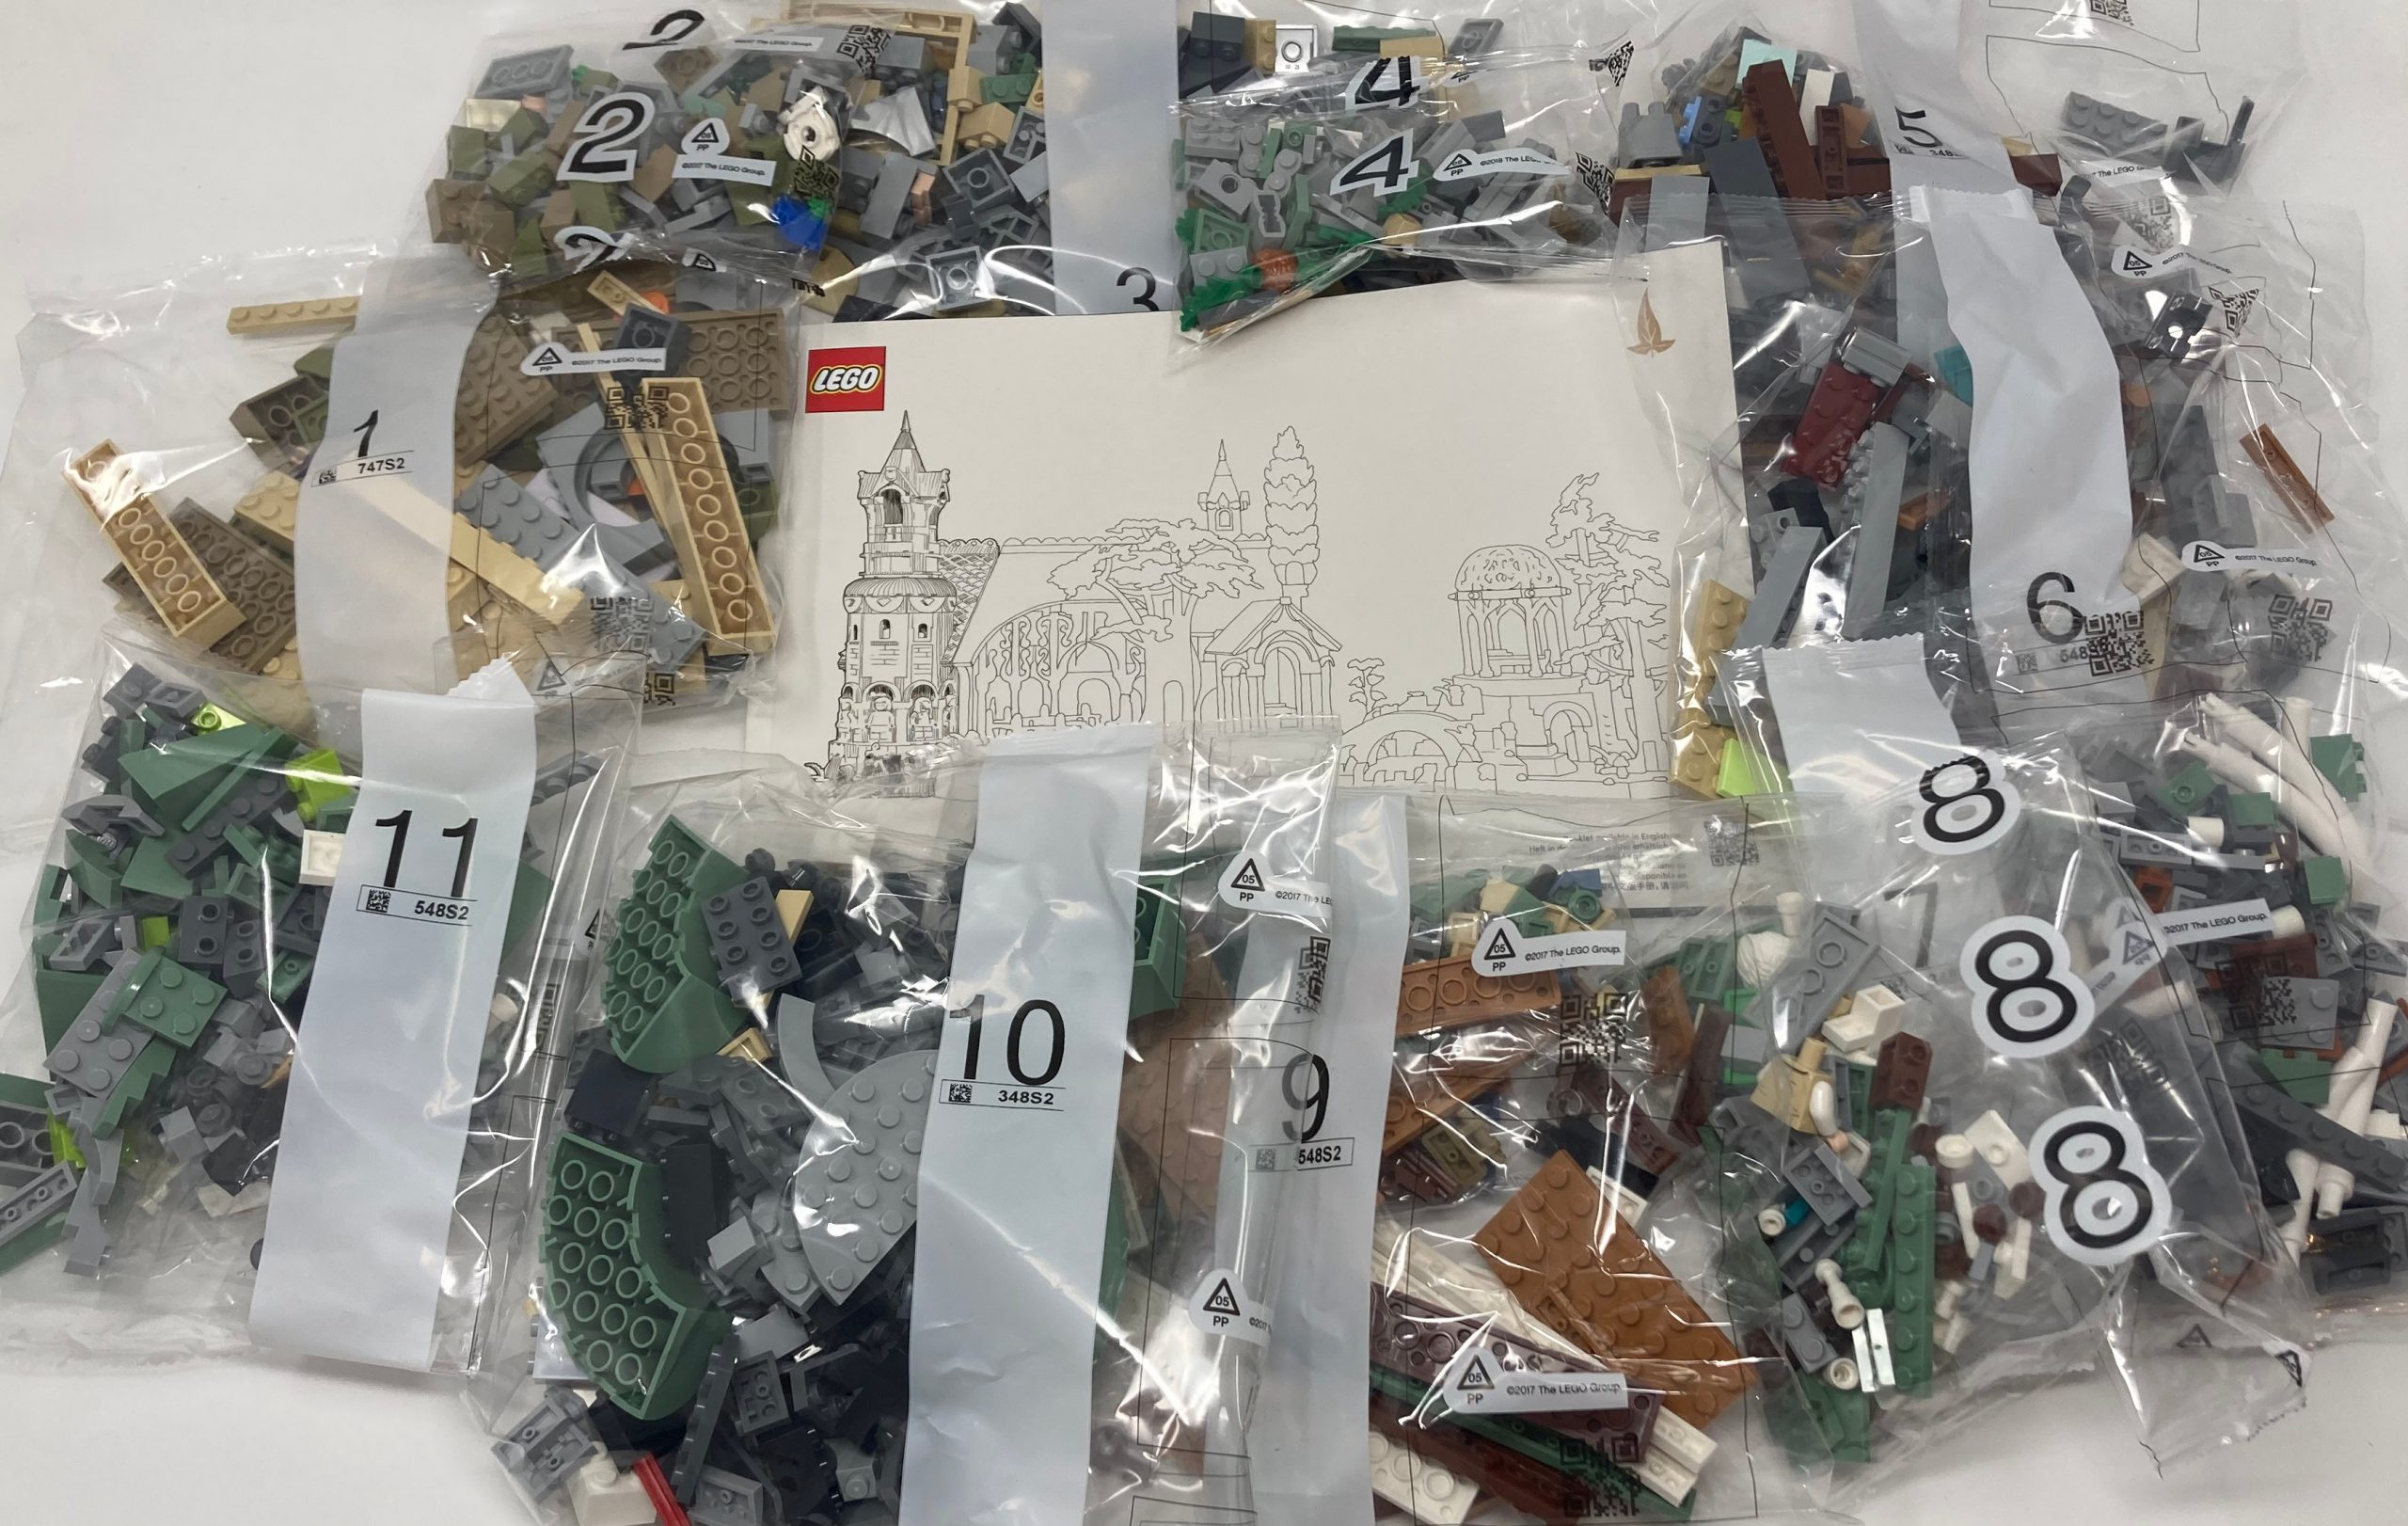
Bags for section 1.
Bags 1-2
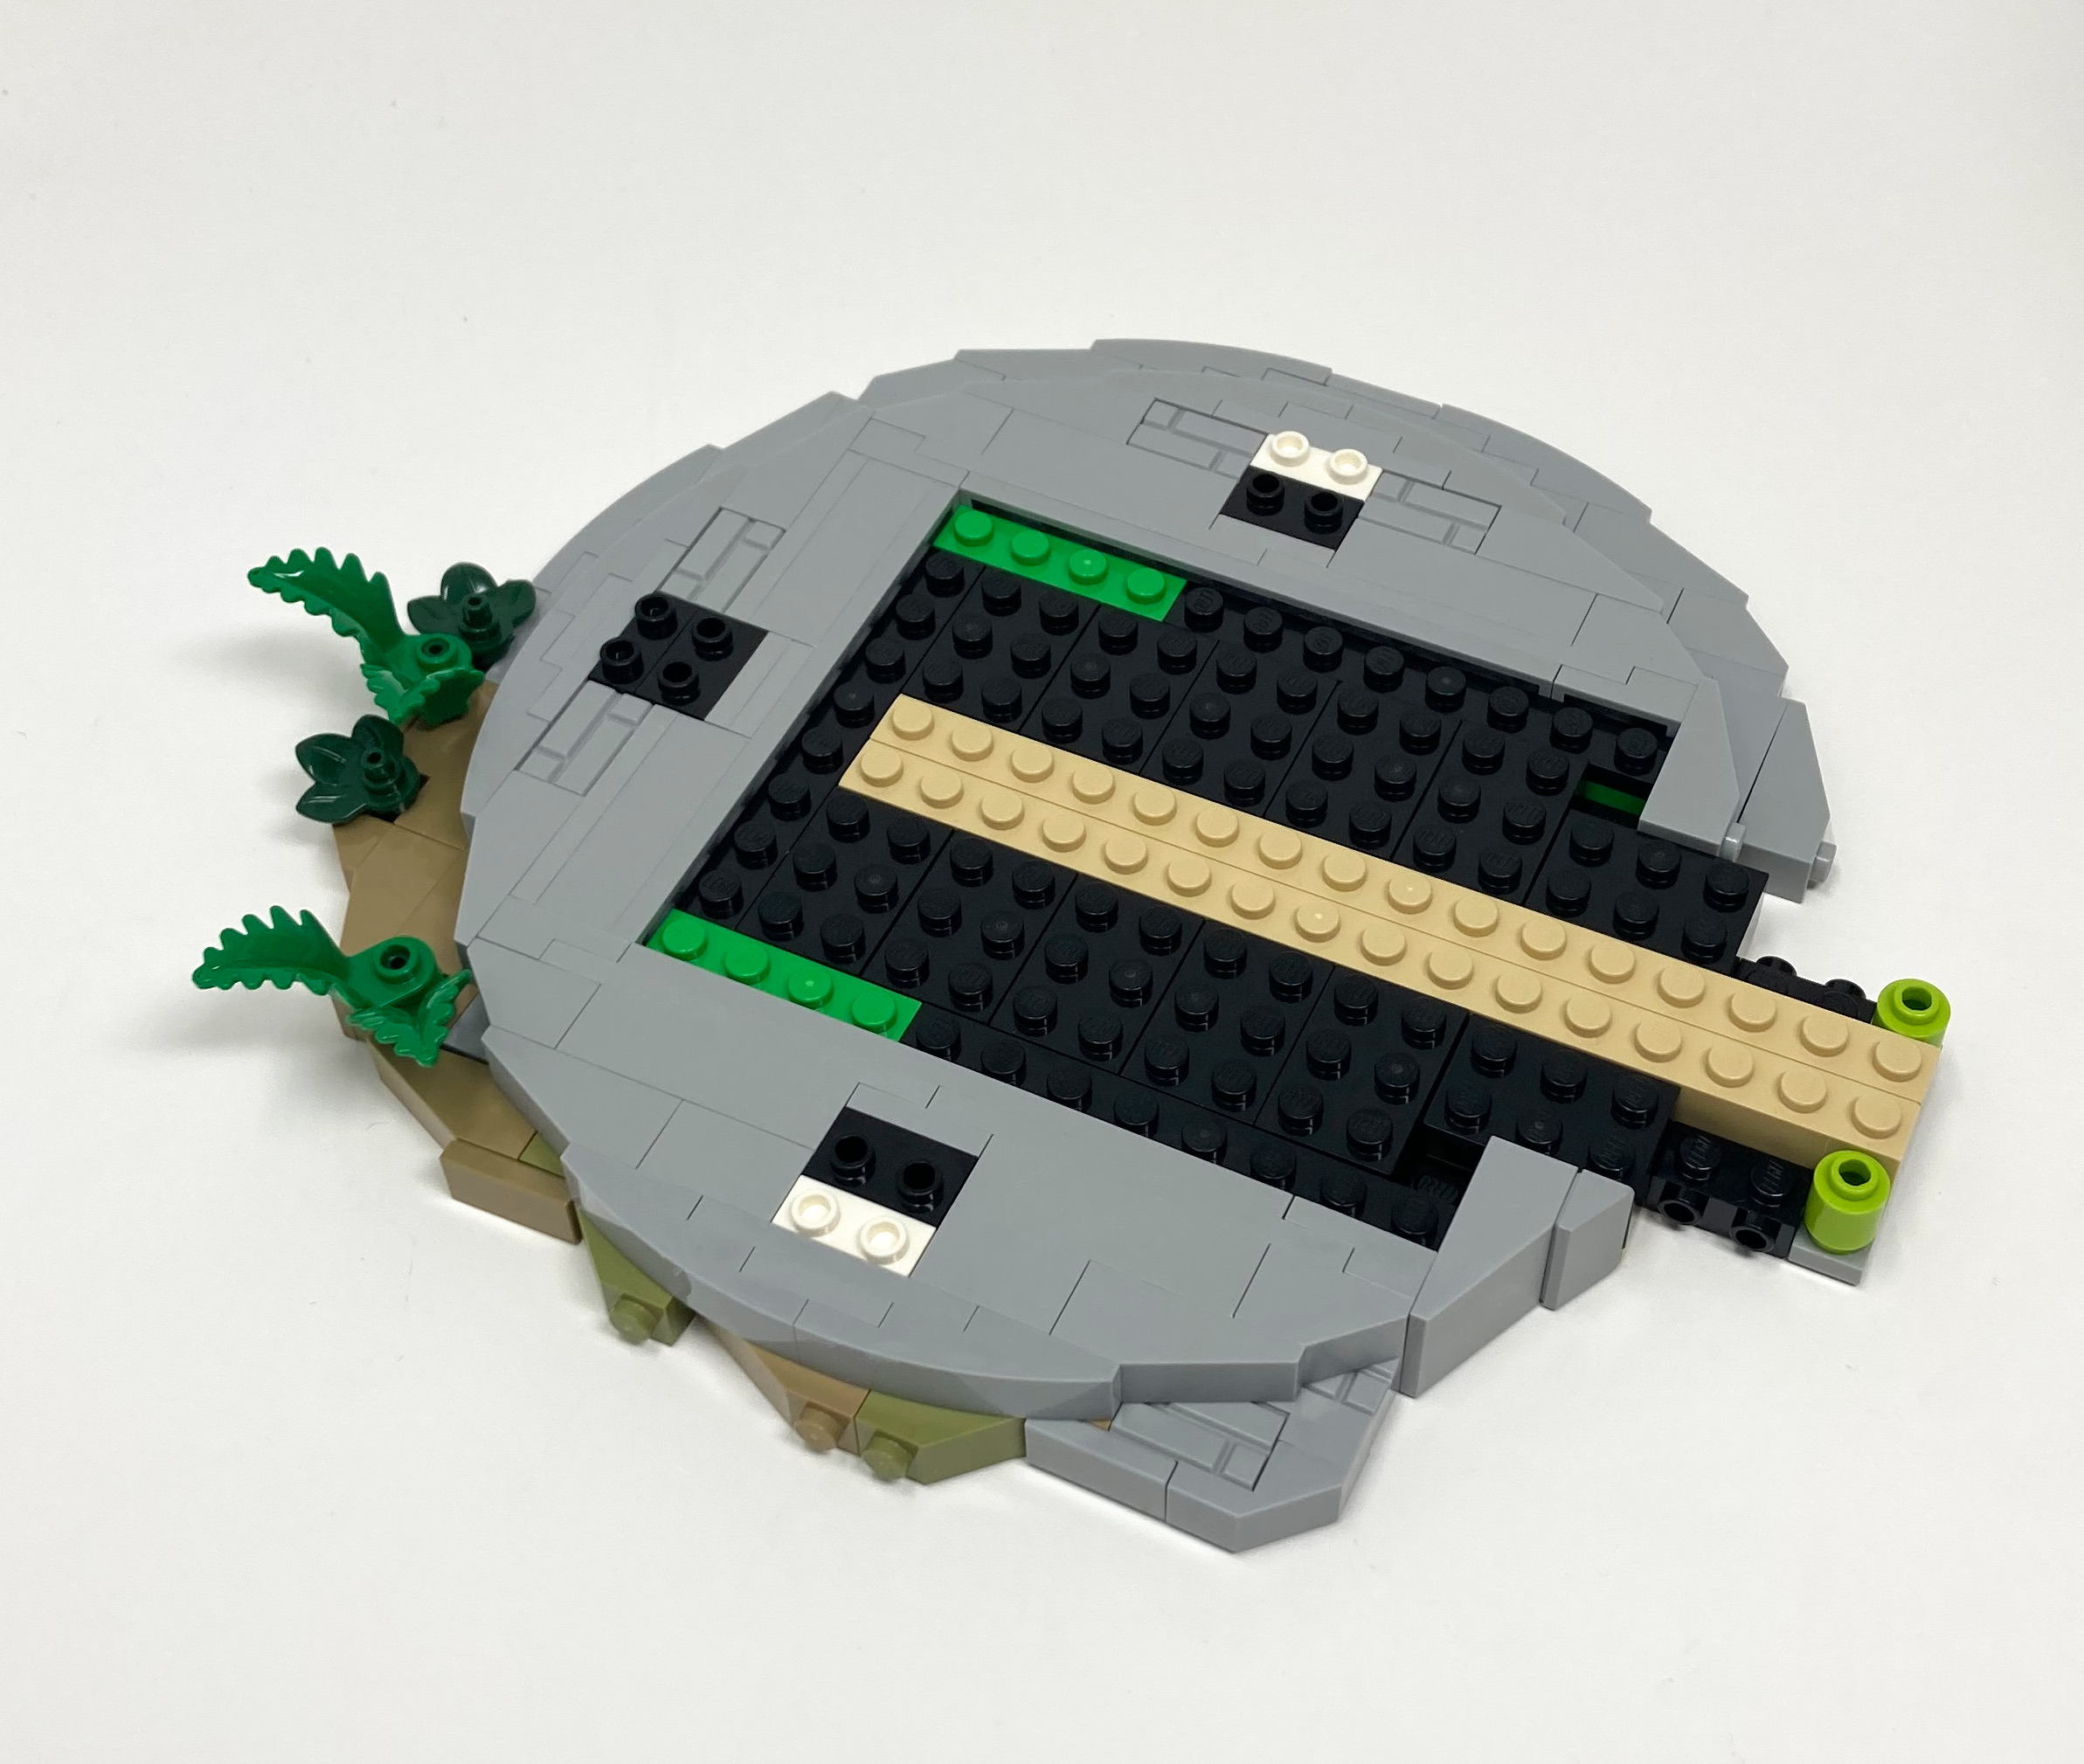
The first two bags of the build focus on creating the foundation of the tower. The designers use a mix of 330Olive Green, 5Brick YellowTan, and 138Sand YellowDark Tan to imitate the earth colors of the misty mountain. The organic feel of the terrain is achieved through a combination of various colors, shapes, and slopes, and enhanced with the use of 28Dark GreenGreen and 37Bright Green for the fallen leaves and mossy studs. The attention to depth is accentuated in the varied heights of slopes. In contrast to the natural elements of the terrain, the base of the tower is constructed with 194Medium Stone GreyLight Bluish Gray arches and bricks.

The base with its contrasting colors and shapes accentuates the landscape.
Bags 3-4
As we build the details of the tower, we start to develop the color palette that will be used throughout the entire build. The palette includes earthy shades of 5Brick YellowTan, 151Sand Green, 199Dark Stone GreyDark Bluish Gray, and 194Medium Stone GreyLight Bluish Gray, which creates a cohesive and natural look for the tower. The building is split into two sections, the first being part of the main structure of Rivendell with a focus on earthen colors. The second part achieves the rugged stony look with the robustness of the tower emphasized using masonry bricks. This section of the build lays the foundation for the overall aesthetic of the set.
Arches are a common theme throughout this set.
This use of upside-down construction adds a sense of complexity and detail to the build, while the candelabras serve as a luxurious addition to the tower’s interior. The pre-built arch pieces create a seamless flow of the architecture, further highlighting the beauty and craftsmanship of the tower. The 1×1 round stud with a hole in it is likely the most versatile piece here allowing for a variety of techniques to be used. Once you use this piece to the fullest you start to see how many great shapes can be achieved through upside down or side construction.
Upside down construction allows for creative shapes to be built.
This set is designed to embody the essence of a forest environment. To achieve this, the designers made use of many new pieces, including the fern piece. This piece plays a key role in giving the set a natural and lush look, with a total of 34 fern pieces included in the set. The set also makes use of 1×2 modified bricks with a singular stud on the side. These bricks allow for parts of the build to be angled, which comes in handy when creating a seamless and organic-looking build.
Foliage in different shapes and sizes litter the landscape.
Bag 5
As the build continues, we can already see the building taking shape. A brick-built recessed wall niche at the front of the tower showcases 5 statues, 3 elven males and 2 elven females, adding anthropomorphic details to the front of the tower’s facade. The designers have creatively utilized the mudguard piece to create a small, rounded arch to finish off the space. The attention to detail in this small aspect of the build is impressive, with design decisions like alternating bricks and rounded studs on the base of the pillars contributing to a Romanesque column capped with an ionic order.
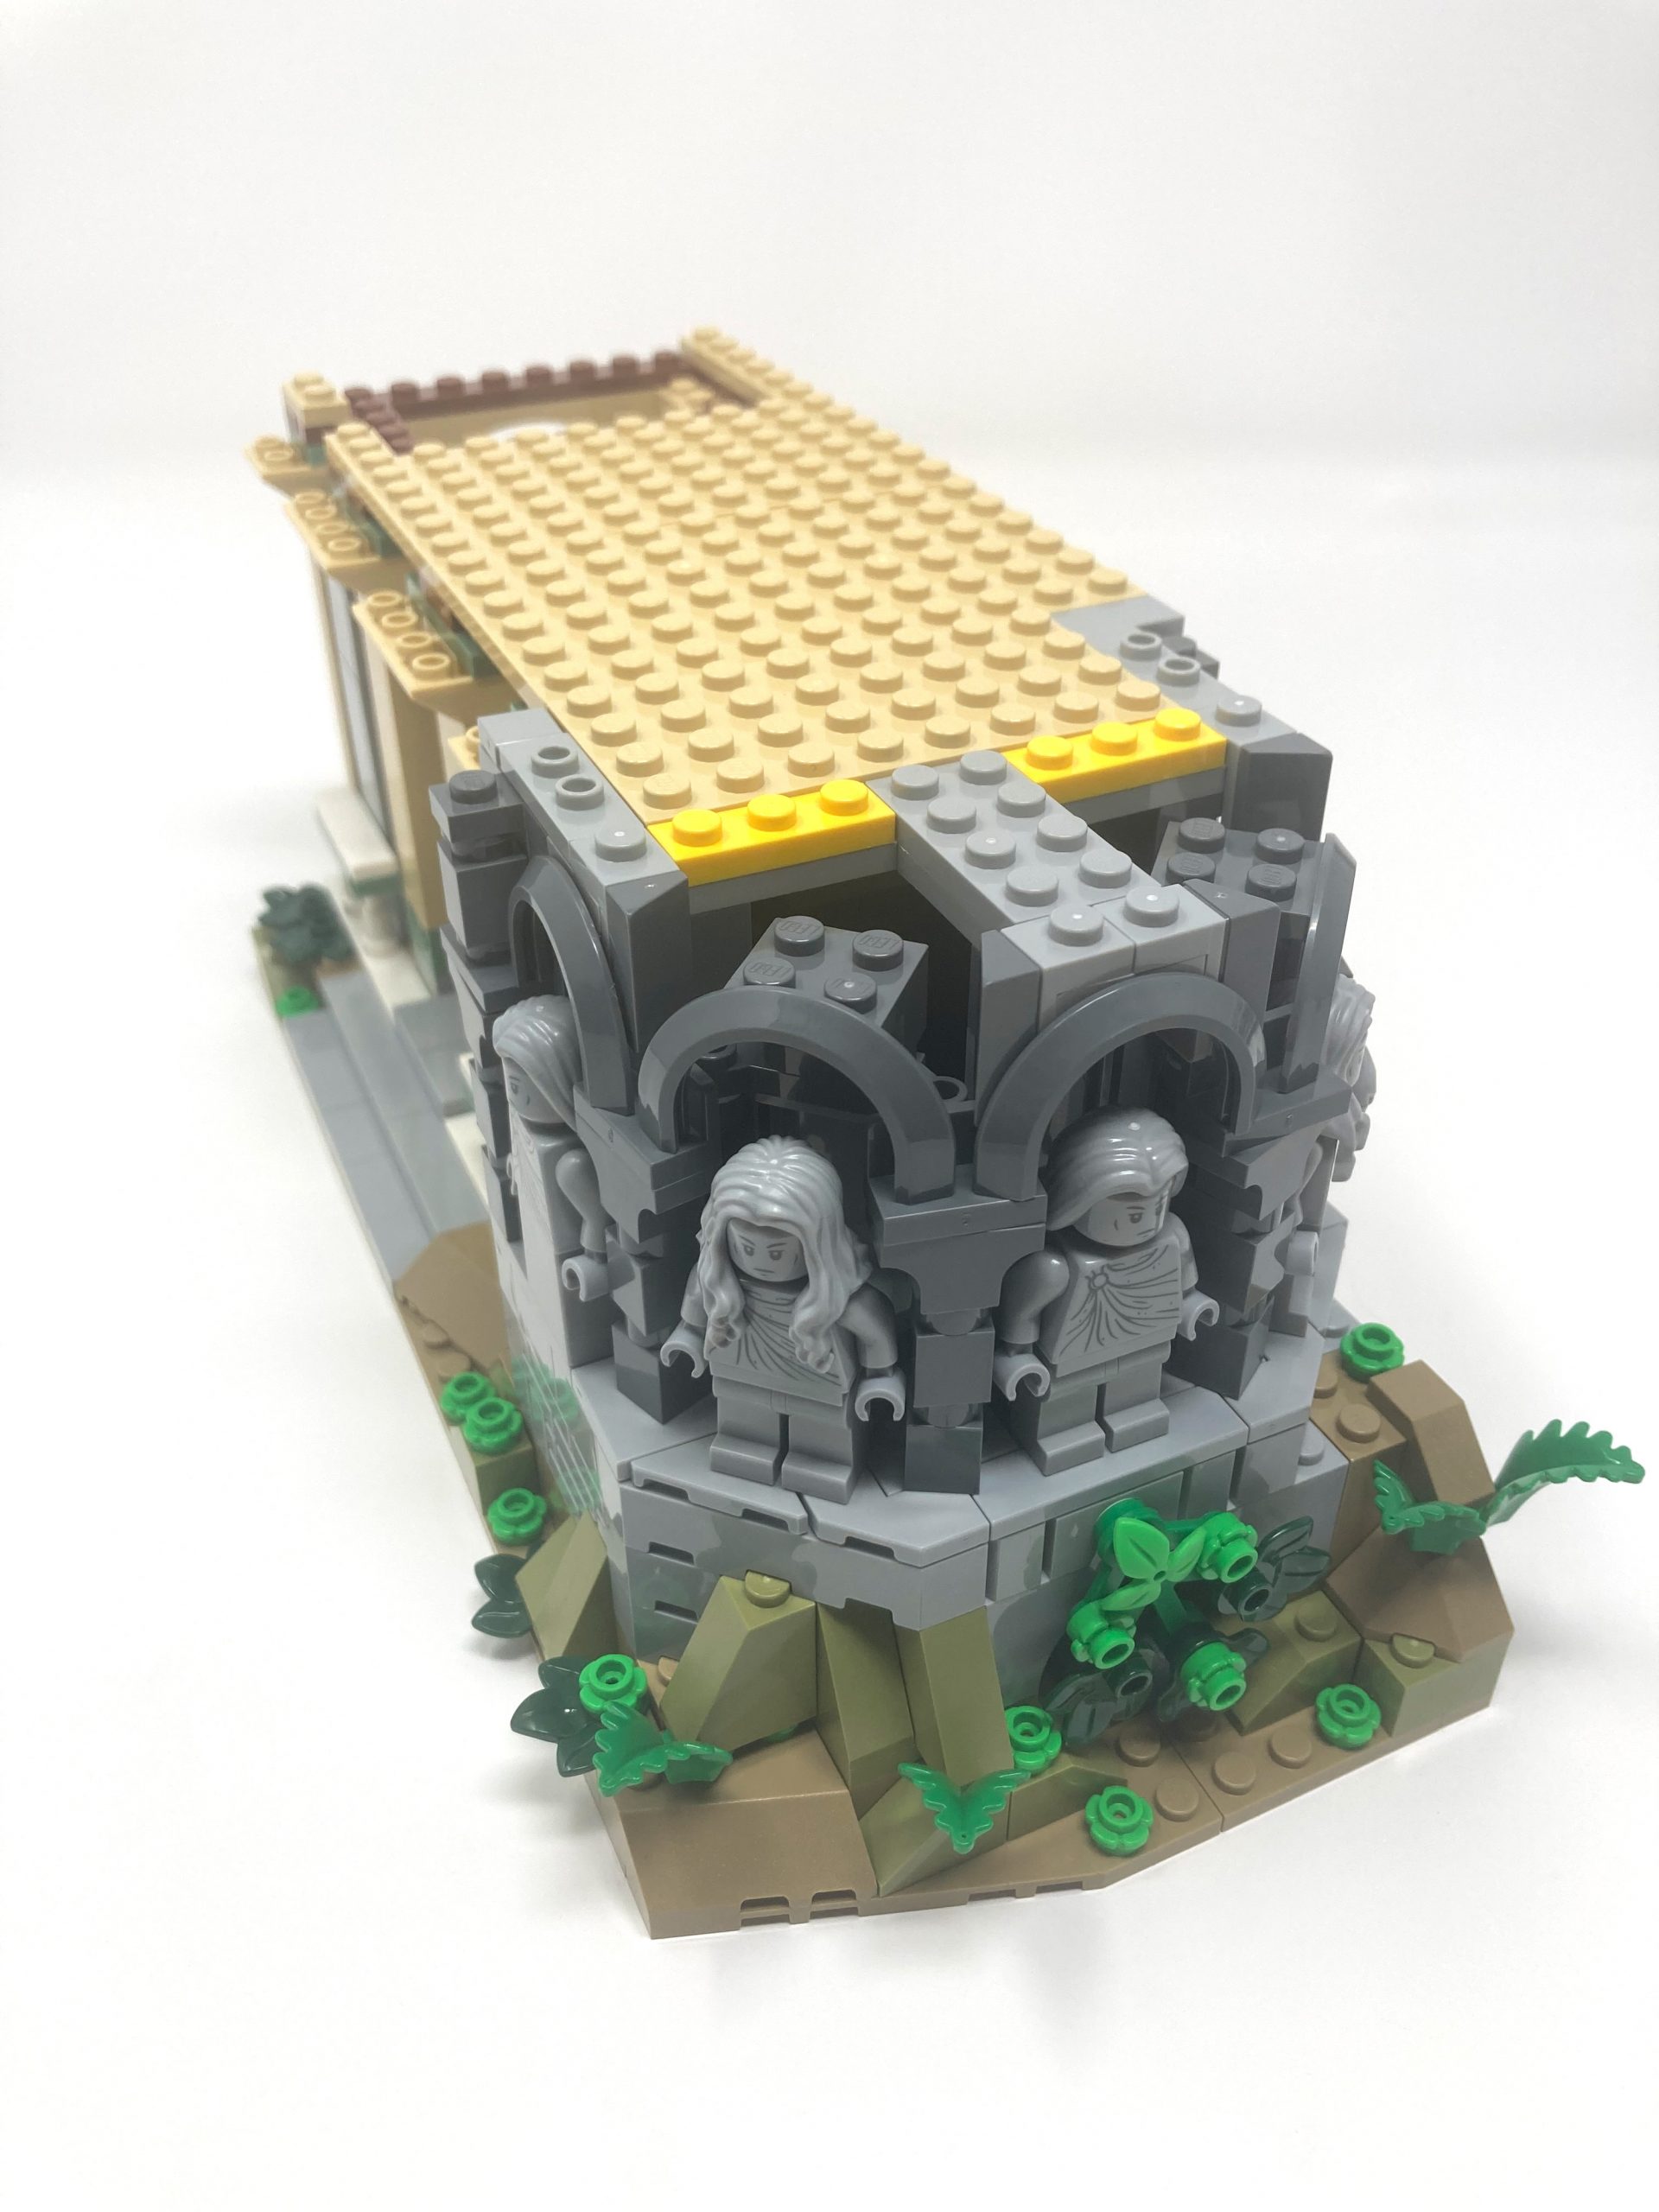
Five additional minifigures create statues along the base of the tower.
The interior design elements in this set are top-notch. A chaise lounge is expertly built with upside-down and stud-on-side construction, and a 1×2 plate with handles serving as legs. The wall is adorned with a stunning brick-built bookshelf. The books themselves are made from a variety tiles and plates with 297Warm GoldPearl Gold flourishes adding detailing to the shelf itself. The hardcover books on the shelf have a distinct look, with wider spines for added depth and some slightly sticking out with the help of a modified 1×2 plate with handles. The overall look is inviting, from soft pillows to the range of colors and textures of the books. The underside of the ceiling on this level is lined with 308Dark Brown rafters, providing a subtle contrast against the 5Brick YellowTan walls. Although it may be hard to spot at first, the addition of these rafters is a nice touch and showcases the attention to detail in this set.
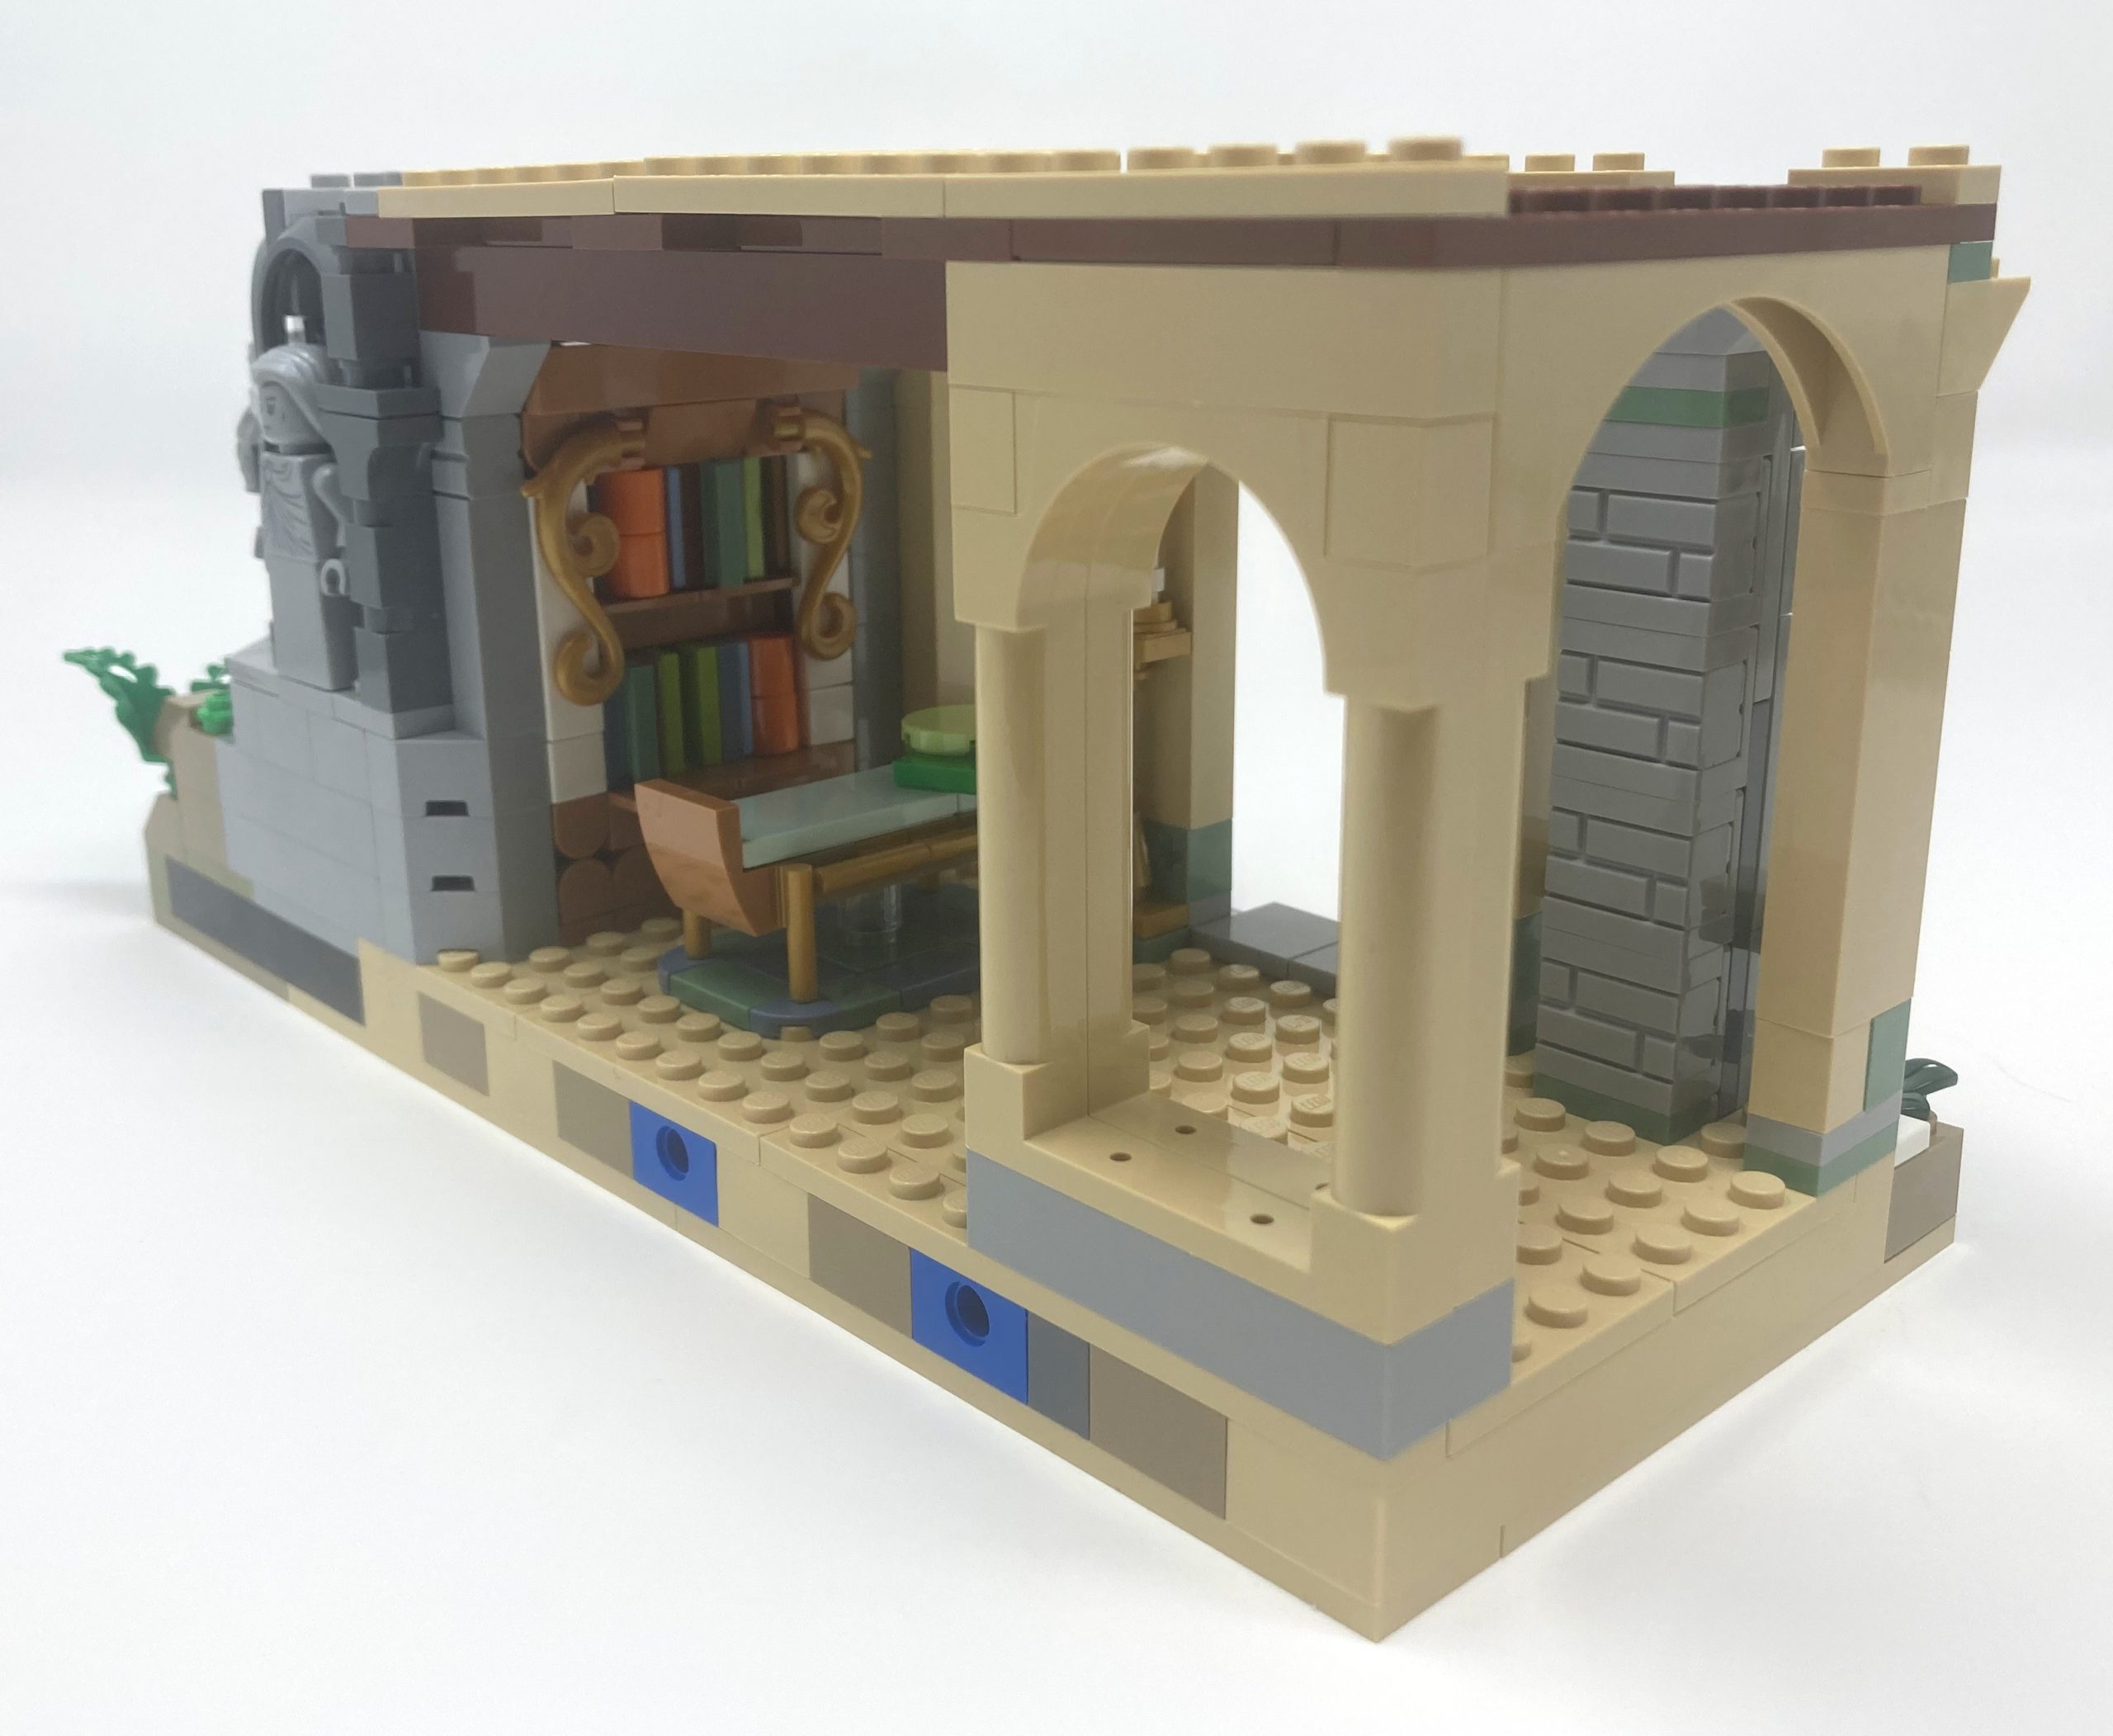
The furniture is built using unique building techniques and helps create a homely feel.
Bag 6
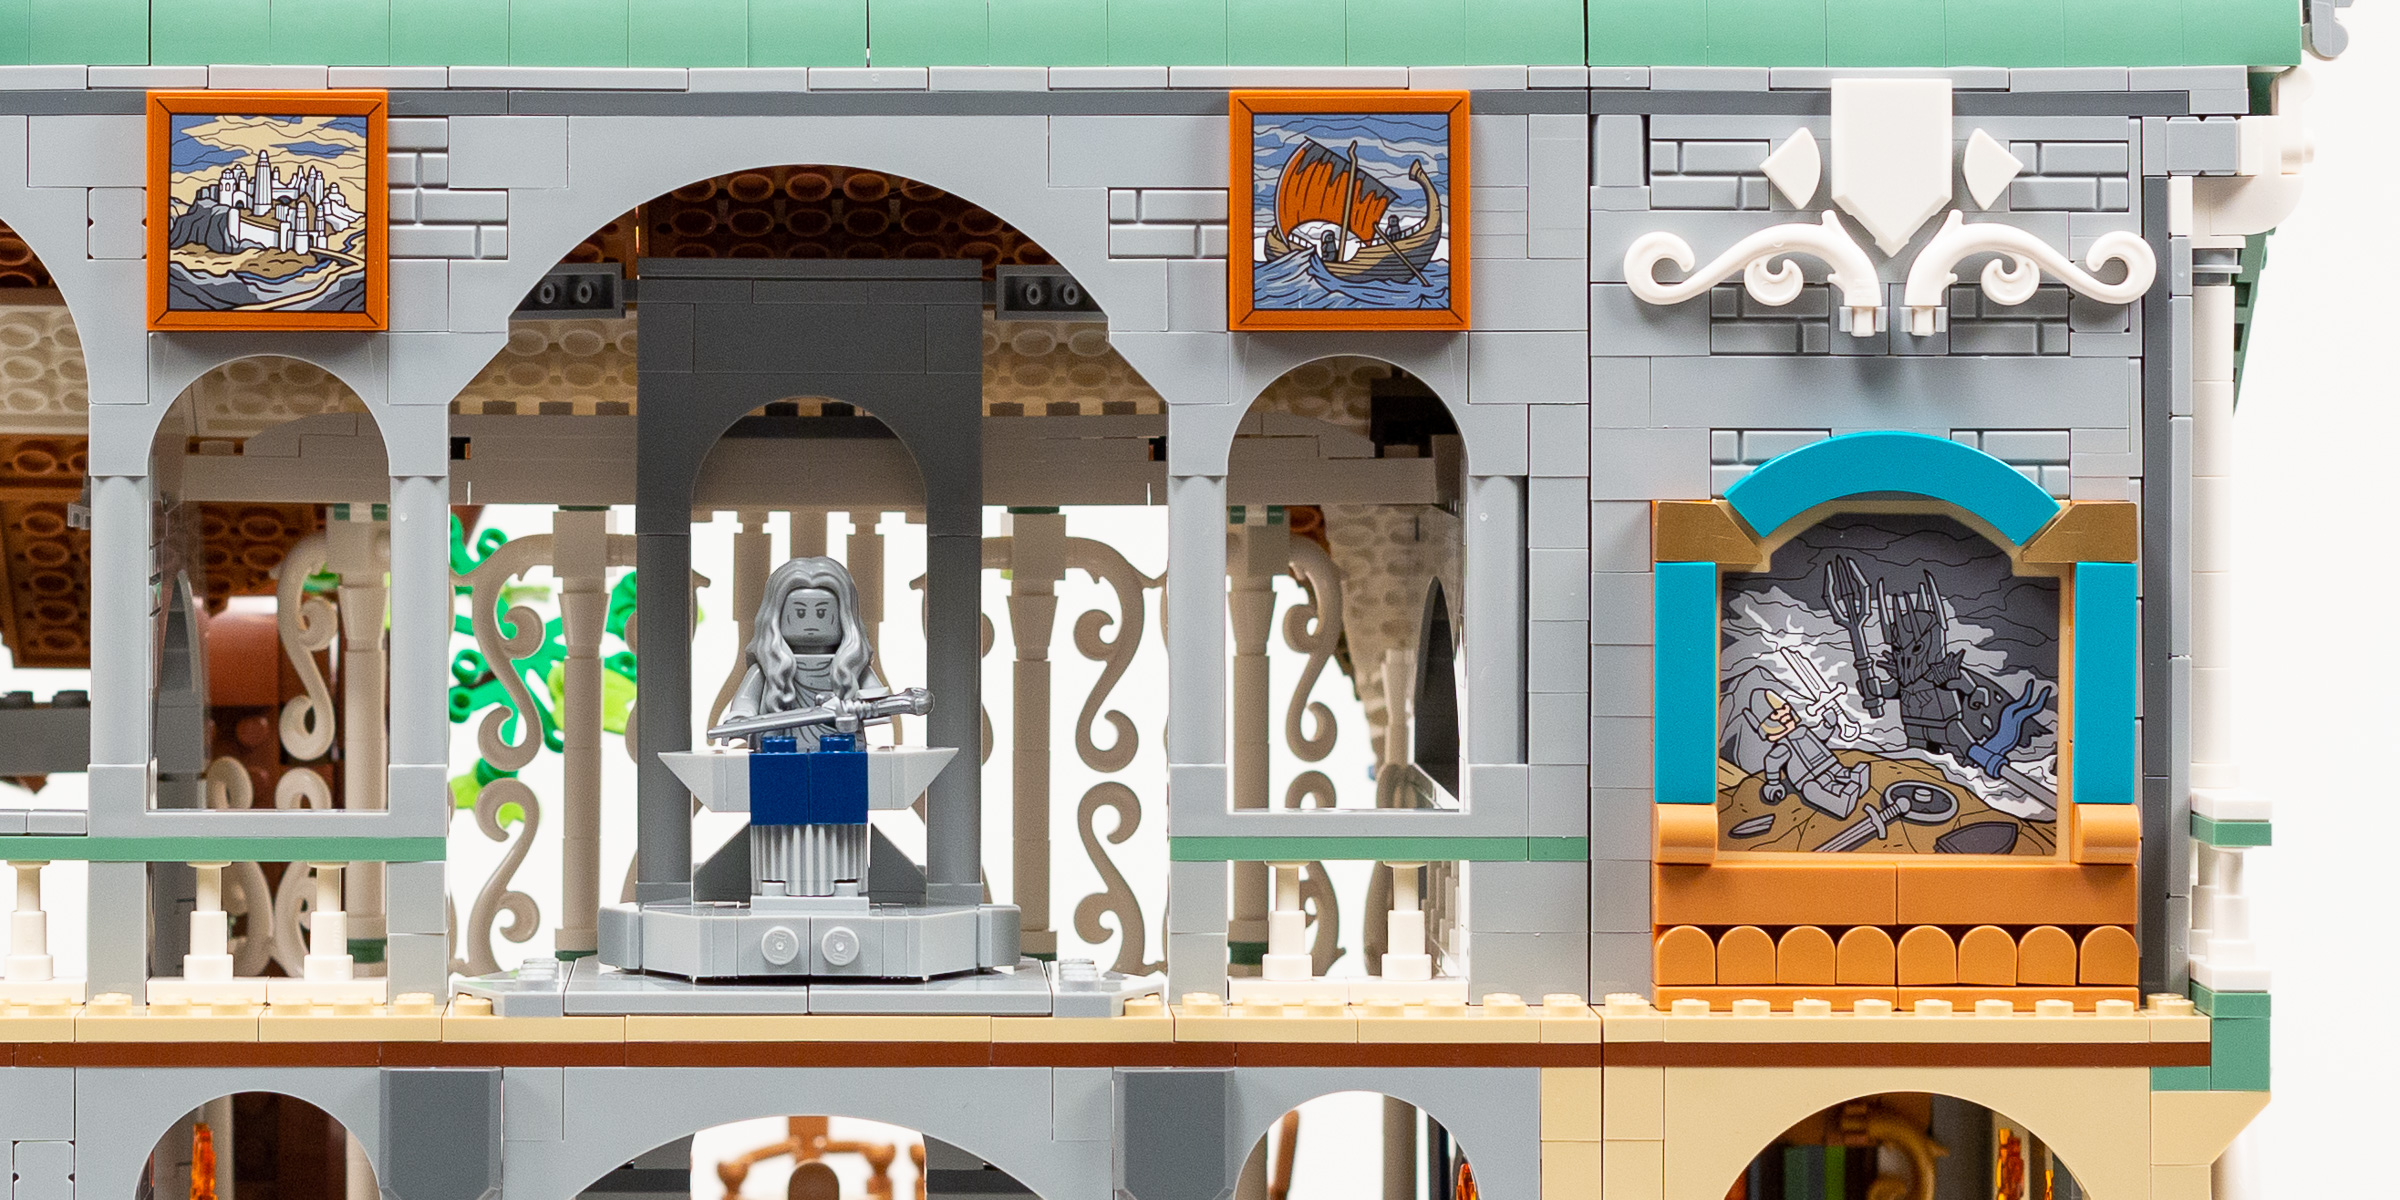
As we construct the second level, we get to see the first application of the included sticker sheets. This level features a brick wall with a large mural depicting Isildur’s battle with Sauron. Using a sticker for this level of detail was a wise choice, as it wouldn’t have been possible with just bricks or printed pieces. The designers have added an extra touch by creating an elaborate brick-built frame, in colors that contrast nicely with the gray wall behind it. This thoughtful design adds depth and richness to the mural, making it one of many standouts of the set.
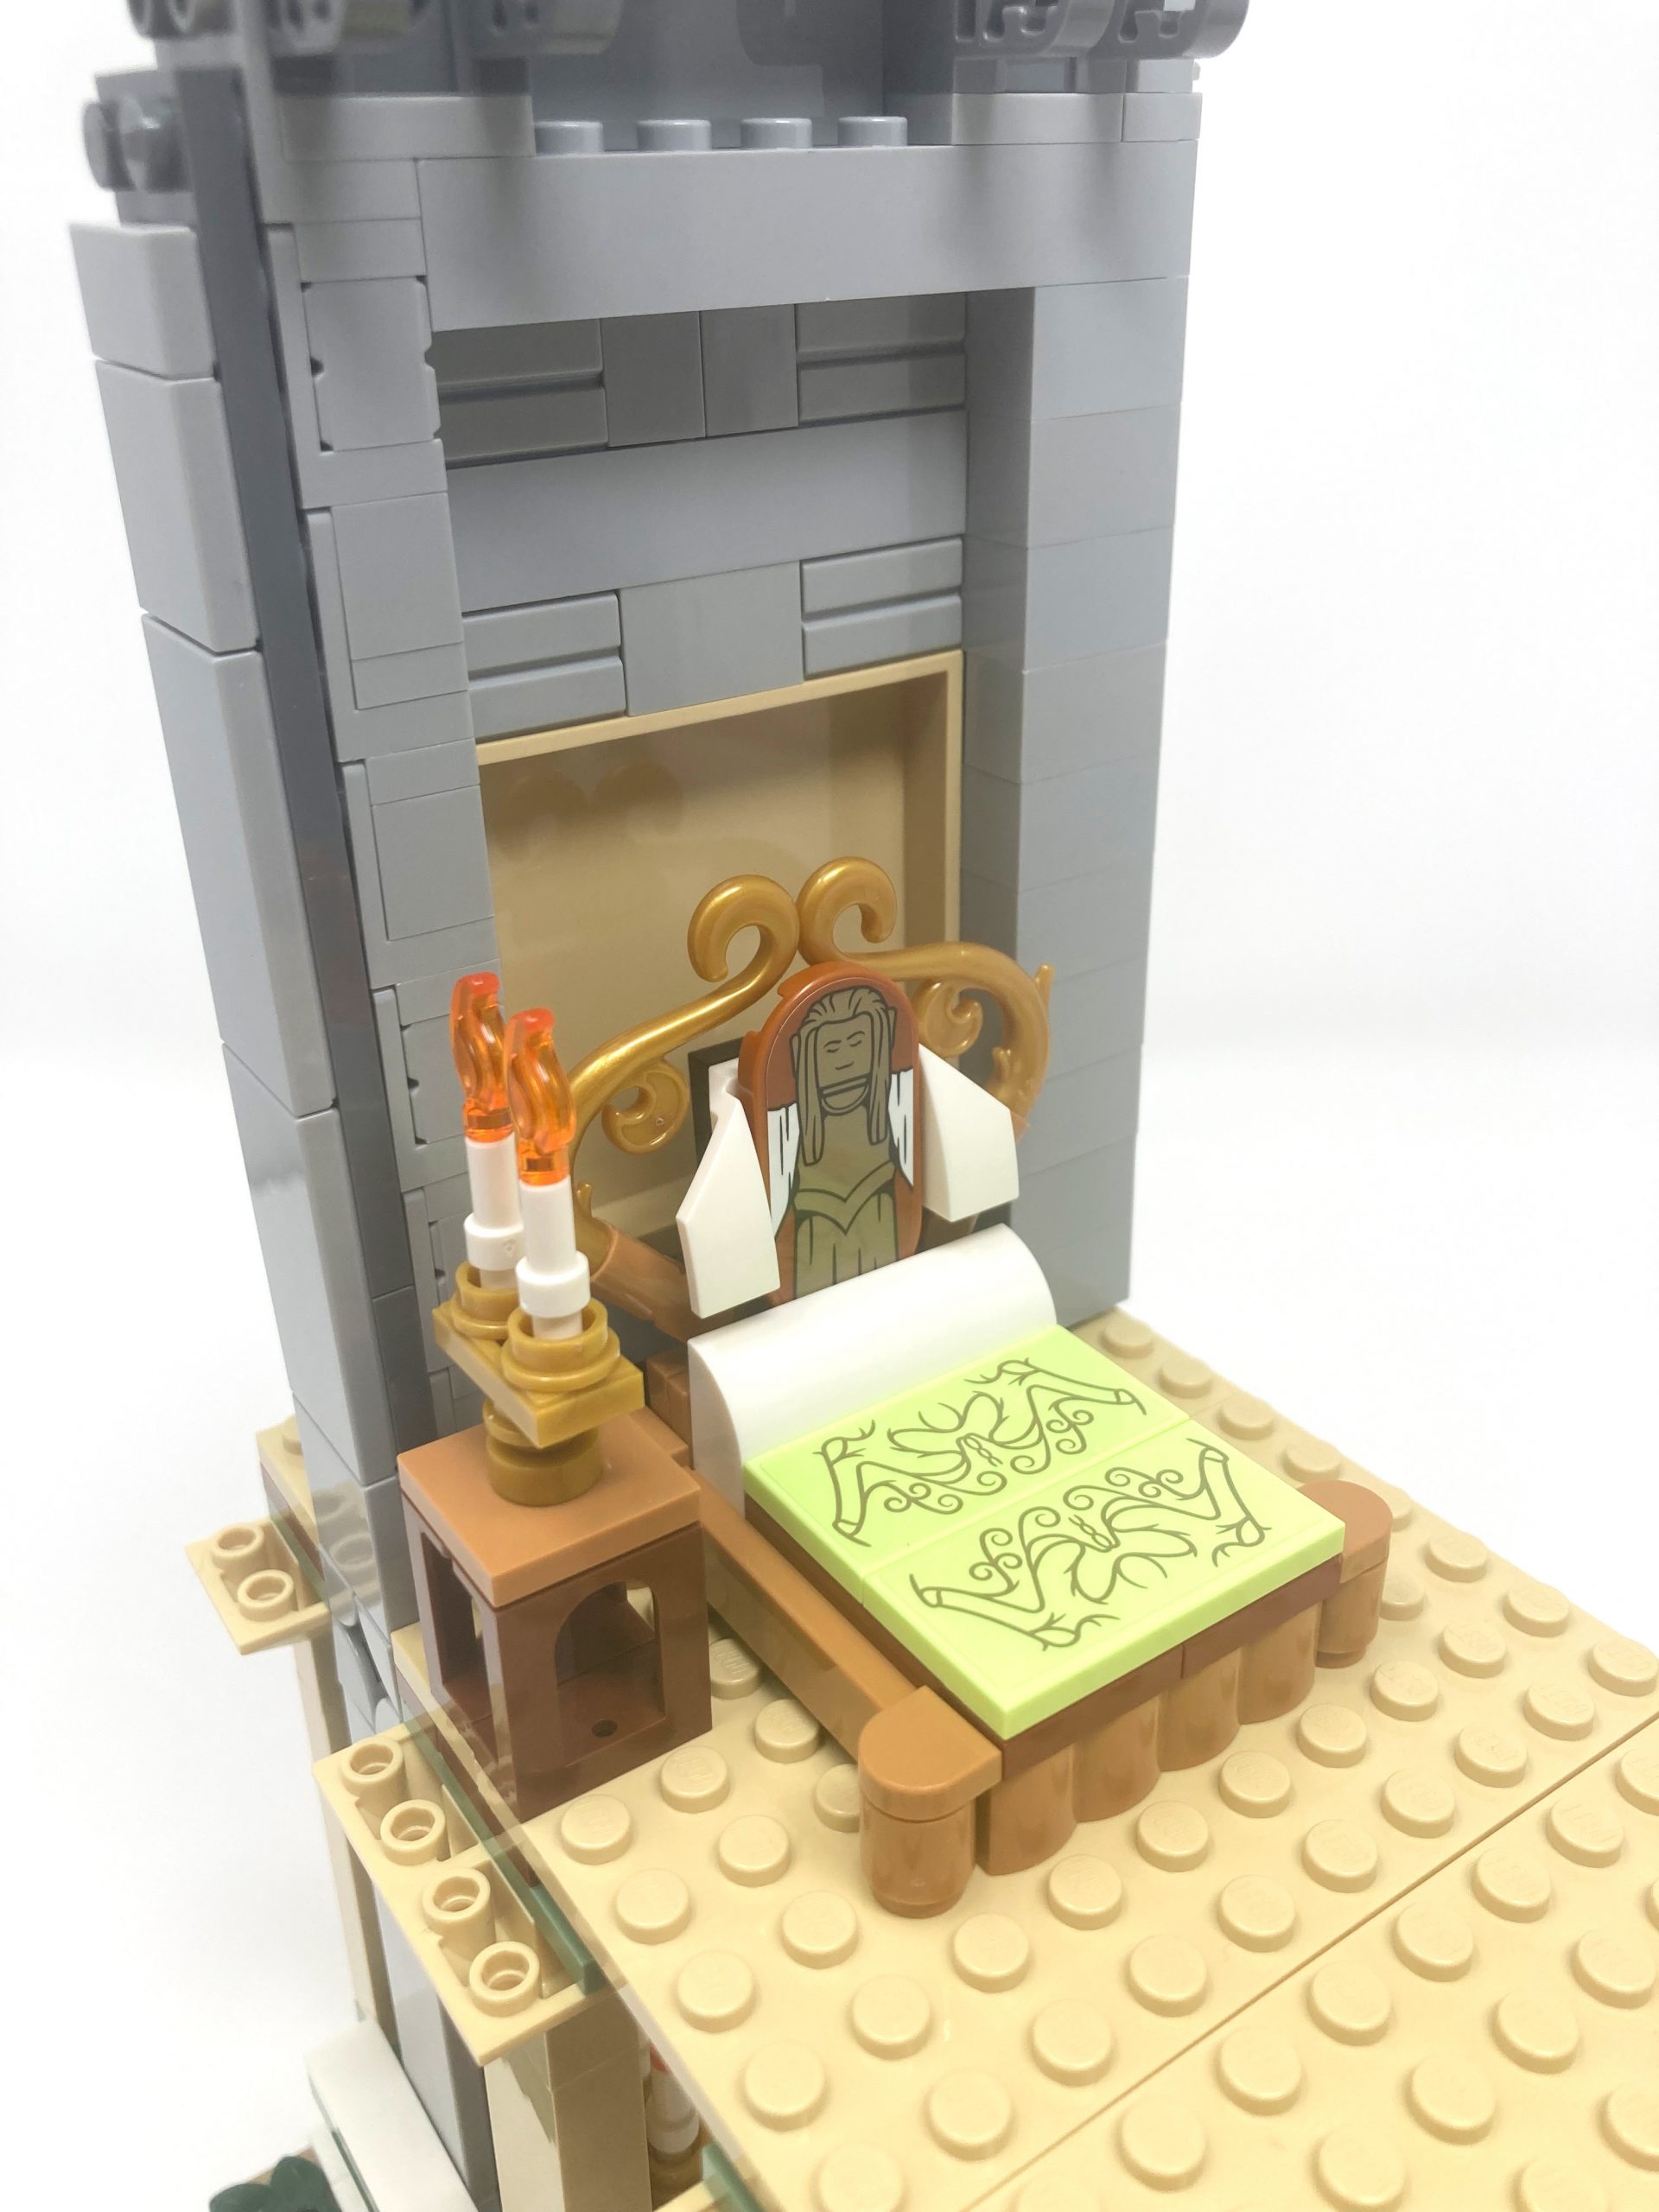
Everything from the frame to the headboard are packed with details.
On the other side of the wall, we construct a bedroom filled with intricate details. The bed uses stickers for the sheets and floral patterns and textures for the bedframe, making it stand out. The bed even has a clothed statue serving as a headboard, closely resembling the statues above Bilbo’s bed in the movies.
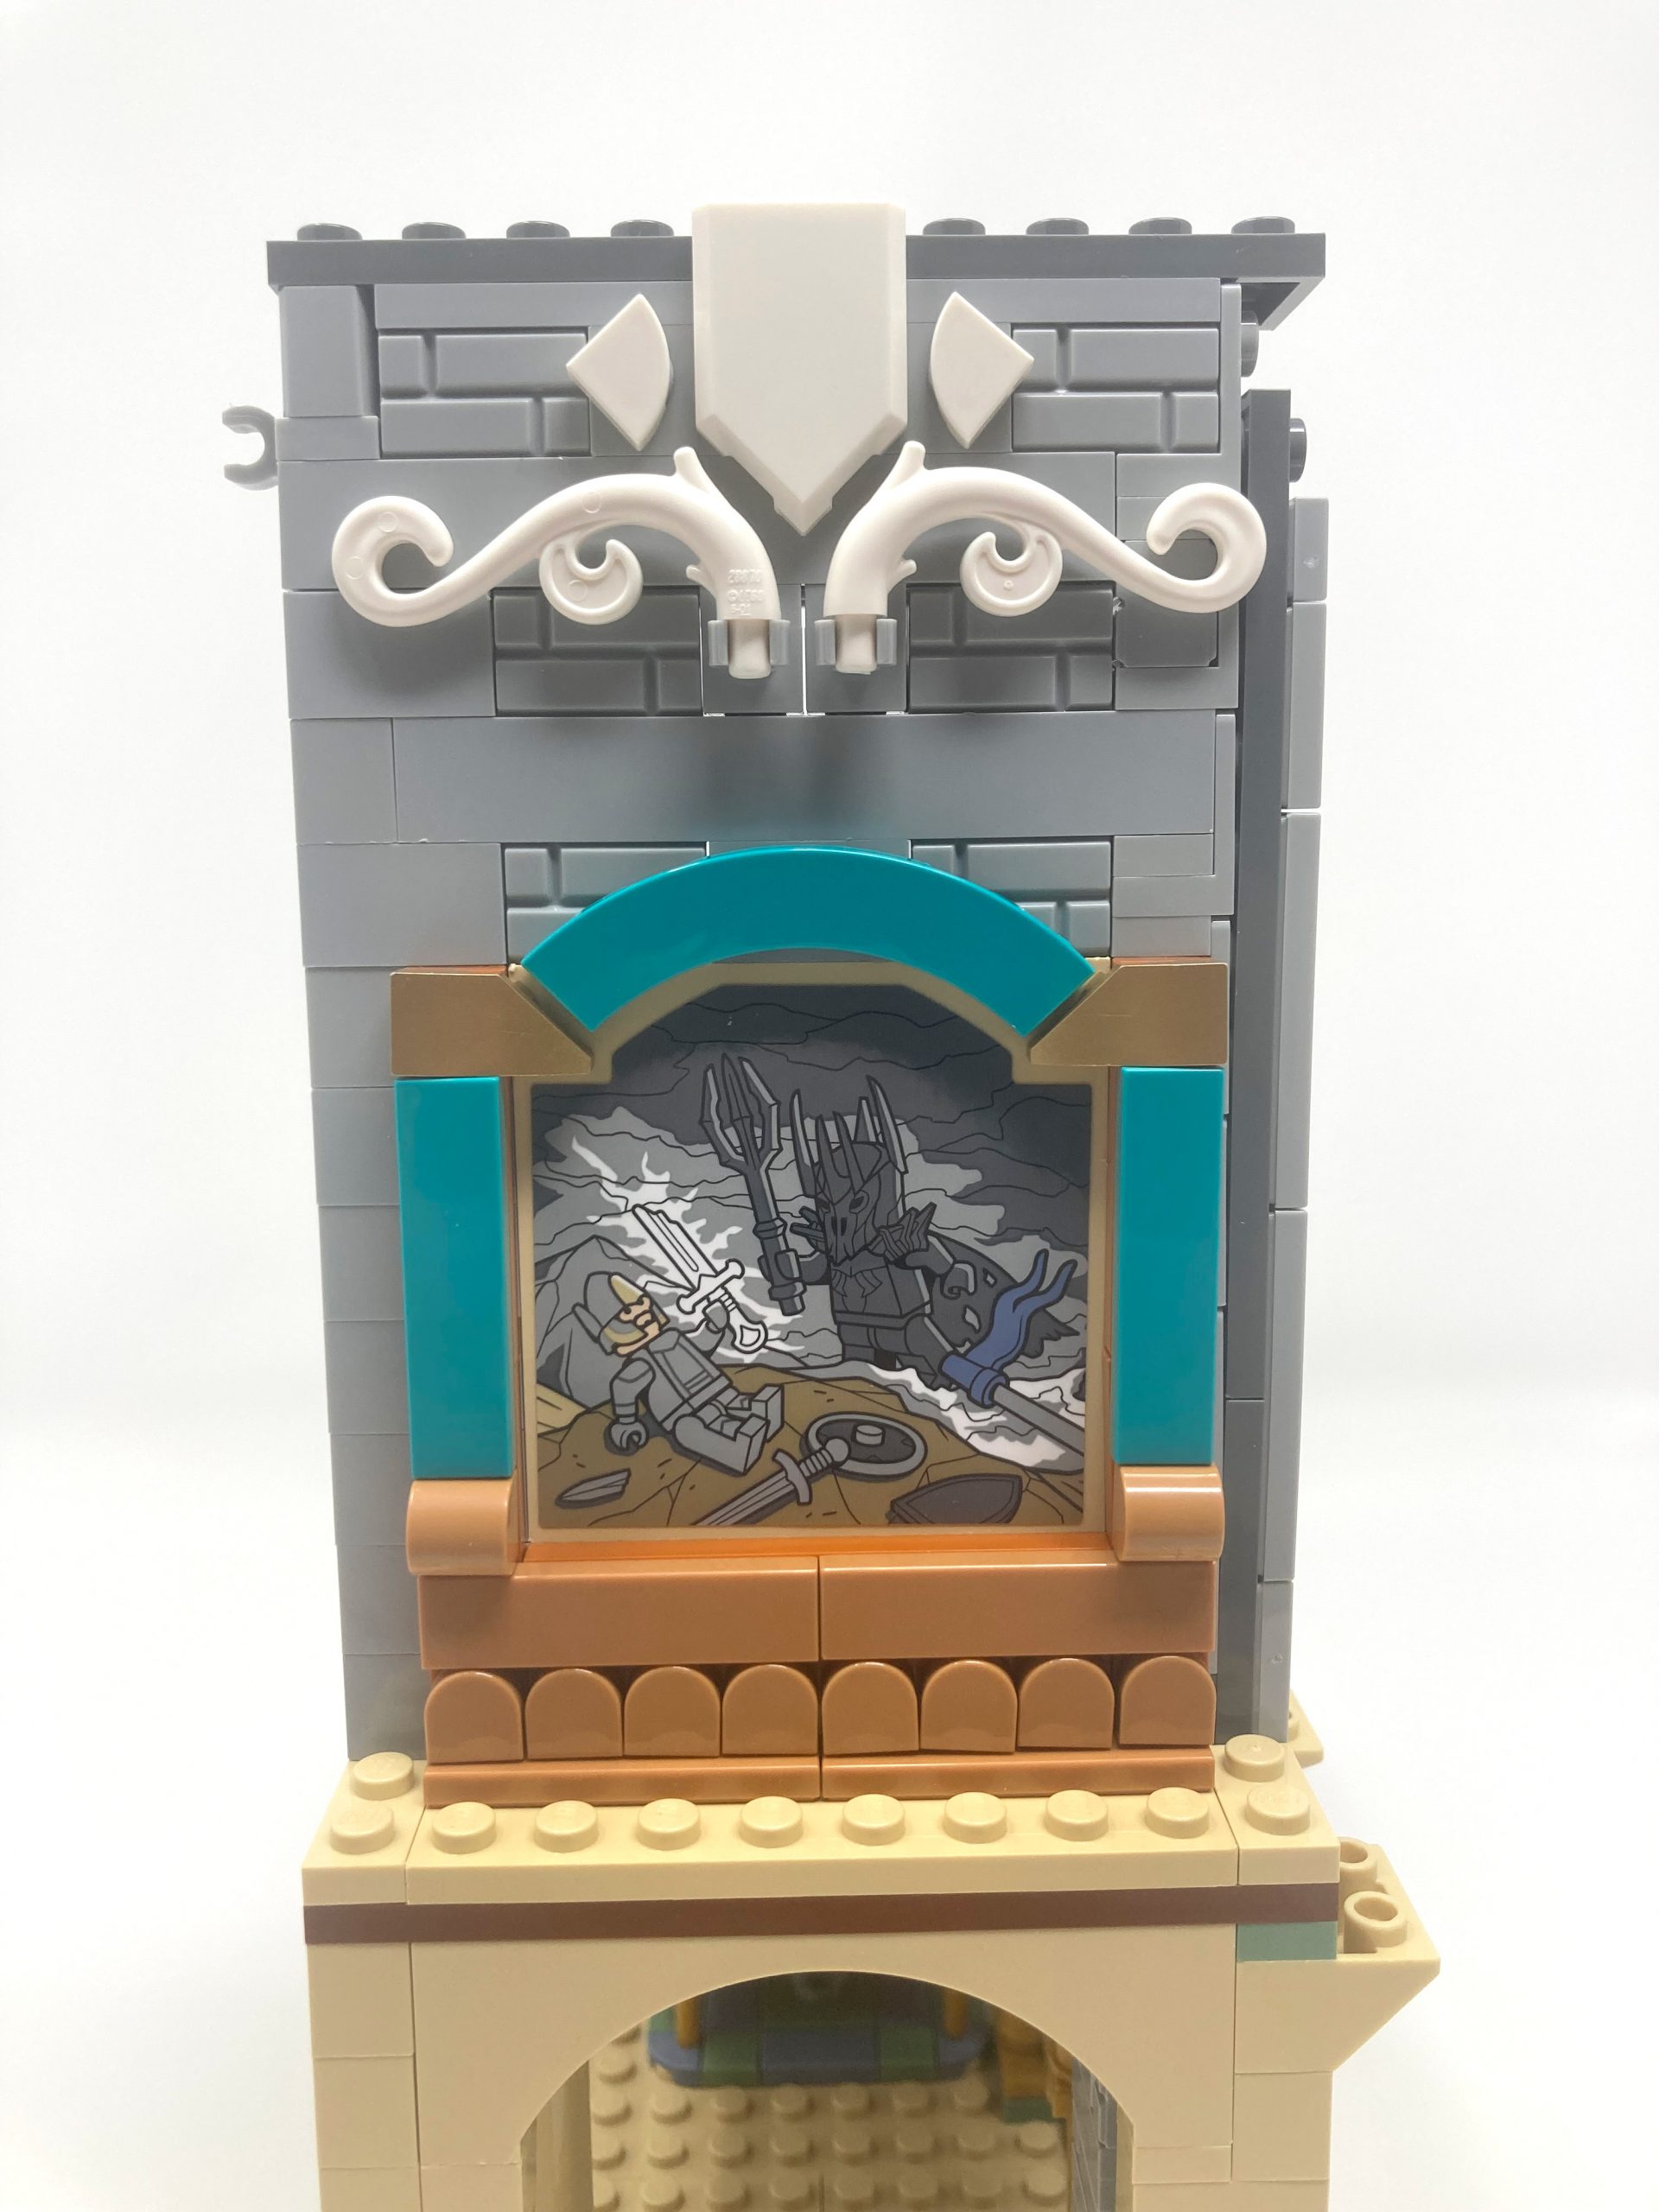
A brick built frame around a sticker helps create depth.
Bag 7
As the building takes shape, we turn our attention to adding details. Elven architecture is known for its use of arches, and the designers have used bone and horn pieces to create a narrow, rising arch. The 1White of the arch pairs well with the 5Brick YellowTan and 151Sand Green, giving the building a natural and weathered appearance. The creative use of different pieces shows the designer’s commitment to capturing the essence of Elven architecture.

Arches of various different shapes are created using a variety of techniques.
Continuing the theme of intricate design, the front of the tower is built with an octagonal shape featuring angled walls with a variety of textures and colors. The designers have used cheese slope pieces to fill any gaps created by the angles, ensuring a snug fit. The use of contrasting colors on either side of the structure highlights the beauty of each section and adds visual interest to the tower’s façade.
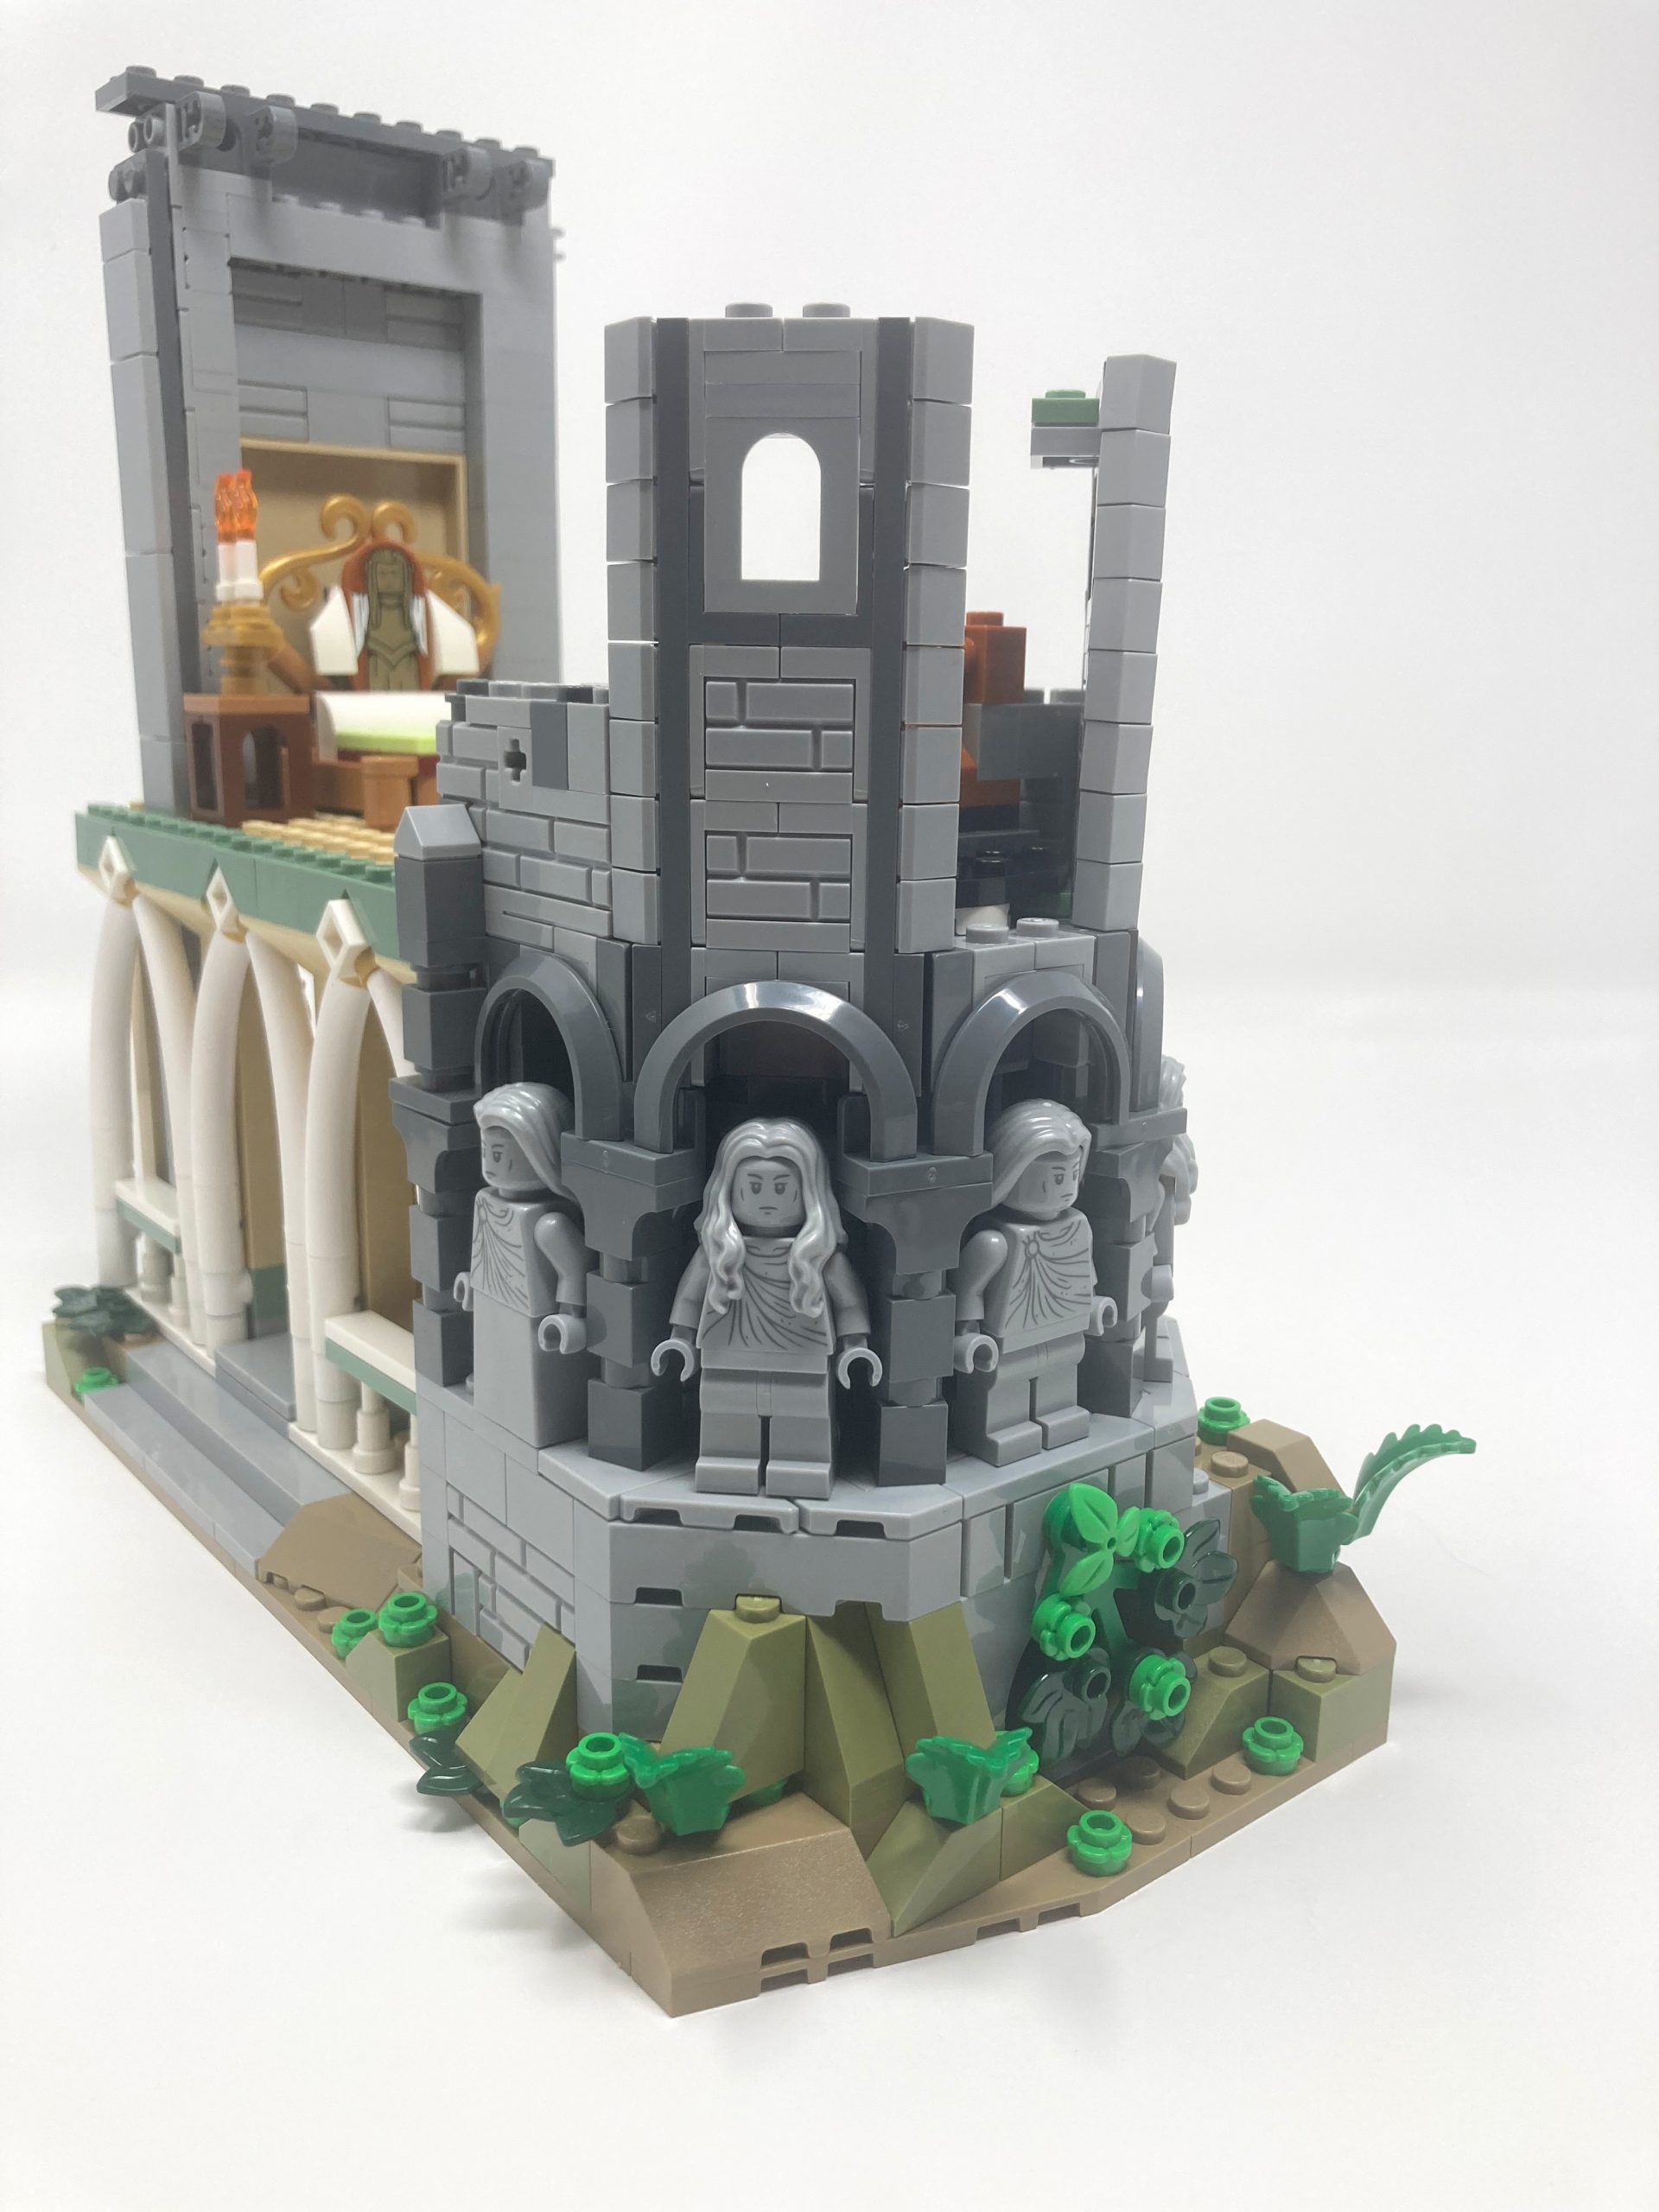
The statues create a solid foundation for the pillar.
Inside the bedroom is a writing table with Bilbo’s book “There and Back Again, A Hobbit’s Tale” resting on it. Although simple in design, the table is elevated by the addition of an ink pad and quill. These small touches bring the scene to life and make the writing table feel more authentic.
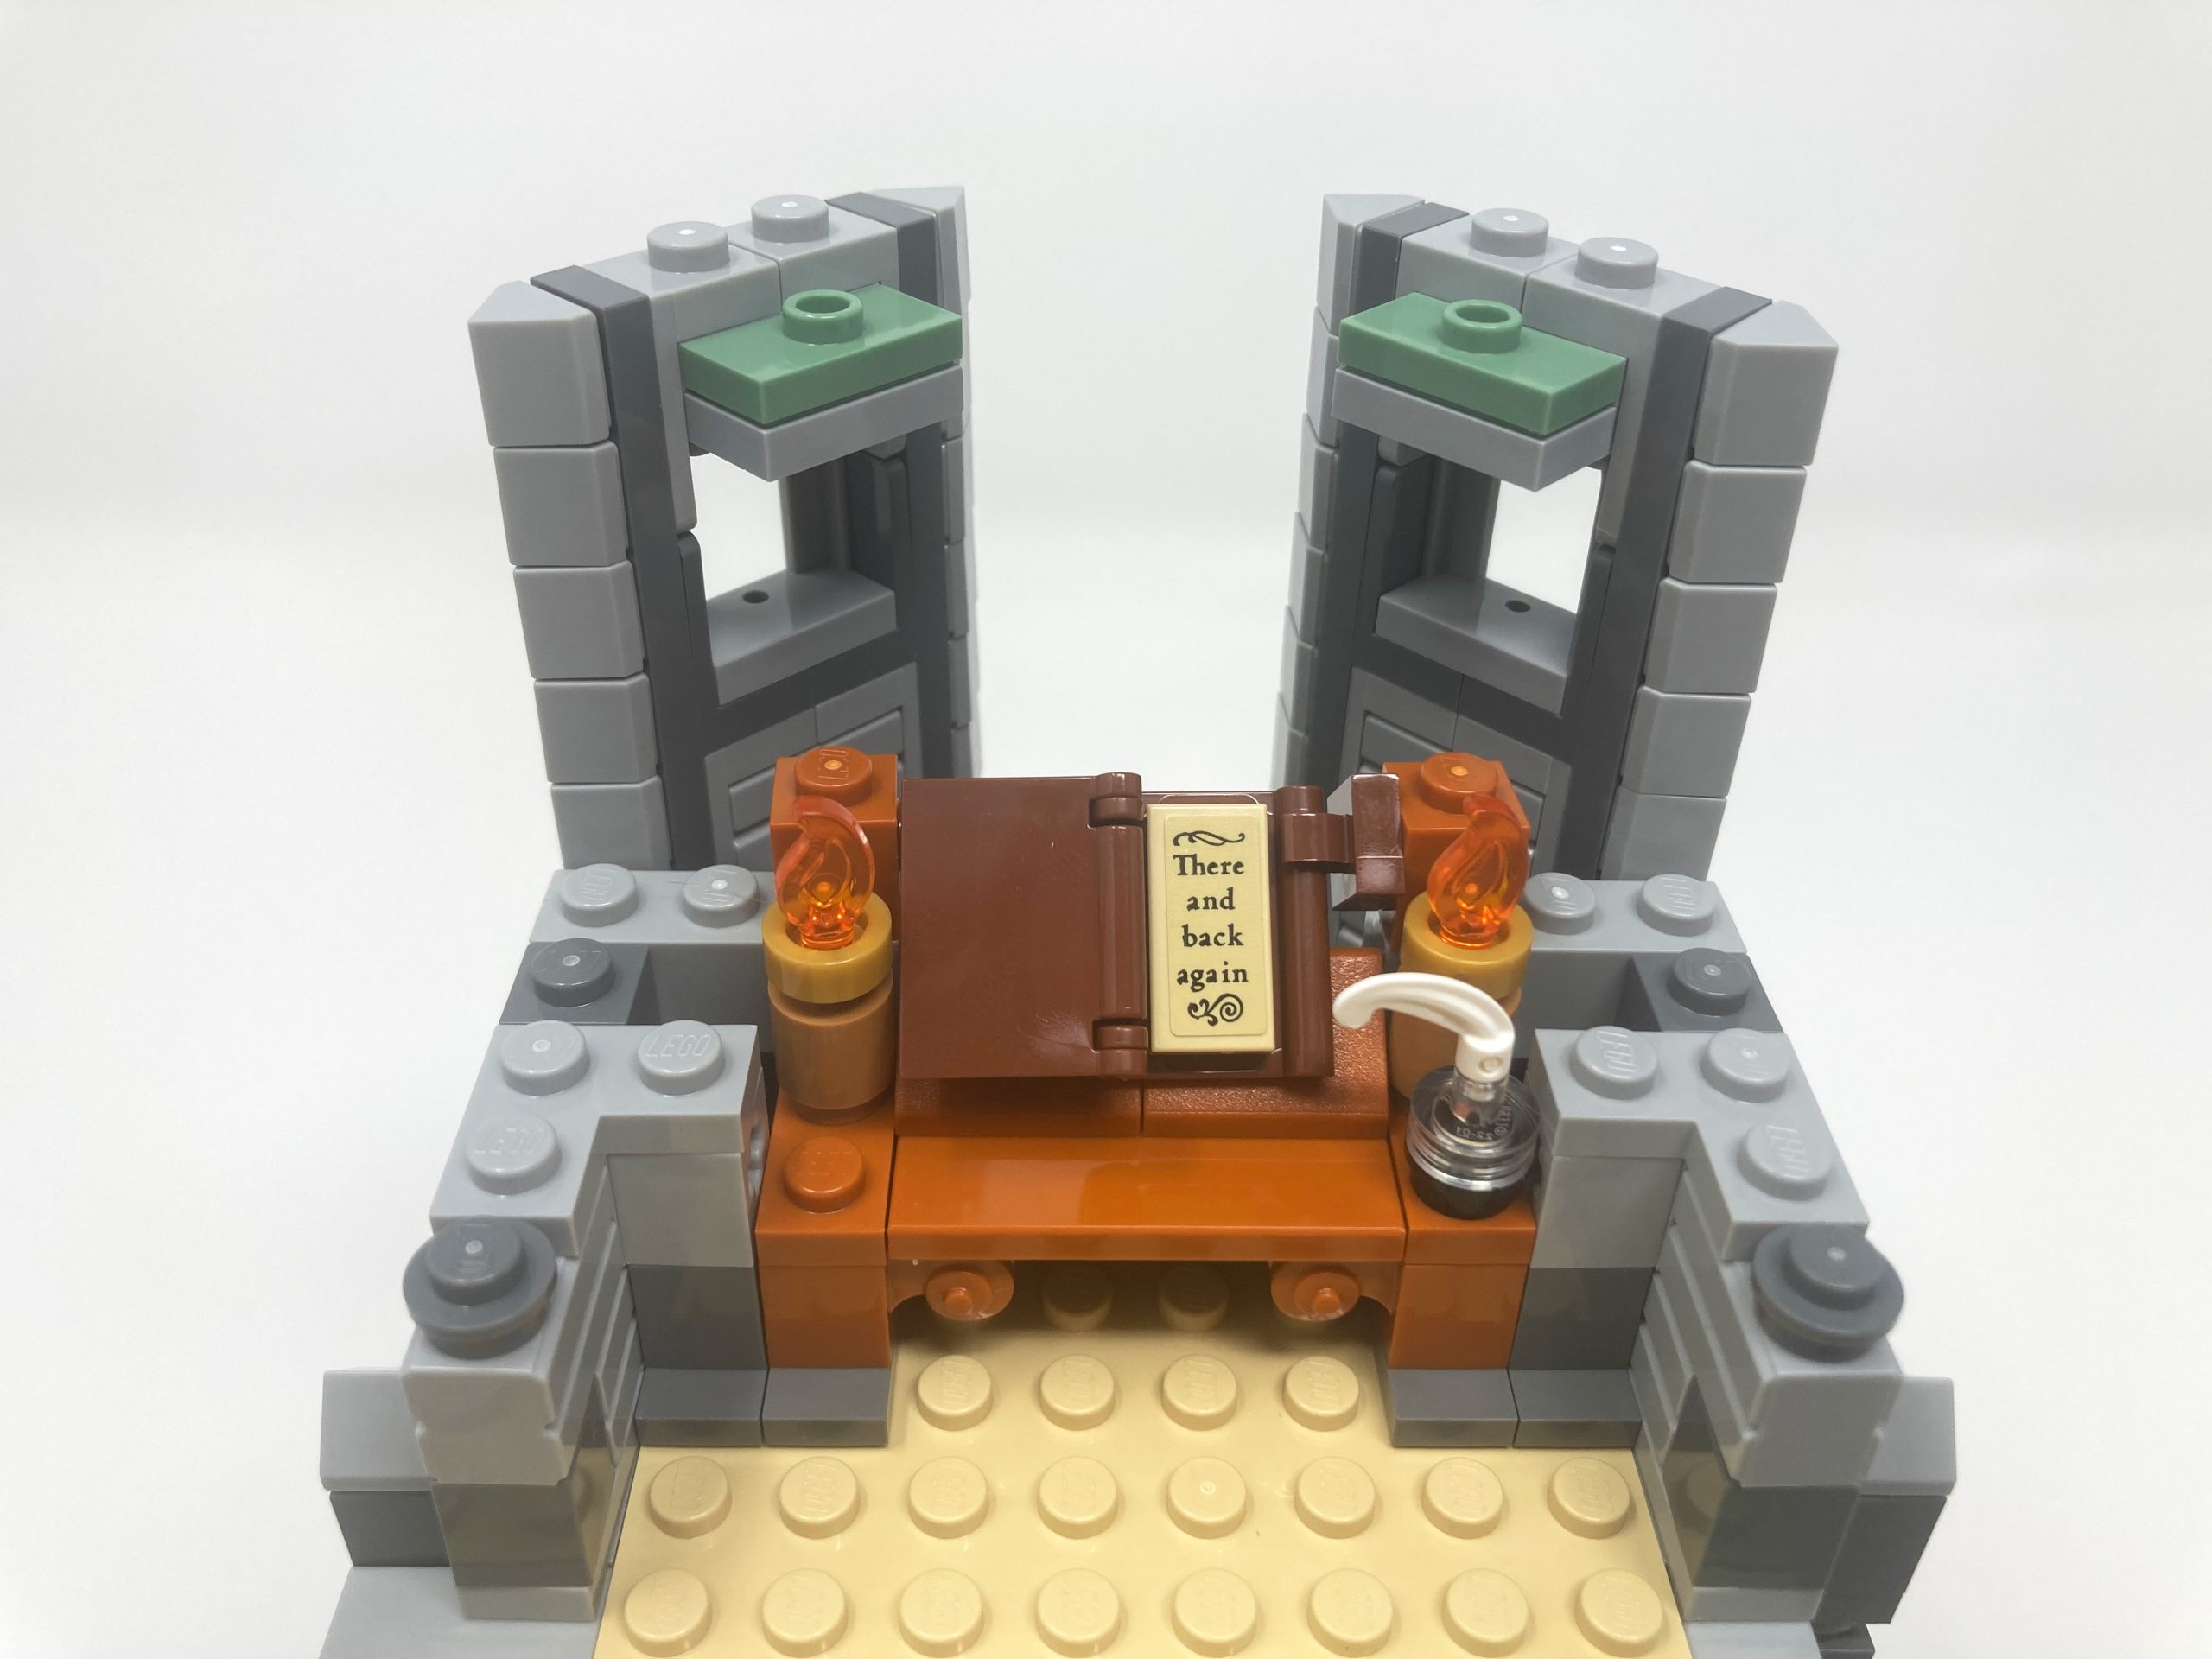
The iconic book that Bilbo is writing sits on a ornate table.
Bags 8-9
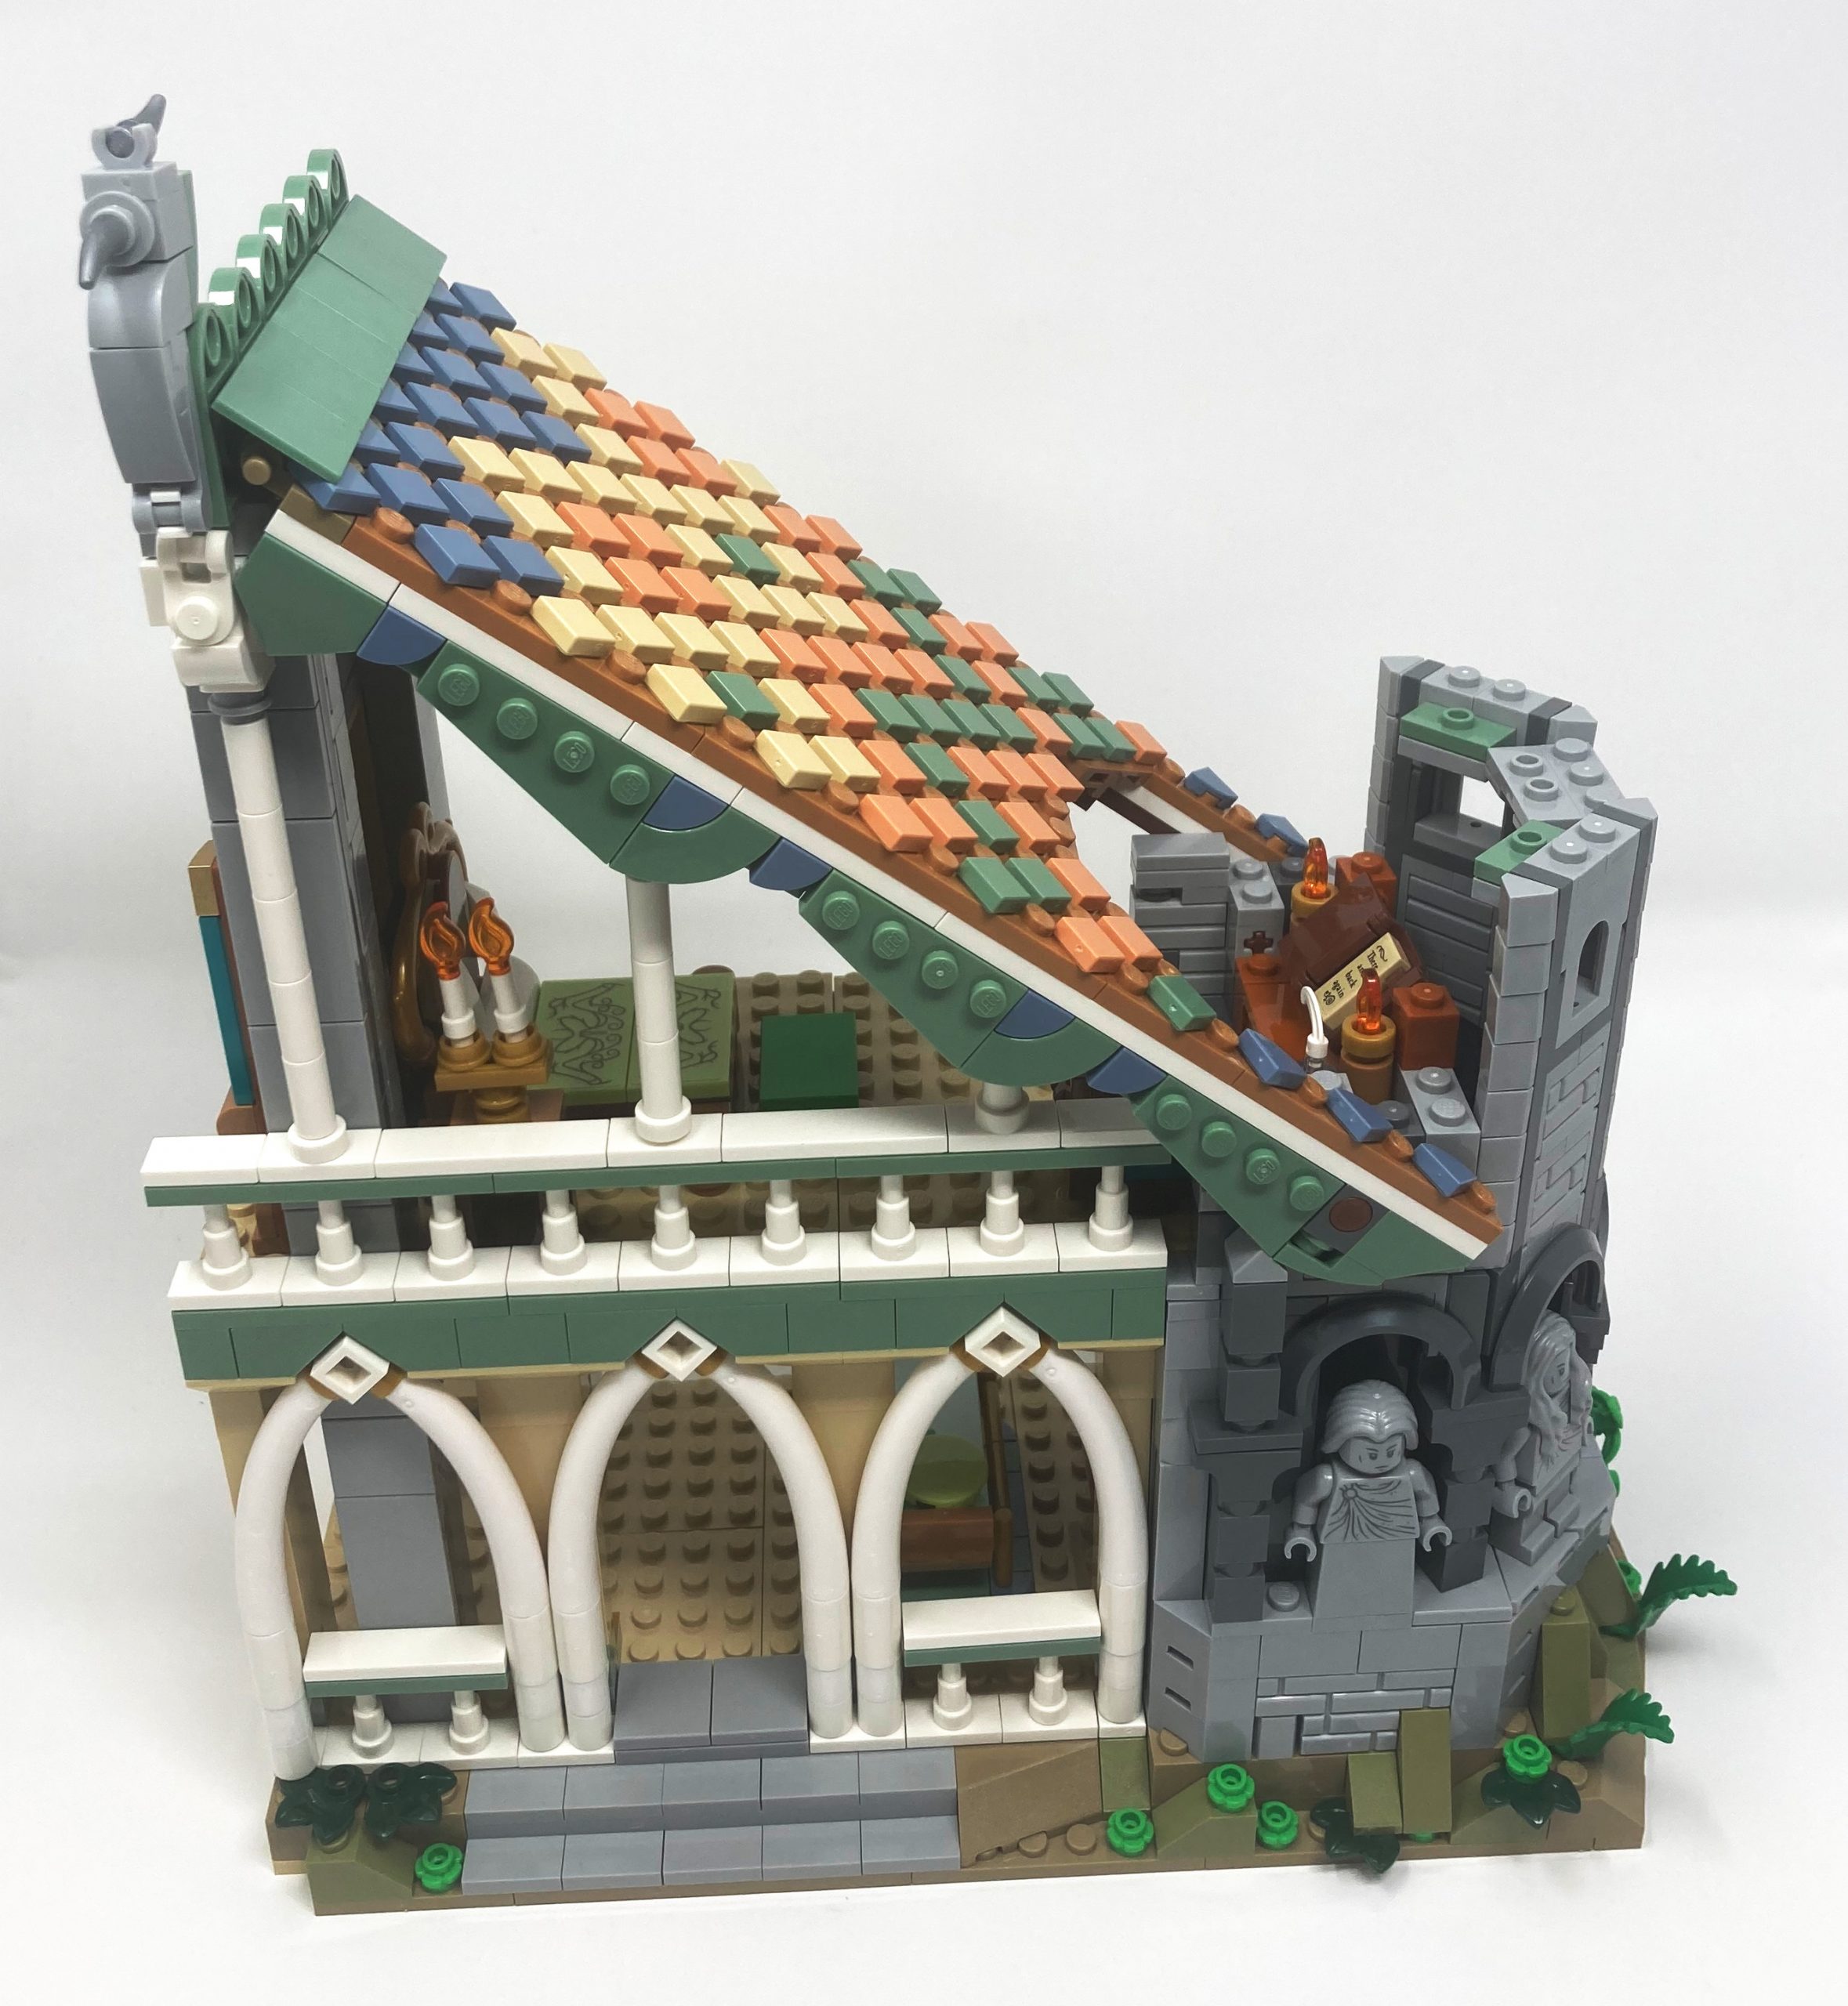
The first thing that catches the eye about this LEGO set is its innovative roof technique. Featuring 94 1×1 tiles mounted at a 45-degree angle, the roof showcases the mosaic style like those in LEGO art sets. To ensure proper alignment, a long plate can be slid between the grooves, keeping all pieces in line. Although the angled roof provides a beautiful and creative touch, it can be repetitive to build. The side details and depth added by the roof effectively capture the Elven aesthetic of the space.
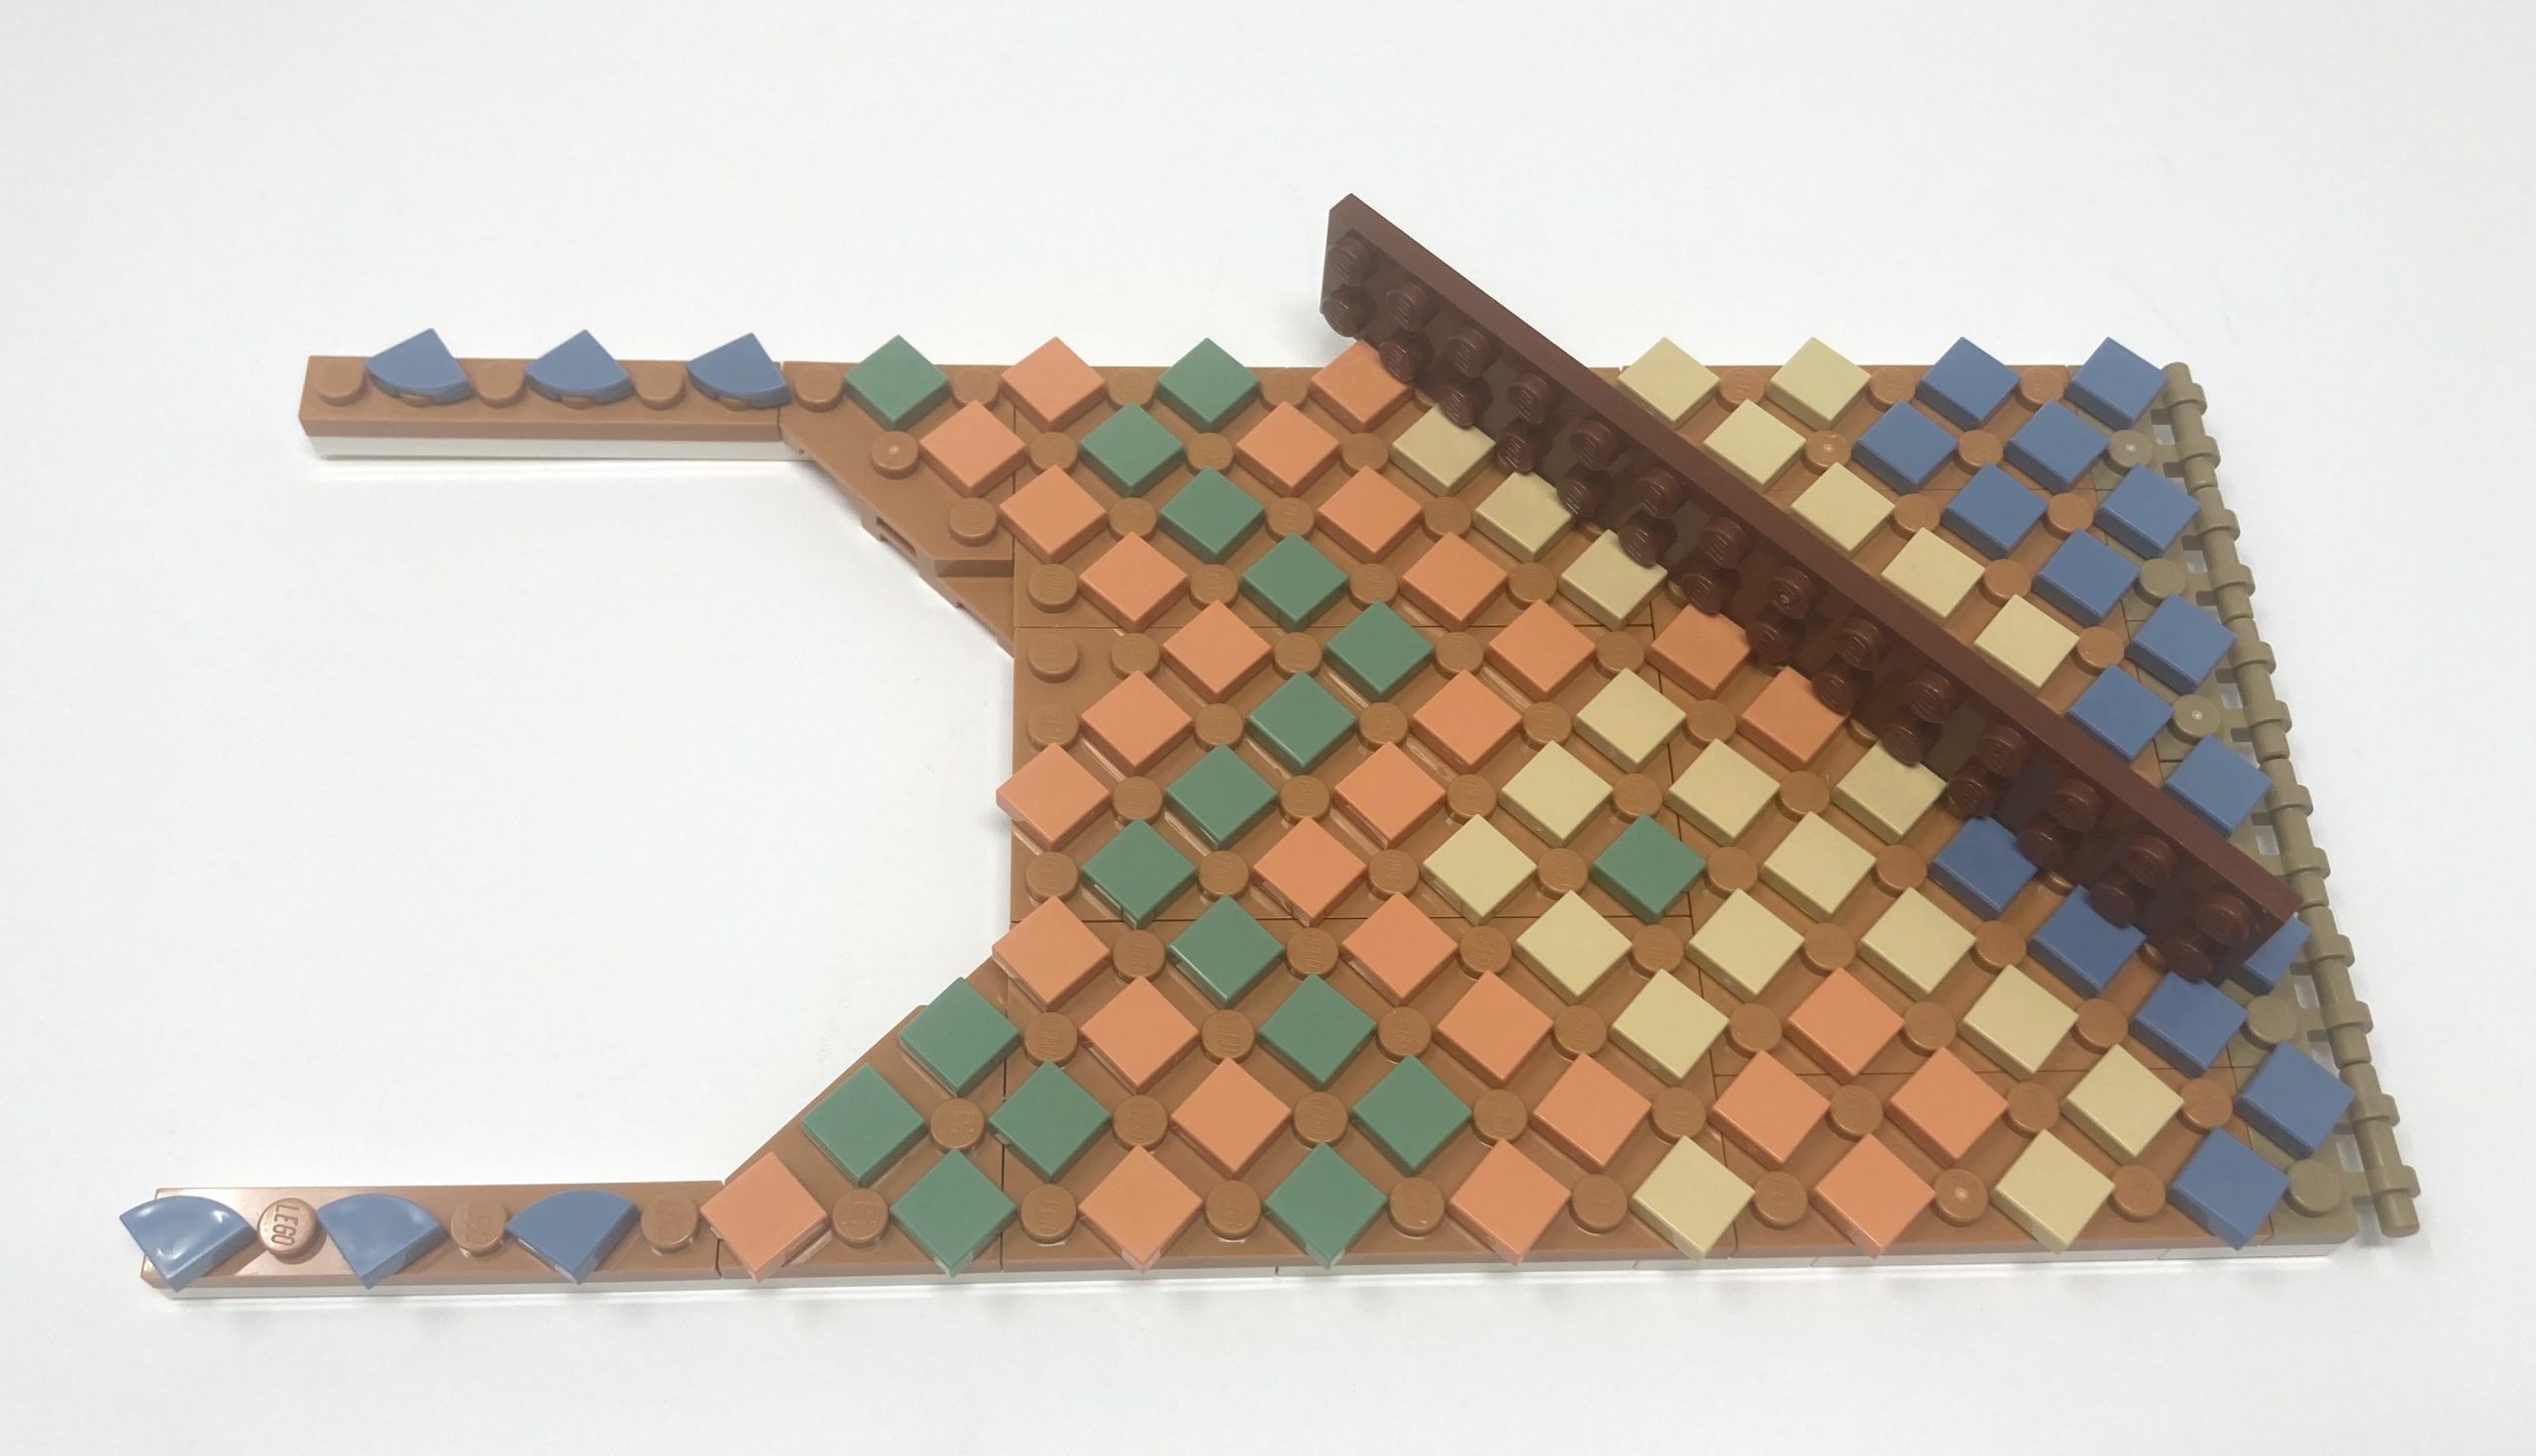
A plate slides between the tiles to align them.
The furniture on this level is built in a pastel color scheme to maintain the overall aesthetic of the building. The chairs, despite the inability of Hobbit legs to bend, are included in Bilbo’s room and are designed creatively. The pillars are constructed using the very versatile candle stick piece which creates narrow supports for the roof, securely fastened with technique pins.
All the colors complement each other very well.
Bag 10
As we progress in constructing the tower, we apply the same techniques from previous levels to complete the structure. A combination of windows and arches are utilized to add diversity to the tower’s appearance. The shapes become more curved and smoother as we reach higher levels, utilizing rounded bricks and wedges to give the surface a rounded finish.
The curves of the stone create a very organic shape contrasting against the rigid stone.
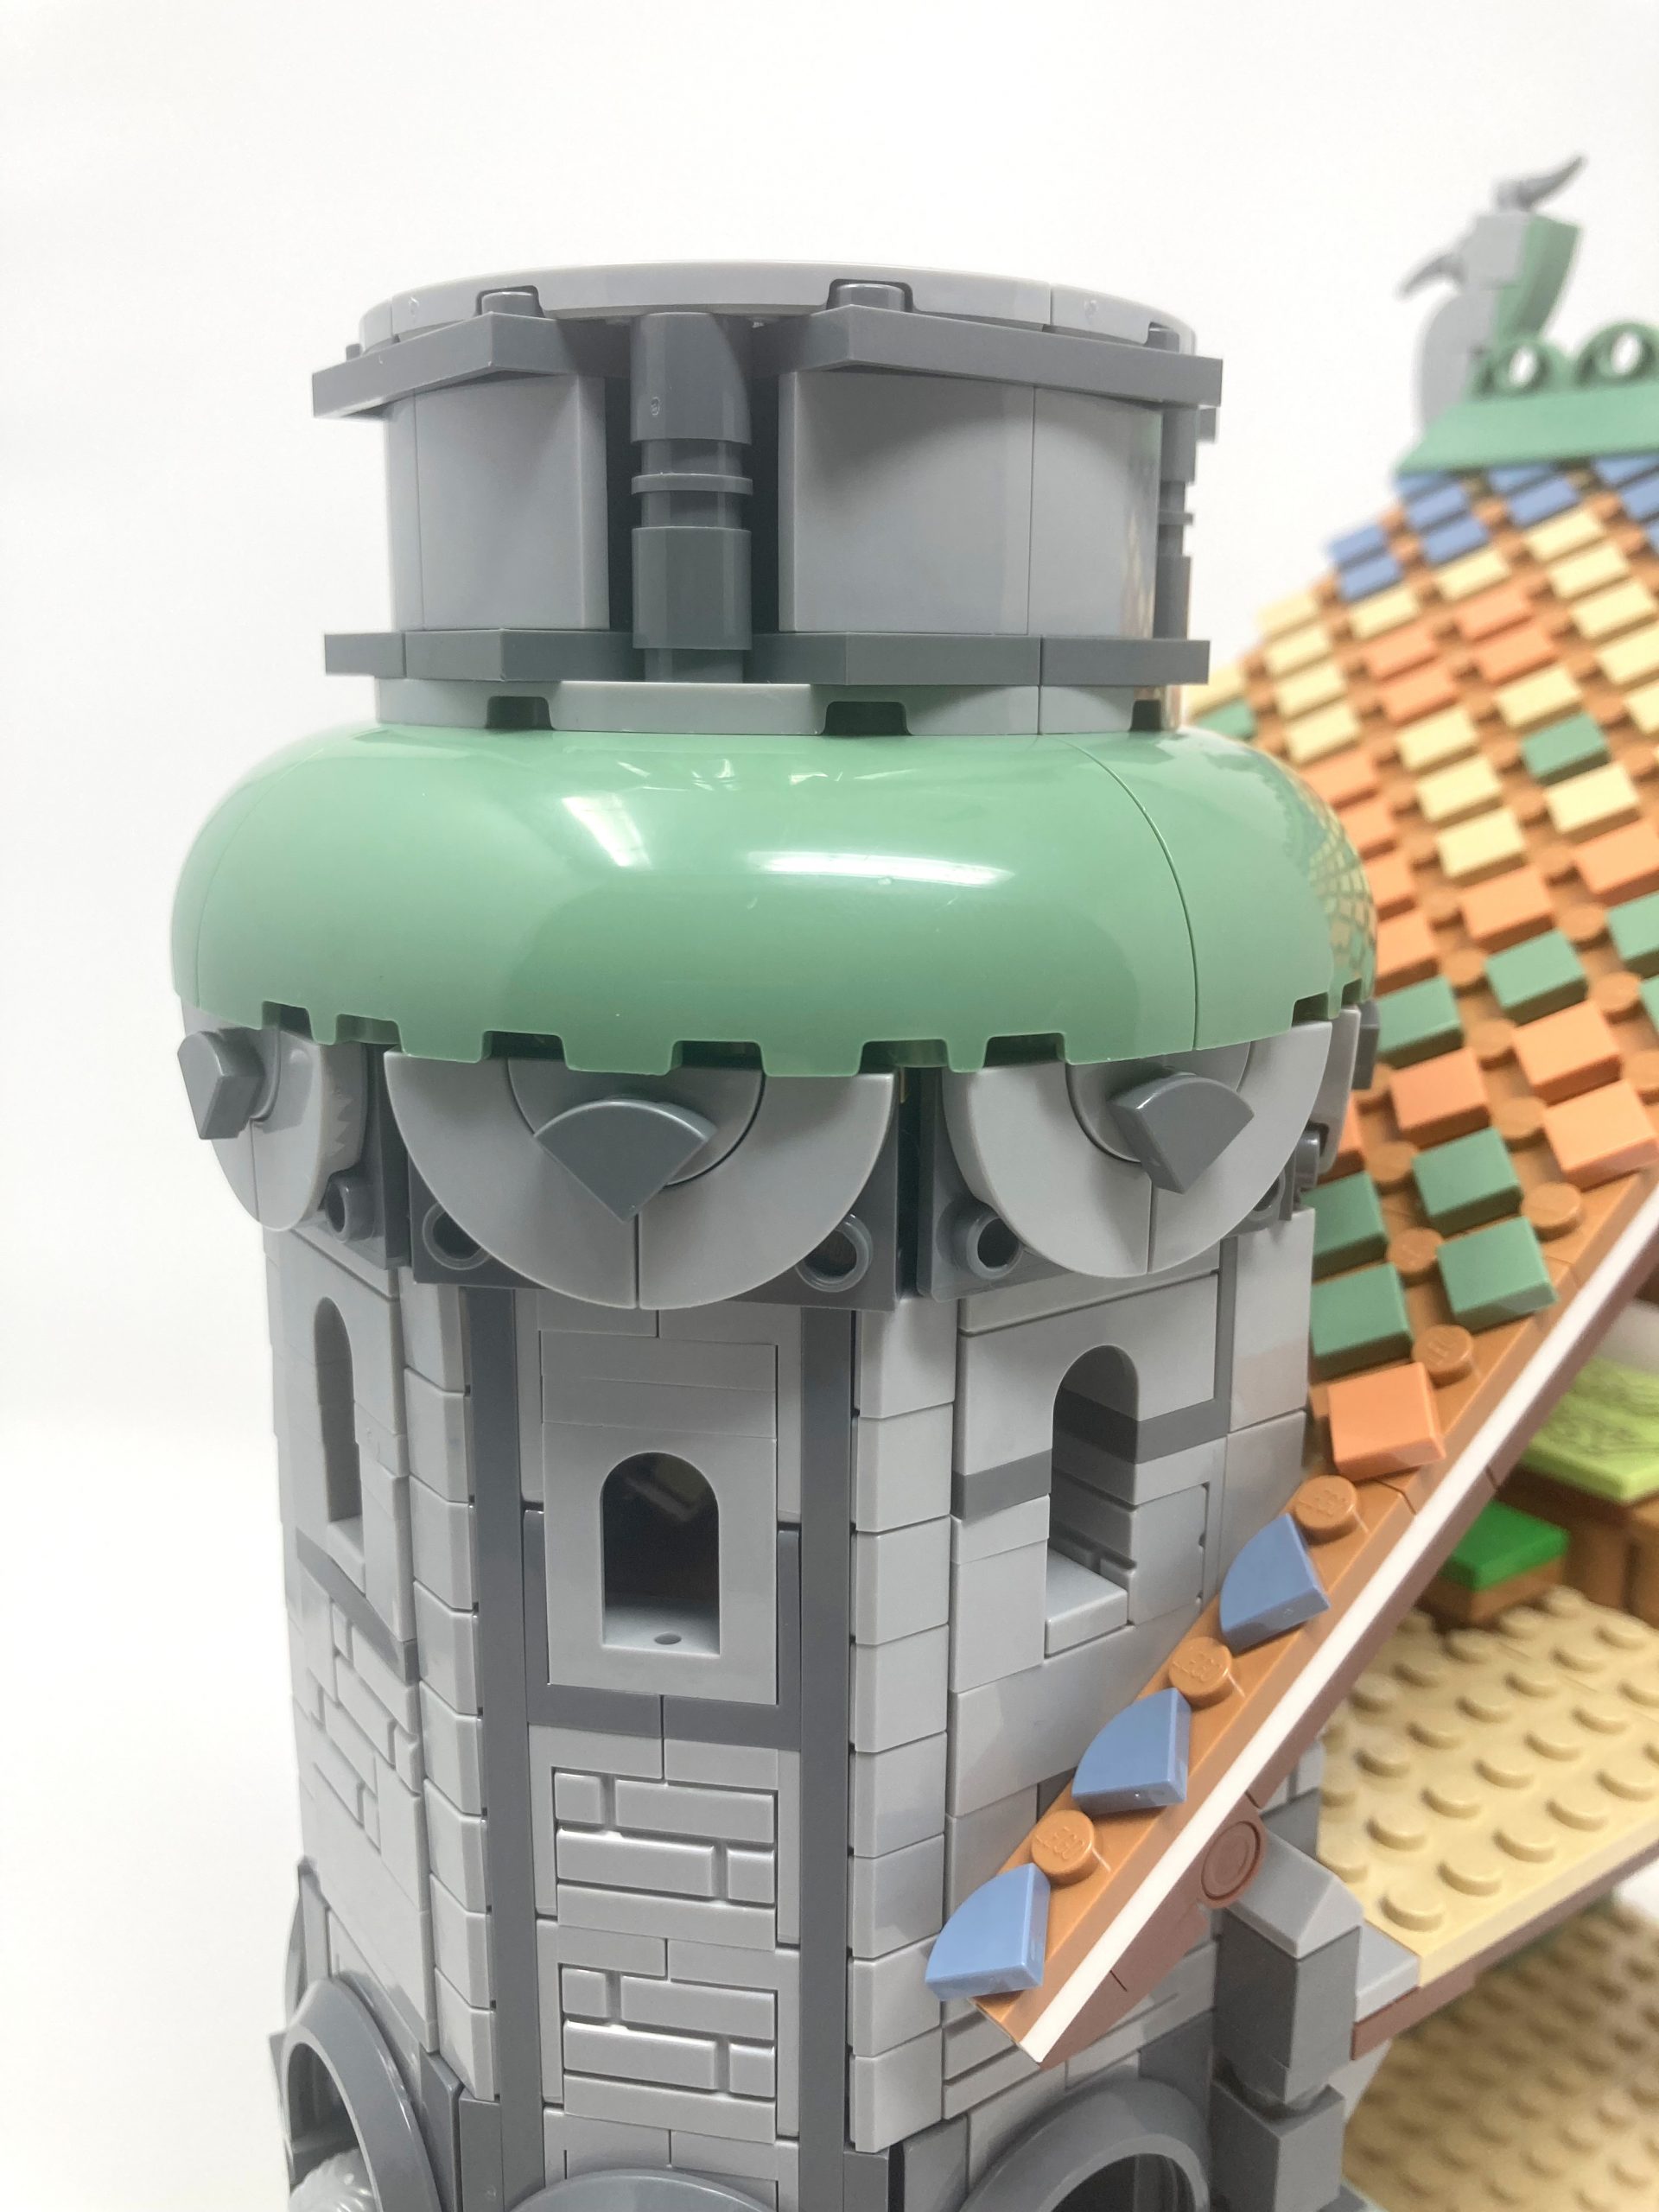
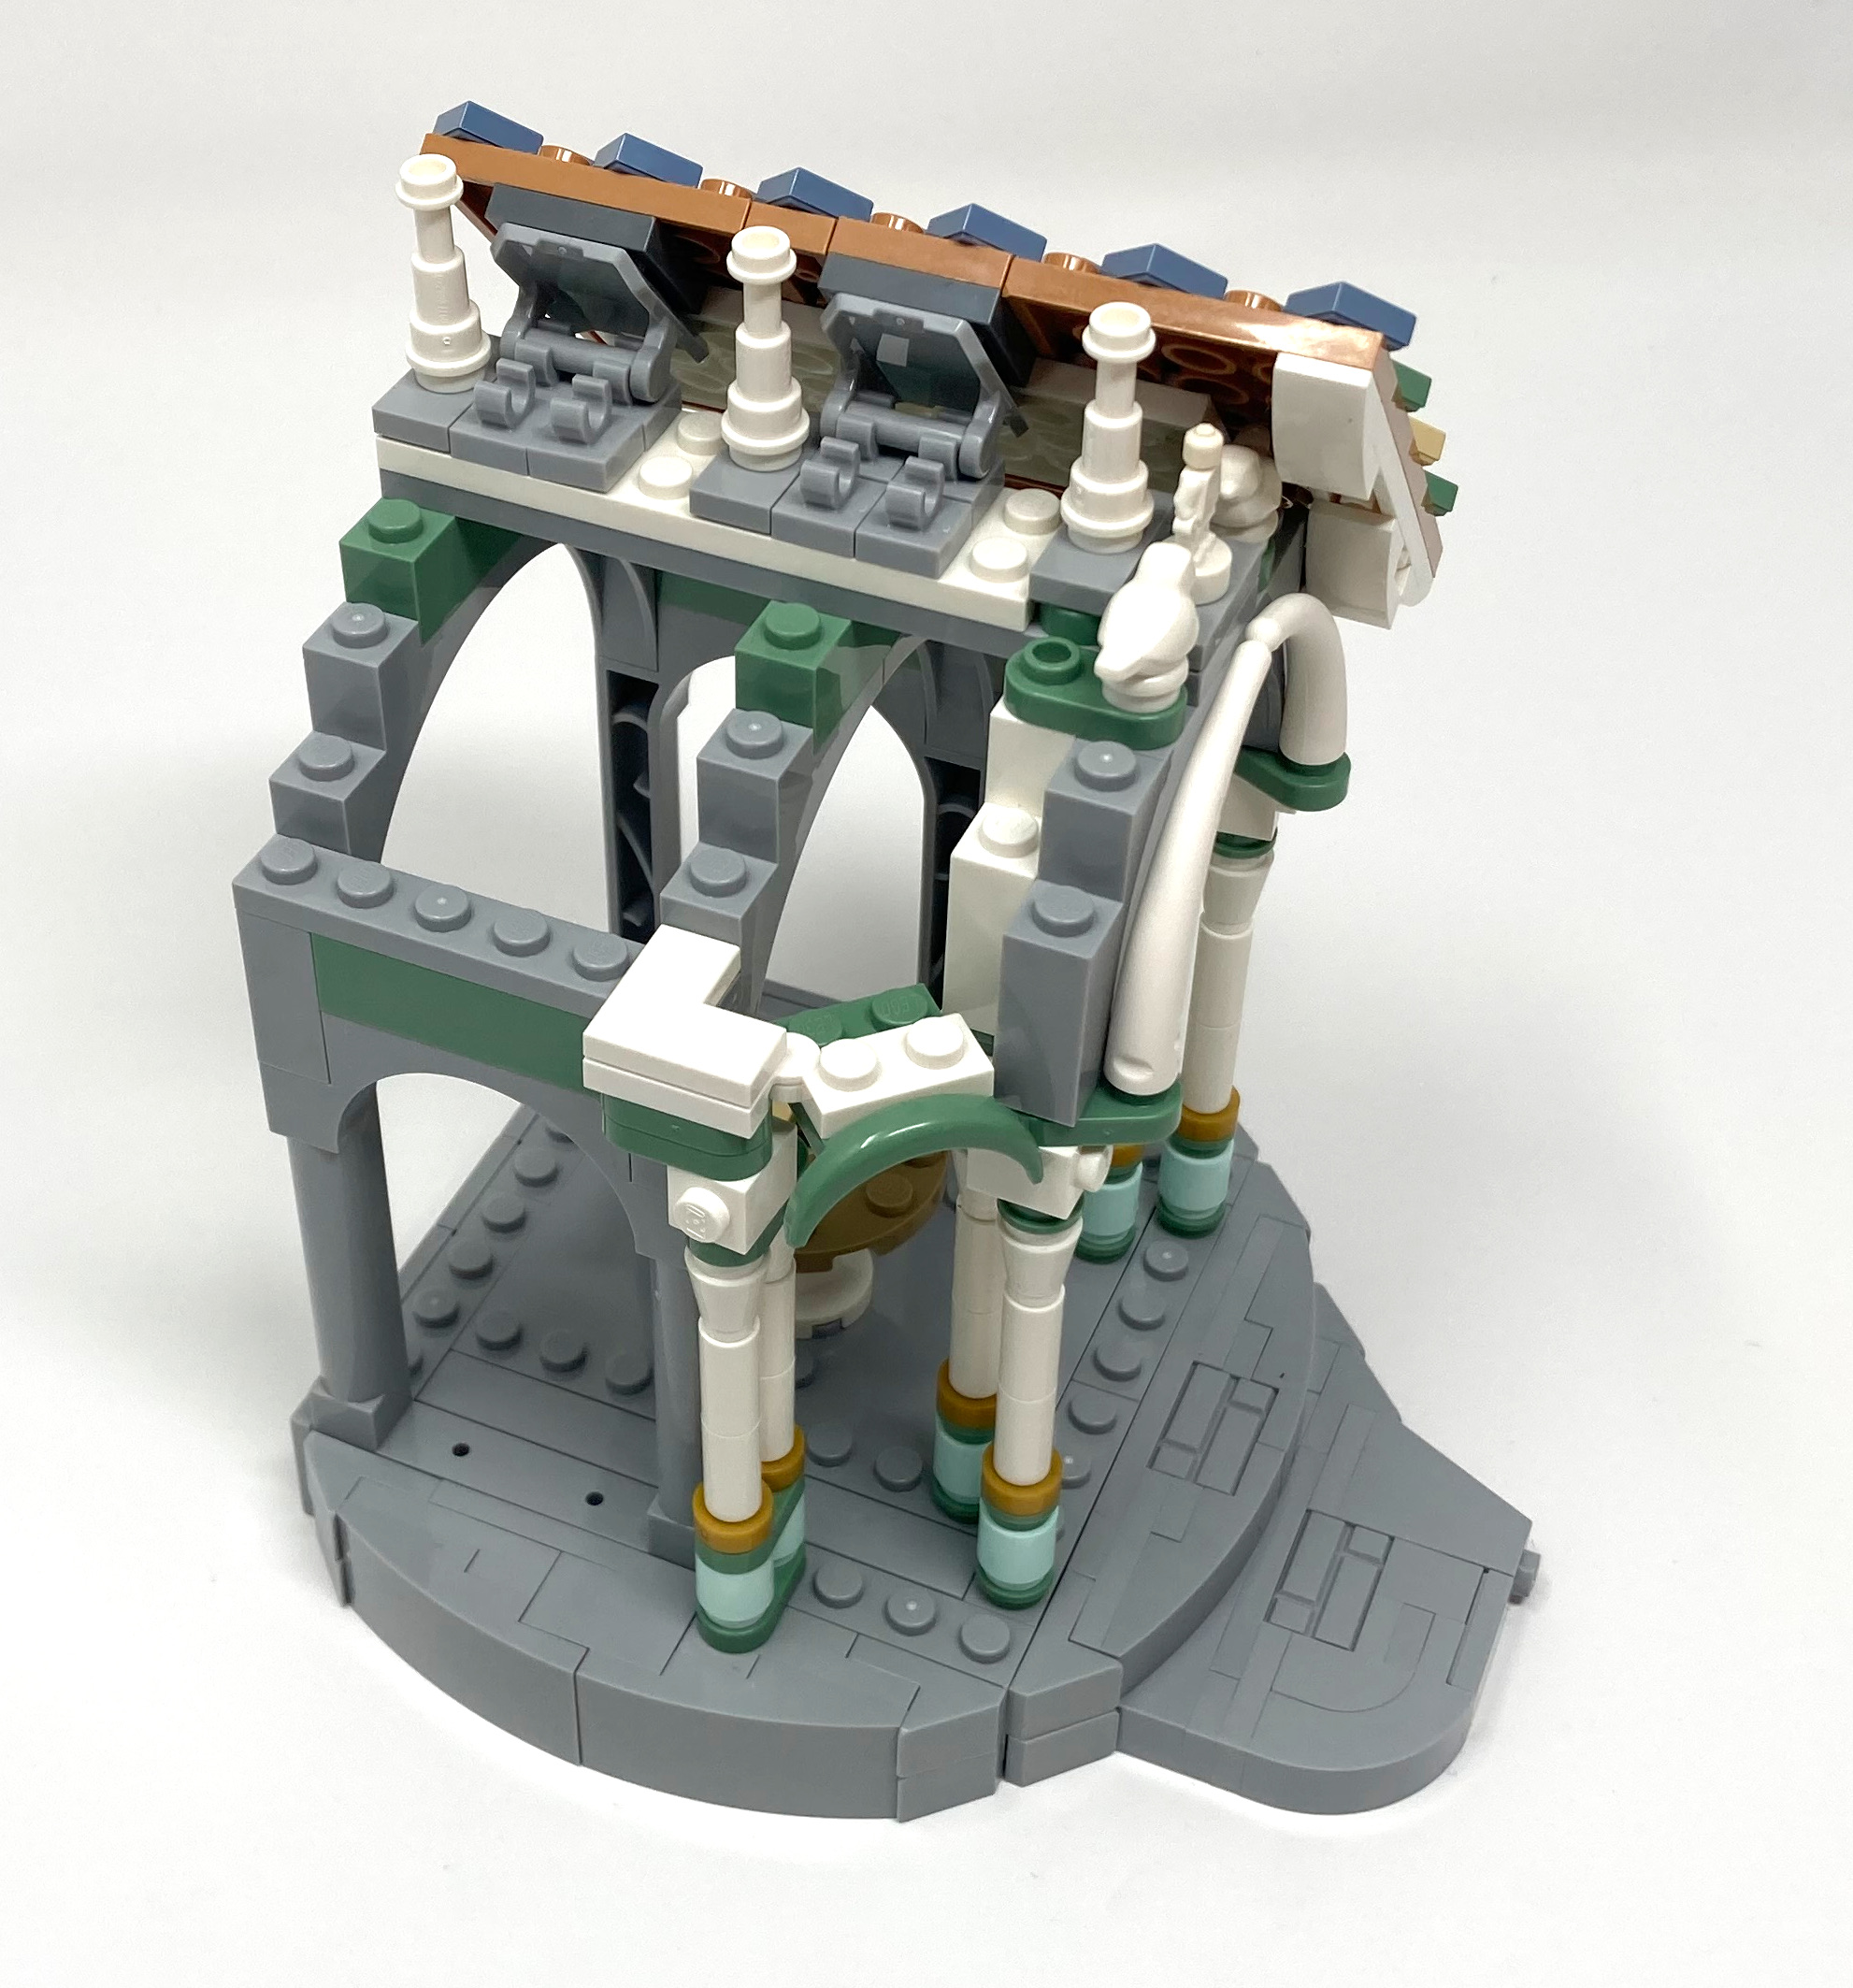
The belfry of the tower is designed using a combination of different building techniques to create its shape. By offsetting 2×4 brackets with technic pins at 45-degree intervals, the octagonal shape of the belfry is achieved. The use of rounded pieces helps give the illusion of a curved surface from a distance, while the juxtaposition of brick-built construction adds rigidity to the design. The designers have intentionally included this contrast, showcasing their ability to use a variety of building techniques to achieve organic edges. The additional use of curved pieces above and below the belfry helps reinforce this rigidity and complete the illusion of a curved surface.

The inside may not be pretty but is crucial to allow the tower to hold its shape.
Bag 11
Sitting atop this tower is a lantern. The lantern is designed using a combination of arches, such as a mud guard piece with a low profile to create a rounded arch, which is then capped with a secondary parabolic arch. The aim of this design is to add depth and texture to the tower, with both arches being the same color to give the illusion of being one piece. To create a rigid texture, a layering of alternating depth slopes is added on the edges of the tower. To achieve this, you build 8 different edges and attach them interlinkingly, providing a simple yet effective design choice.
Arches on top of arches add a layering texture.
Section 1 Wrap Up
When assembled, the various colors and building techniques come together to create a stunning display. The level of detail in just the first section is breathtaking and could easily be a standalone set. The intricate designs will captivate you and leave you in awe wanting to keep building.

The Tower stands proud with all of its colors and shapes, immediately grasping your attention.
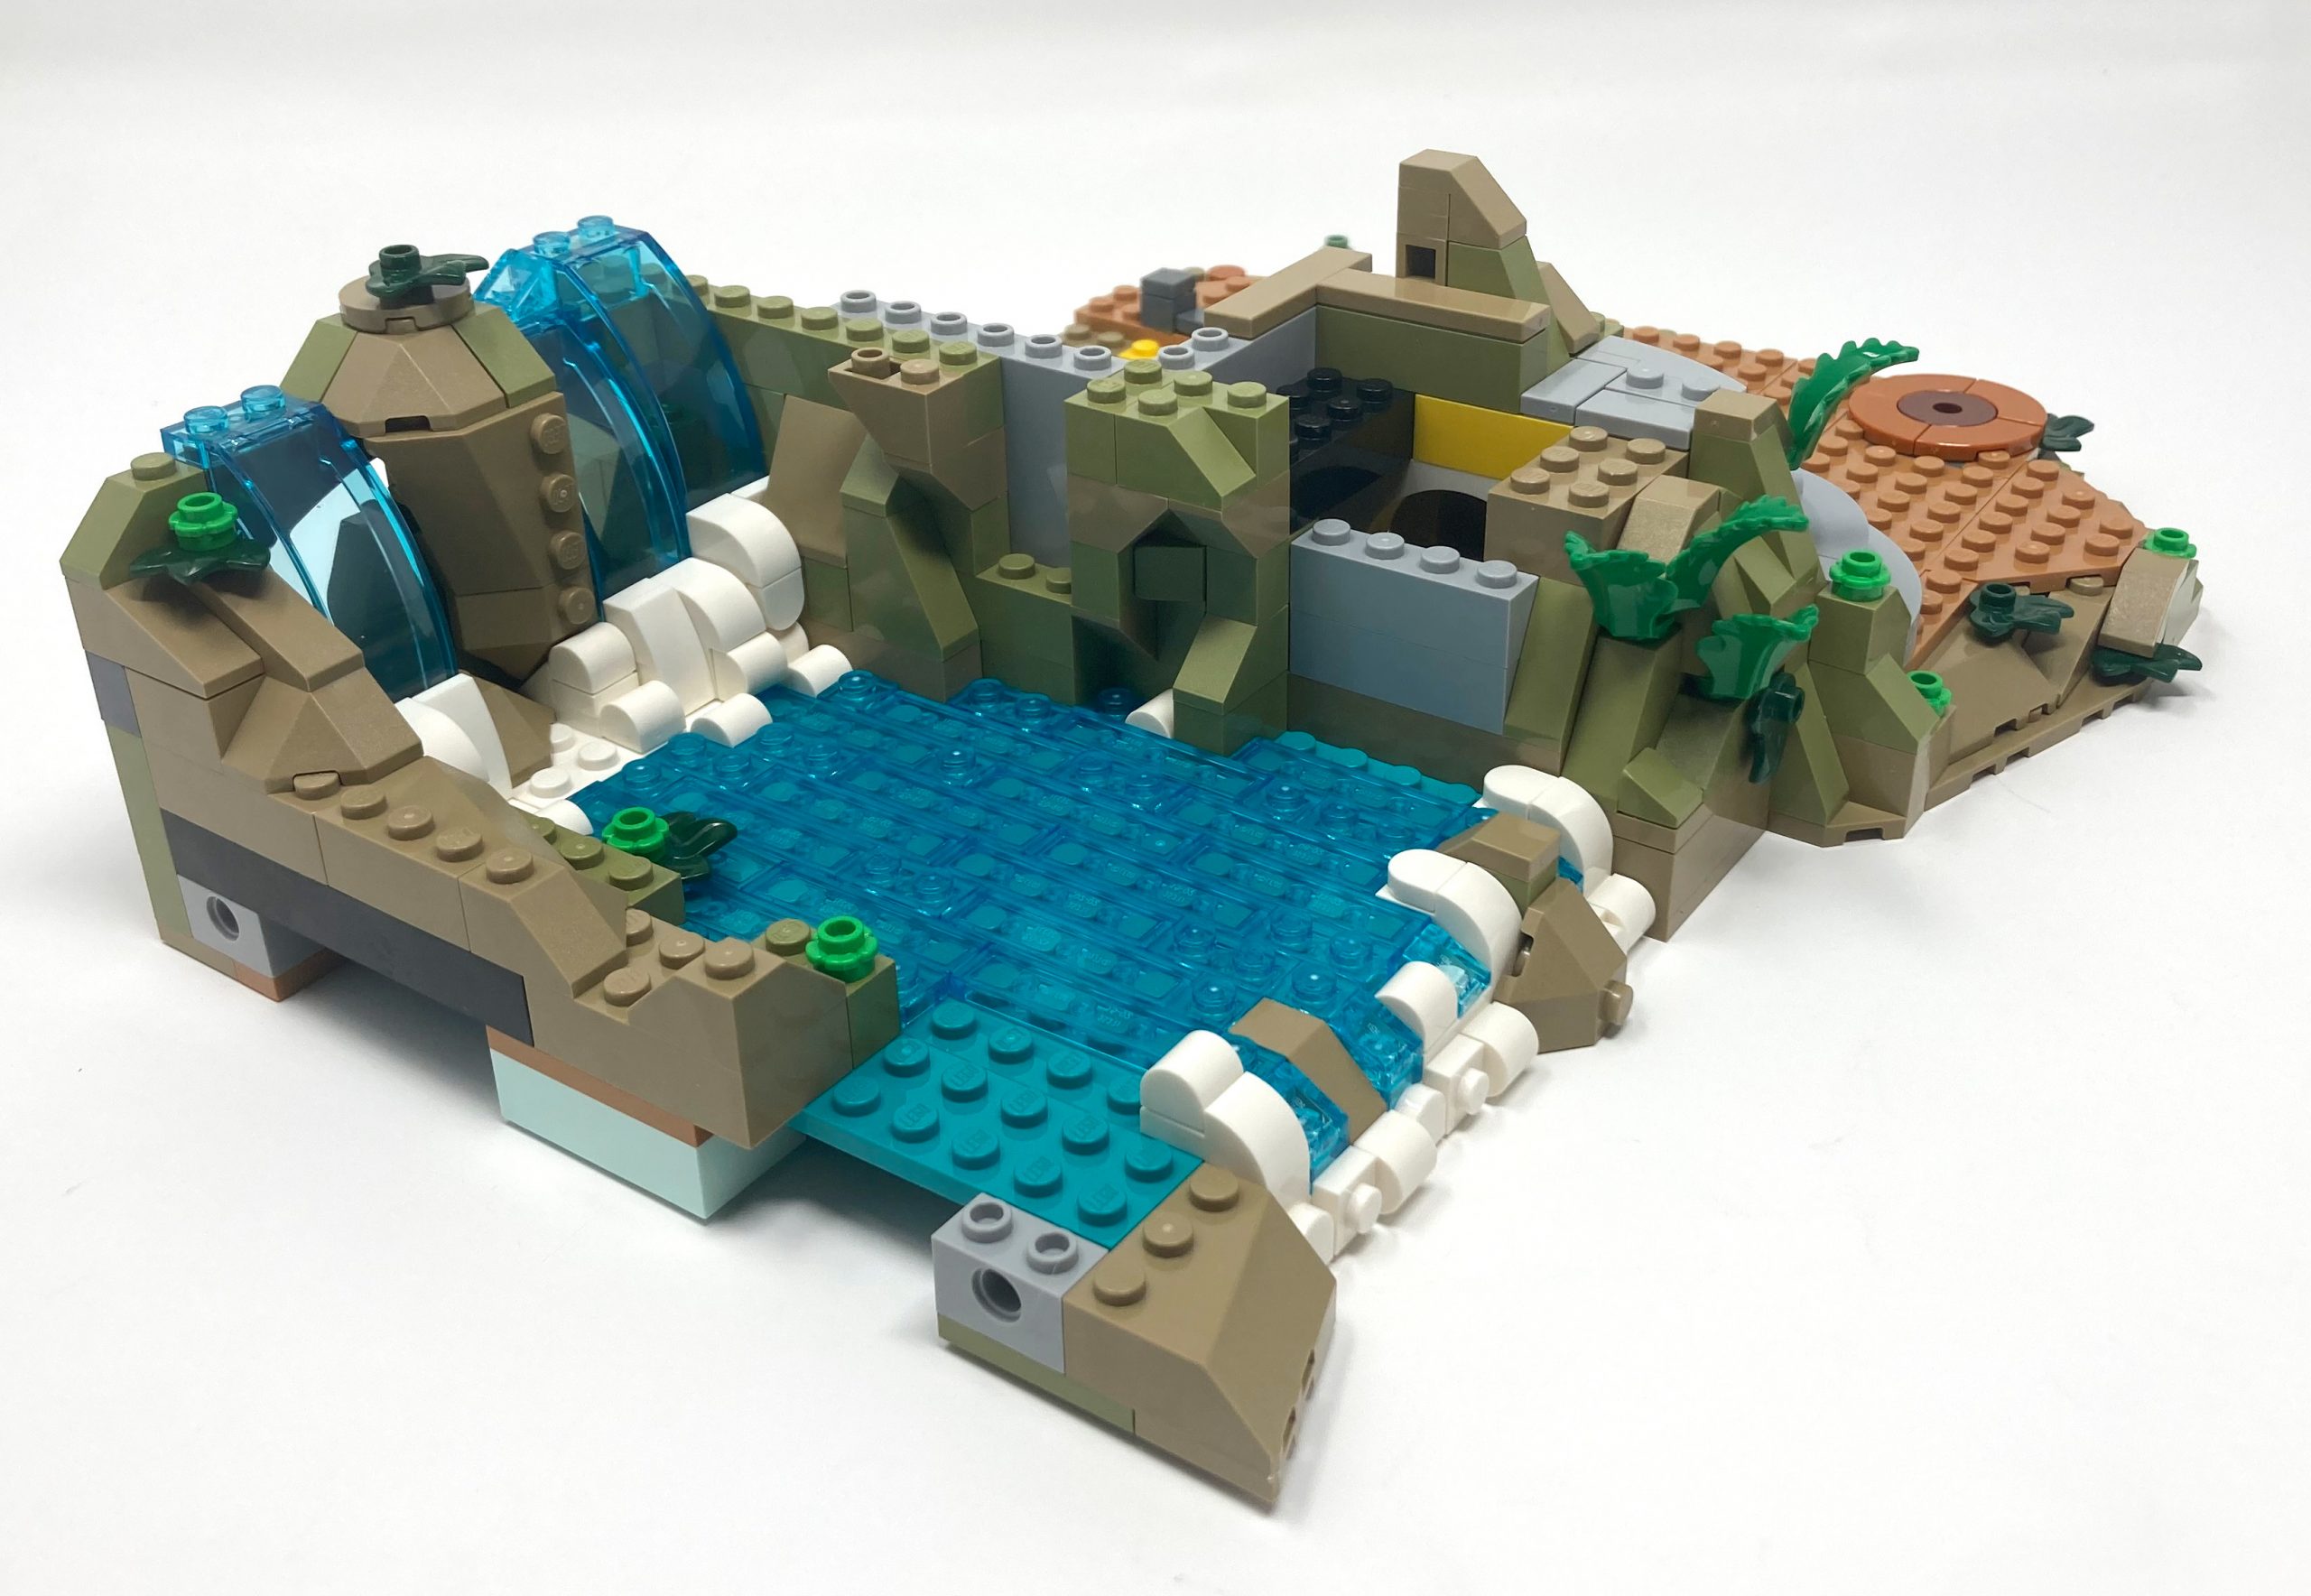
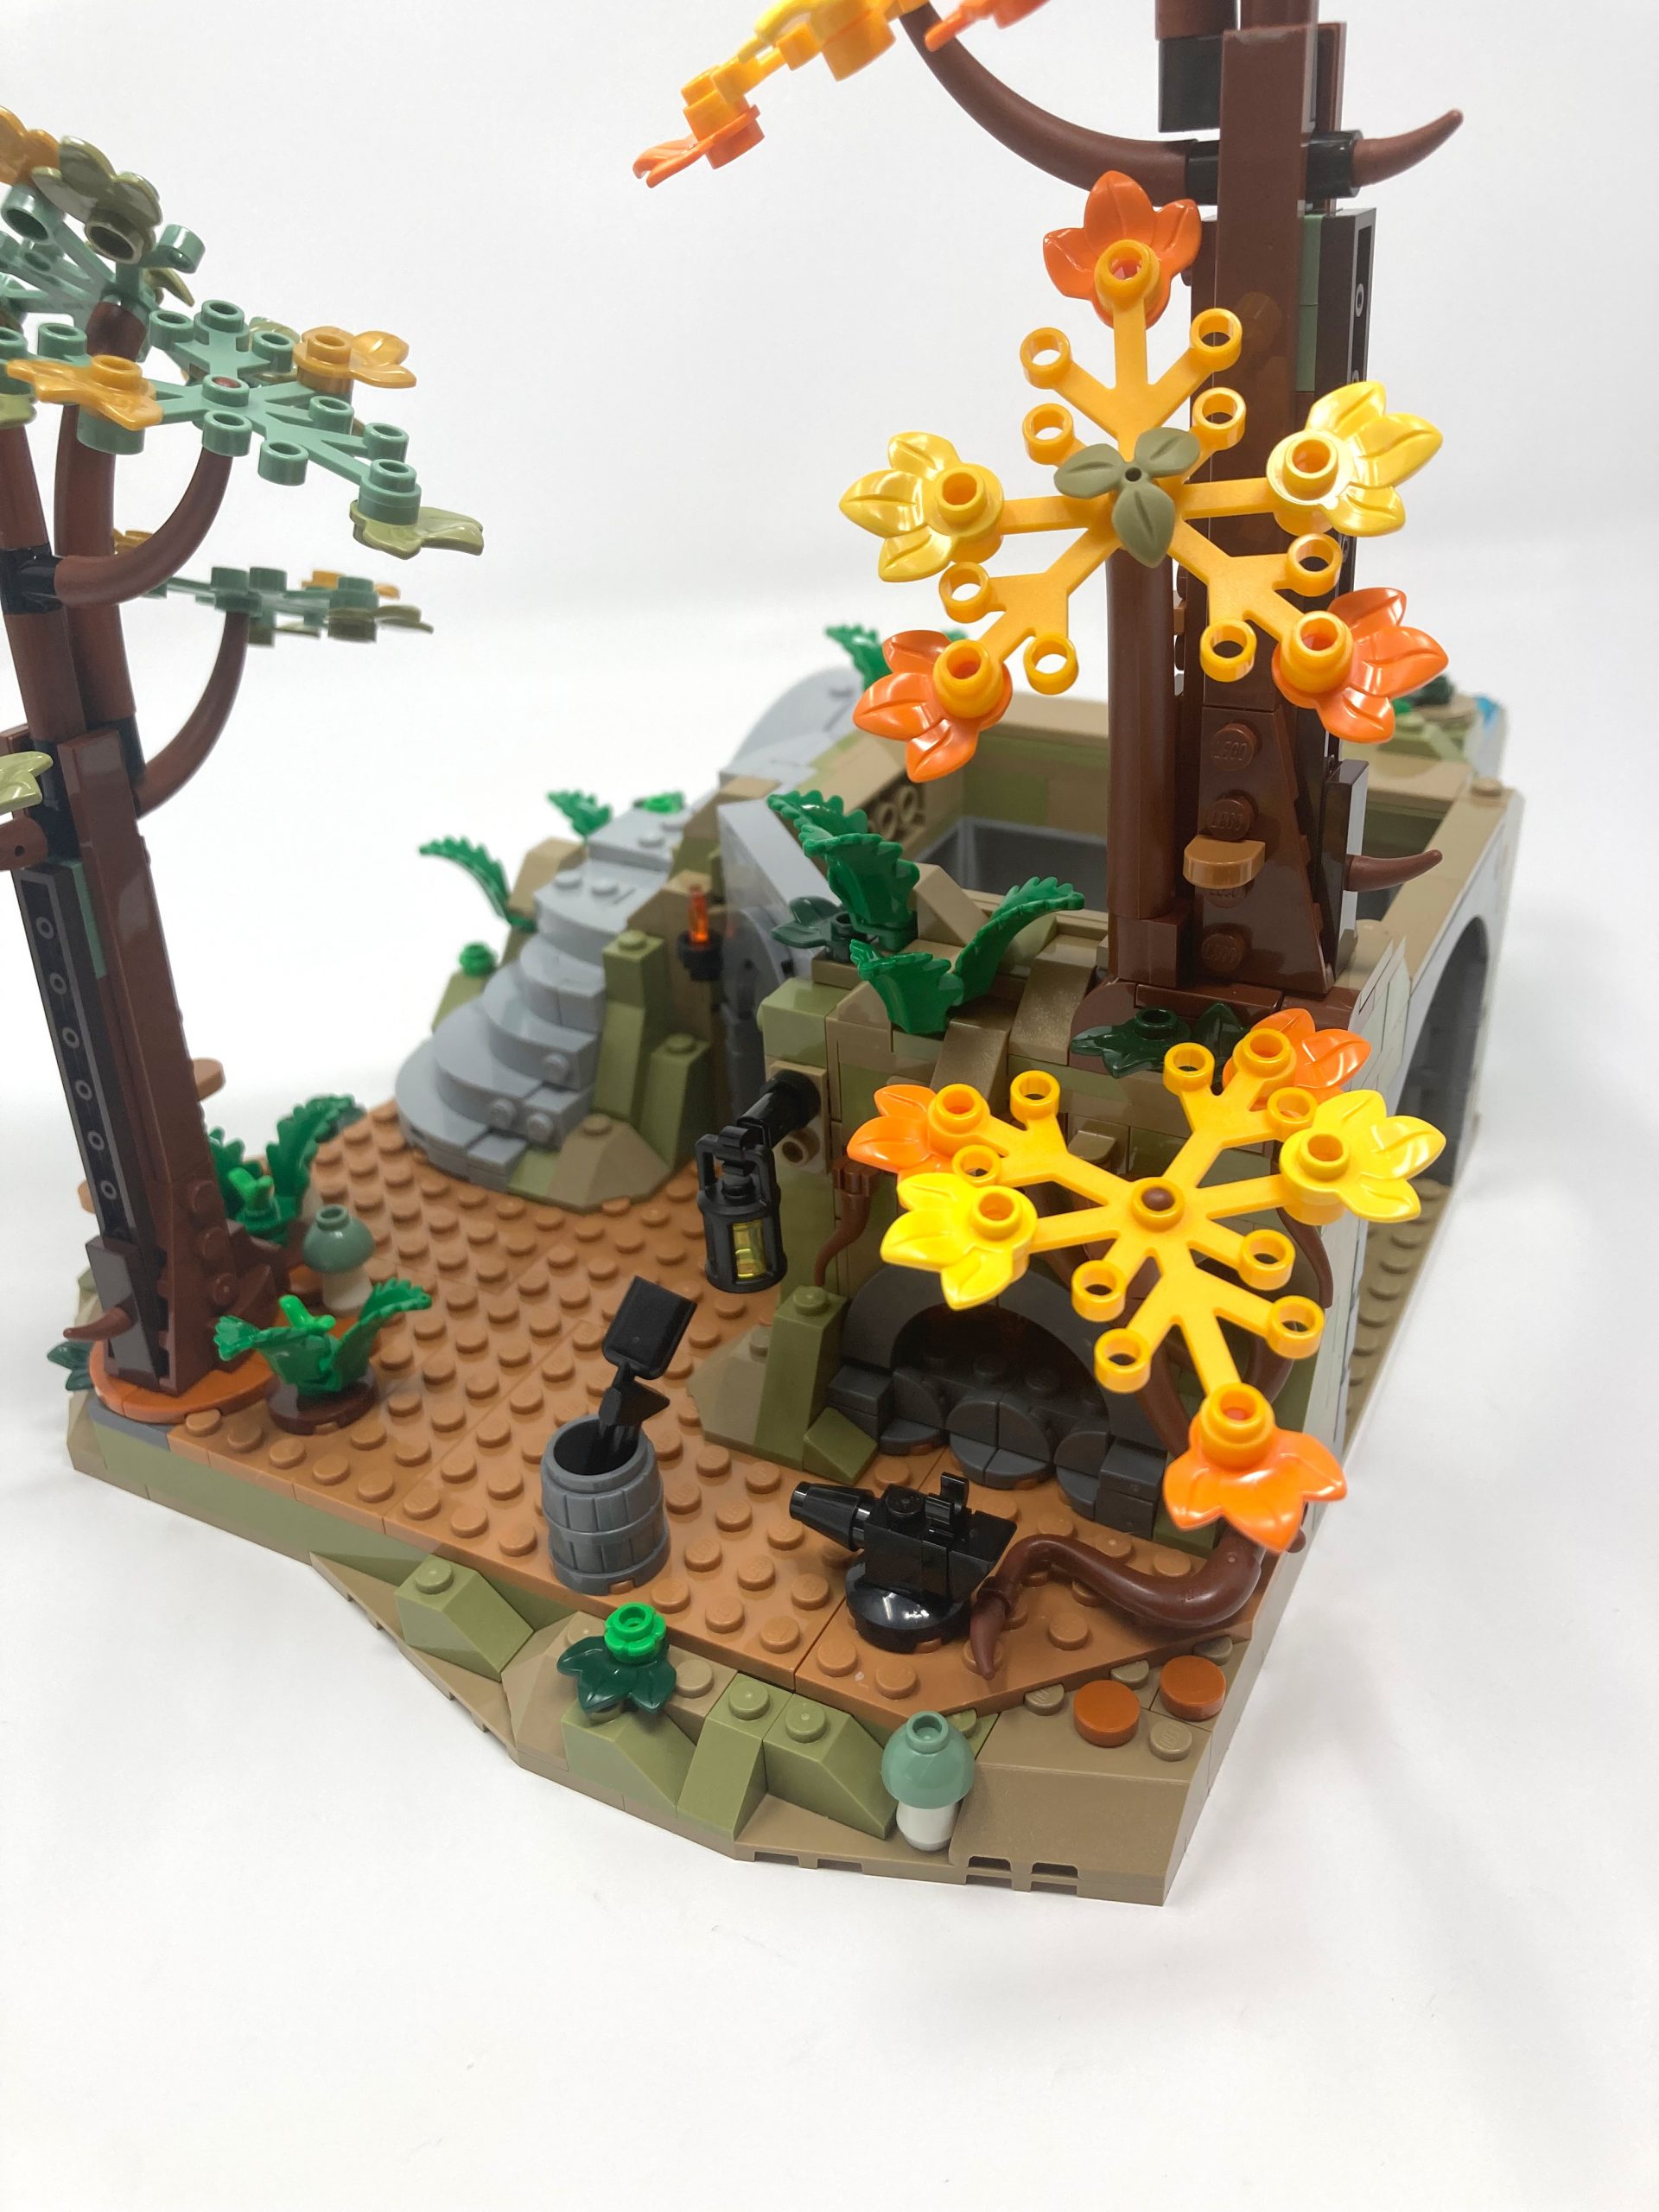
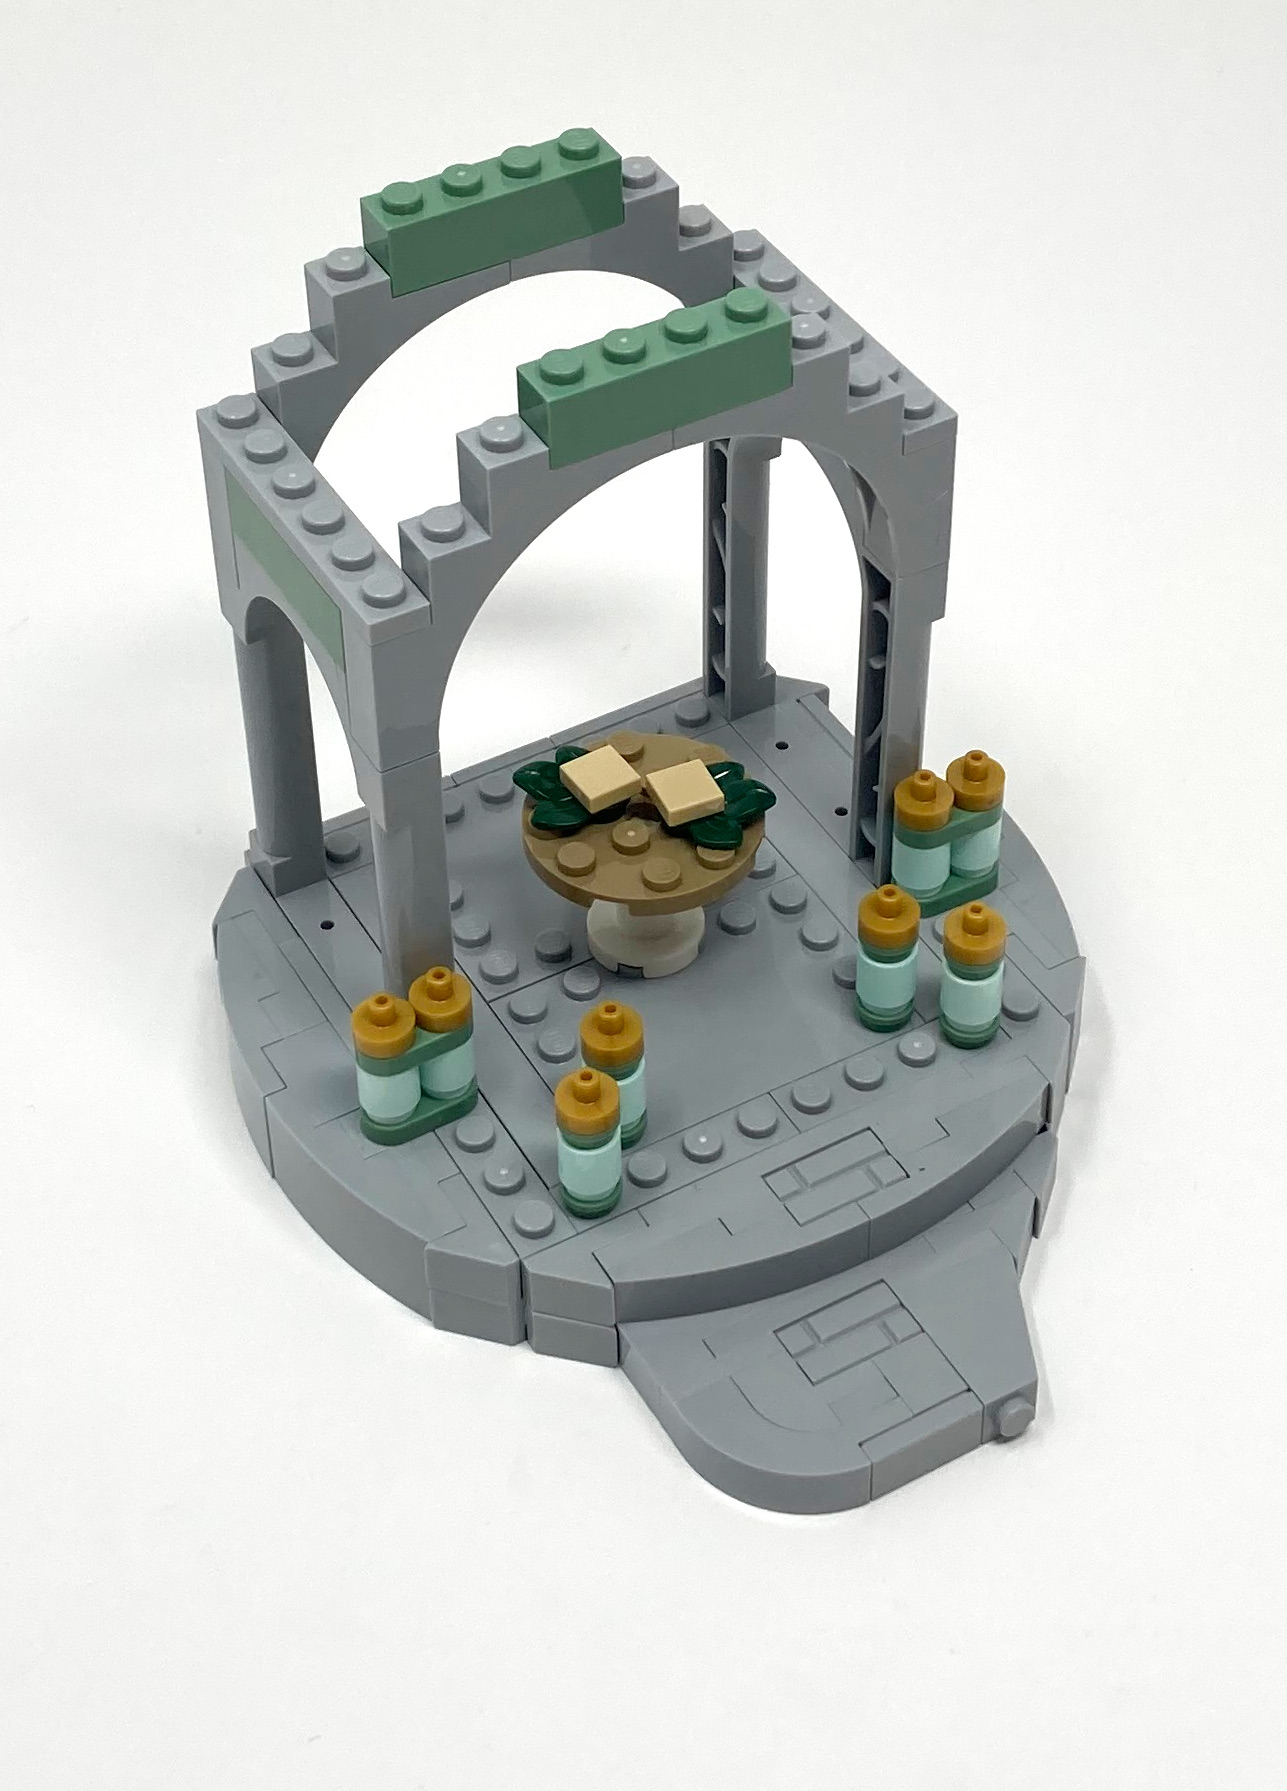
Section 2 – The River, Forge and Armory
Next, we build a river, forge and armory. This section focuses on the intricate details of the terrain, encouraging builders to use techniques from earlier in the build to construct a mountain, as well as a stunning flowing river and eye-catching gazebo. Two impressive trees stand tall and provide a view of the space, each with unique colored foliage to capture the essence of nature.
Bags for section 2.
Bags 12-13
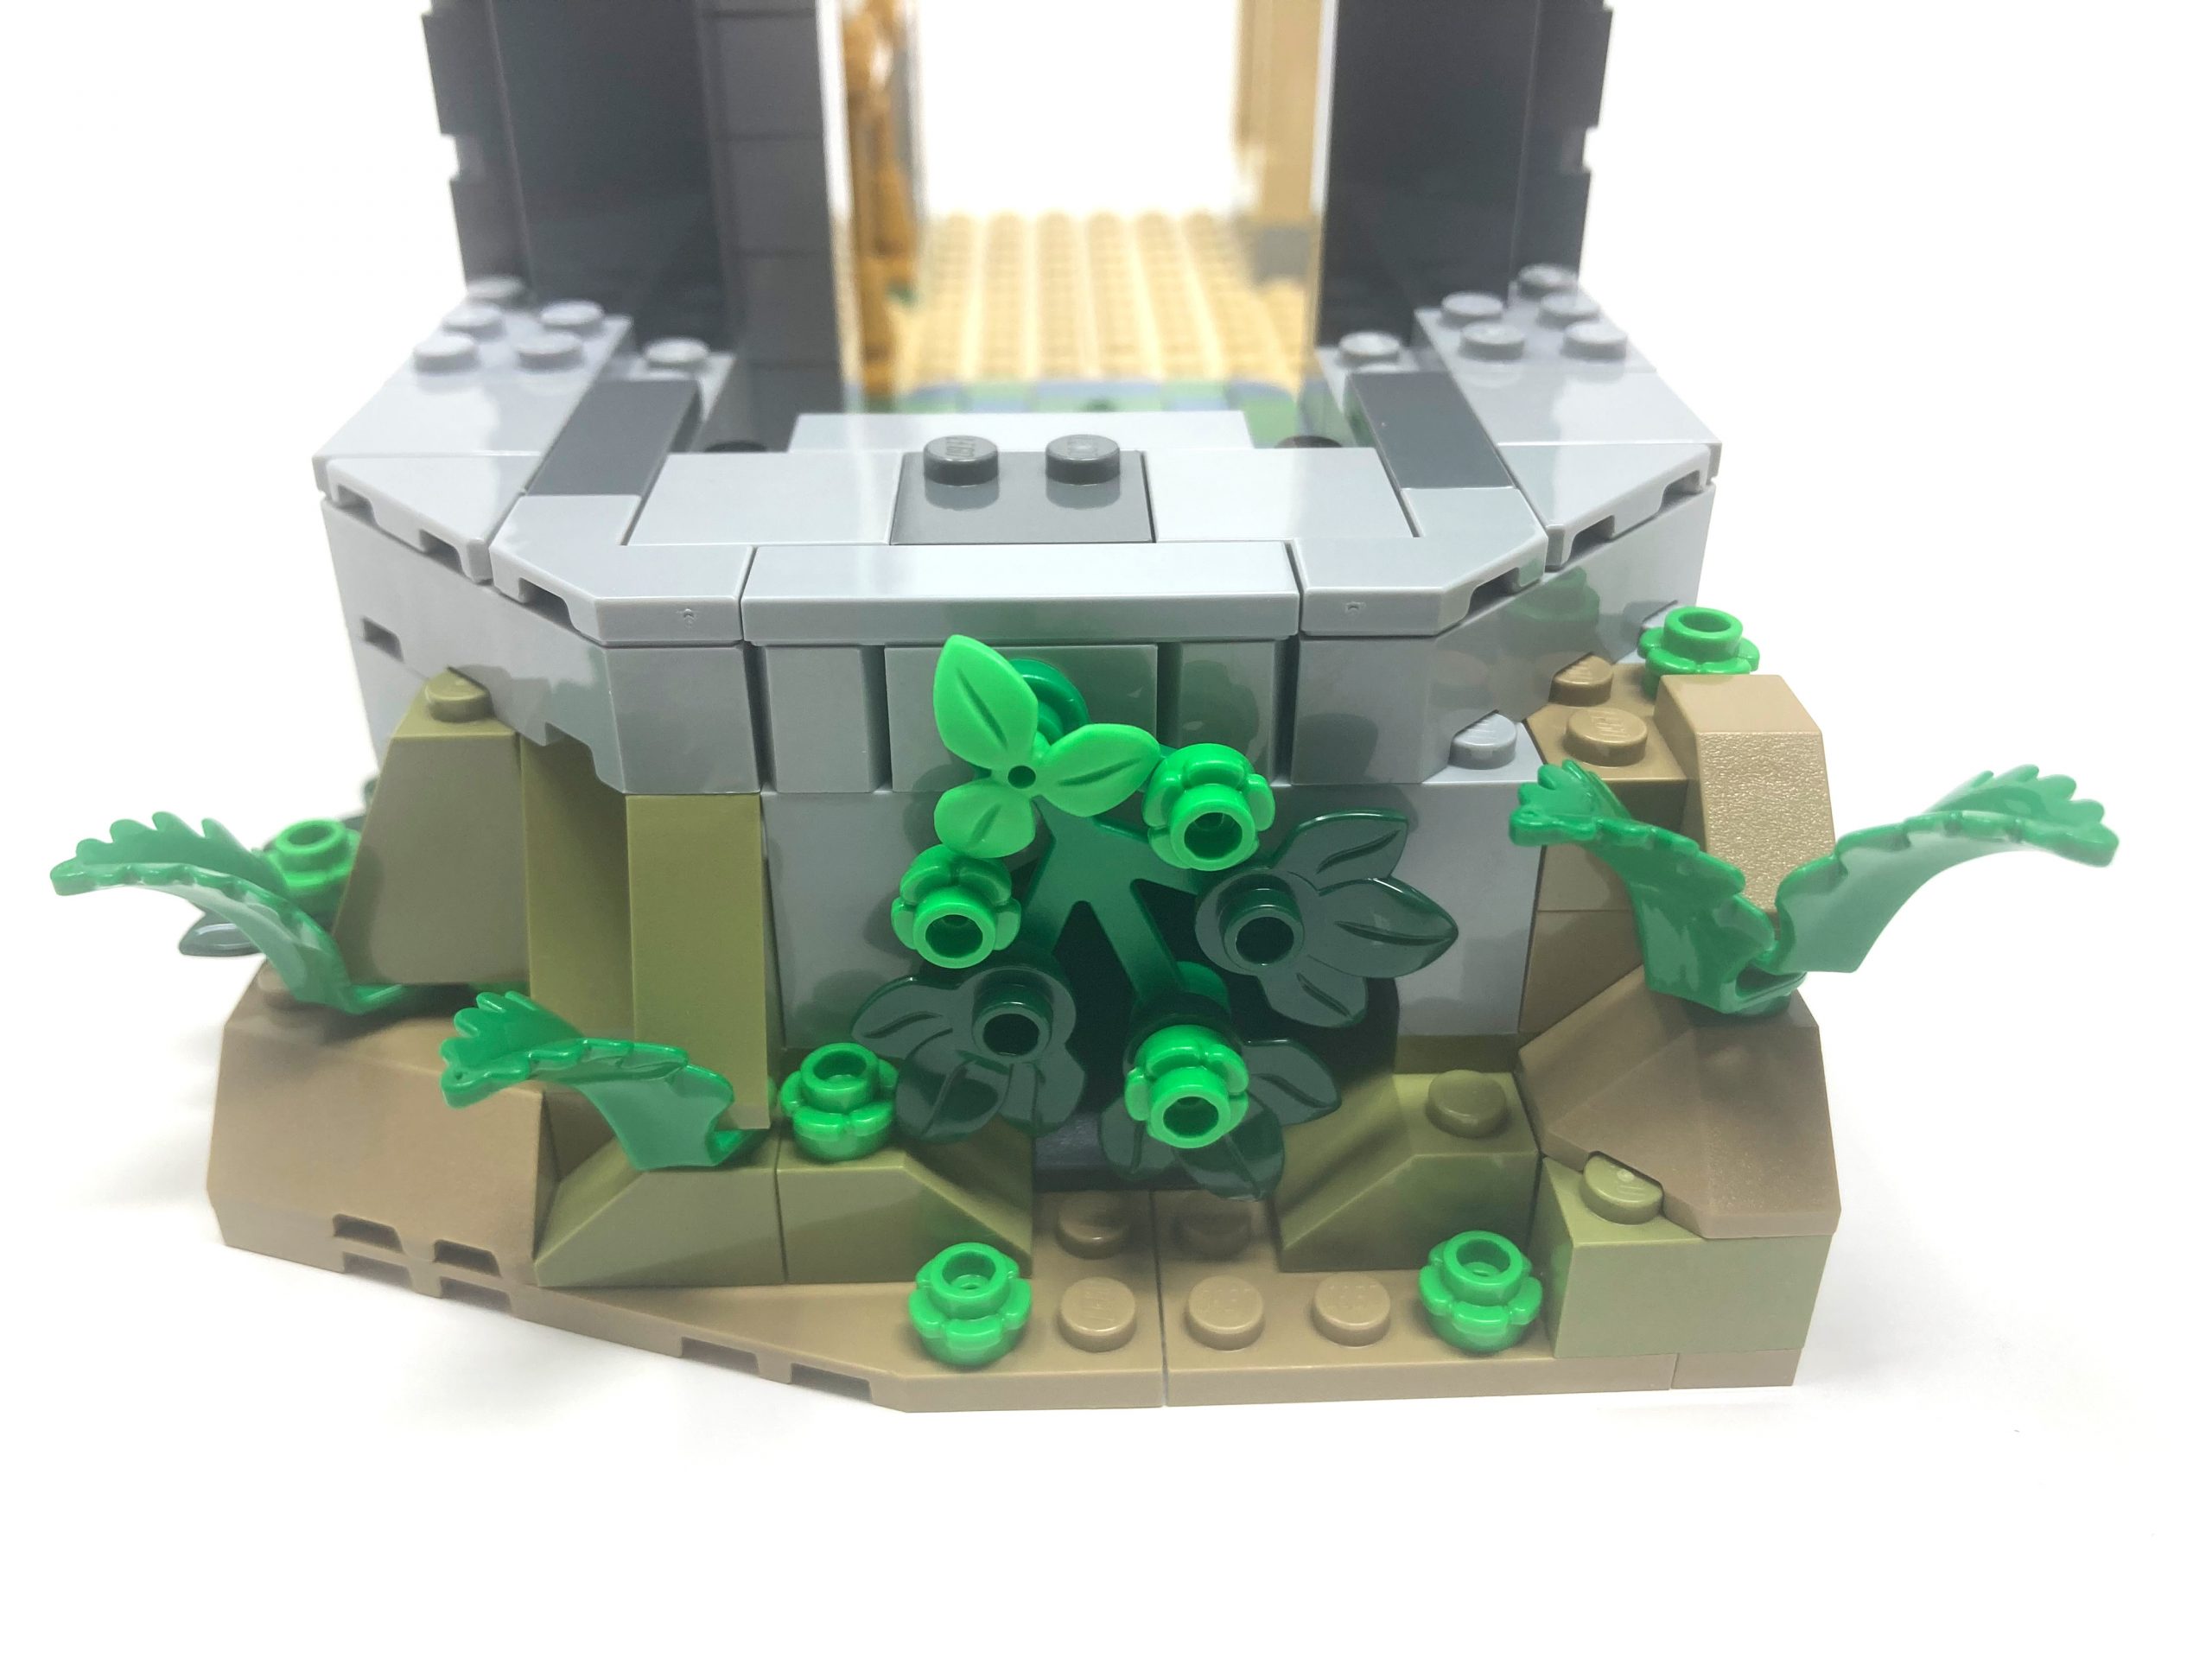
The foundation of the section is built by focusing on earthen colors for the ground and mountains. A variety of slopes and wedges of different depths and sizes are used to create an organic look. The set contains an equal number of each shape, size, and direction, ensuring matching quantities of each angle. Mushrooms are added to the earthy ground, and the mushroom stalks are made using glow in the dark pieces to give the scene a touch of nighttime magic.

Glow in the dark pieces are used for the mushrooms.
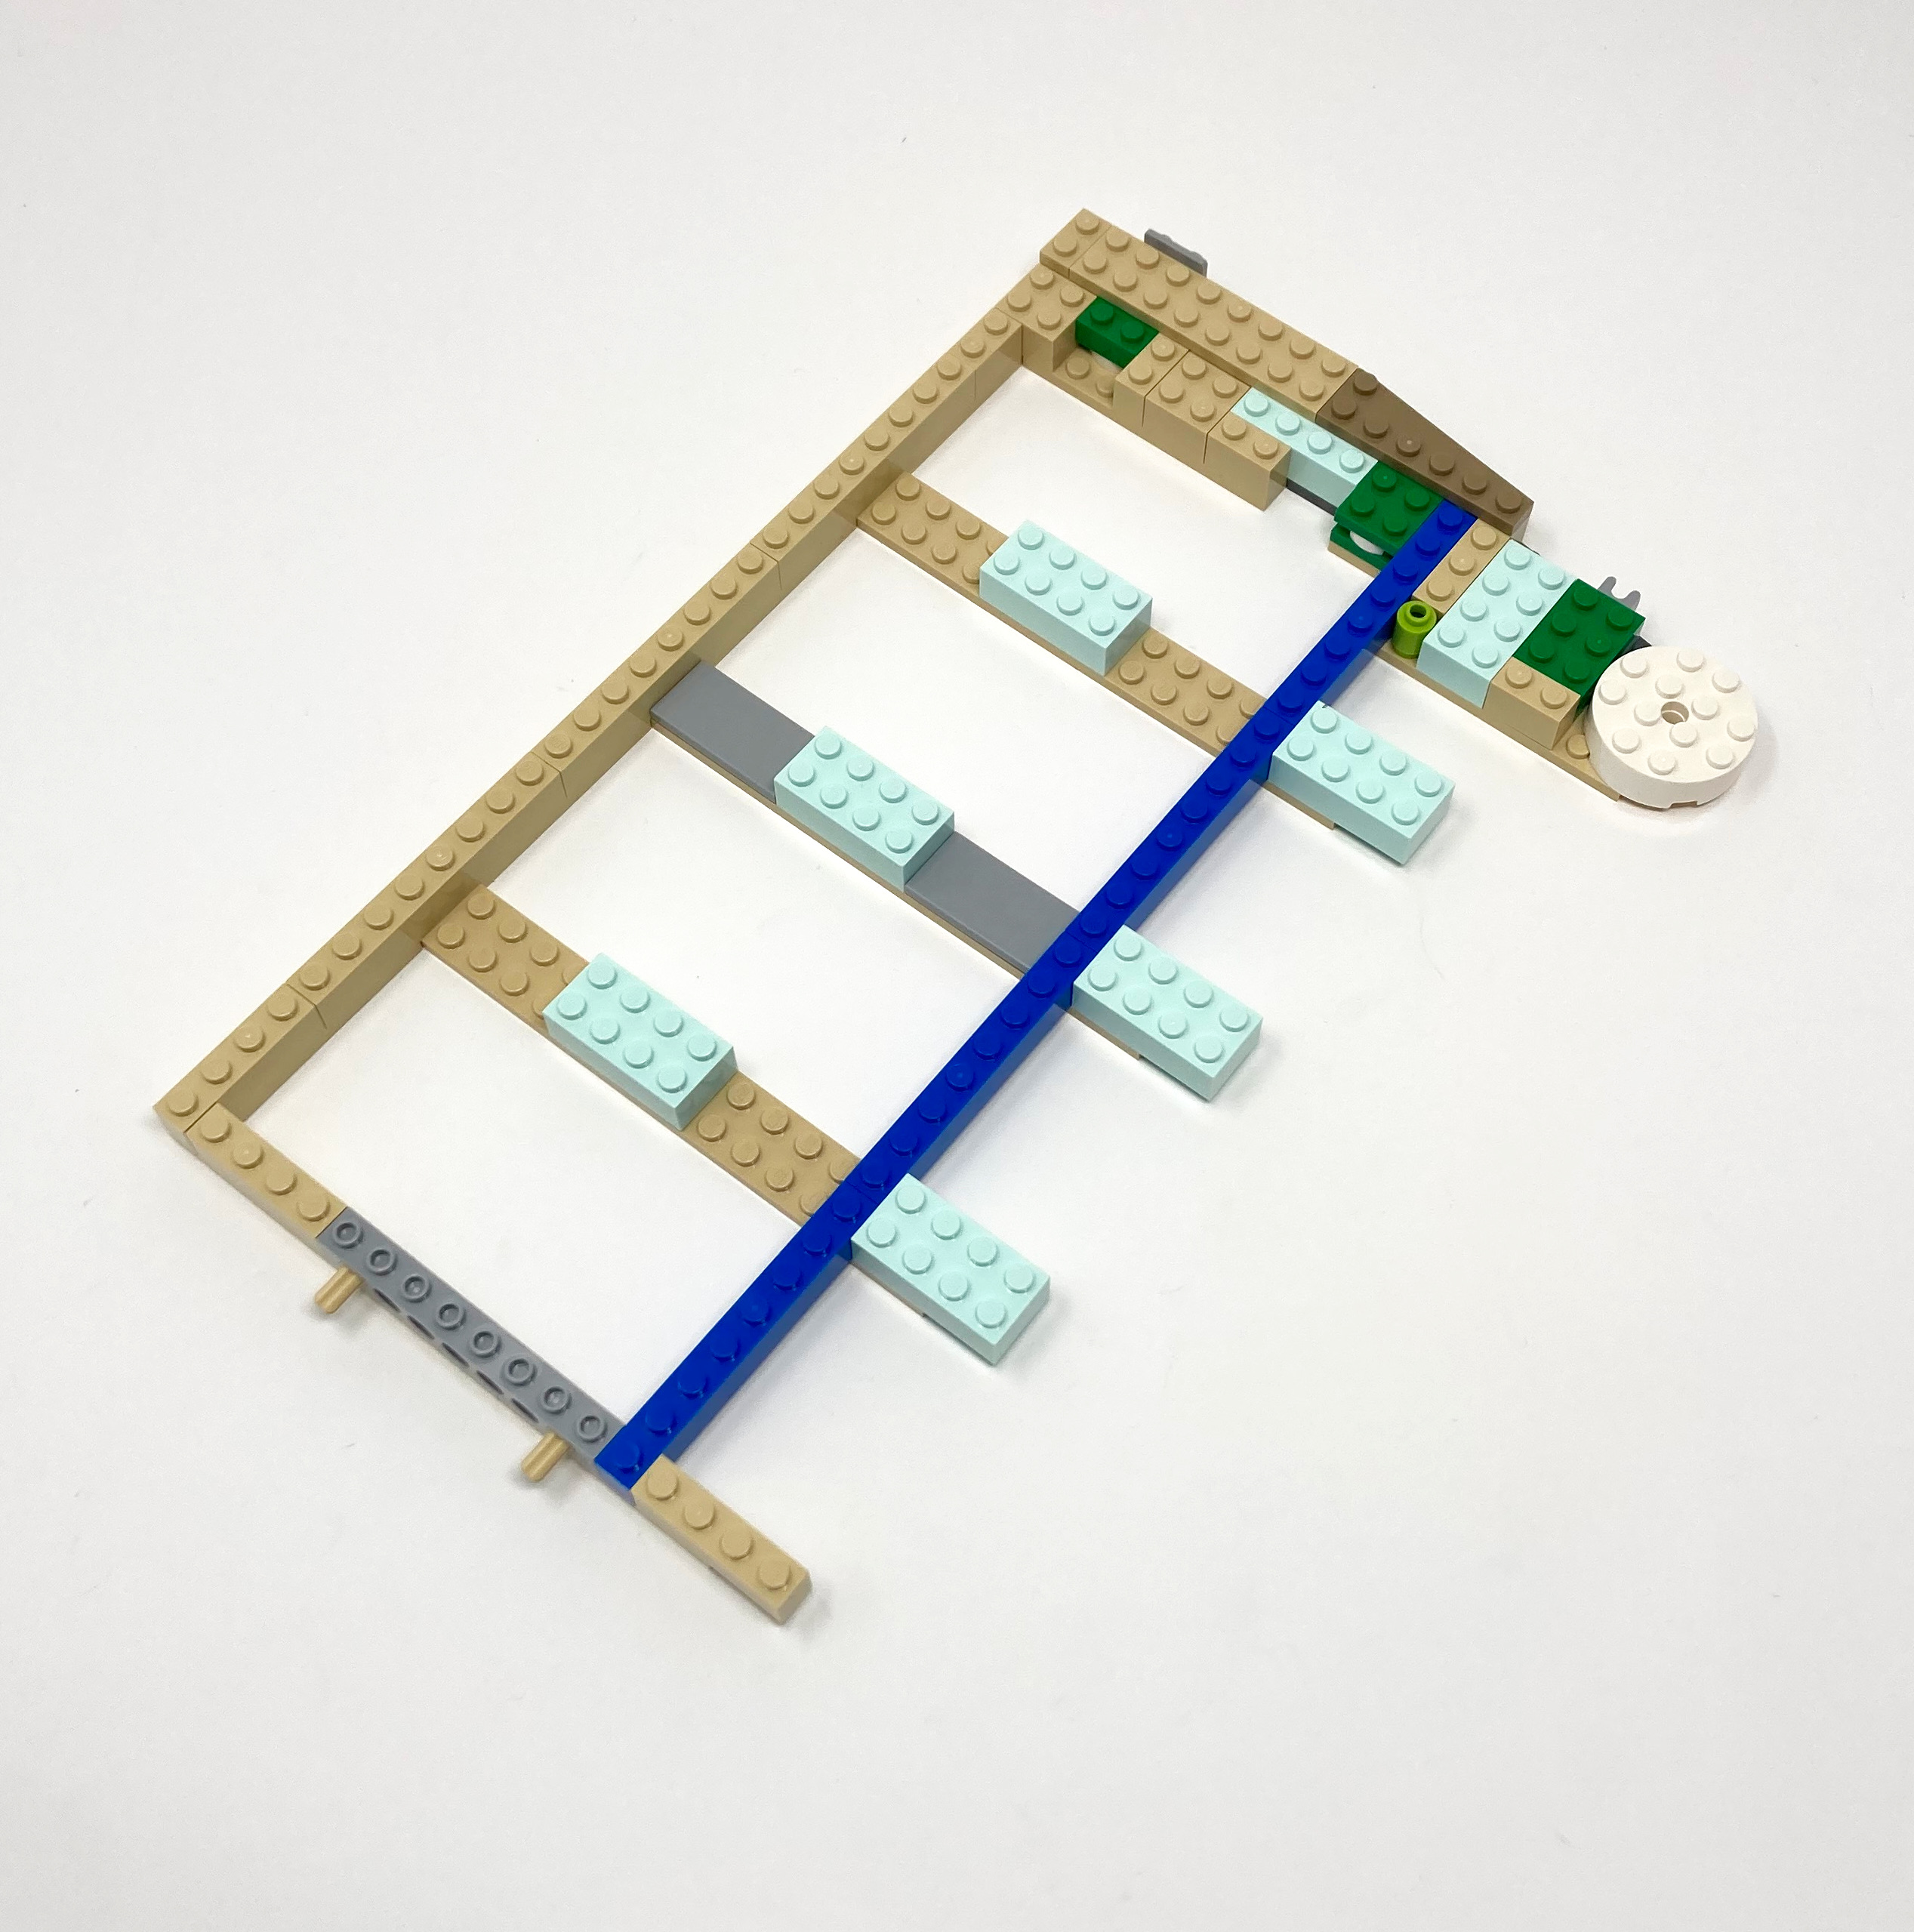
Bag 14
The river Bruinen is built in this section, with a clear and crisp appearance achieved using trans blue tiles over a turquoise baseplate. To add depth and realism, rocks are placed on the river’s surface and edges to create eddy currents, which are made to look like foam with the use of curved white pieces. This foam technique is also applied at the base of the waterfall and the top of the waves, which creates foamy build-ups. The combination of foam, glossy water and rocks helps bring the river to life and makes it appear more realistic.

The roaring white of the waves contrast the translucent blue of the water.
Bag 15
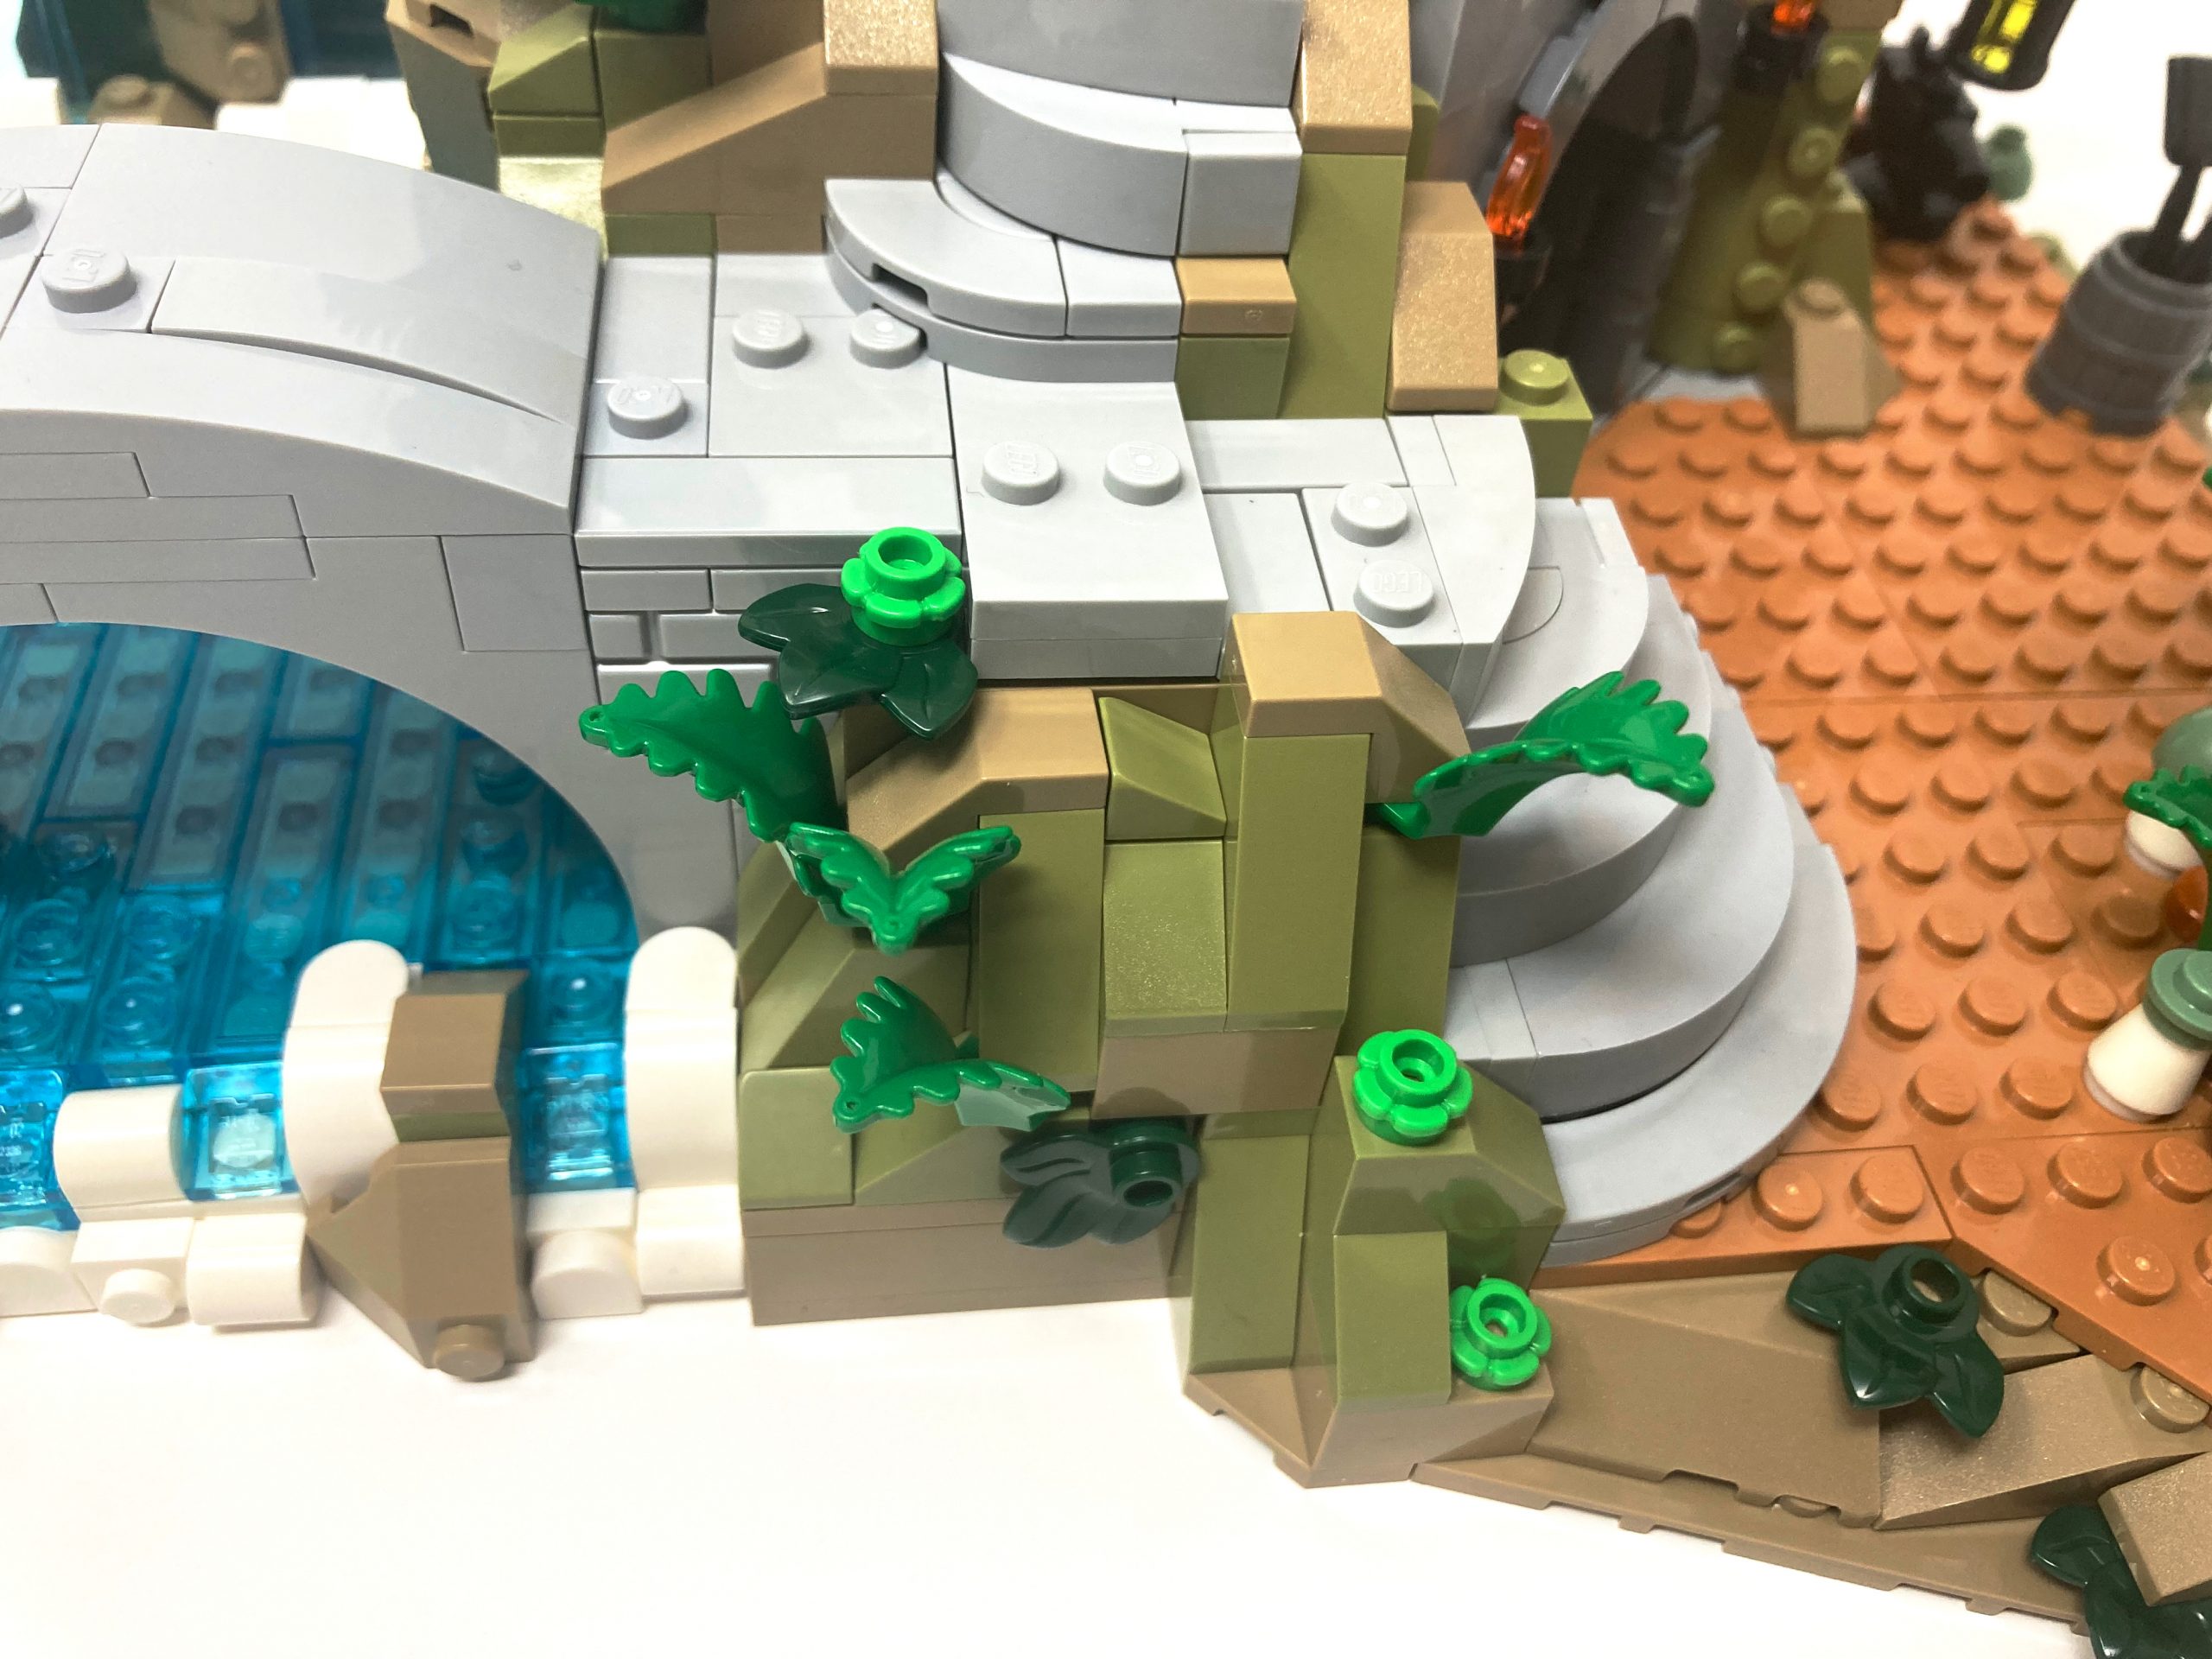
We add more earthen colors to the mountain and surrounding terrain as we build up the foundation. Slopes and wedges are used to create a natural shape, which is enhanced by adding a sprinkle of foliage in key locations. The gaps in the rocks are filled by using studs on side construction to add extra texturing to the build. The focus remains on creating a realistic and natural feel to the scene, with the addition of foliage and stud texturing helping to achieve this.
Different colored rocks help create the weathered rocks feel besides the river.
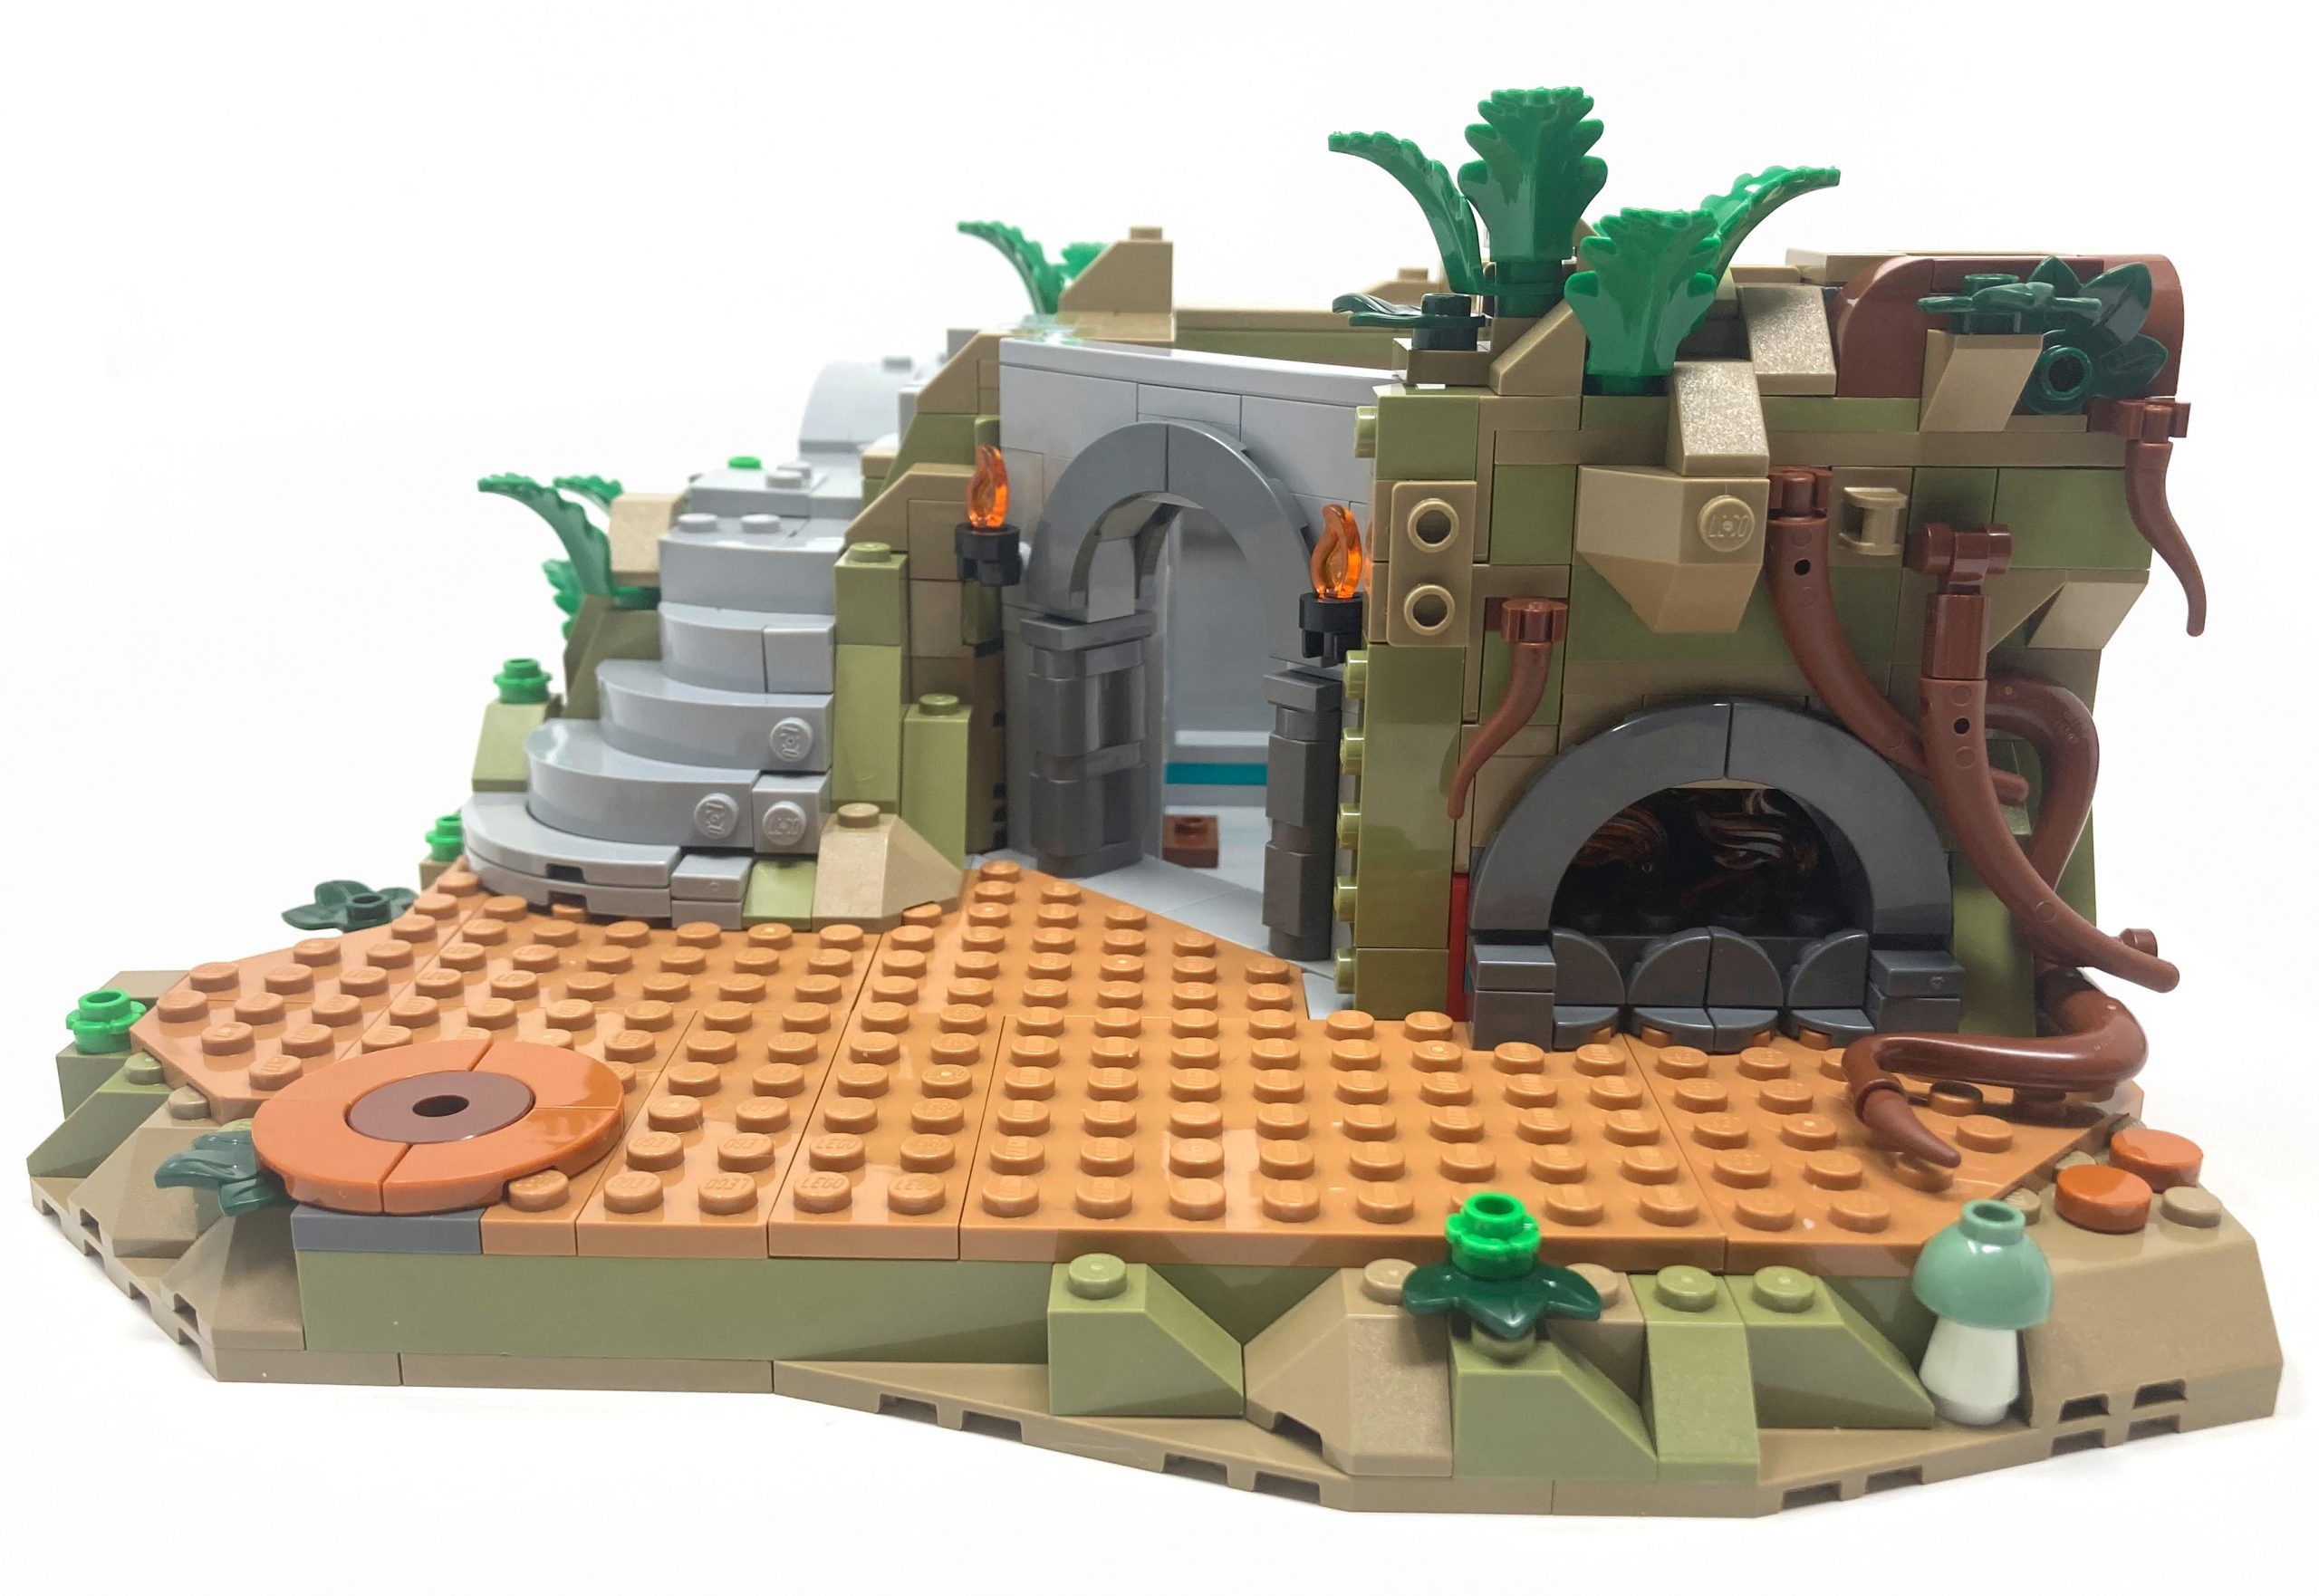
The use of studs on side construction is continued with the bridge over the river Bruinen to build rounded steps. The designers use slopes of different sizes to achieve varying step sizes and create a uniformity of steps at different levels of depth. This layering technique results in organic and stony steps that look almost un-LEGO-like, showcasing the creativity and ingenuity of the designers in making the best use of available pieces. However, the smooth surface of the steps limits the pose-ability of figures on some levels, making it easy for them to fall over.

Studs on side construction allow for various sized steps to be created.
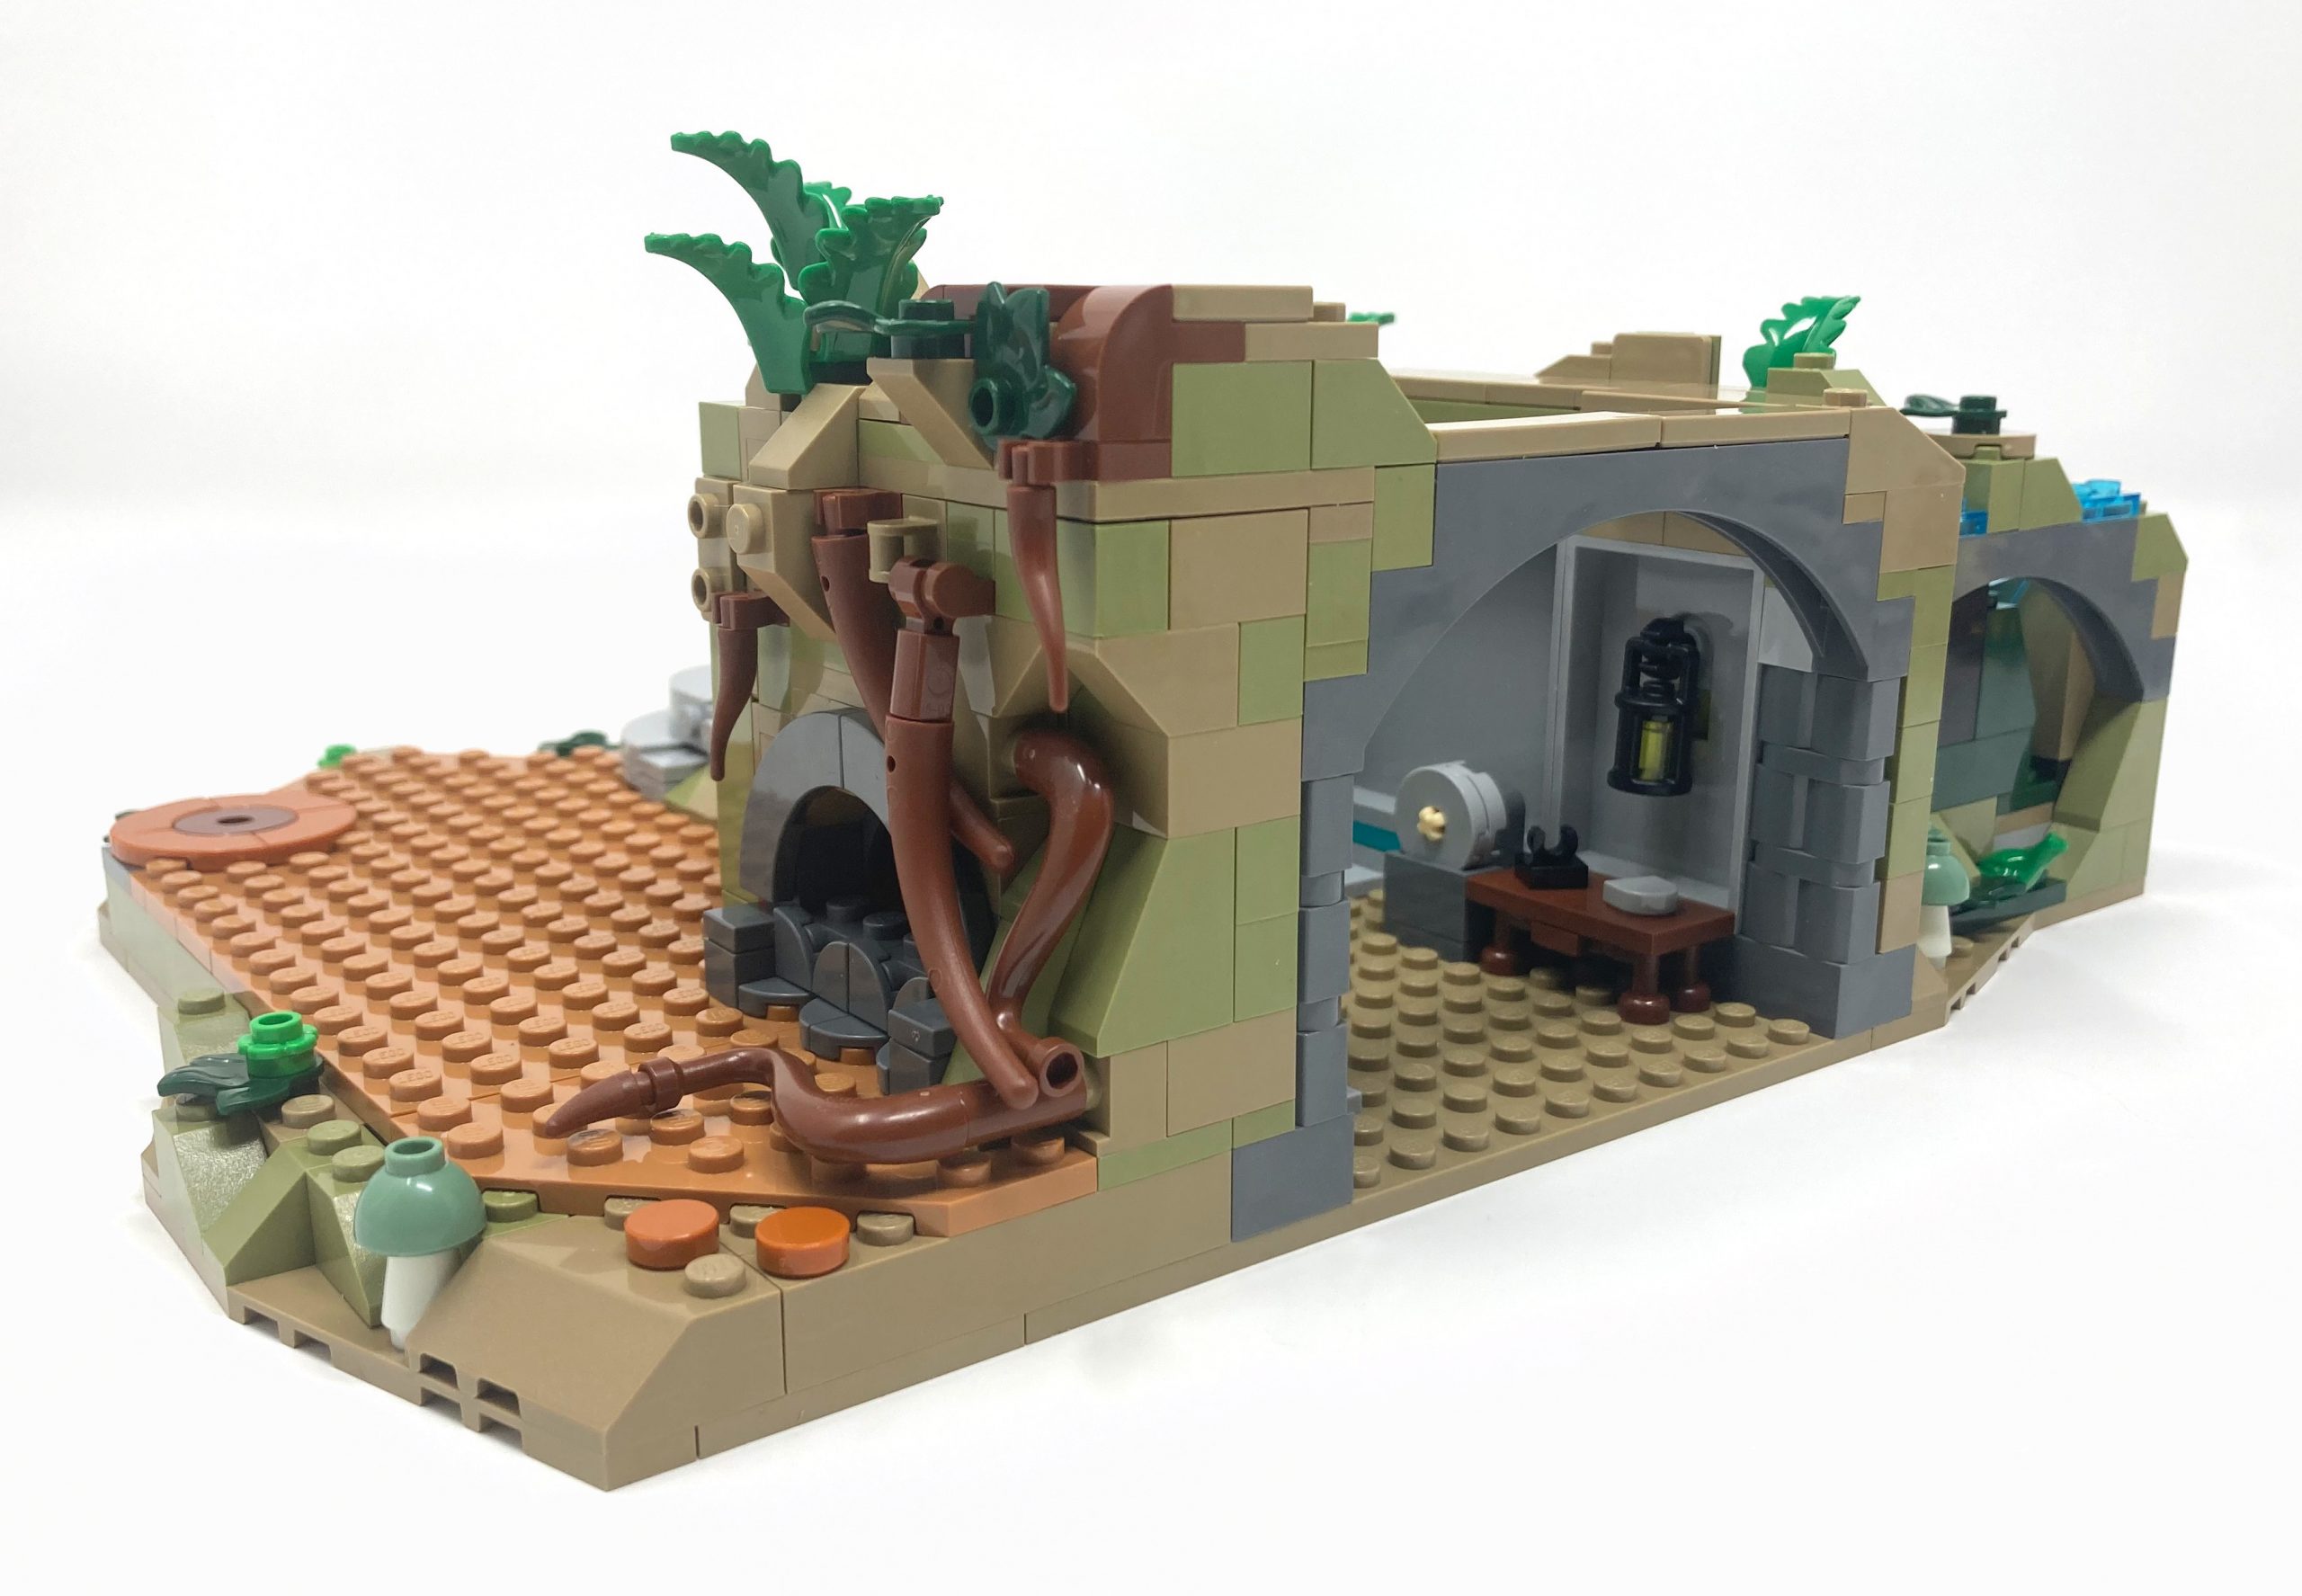
Bags 16-17
The armory inside the mountain is built into the rocks, and although it’s currently empty of weapons, it still has a few details such as a grindstone for sharpening them. A window piece is included in the interior of the armory, but it opens to the rock and serves as a place to hang a lantern deeper than if it were directly placed on a brick, adding depth to the room. The light from the lantern illuminates the small table beneath it, which is unremarkable but is designed differently than previous pieces in the set by using tap pieces as legs, a small yet clever design choice.
Various sized roots grow out of the base for the tree we will build later.
Outside the armory lies the forge, built directly into the mountain. While the forge is an iconic structure, it’s unfortunate that it appears dark, and the internal details are difficult to see. To add a play feature, it would have been great if the designers had included a light brick. Meandering around the forge are the beginnings of a big tree, using a variety of lengths and shapes to create a sprawling effect for the roots, each emerging from the dirt mound behind it. The entrance to the armory from the forge is built on the side of the forge and the focus is on the arch. Instead of using an arch piece, the arch and columns are brick-built, allowing them to protrude from the wall and stand out. The curves of the arch, along with the recessed spaces between each piece, emphasize the parts that stick out, adding to its design.
Brick built arches allow for depth.
Bag 18
The bridge is a significant feature in the set as it provides a path to cross over the river. It is designed to be both sturdy and realistic, with the combination of brick-built arches, studs on side construction, and masonry bricks. The use of layering and exposed studs gives the bridge a natural, organic look that blends in with the surrounding environment. Hidden clip pieces provide the necessary structure to hold the bridge in place, while the arch piece at the bottom of the bridge and the brick-built arches and columns on top add a sense of grandeur to the bridge.
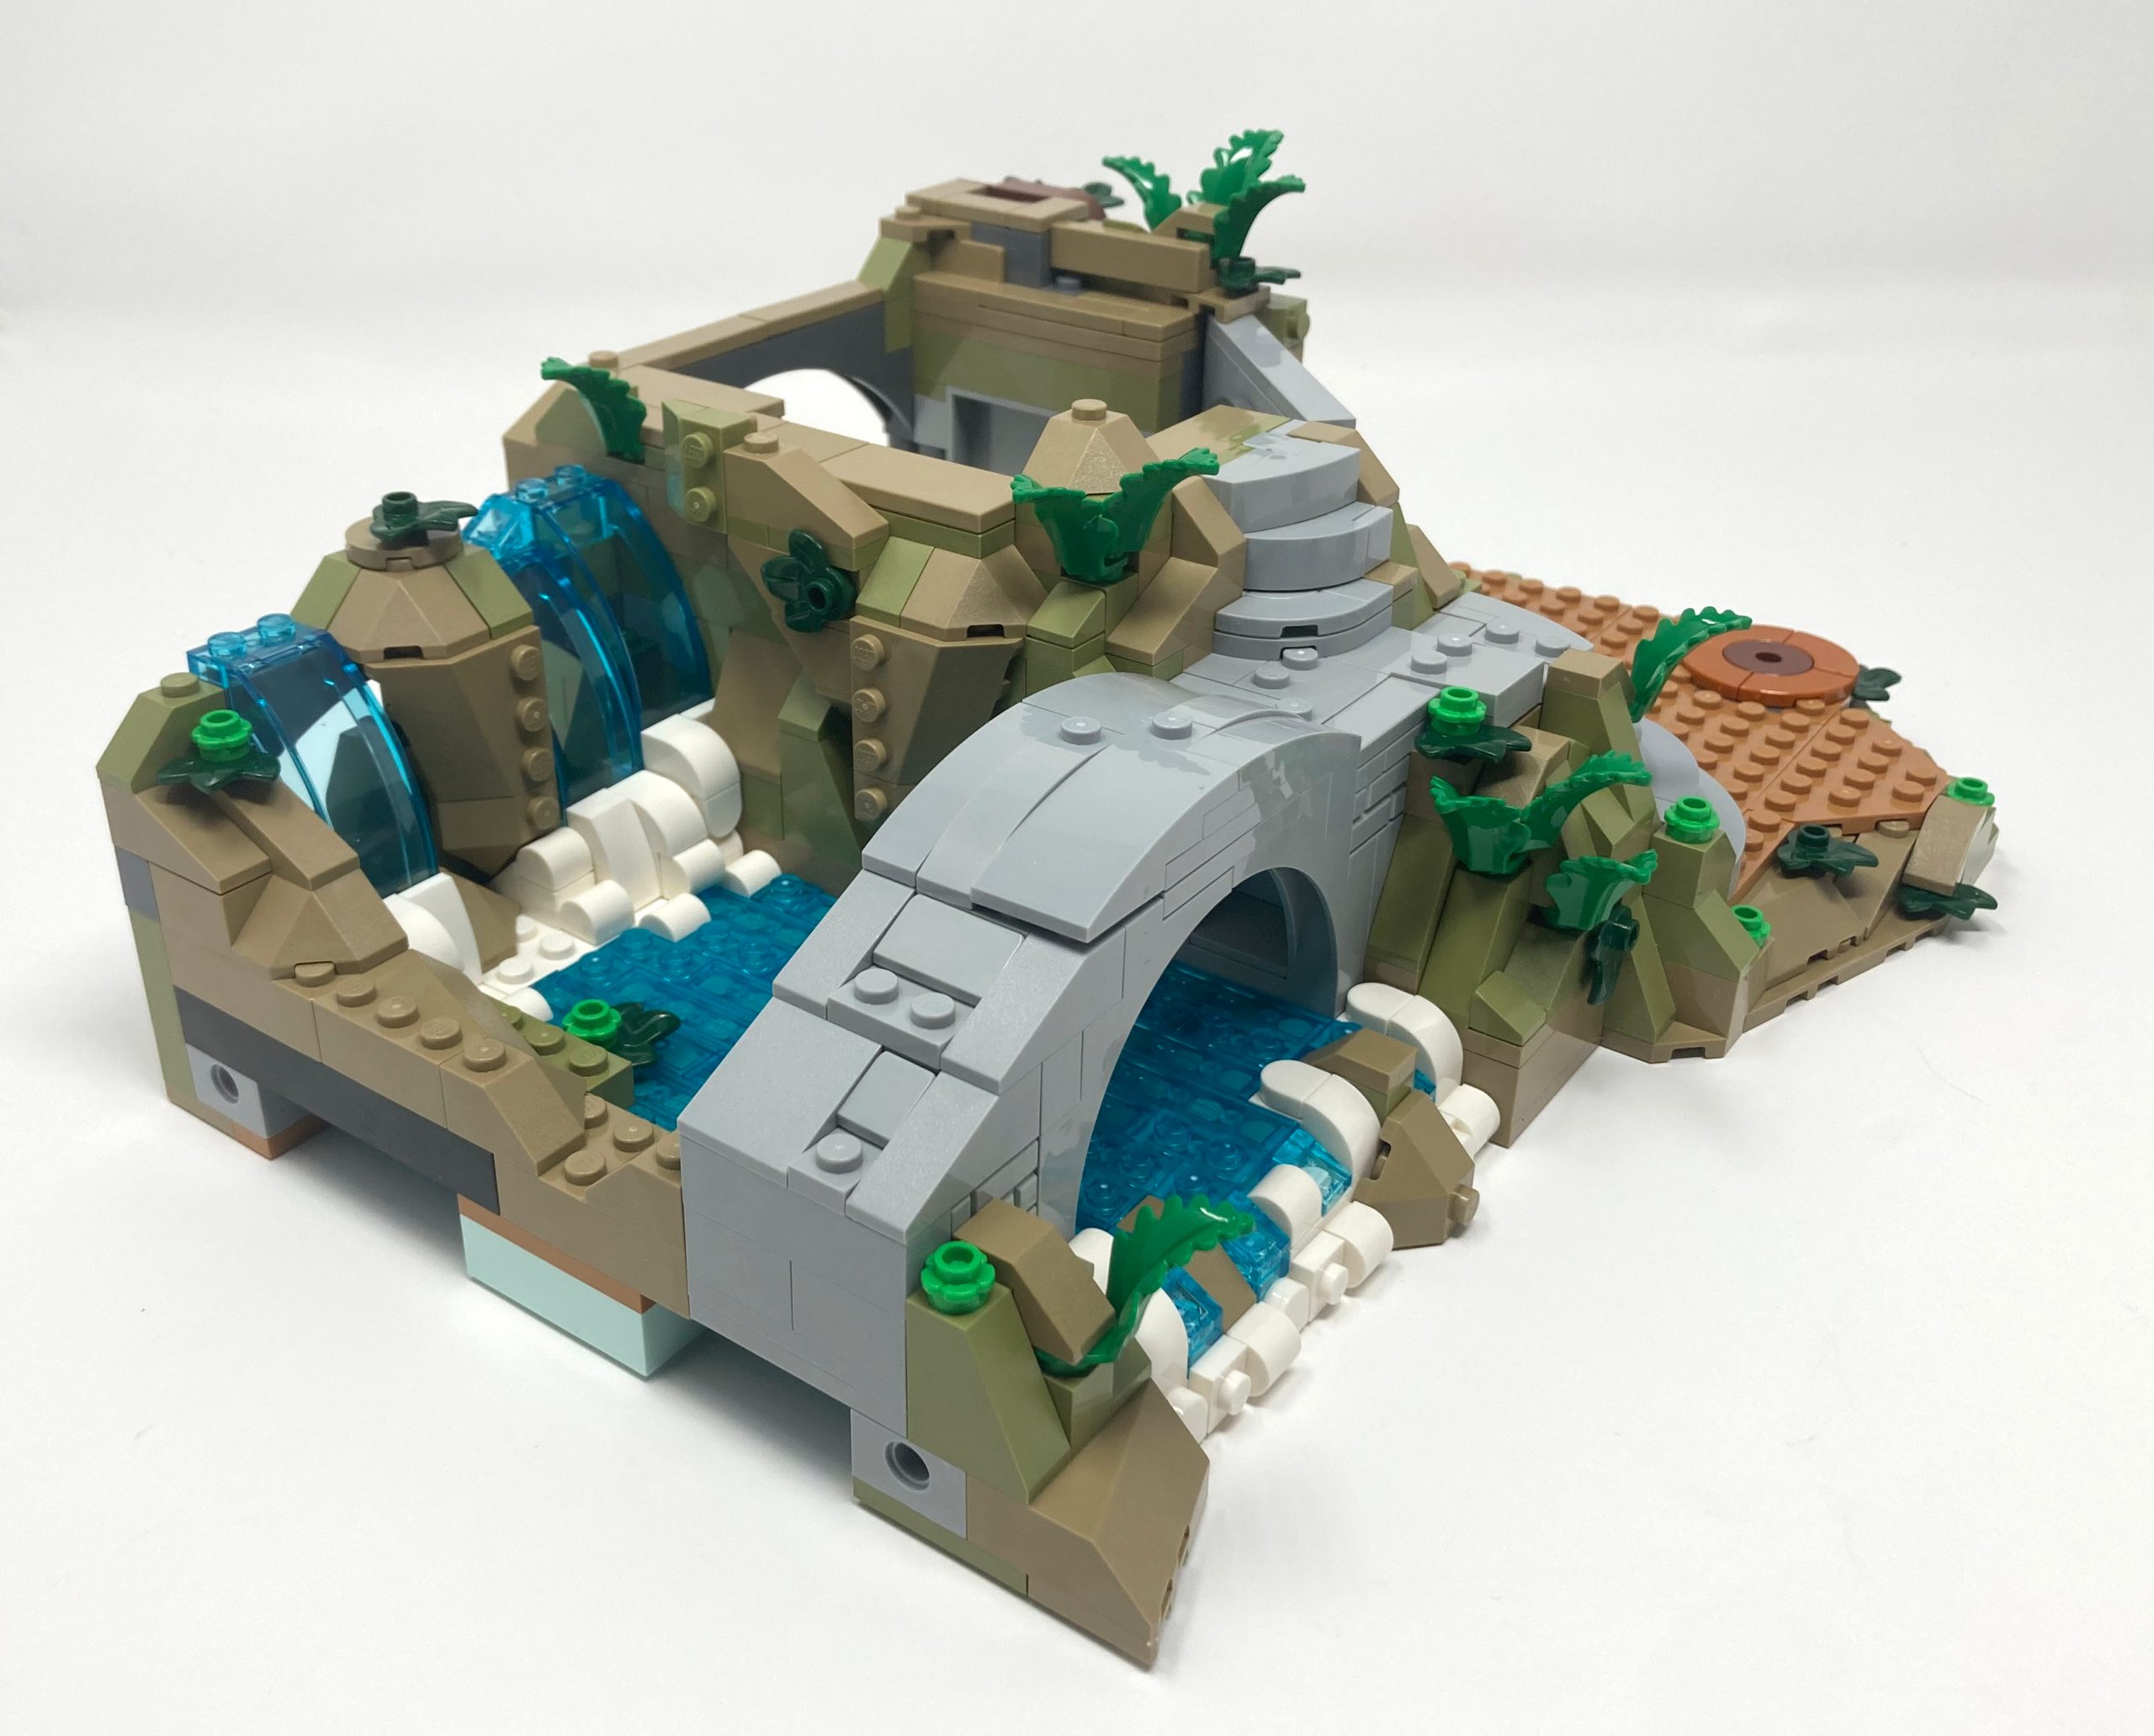
The bridge finishes the river beautifully.
Bag 19
The use of studs on the side construction, along with tiles, plates, and wedges, creates a realistic texture for the trees and enhances their overall look. A technic beam runs through the center of each tree providing stability and support. Horns and bone pieces exposed at angles allow the branches to extend and reach out in all directions. The different colors used for the leaves, including 151Sand Green, 330Olive Green, 297Warm GoldPearl Gold, 191Flame Yellowish OrangeBright Light Orange, and 24Bright YellowYellow, add to the overall liveliness of the forest. The addition of mushrooms growing on the side of the trees and around their trunks is a nice touch, adding to the natural feel of the scene. The building technique used to create the mushrooms on the tree is uncommon, raising the question of whether this method puts any extra stress on the pieces.
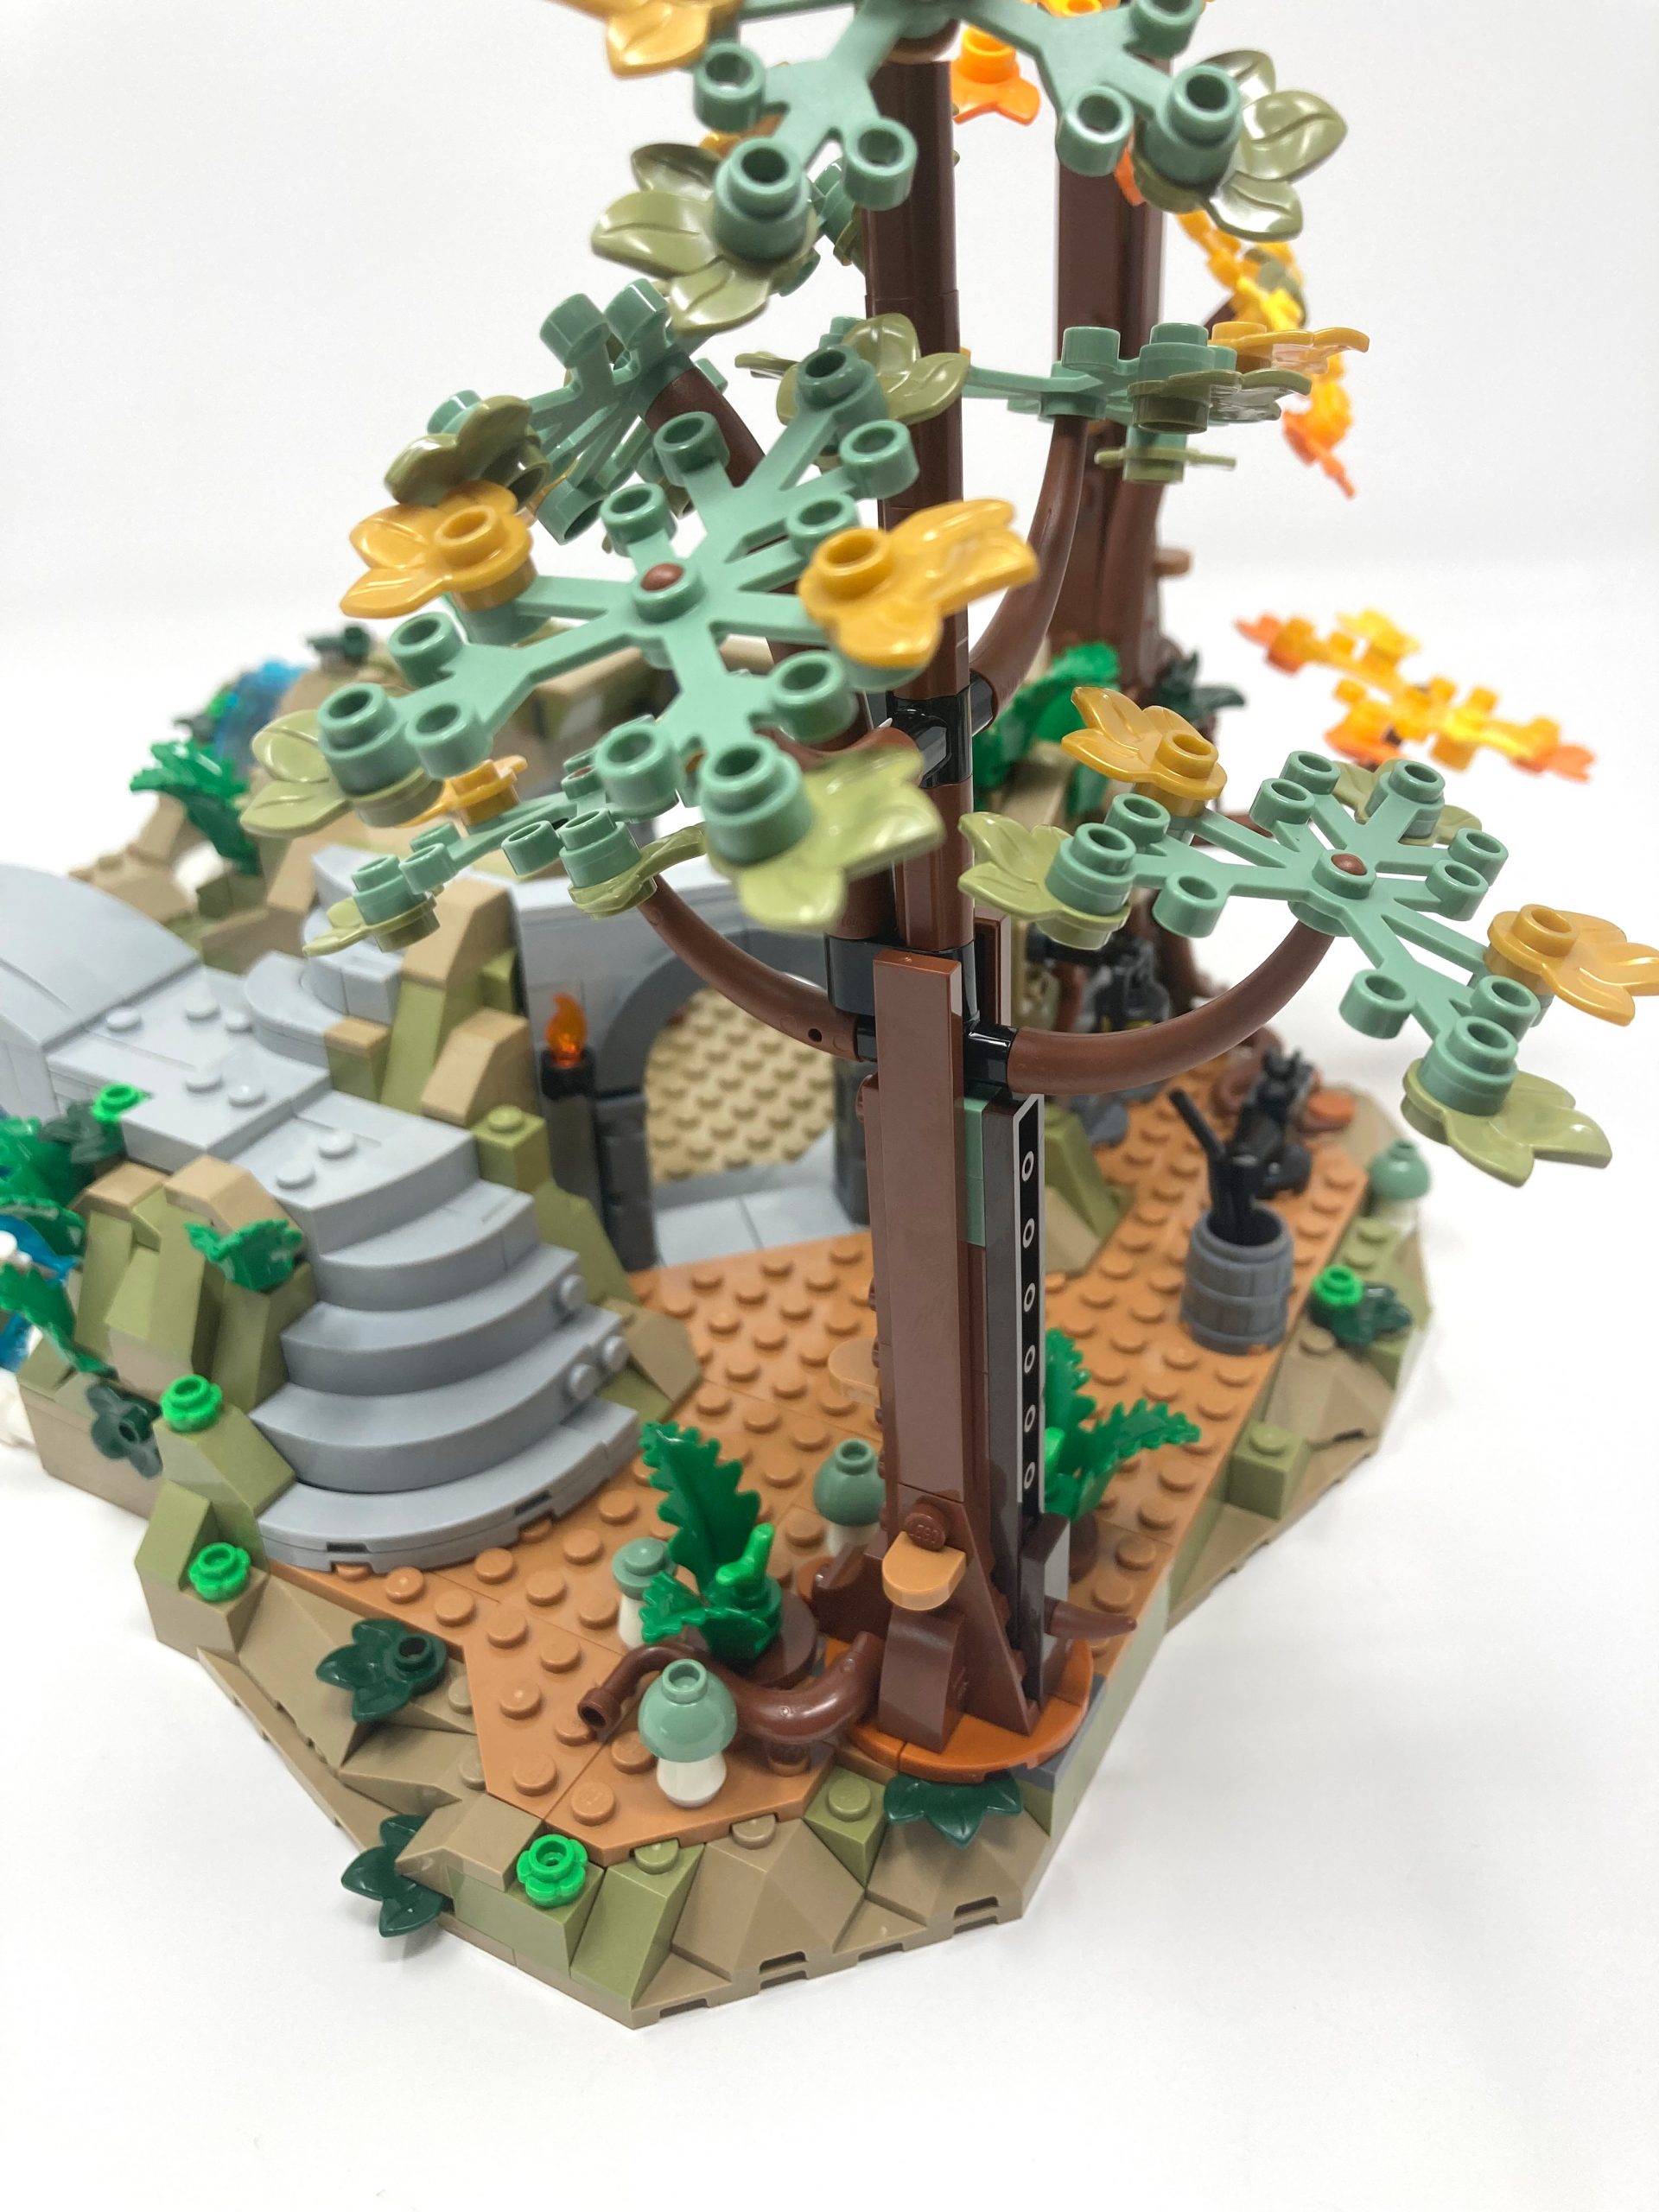
Various types of mushrooms grow around this tree.
The anvil is a simple yet effective design, utilizing square studs to create the overall shape of the anvil and using side construction to create a smooth surface. The clip attached to the side is used to hold the hot swords in place. This addition of the anvil not only serves a practical purpose but also adds to the overall playability of the set, allowing kids to engage in imaginative play as they bring the forge to life.
A brick built anvil adds detail to this scene.
Bag 20
To fill the open space above the armory sits a gazebo. The base of the gazebo showcases intricate detailing, utilizing a mixture of rounded pieces to create a highly circular structure. To achieve this, the designers use a range of brick sizes, making use of studs on side construction as we build the base outwards from the center. This results in a structure that not only is strong but also boasts a smooth, rounded surface. The base uses a lot of pieces to create a highly detailed but dense space.
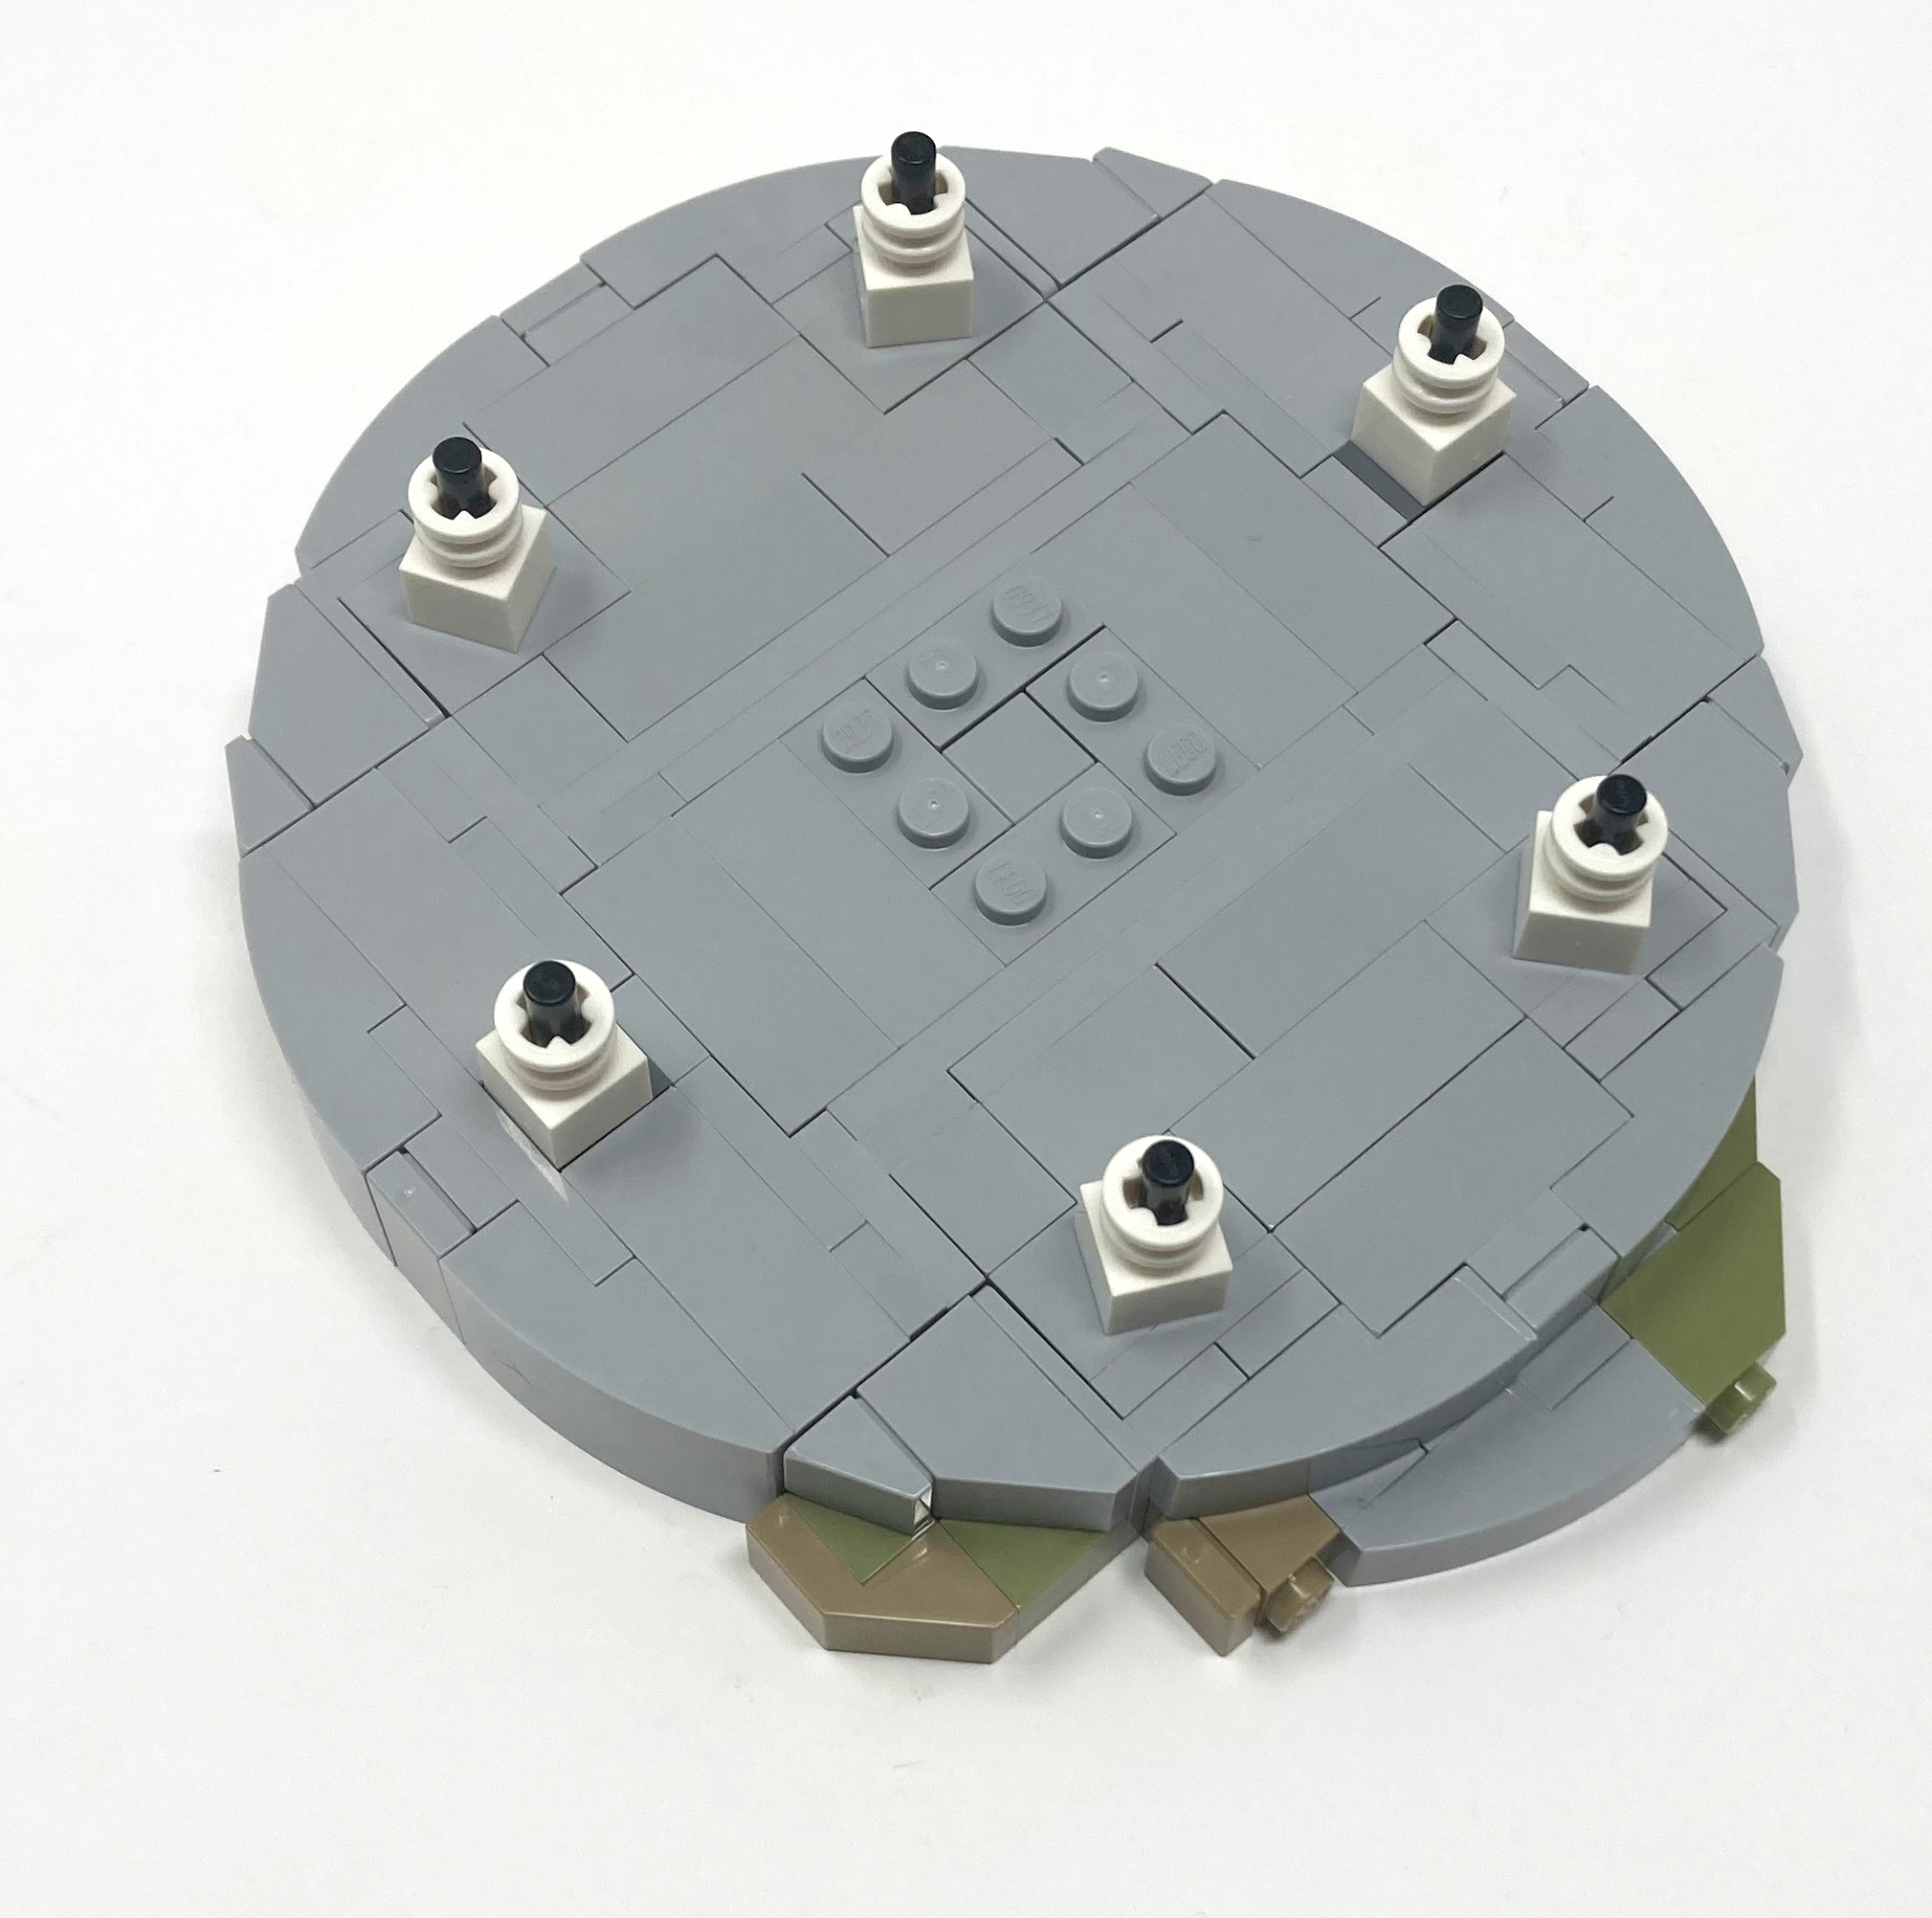
Studs on side technique lets you build a very rounded base.
The bottom of the gazebo base appears differently from its top. The construction details are now visible, revealing the techniques used for its rounded shapes and textures. A hexagonal technic foundation serves as the backbone of the build, providing added stability. Technic pieces reinforce the structure, ensuring it can withstand play and display.
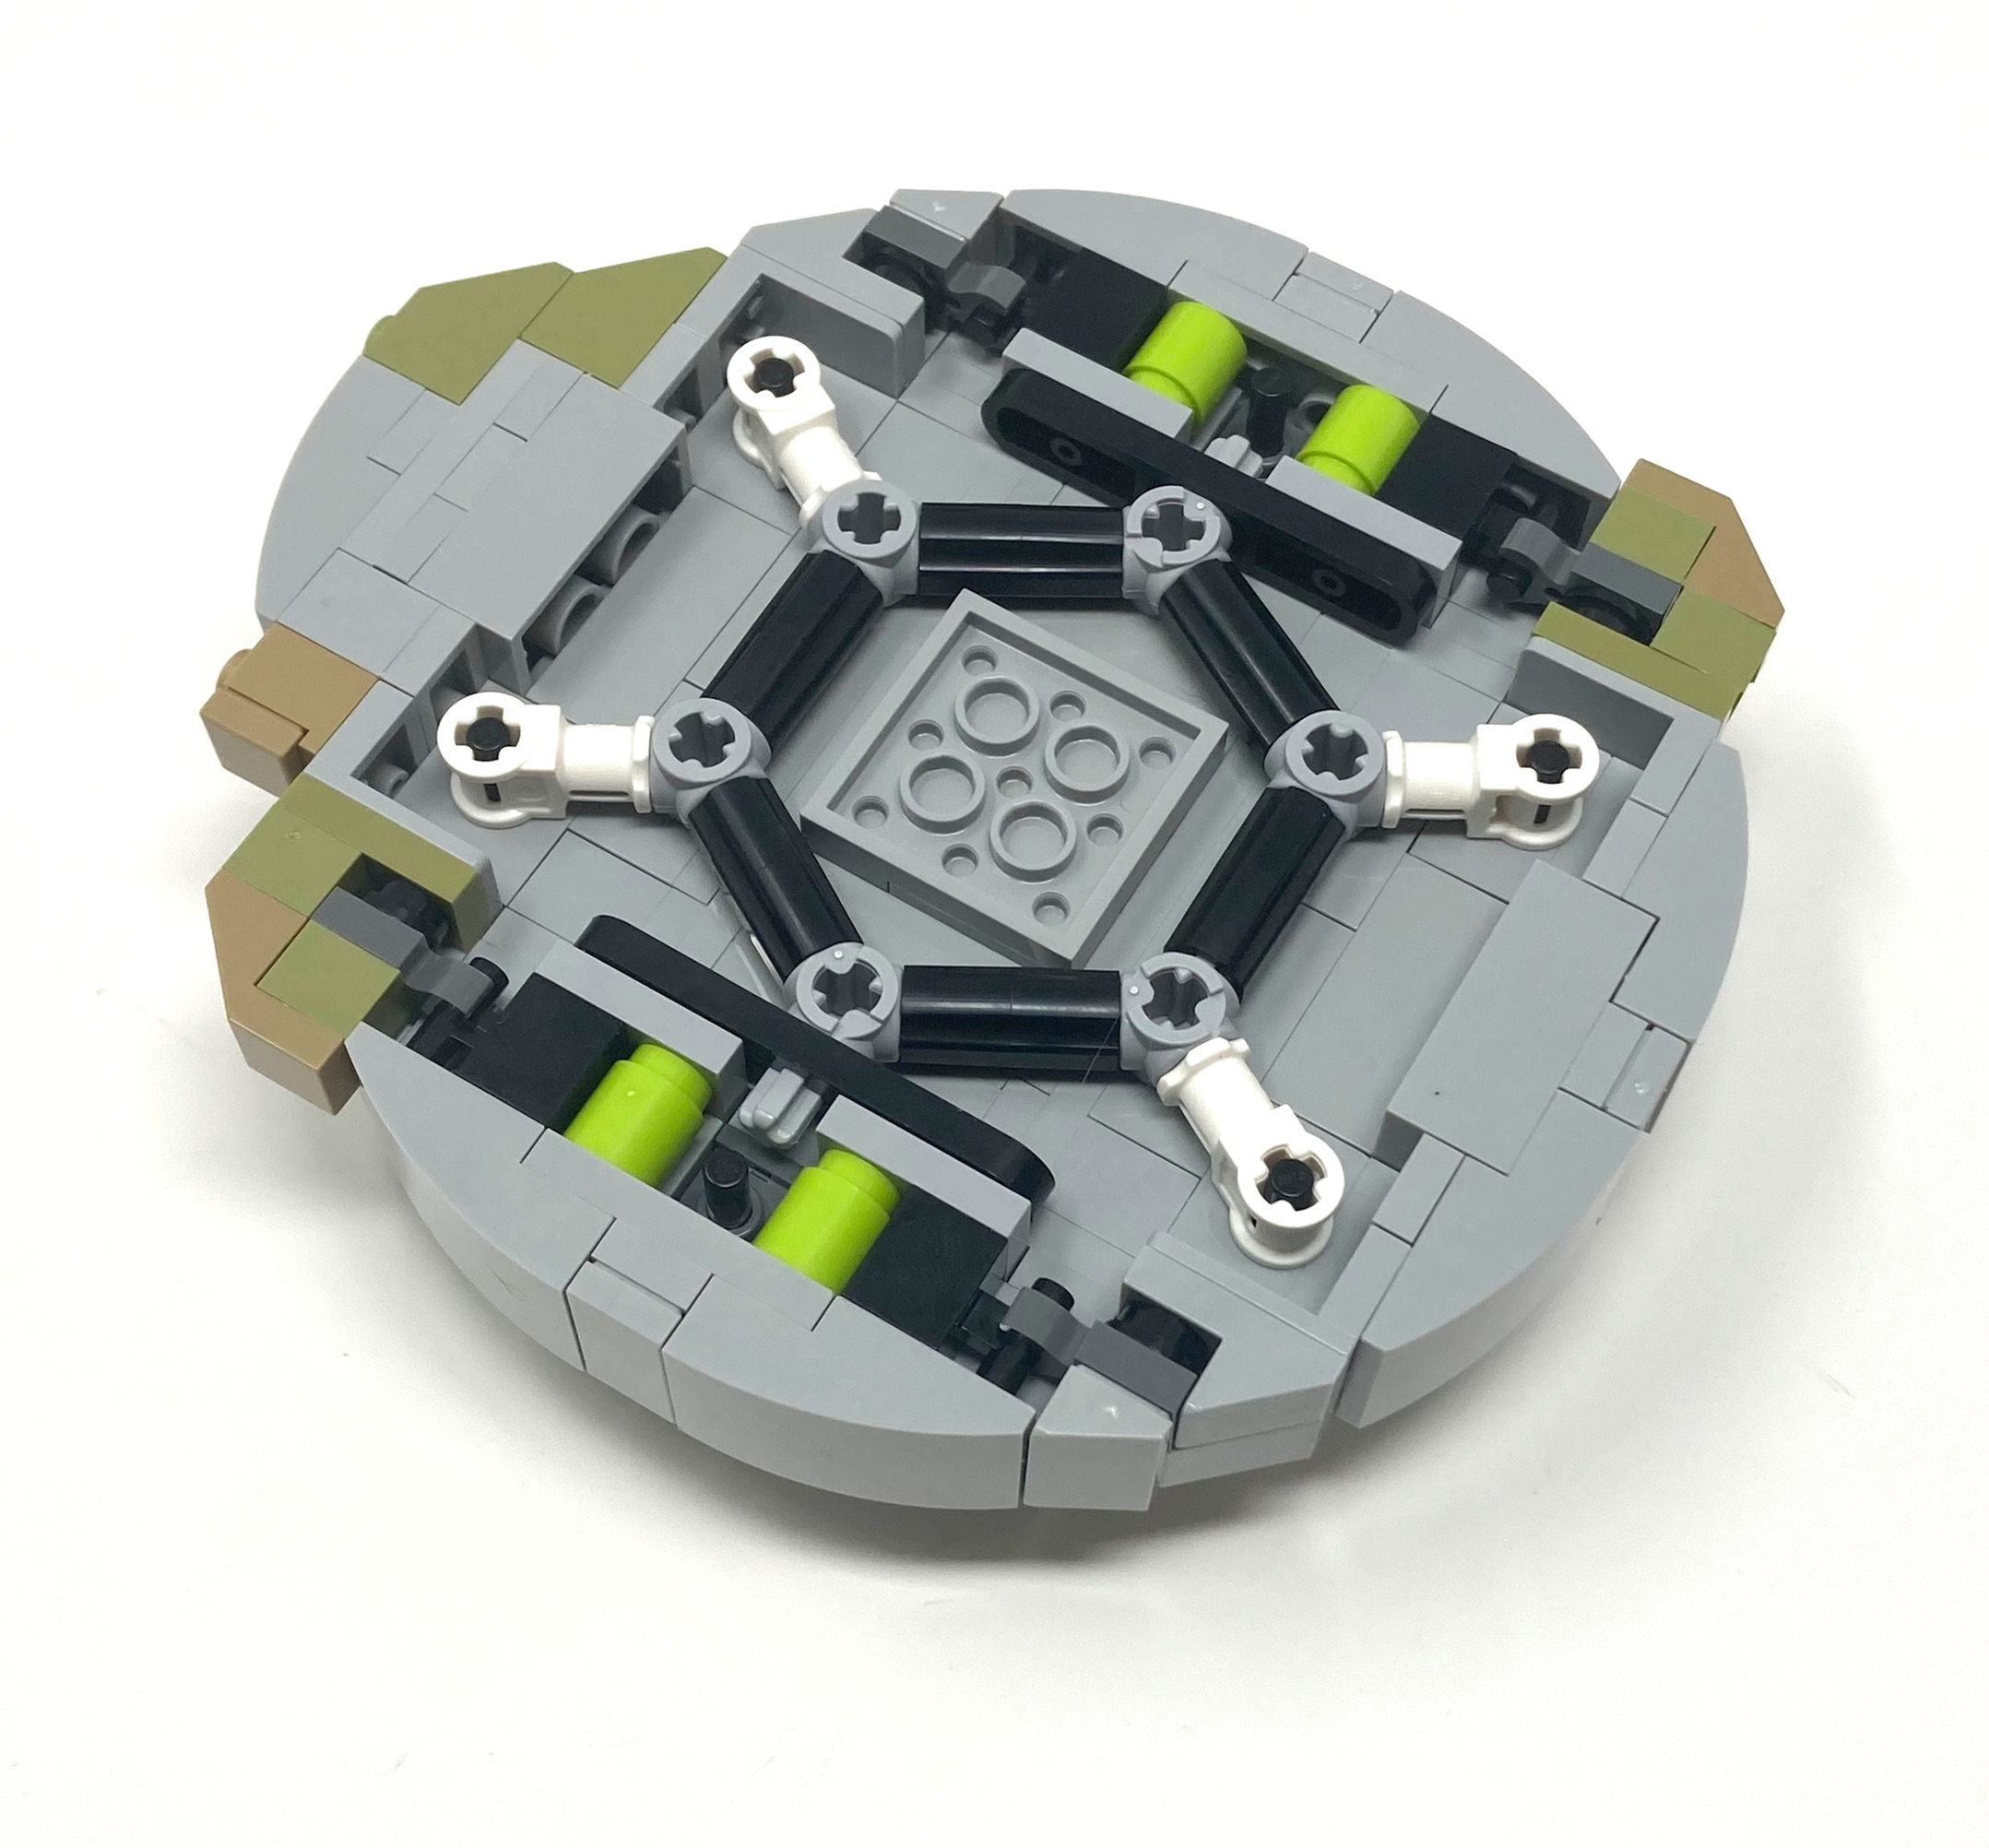
Technic holds the foundations together nicely.
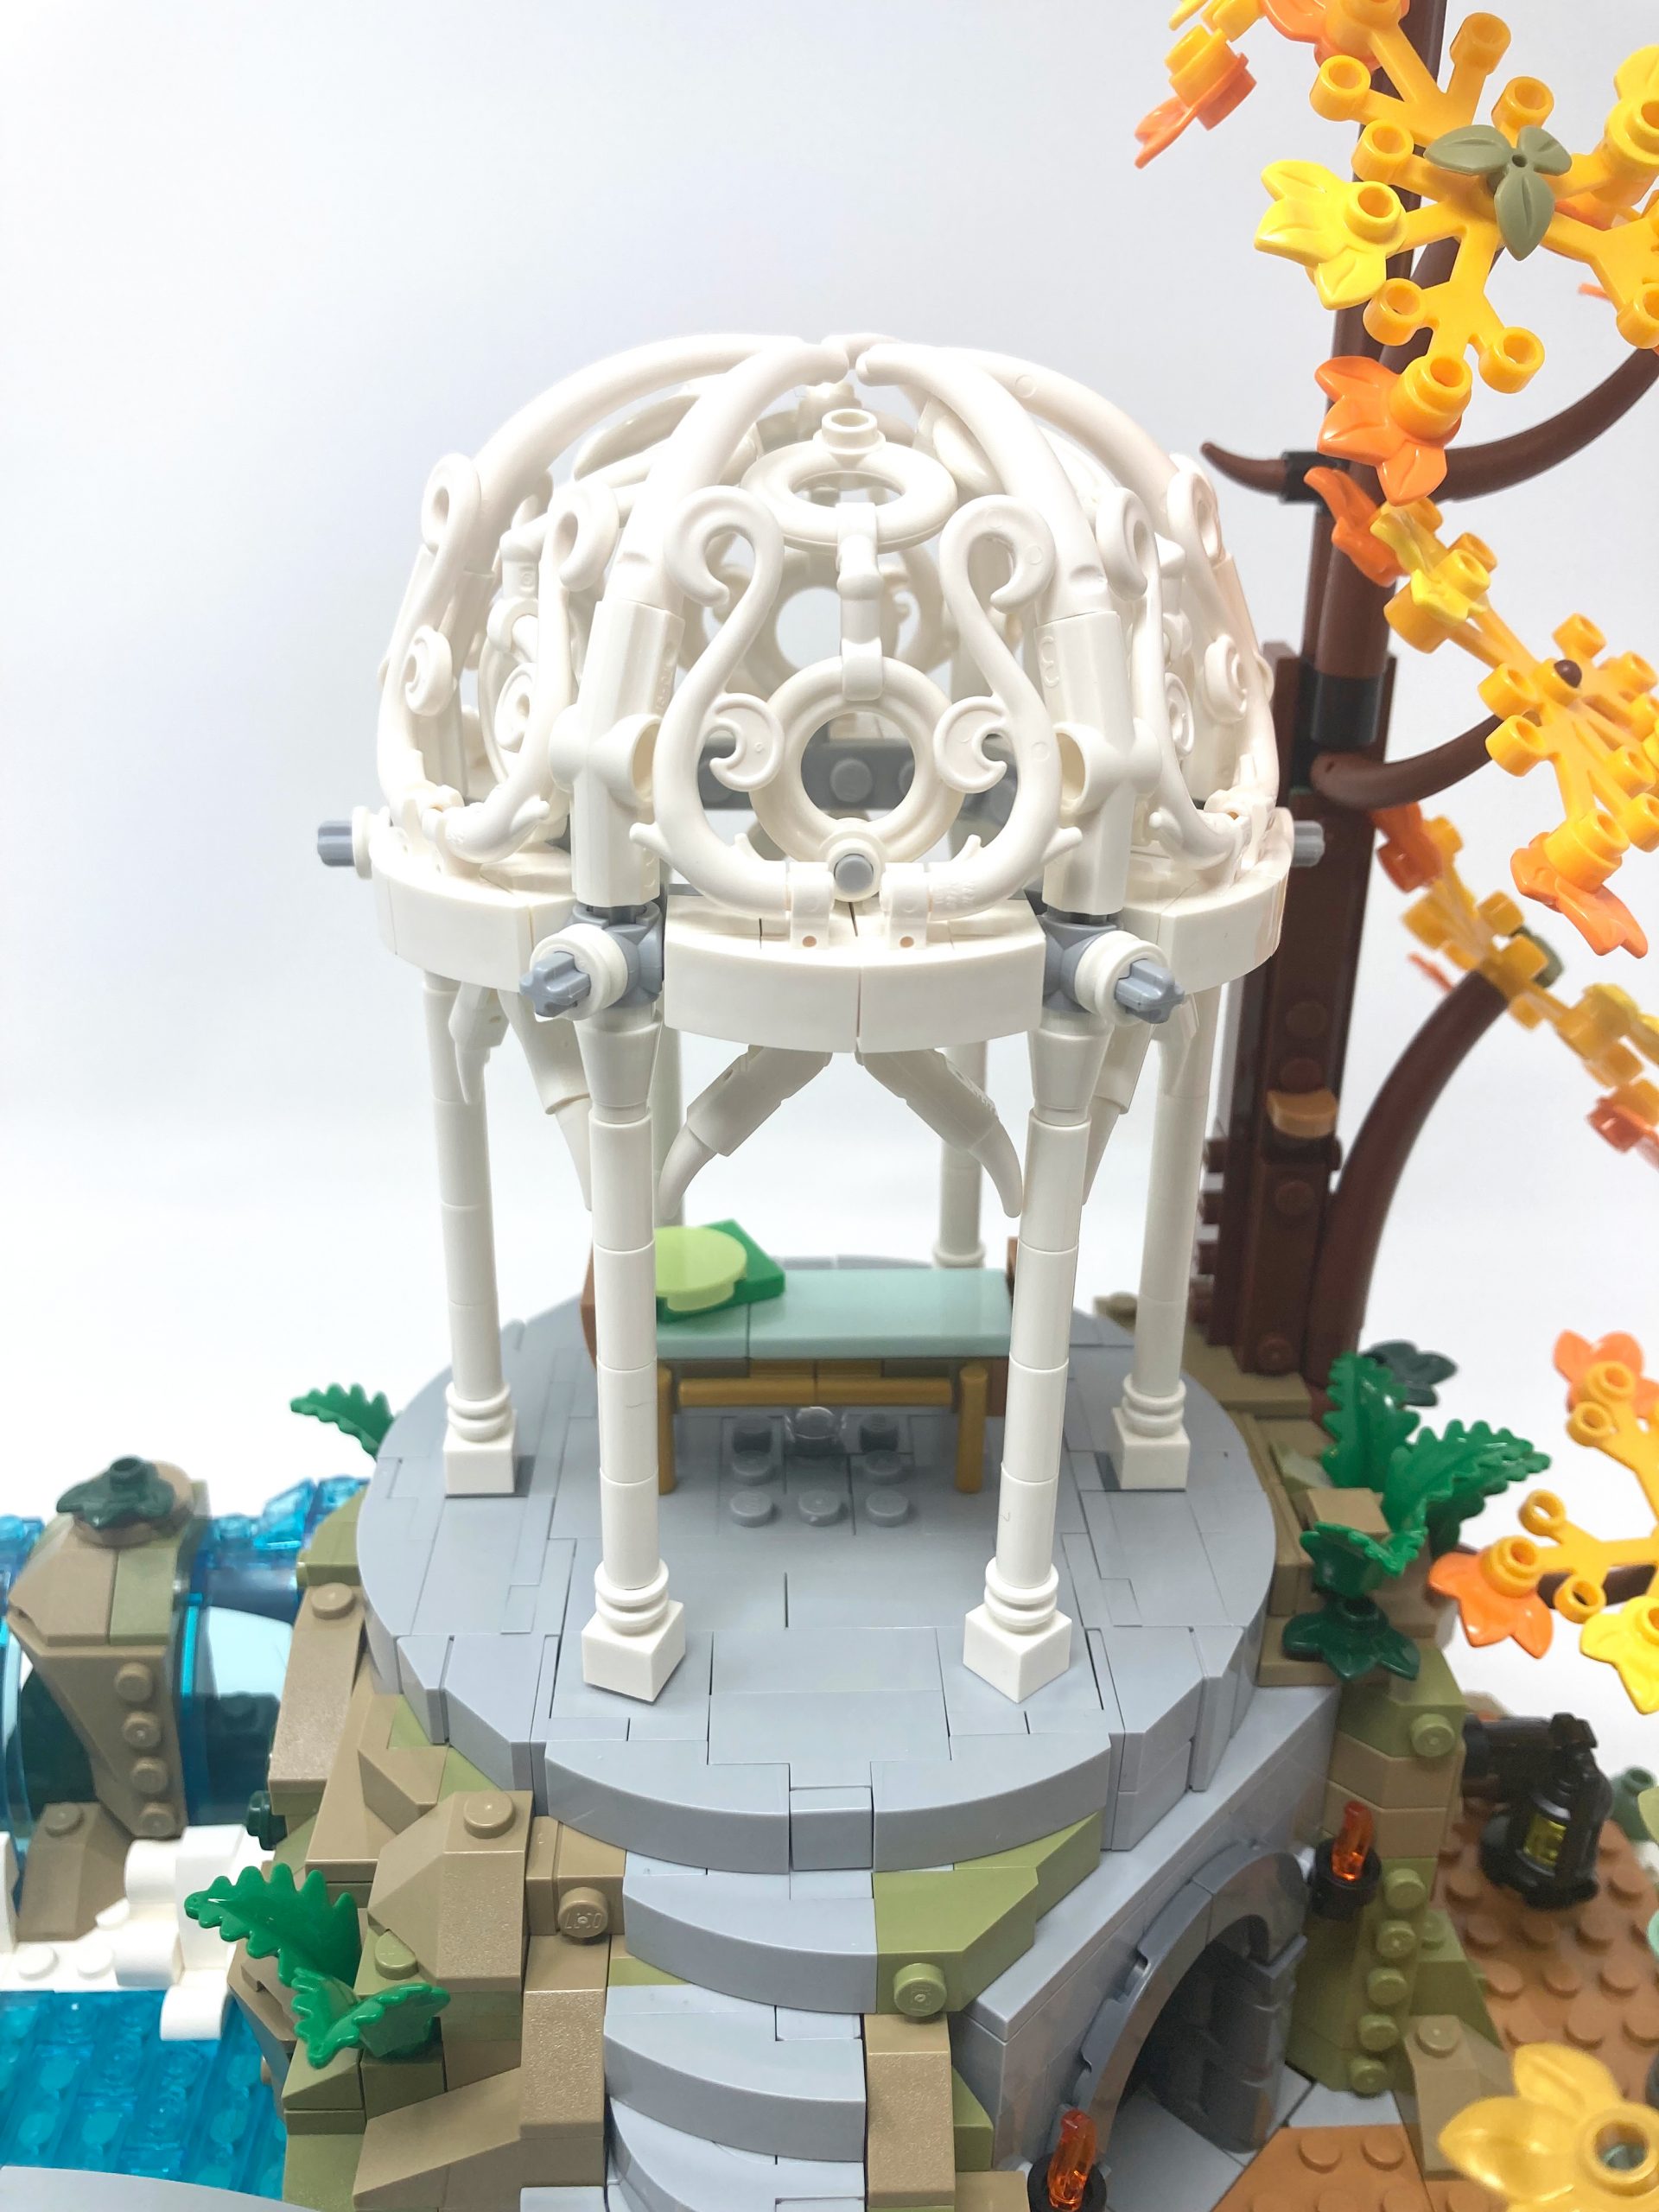
Bag 21
A gazebo has both a dome and pillar, but the current bag focuses on constructing the dome’s base. The floral patterns and shapes are used to create a flowery dome. Technic pieces are used for structure and the base is built in a hexagonal shape, matching the technic foundation underneath.

Creative use of skeleton arms and life savers allow for the creation of a dome.
Bag 22
Due to the continuity this bag could have been combined with the previous one as it continues the work on the dome. The final pieces to hold the dome together are added, including large white horns for the main structural elements, combined with flourish pieces and lifesavers for a rounded appearance. The dome is adorned with wispy, vine-like details which can be fragile and easily broken if excessive force is used during assembly. The columns are built using candle pieces, resulting in an impressive final look. The columns are not attached directly to the base with bricks, but instead fit into an opening created with technic, adding ribbing at the base of the column.
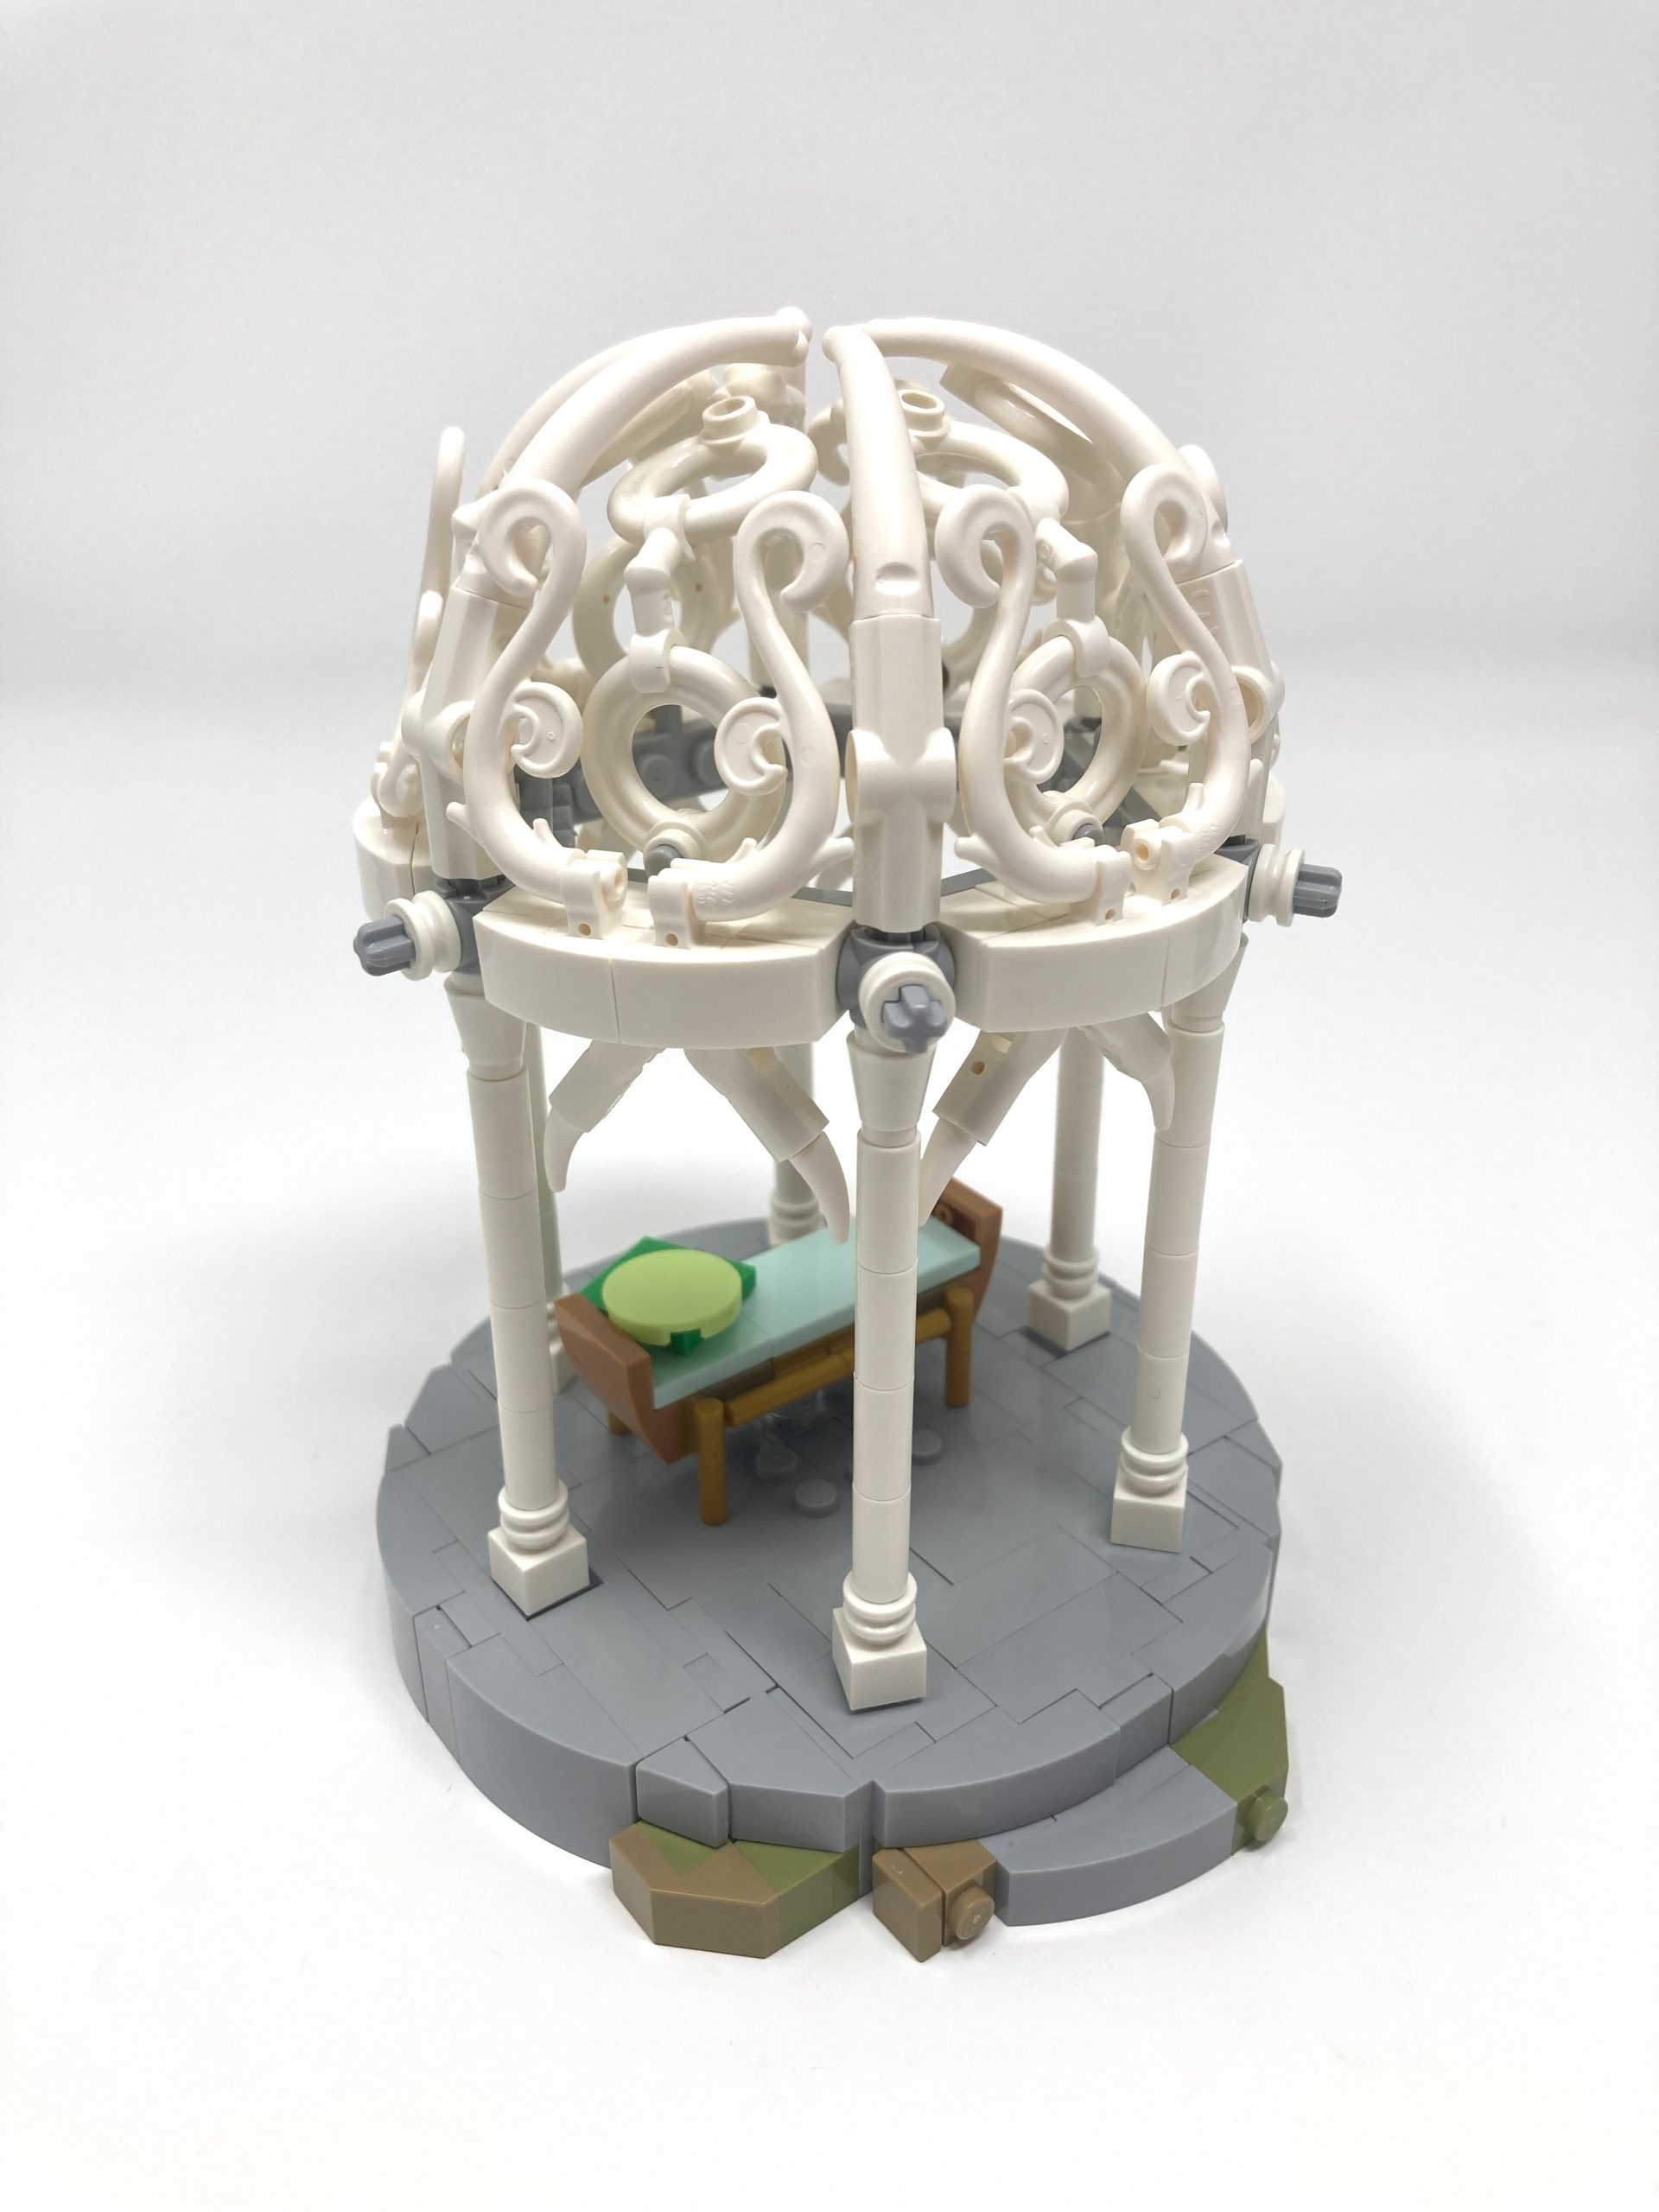
Albeit fragile the gazebo comes together very nicely.
Section 2 Wrap Up
The use of blues, greys, browns, and greens in this section perfectly captures the natural beauty of the misty mountains. An array of intricate details, such as the beautifully crafted gazebo, adds to the overall realism and captures the essence of the environment. The gazebo serves as the centerpiece of this section, contrasting beautifully with the surrounding colors.
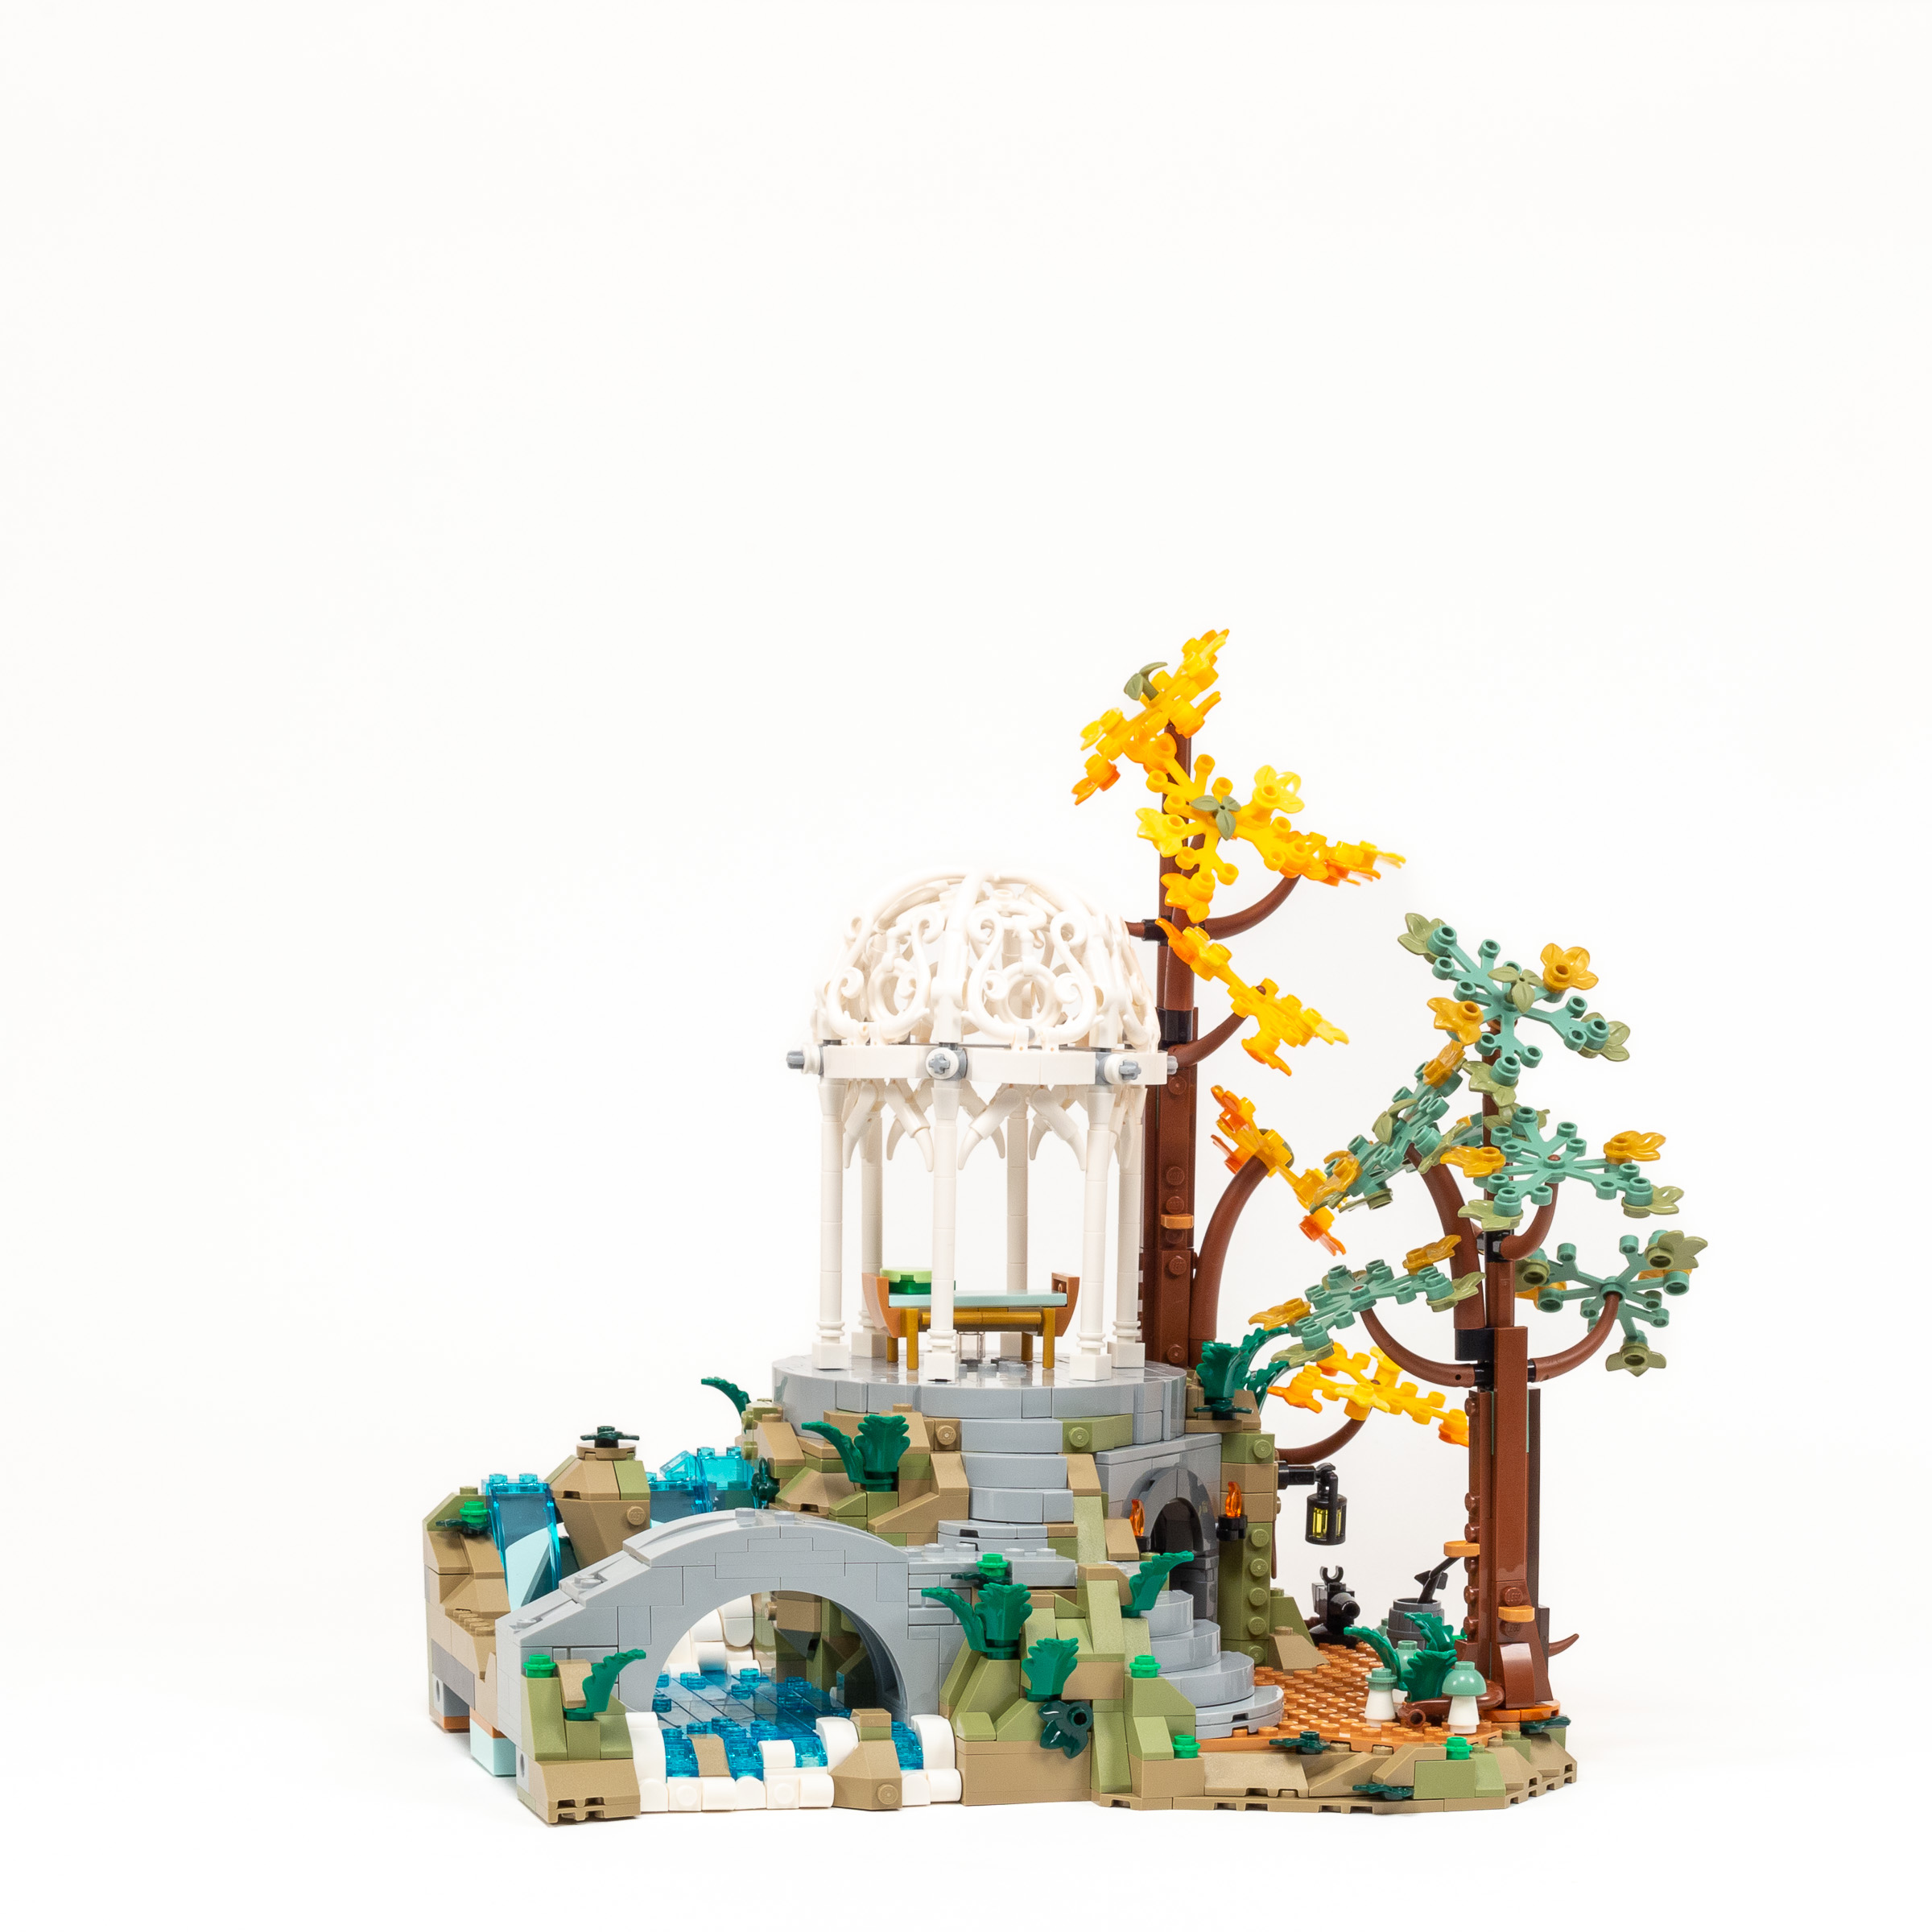
The colorful trees and the flowing water capture the beauty of nature in this section.
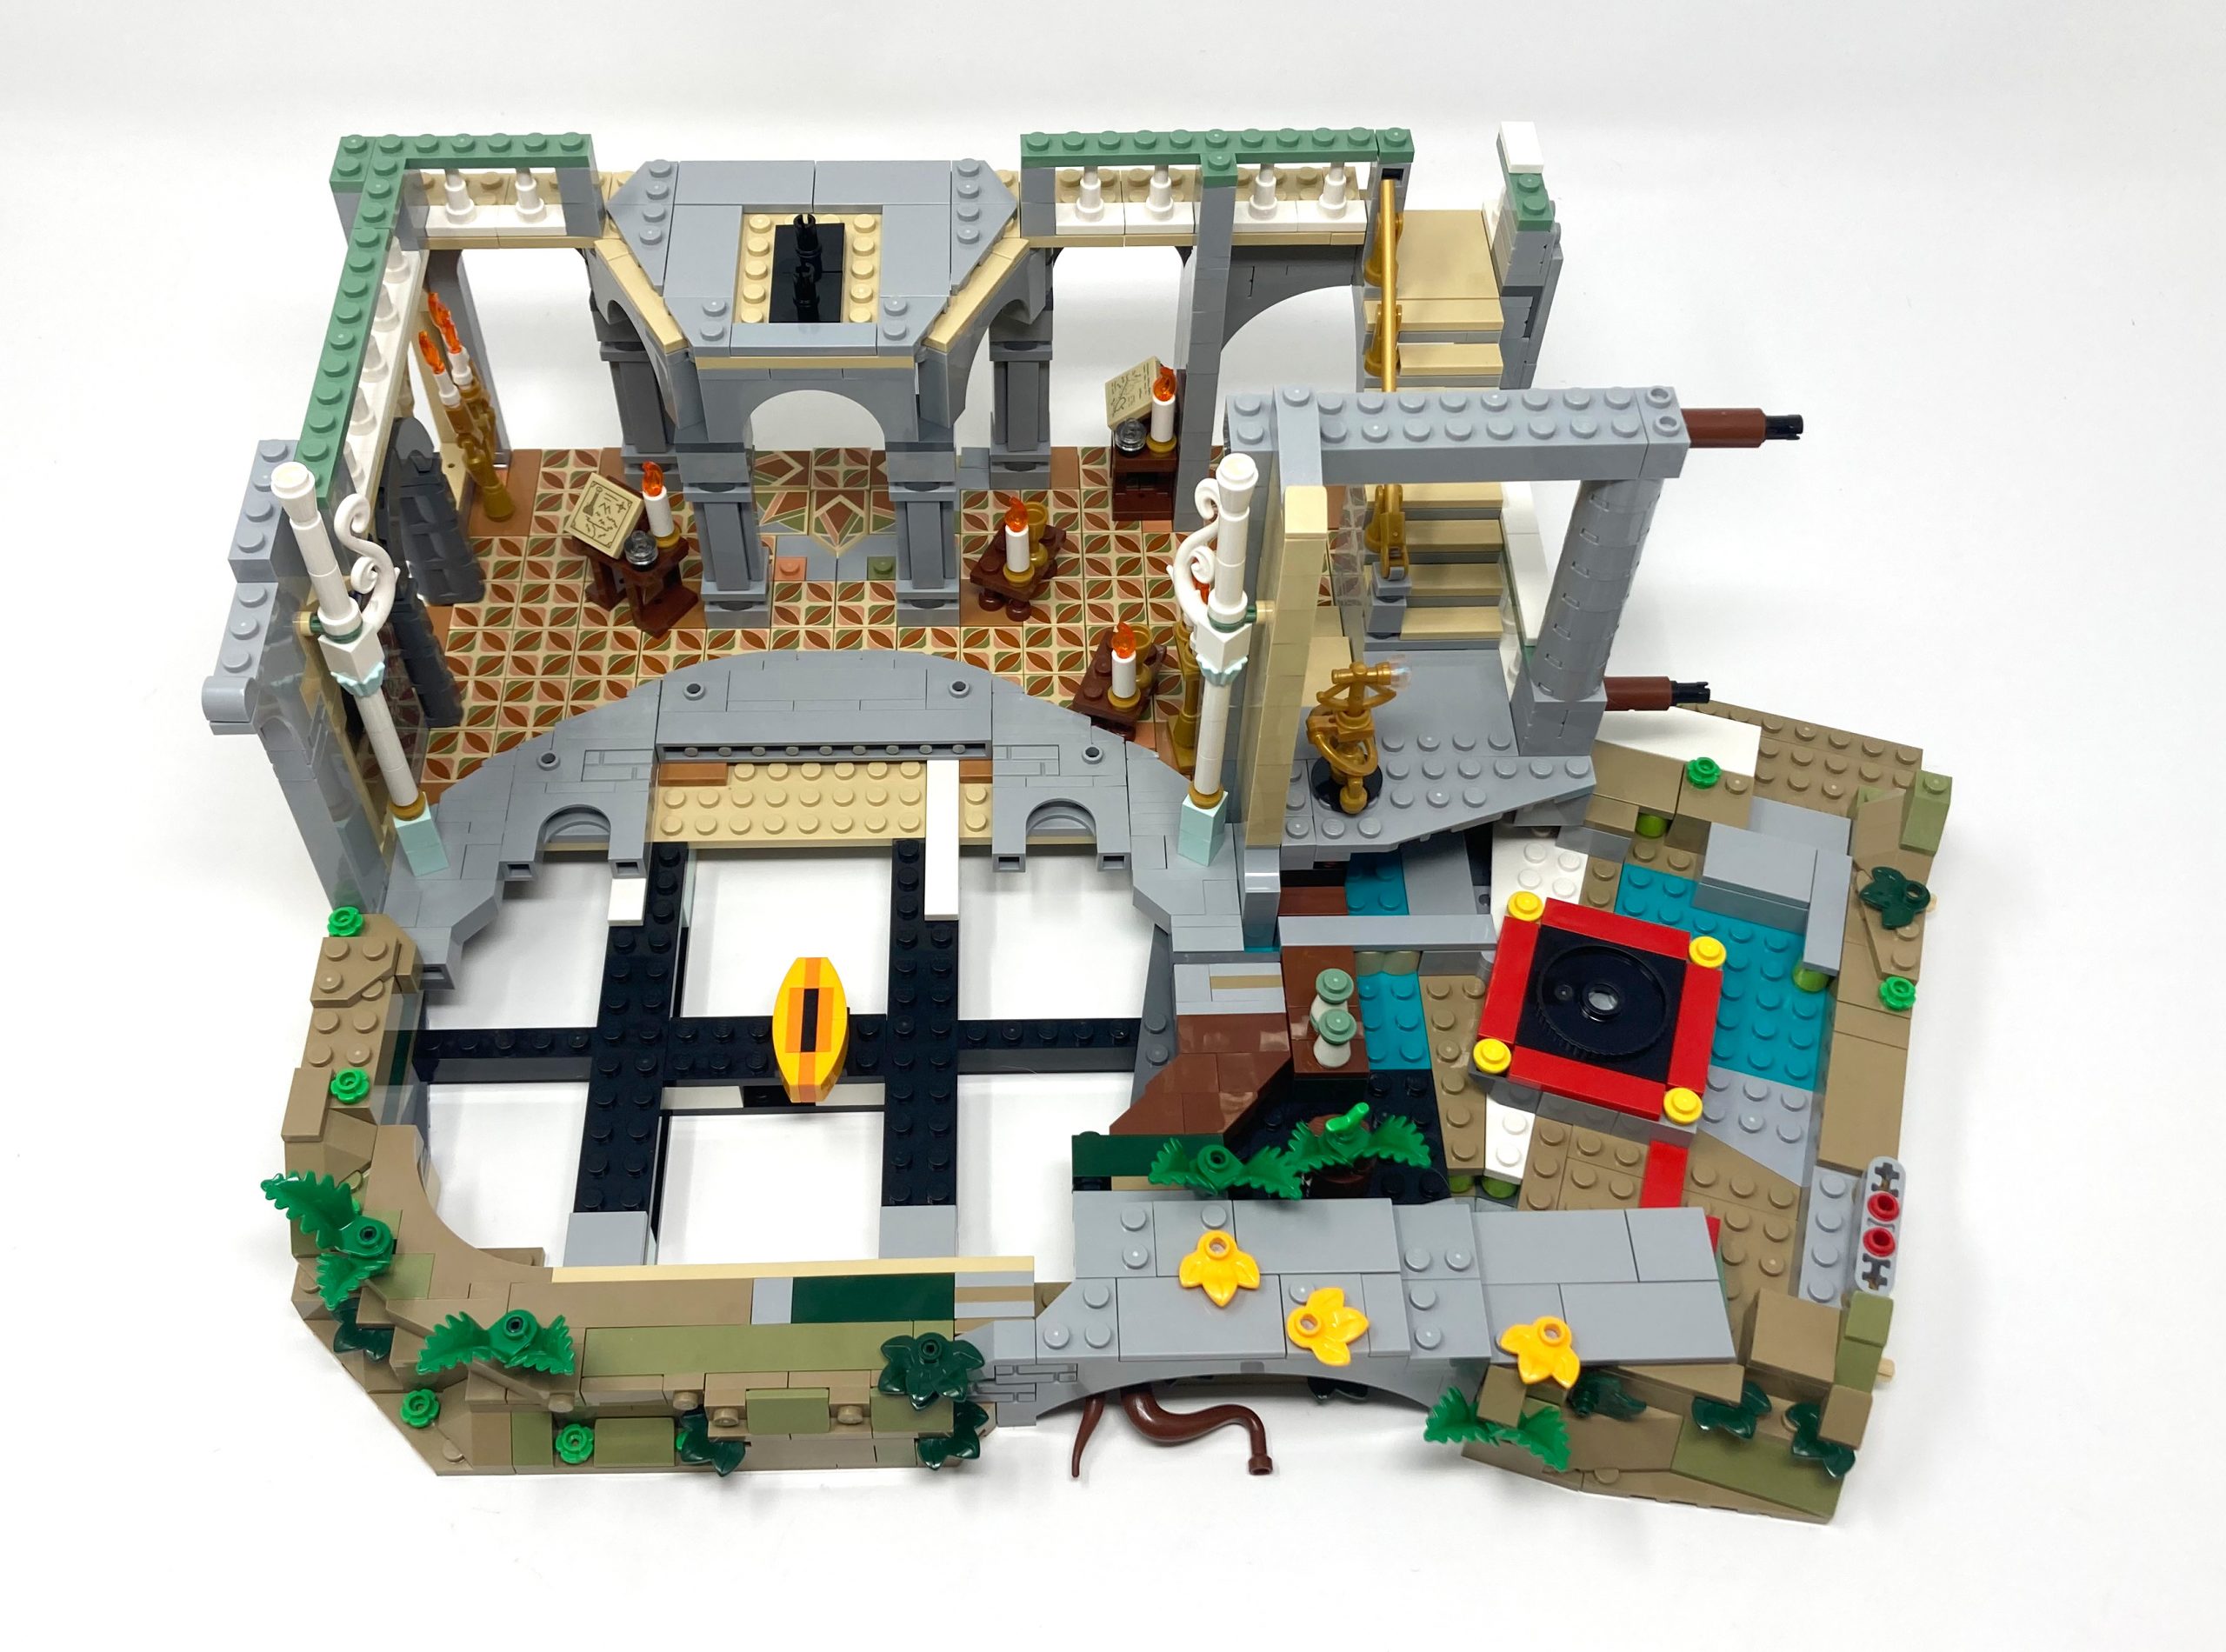
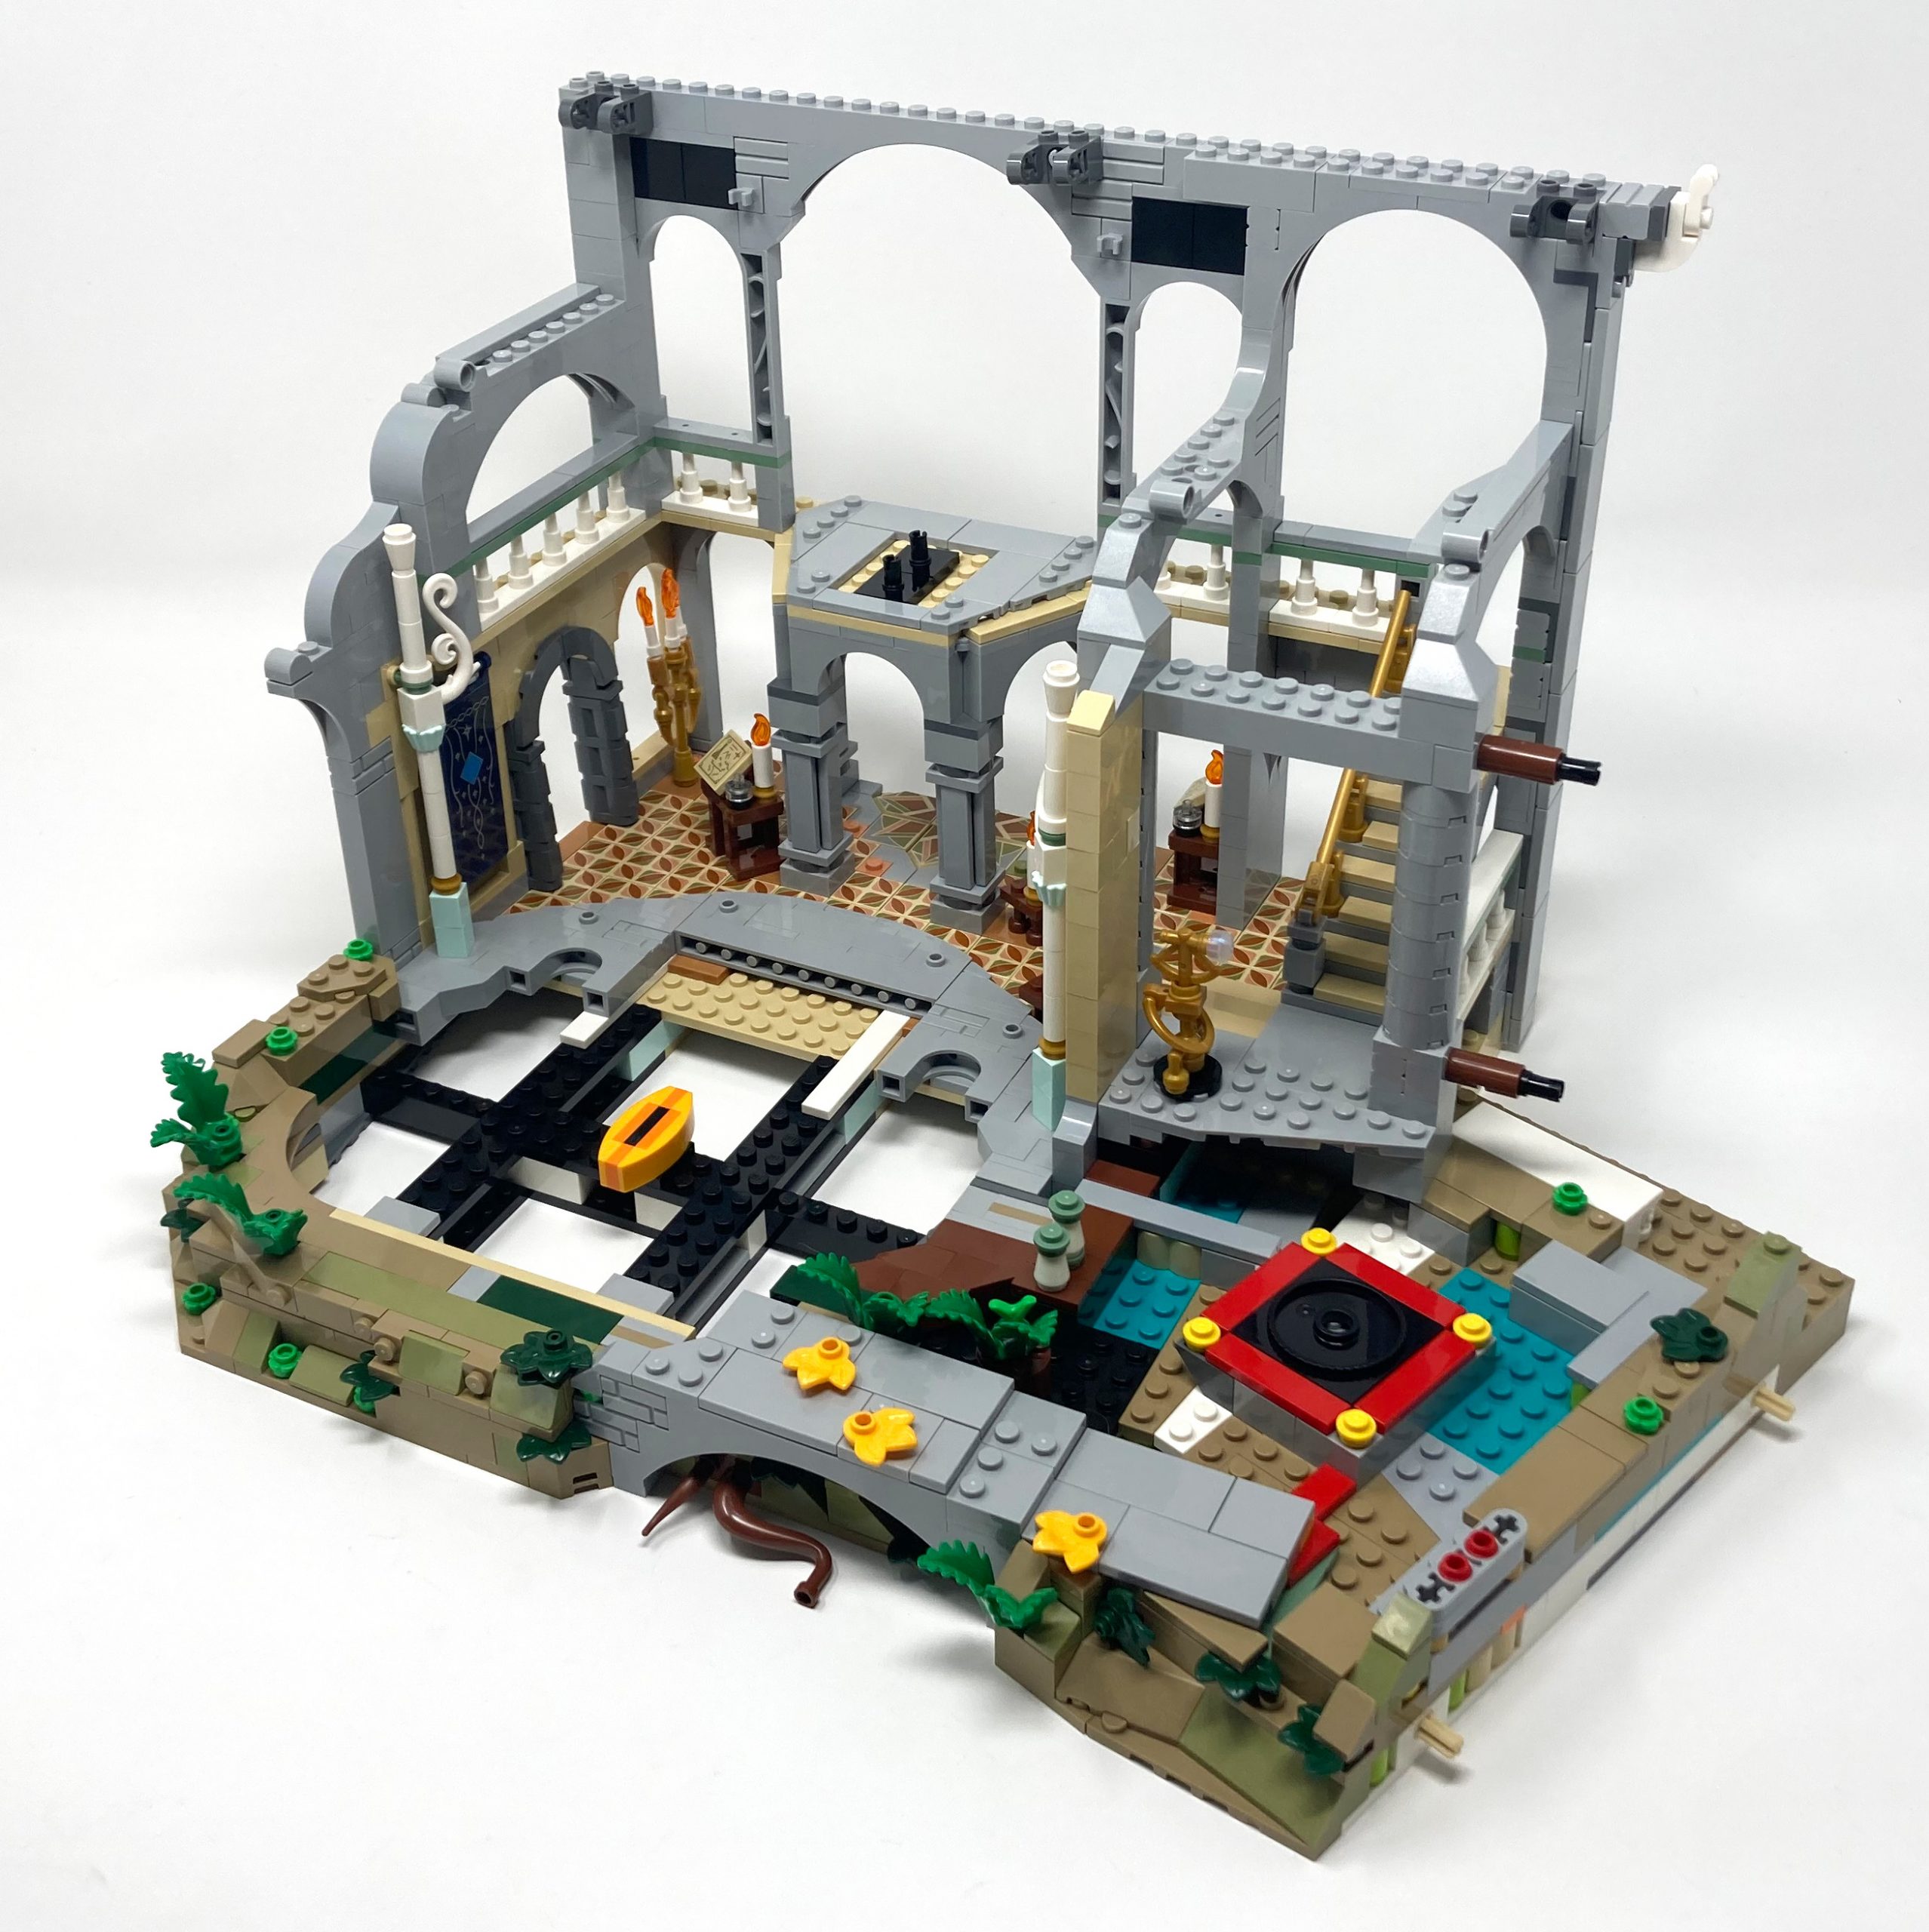
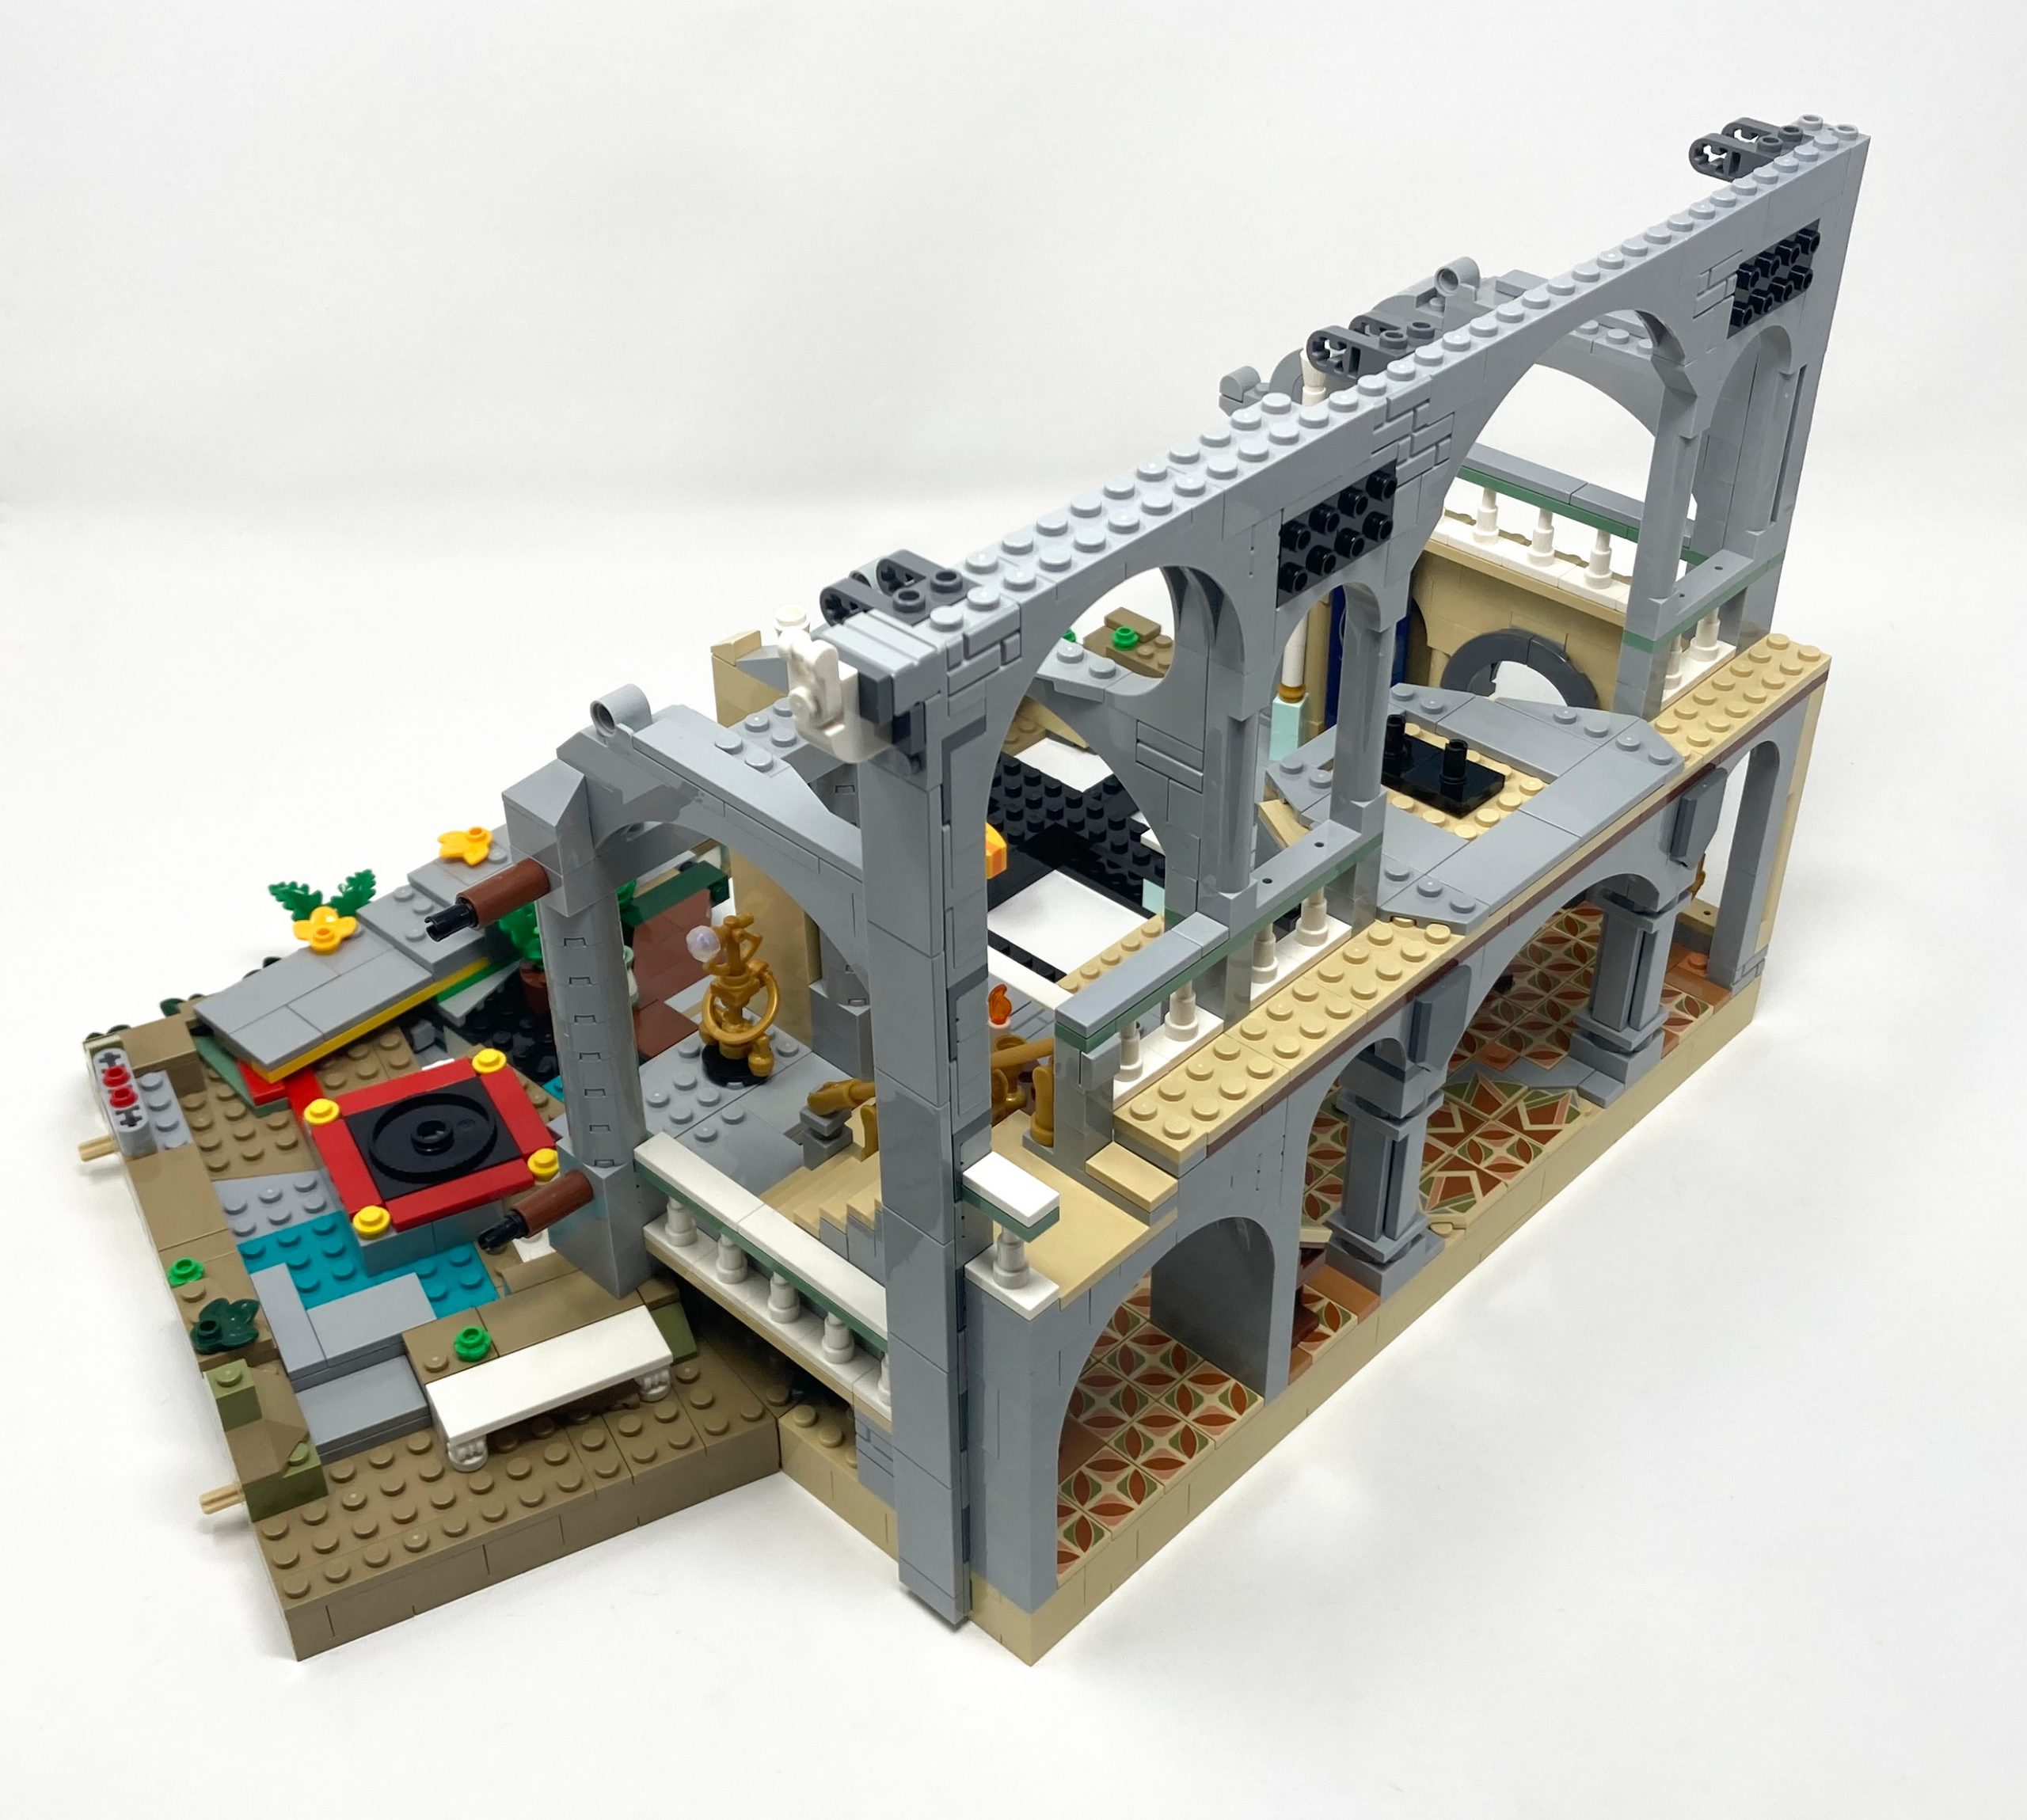
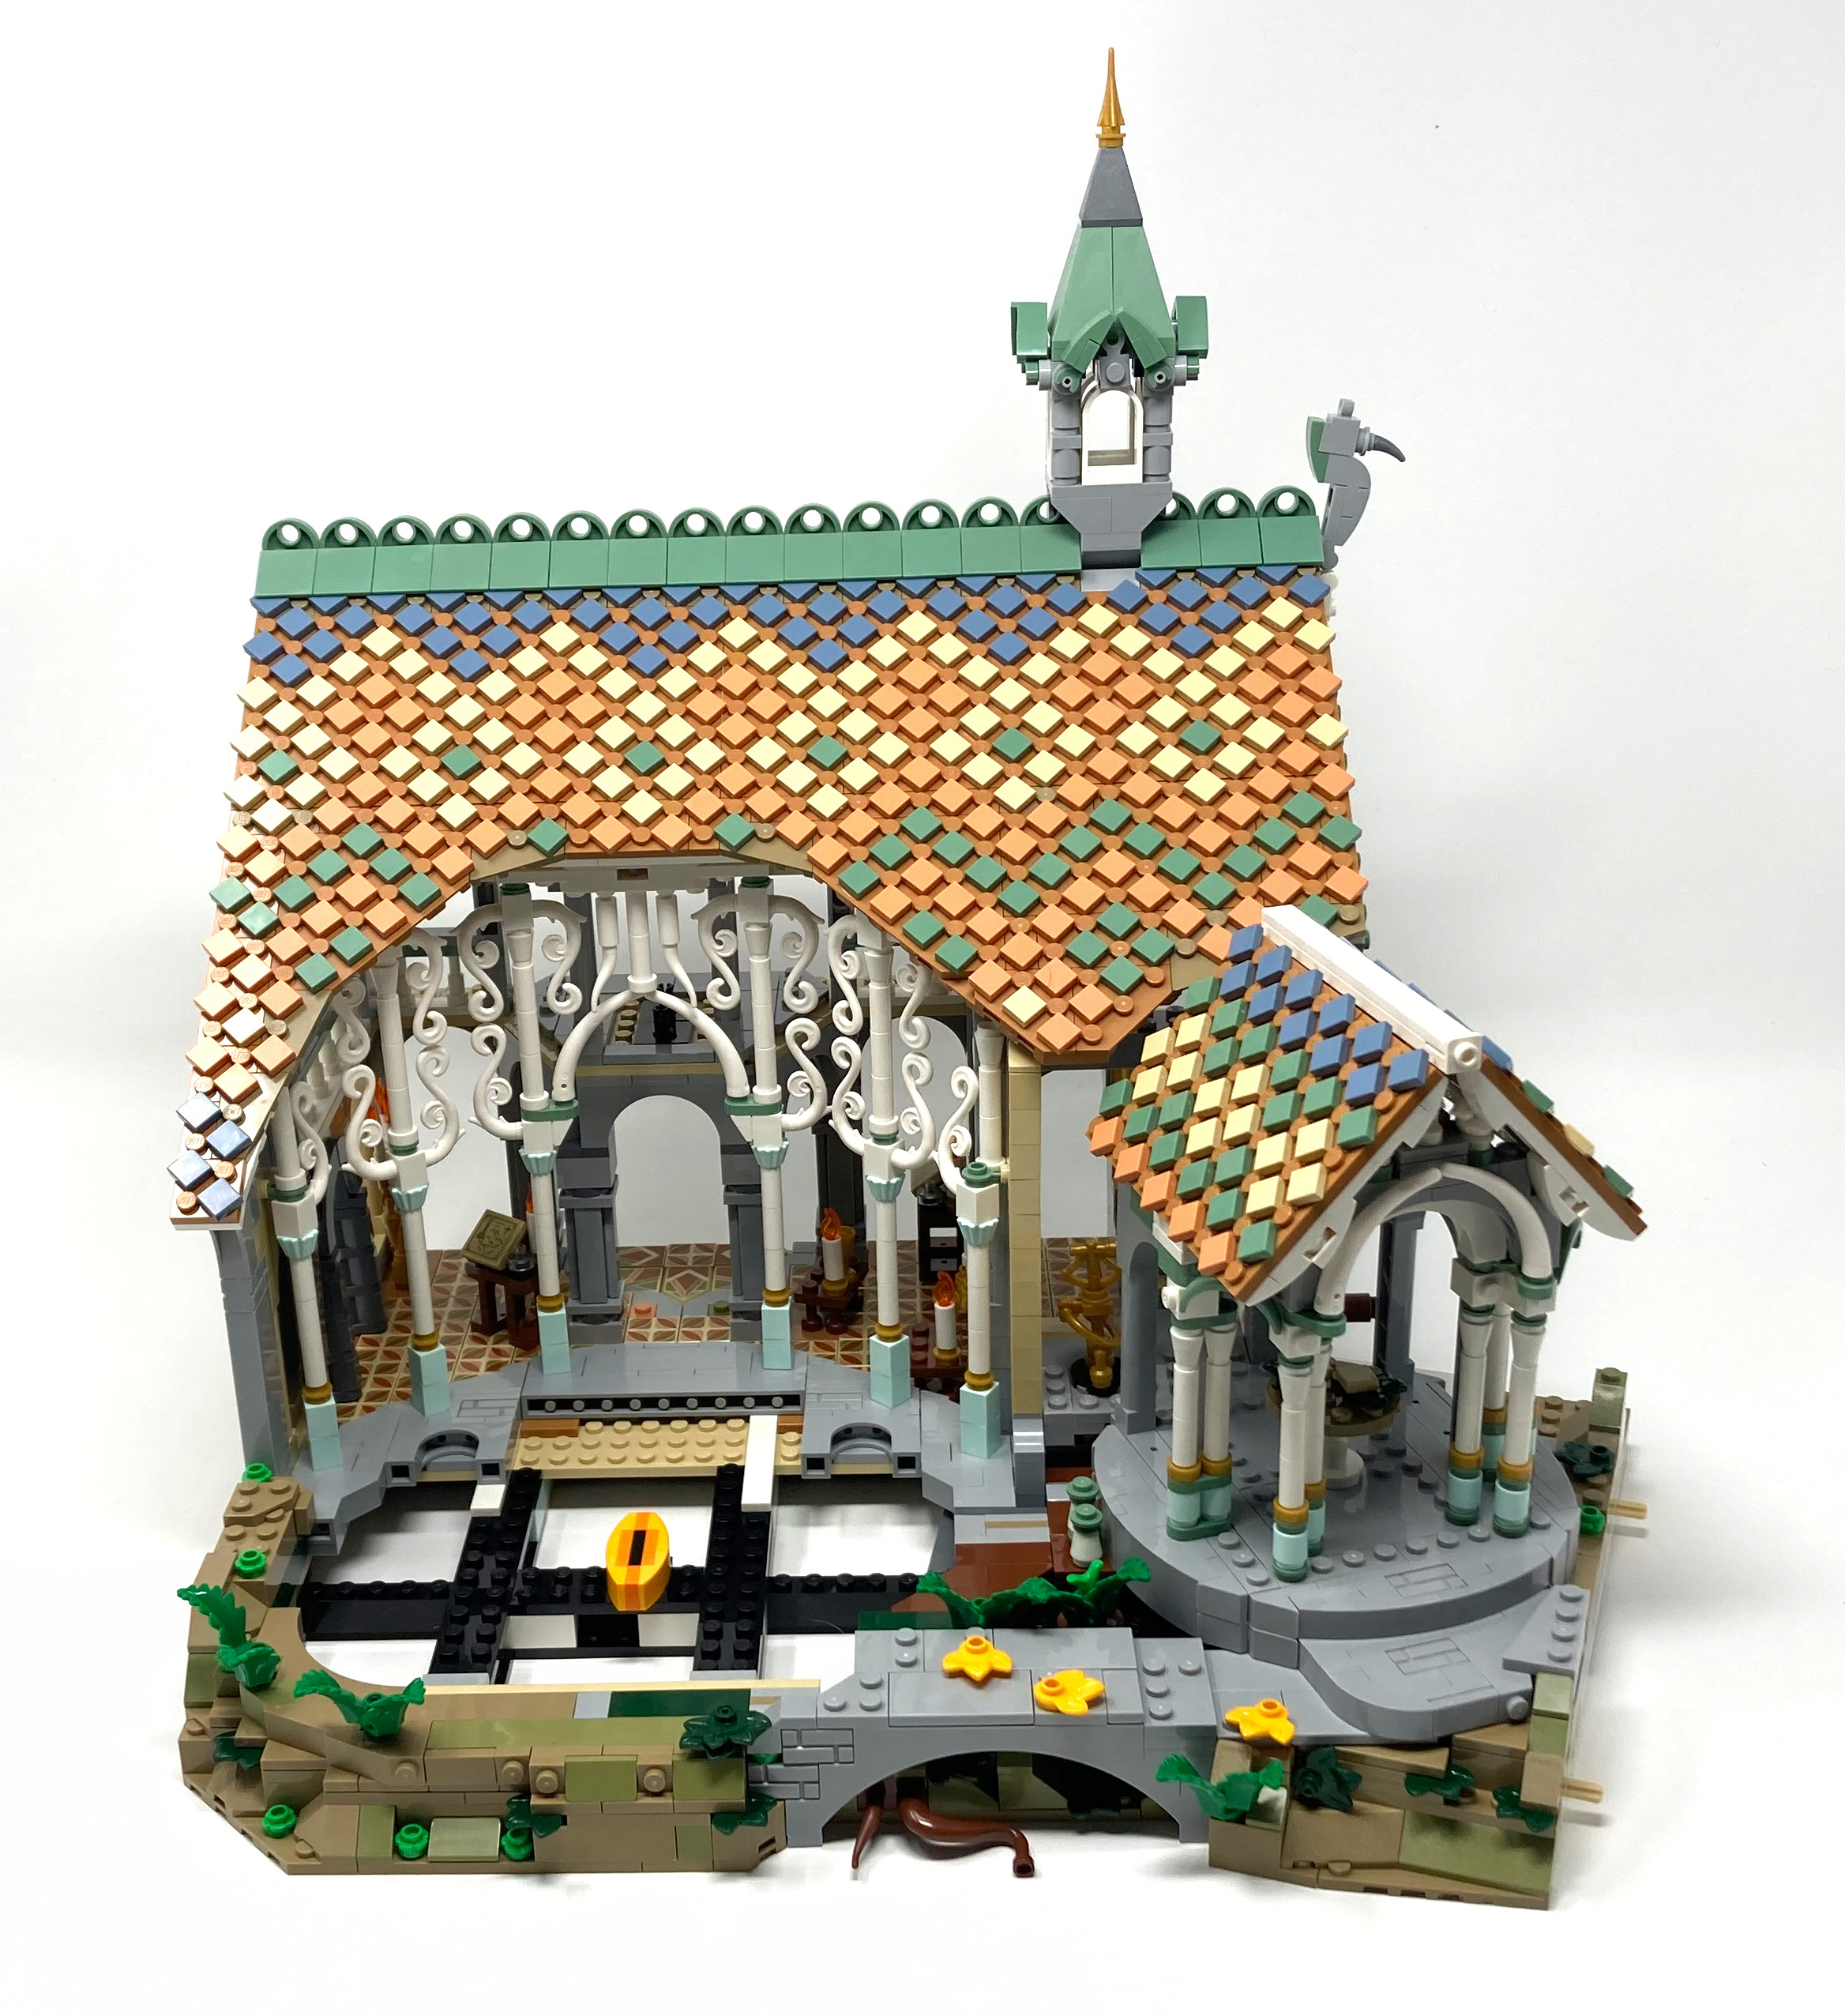
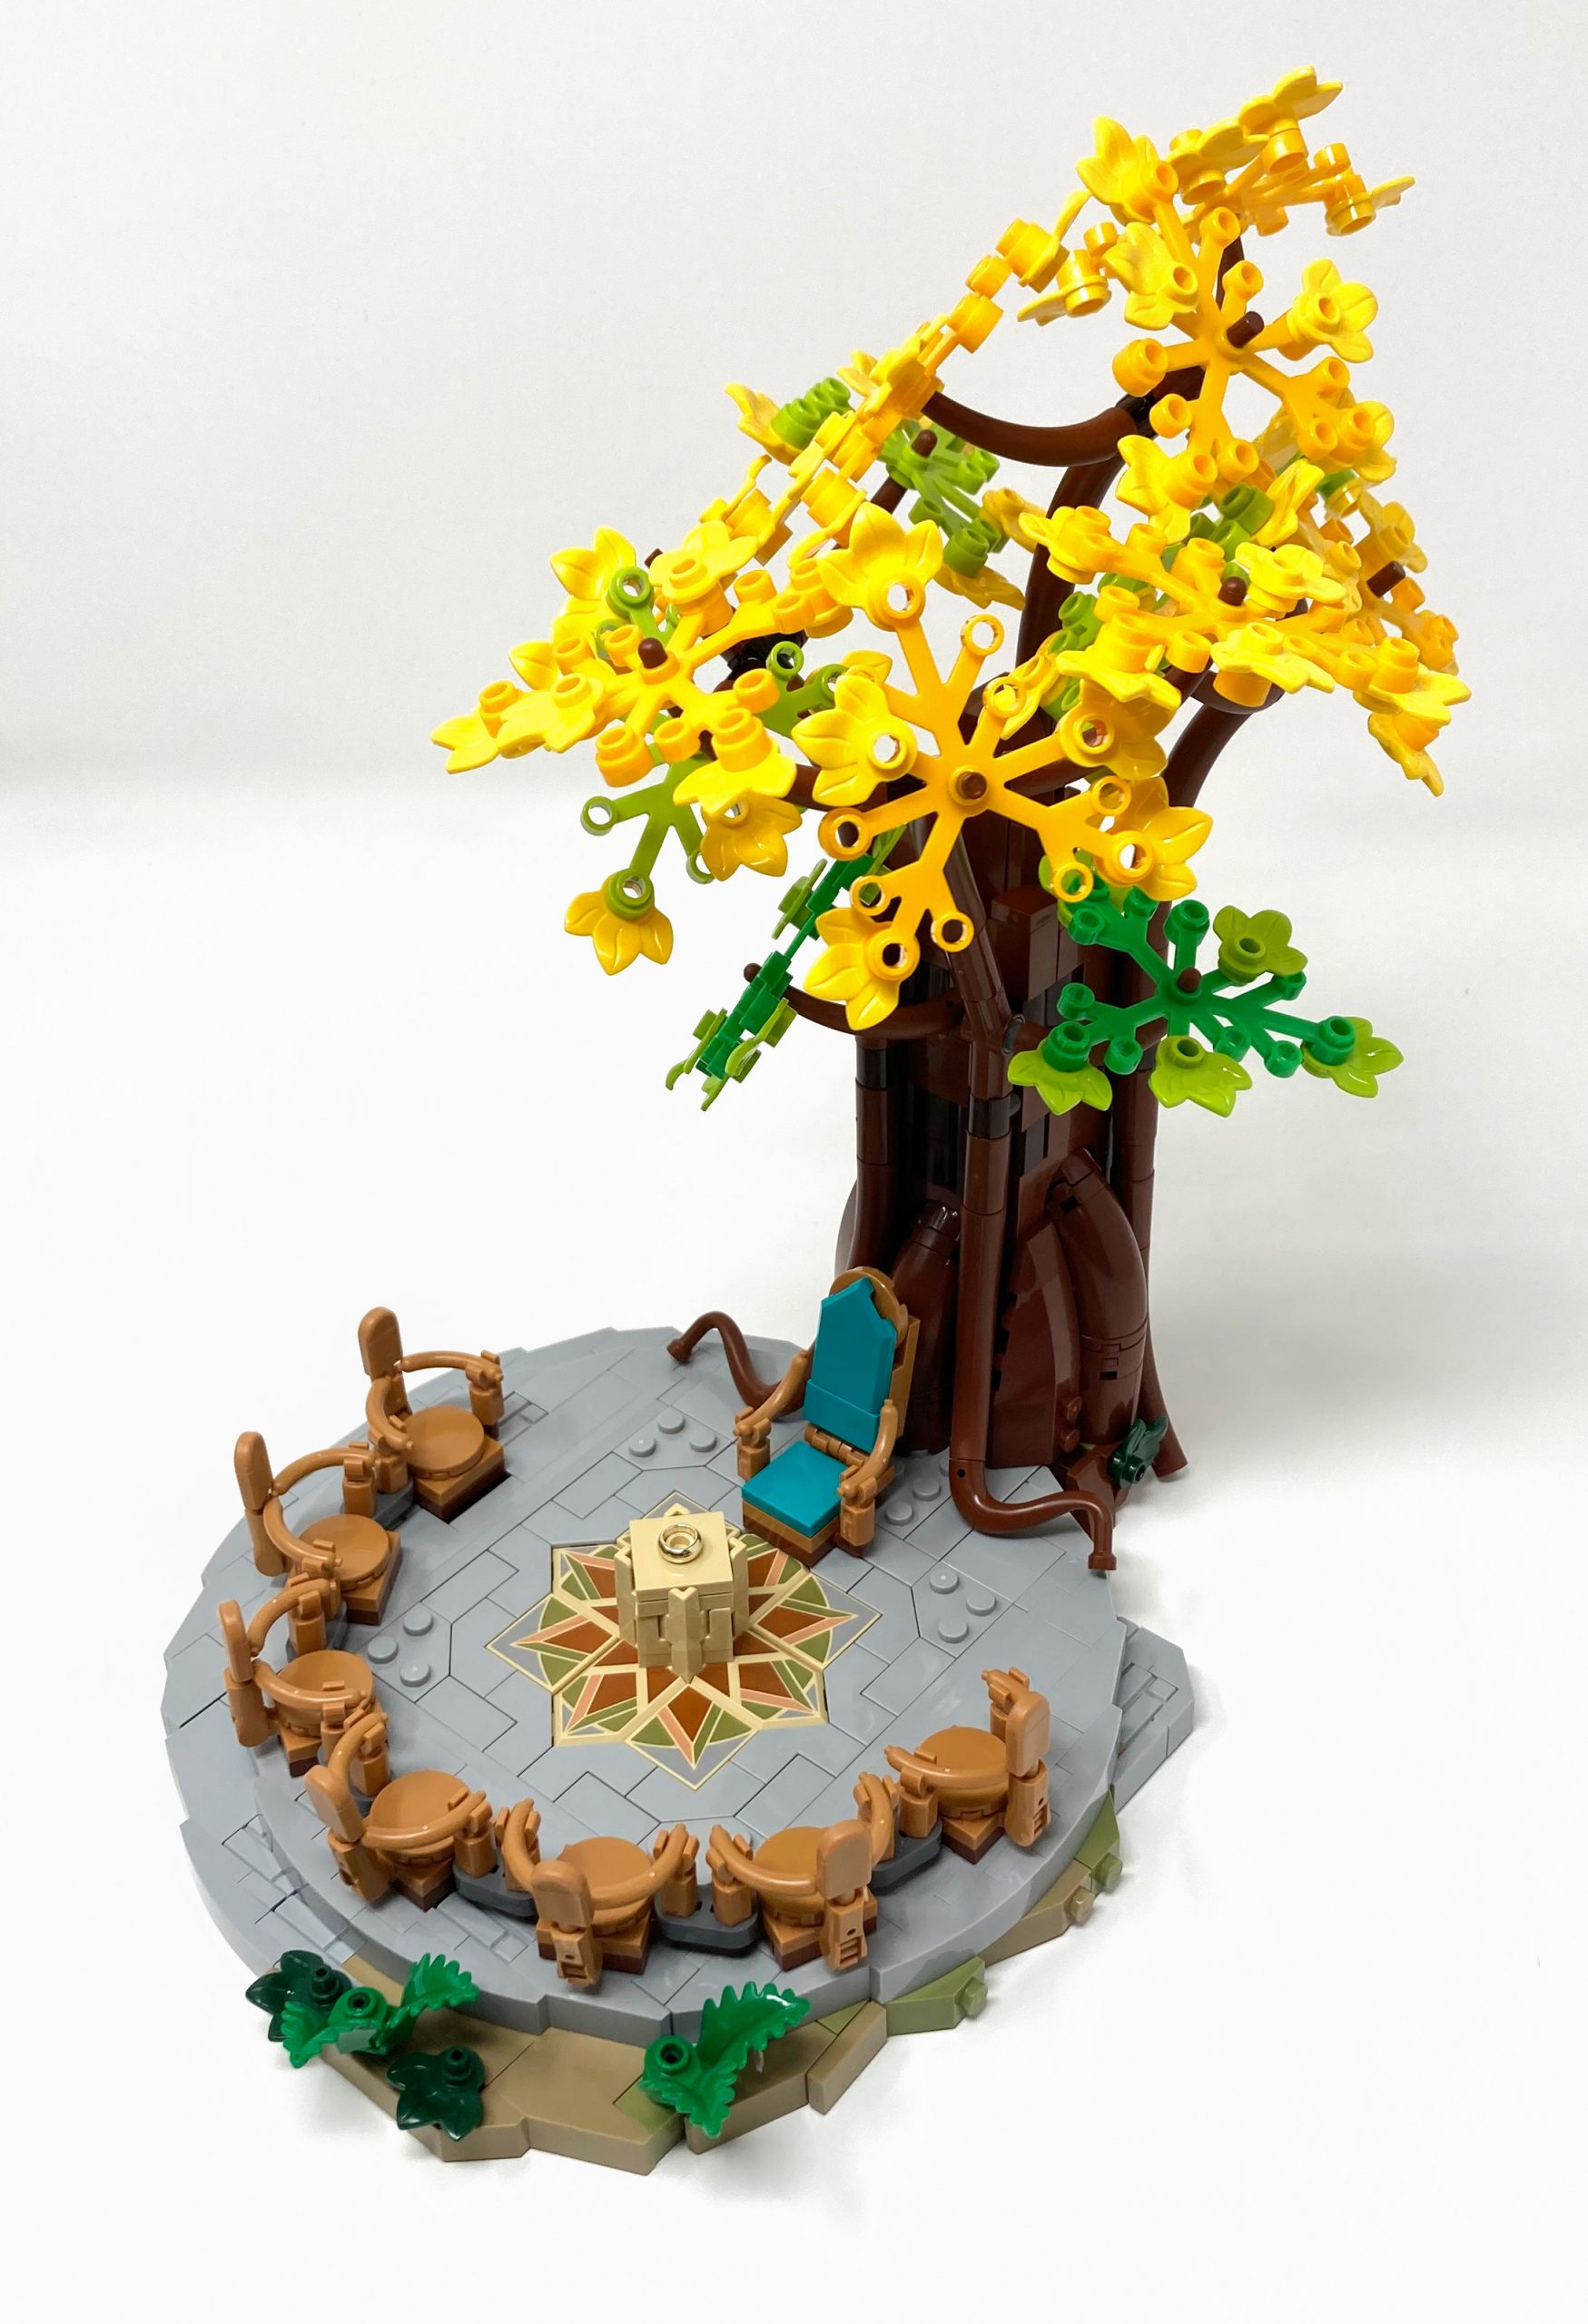
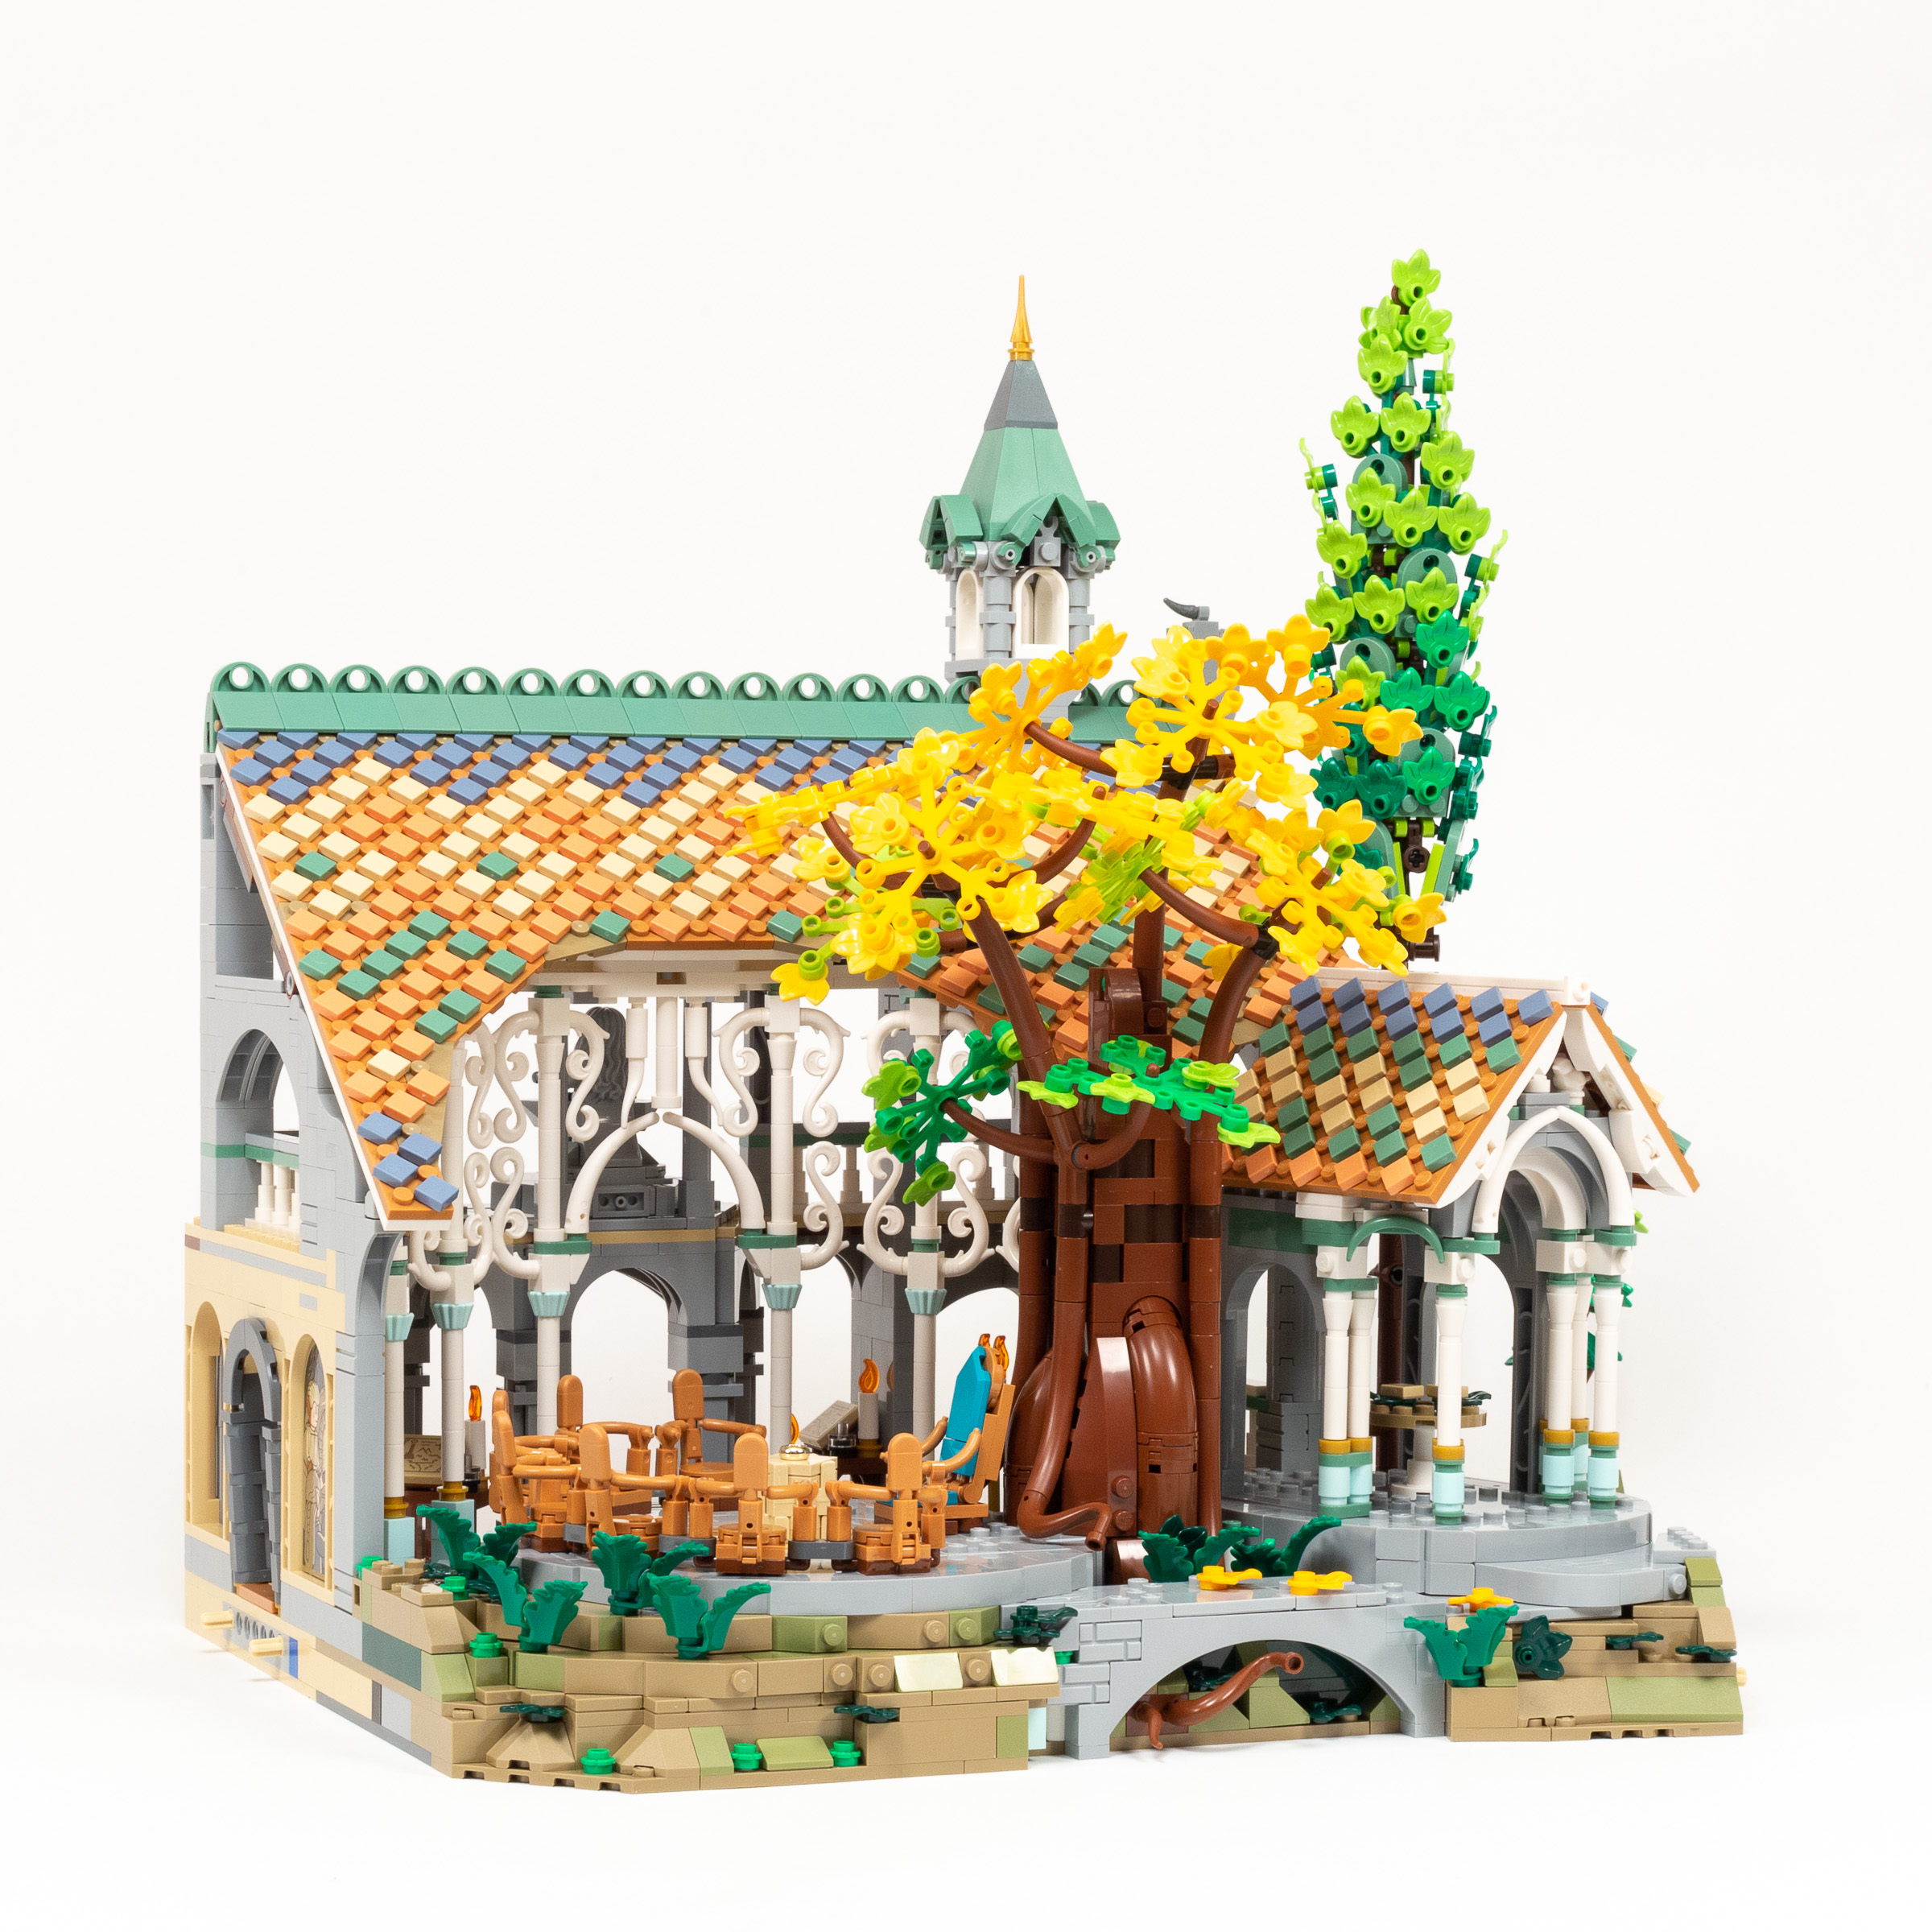
Section 3 – The Council Ring
The largest of the three builds seamlessly integrates into the foothills of the Misty Mountains, capturing the essence of Rivendell’s hall. This area blends effortlessly with its surroundings and contains a wealth of Middle Earth’s history, such as Elrond’s throne, artifacts of Numenor, murals and the shards of Narsil.

Bags for section 3.
Bag 23
We start by focusing on constructing the rigid base for the Council Ring. Despite being covered by subsequent layers, the designers utilize a range of colors to aid in assembly and to provide a variety of colors for custom builds when disassembling the set.
The use of different colors for hidden pieces allows you to build your parts collection nicely.
Bags 24-25
As we continue constructing the foundation, we double its size, making it the largest of the three sections. The foundation is engineered to be sturdy, with interlocking lattice shapes hidden beneath the plates. This ensures that the build will not fall apart when picked up. The design incorporates earth-toned slopes and wedges for the natural parts, while tan is used for the hall itself, maintaining a consistent pattern throughout.
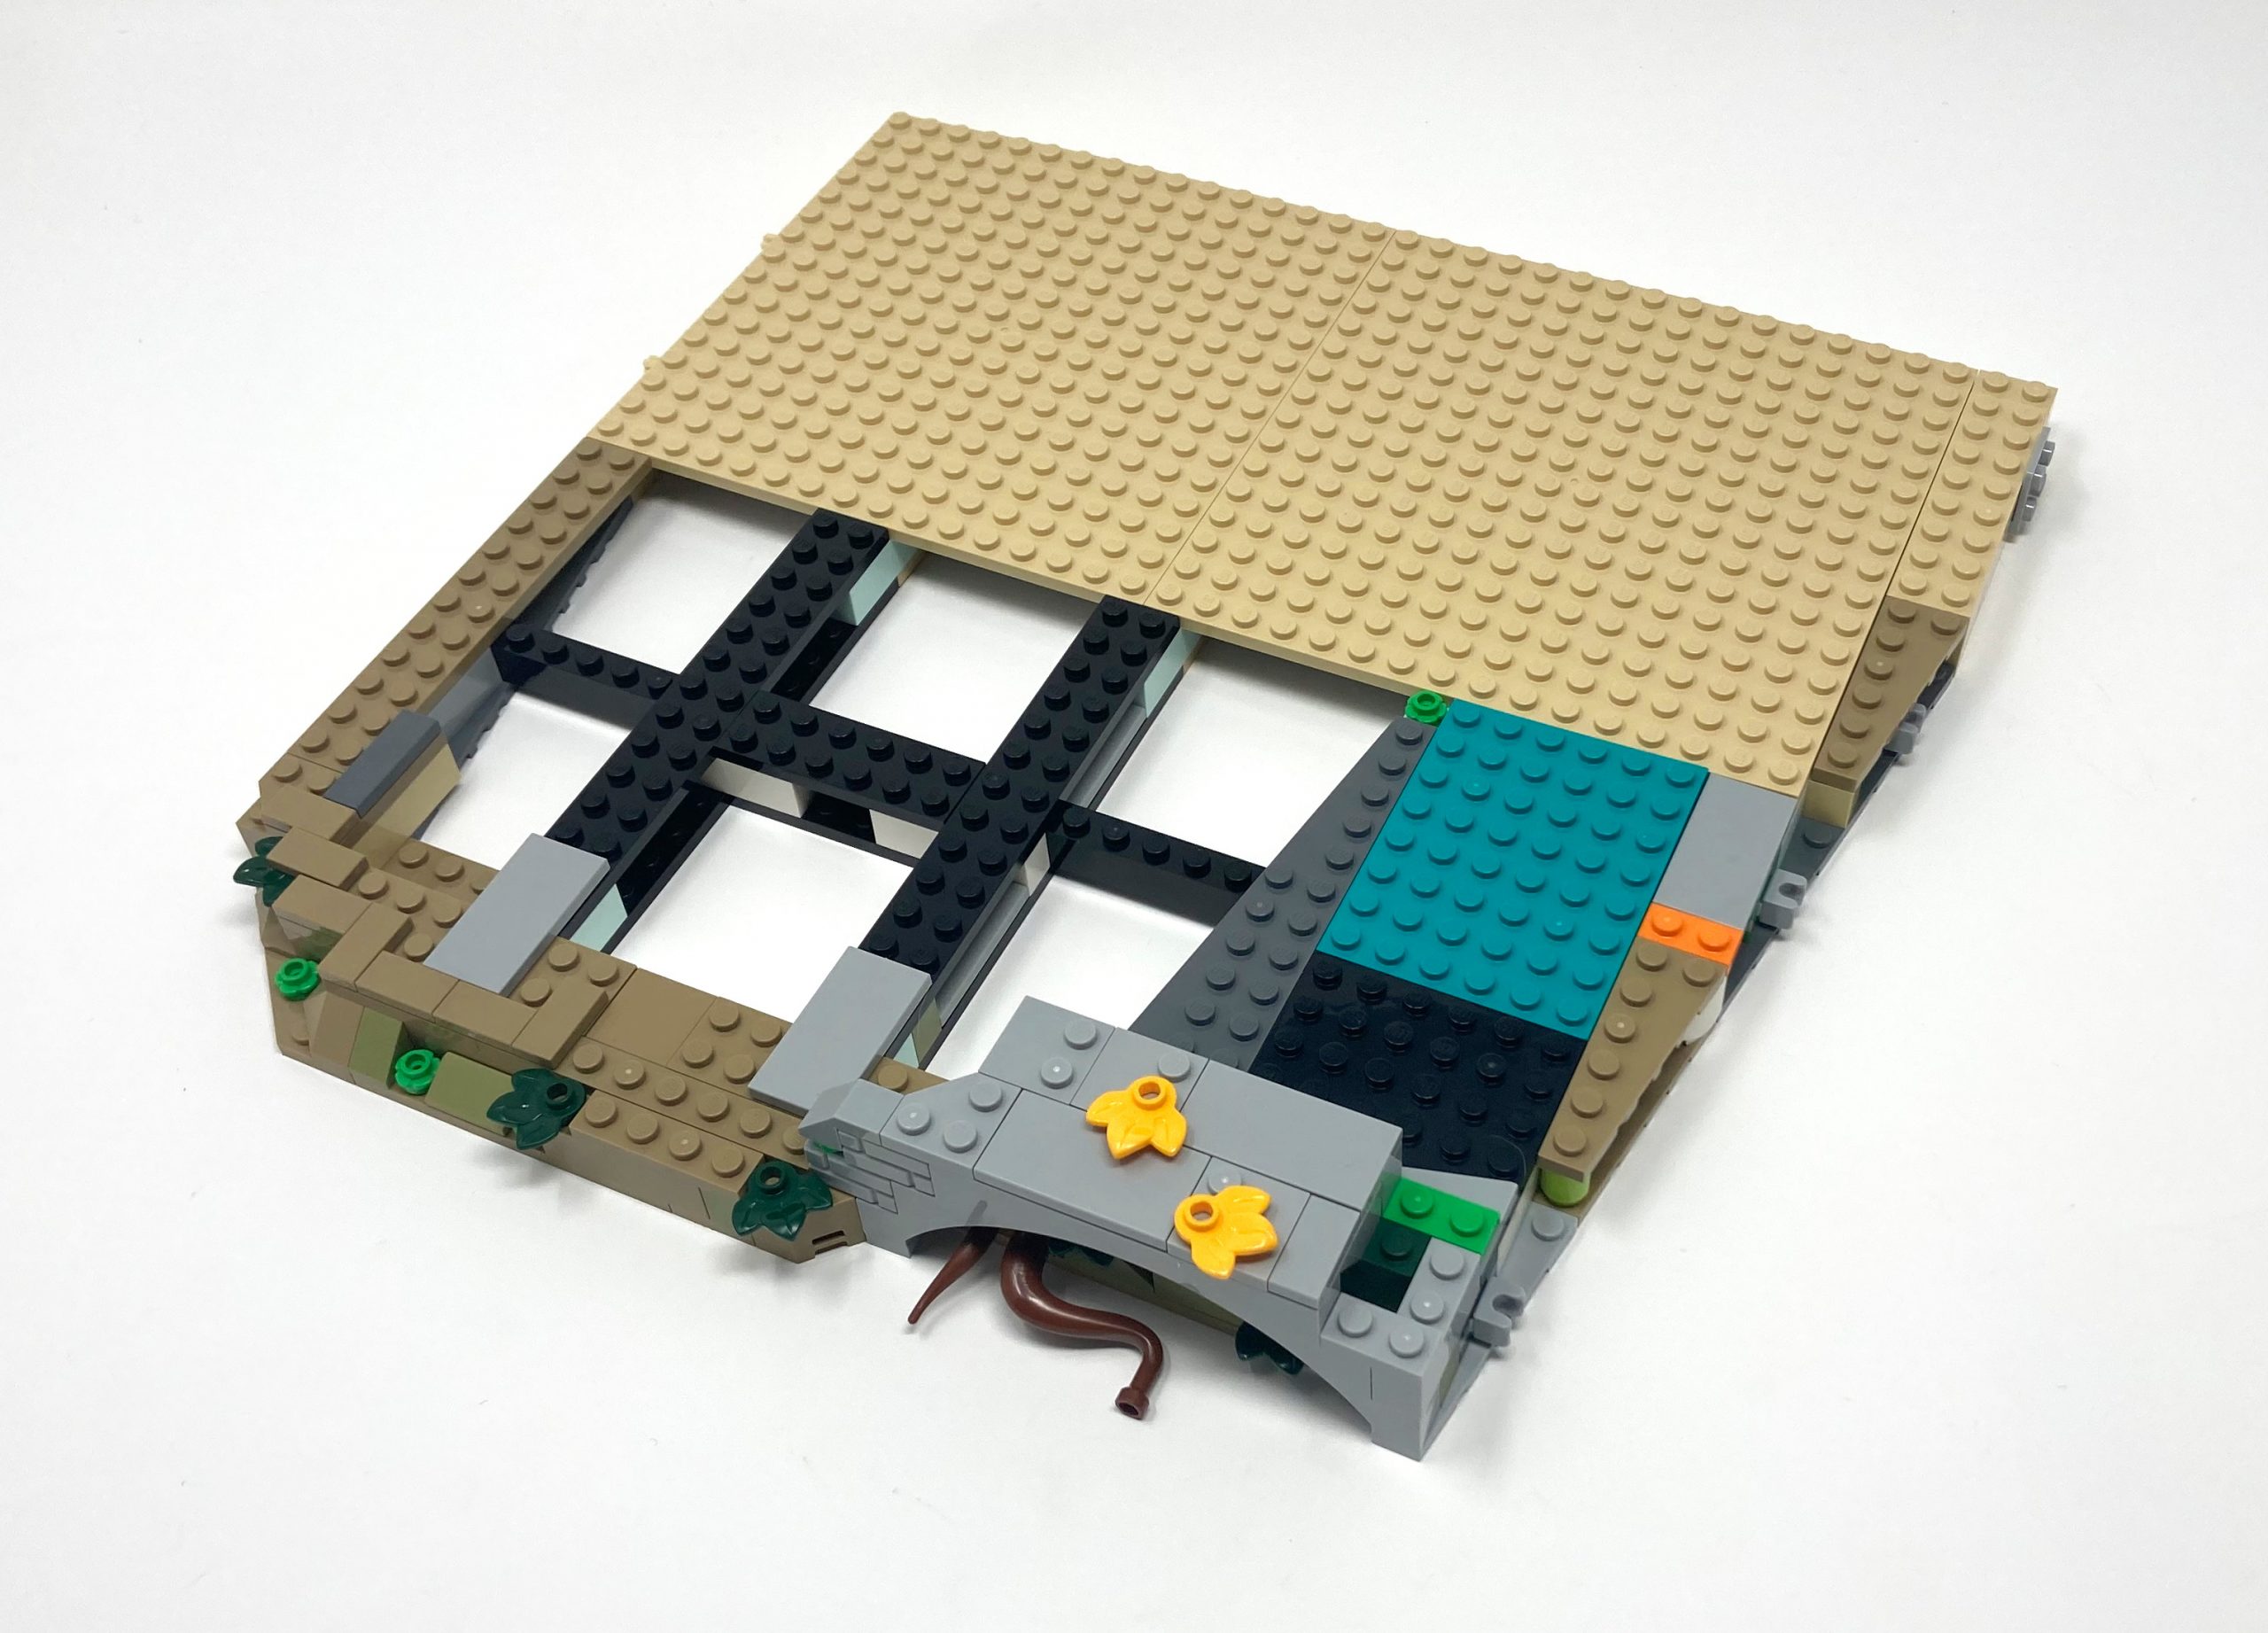
A lattice shape builds a sturdy foundation for this big section.
Bag 26
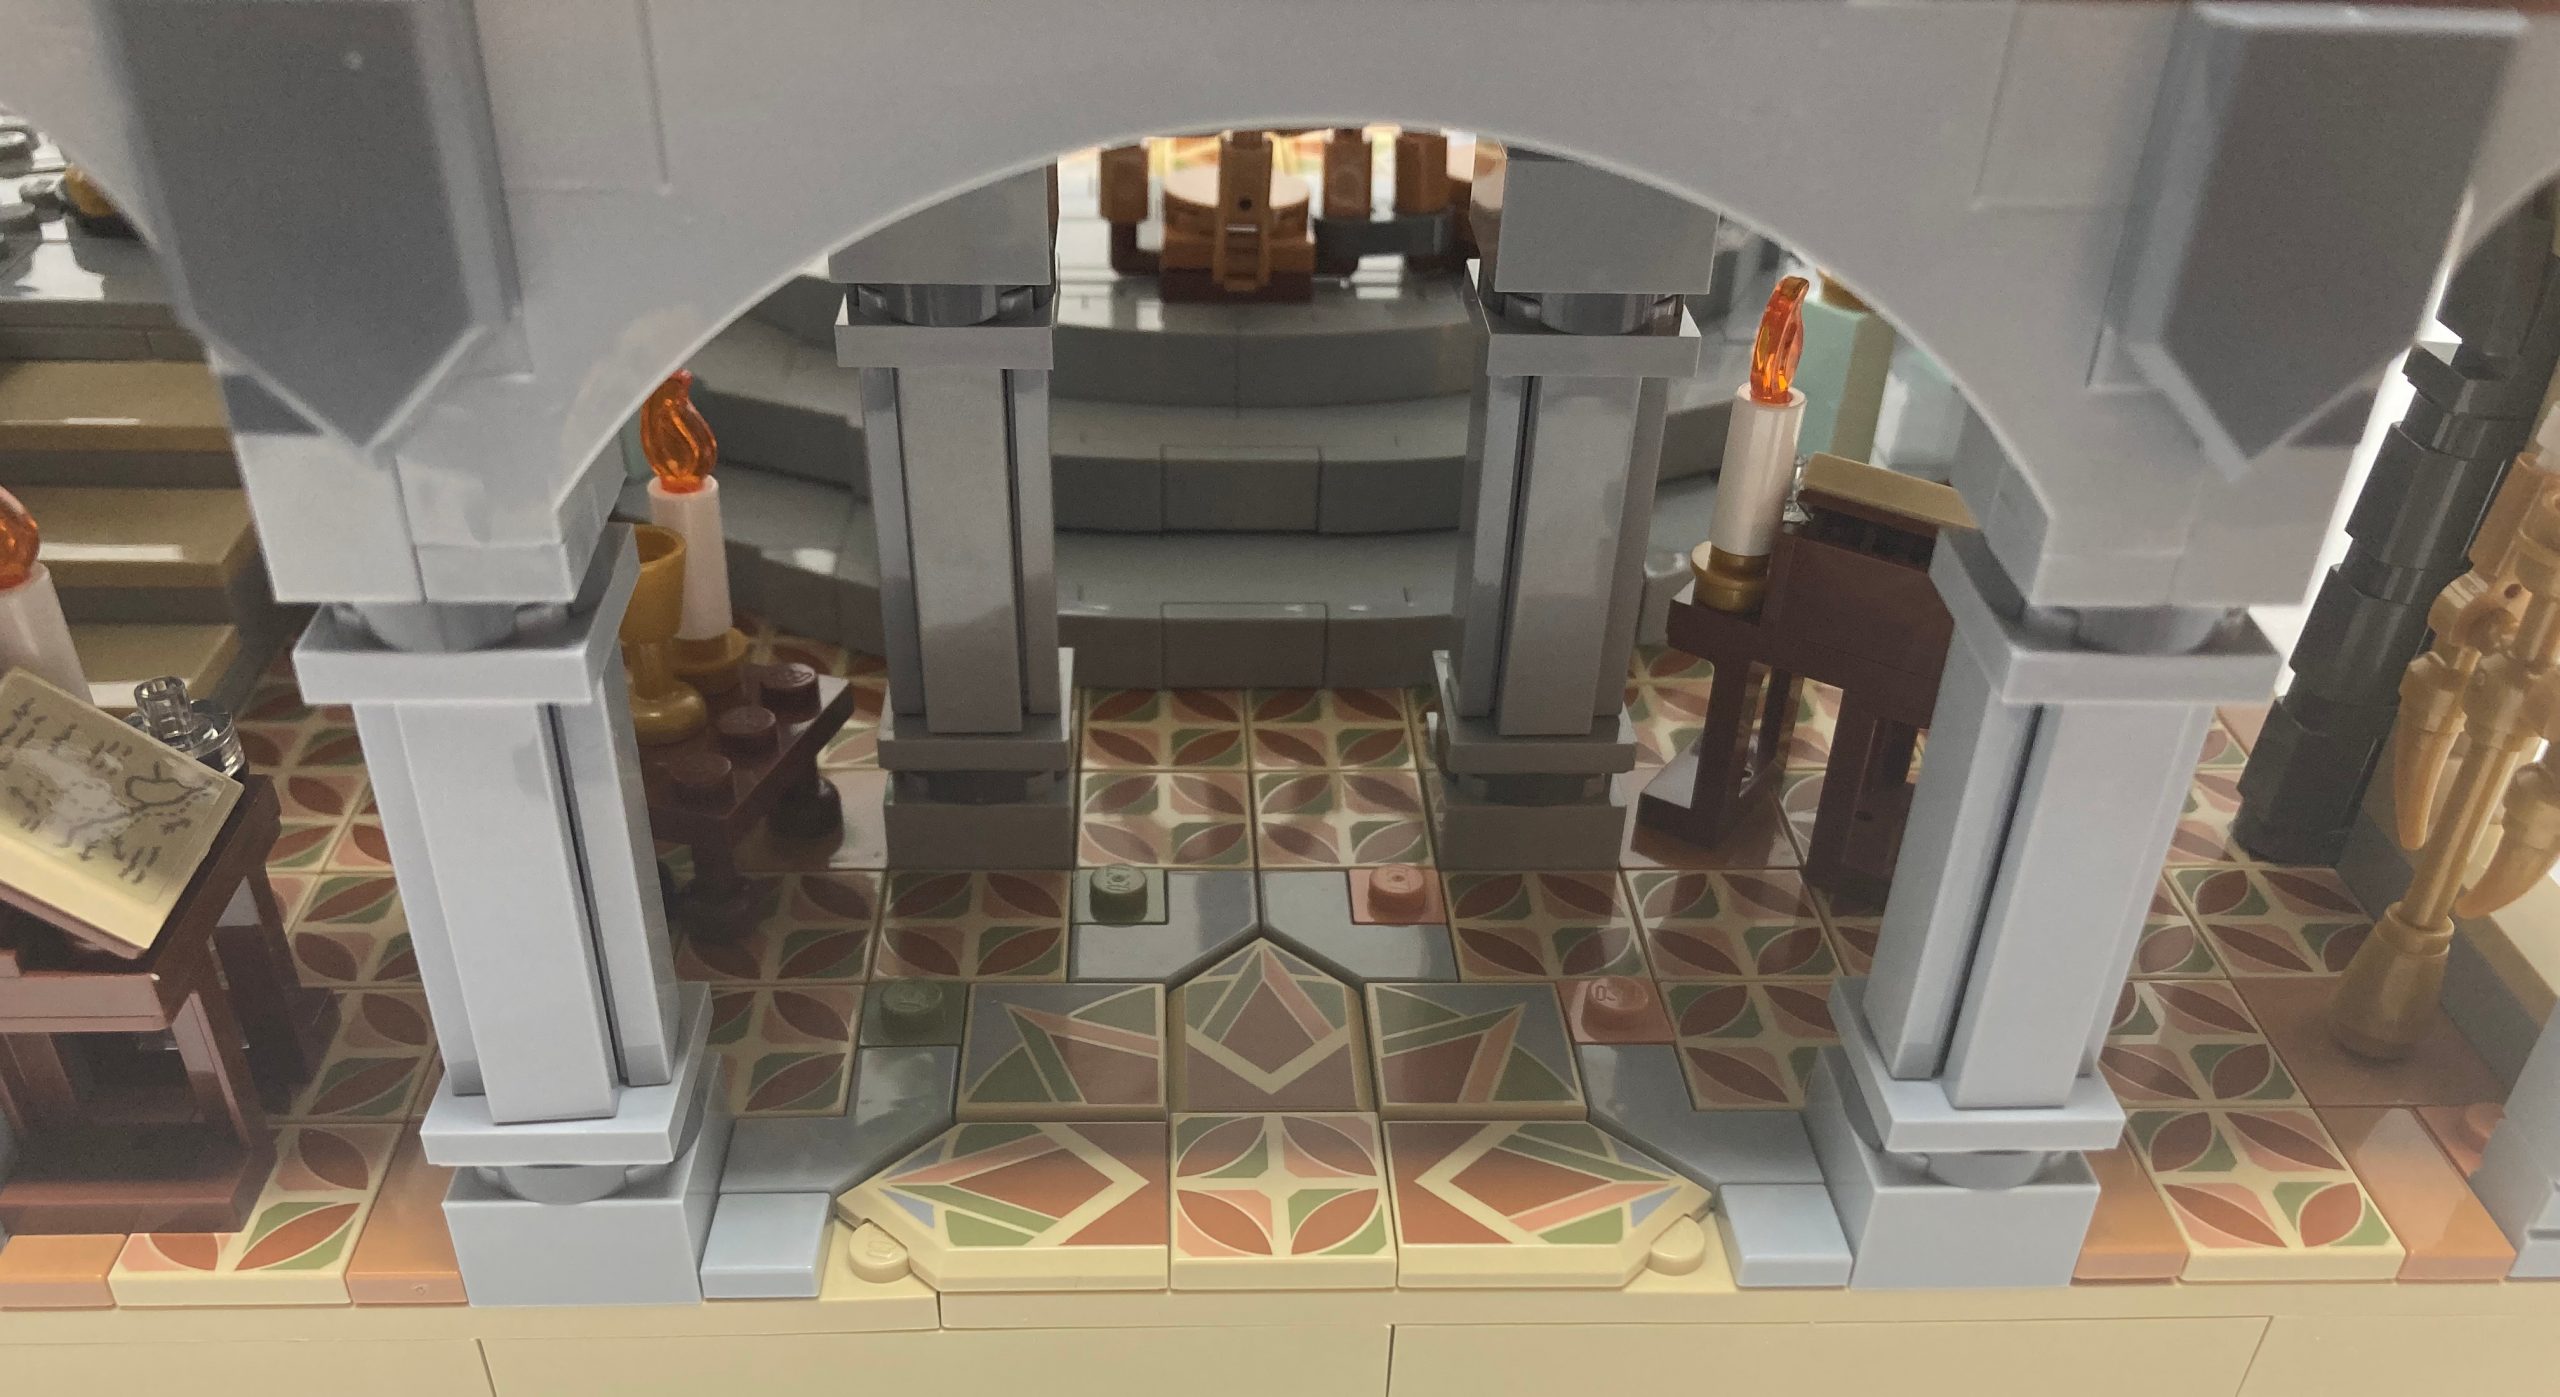
Upon opening the bag, the unique mosaic-patterned floor tiles immediately catch your eye. Currently exclusive to this set, the 2×2 plates, included 64 times, provide ample coverage for a 16×16 plate. The printed pieces, appearing not only on 2×2 tiles but also on Nexo Knights shields, assist in creating the central star shape of the hall.

This set does not hold back with its use of printed pieces.
The room features a collection of tables of varying sizes, using different building techniques to create varying heights – either through window pieces or slopes. Each table displays a map of different parts of Middle Earth, albeit as stickered pieces. Despite the set’s size, it would have been nice to see these as printed parts. The room also includes two candelabras, the first utilizing the same technique as the library in the previous section, while the second is a larger, brick-built design, featuring more pieces and angles to create a regal appearance. Both candelabras are intracity built using the same upside-down techniques adopted in the tower portion of the build.

Contrasting the printed pieces in this section we see stickers used for map detailing.
Bag 27

The Eye of Sauron is always watching the fellowship.
Bags 28-29
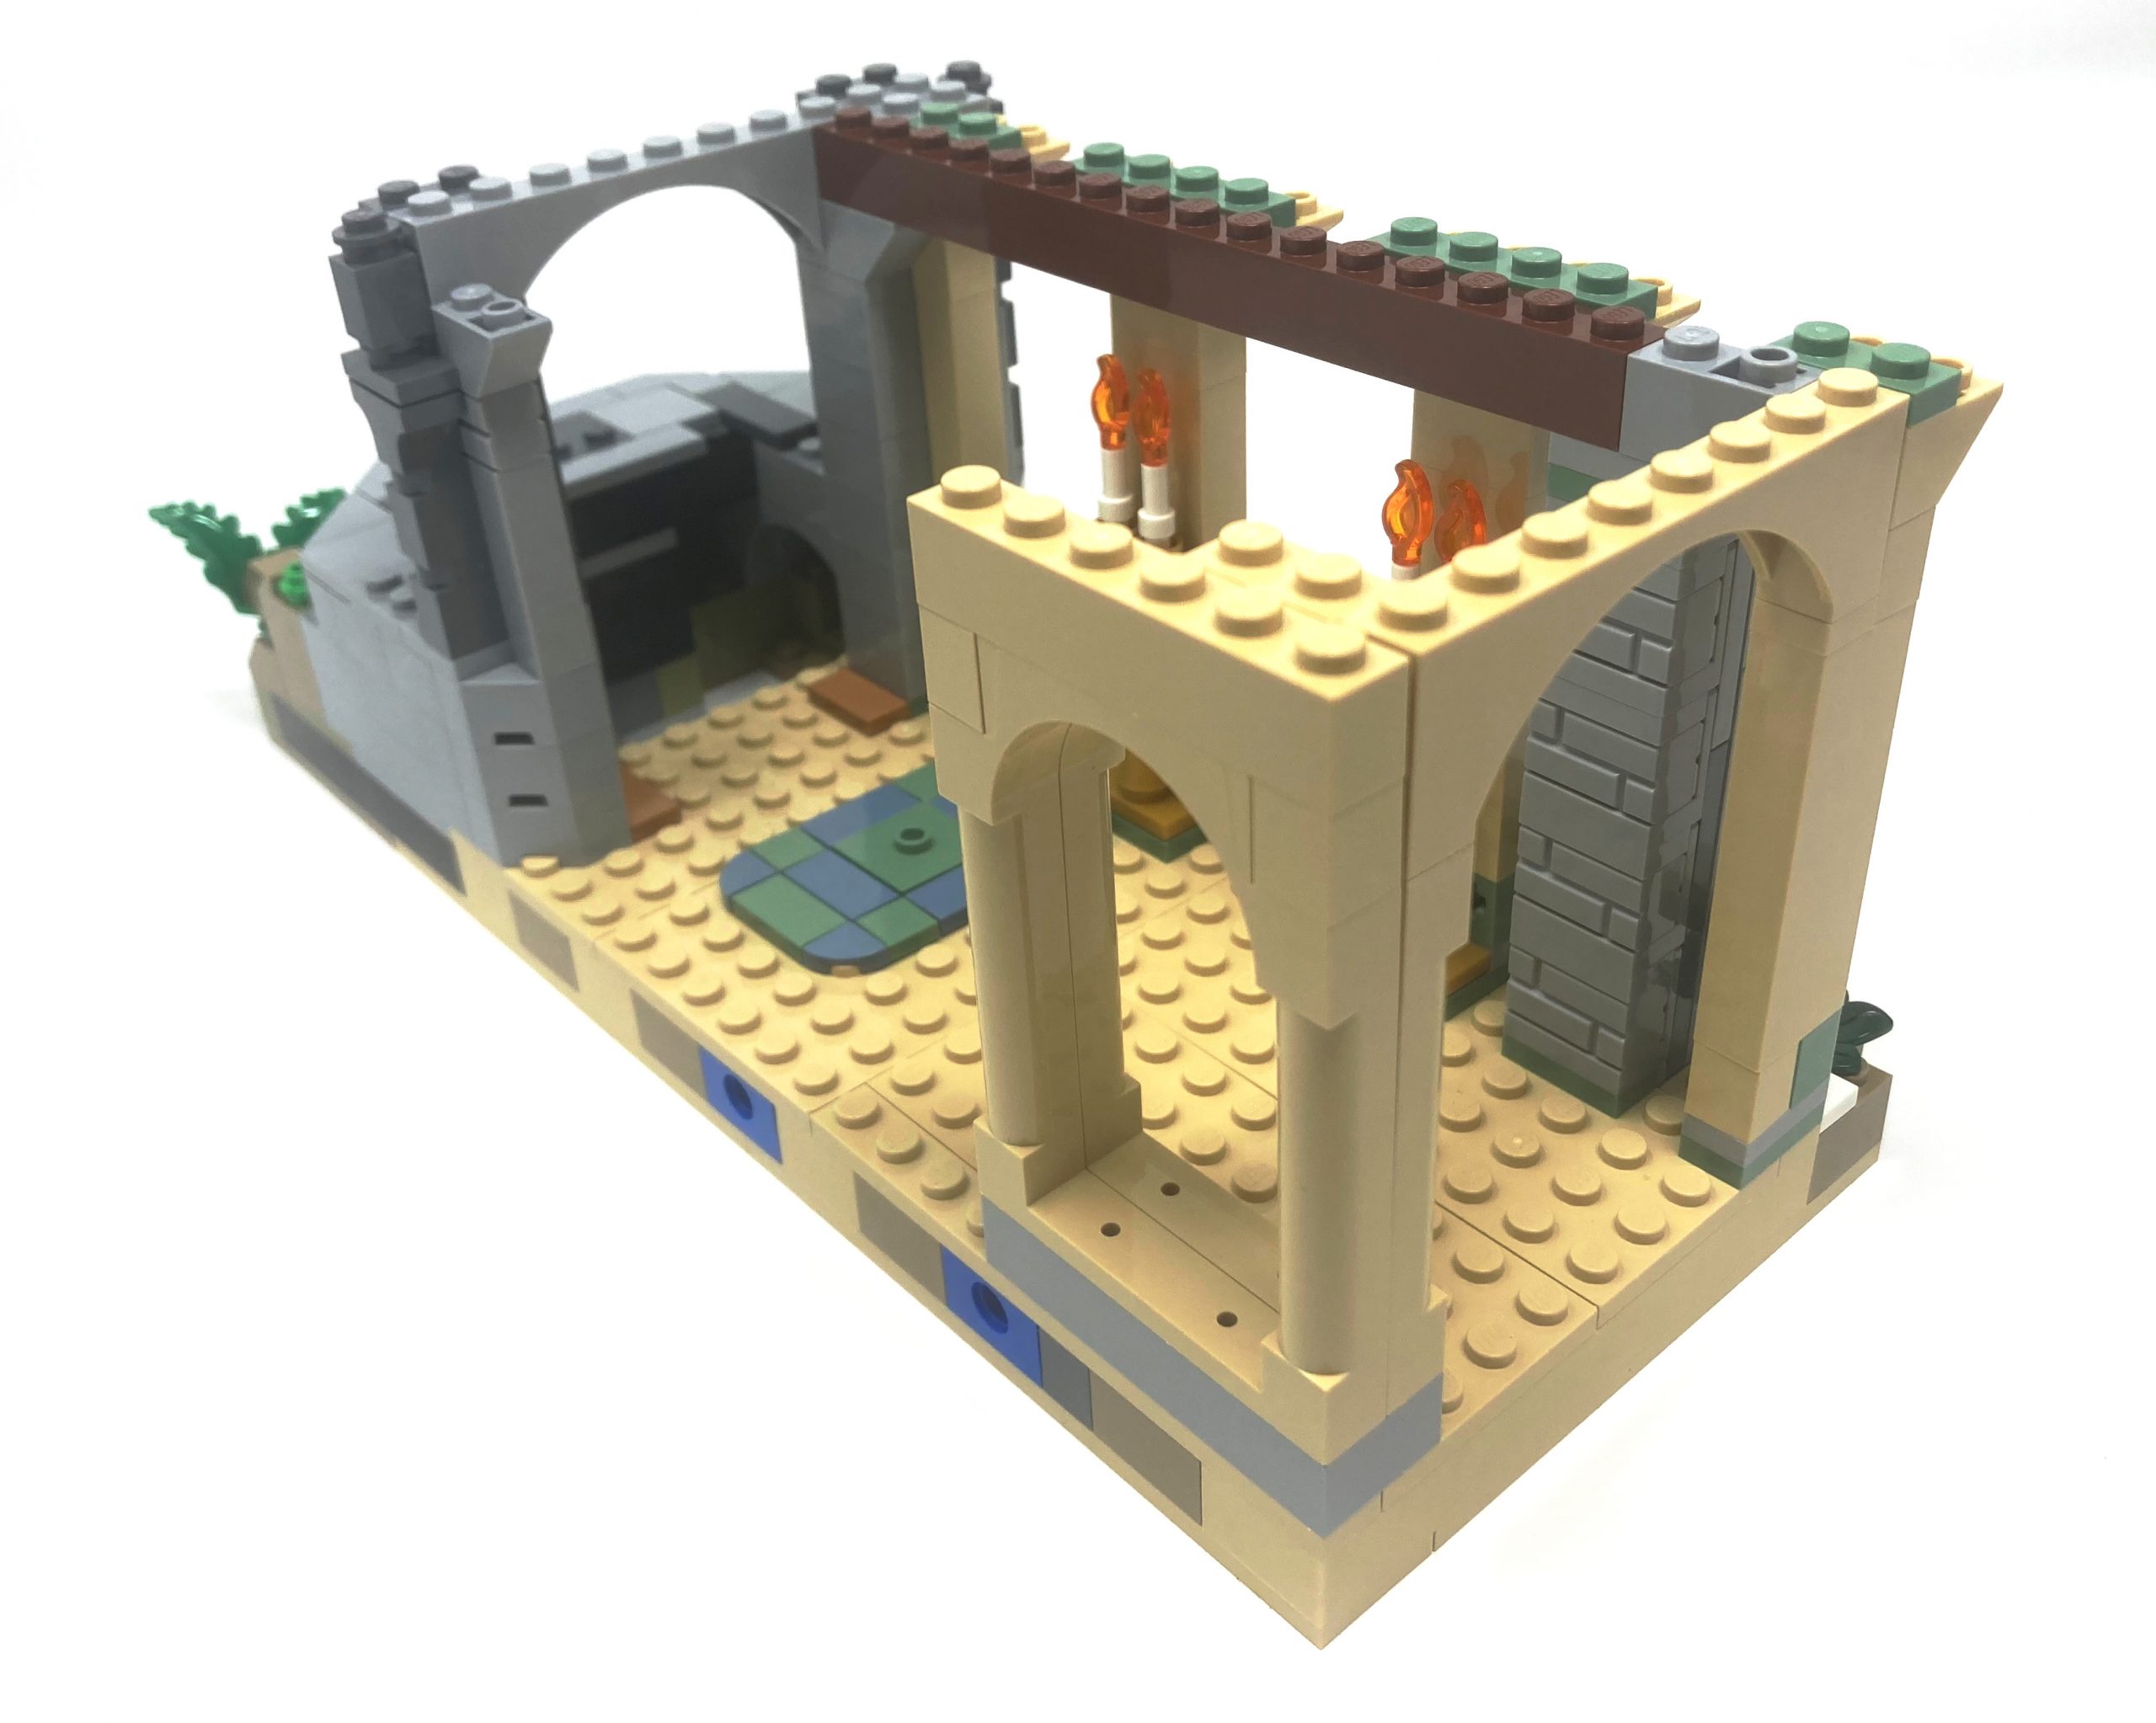
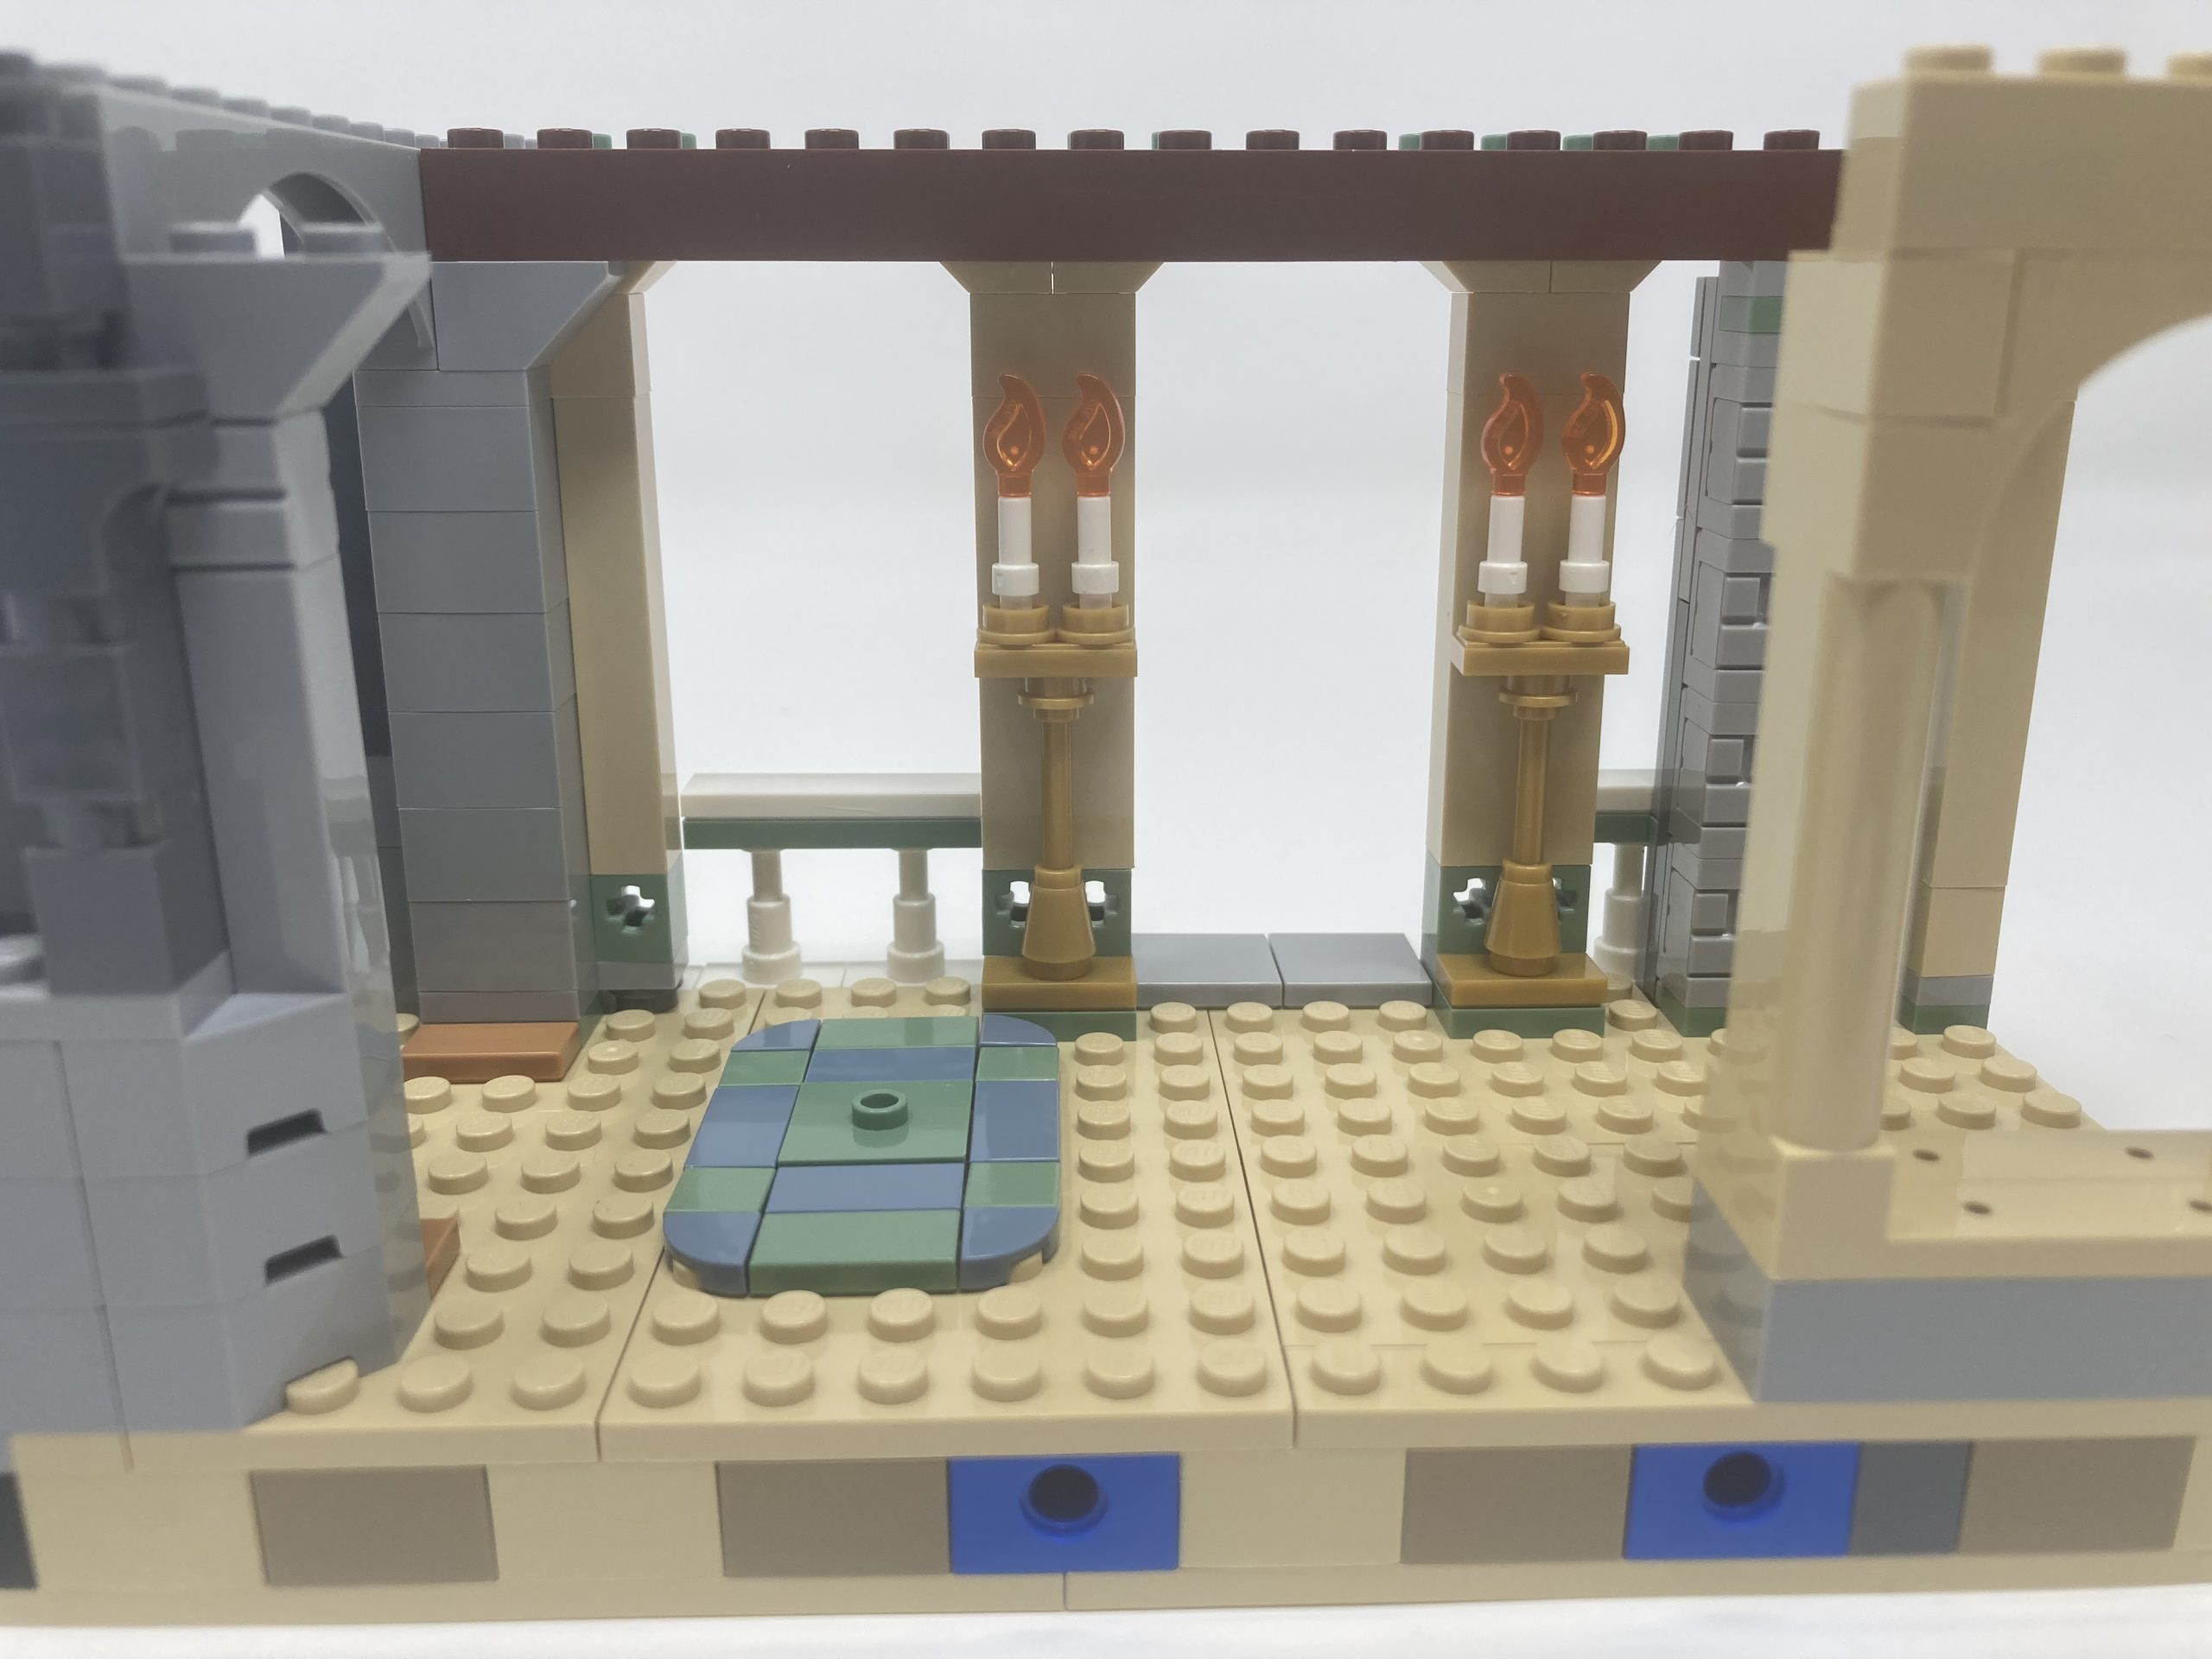
Building up to the second floor, arches are still the main theme, forming spacious pathways in the main room. The arches sit on detailed brick pillars, crafted with a mix of rounded and square shapes with tiles lining studs-on-side construction, adding ornate beauty to the space.

Angled pillars start to create the inner rooms of the hall.
Both inside and outside, the entryway to the hall features the same arch and column technique that was used in the armory. Along the walls are intricate murals depicting the creation of the ring, as well as a banner showcasing the emblems of Rivendell. To capture the necessary details, the designers have utilized stickers rather than brick-built designs. While it would have been preferable to use printed pieces, this is a common practice among LEGO sets due to the lower cost and ease of use of stickers.
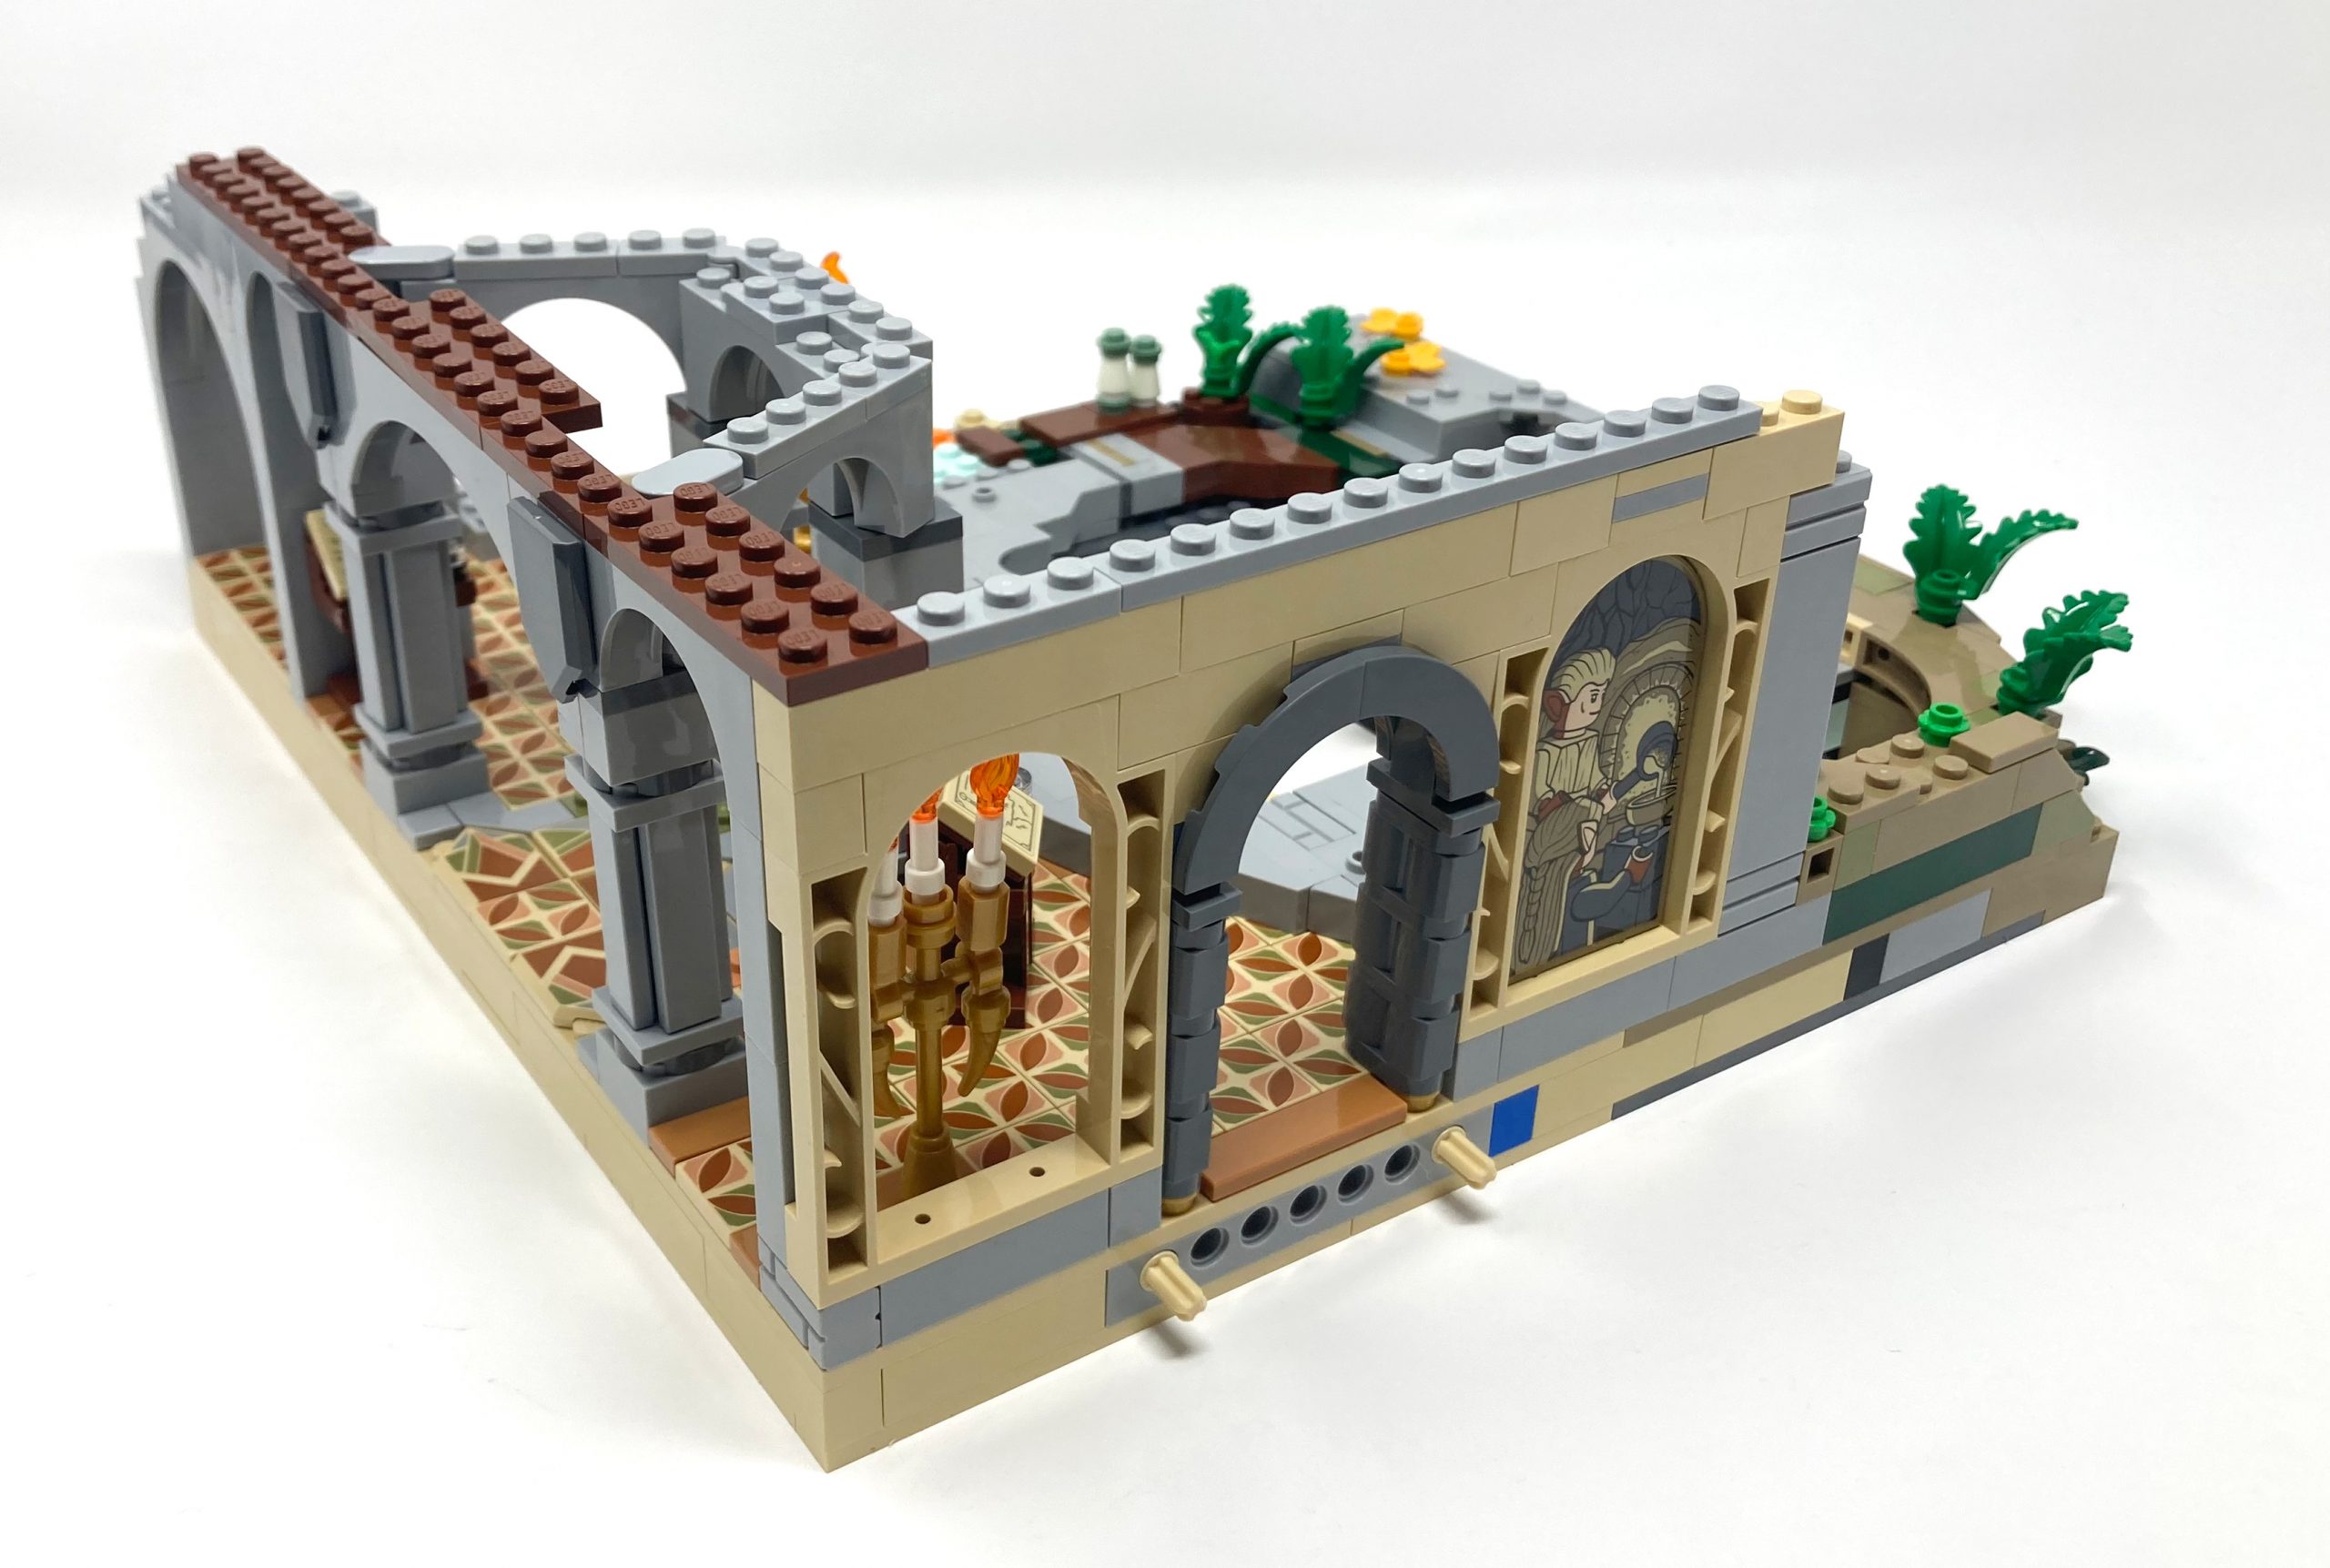
Stickers are used to capture intricate details in the murals.
Bag 30
As the room becomes more detailed, the only option is to build upward. The grand staircase leading to the second-floor balcony is a highlight of the design. The stairs are smoothed out with tiles, giving them a glossy appearance. The combination of 297Warm GoldPearl Gold railings, 5Brick YellowTan stairs, and 194Medium Stone GreyLight Bluish Gray bricks creates a stunning contrast that emphasizes the wealth and prestige of the building.
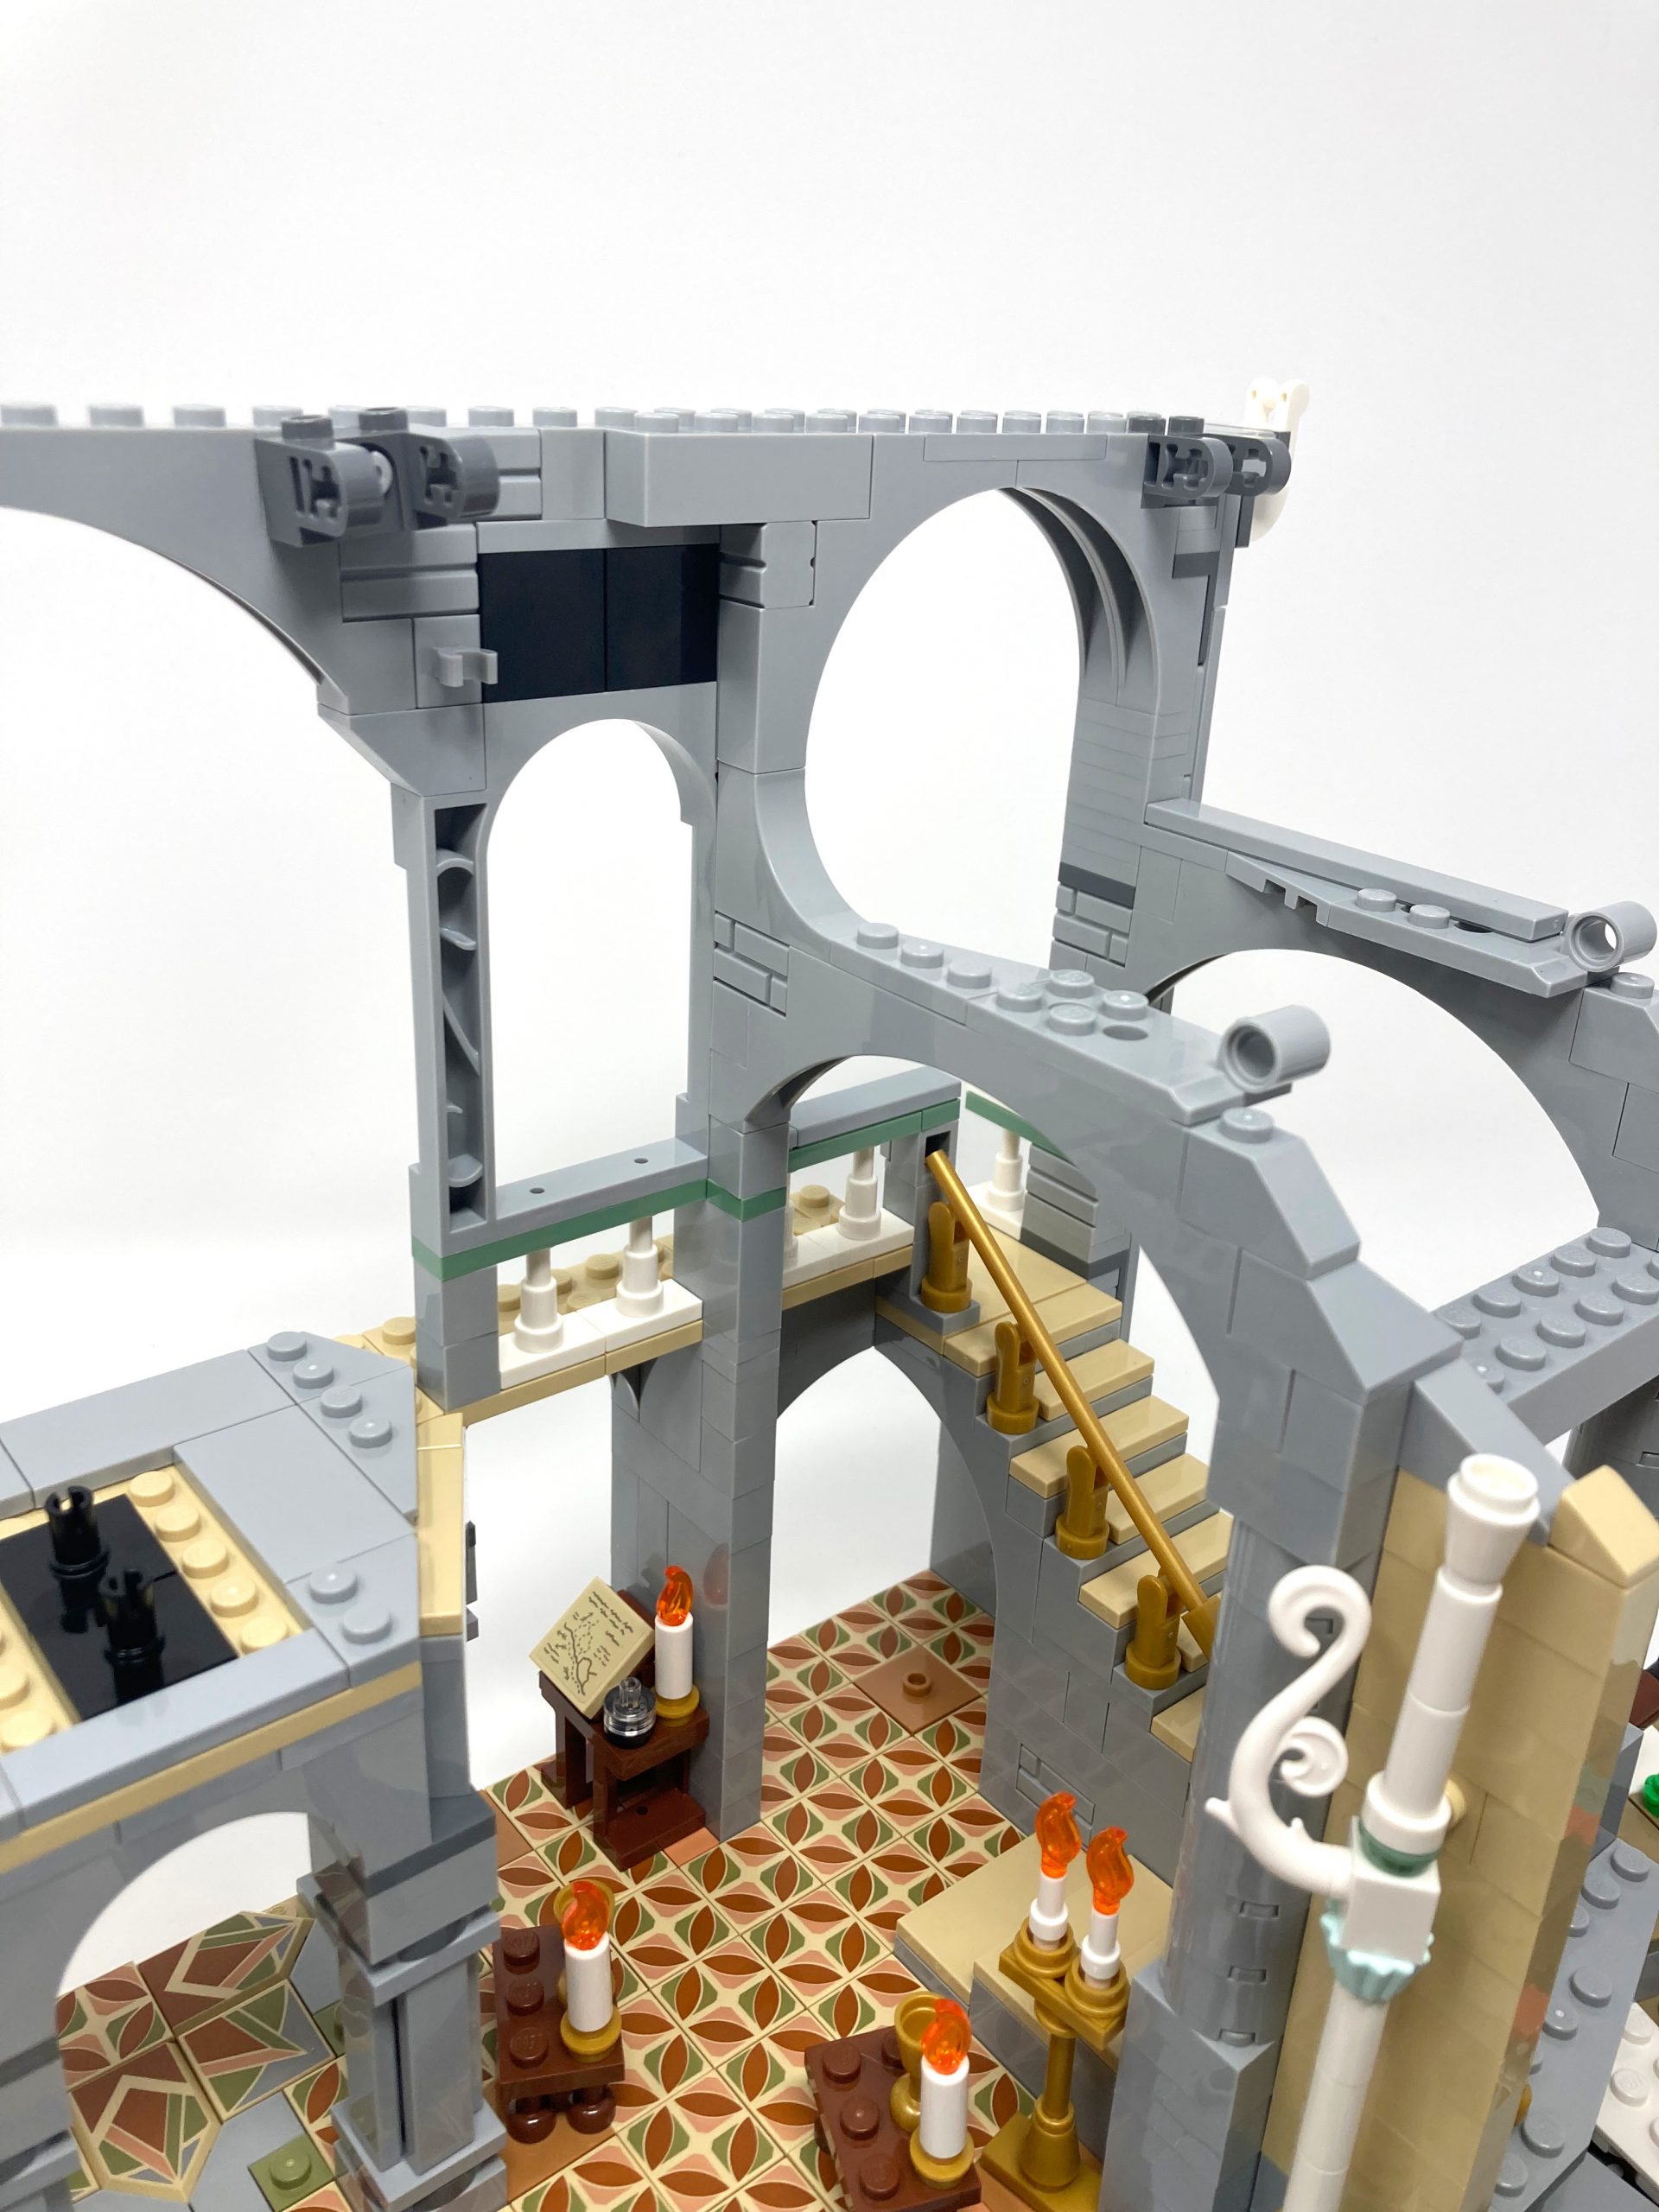
The curves of the arches capture the staircase like a painting.
Despite the impressive appearance, the banisters of the staircase rest on the railings rather than being attached, which creates a small gap that may be noticeable upon close inspection.
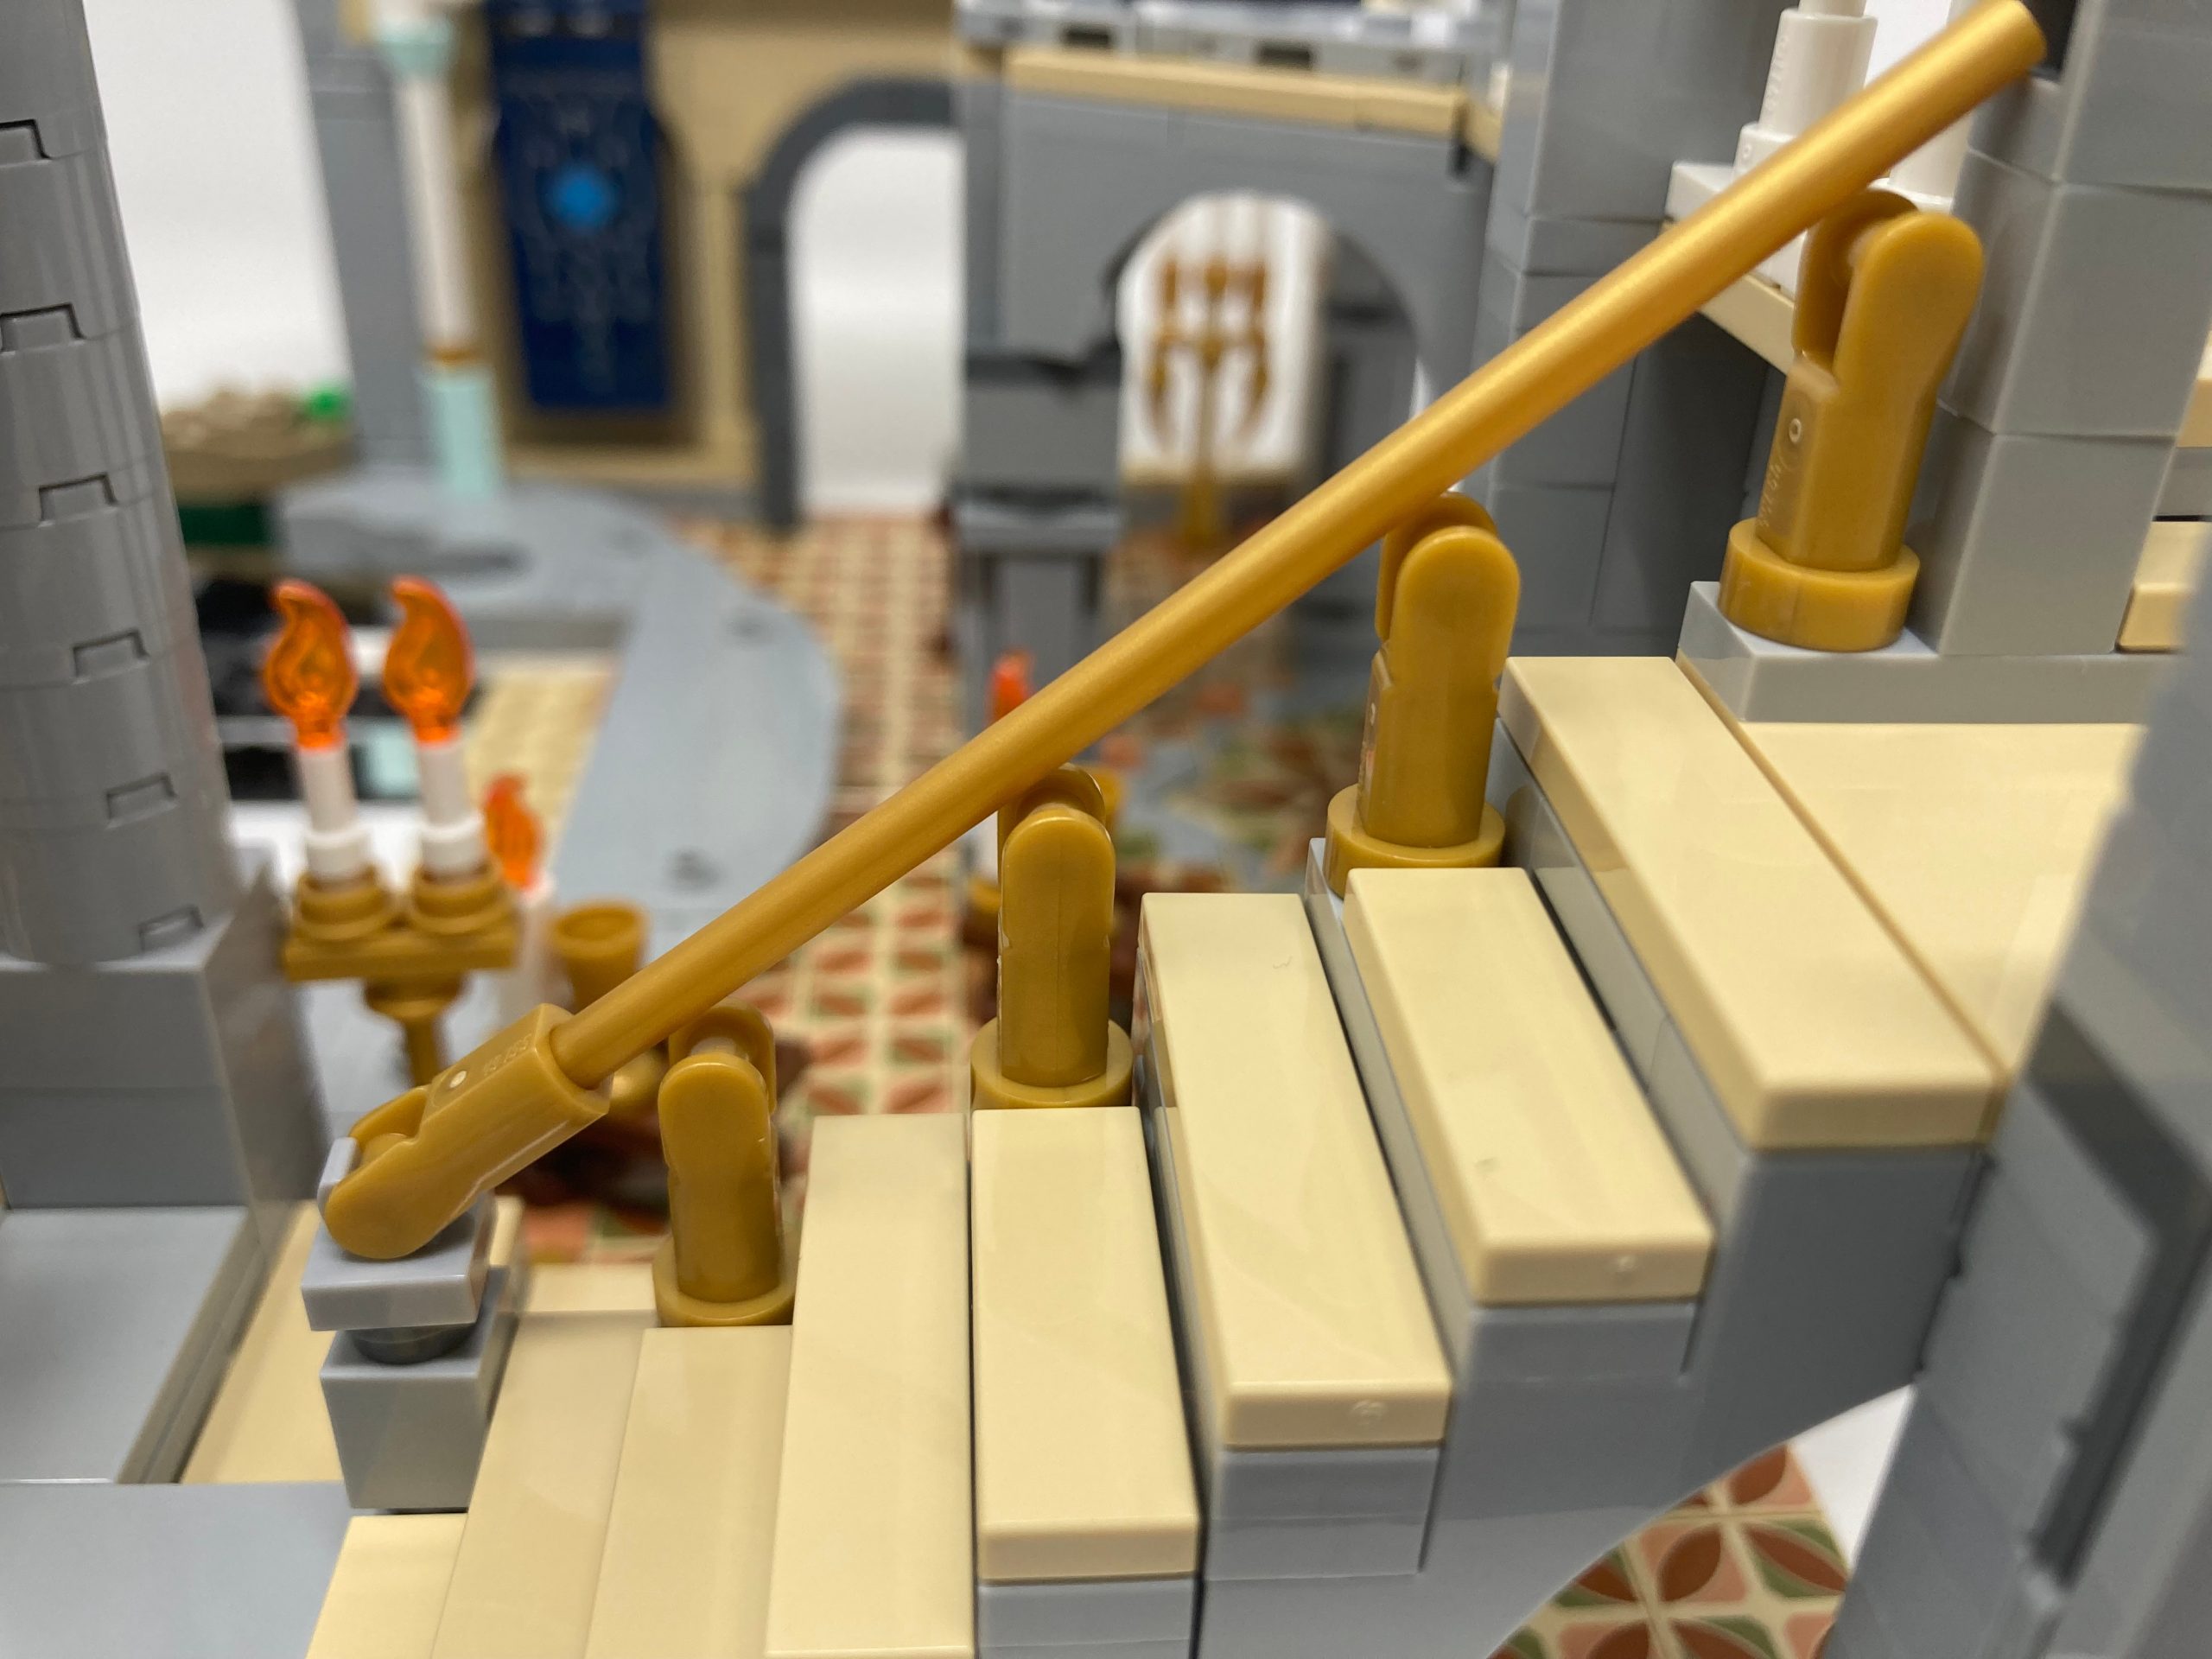
The handrail does not actually connect to the railing.
Bags 31-32
As the build progresses, we suddenly go back down to the first level to add more foundation and expand it even further. All the key elements of nature are included in this expansion, such as ferns, wedges, slopes, and leaves. The new extension is built at an angle adjacent to the main council space creating an interesting angle. The connection is made clean and secure through the use of ball joint connections and hinges for extra support.
Expanding the foundation allows for more room to build upon.
Bag 33
Returning to the house, we add more details to the walls and second level. The 1White and 151Sand Green railings from the tower build are repeated on the second-floor balcony, and in the center of the room, around the edges of the council space, we see the first of the many ornate pillars. The 1White of the pillars contrast with the accompanying 194Medium Stone GreyLight Bluish Gray and 5Brick YellowTan of the walls, adding to the regality the space. With all the additional walls and pillars added, the room starts to feel more like a series of smaller, private rooms.
With the first level done we build up and continue using similar techniques we used before.
At the base of the grand staircase, an intricate telescope is added to the room. The unique design of the telescope is built upside down, showcasing creative building techniques and adding an interesting twist to the piece. The telescope is held in place through use of an upside-down candelabra, making it a standout feature of the room.

A small but detailed build creates such an impact.
Bag 34
The second floor features a 194Medium Stone GreyLight Bluish Gray color scheme, contrasting with the 5Brick YellowTan of the first level. This level showcases an abundance of arches, with seven arches being built in this section alone. The details on this floor are created using masonry bricks, but with the timber side facing out to highlight refined brick rather than unworked stone. The contrasting colors and intricate details enhance the overall grandeur of the building.
Both sides of the arch piece are used to full effect to maximize details.
Bag 35
The use of the back of the wall with arch piece to create a flowery pattern, which is common in elvish design, adds a unique and interesting touch to the second floor of the building. The pattern is typically hidden as it is used for support, but the designers creatively utilized it for additional detailing, making it a favorite and potentially unintended detail. It is remarkable how the designers utilize so many different LEGO elements and techniques to create an intricate and detailed design for Rivendell. The use of elements from the LEGO Elves line (from 2017) enhances the overall look, bringing it to life with an elven touch. The pillars with their unique blend of upright and upside-down construction, as well as the horns, give the room a fluid and organic feel, further emphasizing the close relationship between the elves and nature.

The floral patterns are mesmerizing to look at.
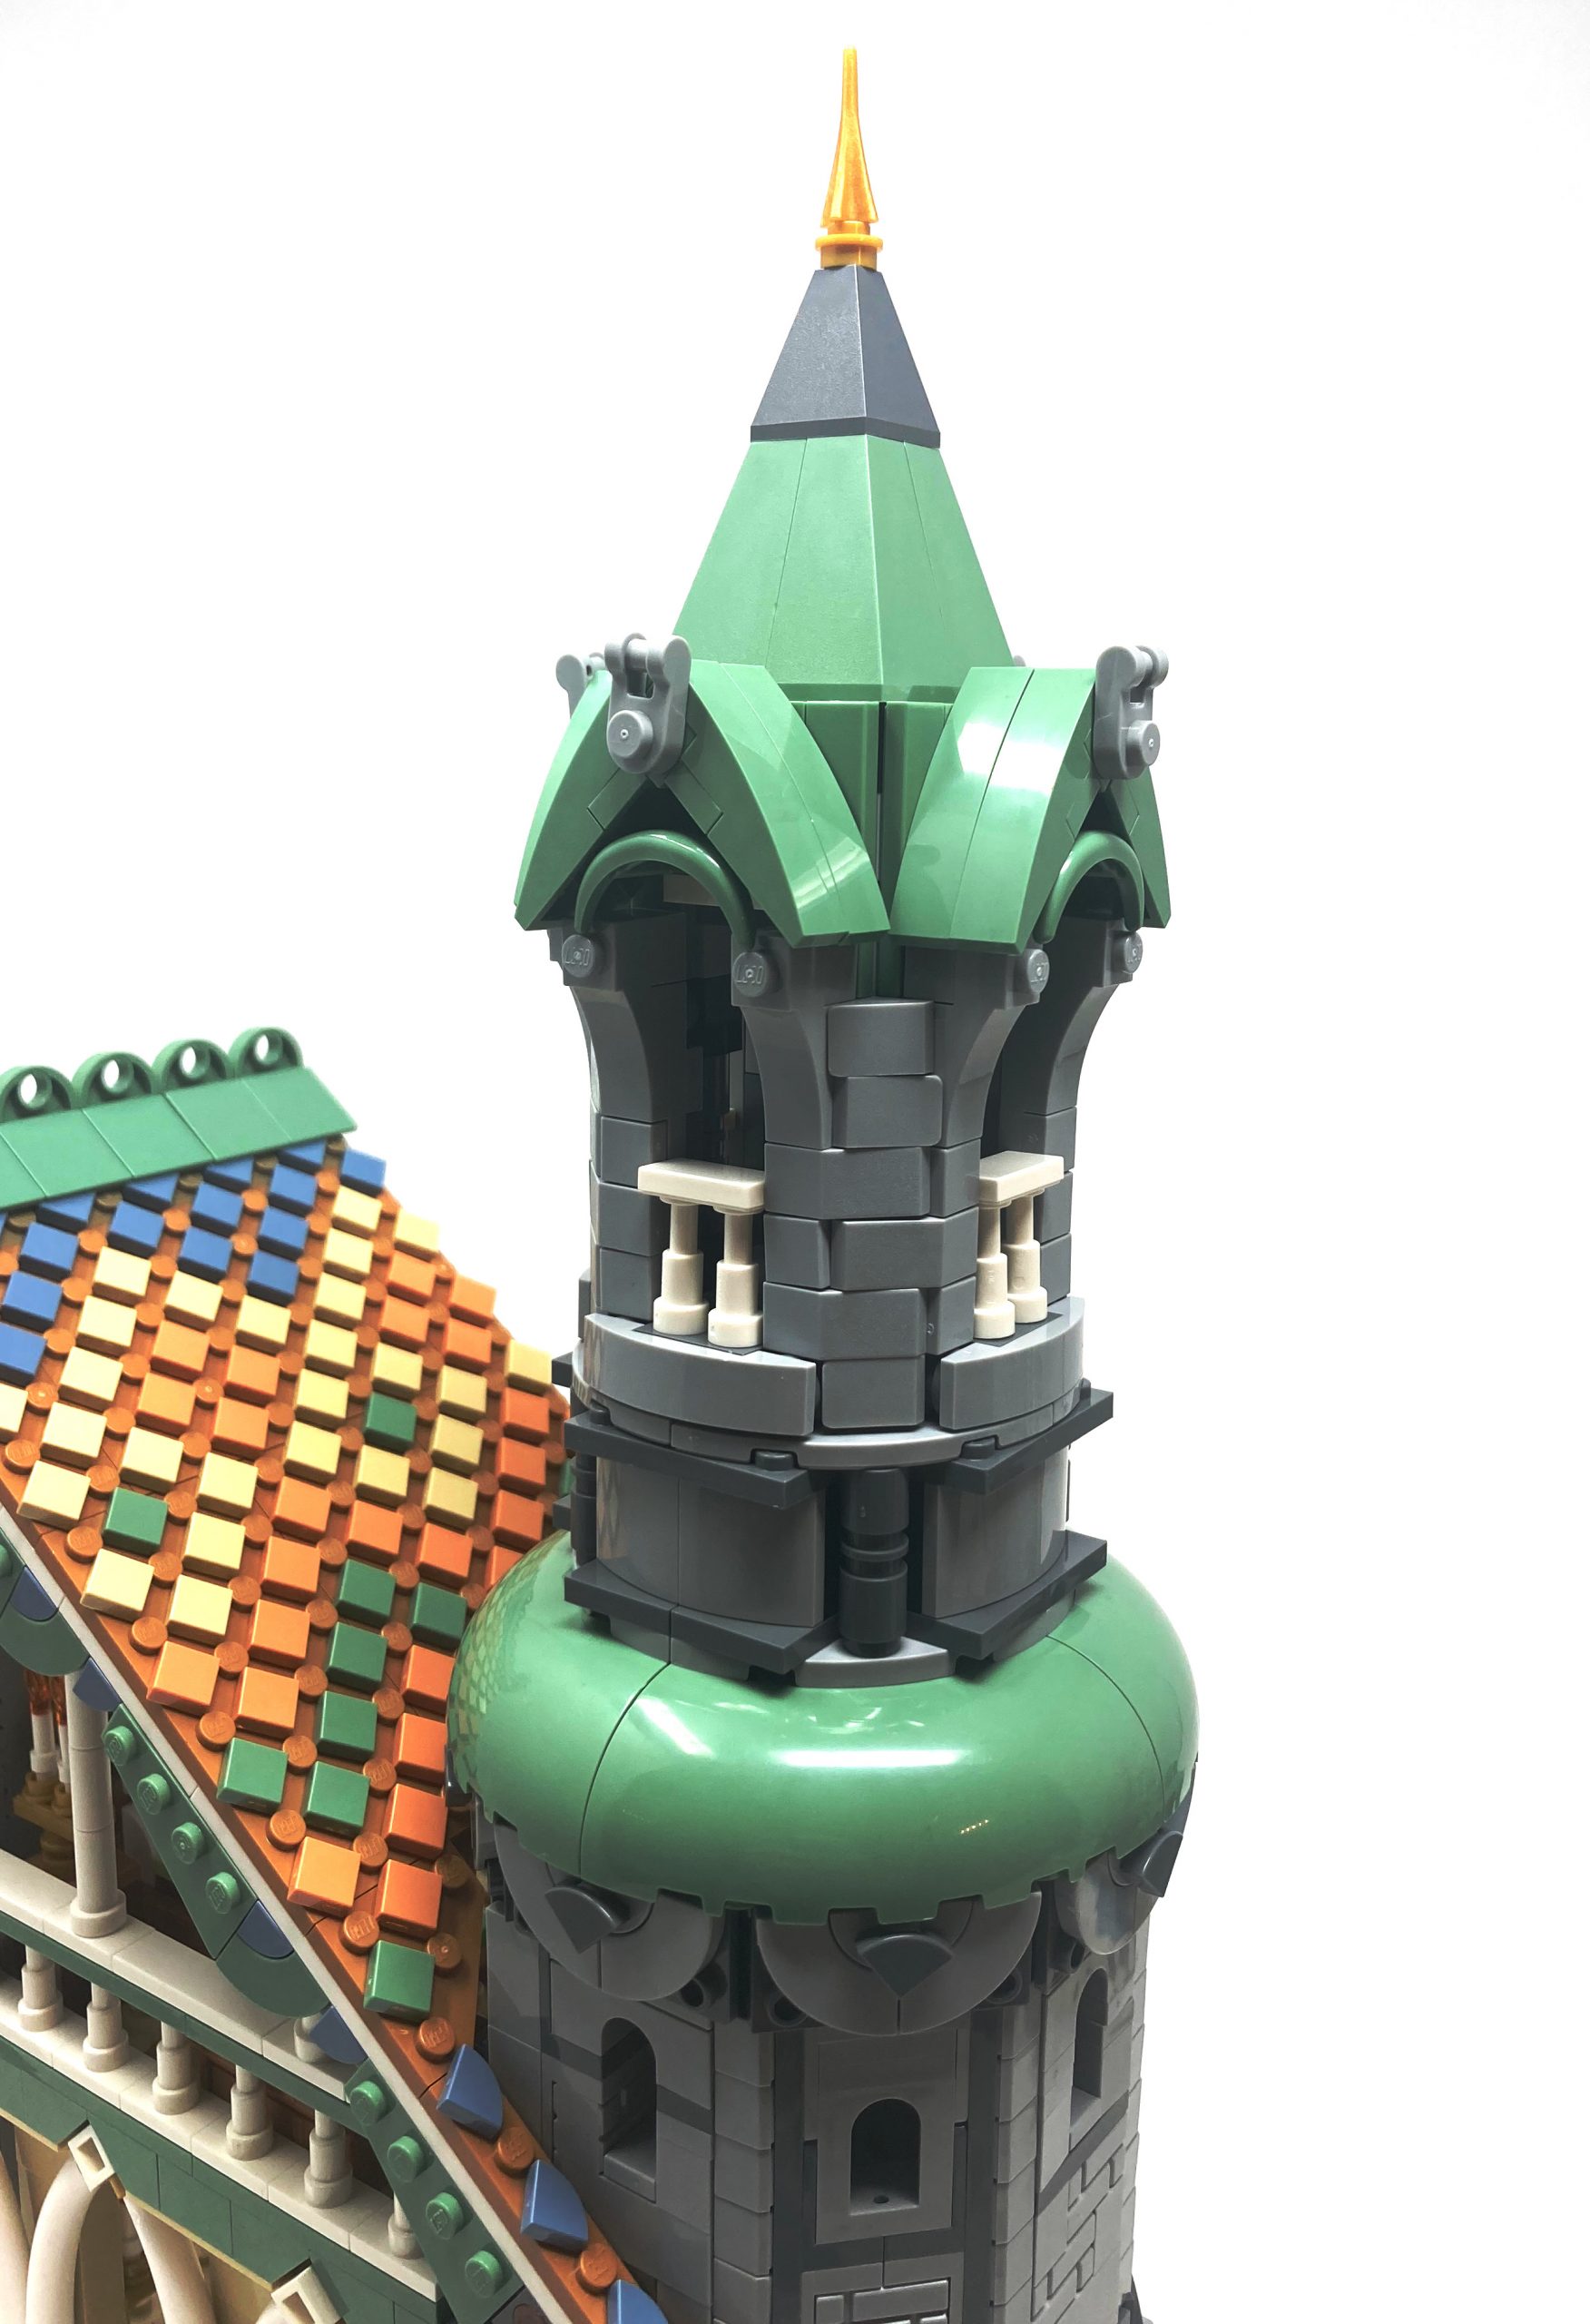
Bag 36
In the hall, two stunning paintings are displayed on the wall. The paintings are stickers stuck on large 3×3 tiles, an uncommon sized piece. The tile serves as a frame for the intricate images within, elevating the artwork.

The stickers being smaller than the tile behind it creates a bordering effect.
The roof ridge is constructed using sand green 2×2 plates modified with holes for the roof ridge, combined with slopes for a rounded finish. A small, inaccessible tower sitting atop the ridge features the same building techniques used for the tower, reinforcing the recurring design elements. A gargoyle depicting a grand perched bird is placed at the edge of the roof, overlooking the city.
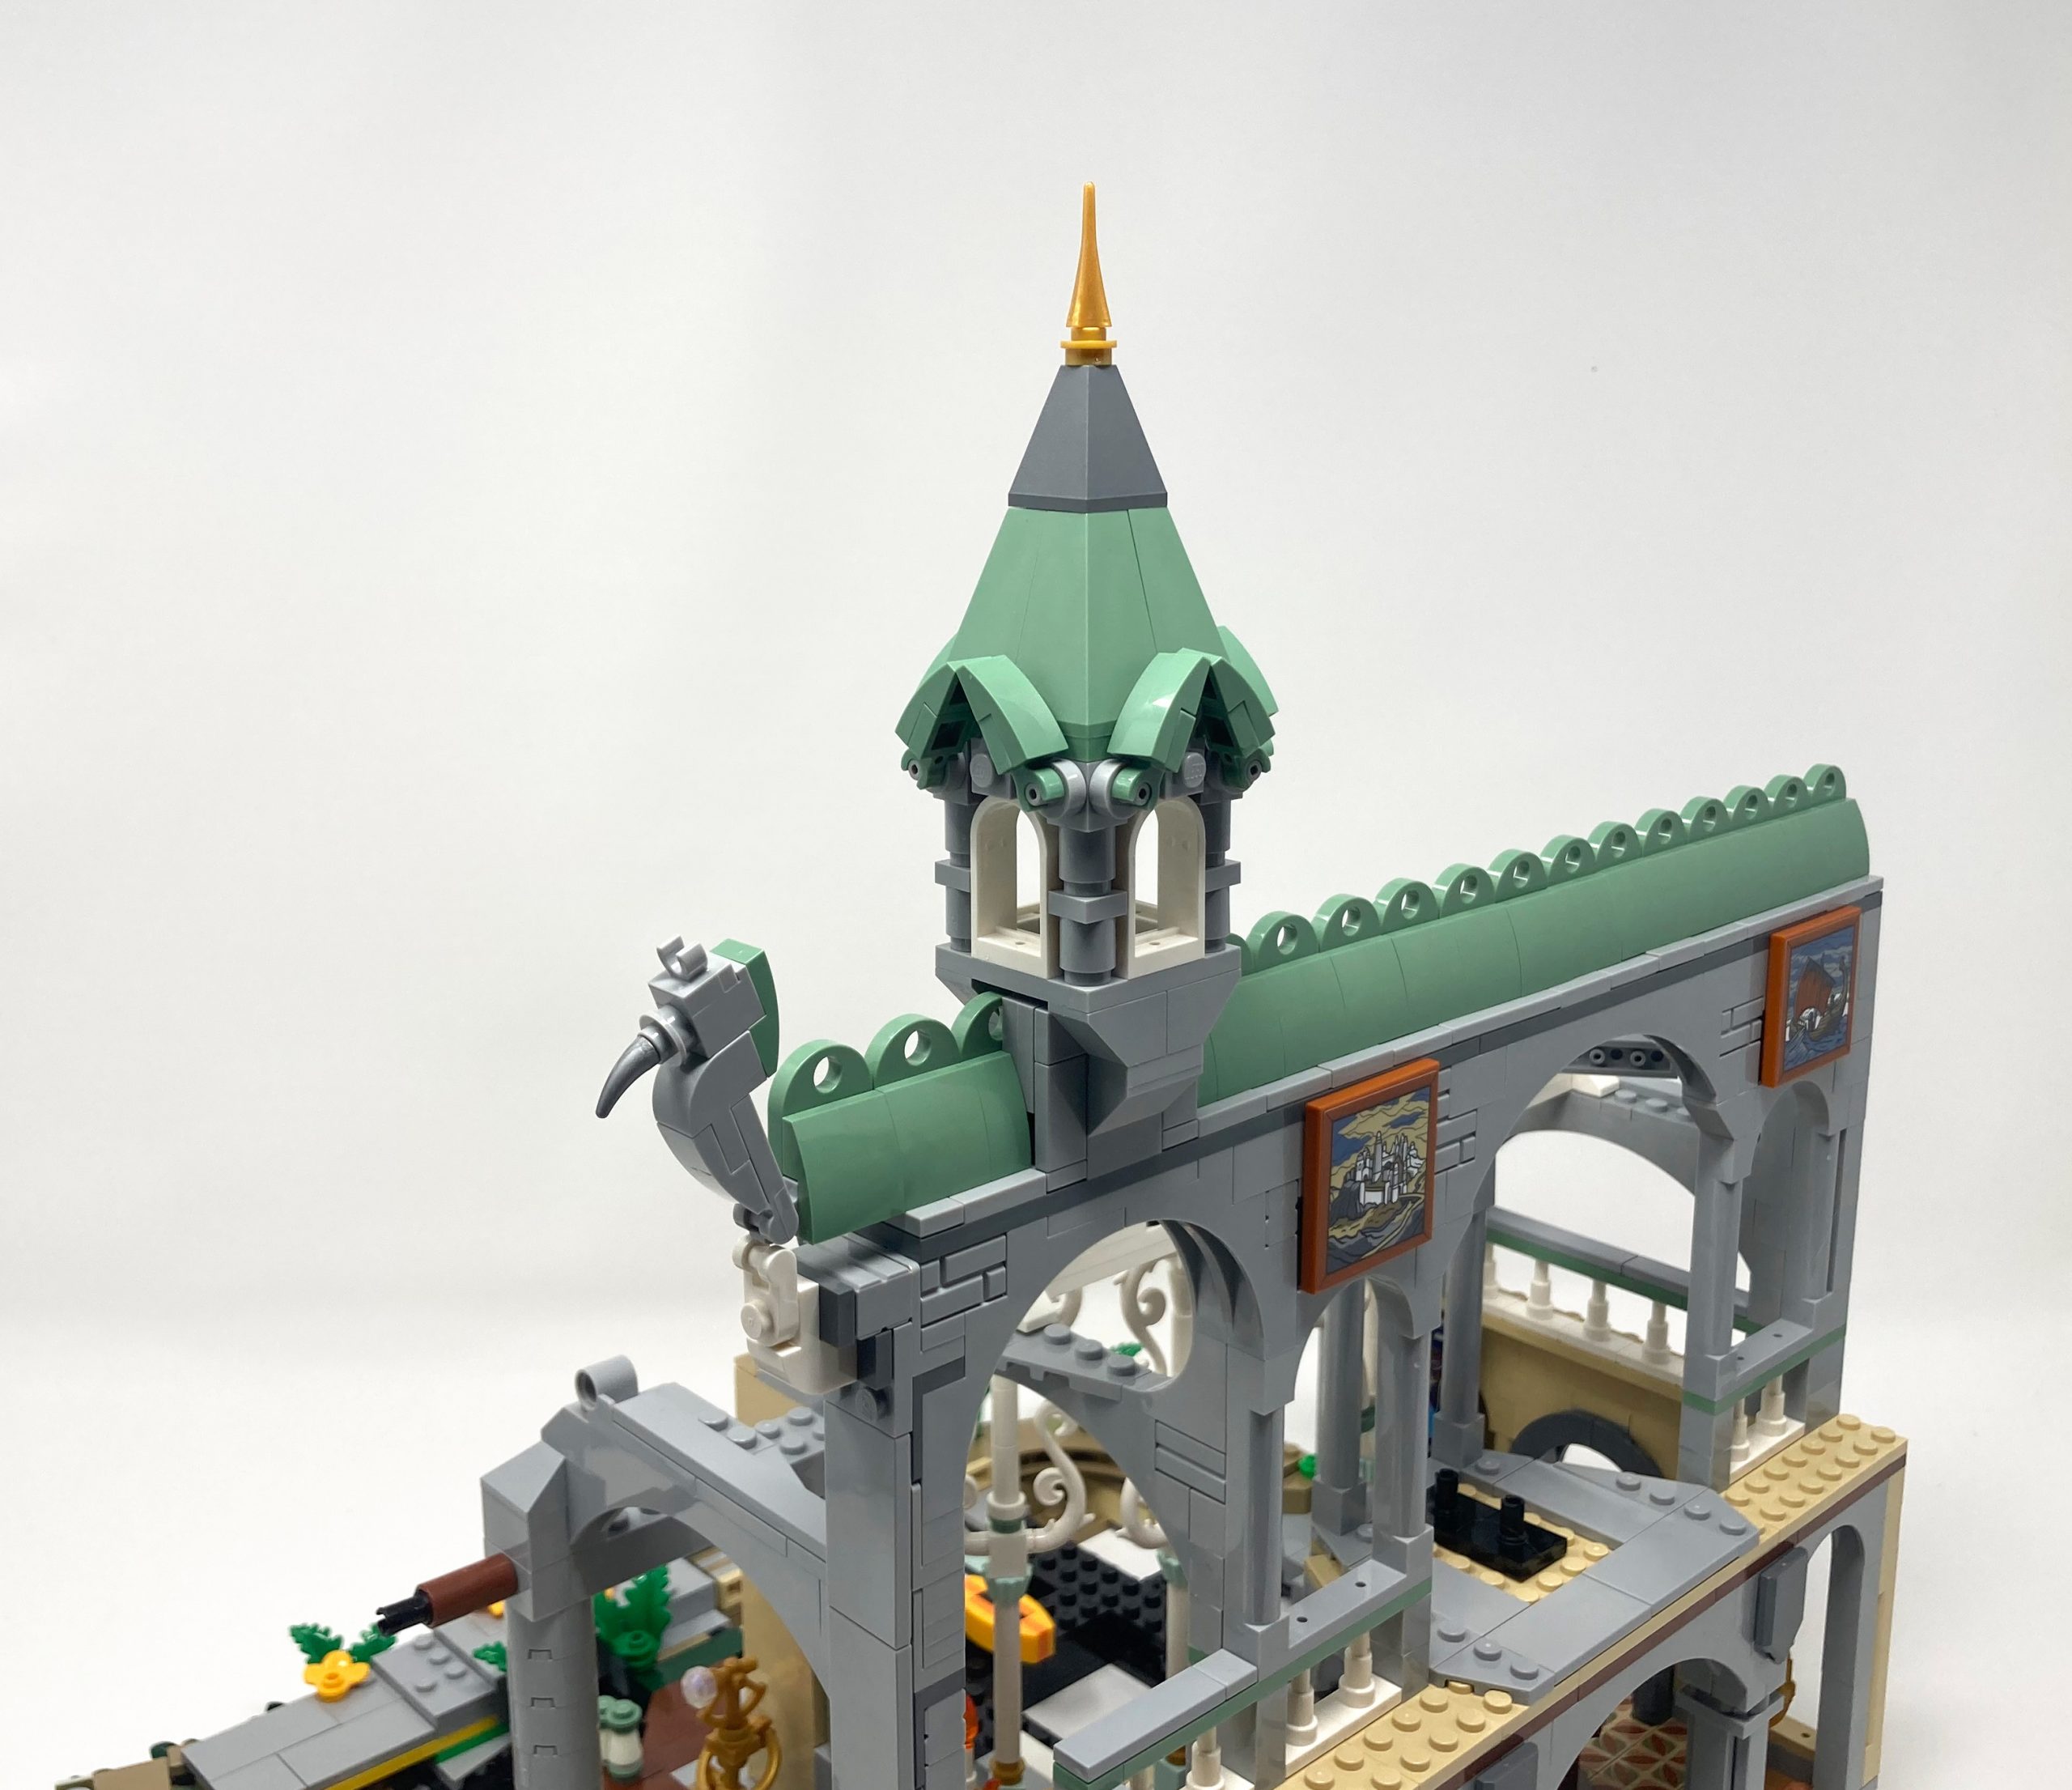
A stone bird watches over those in Rivendell.
Bags 37-38-39
The construction of the roof for this section is a mixture of emotions – both excitement and dread – due to the large number of tiles used. The final product is eye-catching with its intricate mosaic patterns using earthy colors. The roof includes a substantial number of 135Sand Blue, 5Brick YellowTan, 38Dark Orange, and 151Sand Green tiles arranged to highlight the contrasting colors and designs. The tiles are meticulously arranged to make sure the design can be appreciated from all angles. The attention to detail extends beyond the surface, with features running down the sides to make sure the beauty can be appreciated from all angles.
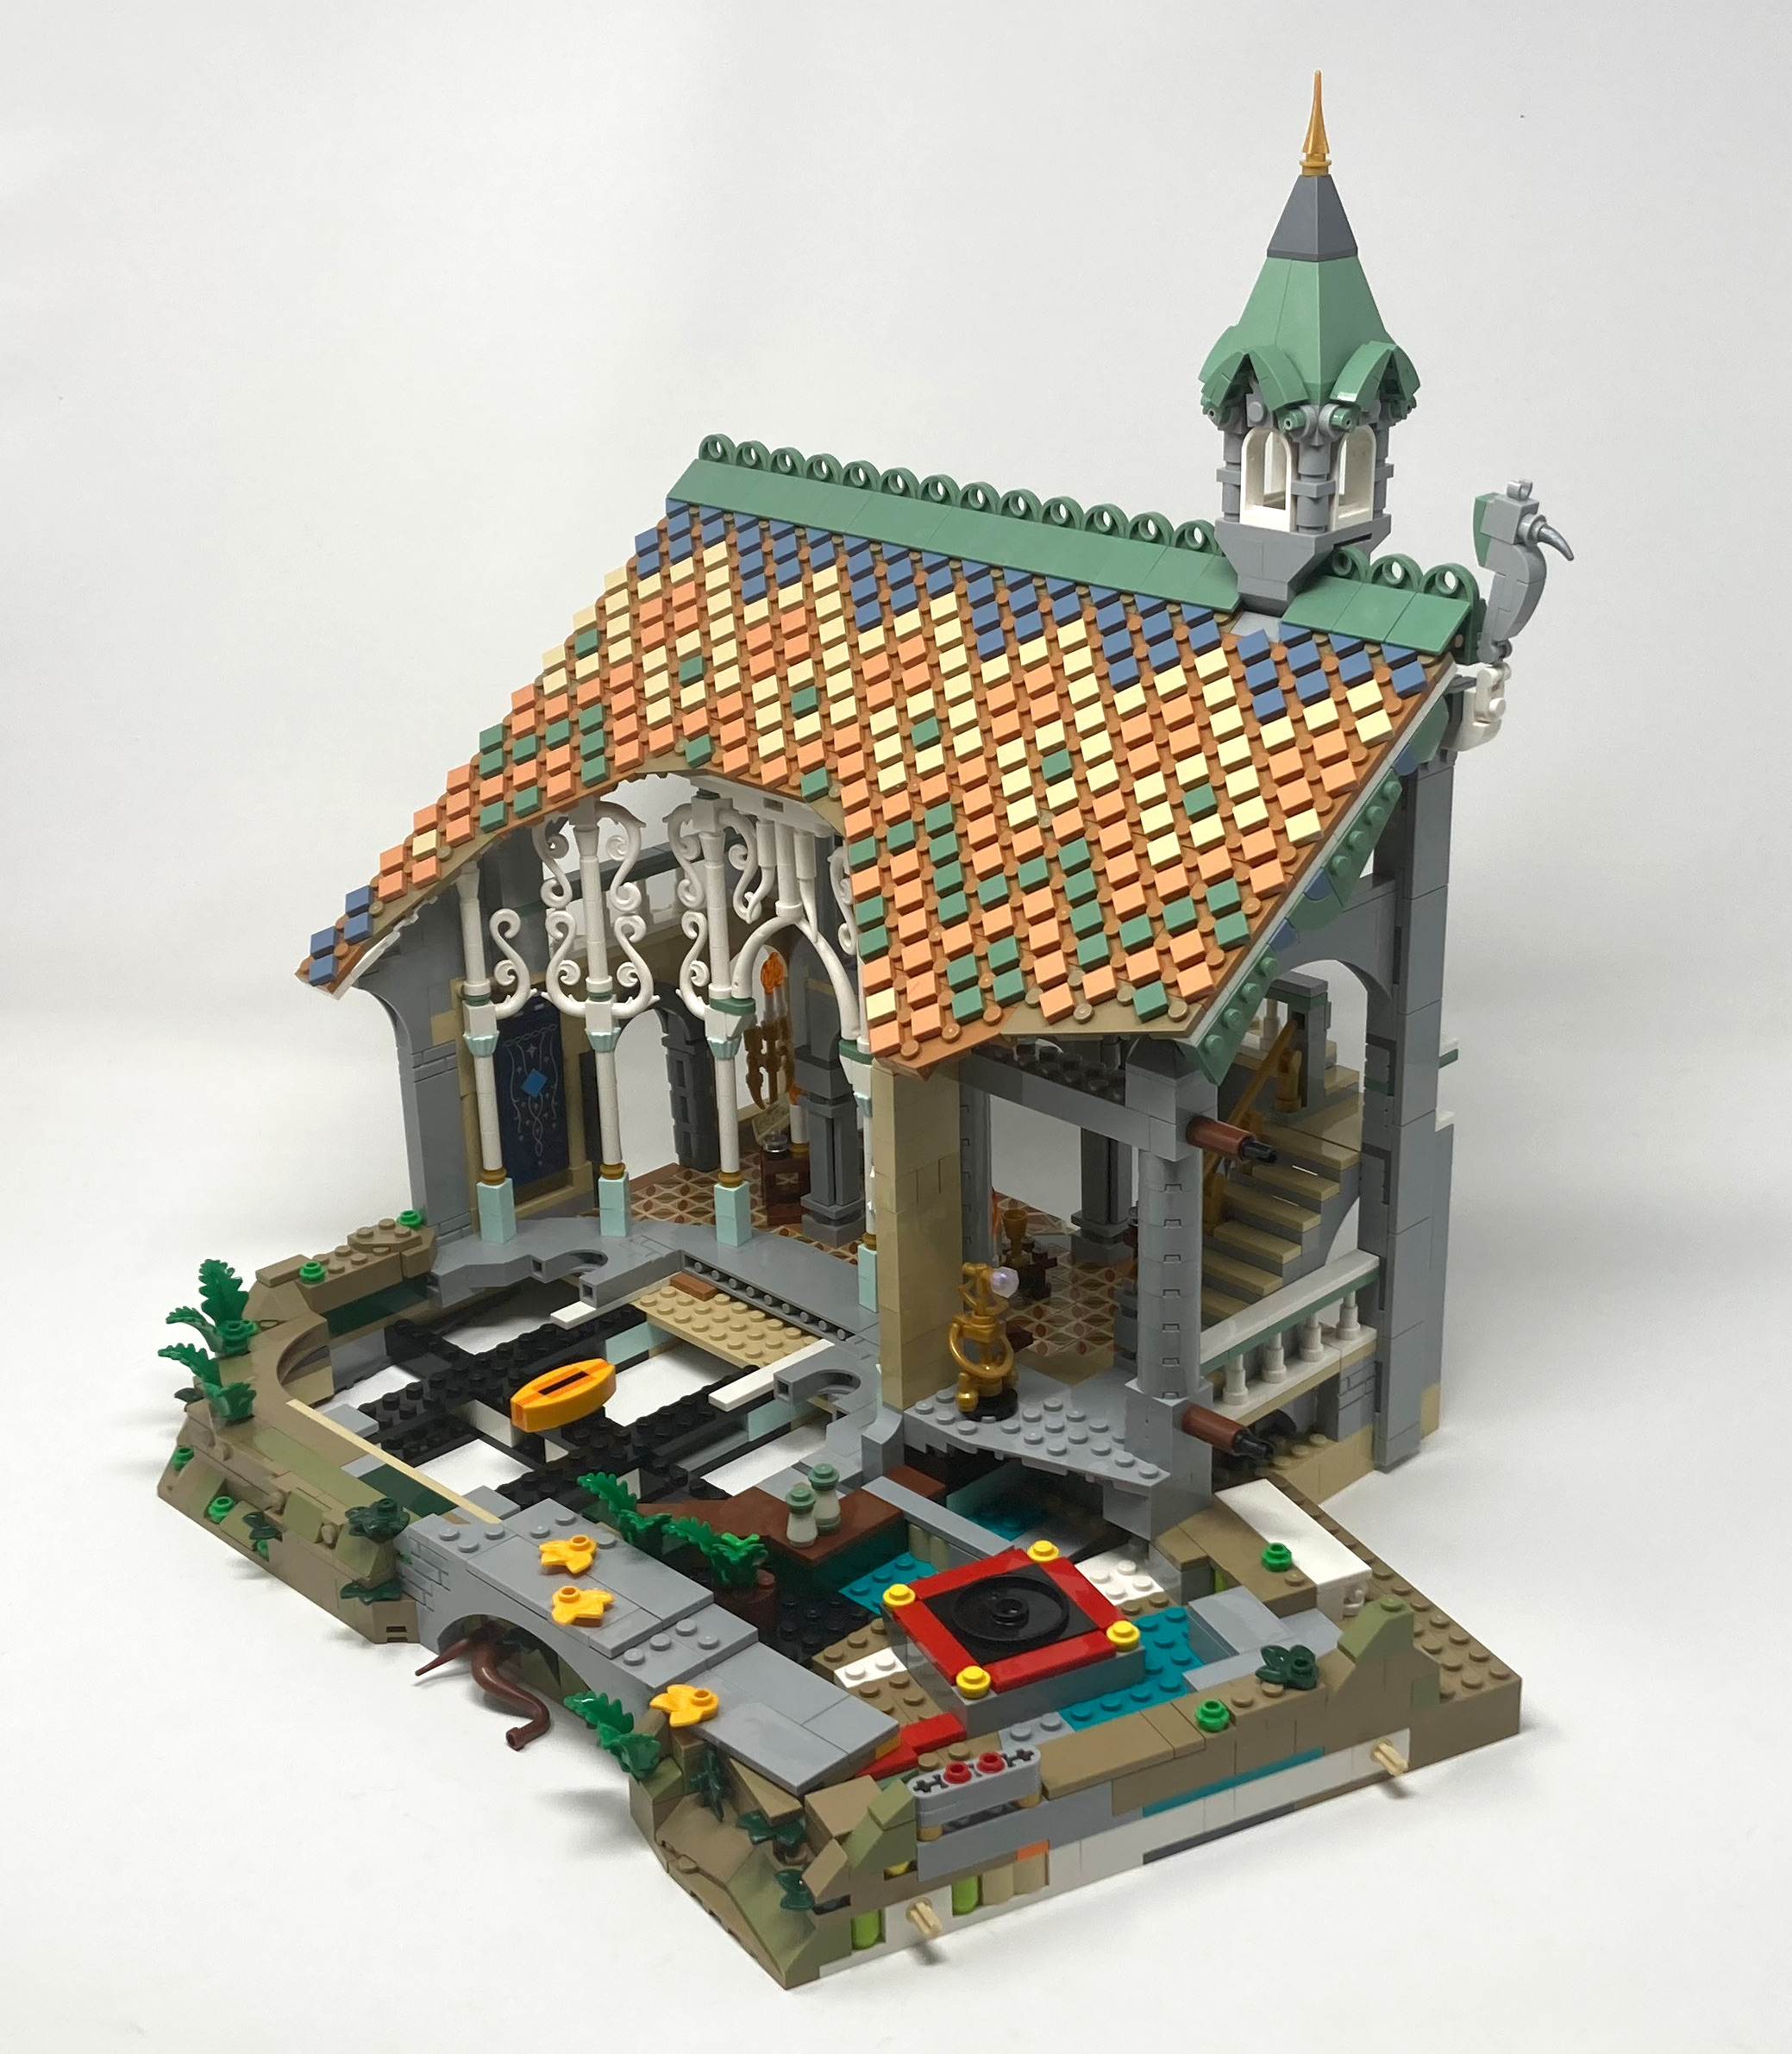
The roof never disappoints.
Bag 40
With the main house completed, the construction of a sunroom begins. The foundation of the sunroom is constructed from the center outward to enable the creation of varied depths, while keeping the top free from exposed studs.
The designers keep blowing us away with how cleanly they can create circular bases.
Albeit simple, the build for Lembas bread is immediately recognizable.
Bag 41
To support the roof of the sunroom, white decorative pillars are erected, contrasting in color and design from the internal structural pillars. The style of the sunroom is inspired by the main pillars in the hall and uses similar pieces as the earlier build. Decorative elements, such as two white marble statues on the front gable using unprinted trophy and bird pieces add to the airy aesthetic.
Different colored pillars signify support or cosmetic pillars which is a nice touch.
Resting atop all the arches are more of the tiled roof techniques that we saw on the main structure. The varied colors of this build create a salad of colors, letting it radiate while not being too busy.
Different colored pillars signify support or cosmetic pillars which is a nice touch.
The tiled roof on the sunroom arches continues the pattern established in the main structure. The range of colors used, including earthy tones and manmade hues, creates a harmonious blend of colors that gives the sunroom a vibrant yet balanced appearance.
The angled room creates a nice shape for the entire space.
Bags 42-43
A fully grown tree is constructed with , and 28Dark GreenGreen leaves, giving it a natural and realistic appearance. The sapling, on the other hand, is smaller in size and has a lighter green color. Both trees complement the surrounding environment and add to the overall aesthetic of the space. The use of technic holes and pin connections not only ensures stability as the trunks are very thin.

The trunk is connected to the building for stability.
This unique tree design resembles a pine tree, with its foliage created exclusively using leaves. The needle-like effect is achieved by arranging the leaves in a way that they build upwards, held closely to the trunk. The leaves come in three different colors, gradually lightening as they rise up the tree, creating a gradient effect.
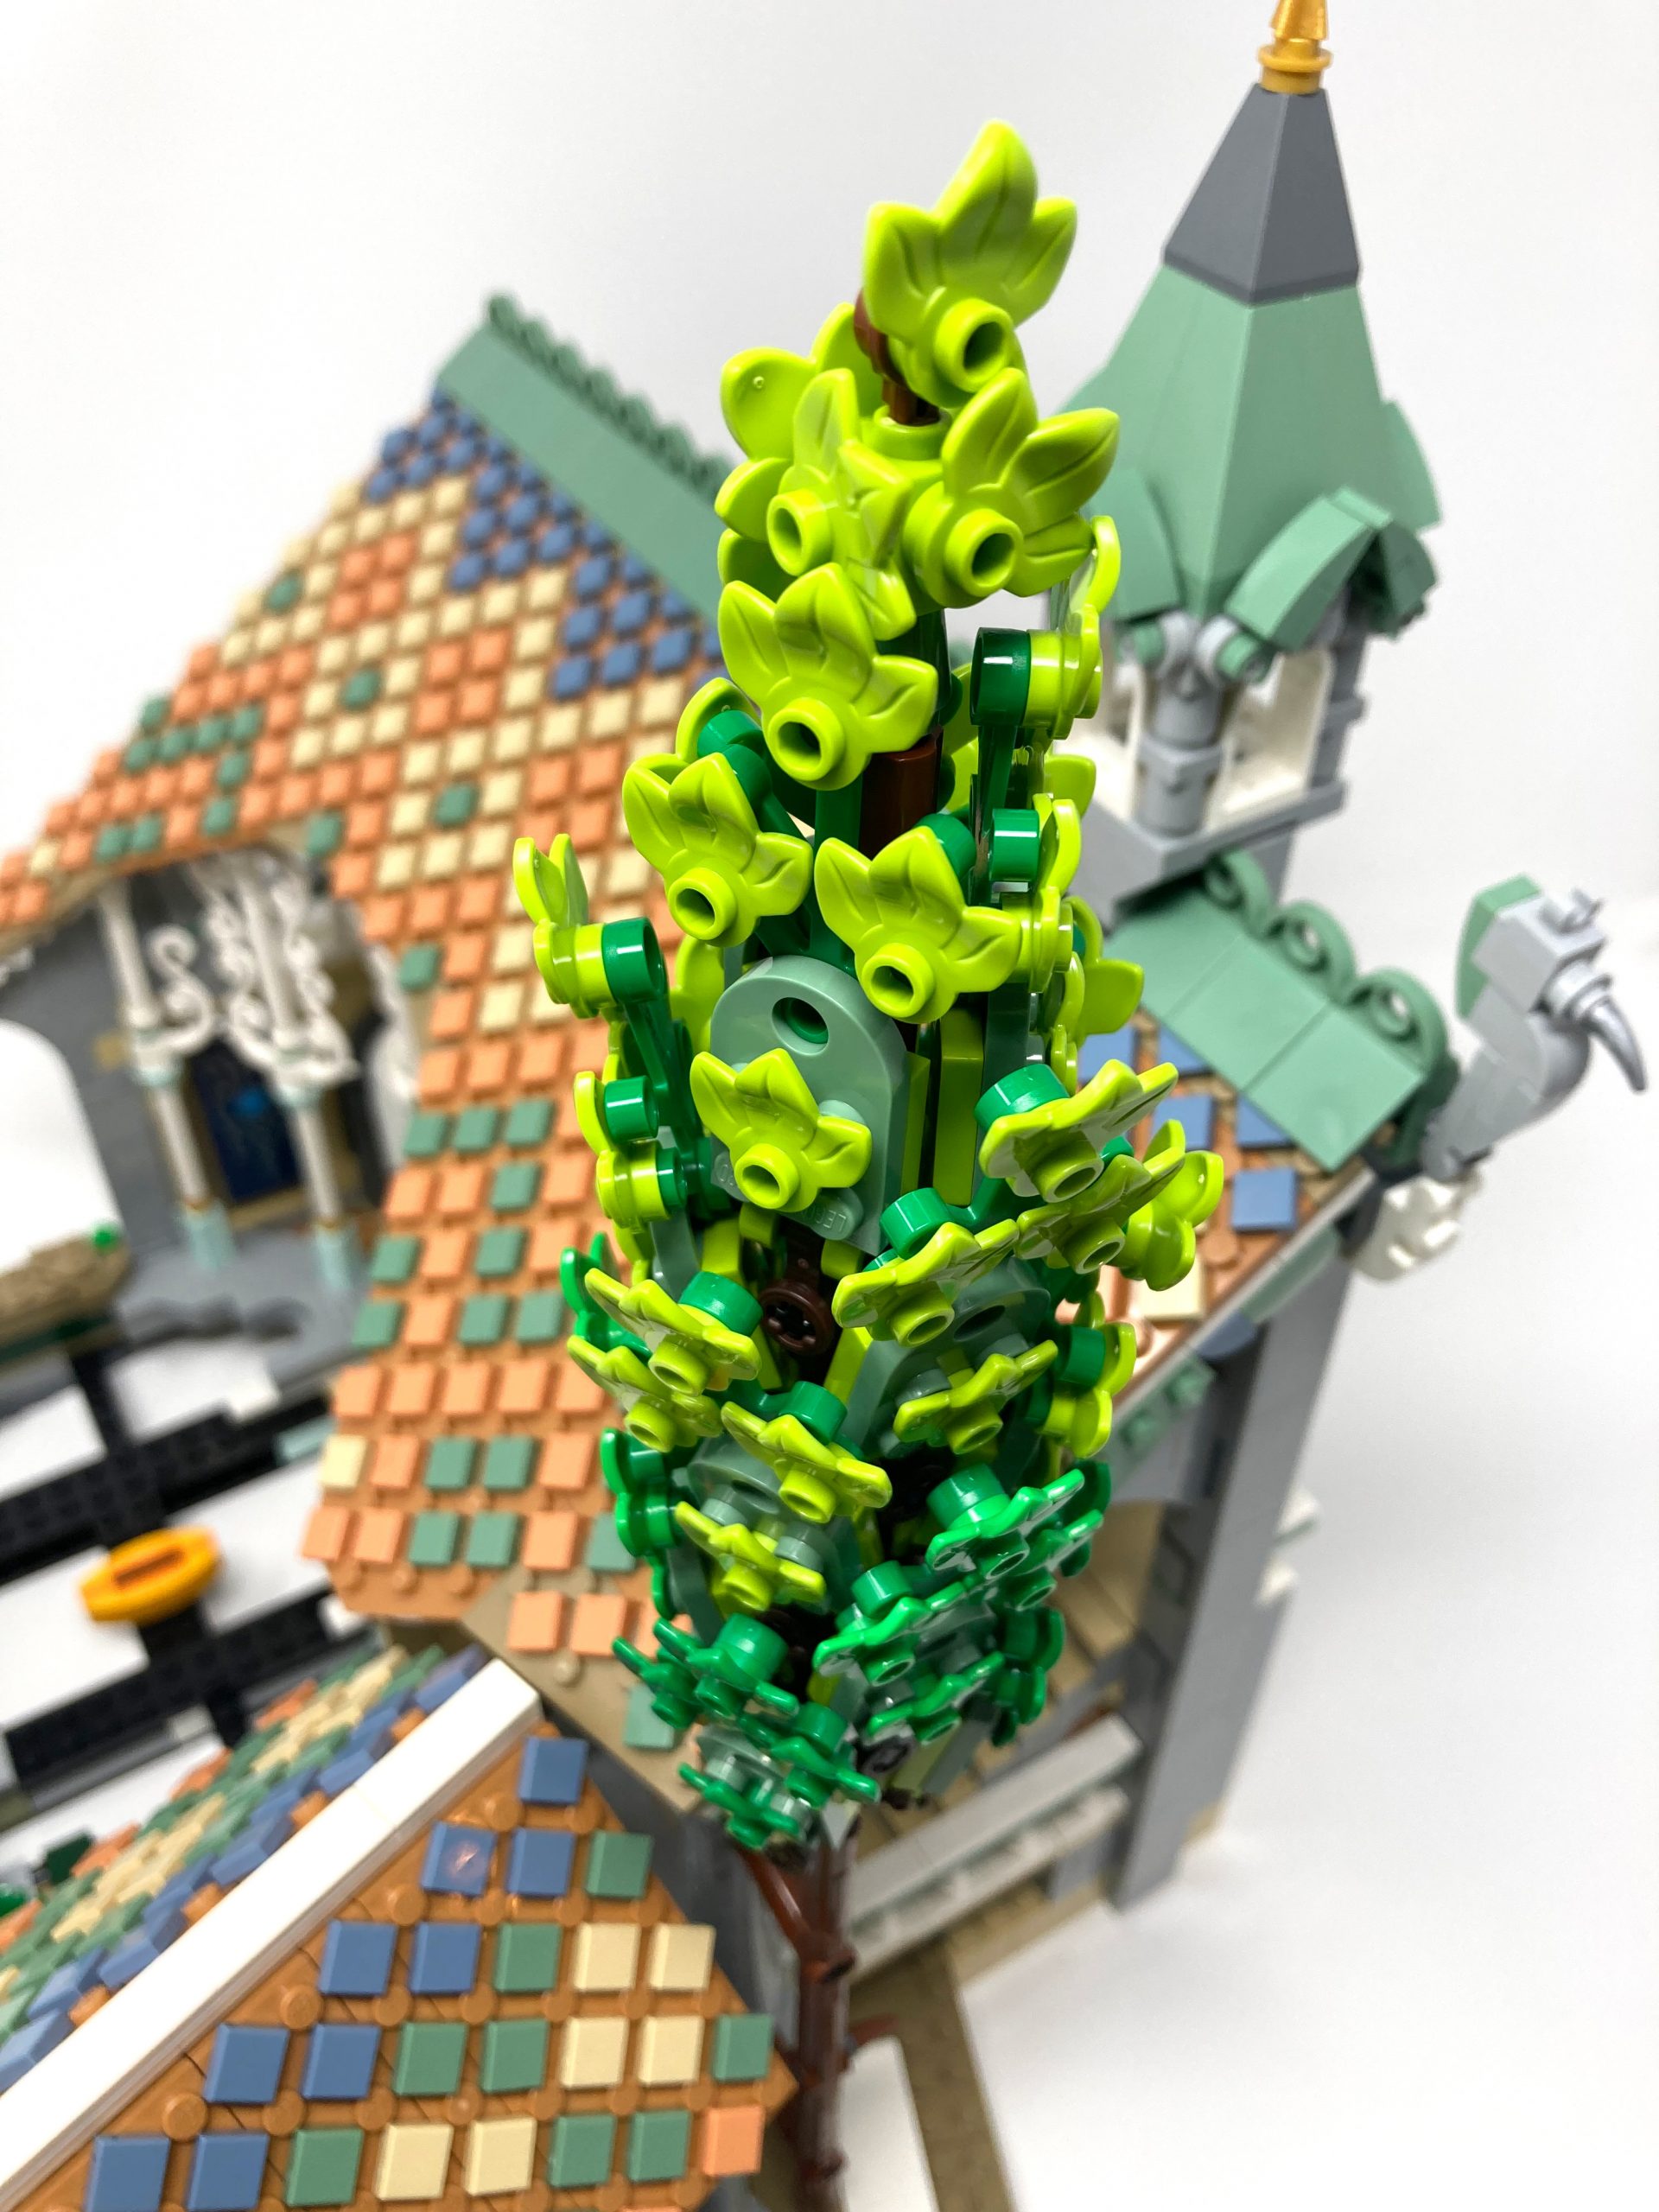
The leaves get gradually lighter the higher up they go.
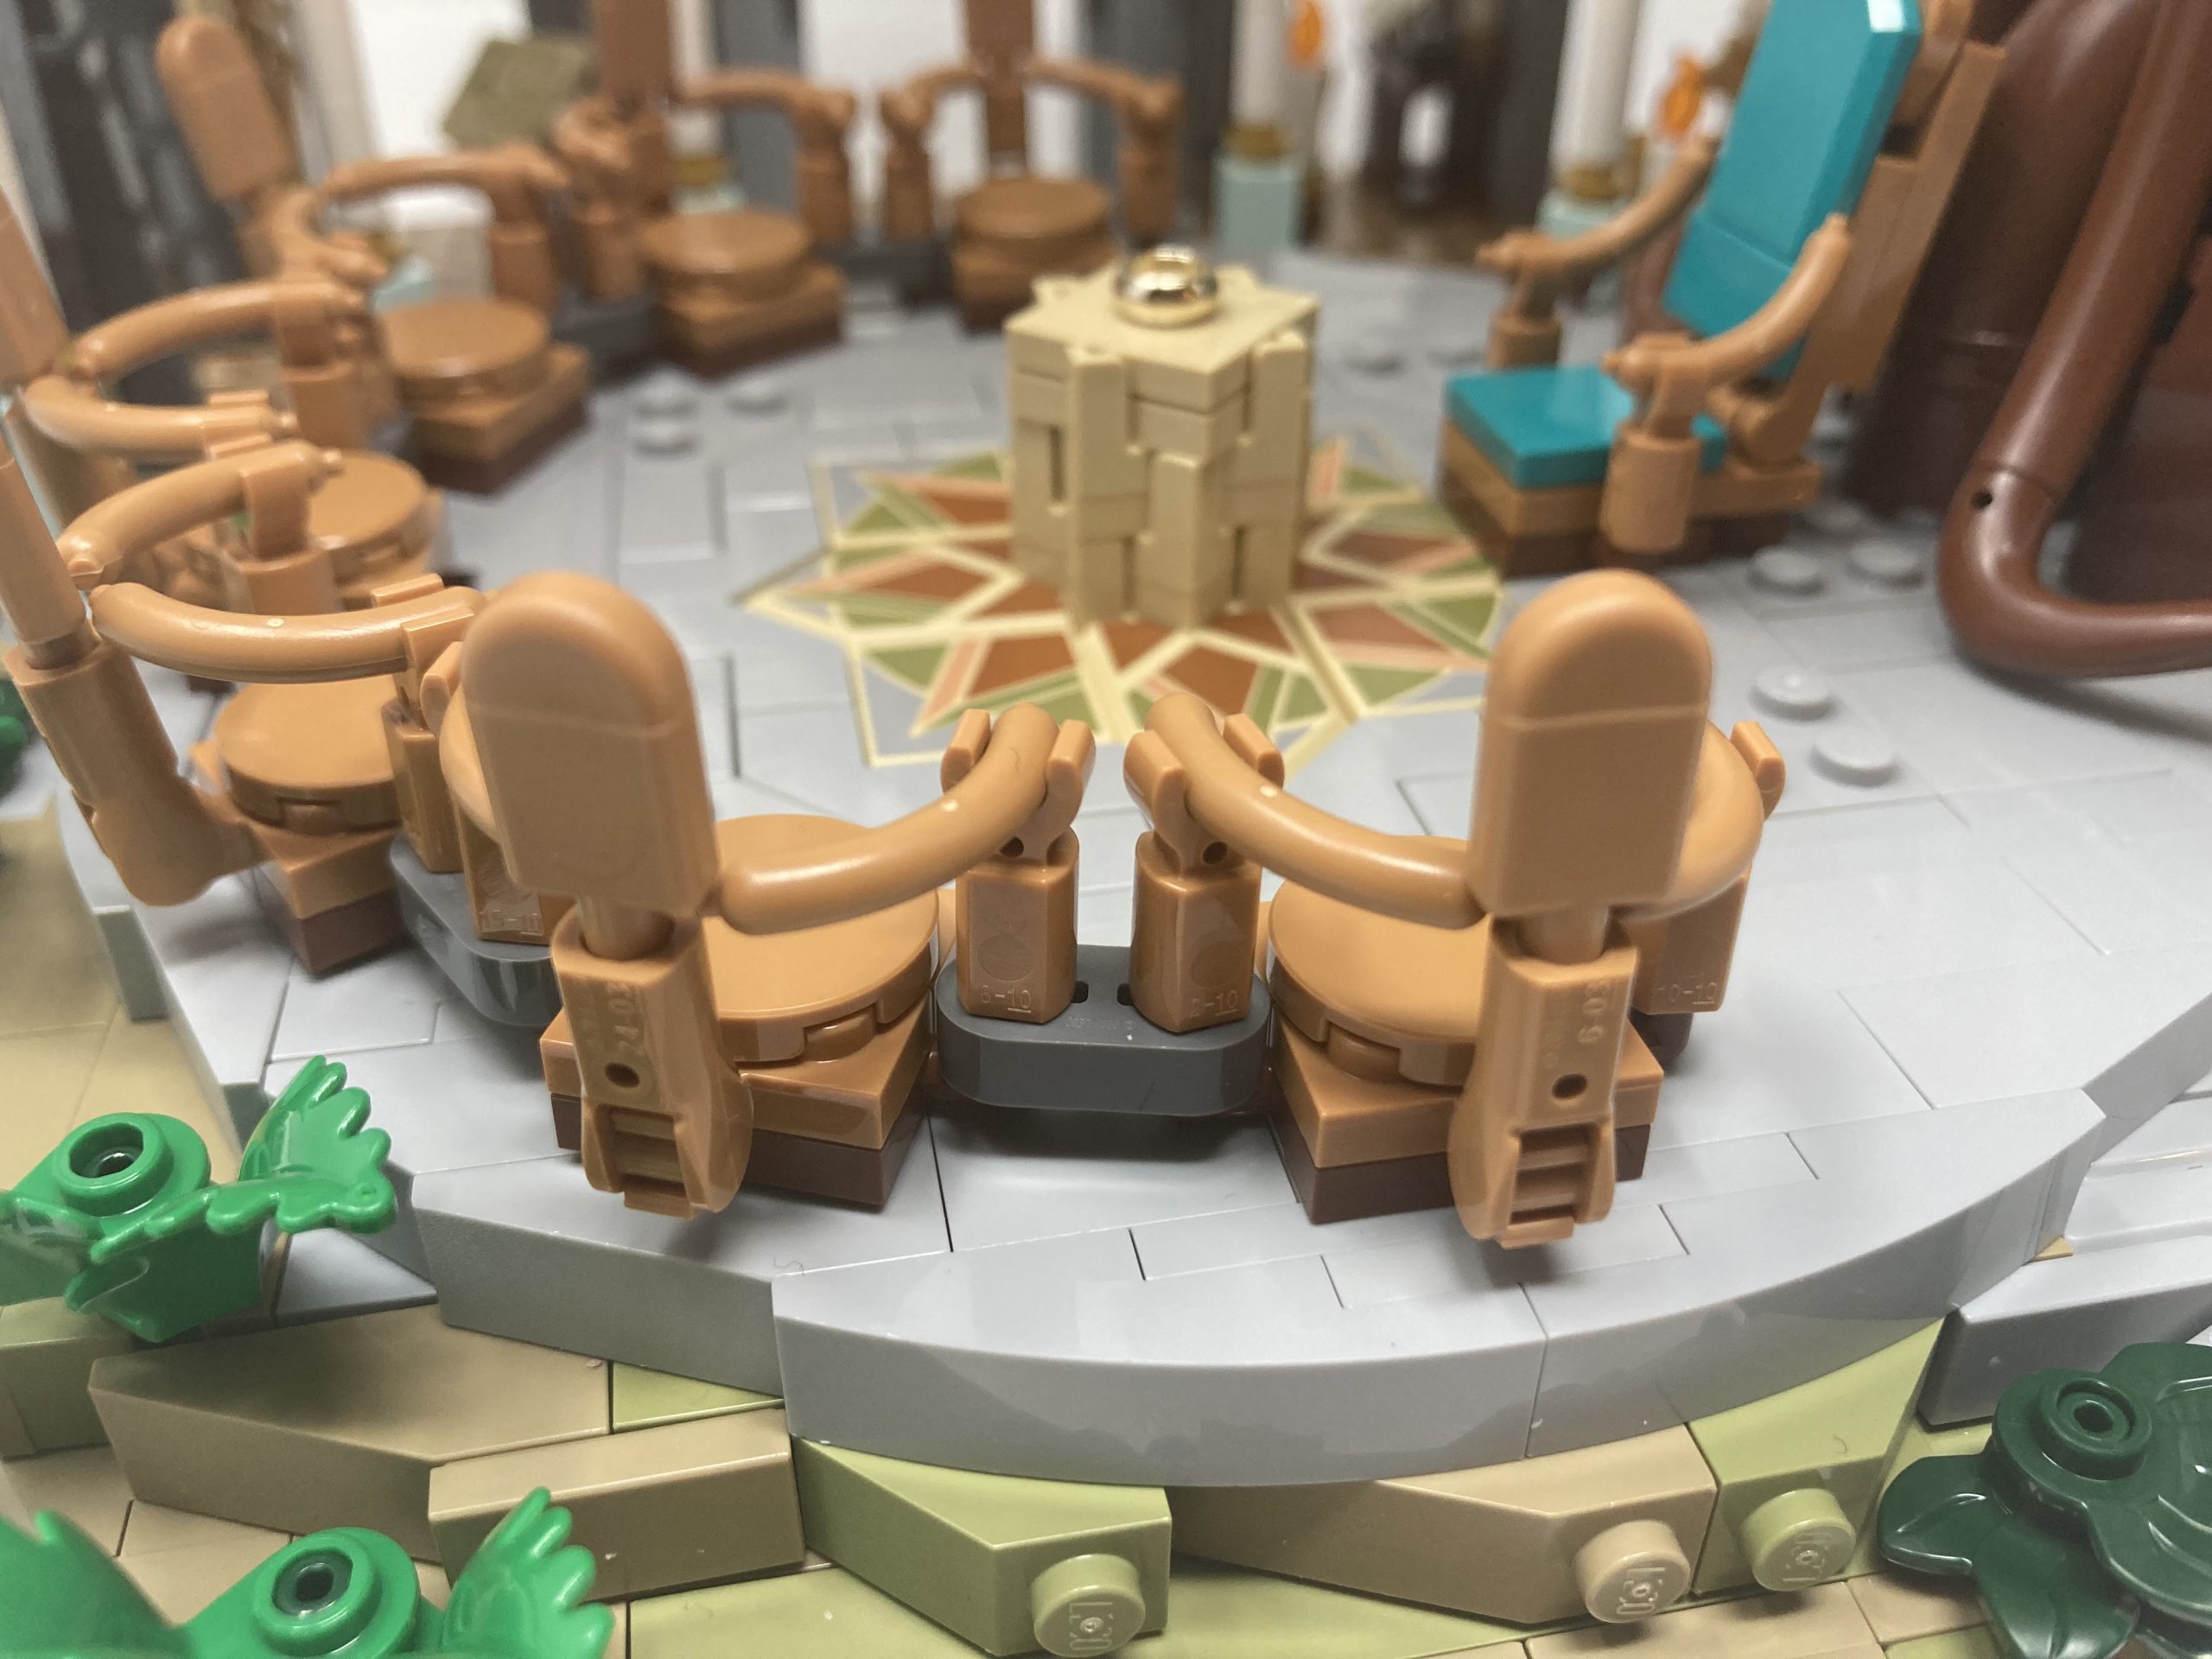
Bags 44-45
With the final spaces being filled in, the construction of the council chamber is the last major task at hand. The building techniques used for this structure are consistent with the rounded foundations used for other structures. The base is built from the center outwards, with studs on the sides and a rounded edge. The base is built to double height, with a wider base resting on top of a smaller circular base. The stacking of levels at different sizes creates steps, enabling the designers to smoothly blend the man-made stone into the natural, earthy shapes beneath it.
The most rounded of the bases in this set are used for the most important section.
Bag 46

The seats are equidistant from each other in a nice rounded pattern.
Bag 47
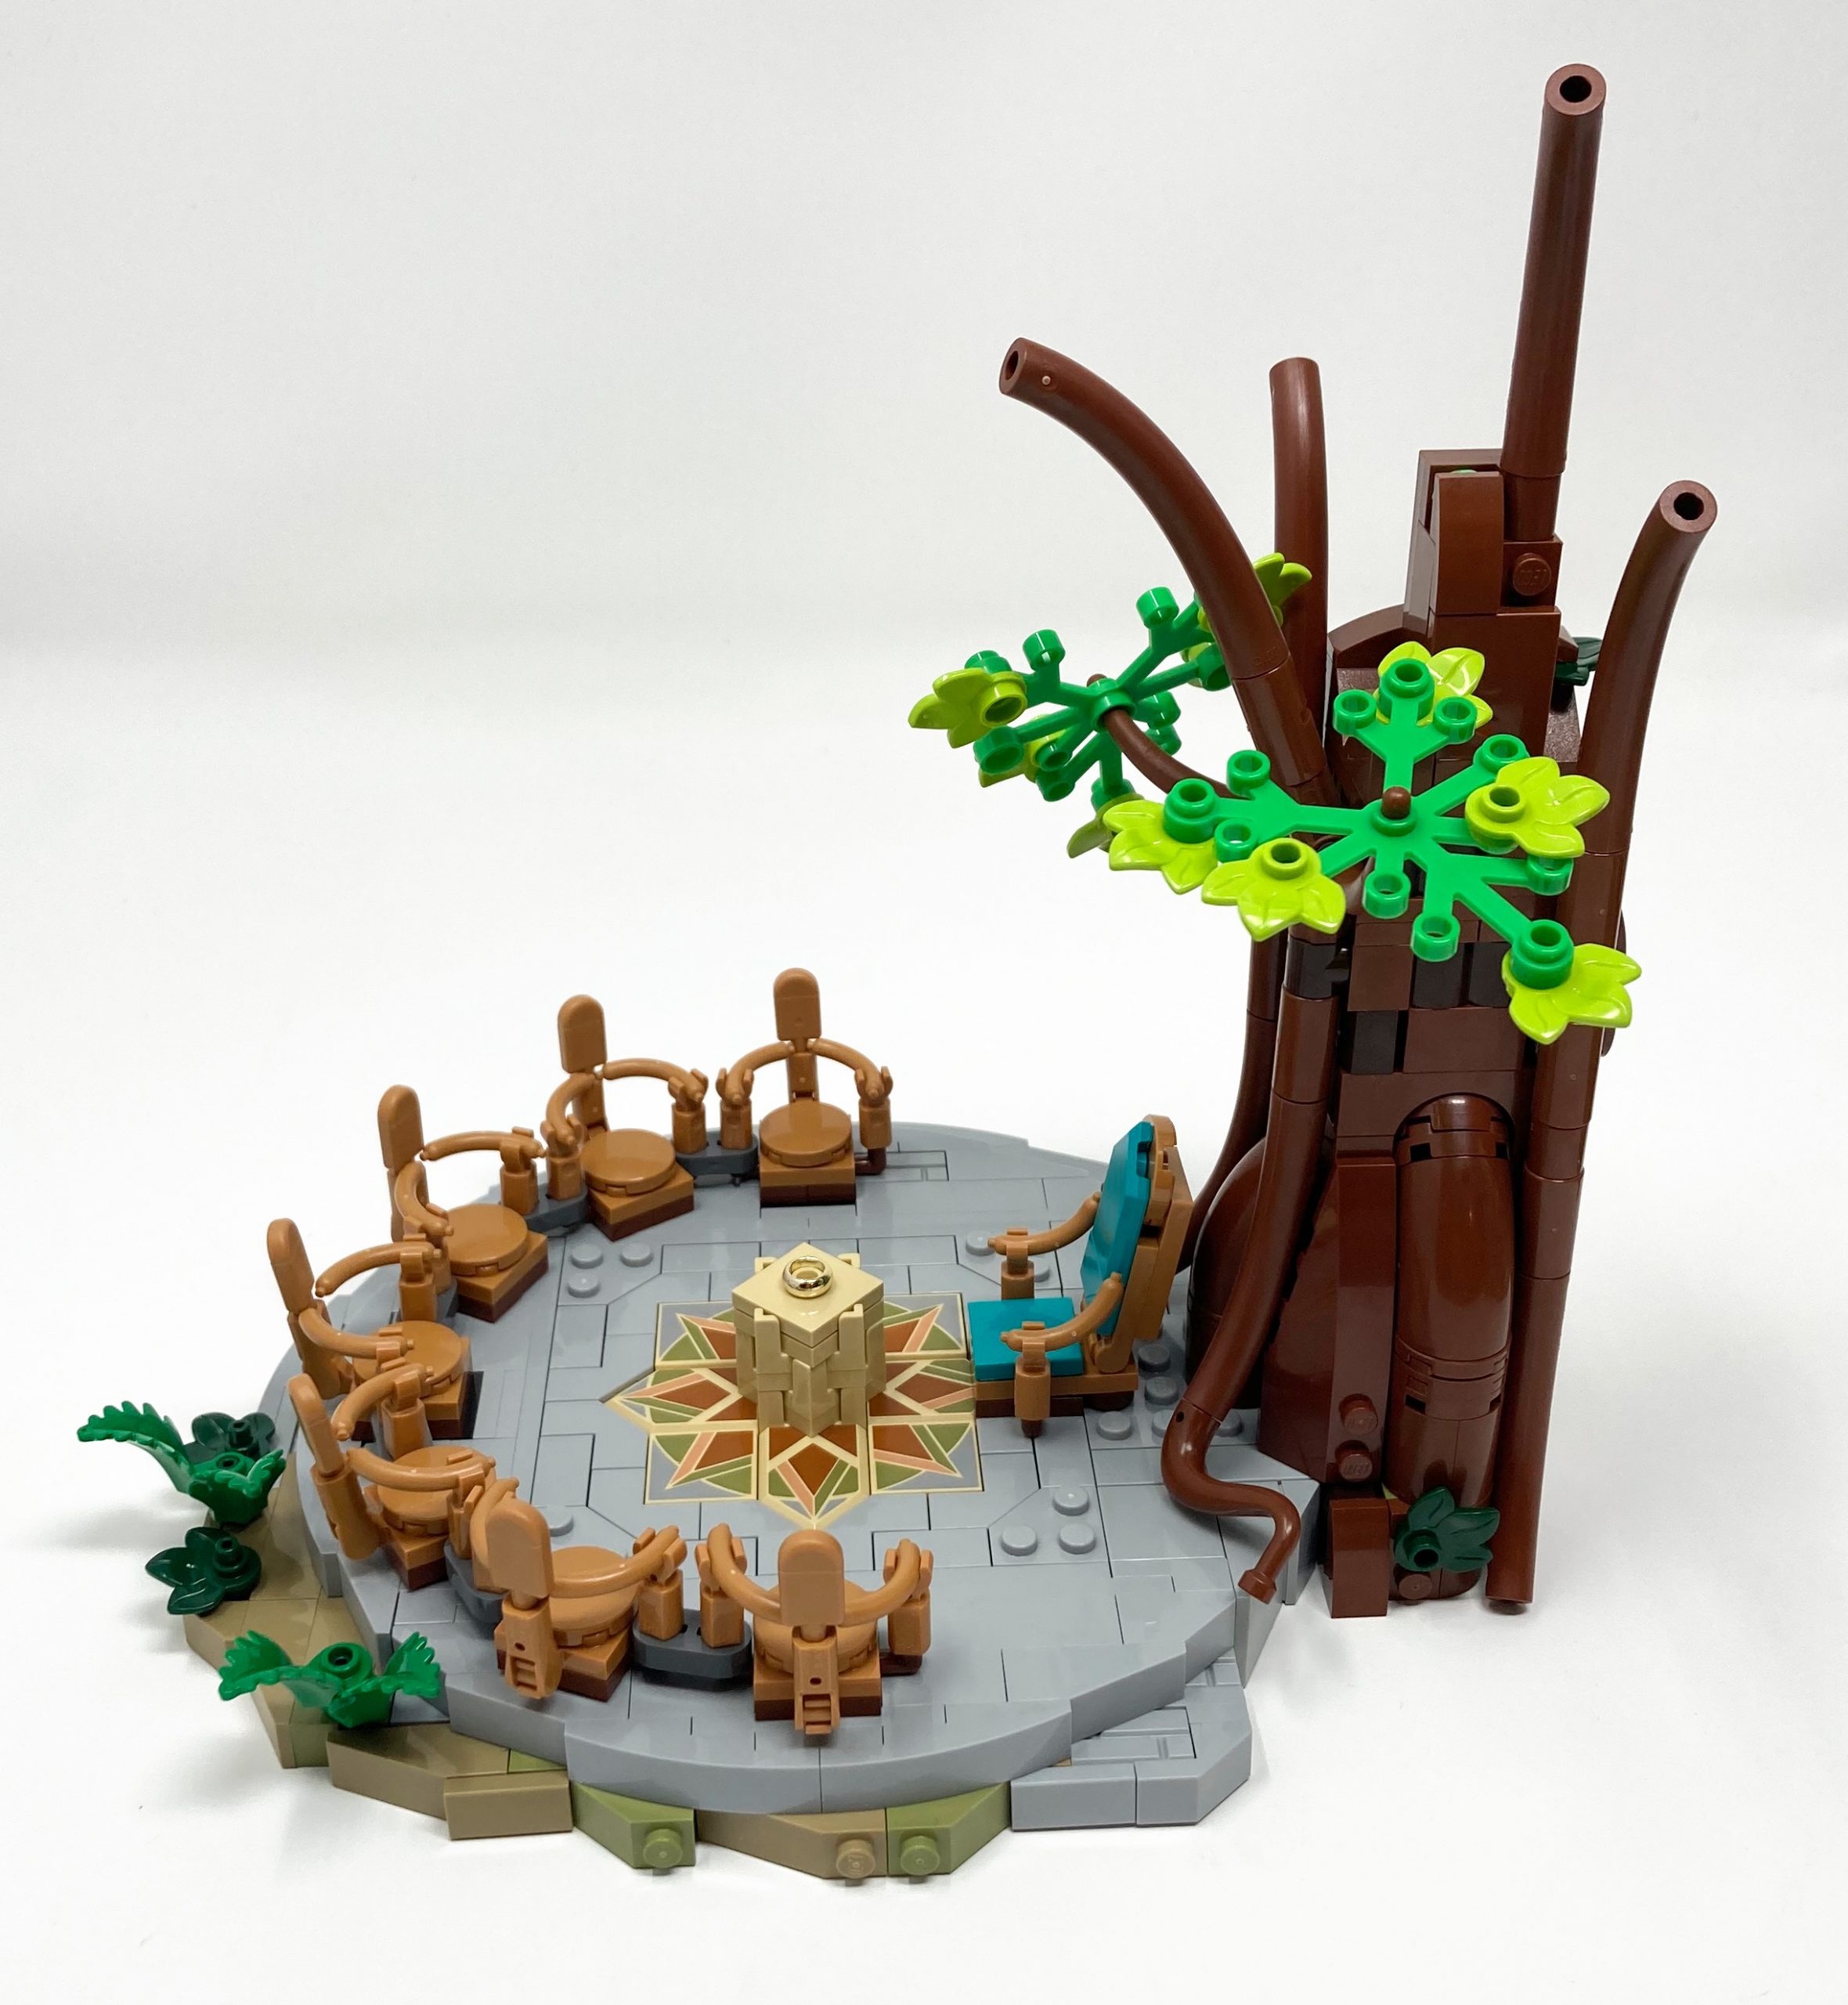
The tree looms tall over the seats.
Bags 48-49
In the final stretch of building, we add the final touches to complete Rivendell. The first addition is a statue in the hall that holds the shattered pieces of Narsil, a magnificent molded weapon. This statue is placed on the second floor of the hall. On the ground floor, we build a large drafting table that showcases a map of Middle Earth, complete with intricate details of the iconic structures that the Fellowship encounters on their journey throughout the story. The map is brought to life with stickers that highlight the most significant landmarks.

A sticker is used to display the details on the map.
The weapons are modeled after those designed by Weta Workshop for the films.
In addition to the brick-built seating attachments, the set also includes a variety of figures with different leg types. The figures are all movable except for Hobbit legs and robes. The designers have creatively found ways to include seating options for these figures, making them more display-able. For example, the robes can be replaced with a slope and bracket combination that includes the same printing as the robe legs, while the Hobbits’ seating position is created using headlight pieces. This is a great example of designers thinking outside the box and finding unique solutions to challenges. I hope that this technique is employed in future sets.
This is the first time I have seen this technique used to allow figures to sit.
A ornate pedestal backed by a statue is built to display one of the prized pieces of this set, the shards of Narsil. Beautiful studs on the side construction allow for a rounded base (a common theme in this set) with a contrasting blue and grey putting emphasis on the blade. A textured brick is used at the base to add depth and detailing which contrasts the smoothness of the rest of the pedestal.
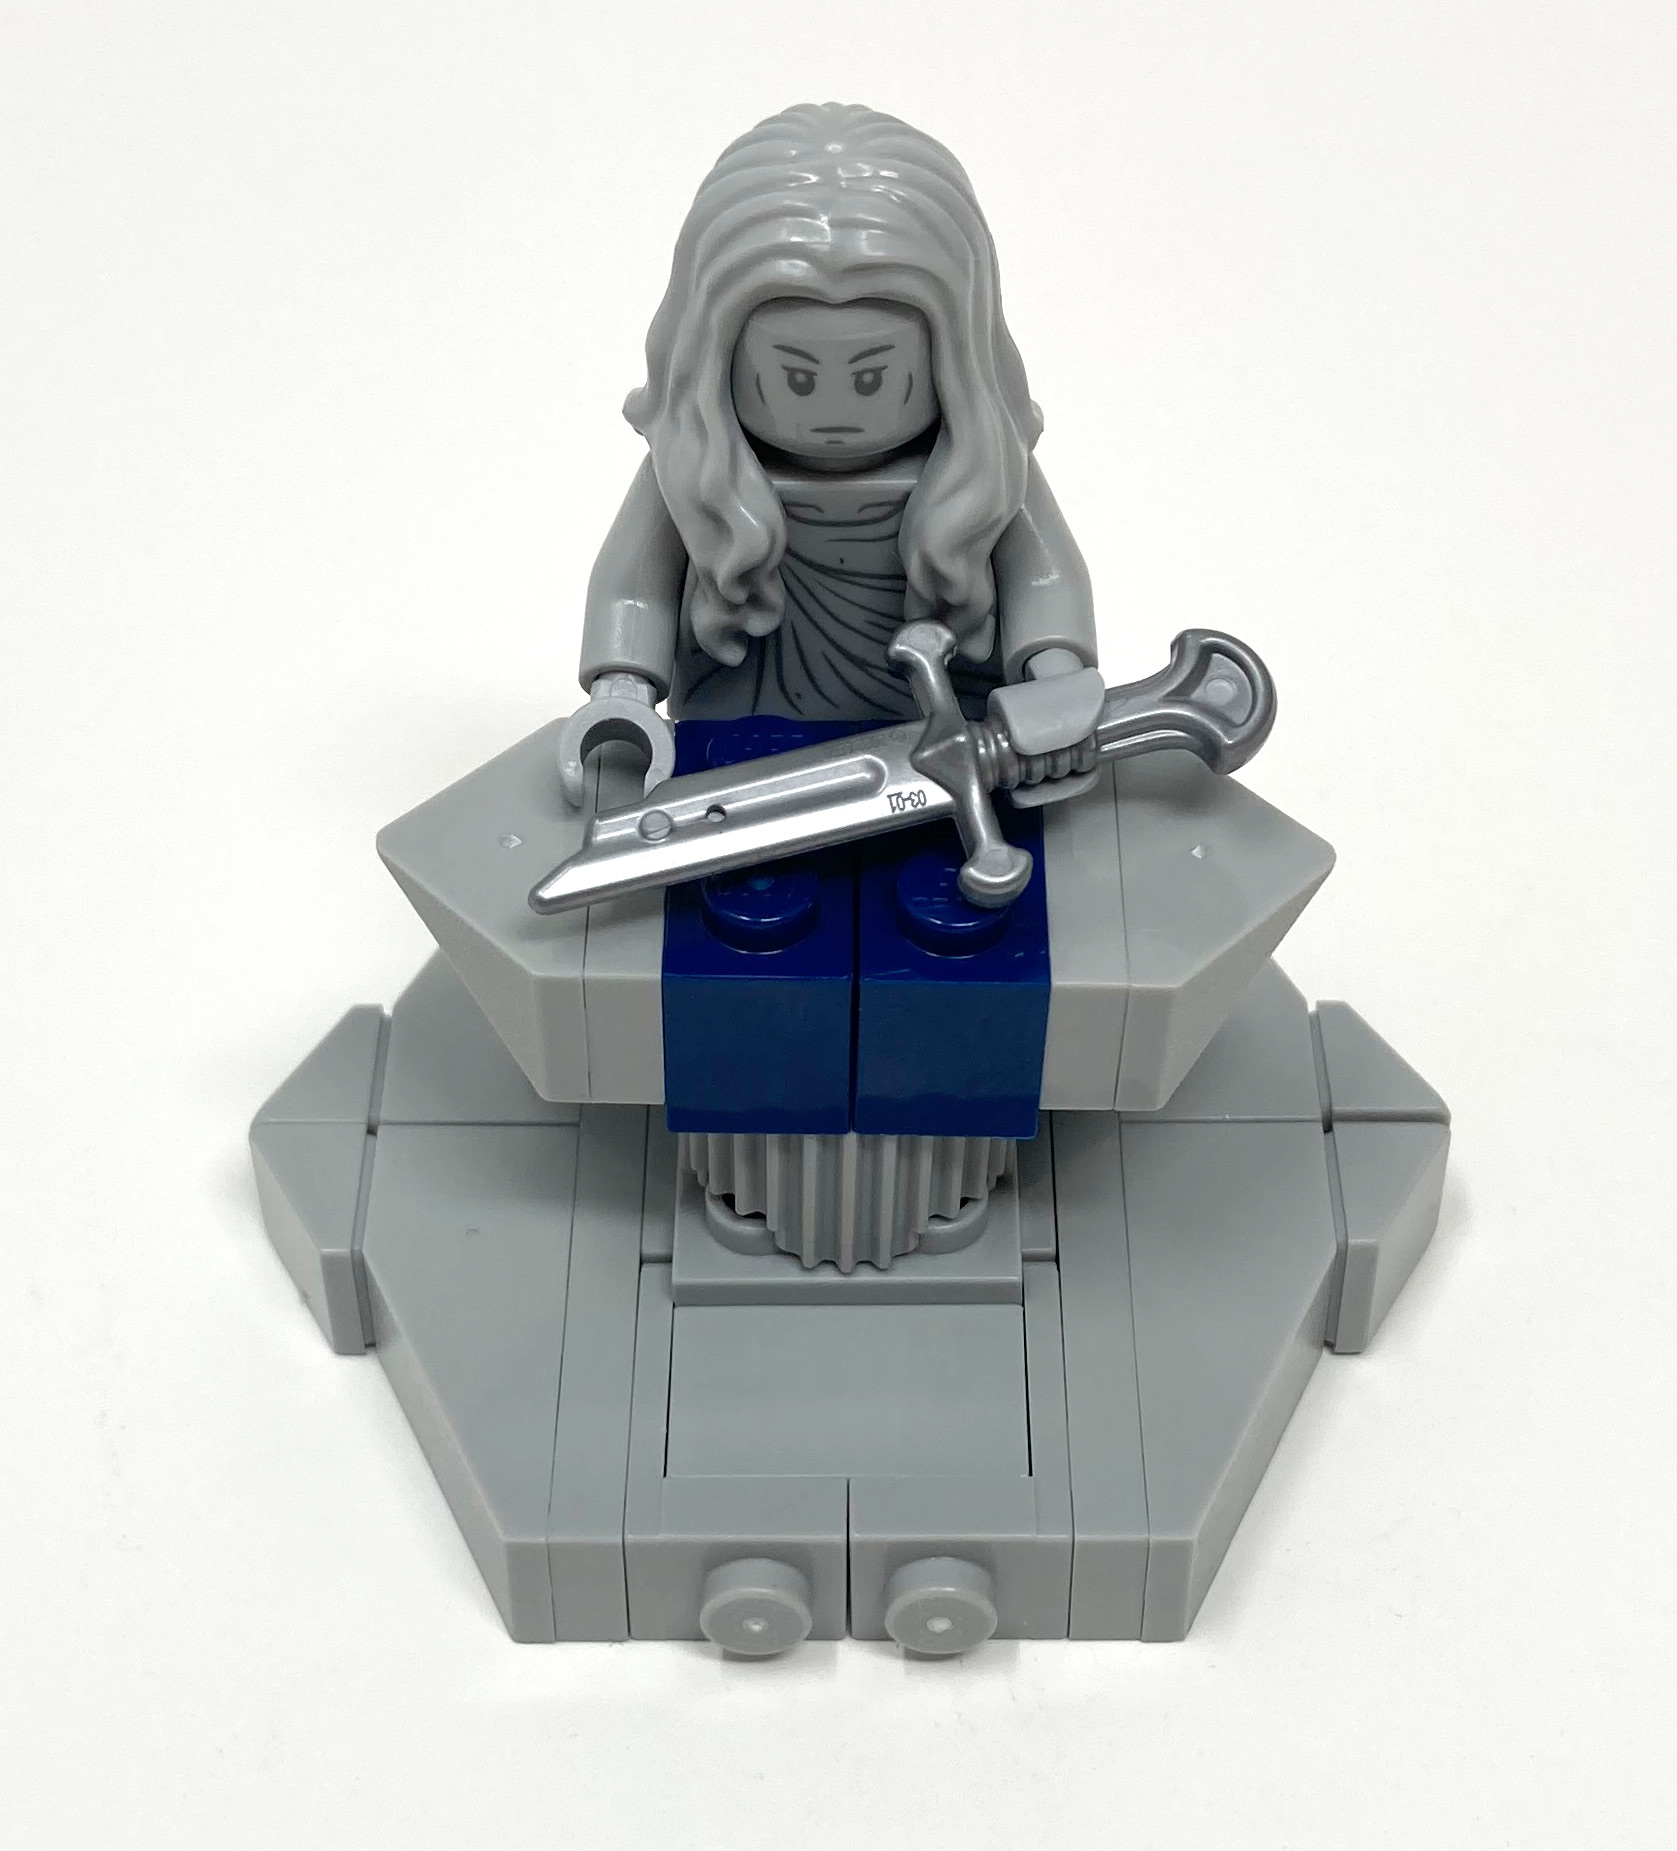
This set comes with two shards of Narsil.
The Council space can be removed to act as its own stand alone display piece.
Section 3 Wrap Up
From the grand halls to the council space, this section concludes by highlighting many iconic scenes from the films. The designers have not overlooked any details, using carefully selected stickers to enhance the brick-built environment. Every piece feels precisely chosen to fit the set, adding all the necessary elements to make it movie accurate.
The colors blend together harmoniously allowing all the detailed patterns to stand out.
Parts in this set
Minifigures
For those who have previously owned a Lord of the Rings set from the first wave, the minifigures may look familiar. These figures have been updated with added details to match the current standard of minifigures. At first glance, they may appear to be the same, but this only highlights how well-designed the original figures were. The set includes 21 figures, which is typical for a set of this size. To provide a comparison, I have retrieved some of my original figures from the first wave to compare them side-by-side. Some comparisons cannot be made as this set includes some figures that have never been seen before.
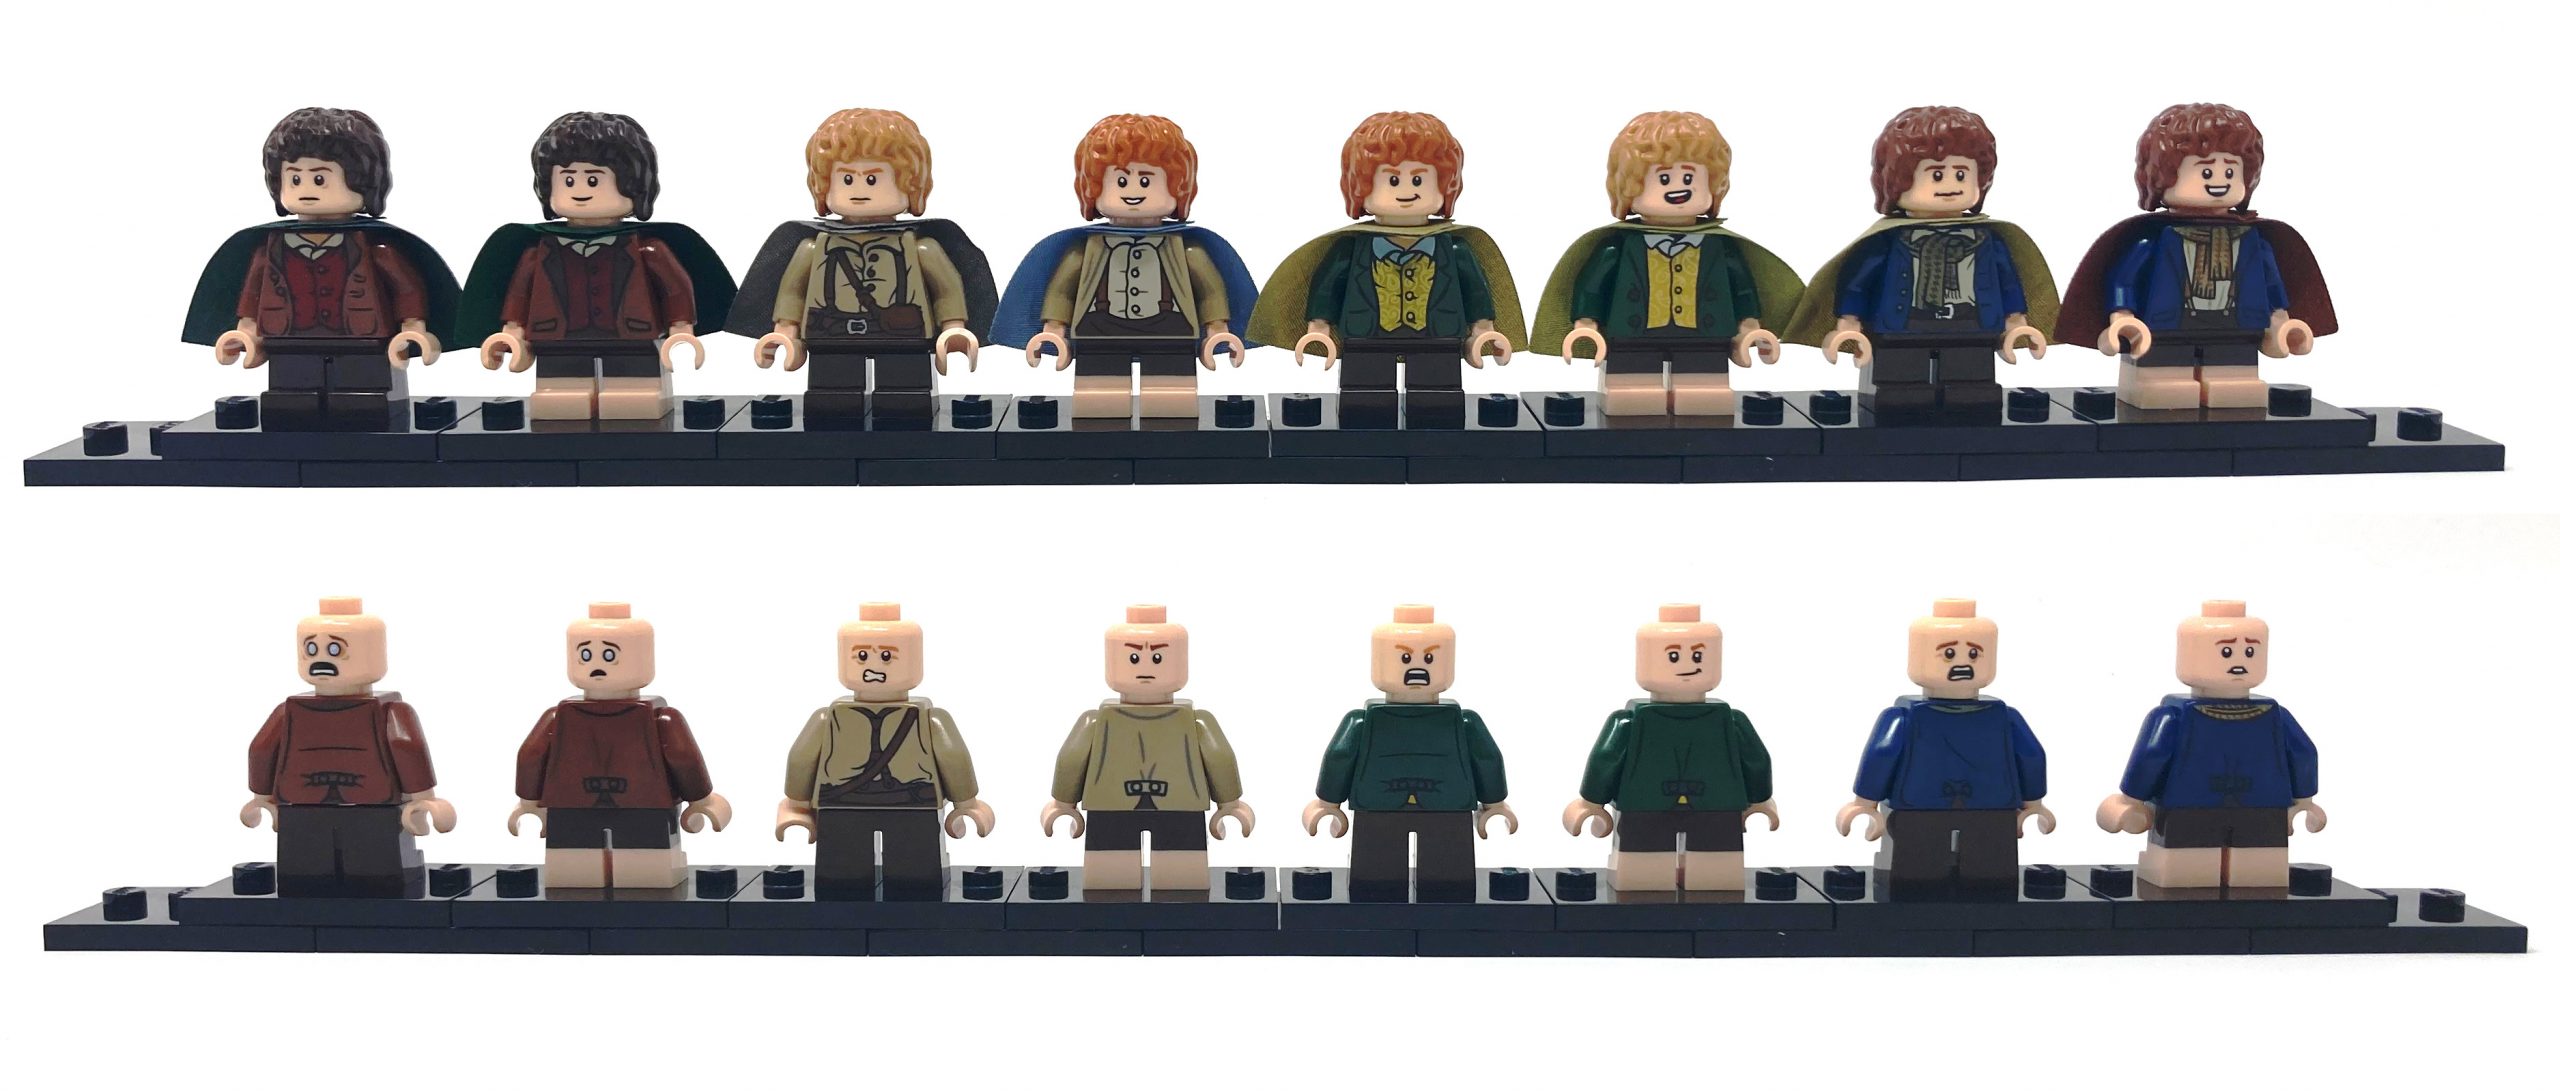
Comparison of old (left) and new (right) Hobbit minifigures. From left to right: Frodo, Sam, Merry, Pippin.
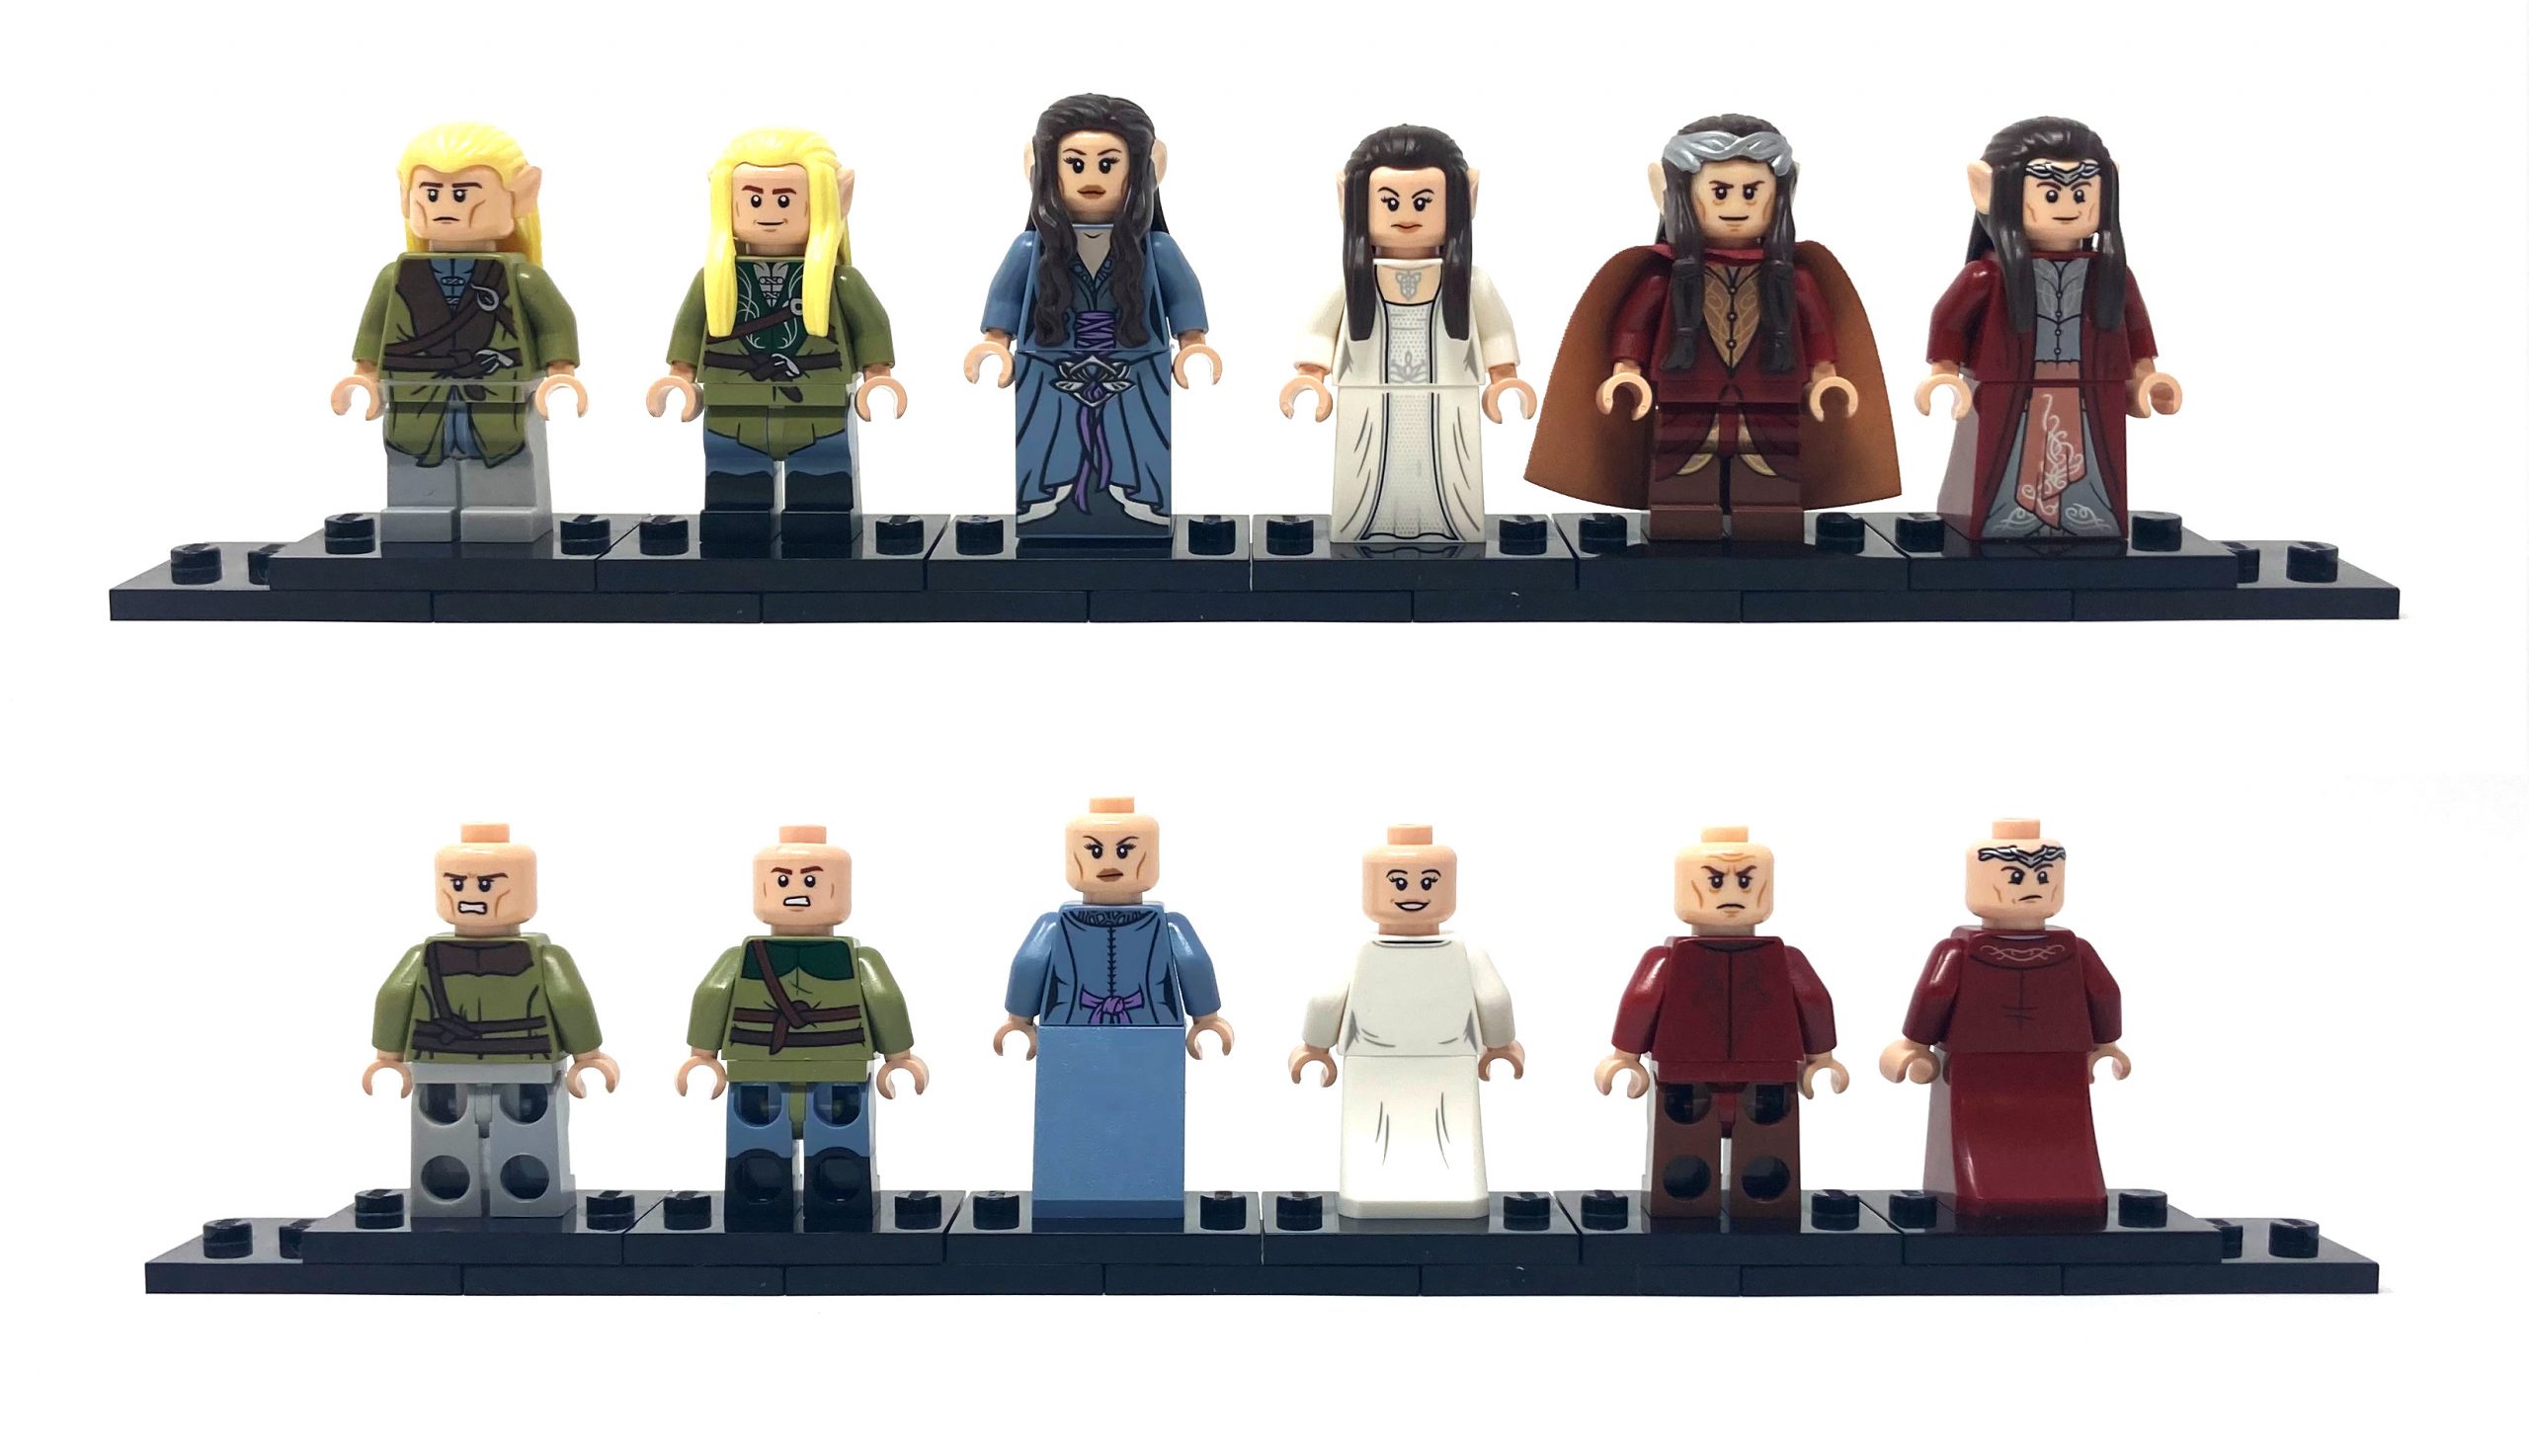
Comparison of old (left) and new (right) Elf minifigures. From left to right: Legolas, Arwen, Elrond.
Gandalf the Grey, Boromir, Aragorn, and Gimli are the final figures in this set. They are all recognizable from the Council of Elrond scene, each dressed in their respective attire. Both Gandalf and Gimli come with interchangeable headwear and hairpieces. Gimli’s unique feature is his medium-length legs, making him shorter than the humans and elves but taller than the Hobbits. While the similarities between these figures and their first wave counterparts are apparent in terms of facial expressions, hair, and torsos, there are subtle improvements in their design. One such improvement is Gimli’s new helmet print and beard mold. Aragorn, among the four figures, has undergone the most significant outfit change, trading in his ranger attire for the outfit he wore in Rivendell.
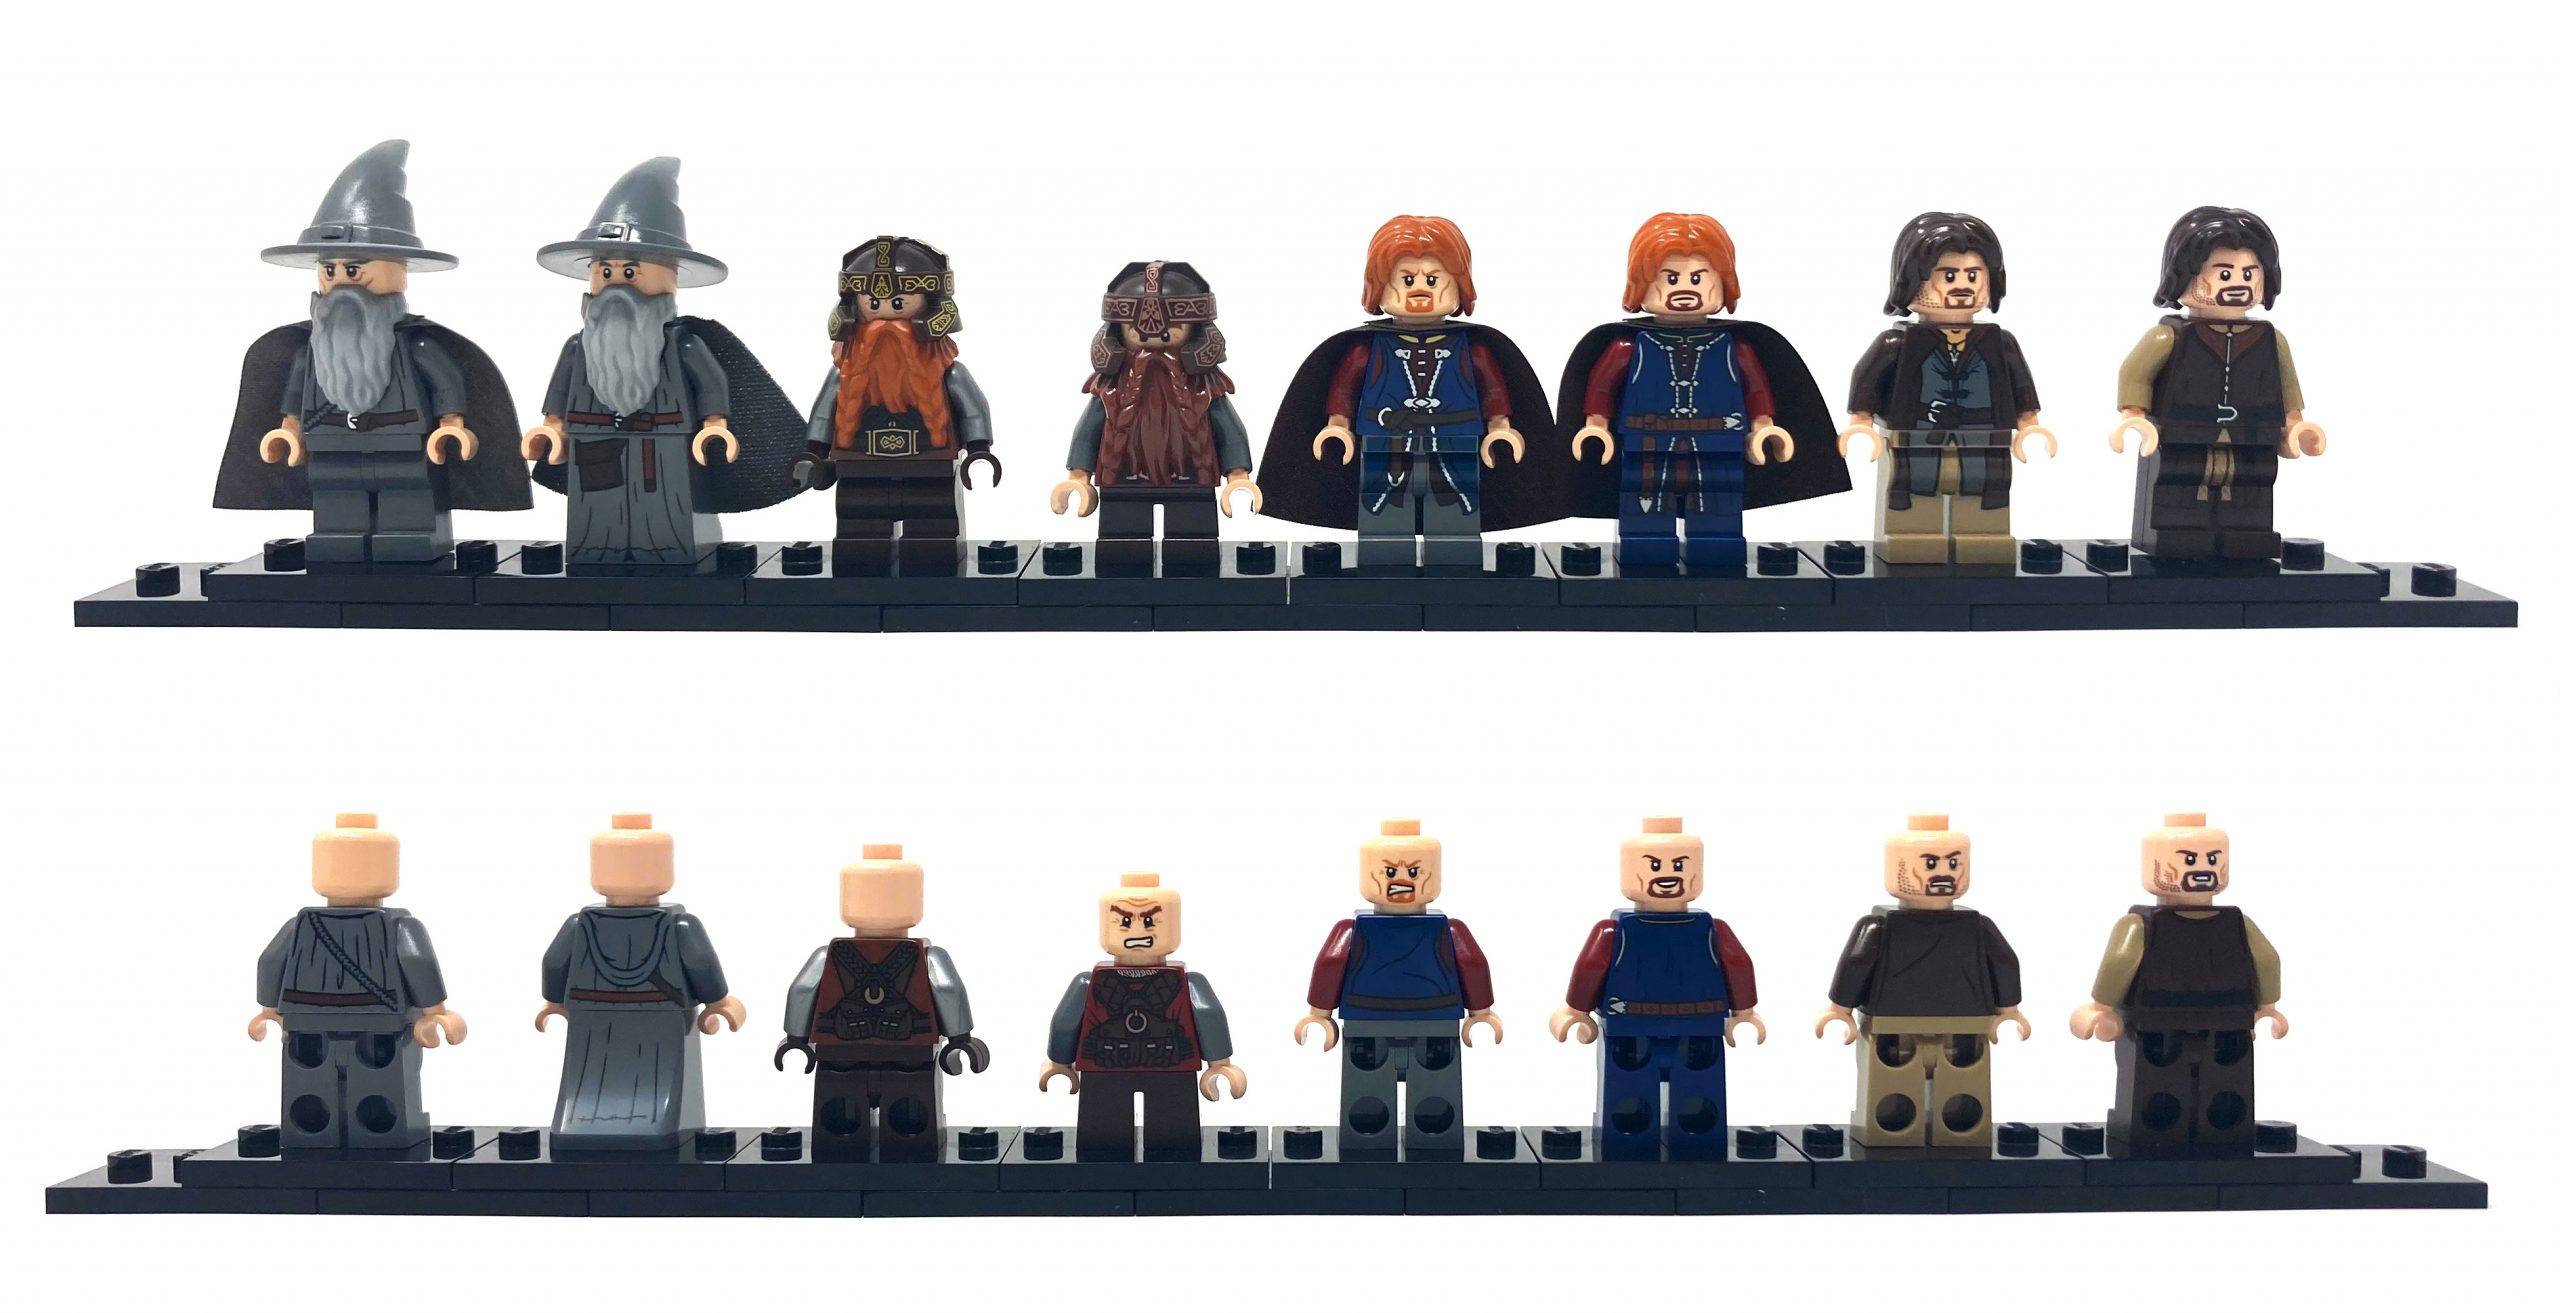
Comparison of old (left) and new (right) remaining fellowship minifigures. From left to right: Gandalf, Gimli, Boromir, Aragorn.
Of all the figures that have been released in older sets, there are a handful that are new to this set. The first of two are a generic male and female elf. Each elf wears an elven braid tunic and makes use of the new head piece to emphasize the elven ears. On the shorter side of characters, this set includes both Bilbo, Frodo’s uncle and former Ring-Bearer, and Glóin, Gimli’s father and dwarven lord of Erebor. Both characters capture their movie likeness with Bilbo having a surprise alternate face that captures one of the few jump scares in the films. Glóin was previously released in the Hobbit line however is a younger version of the figure included here. Additionally, this set also comes with six statues that are placed throughout the set, three of which are male and three female. These statues unfortunately do not have leg printing, a shame as the torso is printed beautifully and cuts off at the legs.
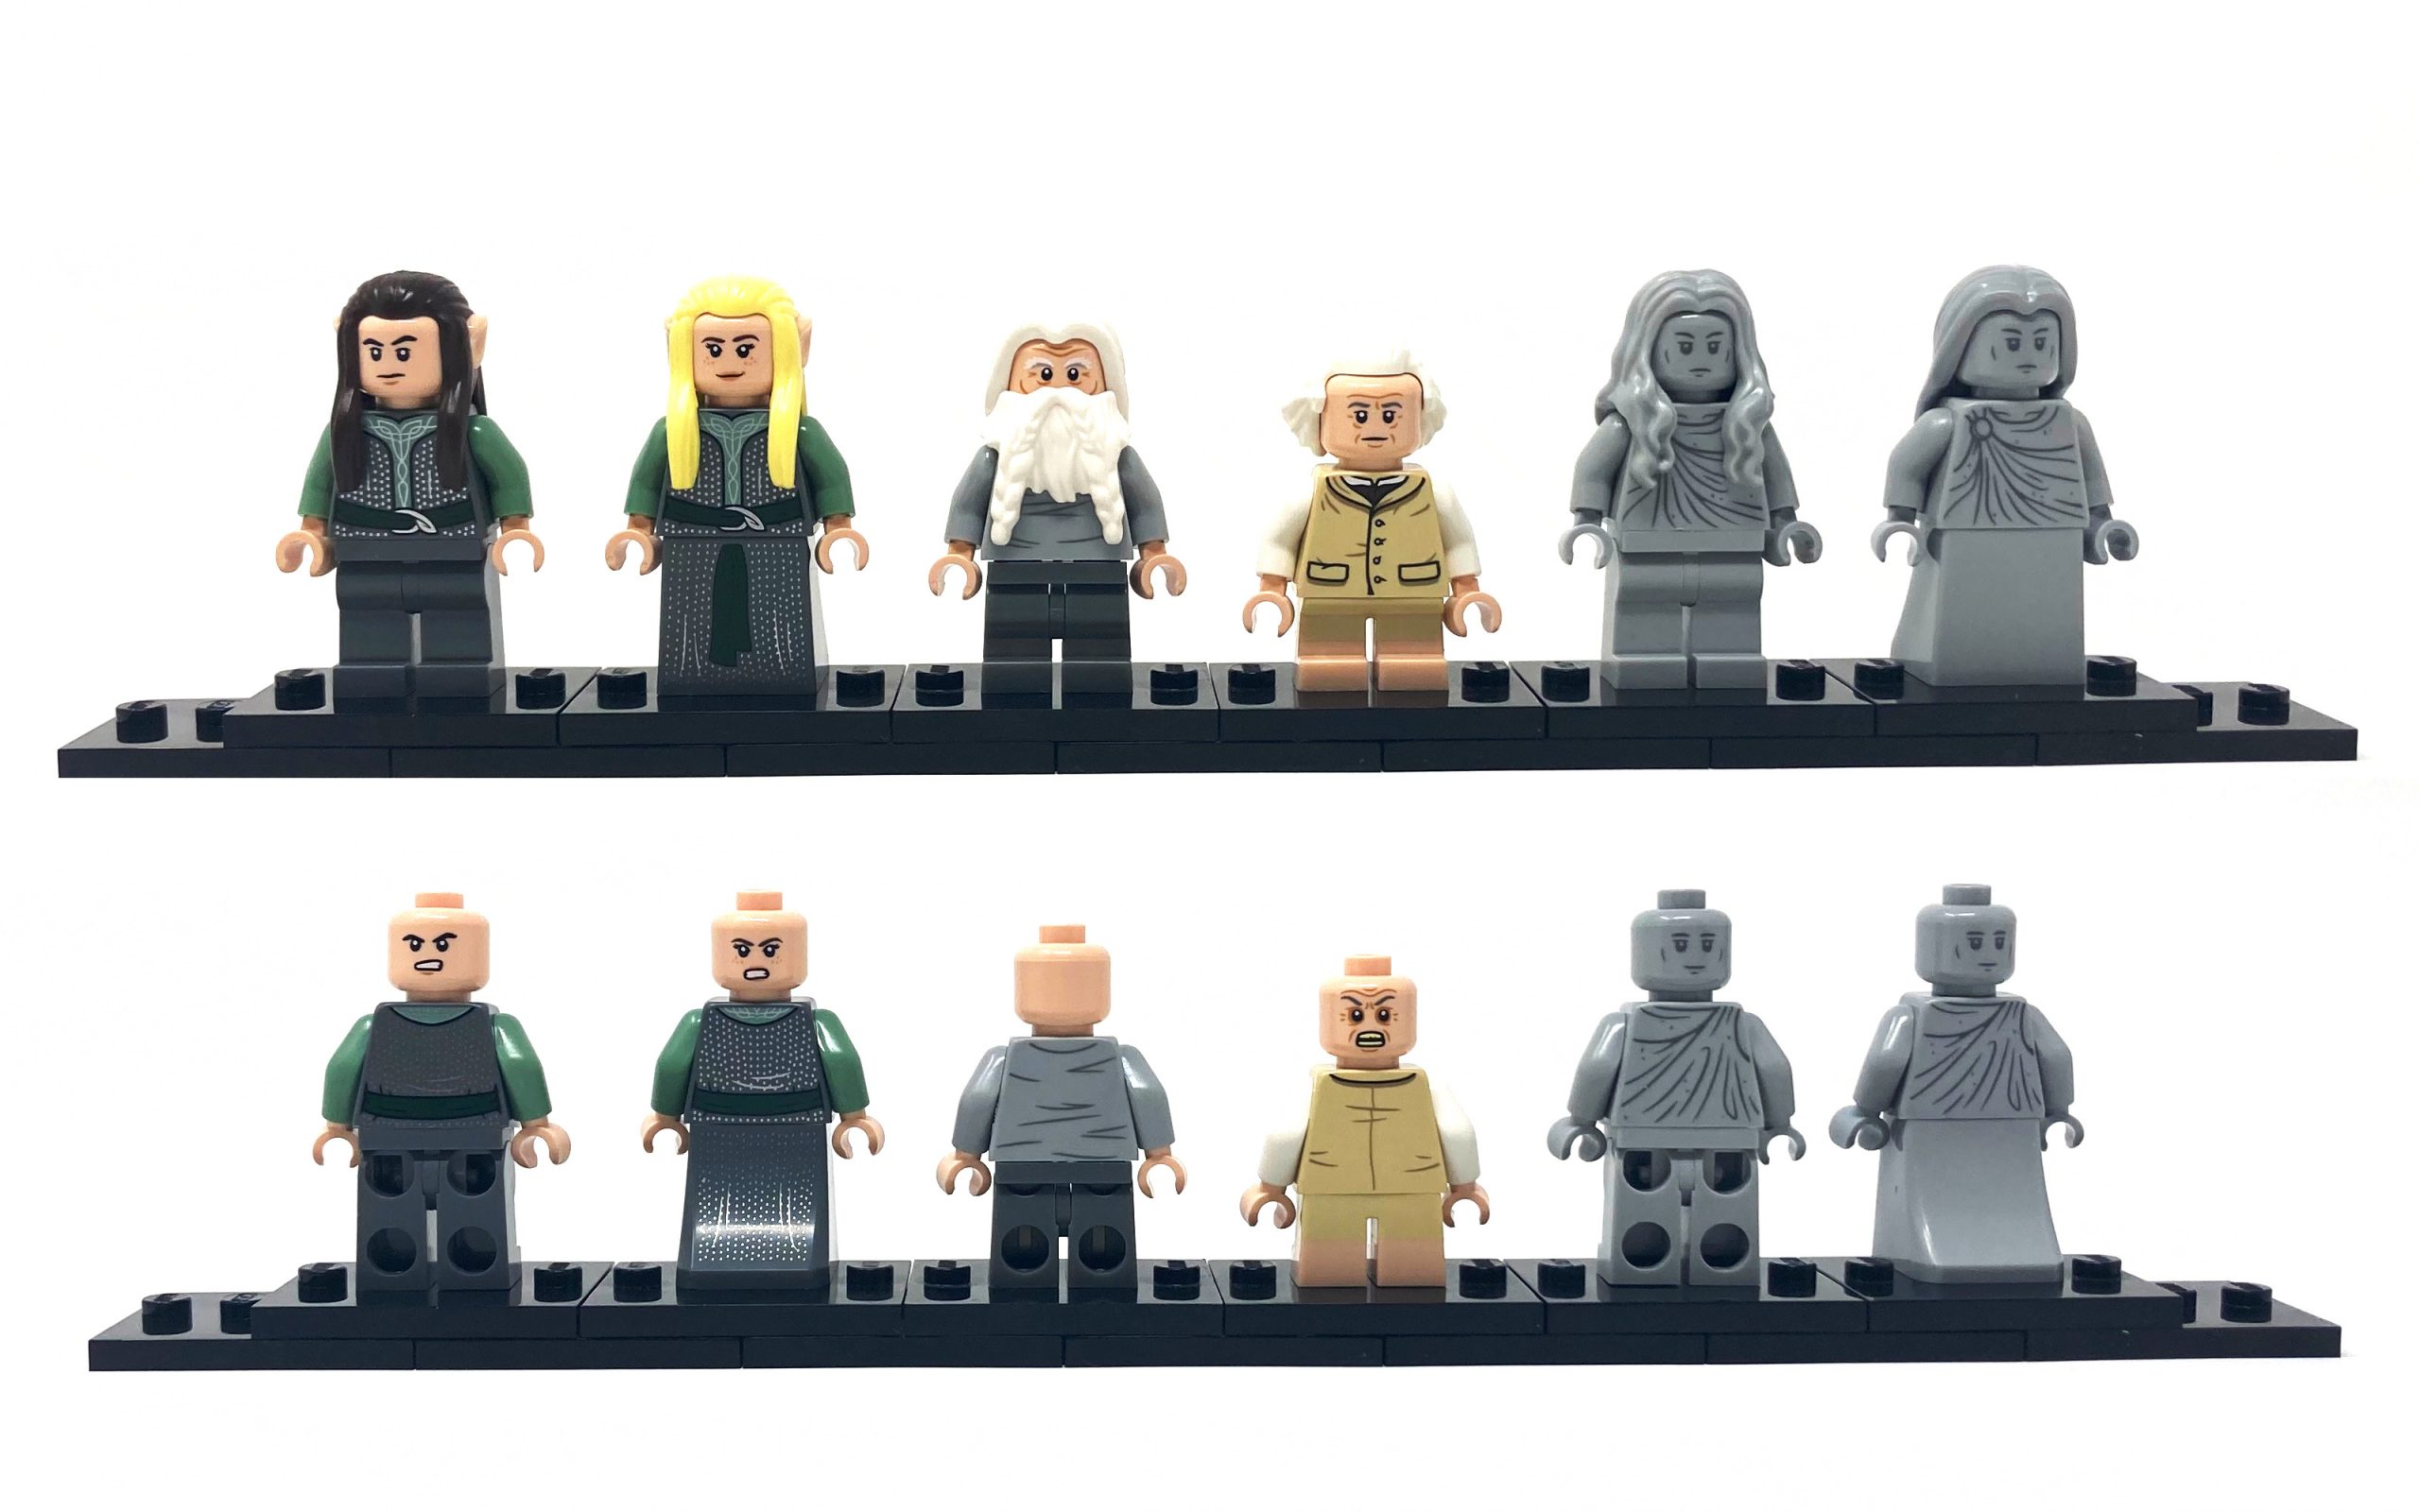
Additional minifigures. From left to right: Male elf, female elf, Gloin, Bilbo, male statue, female statue.
Weapons
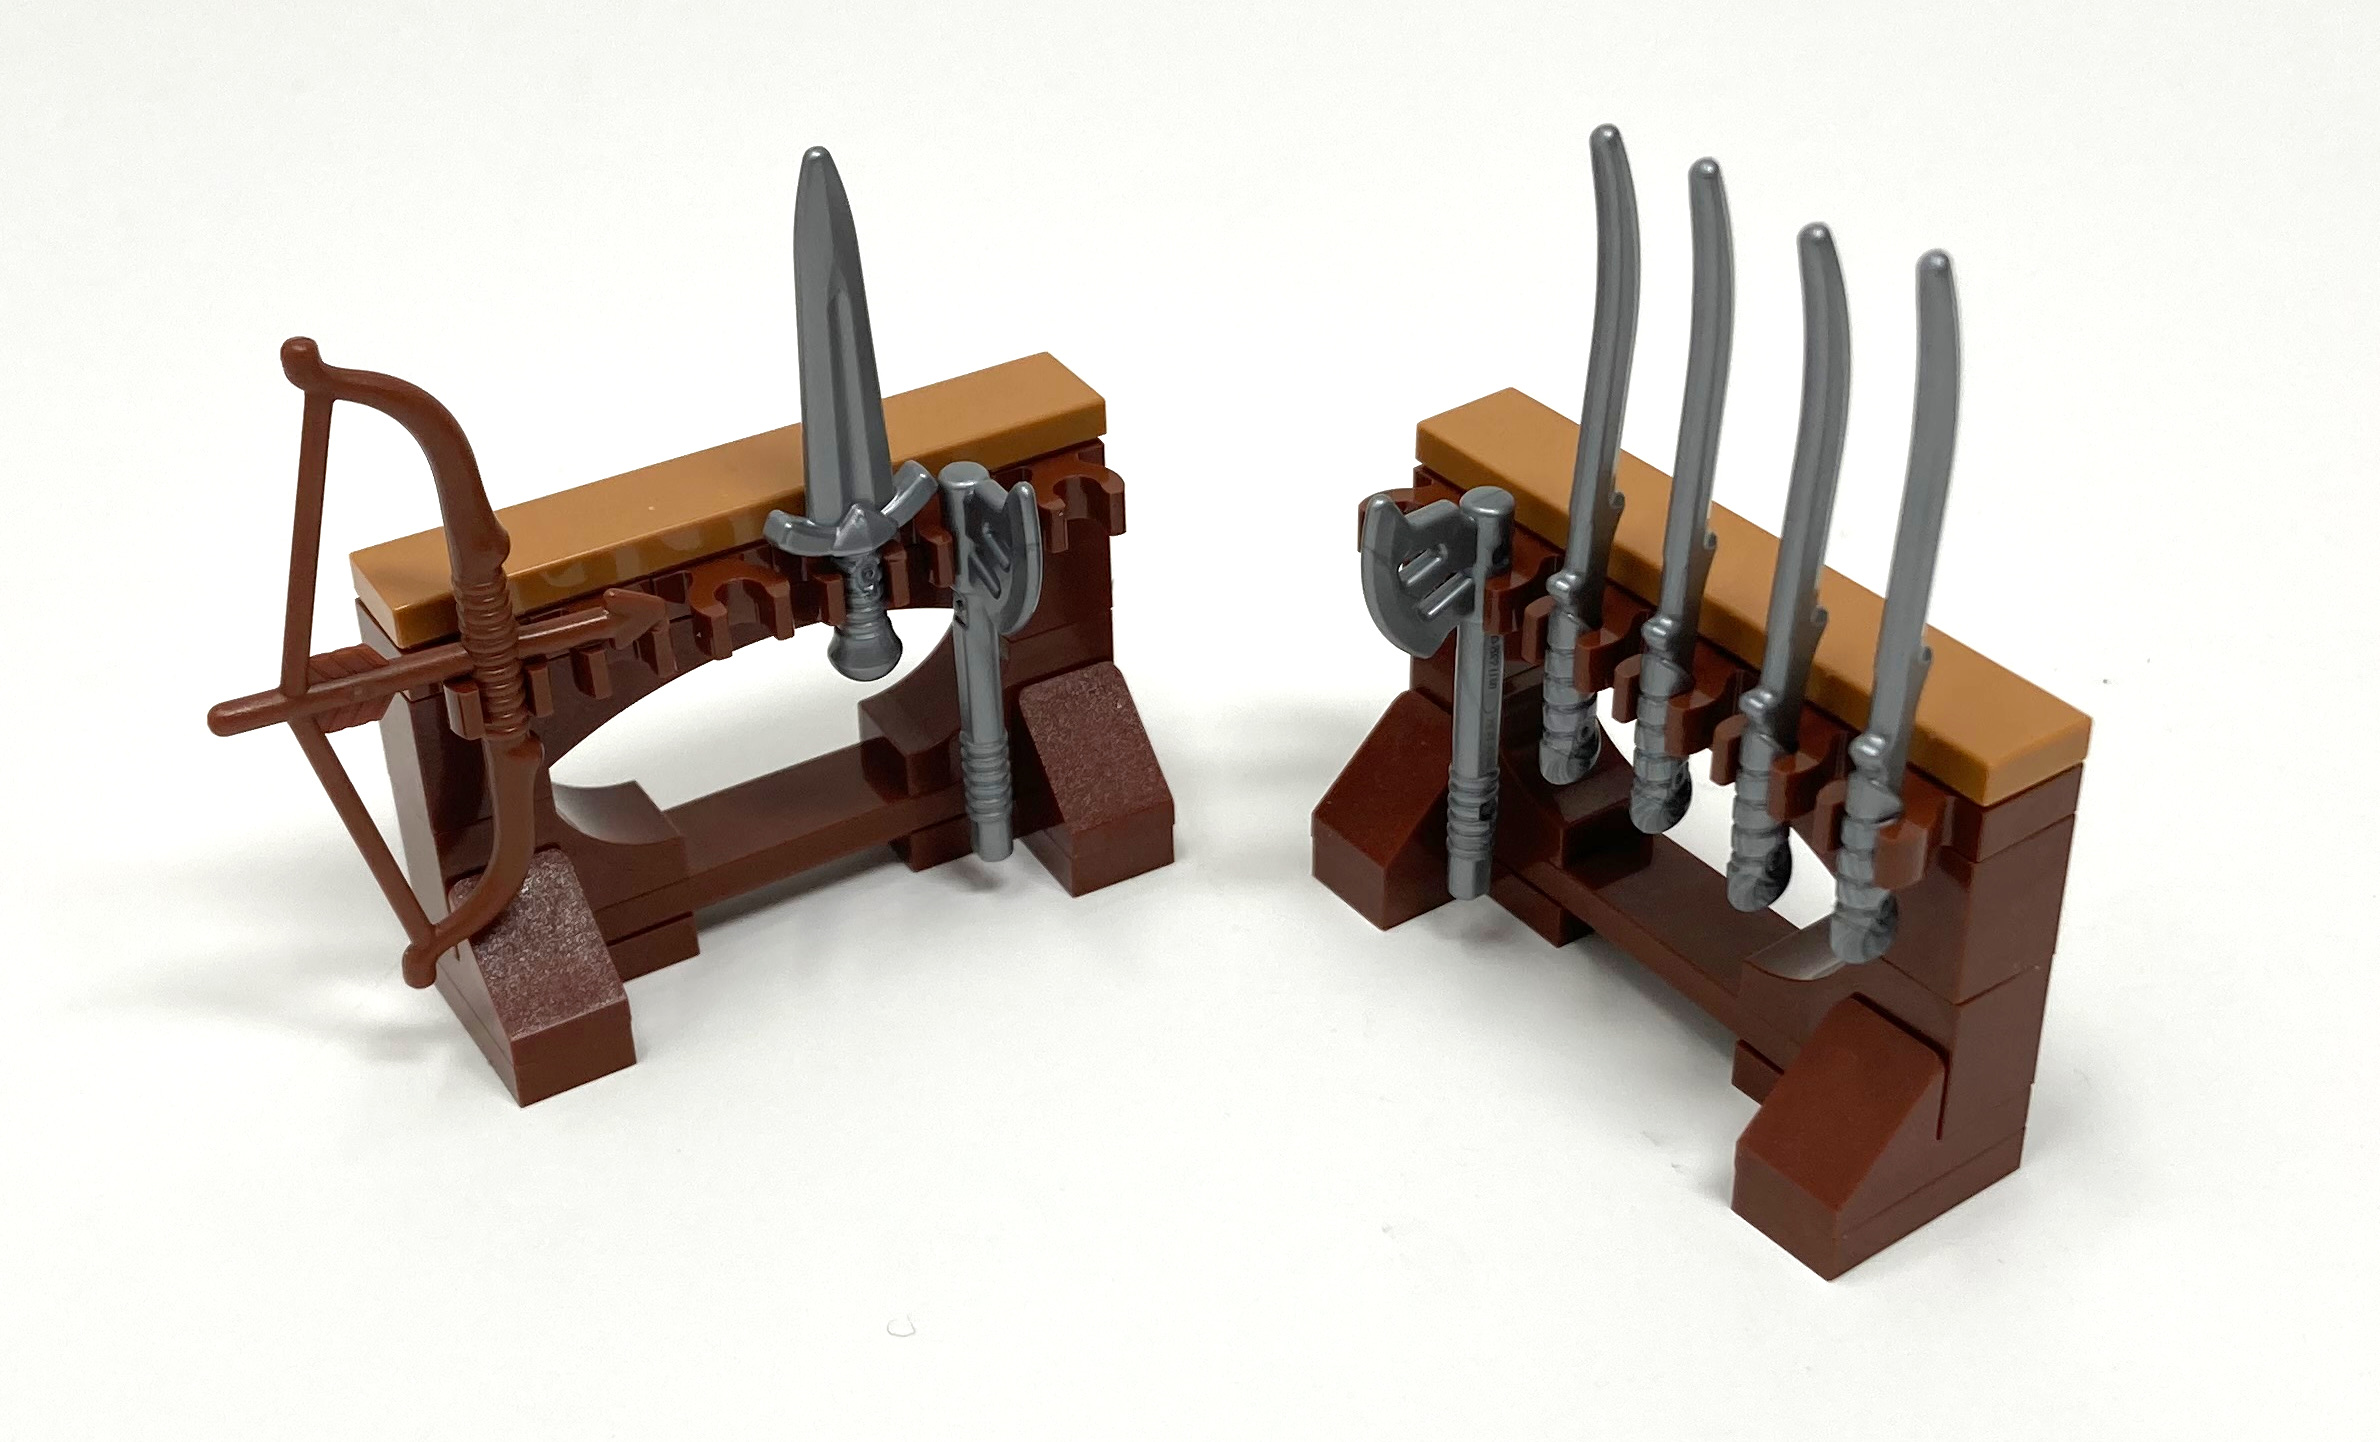
The weapons in this set are a highlight, with six new molds included to match their WETA Workshop counterparts in the movies. Each weapon comes in multiples of two, so you’ll have spares for your collection. The weapons included are an elven blade, short sword, elven sword sting, shards of Narsil, longsword, and a dwarven axe.
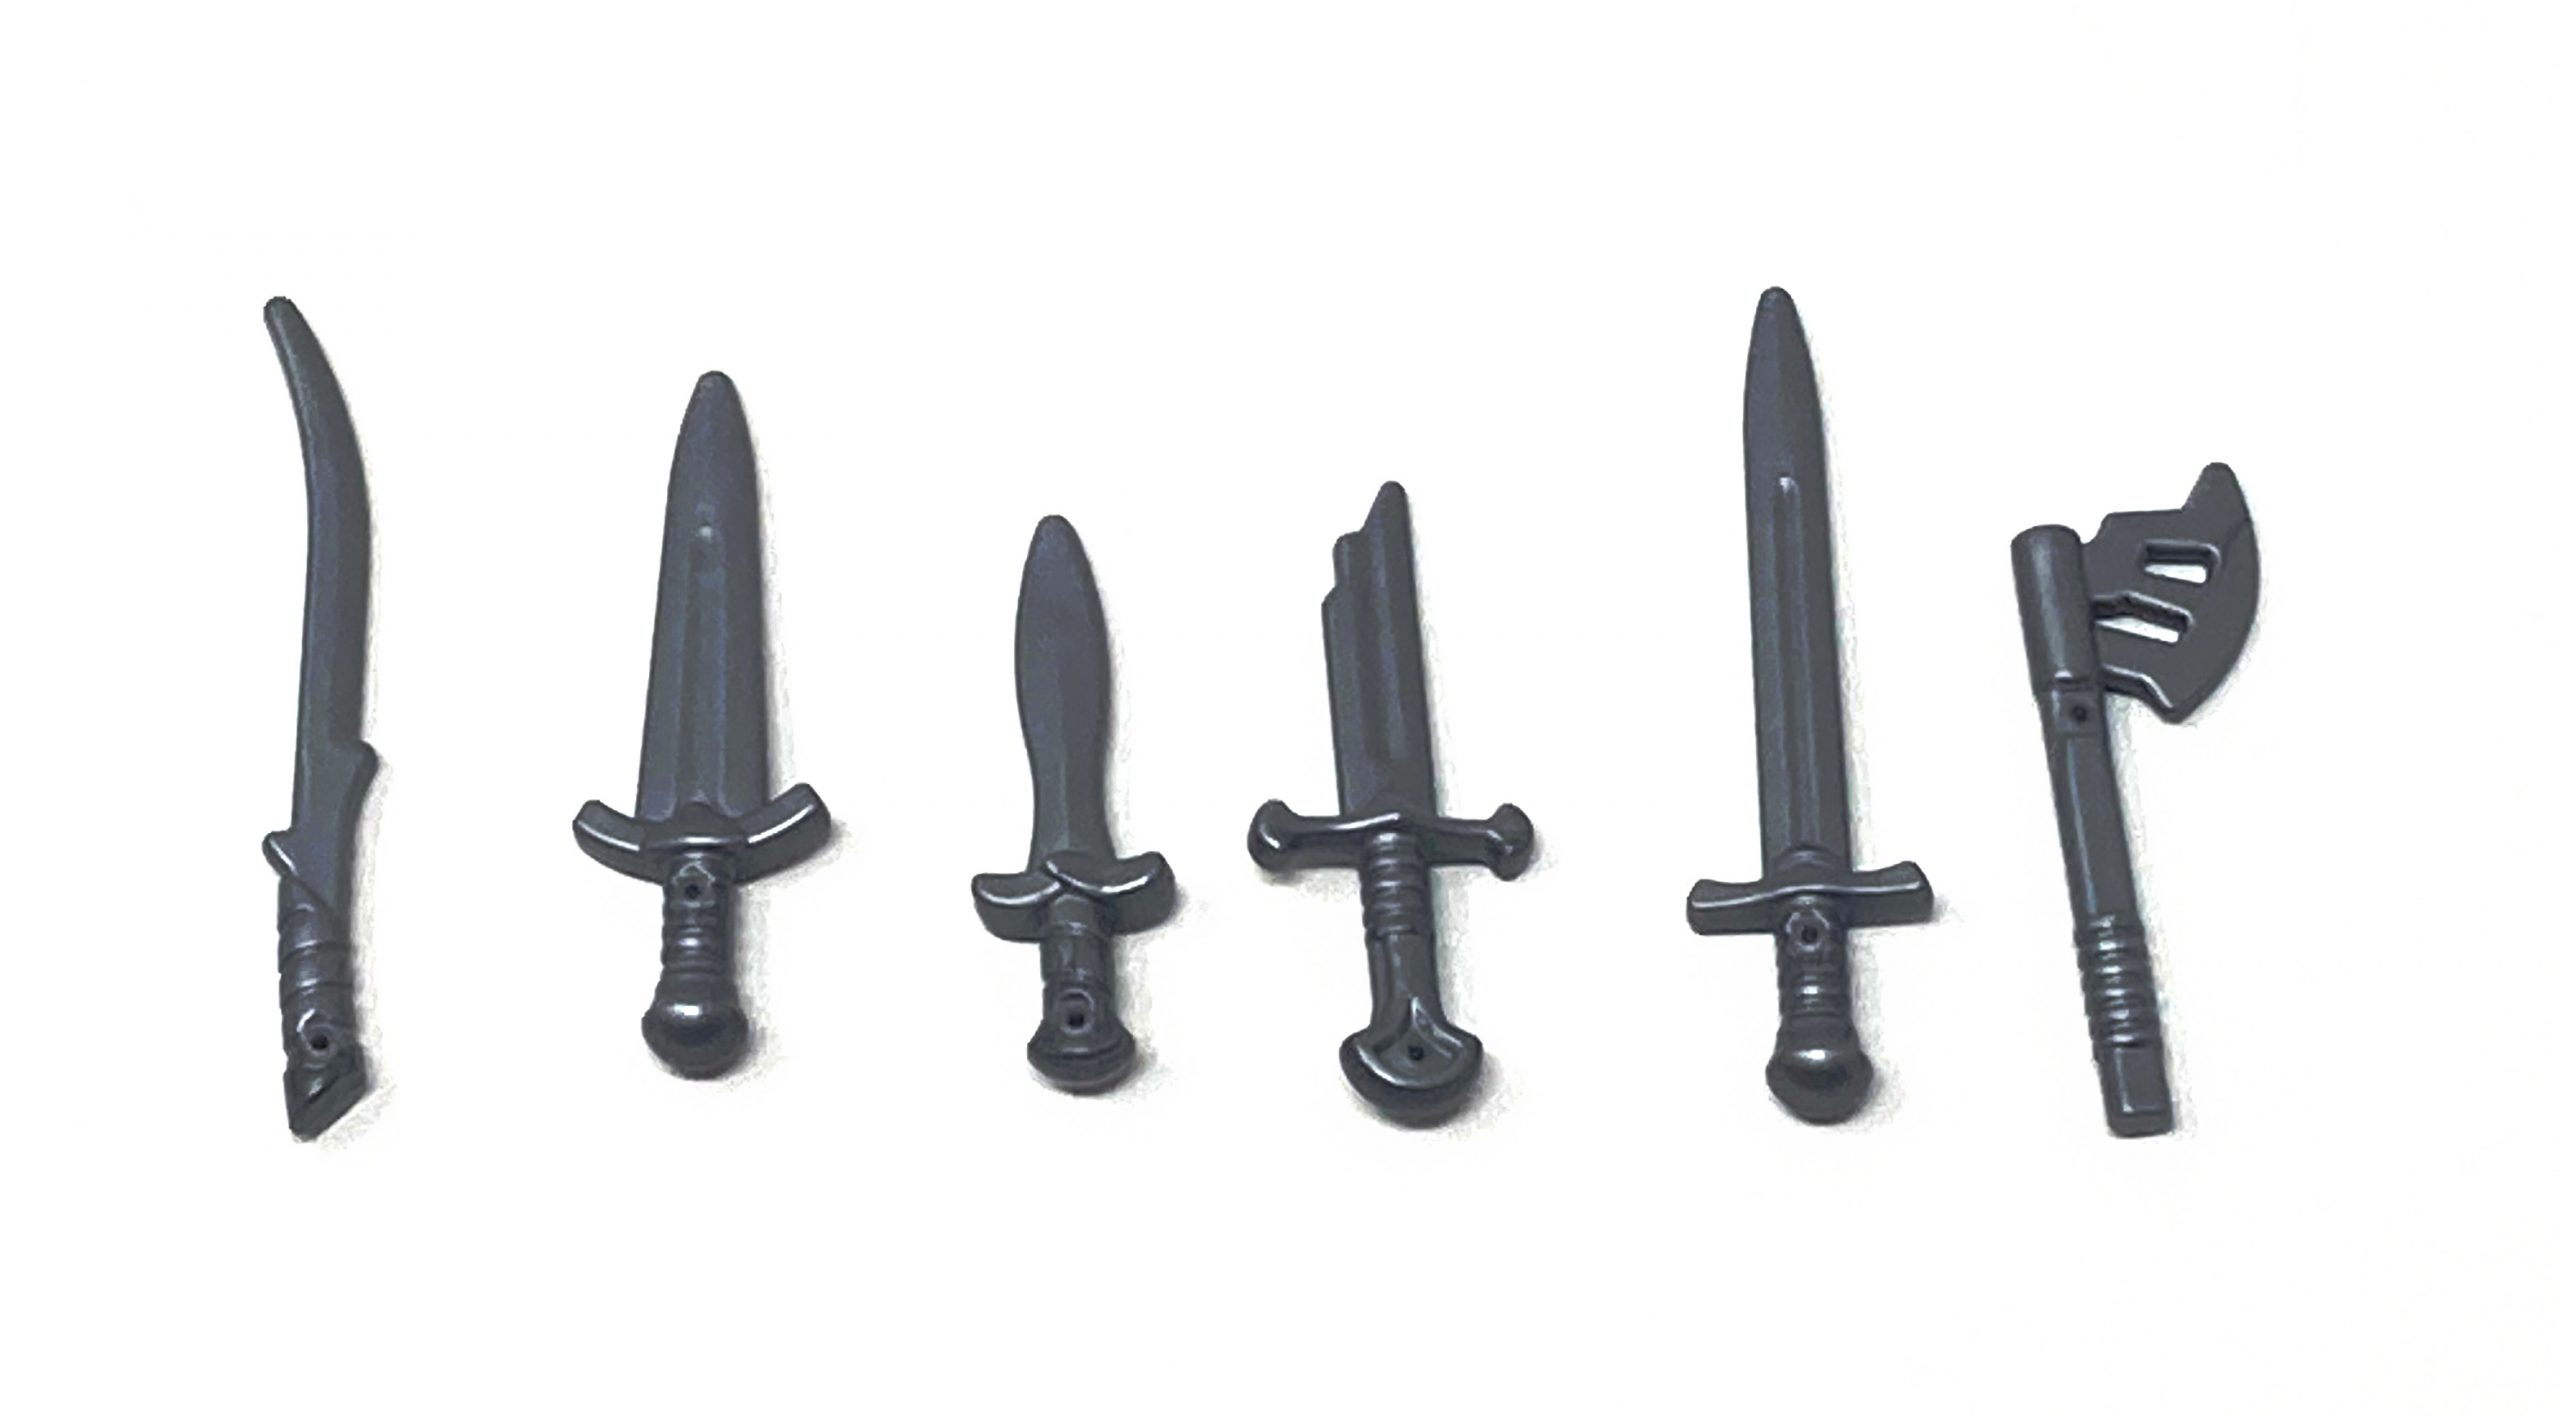
A variety of iconic weapons are included in this set, each come with extras.
Stickers
Beautiful stickers capture details that would otherwise not be possible to capture.
New Pieces Spotlight
The LEGO designers have used a creative approach to build the shapes and patterns that resemble Rivendell. However, sometimes the available pieces were not enough to achieve the desired result. To overcome this, the designers have included a few new pieces in this set. These pieces are either new molds or recolors of existing pieces. A few of these new pieces are worth mentioning.
Despite the presence of stickers, new intricately tiled mosaic pieces have been introduced to recreate the mosaic tiles of Rivendell’s floor. The set includes enough tiles to fully cover a 16×16 plate, capturing the intricate design across different shapes and patterns. The prints can be found on both 2×2 tiles and Nexo Knights shields, allowing for the creation of rounded textures with printed parts.
Beautiful printed tiles emphasize the mosaic feel to the flooring.
To capture the shapes and patterns needed to build the chairs in Elrond’s Council, a recolor of the Popsicle and Sausage piece in 312Medium NougatMedium Dark Flesh has been included. This gives the seats a very naturally organic feel.
Creative use of food pieces allow for rounded arm and back rests.
The pedestal in the center of the council chamber is built using a new box piece that was first introduced in the Minecraft set, 21246 The Deep Dark Battle. This piece, in 5Brick YellowTan, is not unique to this set, but the way it is stacked at an offset of 45 degrees to create the pedestal is a new building technique.
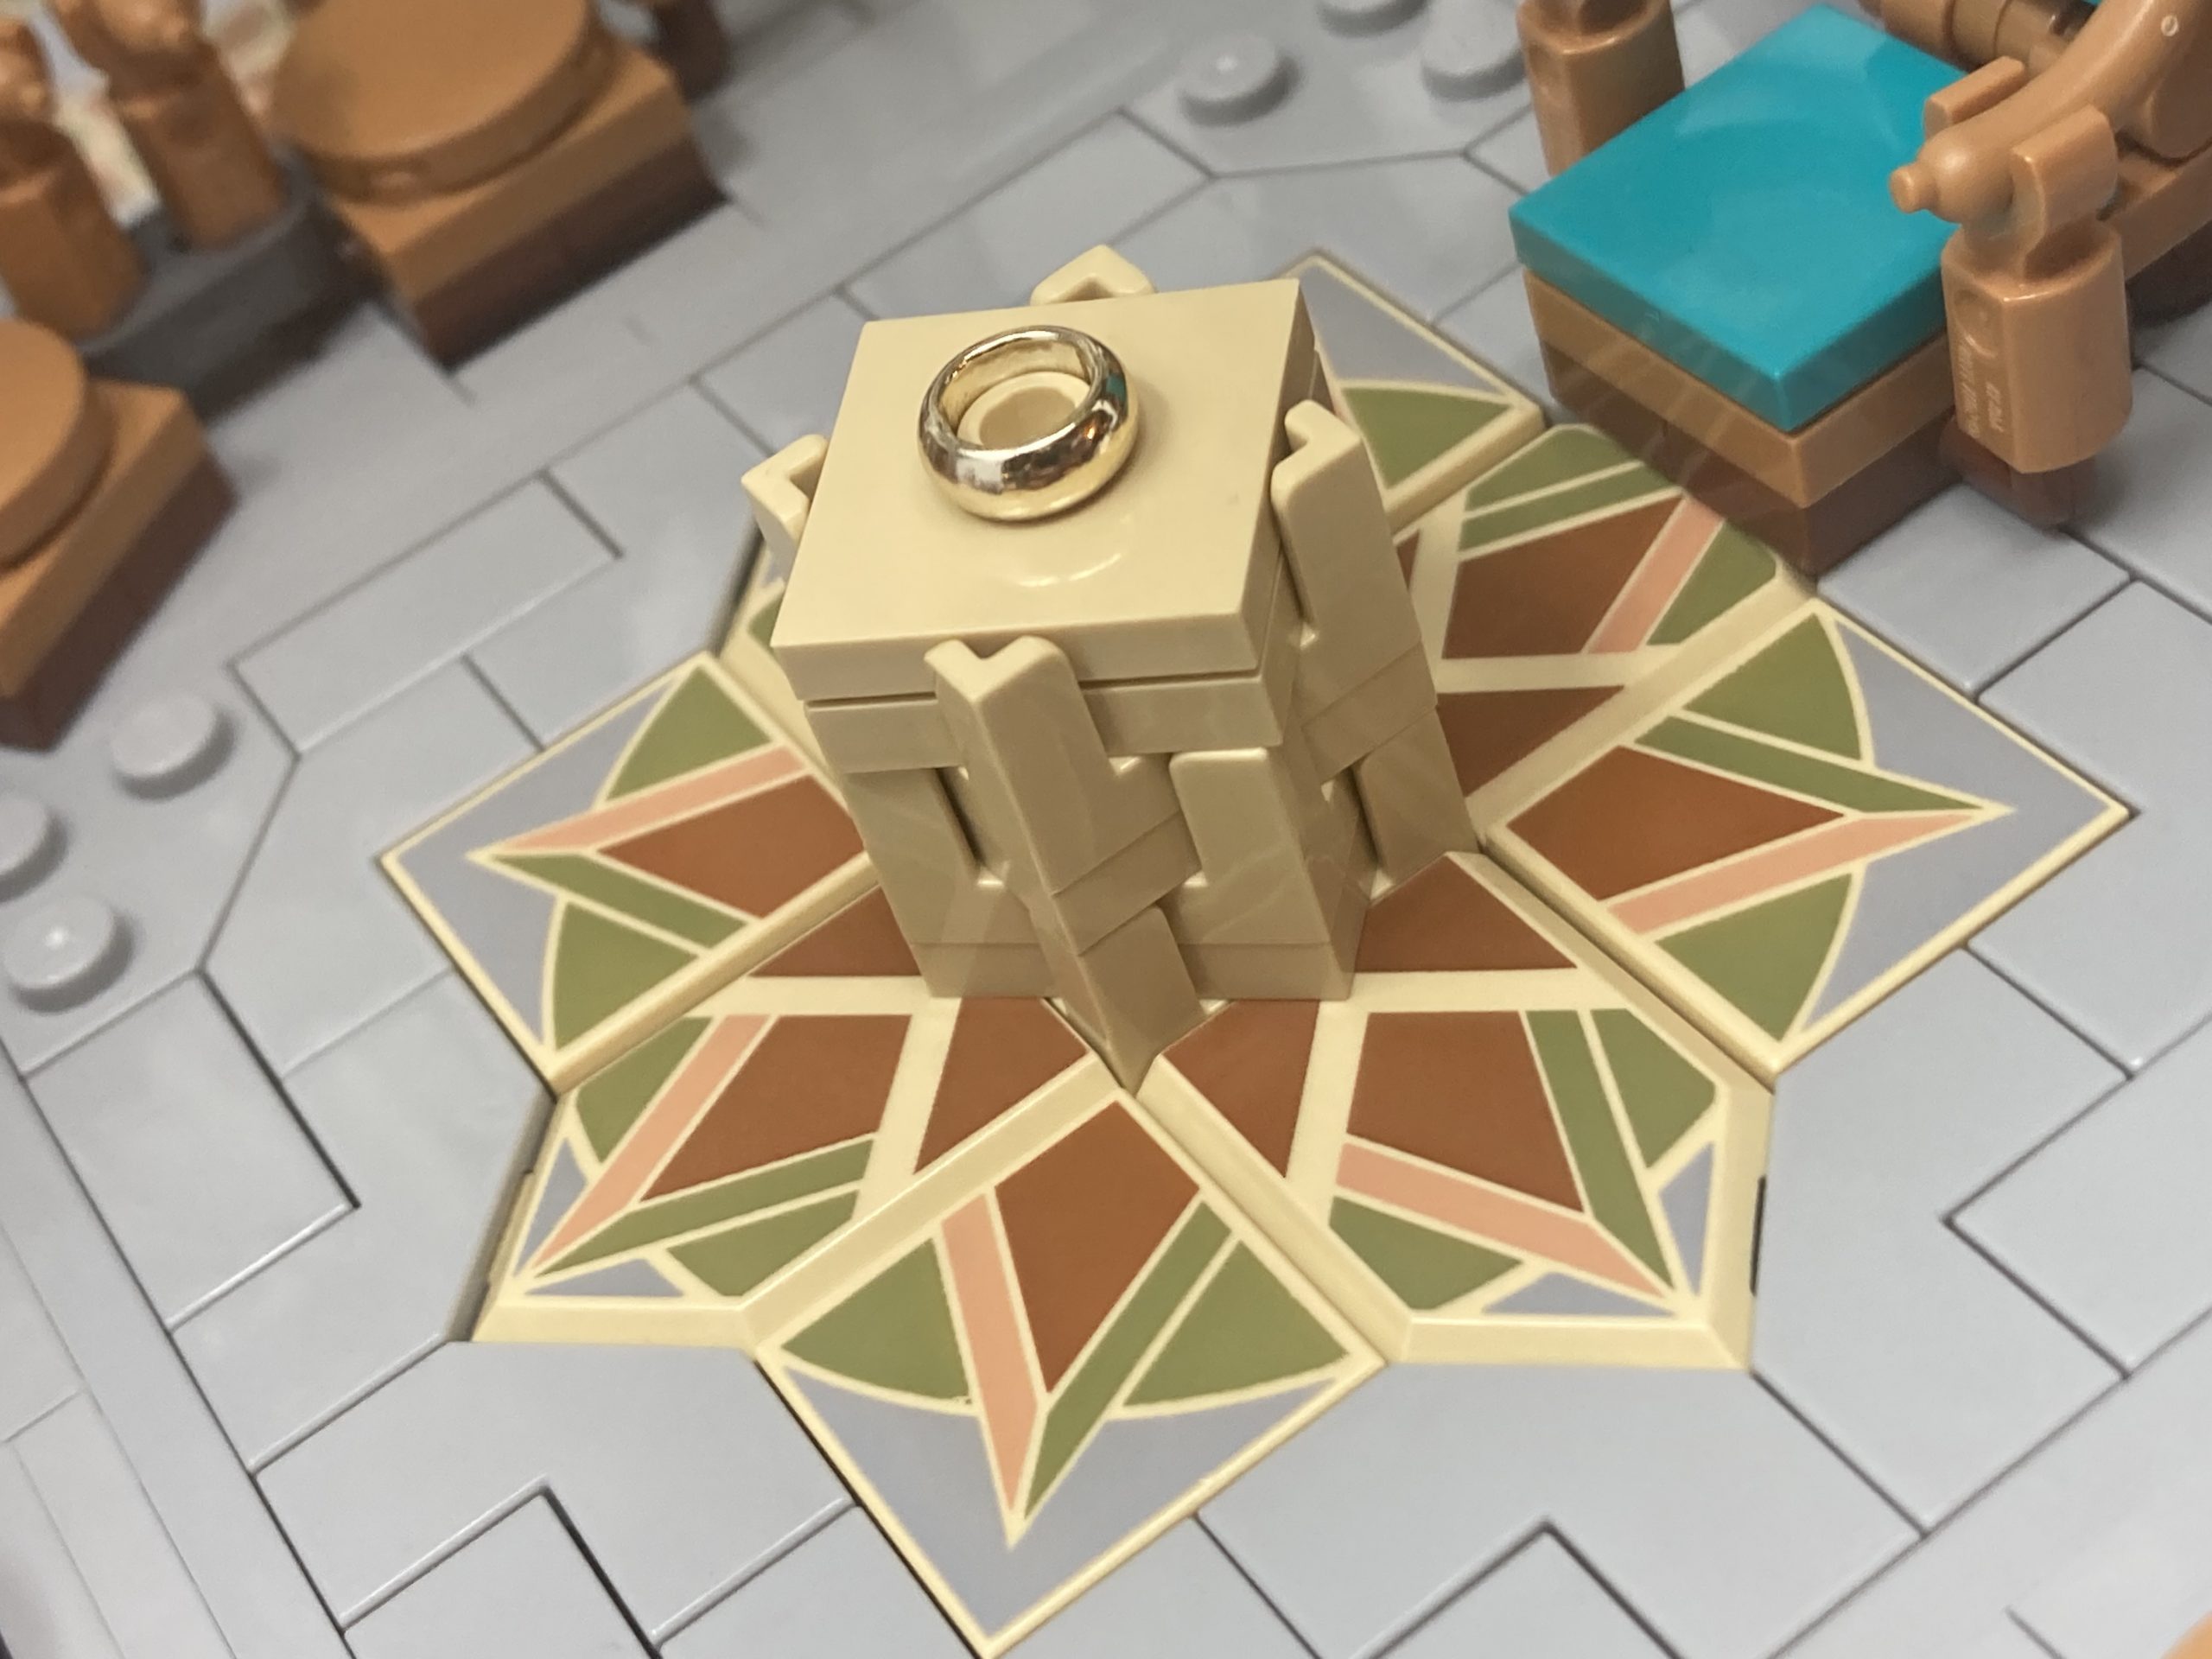
A brand new box piece allows for the creation of a unique shape.
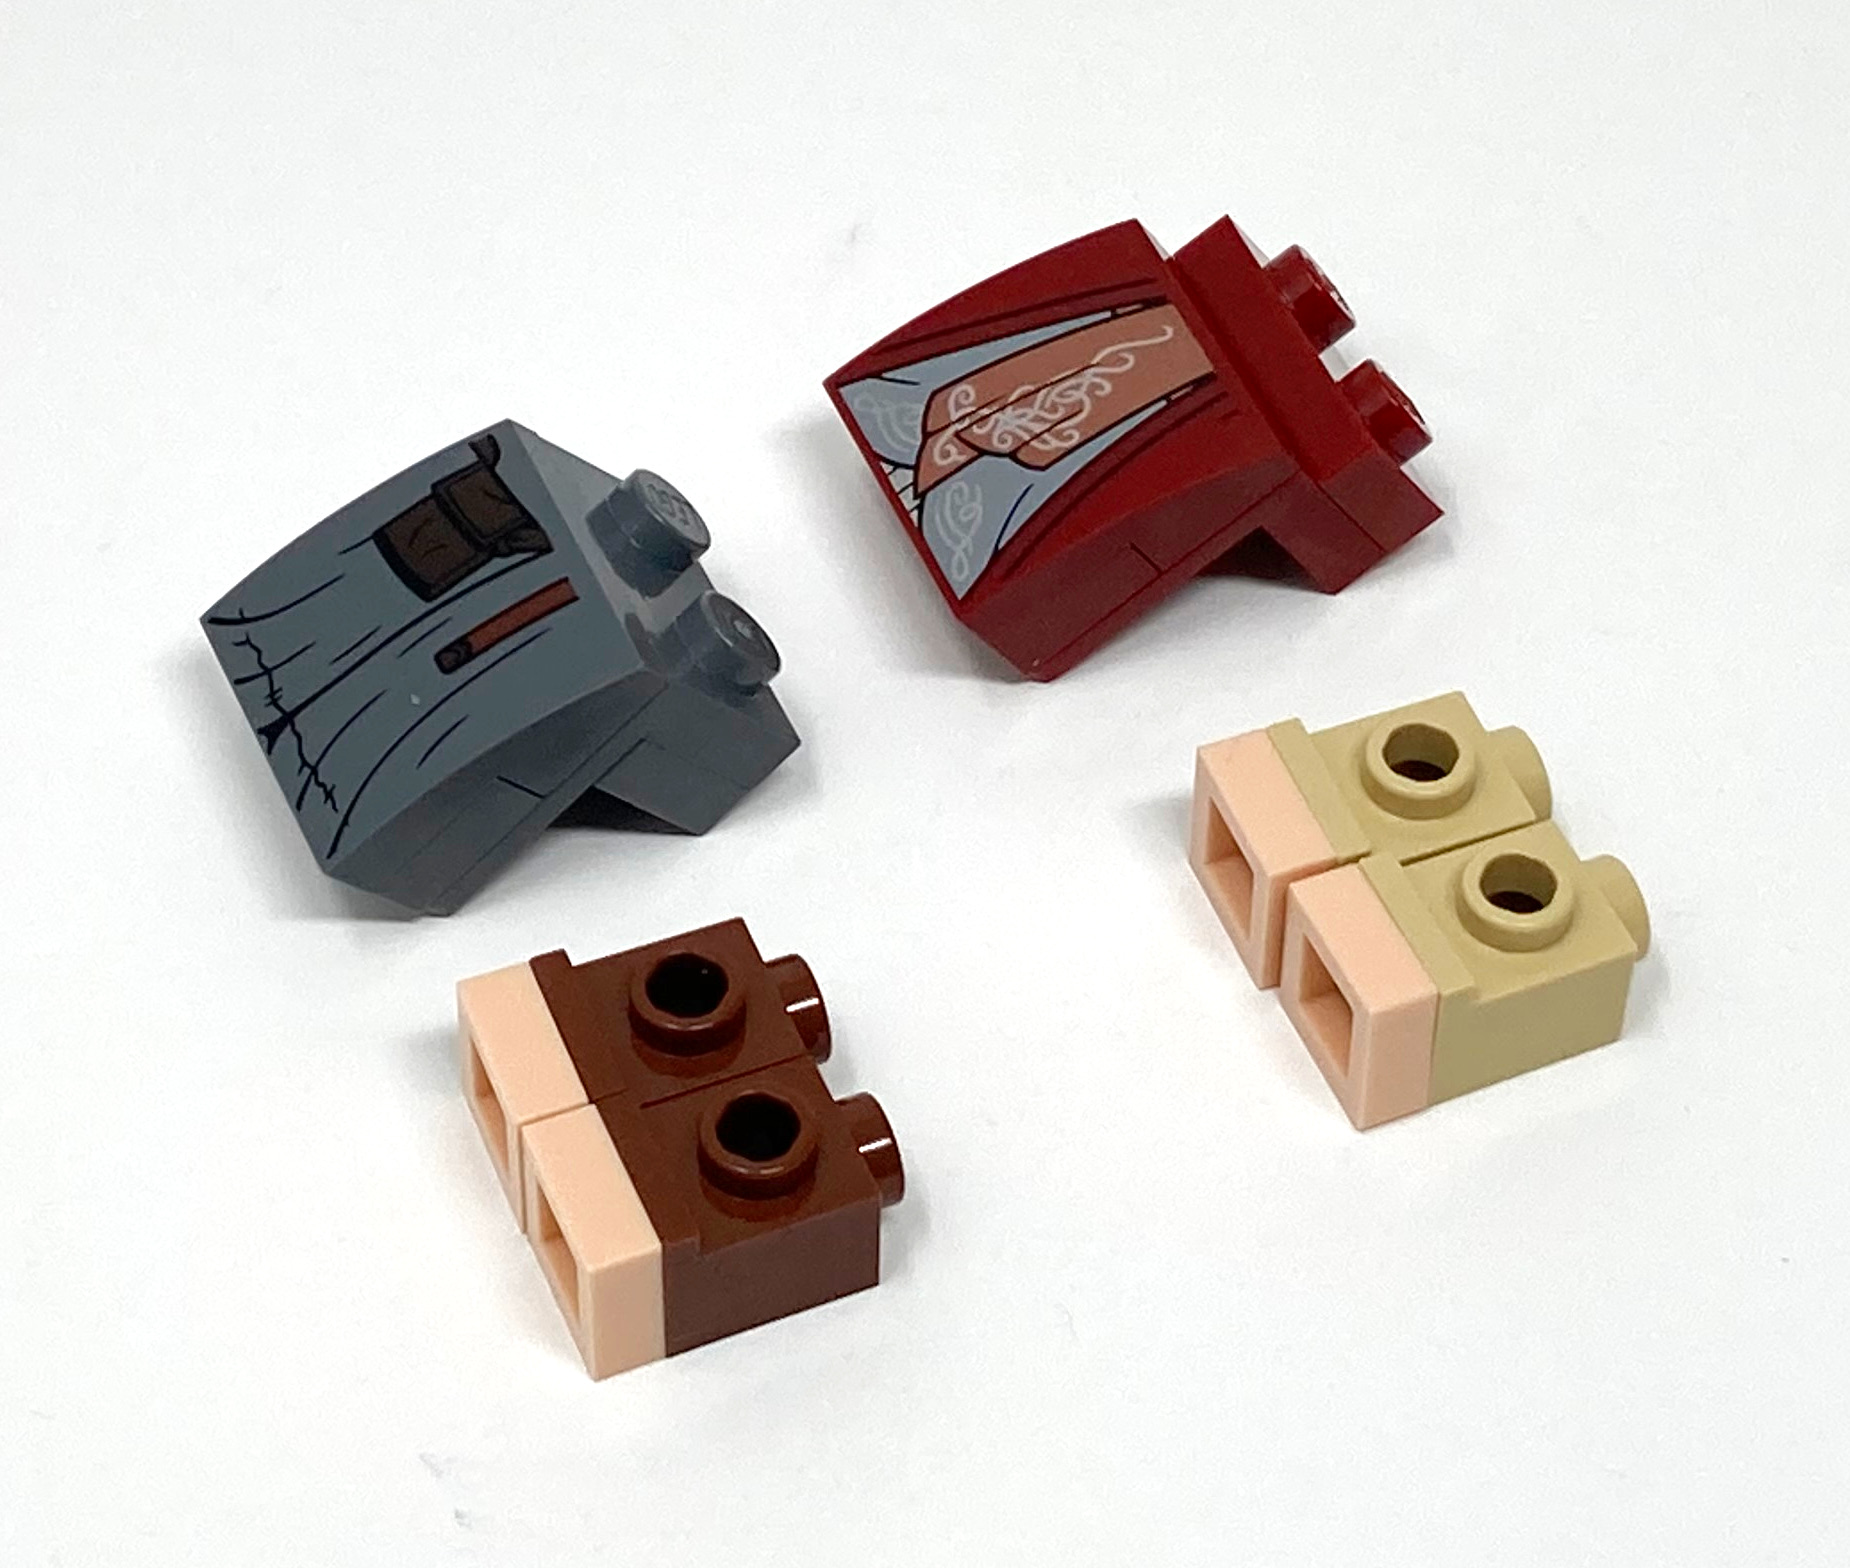
The ornament pieces in white are a highlight of the set as they capture the essence of elven architecture with their organic shapes. These pieces, which were first released in the Elves line of LEGO sets, have been recolored in 1White specifically for this set. They are used extensively throughout the set to build the curved shapes and elegant designs of the pillars in Rivendell. The white color used is a new production specifically for this set.
A recolor of a piece originally released in the Elves line makes its first appearance in Rivendell.
The new 151Sand Green coloration of the 2x2x3 roof corner and 6x6x2 quarter round pieces were introduced in order to accurately capture the roof of Rivendell in the set. These pieces, which are not completely new, are crucial in giving the tower the desired color finish.
New sand green pieces contrast against the stone colors of the tower.
This new fern piece in 28Dark GreenGreen is an important addition to the set, as it helps to bring the lush greenery of Rivendell to life. The ability to stack multiple ferns to create taller plants allows for even greater customization and creativity when building the forested location.
The new fern piece is a must have in any LEGO owner’s collection.
Movie Comparisons
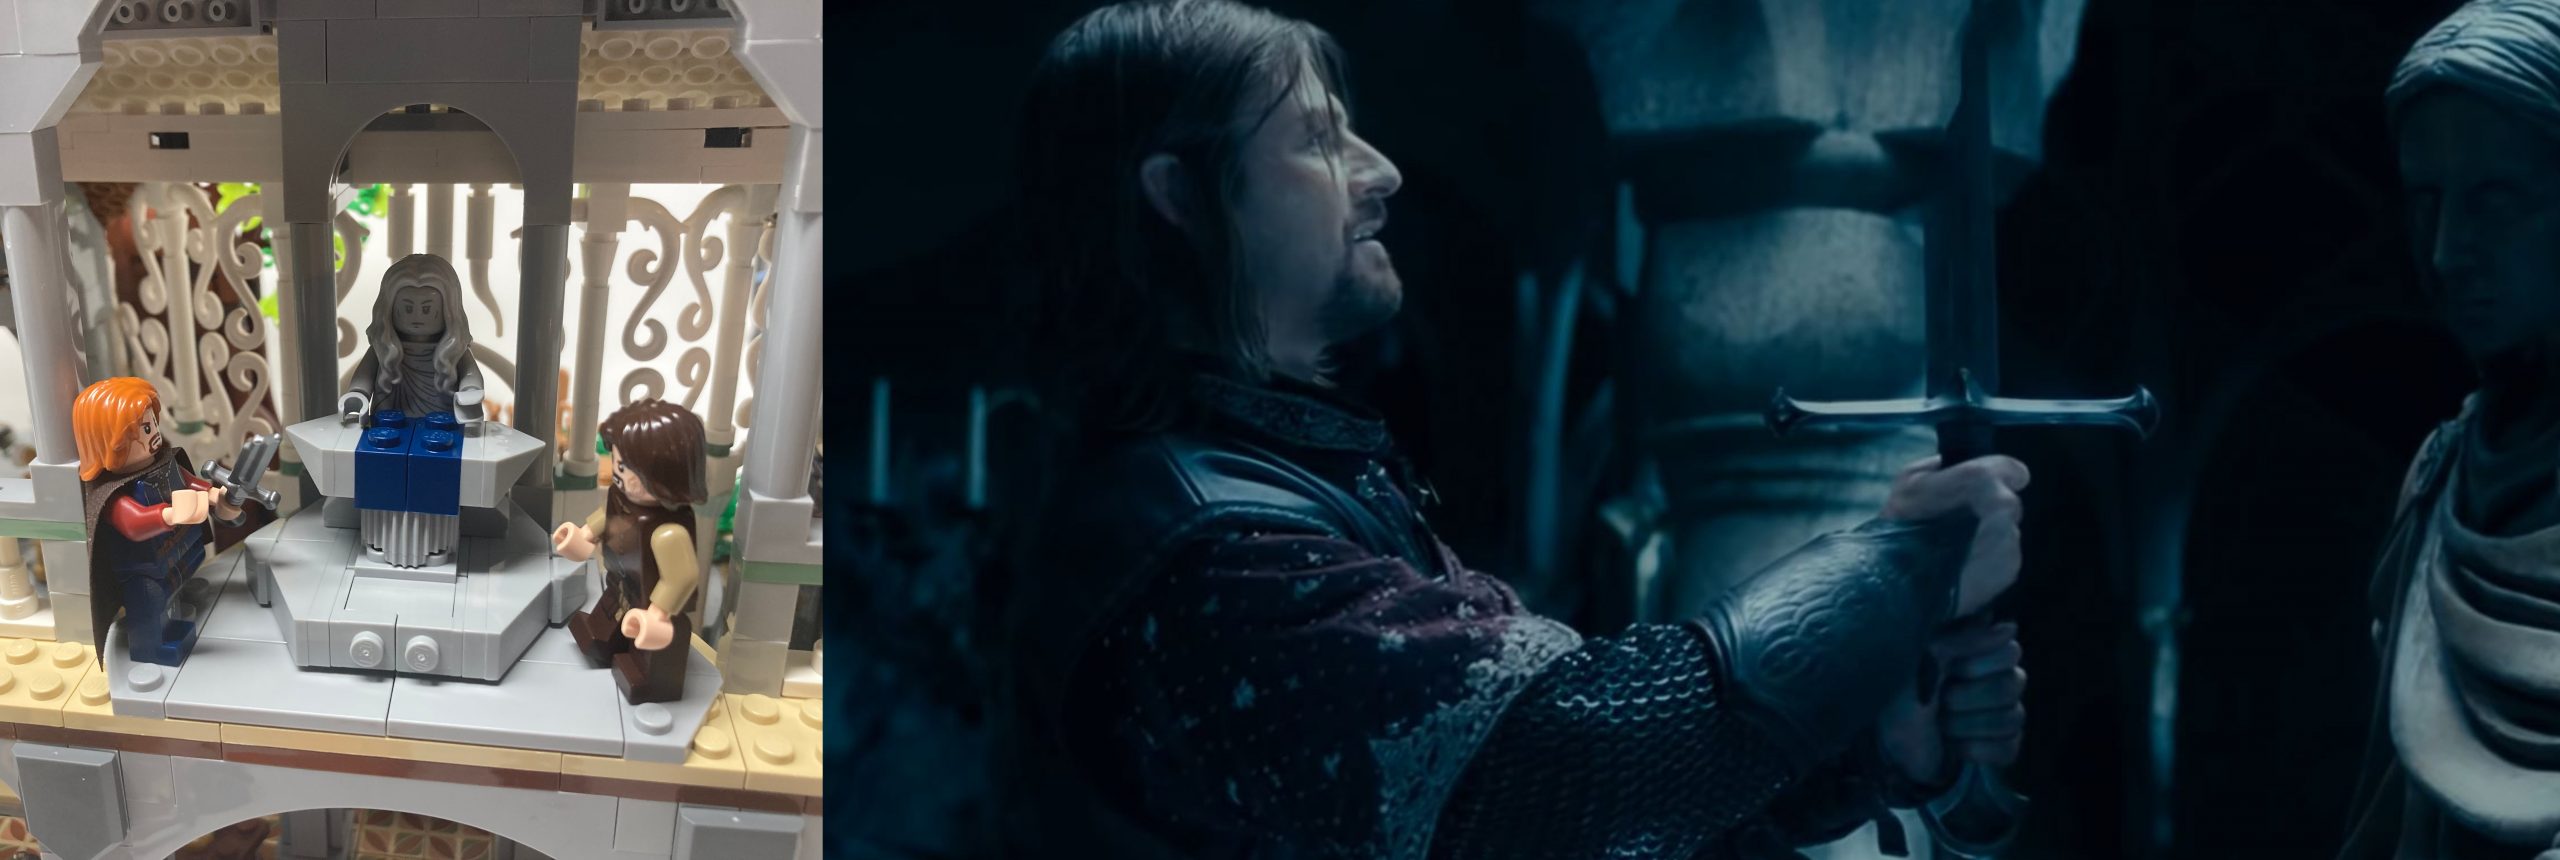
The Council of Elrond is one of the iconic scenes captured in this set. The center pedestal is designed to hold the One Ring, with eight chairs surrounding it to accommodate the guests present in the scene. The designers have carefully recreated the intricate details of the elvish architecture, including the flourished ornaments in the arches and the mosaic prints. When compared to a still from the movie, the attention to detail is evident, capturing the very essence of elvish design in the LEGO set.

Side by side comparison of the Council of Elrond scene (Photo: New Line Productions, Inc).
The set includes a scene from the film where Frodo is taken to Rivendell to heal from the Morgul Blade wound. The room is depicted in the tower and is complete with details such as the statue overlooking the bed, the ornate 297Warm GoldPearl Gold candelabrum, and a chest that contains Sting and the Mithril vest.
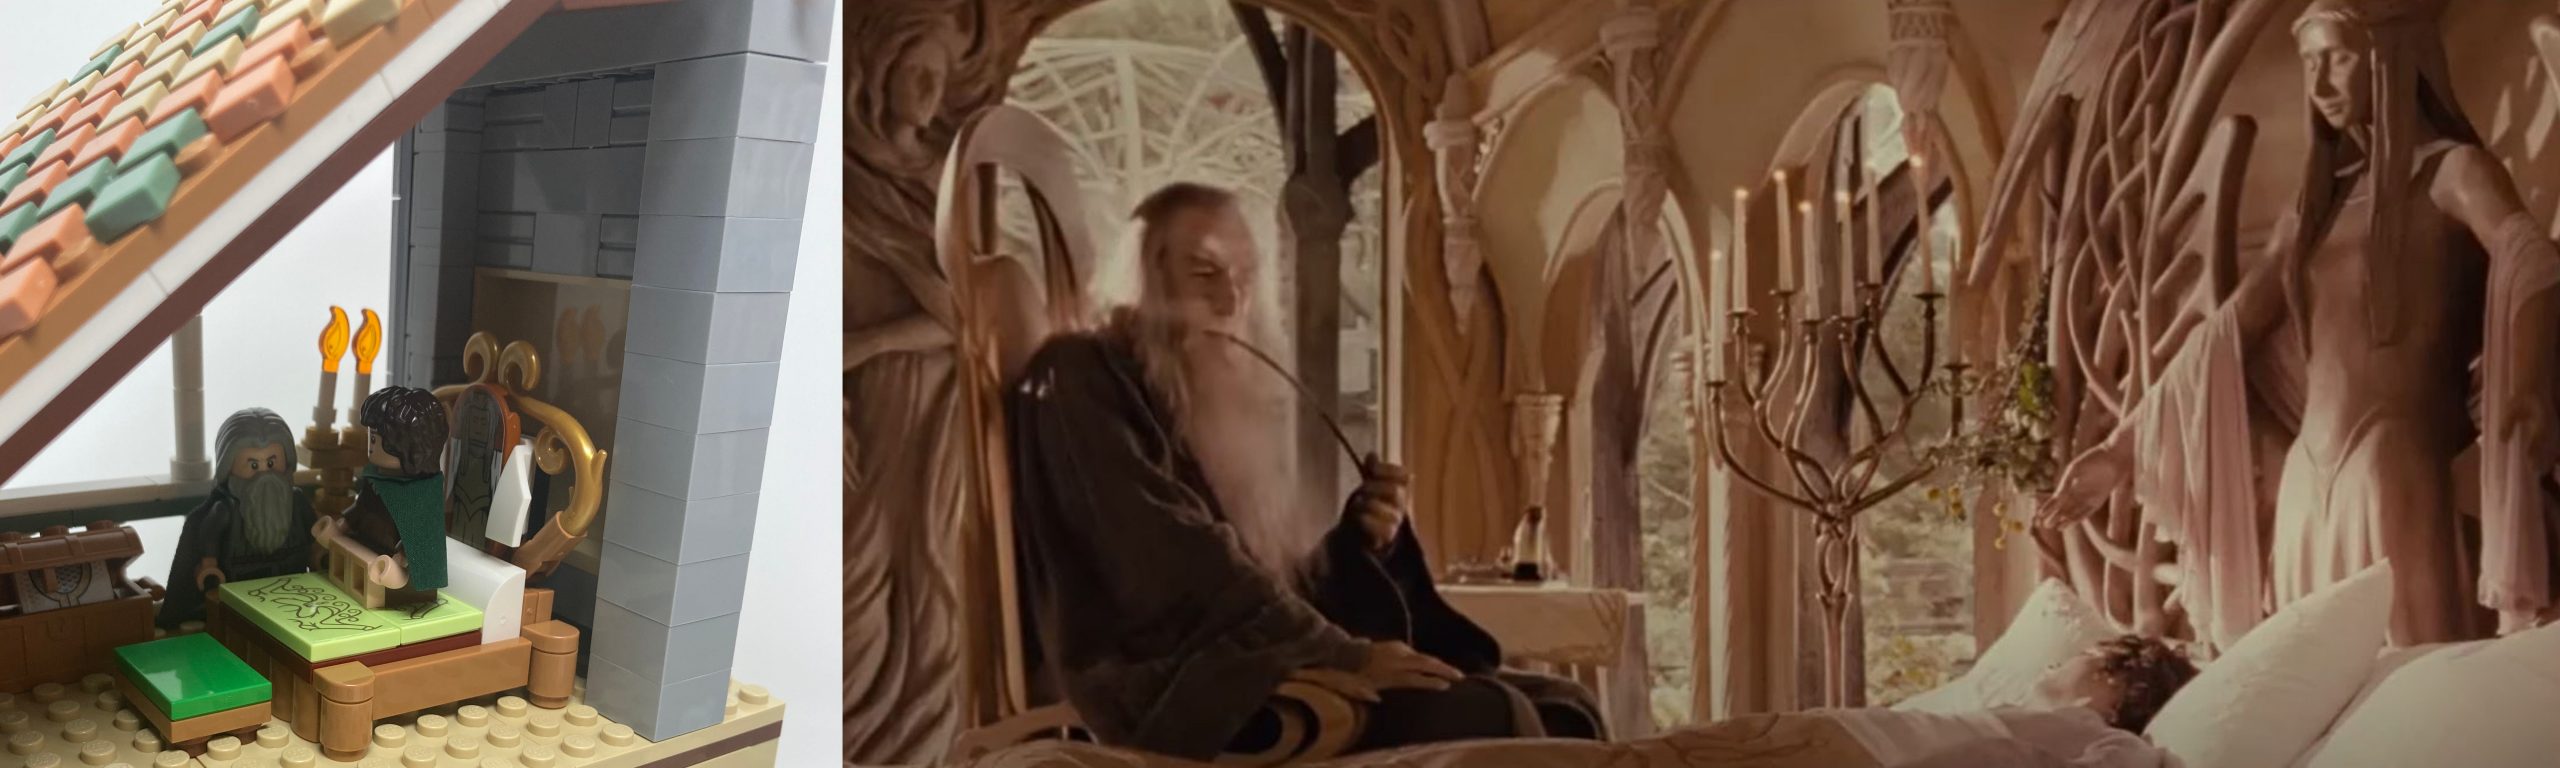
Side by side comparison of Frodo awakening in Rivendell scene (Photo: New Line Productions, Inc).
The set also includes a pedestal inside the walls of Rivendell that displays the shards of Narsil. This iconic blade, which cut the Ring from Sauron’s hand, is a new print that is included twice as a neat extra piece.
Side by side comparison of Boromir and the shards of Narsil scene (Photo: New Line Productions, Inc).
When Frodo first reunites with Bilbo they meet on a bench in the gardens of Rivendell. Albeit a very minor part of the movie this bench and tree are captured at the base of the buildings.

Side by side comparison of Bilbo in the garden scene (Photo: New Line Productions, Inc).
Aragorn meets Arwen at the Bruinen Falls before he sets off on his adventure. She gifts him the Evenstar as a symbol of her love. The bridge and Gazebo are depicted with precision.
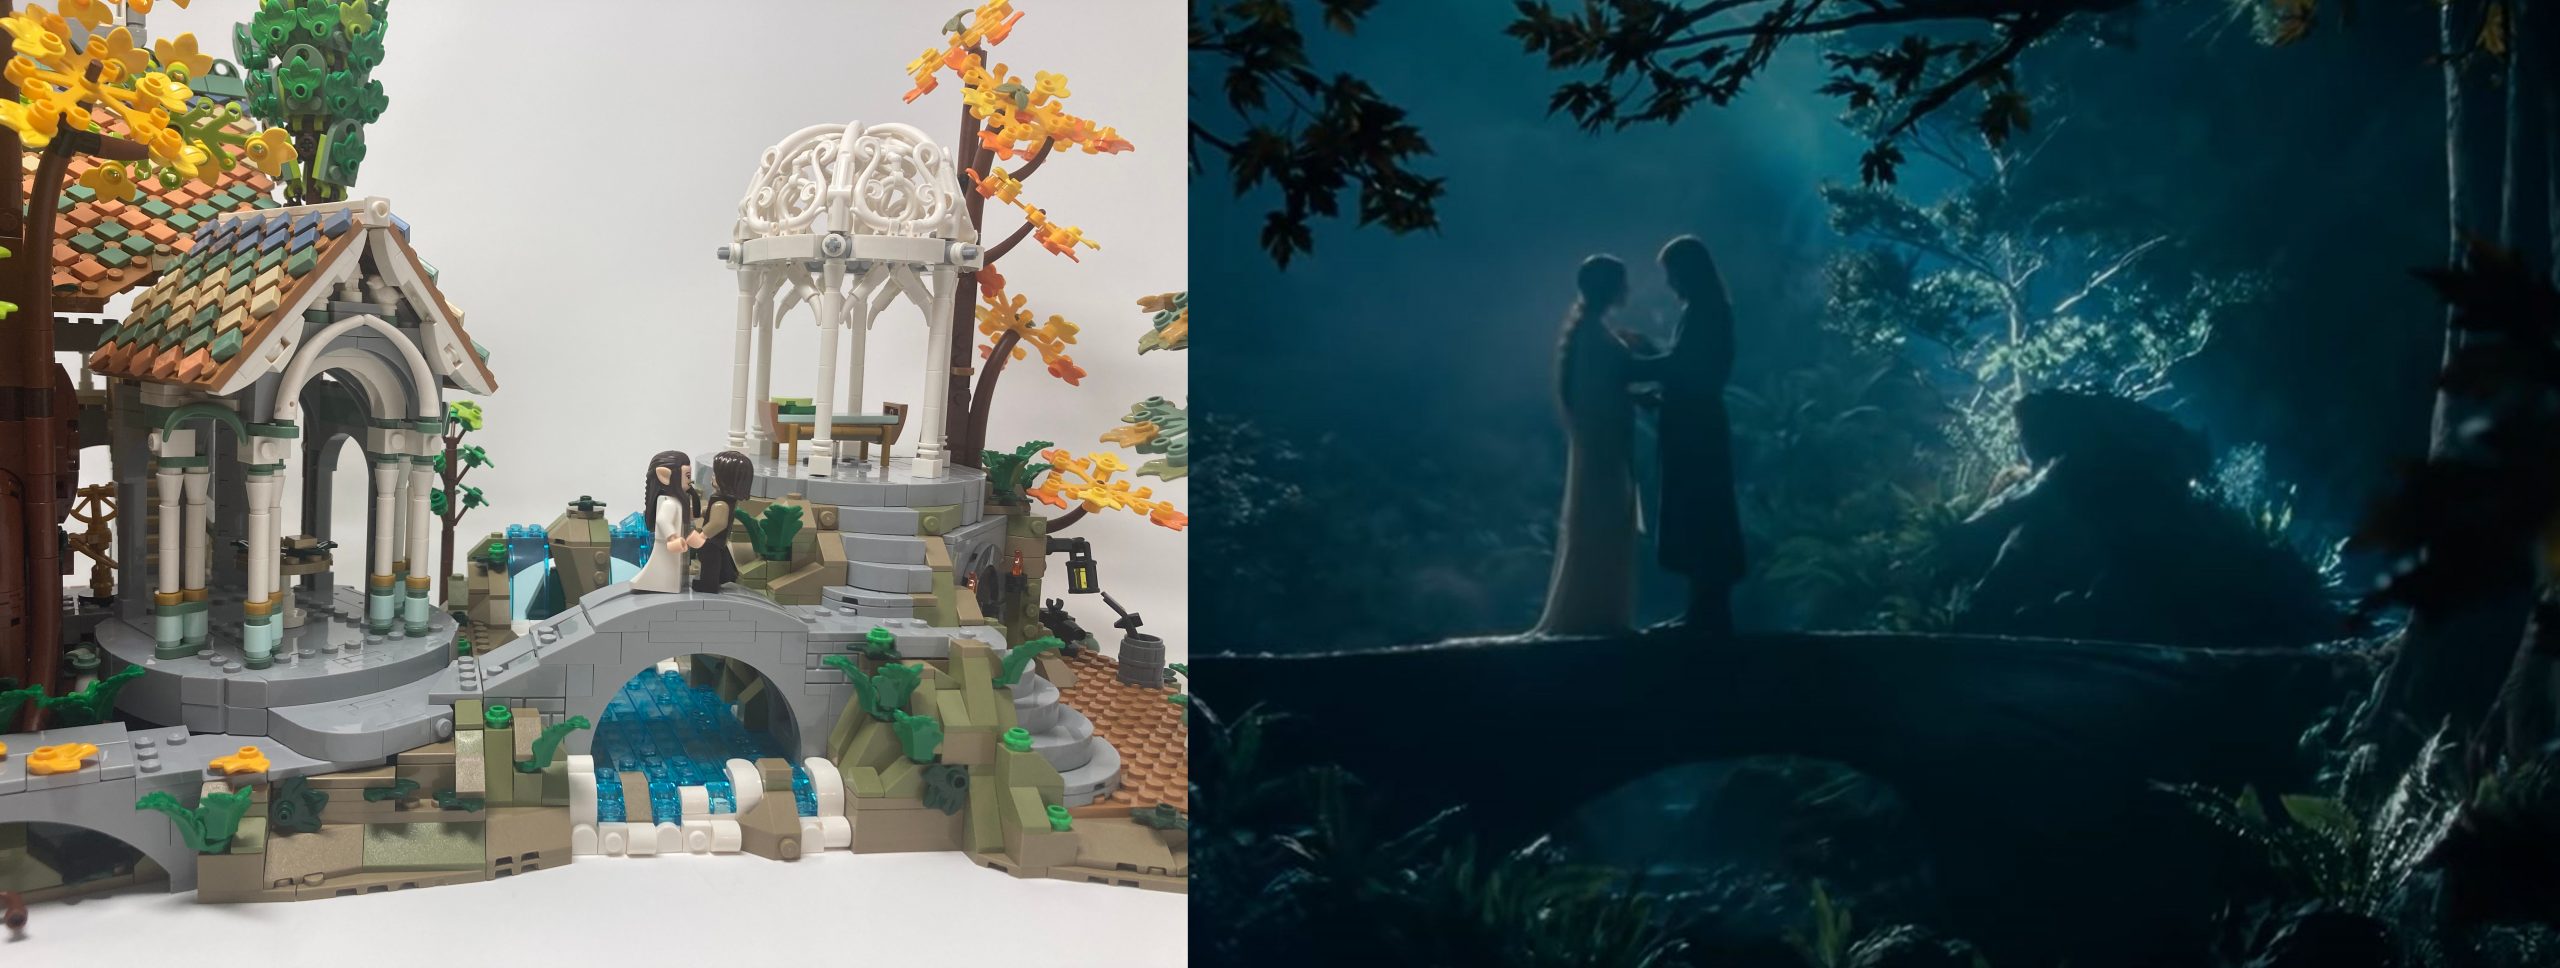
Side by side comparison of Aragorn and Arwen on the bridge scene (Photo: New Line Productions, Inc).
The Elven Forge of Rivendell is the location where Narsil is reforged into Andúril, the Flame of the West. In the films, Aragorn only receives the blade after Elrond advises him to take the Dimholt Road to gather more soldiers. However, in the books, Aragorn possesses Andúril from the outset of his journey.
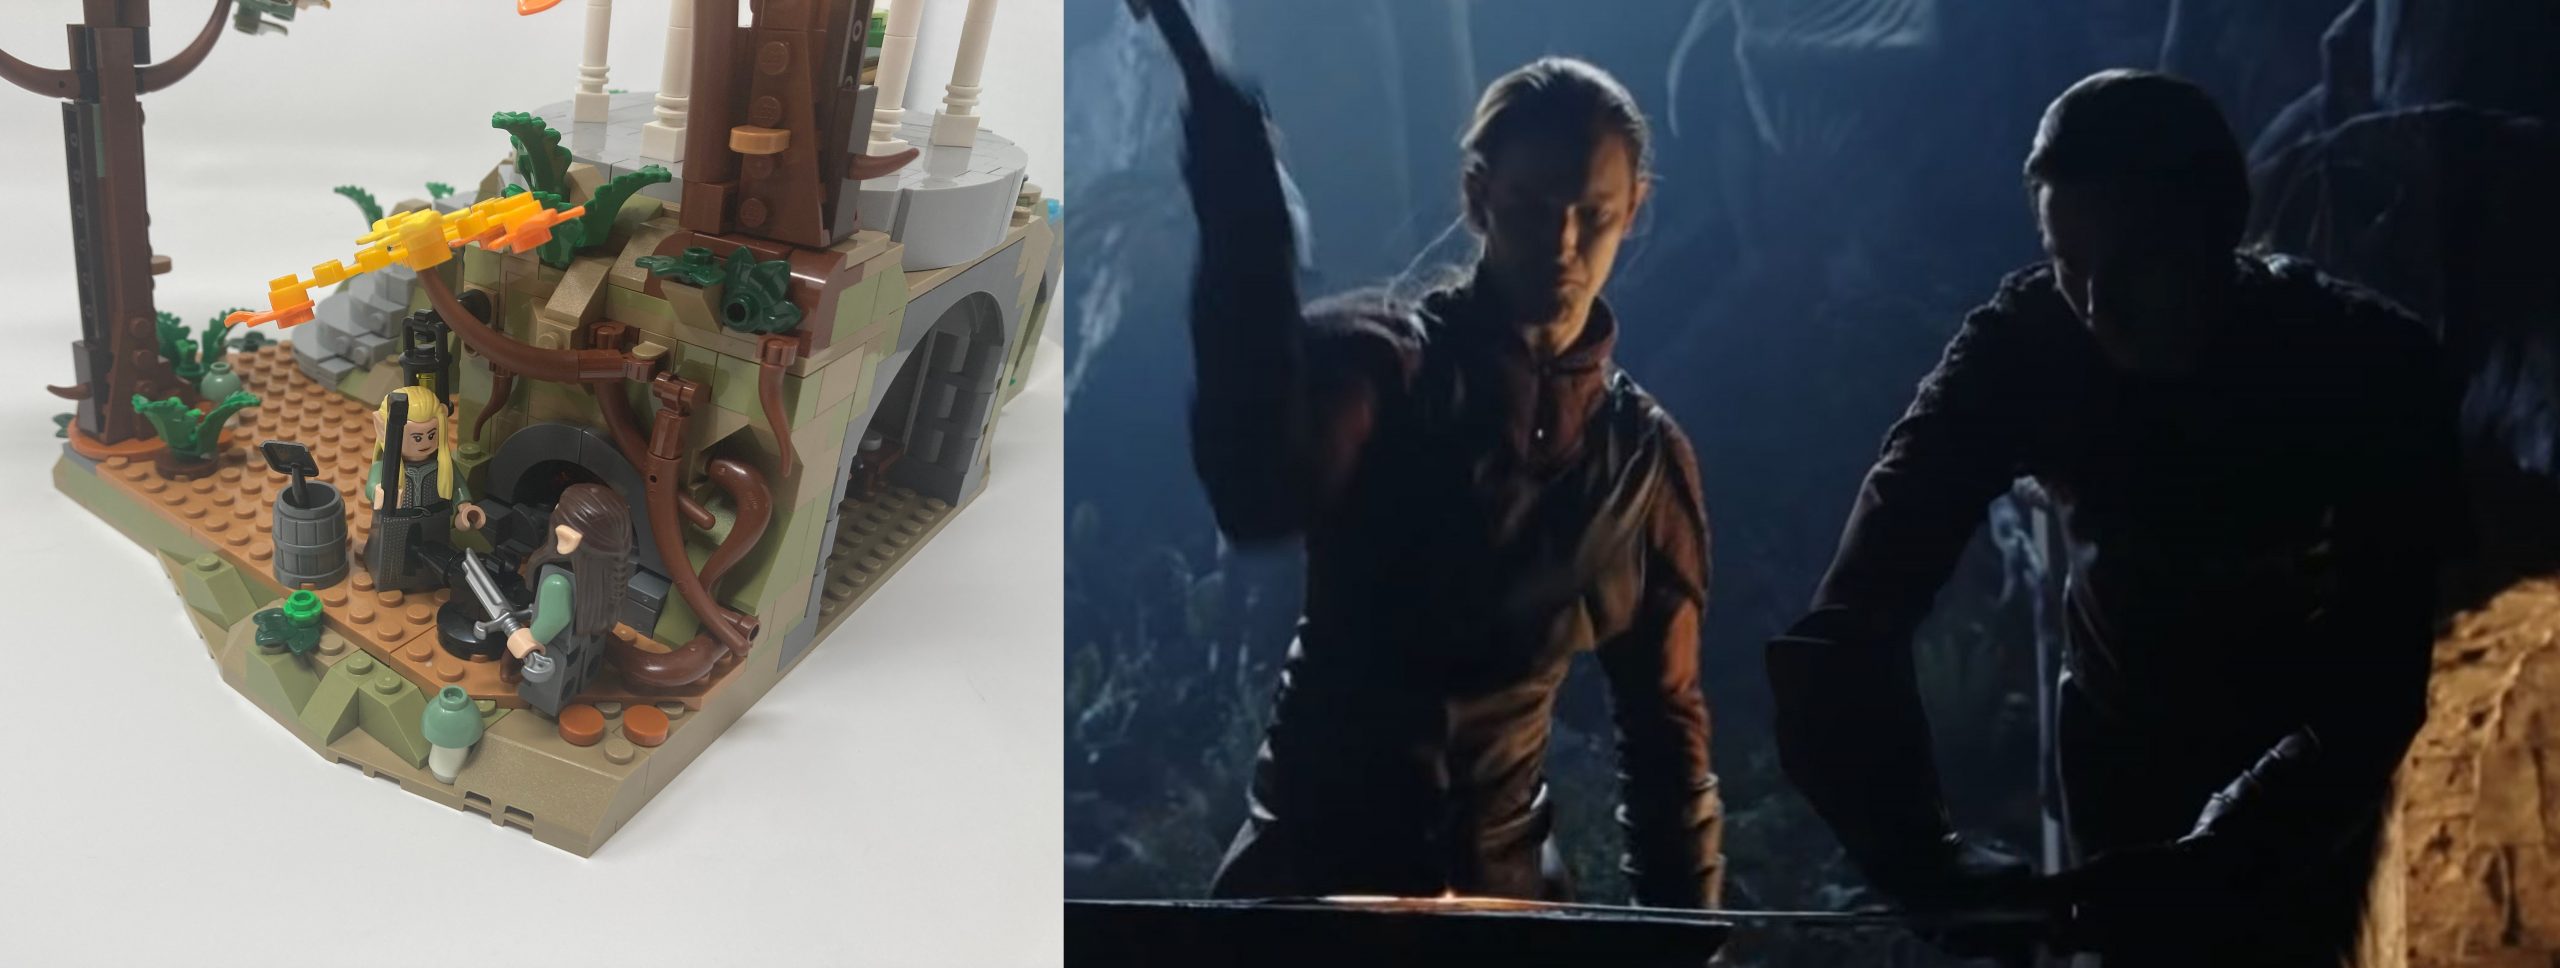
Side by side comparison of the Elven forge scene (Photo: New Line Productions, Inc).
Value
In summer 2022, LEGO announced a price increase of up to 20% on their sets. After the launch of their Adults Welcome campaign and the release of many new, larger sets, it will be intriguing to see how sales have been affected. Fans have been using 10 cents per piece as a metric to judge the fairness of LEGO set prices, but with many sets containing small pieces, it’s worth considering the price per weight as well.
Note: The prices mentioned below are based on the LEGO release price.
| LEGO Set | Price | Part Count | Price-per-part | Weight | Price-per-gram |
|---|---|---|---|---|---|
| #31203 World Map | $249.99 | 11,695 pieces | $0.021 per-piece | 4020 grams | $0.062 per-gram |
| #21056 Taj Mahal | $119.99 | 2022 pieces | $0.059 per-piece | 1811 grams | $0.066 per-gram |
| #21058 Great Pyramid of Giza | $129.99 | 1476 pieces | $0.088 per-piece | 1832 grams | $0.071 per-gram |
| #10278 Police Station | $199.99 | 2923 pieces | $0.068 per-piece | 2602 grams | $0.077 per-gram |
| #71741 Ninjago City Gardens | $299.99 | 5685 pieces | $0.052 per piece | 3719 grams | $0.081 per-gram |
| #71043 Hogwarts Castle | $399.99 | 6020 pieces | $0.066 per-piece | 4899 grams | $0.082 per-gram |
| #10292 Friends – The Apartments | $149.99 | 2048 pieces | $0.073 per-piece | 1778 grams | $0.084 per-gram |
| #10297 Boutique Hotel | $199.99 | 3066 pieces | $0.065 per-piece | 2380 grams | $0.084 per-gram |
| #10312 Jazz Club | $229.99 | 2899 pieces | $0.079 per-piece | 2392 grams | $0.096 per-gram |
| #10270 Bookshop | $199.99 | 2504 pieces | $0.080 per-piece | 2085 grams | $0.096 per-gram |
| #10282 Adidas Originals Superstar | $79.99 | 731 pieces | $0.109 per-piece | 735 grams | $0.109 per-gram |
| (This set) #10316 Rivendell | $499.99 | 6167 pieces | $0.081 per piece | 4375 grams | $0.114 per-gram |
| #10305 Lion Knights’ Castle | $399.99 | 4514 pieces | $0.089 per piece | 3265 grams | $0.122 per-gram |
| #10303 Loop Coaster | $399.99 | 3756 pieces | $0.106 per-piece | 3189 grams | $0.125 per-gram |
As we can see this set is priced below 10 cents per piece guideline at $0.081 per piece, but when comparted to other sets, both licensed and unlicensed the price falls in the middle. Surprisingly despite being licensed the price per piece is better than even #10305 Lion Knight’s castle. Alternatively, if we now look at it on a price per gram basis this sits at $0.114 per gram which puts it amongst the priciest on the list of comparative sets, pricing it even more than #10305 Lion Knight’s castle. This is due to the fact that a majority of the pieces in this set are small for detailing, artificially inflating the price per piece count. Unfortunately this emphasizes the point that LEGO is becoming increasingly more expensive.
Conclusion
As a big fan of both LEGO and Lord of the Rings, I was blown away by #10316 Rivendell. The first-time building process was a journey that I wished I could relive as soon as it was complete. This set exceeded all my high expectations with its fantastic minifigures, excellent parts selection, and creative building techniques. It was a true joy to put together. In addition to being a phenomenal build, the set is also a magnificent display piece that showcases movie-accurate scenes and satisfies all the desires of a Lord of the Rings LEGO fan.
From the back, you can see many iconic moments come to life.
What stands out the most for me in this set is its display capability. You can divide the massive scene into three sections and even further into six standalone displays if desired. The set is visually appealing from every angle with its bright shapes and colors that create a well-balanced blend of density and airiness, capturing the essence of a safe haven built into the woods and mountains.

This set can be displayed from any angle and can be broken up into each section to be displayed individually.
When compared to the original minifigures, the improvements made are minor. However, considering the high cost of the original figures, purchasing this entire set to complete your collection of the fellowship figures is a cost-effective option. It’s worth noting that the minimal improvements needed for these figures demonstrate the high level of accuracy LEGO achieved in their initial design. The interchangeable legs and hair of some figures make it possible to recreate important scenes from the movies with ease. The only downside is the limited number of female characters, but this is not a design flaw on LEGO’s part as the source material primarily features male characters.
When filled with figures the entire scene comes to life.
“The only downside is the limited number of female characters, but this is not a design flaw on LEGO’s part as the source material primarily features male characters.” oh you miserable leftists hahaha
Is left tower the highest point of the set? Do you know by chance how tall is it? Just lego dimensions from the website aren’t really accurate. Many people who had built the set agree that depth is about 38 cm, not 50 cm as lego write. I am trying now to find out how realistically tall the set is, and if I manage to fit it on my shelf.
The measured height of the tallest tower is 39cm, hope that helps.
What an incredible review! The details you highlighted about Rivendell’s design truly capture its essence from the films. I especially loved the focus on the intricate architecture and how it reflects the beauty of Elven culture. Can’t wait to hear more about your thoughts on other sets!
This review of #10316 Rivendell is fantastic! I love how it captures the essence of Middle-earth. The attention to detail is remarkable, and the photos really showcase the set’s beauty. Can’t wait to see how it looks on my shelf!
Would it be possible for you to tell us the dimensions of each separate section? I really want this, but I need to know if I can display it somewhere in my house, even if separately. As a whole I know it will be impossible.
Thank you! And review, really. It only makes me want this set even more.
You’re using the wrong color names throughout the review. The gold is not “drum lacquered,” it’s Pearl Gold. Drum lacquered gold parts are typically cast in dark tan, then painted gold.
And the leaf pieces appear to be in standard Lego yellow, not “vibrant yellow.” Vibrant yellow is garishly neon like a highlighter.
Thanks for the feedback. Small color names can slip through so this has been addressed 🙂
It’s so pricey but I had to get this. I love lotr, and I’ve loved lego my entire life. I’ve watched every review I could find and that convinced me. This will be a joy to build – I’m so excited.
Looks fantastic. Just too expensive for me.
How are you calculating the parts weight? The weights shown are much lower than reported (Could this be die to packaging?)
Reported weight includes all the packaging and manuals. The weight we got was from weighing the final model and figures only. It does not include extra pieces, the boxes, bags or packaging.
I would love to build this kit. 500$ is I bit too much though. 350$ would be a better price.