
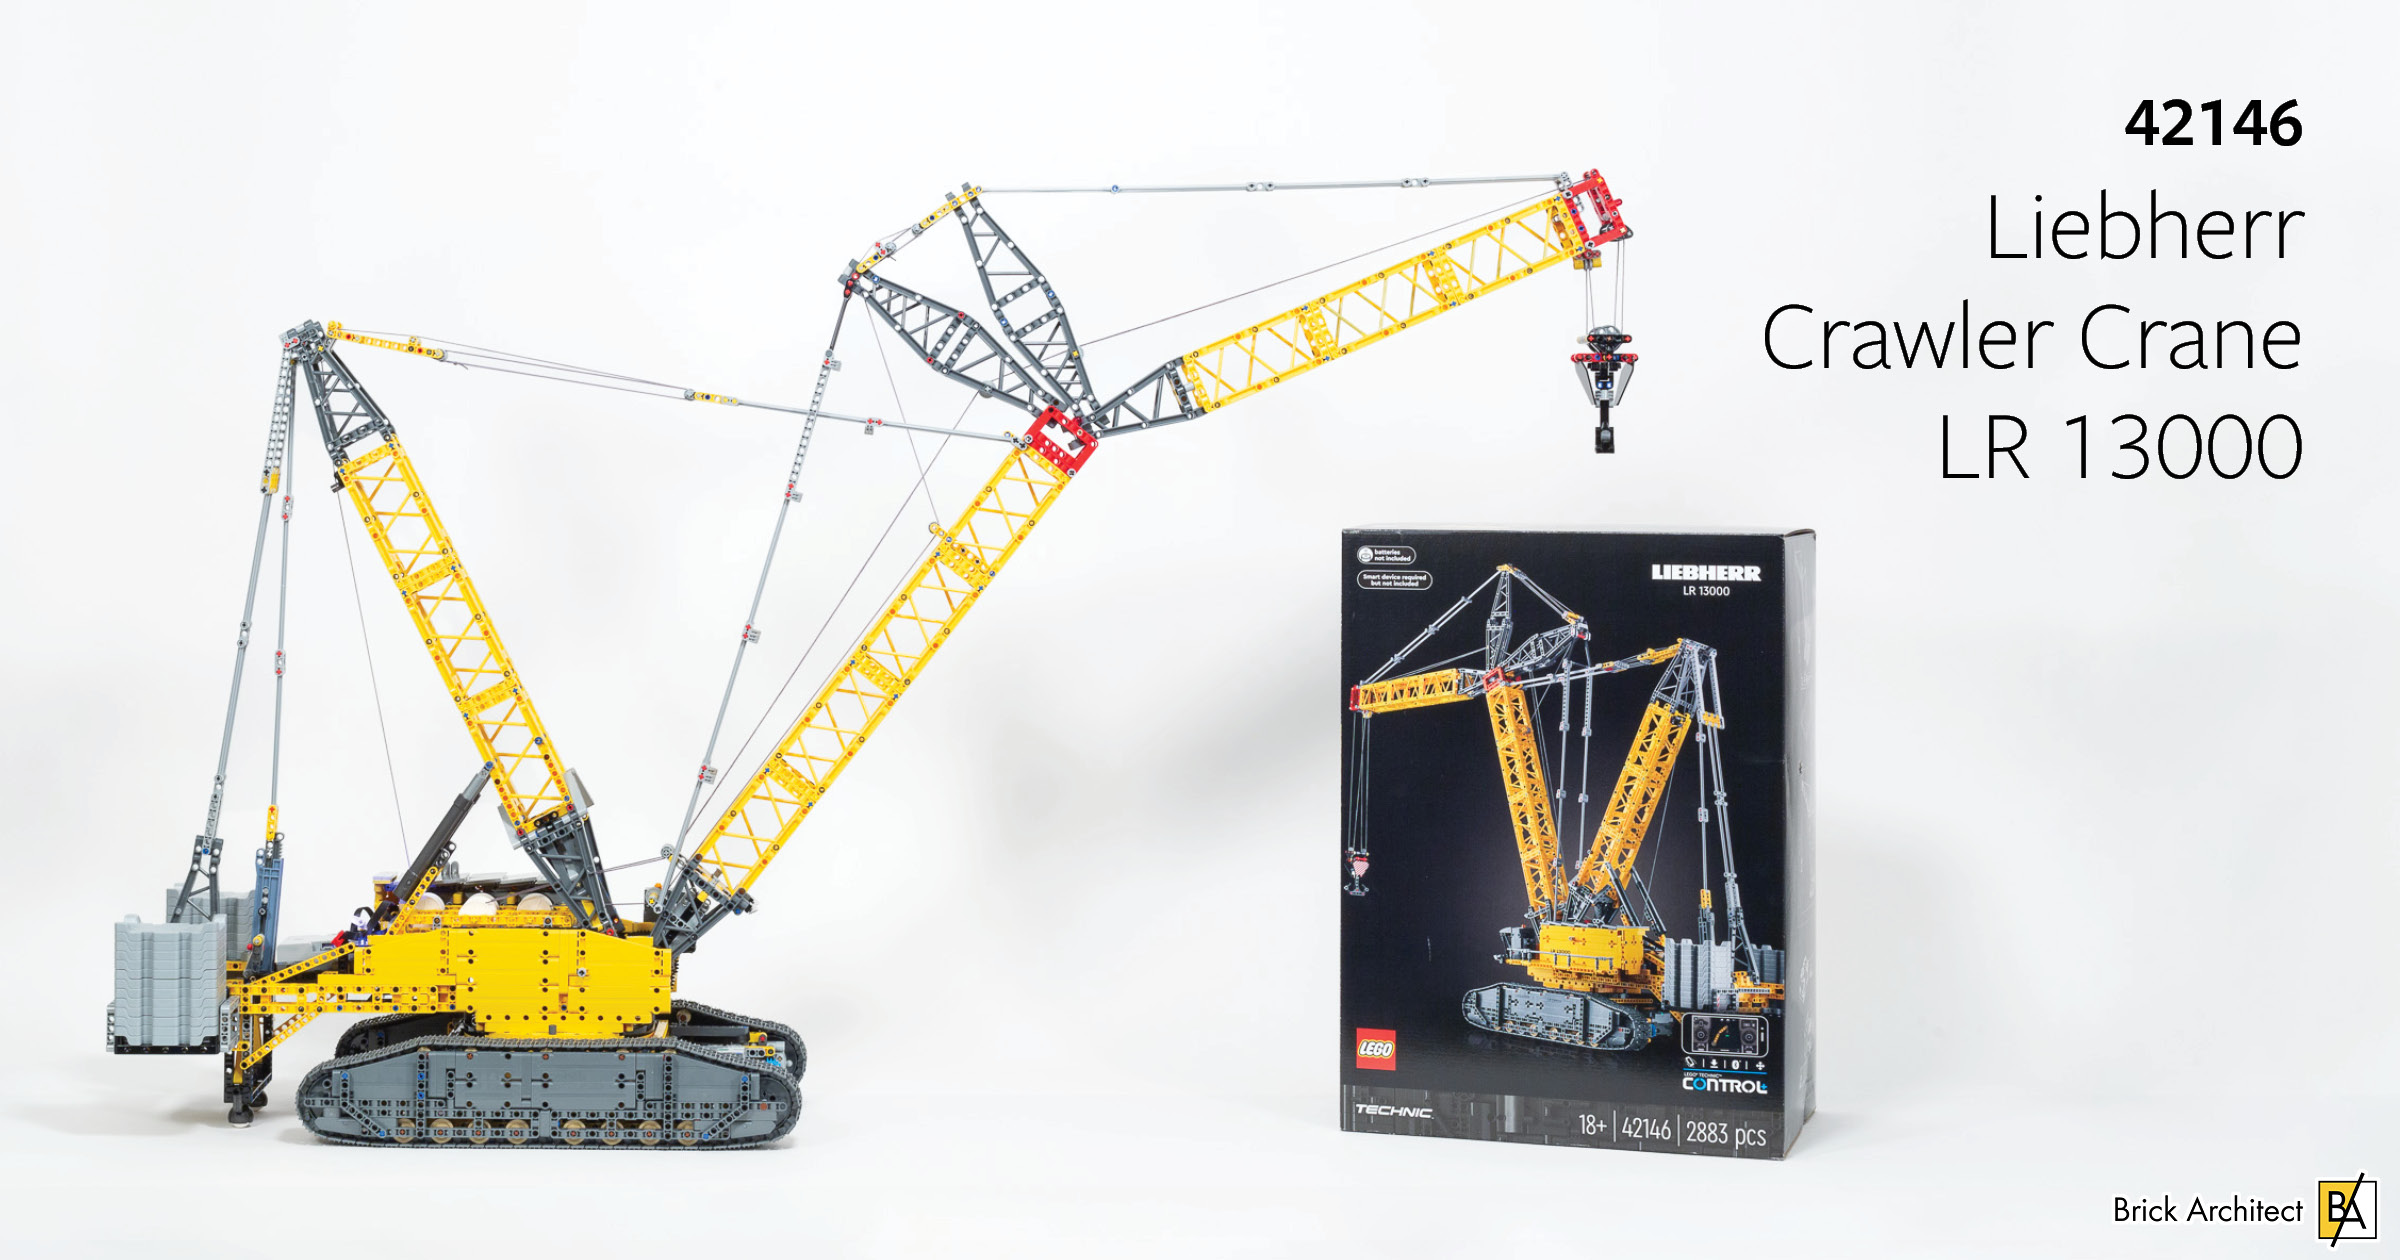
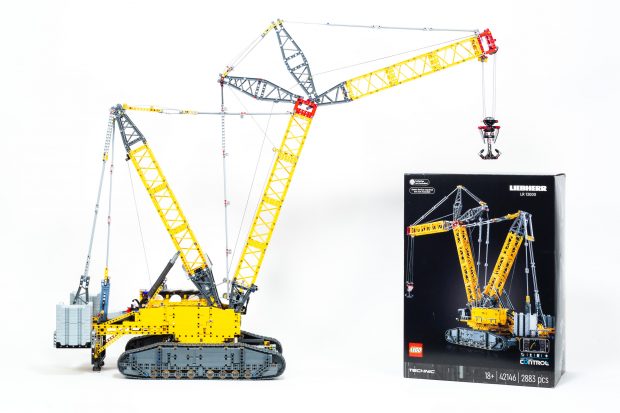
Review: #42146 Liebherr Crawler Crane LR 13000
An awesome LEGO Technic set that has a heavy lift to justify the hefty price tag. Let’s find out if it’s worth it!
#42146 Liebherr Crawler Crane LR 13000 will be released on August 1, 2023. It is the most expensive LEGO Technic set ever released with a cost of $699.99 (679.99€ / £579.99 / 899.99 CAD / 1049.99 AUD). Despite the high price, it contains just 2883 pieces, although that includes two Control+ Technic hubs, 6 large motors, and some new ballast elements. It is recommended for ages 18+.
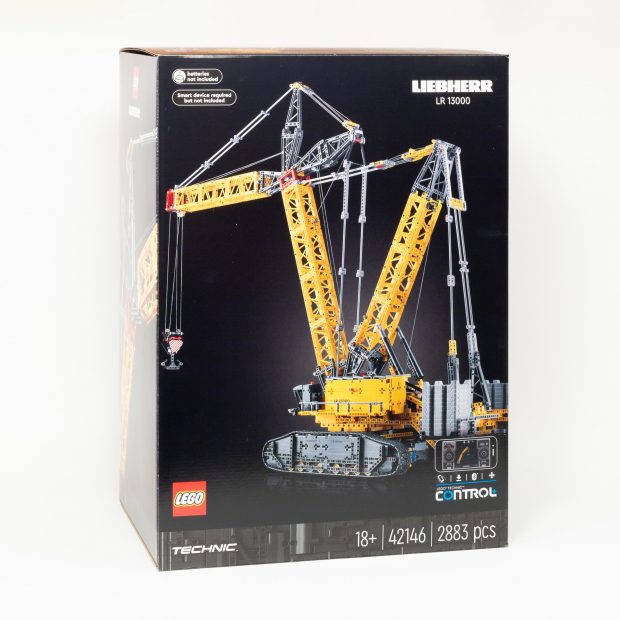
#42146 Liebherr Crawler Crane LR 13000 comes in a large box.
First Impressions
While I do not enjoy LEGO Technic as much as LEGO Architecture, I have grown to really appreciate it’s ability to teach complex engineering concepts through play. I also really enjoy seeing how mature the selection of LEGO Technic elements has become, to the point that modern Technic sets contain very few studded LEGO ‘System’ bricks. (The same can not be said for traditional brick-based sets which include a ton of Technic elements to bring various play features to life.)
All that I knew before the box arrived was that it would be the largest and most expensive LEGO Technic set yet, despite having fewer than 3000 pieces. The really impressive part is that it requires two battery boxes to control the six motors advertised on the side of the box. (Each hub supports up to four motors and/or sensors.)
I am extremely curious to find out if the vast majority of the build process will be dedicated to the long booms, or if those are large but simple assemblies and the bulk of the interesting stuff is in how they connect to one another. I am also quite curious to see what mechanical function they end up using to raise and lower the crane – they could use direct gearing or pneumatics, but I don’t think either would be strong enough, so I’m expecting some sort of string/cable that is wrapped around a pulley.
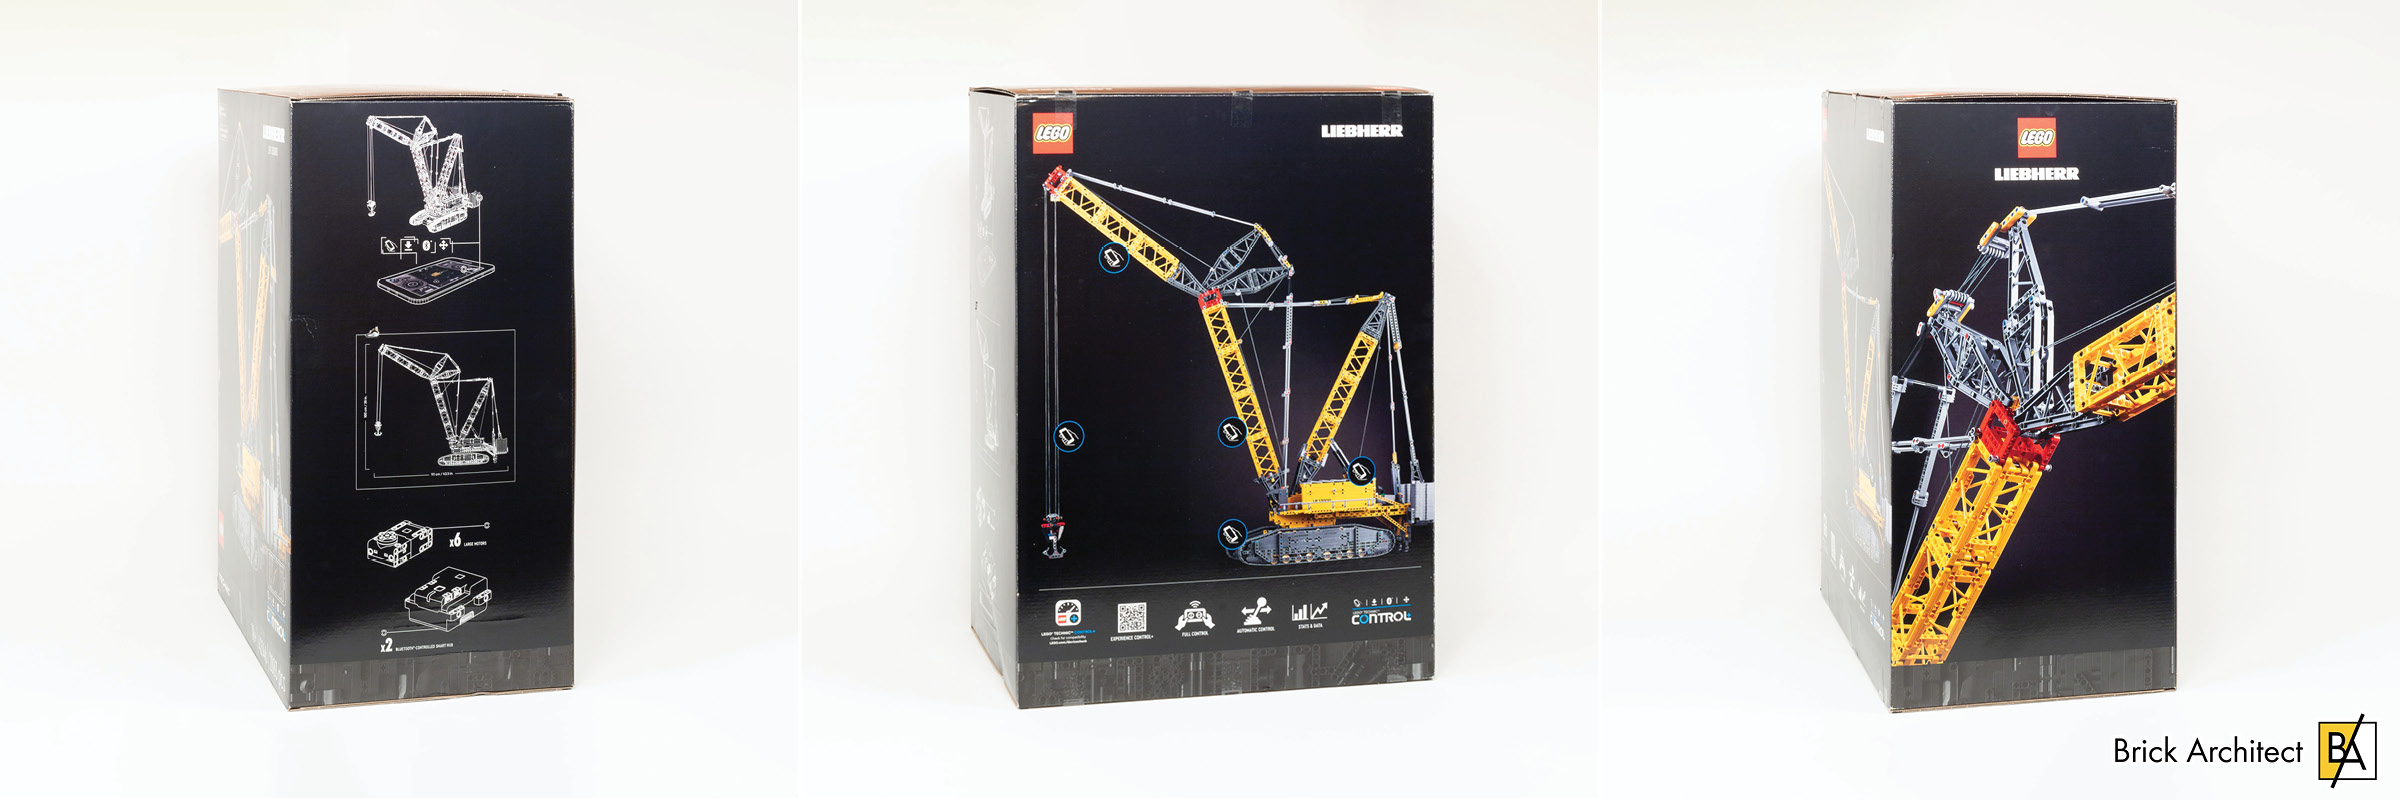
The five mechanical functions (using six motors) are featured on the back, and we get a close-up photo of the connection between the Boom and Jib on one of the sides.
With an $700 price tag and just 2883 pieces, this set will need to have a lot to offer to justify nearly $0.25 cents per part. I was struggling to contextualize the high price, and the price-per-part, and I couldn’t help myself… If you stacked $700 in US quarters, you would have a stack that is nearly 5 meters tall (and would weigh nearly 16 kilograms). By contrast, this set is just one meter tall. This is not an explicit statement of value, but rather meant as context as we consider what you are getting in this (admittedly large) box.
Lastly, I jut can’t wait to see how big it is, and whether there’s a chance in hell that I can find a home for it in my home… Probably not, unless my son adopts it as a pet in his room!
Contents
When I opened the box, I was delighted to see a stack of smaller boxes inside with line art images showing roughly what is included in each box. This aims to keep things organized, and it can also make it less likely for the outer box to get destroyed in transit since the inner boxes strengthen the box overall. That said, my box was damaged a bit in shipping despite a robust brown cardboard box (but I’ve seen a lot worse).
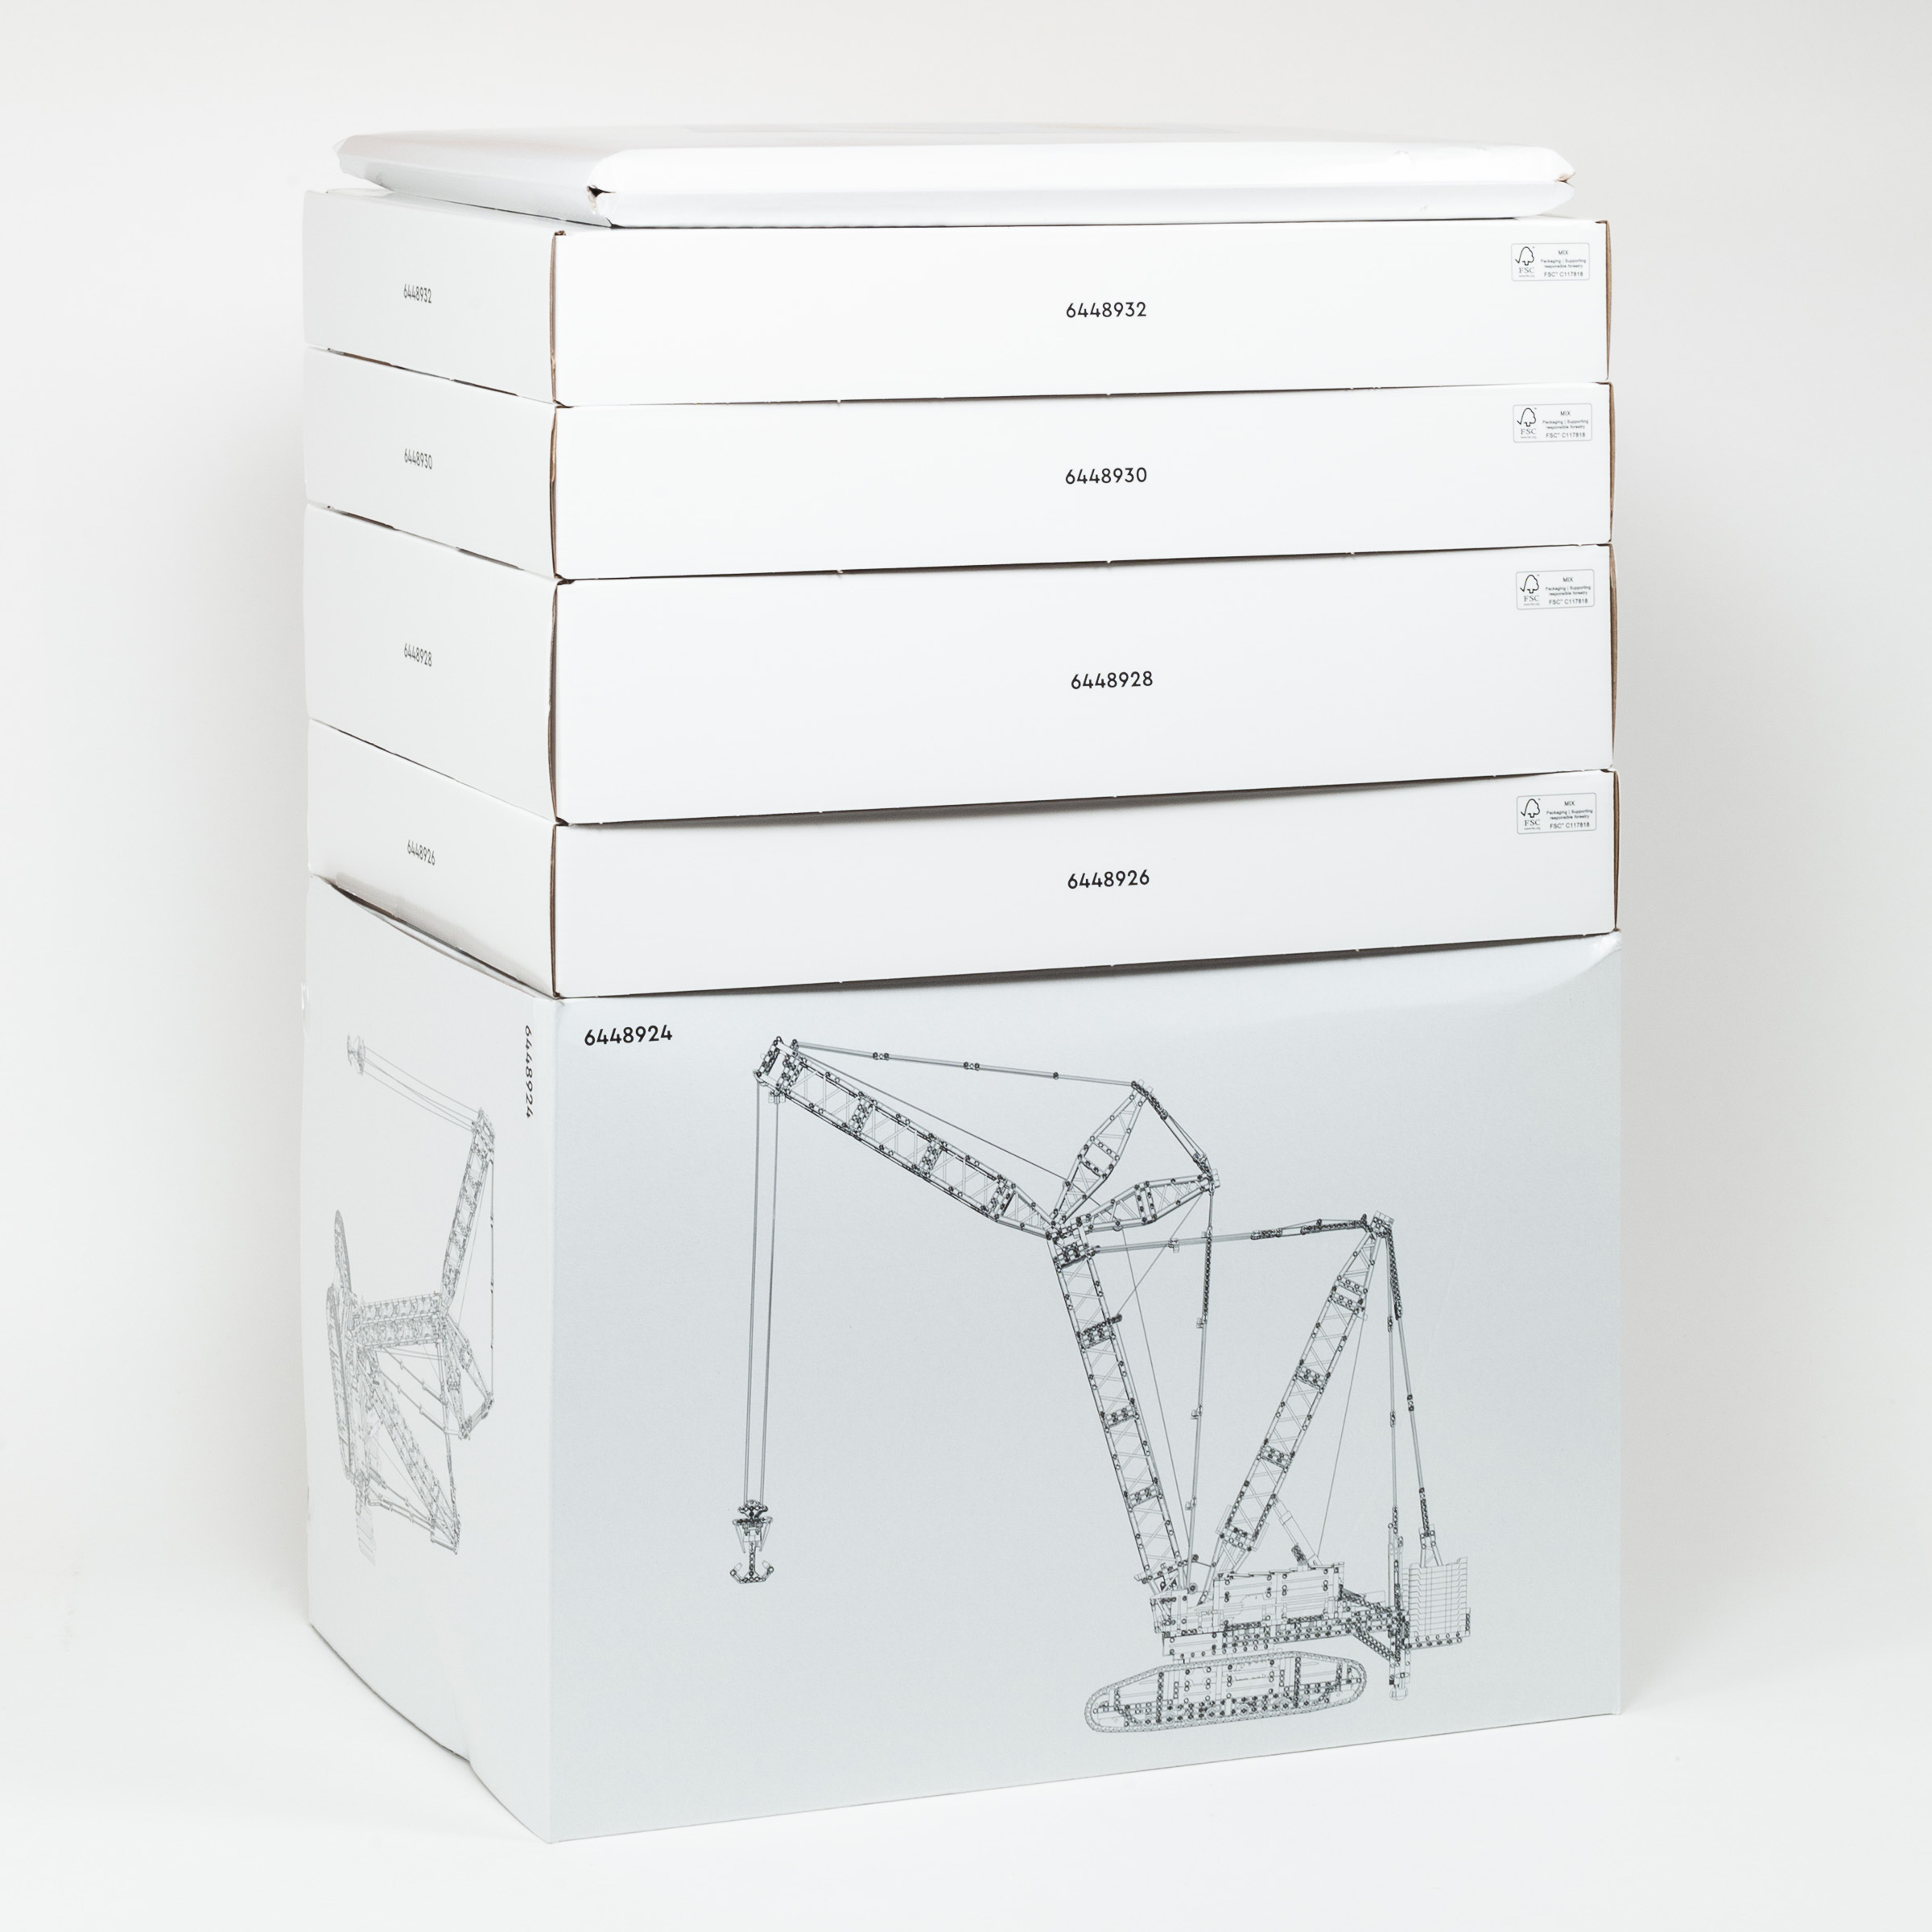
A cardboard pouch and five cardboard boxes try to keep things organized.
- Box Size: 37.8 x 52.1 x 25.7 cm (14 7/8” × 20 1/2” × 10 1/8”)
- Box Weight: 7900 grams (17.4 lbs)
- Box Density: 156 g/L
- LEGO Parts Weight: 5100 g (11.2 lbs)
- Weight-per-piece: 1.77 g/piece
- Price per piece: $0.243 per piece
- Price per gram: $0.137 per gram.
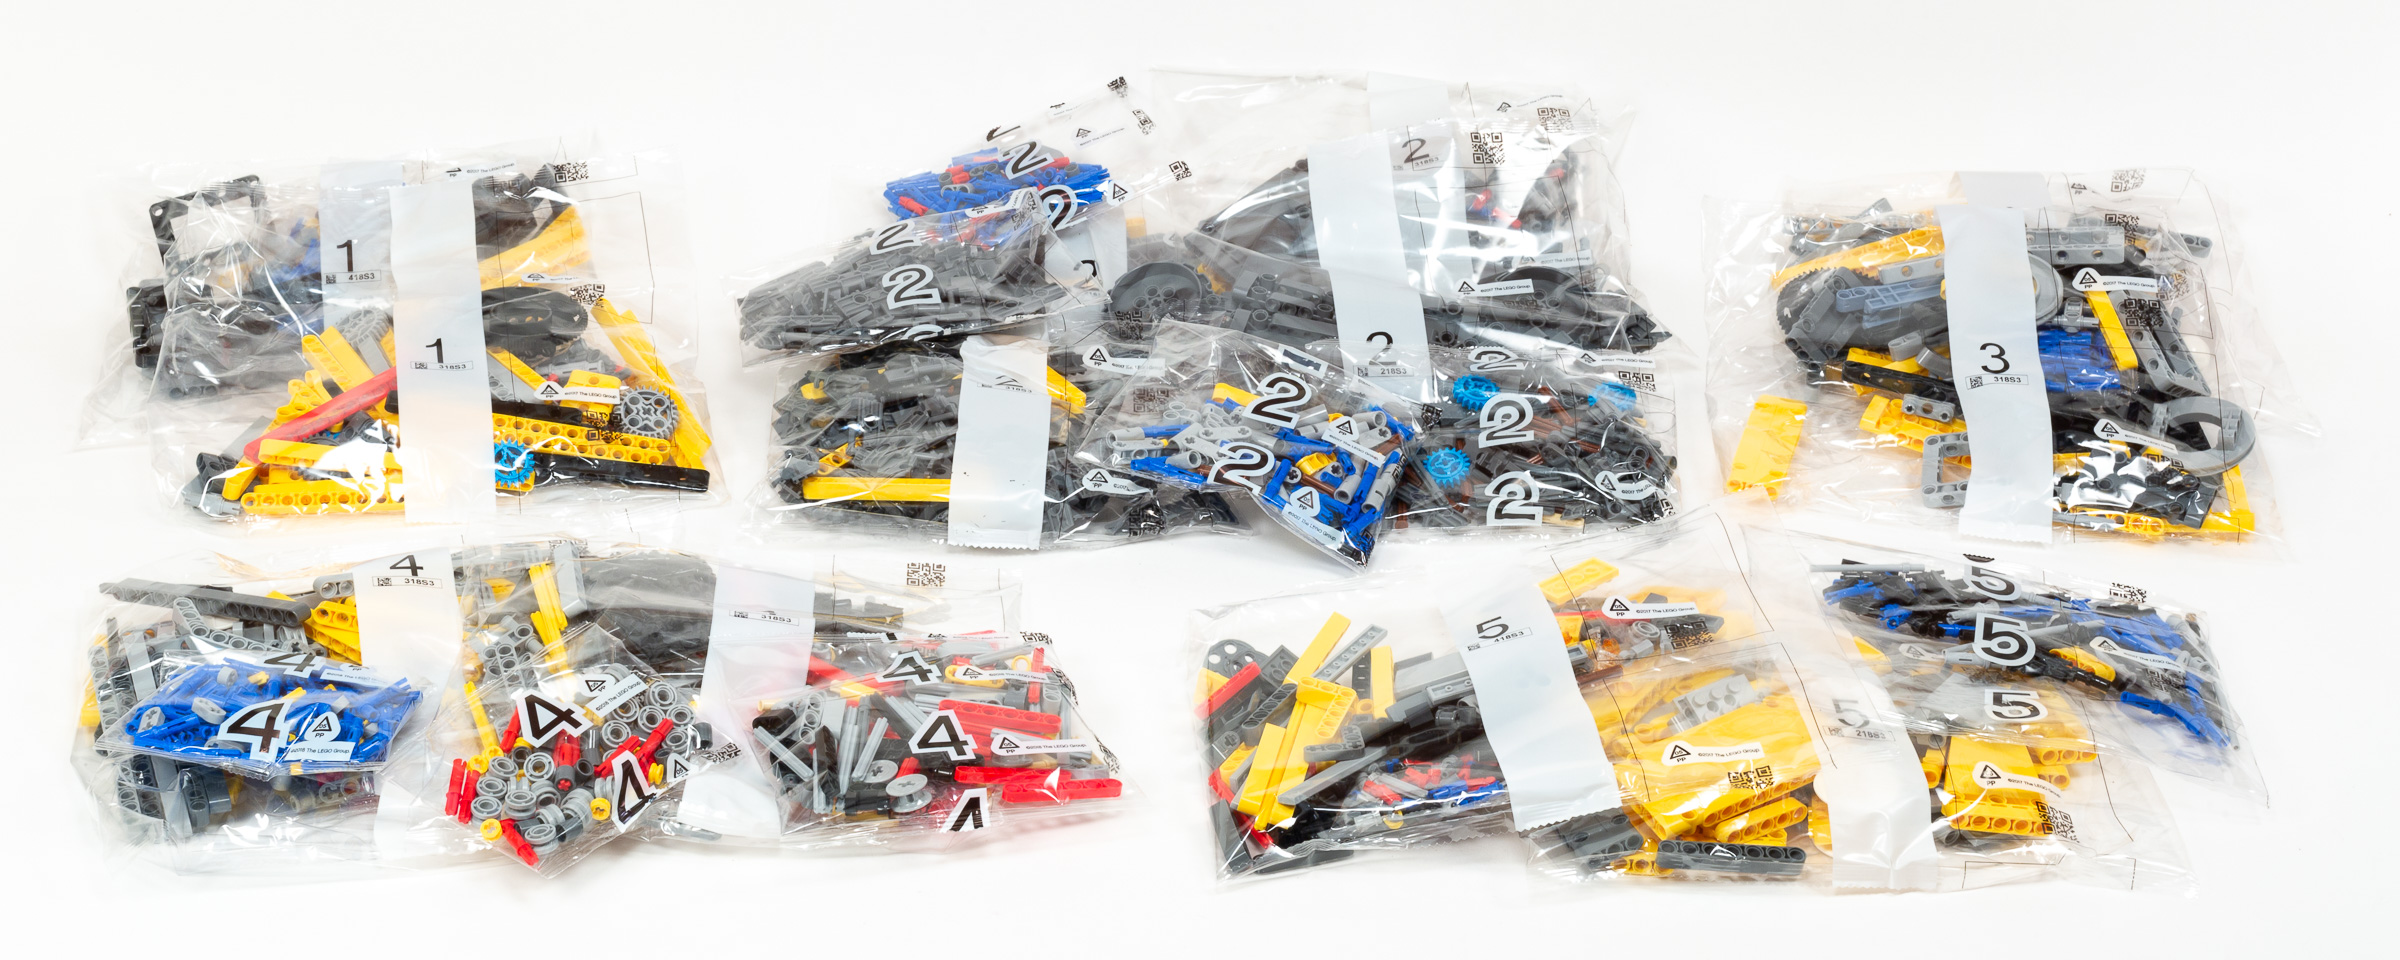
The larger box contains numbered bags for just 5 stages.
The smaller boxes contain loose bricks.
Box contents (from top to bottom of box):
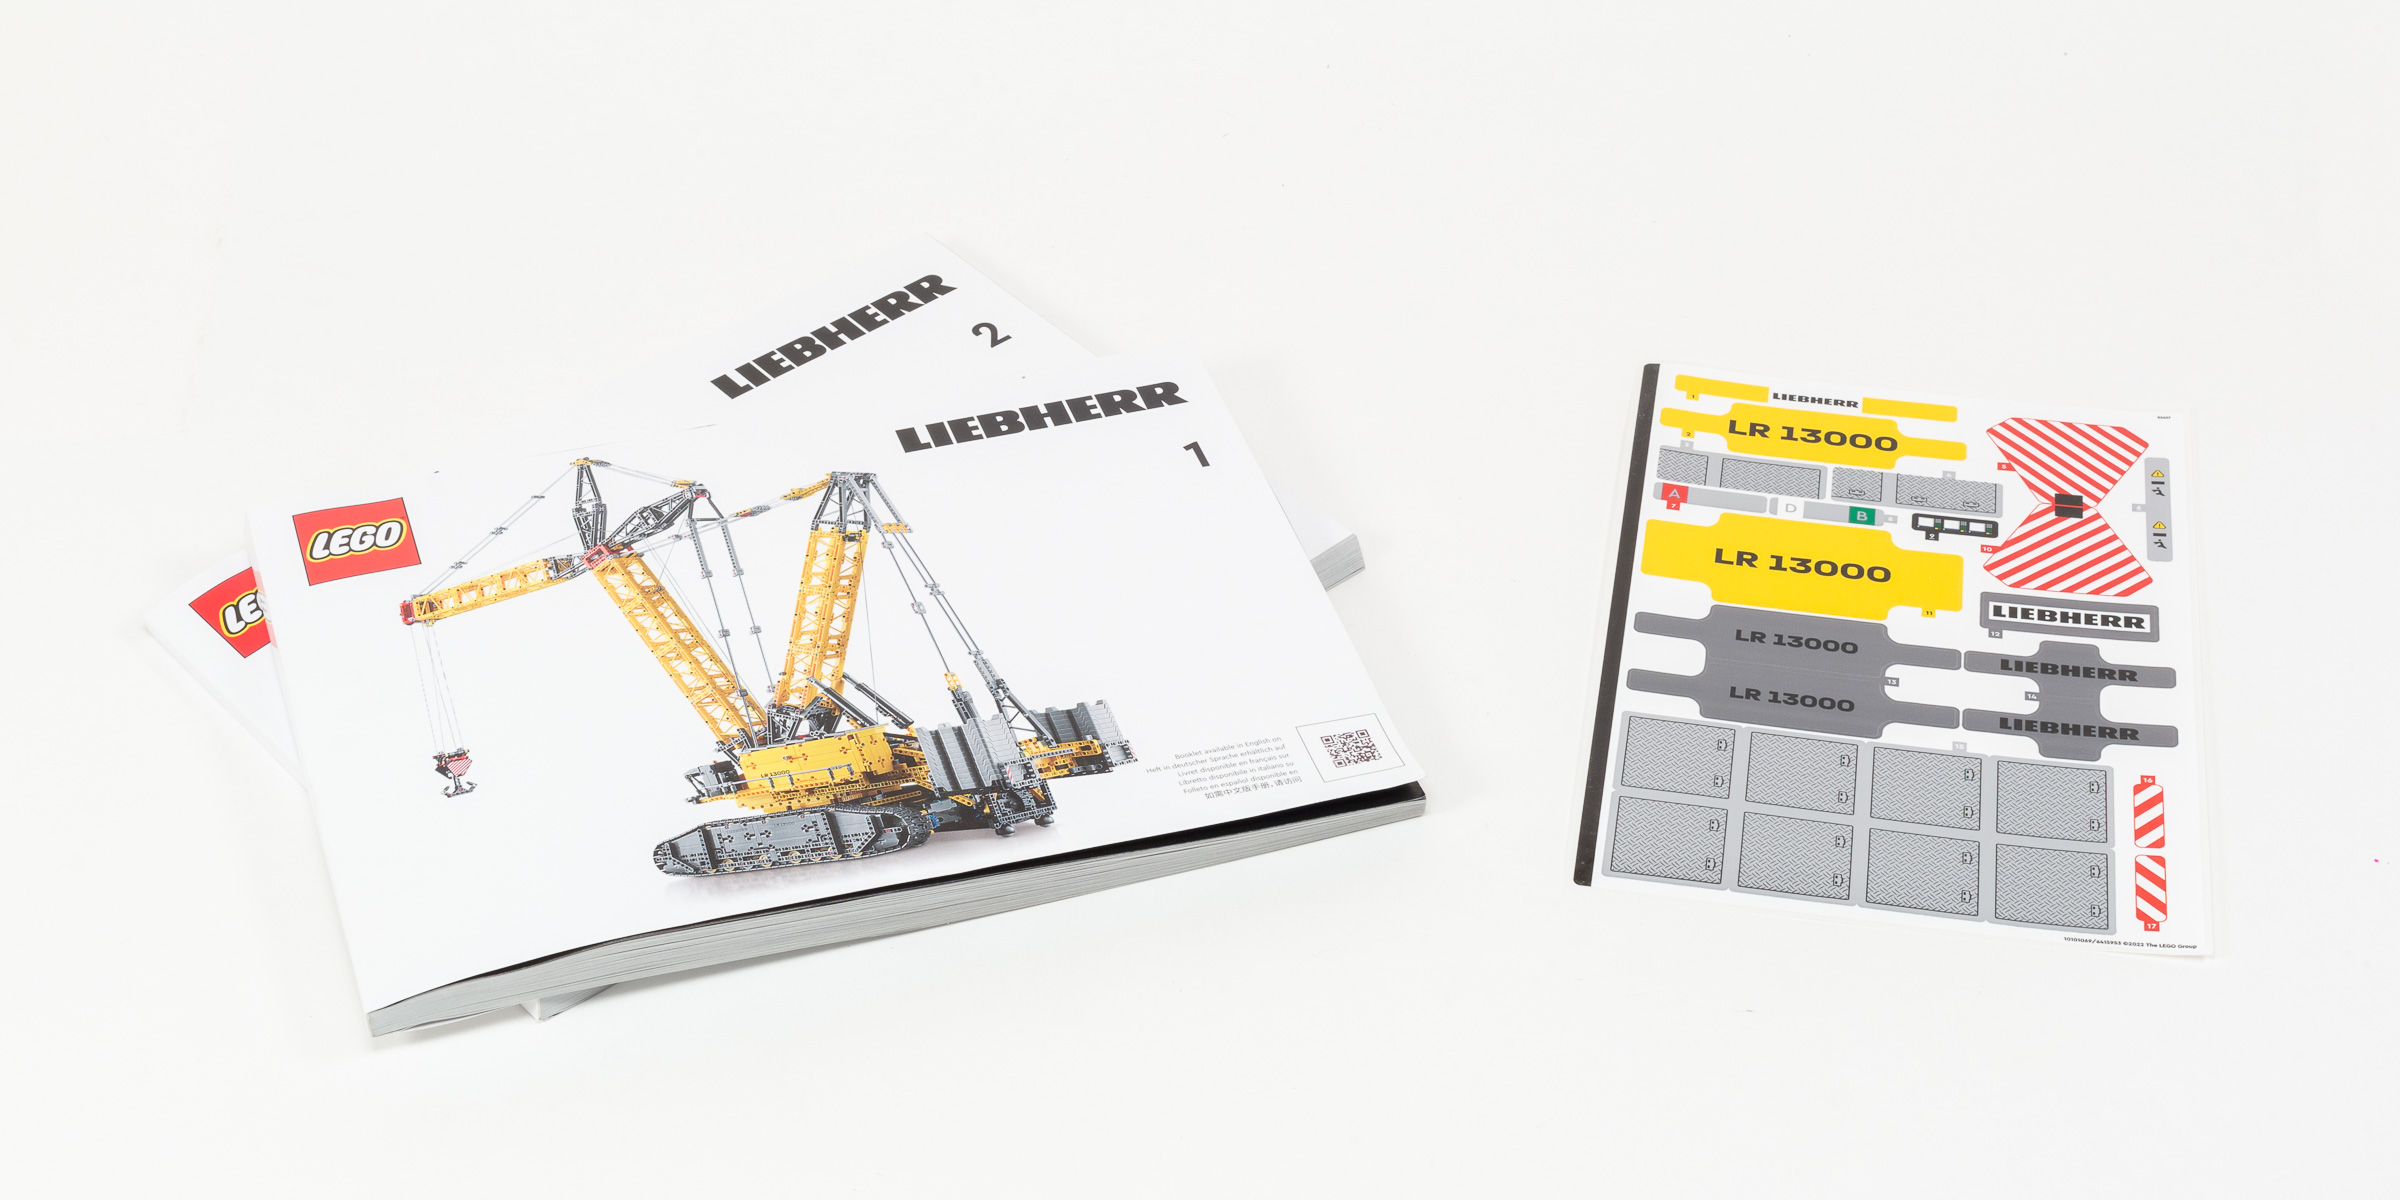
- Cardboard pouch (marked 6473627) containing:
- Two instruction booklets: Book 1 contains 316 pages, Book 2 contains 280 pages. 27.0 x 19.2 cm (10 5/8 x 7 5/8”).
- Sticker Sheet (marked 22637, 10101069/6415953) containing 22 stickers. 16 x 23 cm (6 3/8 x 9”)
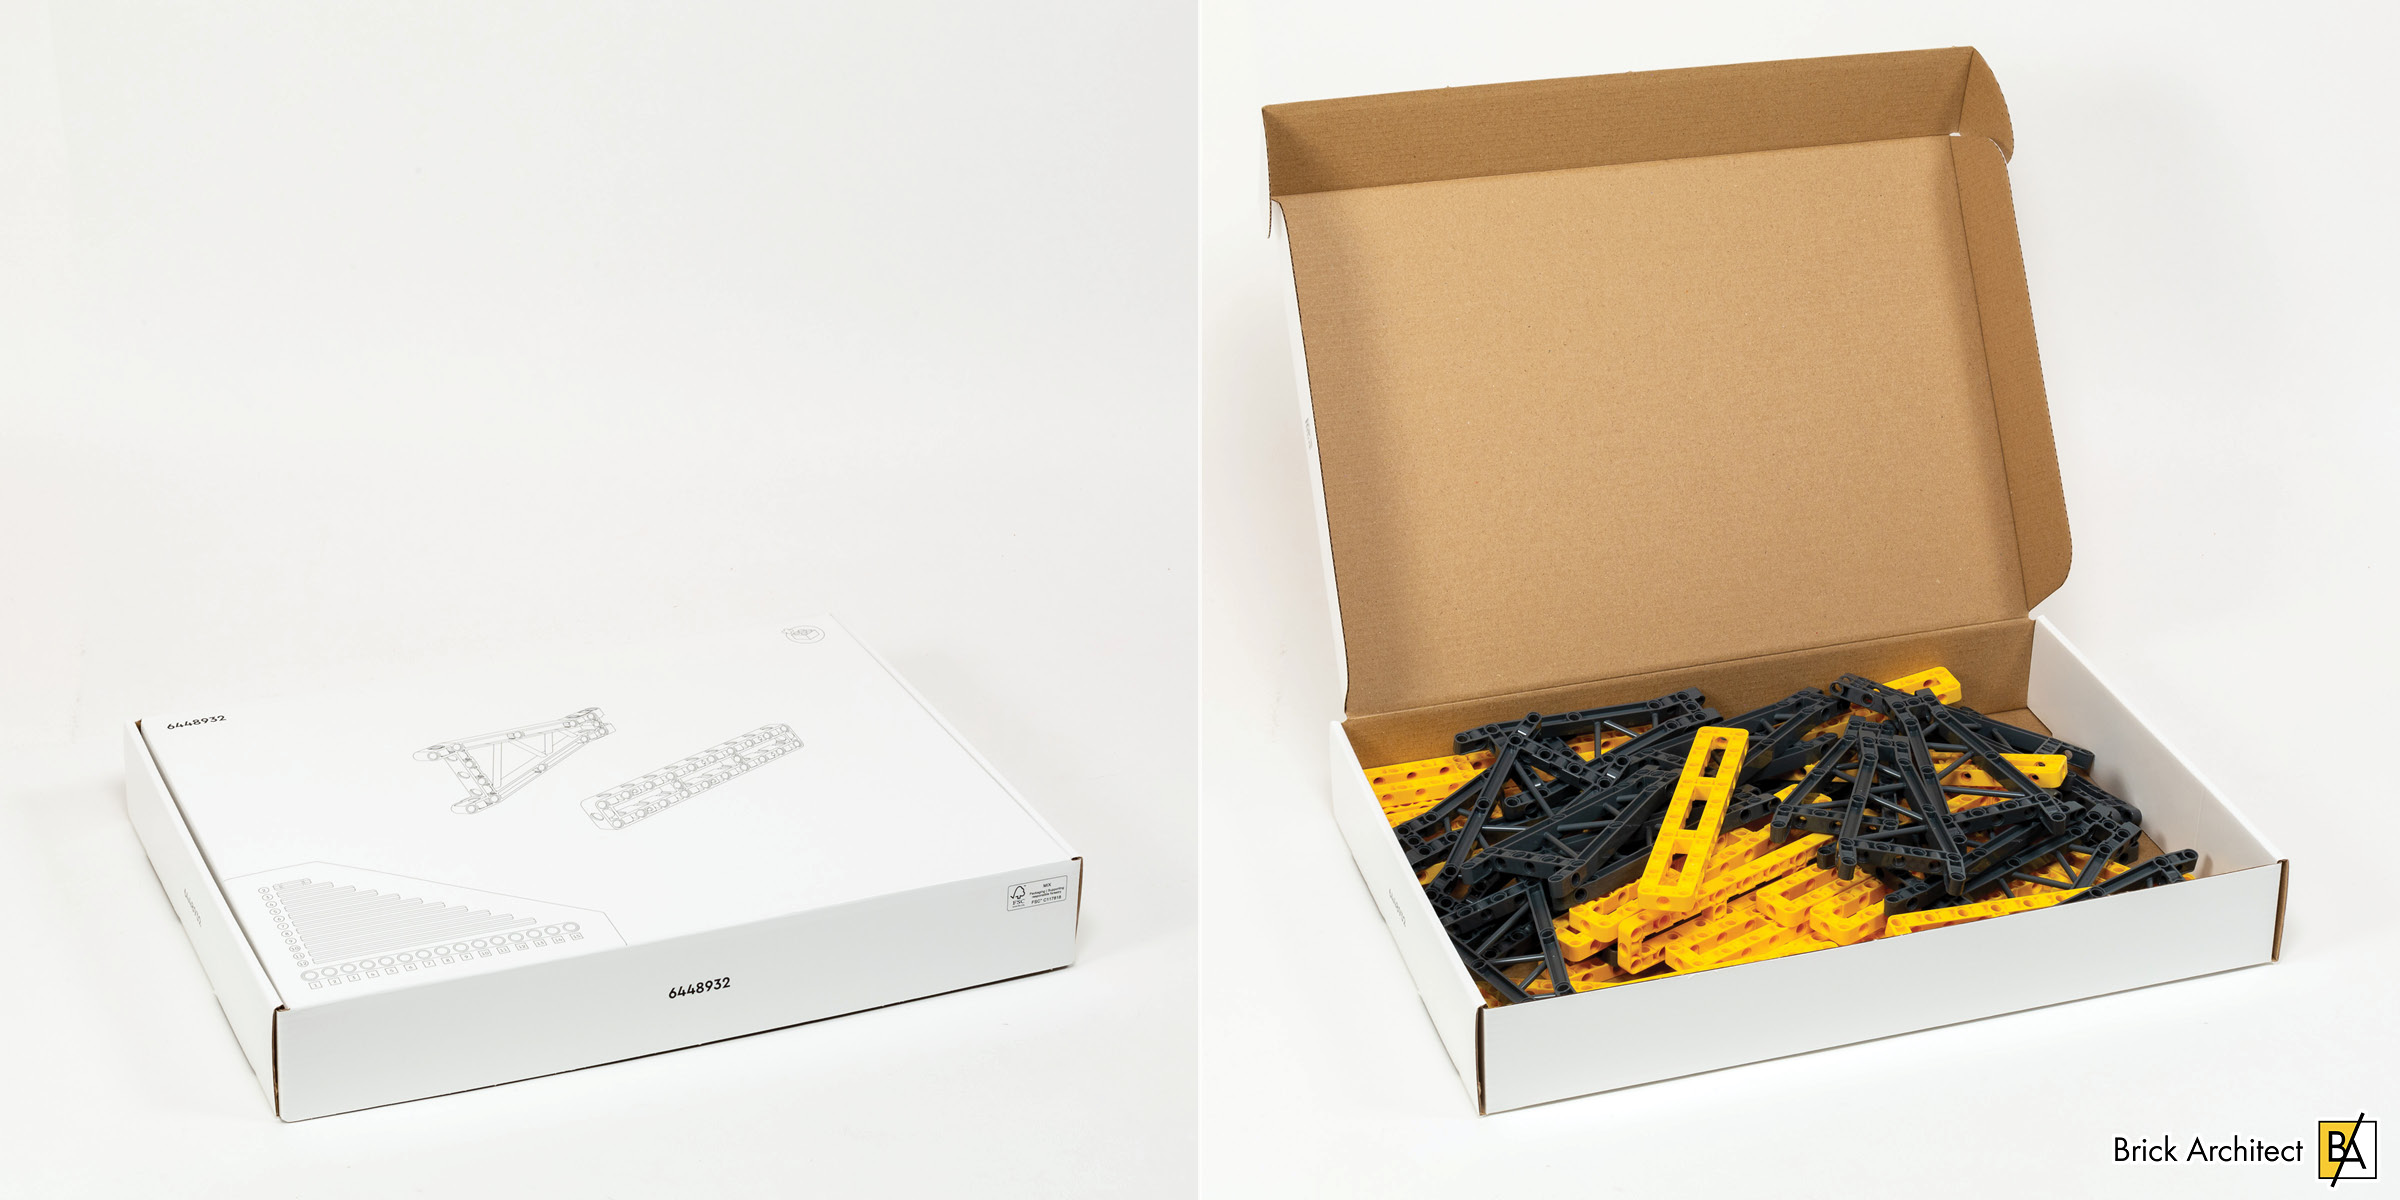
- Cardboard box (marked 6448932) containing:
- (new) 16x – 7×16 Triangular Girder (part 79768) in 199Dark Stone GreyDark Bluish Gray
- 26x – 3×19 Frame (part 67491) in 24Bright YellowYellow
- Cardboard box (marked 6448930) containing:
- 3x – 11×15 Frame (part 39790) in 26Black
- 10x – 7×11 Frame (part 39794) in 26Black
- 12x – 11×11 Quarter Gear, Curved (part 24121) in 24Bright YellowYellow
- Bag containing 16x – 1×16 Link Arm (part 2637) in 194Medium Stone GreyLight Bluish Gray
- Bag containing 4x – 1×16 Link Arm (part 2637) in 194Medium Stone GreyLight Bluish Gray, 1x – 2m / 78.74″ String (box part ID 6404262), 1x – 6.5m / 255.91″ String (box part ID 6404405)
- Bag containing 4x – 1×16 Link Arm (part 2637) in 194Medium Stone GreyLight Bluish Gray, 2x – Shock Absorbers, 4x – 11×11 Quarter Gear, Curved (part 24121) in 26Black, 1x 3.5m / 137.80″ String (box part ID 6404235).
- Cardboard box (marked 6448928) containing:
- (new) 20x – 7×15 Frame with diagonal support (part 79766) in 24Bright YellowYellow
- (new) 20x – 5×15 Frame, H-shape with diagonal support (part 79767) in 24Bright YellowYellow
- Cardboard box (marked 6448926) containing:
- 2x – Technic Hub
- 20x – Technic large angular motor
- (new) 24x – 11×7×2 Ballast, Stacking (part 80428) in 194Medium Stone GreyLight Bluish Gray
- Cardboard box (marked 6448924) containing:
- Bag 1: 1x extra-large bag (marked 318S3), 1x large bag (marked 418S3).
- Bag 2: 1x extra-large bag (marked 218S3), 1x large bag (marked 318S3), 1x large bag (marked 218S3), 1x large bag (marked 318S3), 2x different medium unmarked bags, 2x different small unmarked bags.
- Bag 3: 1x extra-large bag (marked 318S3), 1x large bag (marked 318S3).
- Bag 4: 1x extra-large bag (marked 218S3), 1x large bag (marked 318S3), 1x medium and 2x small unmarked bags.
- Bag 5: 1x extra-large bag (marked 218S3), 1x large bag (marked 418S3) bag, and 1x medium unmarked bag.
The set includes two instruction booklets, and a sticker sheet (that I didn’t use).
I know that the set contains fewer than 3000 pieces, but just five numbered stages is not very many for a set of this size. I’m actually excited by this approach – it means that each numbered stage will include a substantial amount of building. I find this appropriate, since this is one of those extra-serious AFOL which will likely justify the 18+ age mark based on subject matter, complexity, and attention span.
Build Process
As noted earlier, the largest LEGO Technic set ever produced (by size) is built in just five numbered stages. I often include just one photo from each stage, but am including several photos from each stage to show some of the major moments in the build process and sub-assemblies we build along the way.
Bag 1: Rotating base
We begin with a relatively modest two bags with the number ‘1’ printed on them, as well as a large handful of additional parts from the other smaller boxes included in the set. It’s a lot of pieces, but isn’t an especially daunting pile of parts on the table.
What is most striking is how sturdy everything is. The central assembly is built by interlocking multiple frame elements with pins connecting them in different directions. I think it will be very difficult to disassemble later, but that isn’t my main concern right now.

The first two interlocking assemblies in this set.
From here, we spend several pages assembling an extremely robust round platform that the crane will rest on. It is built with 8x of the curved gear elements, even though it only takes four to make a complete circle. That’s because the two rings are stacked together offset by 45° and connected with a lot of pins – it is very sturdy! On top of this, we build a pretty unusual octagonal assembly with 8x mini train wheels carefully positioned to fit in the groove on the sides of the massive gear elements. These function as bearings to manage friction when it rotates.
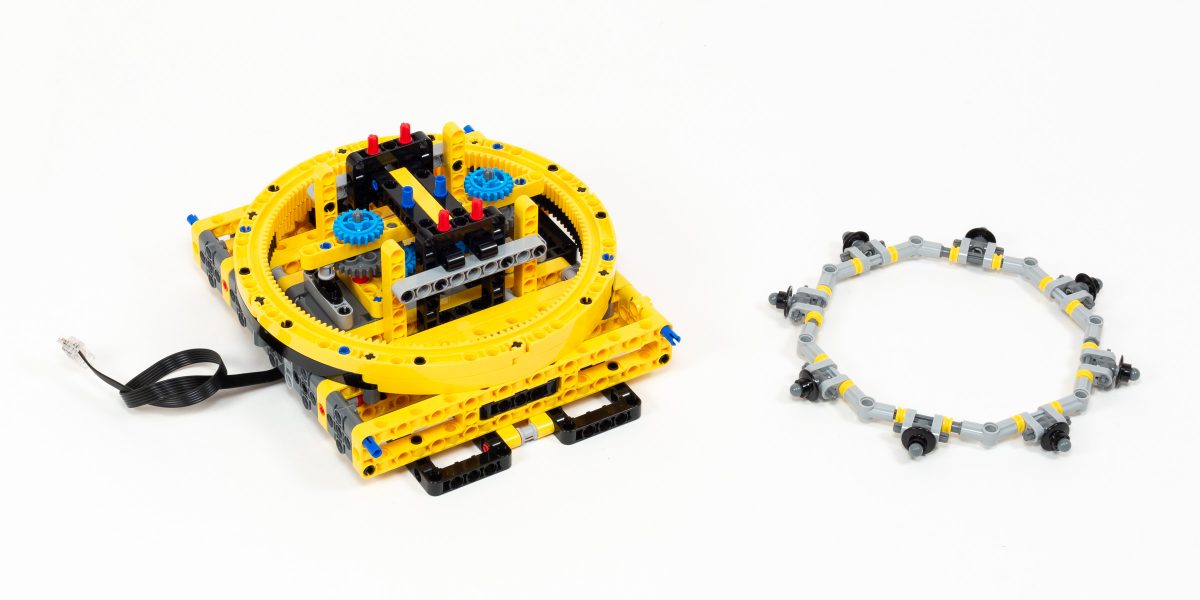
Large four-part gear with a ring of wheels functioning as bearings.
After adding a second ring comprised of another eight gear elements, we add a rigid rectangular frame on top. Everything is pretty compact as we finish the first bag, and I suspect it is going to get more substantial as we keep going.

Progress at the end of Bag 1.
Build time: 48 minutes.
Bag 2: Treads and support
The so-called Bag 2 is actually 8 bags, plus a bunch of additional parts from the other boxes. You are going to need a pretty large workspace to build this bag comfortably. As we add the first of these larger assemblies, we will quickly see how much bigger the base is going to get.

The base continues to grow as we add sub-assemblies to both sides.
Things get a lot more interesting as we add small gears around the bottom and top edge of both sides. I can’t tell exactly how these will work, but they will certainly allwo the tread to roll more smoothly. We also add the propulsion system at this time, with one of the large motors attached to each side of the model. It is a lot easier to see how the tread will attach once these are in place.

A separate motor on each side will allow it to more forward and back, and to turn by rotating them in opposite directions.
I was a bit concerned that the treads would take a lont time to attach, but at just 75 tread sections on each side, it only took a few minutes to assemble each loop. They go around the section we had already completed pretty easily, although it is a bit of a trick to attach the two ends after wrapping them around the rest of the mechanism — it is an appropriately snug fit!

The treads loop around the gears pretty easily.
Build time: 2:00 (120 minutes).
Bag 3: Counterweight platform and motors
I’m pretty sure that this will be the last bag of the central assembly before we start building the vertical tower and crane itself. This section begins by creating a rectangular prism that sits directly on top of the rotating assembly. It has a pair of 60-tooth gears on one end, presumably where an angled section of the crane will attach later.

The Boom and Derrick will attach to this rectangular assembly later.
As we keep going, I’m surprised to see how long the ‘tail’ extends beyond the treads. I couldn’t wrap my head around how all of this weight would be supported on top of the central rotating assembly until I added a vertical support with a pair of rollers to the back end. I do worry about the ability for the crane to navigate rough terrain with a fixed small-diameter roller on the back, but we’ll have to wait and see.
The tail requires rollers to support the heavy load.
After attaching the rollers, we connect both ends of the tail assembly and create two caddies (one on each side) which I expect is where the counterweights will rest when they are not in use. This whole counterweight concept is something I can’t wait to see, especially whether or not the counterweights are attached automatically or manually.
Lastly, we attach the battery pack to an angled assembly right above the rollers. What’s a bit strange is that the angle can be adjusted with a mechanism you can pull upwards, but there is resistance from two rubber bands keeping it tilted downward. I can’t quite predict how this will all work out.
Attaching the second battery pack at the end of Bag 3.
I had thought we would be done with the central assembly with just two bags to go, but I guess the support mechanism and cranes are going to be really simple assemblies that are controlled by this more complex base.
Build time: 1:12 (72 minutes).
Bag 4: Derrick, Boom, and Jib
Bag 4 begins with a small assembly near the tail which we will no doubt connect later, followed by a much larger assembly which attaches in the center of the model leaning back. Judging from the photos on the box, this will be the rear support which connects to the ballast to counter the weight of the object being lifted. Two substantial shock absorbing elements that are unfamilar to me attach it at the required angle.

Preparing to make things a lot taller.
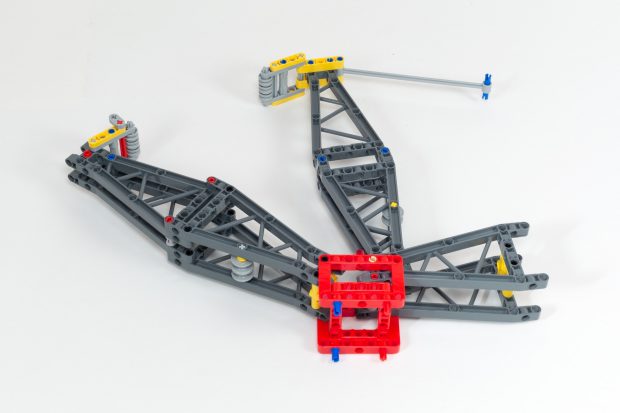
We complete the back end of the crane by extending the rear support with another two rectangular modules, with a triangular section on the end. This is the first of two supports that work together to support heavy loads in a configuration called a derrick. While it is very strong already, it’s time to attach two sections of cabling down to the counterweight end of the model. Instead of using cabling or cord, the set designers conencted several sections of 1×16 Link (part 2637) to create something which is strong in tension and won’t stretch very much. This is a compromise aesthetically but aligned with the industrial look of the real thing.

The Derrick in place with a support cable connected to the Ballast.
One thing that is a bit different betweent he LEGO set and the real model is where the two sets of cabling attach. In the real vehicle, there is one set of cabling attached to ballast on the tail of the rotating platform, and a second set of cables connected to additonal ballast placed on a skid behind the crane (for lifting especially large loads or at an extreme reach). In the LEGO model, they both connect to different points on the tail assembly.
The next angled support which we build is the main boom. It is built in a similar way to the previous support, but attaches in a more adjustable way by using the 60-tooth gears simply as turntables to allow smooth rotation. Things get more interesting as we prepare to attach the boom to the derrick using a combination of fixed length sections of cable (using the same 1×16 Links) and an adjustable section attached using string (or in the case of the real crane, heavy industrial cabling). There are 6 strands of cable visible at this attachment but the cable does not actually go around one of the 6 pulleys, resulting in a 5:1 mechanical advantage (before factoring in efficiencly lost to friction).
Cables are used to connect Derrick to the Boom.
The next sub-assembly is what differentiates this configuration of the Liebherr Crawler Crane LR 13000 from simpler configurations which are also produced. Most configurations have a single long boom with the hook hanging from the end, but The LEGO Group decided to re-create the most complicated configuration which adds additional height and reach with an additional section that bends, and an extension beyond the main boom that is apparently called a ‘Luffing Fly Jib’. This assembly is where the main boom will connect to the Jib.
This complex assembly connects to and ultimately supports the Jib.
From here, we plow forward with a series of small sub-assemblies. This includes a pair of cables to connect the angled section where the jib attaches to the base. This is also when we attach the second string through another 5:1 mechanical advantage system, which will be used to change the angle between the boom and jib. Finally, we build the Luffing Fly Jib itself, which is built using three more 15-stud long modules. Our crane is really taking shape as we finalize bag 4.
Build time: 2:22 (142 minutes).
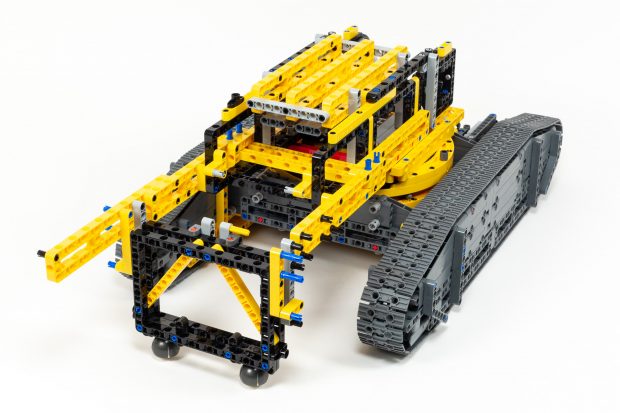
Bag 5: Hook, Cab, and Detailing
The final bag begins with few remaining functional elements. We begin by simply stacking the ballast elements on the basket where they are designed to rest. I do find it very strange that these components do not have standard Technic pin (or LEGO stud) connections at all. I feel like they would be much more versatile with a reliable connection.
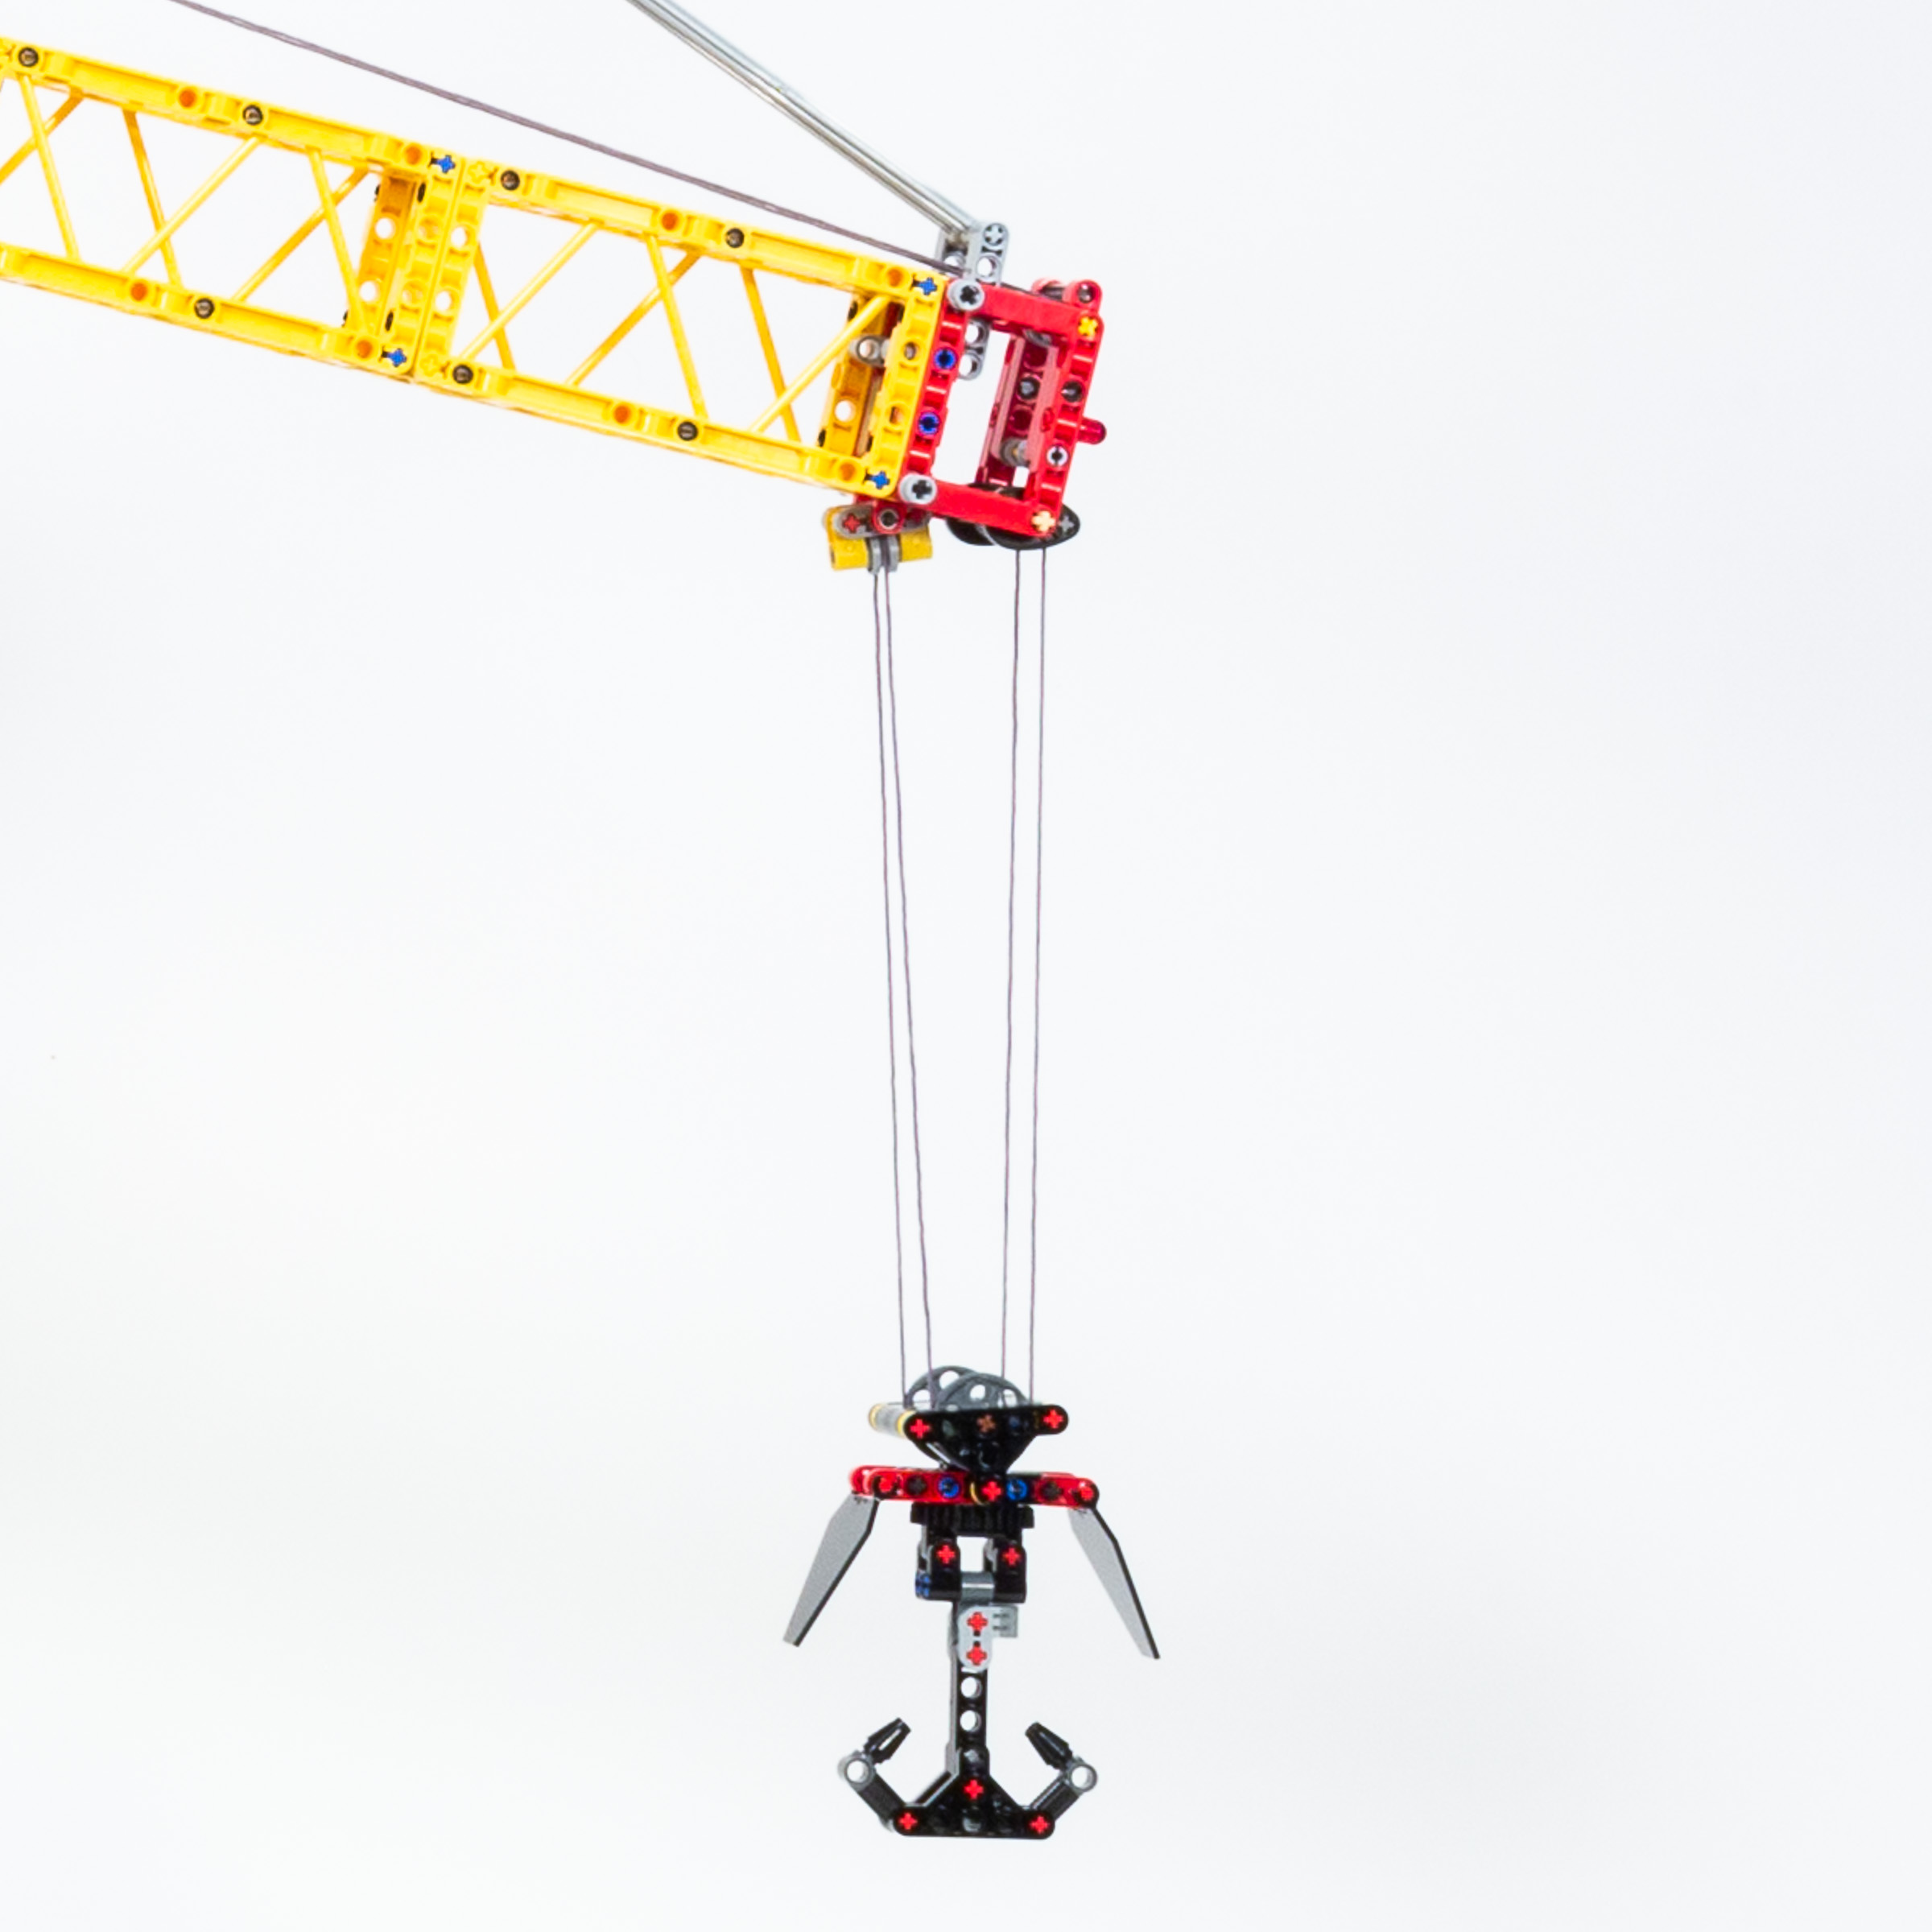
The hook is brick-built, but can not grab objects easily without assistance.
After that, we quickly begin assembling a relatively large brick-built hook, which in order to achieve the required mechanical advantage includes a pair of large pulleys above the hook itself. Actually rigging the hook is a time consuming process with more than a dozen steps from the winch to the hook and back again. I did not struggle to rig it correctly, but the pictures were not always very clear and it’s simply time-consuming to feed a narrow thread through so many pulleys. I could see this as a real challenge for folks who are less experience working with string/rope, or have limited dexterity.

Yellow Technic panels cover up the sides of the central rotating platform.
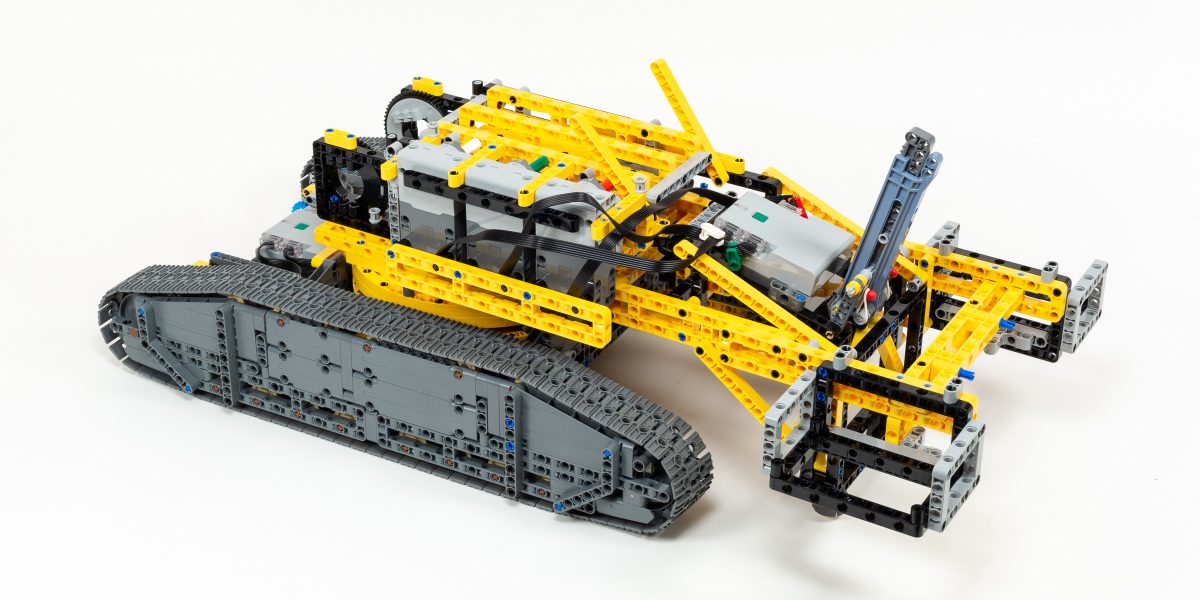
While you are now free to start playing with the crane, there’s still a lot of parts on the table. This includes a fair number of system elements as well as Technic panels. All of these parts are used to create a platform and decorative enclosure on the rotating base. On one side we have a deck and cab, and on the other side we have a series of sloped roof sections which look like exhaust vents for the power source of this large vehicle. In practice, this covers the three motors that control the angle of the boom and cable length supporting the hook.

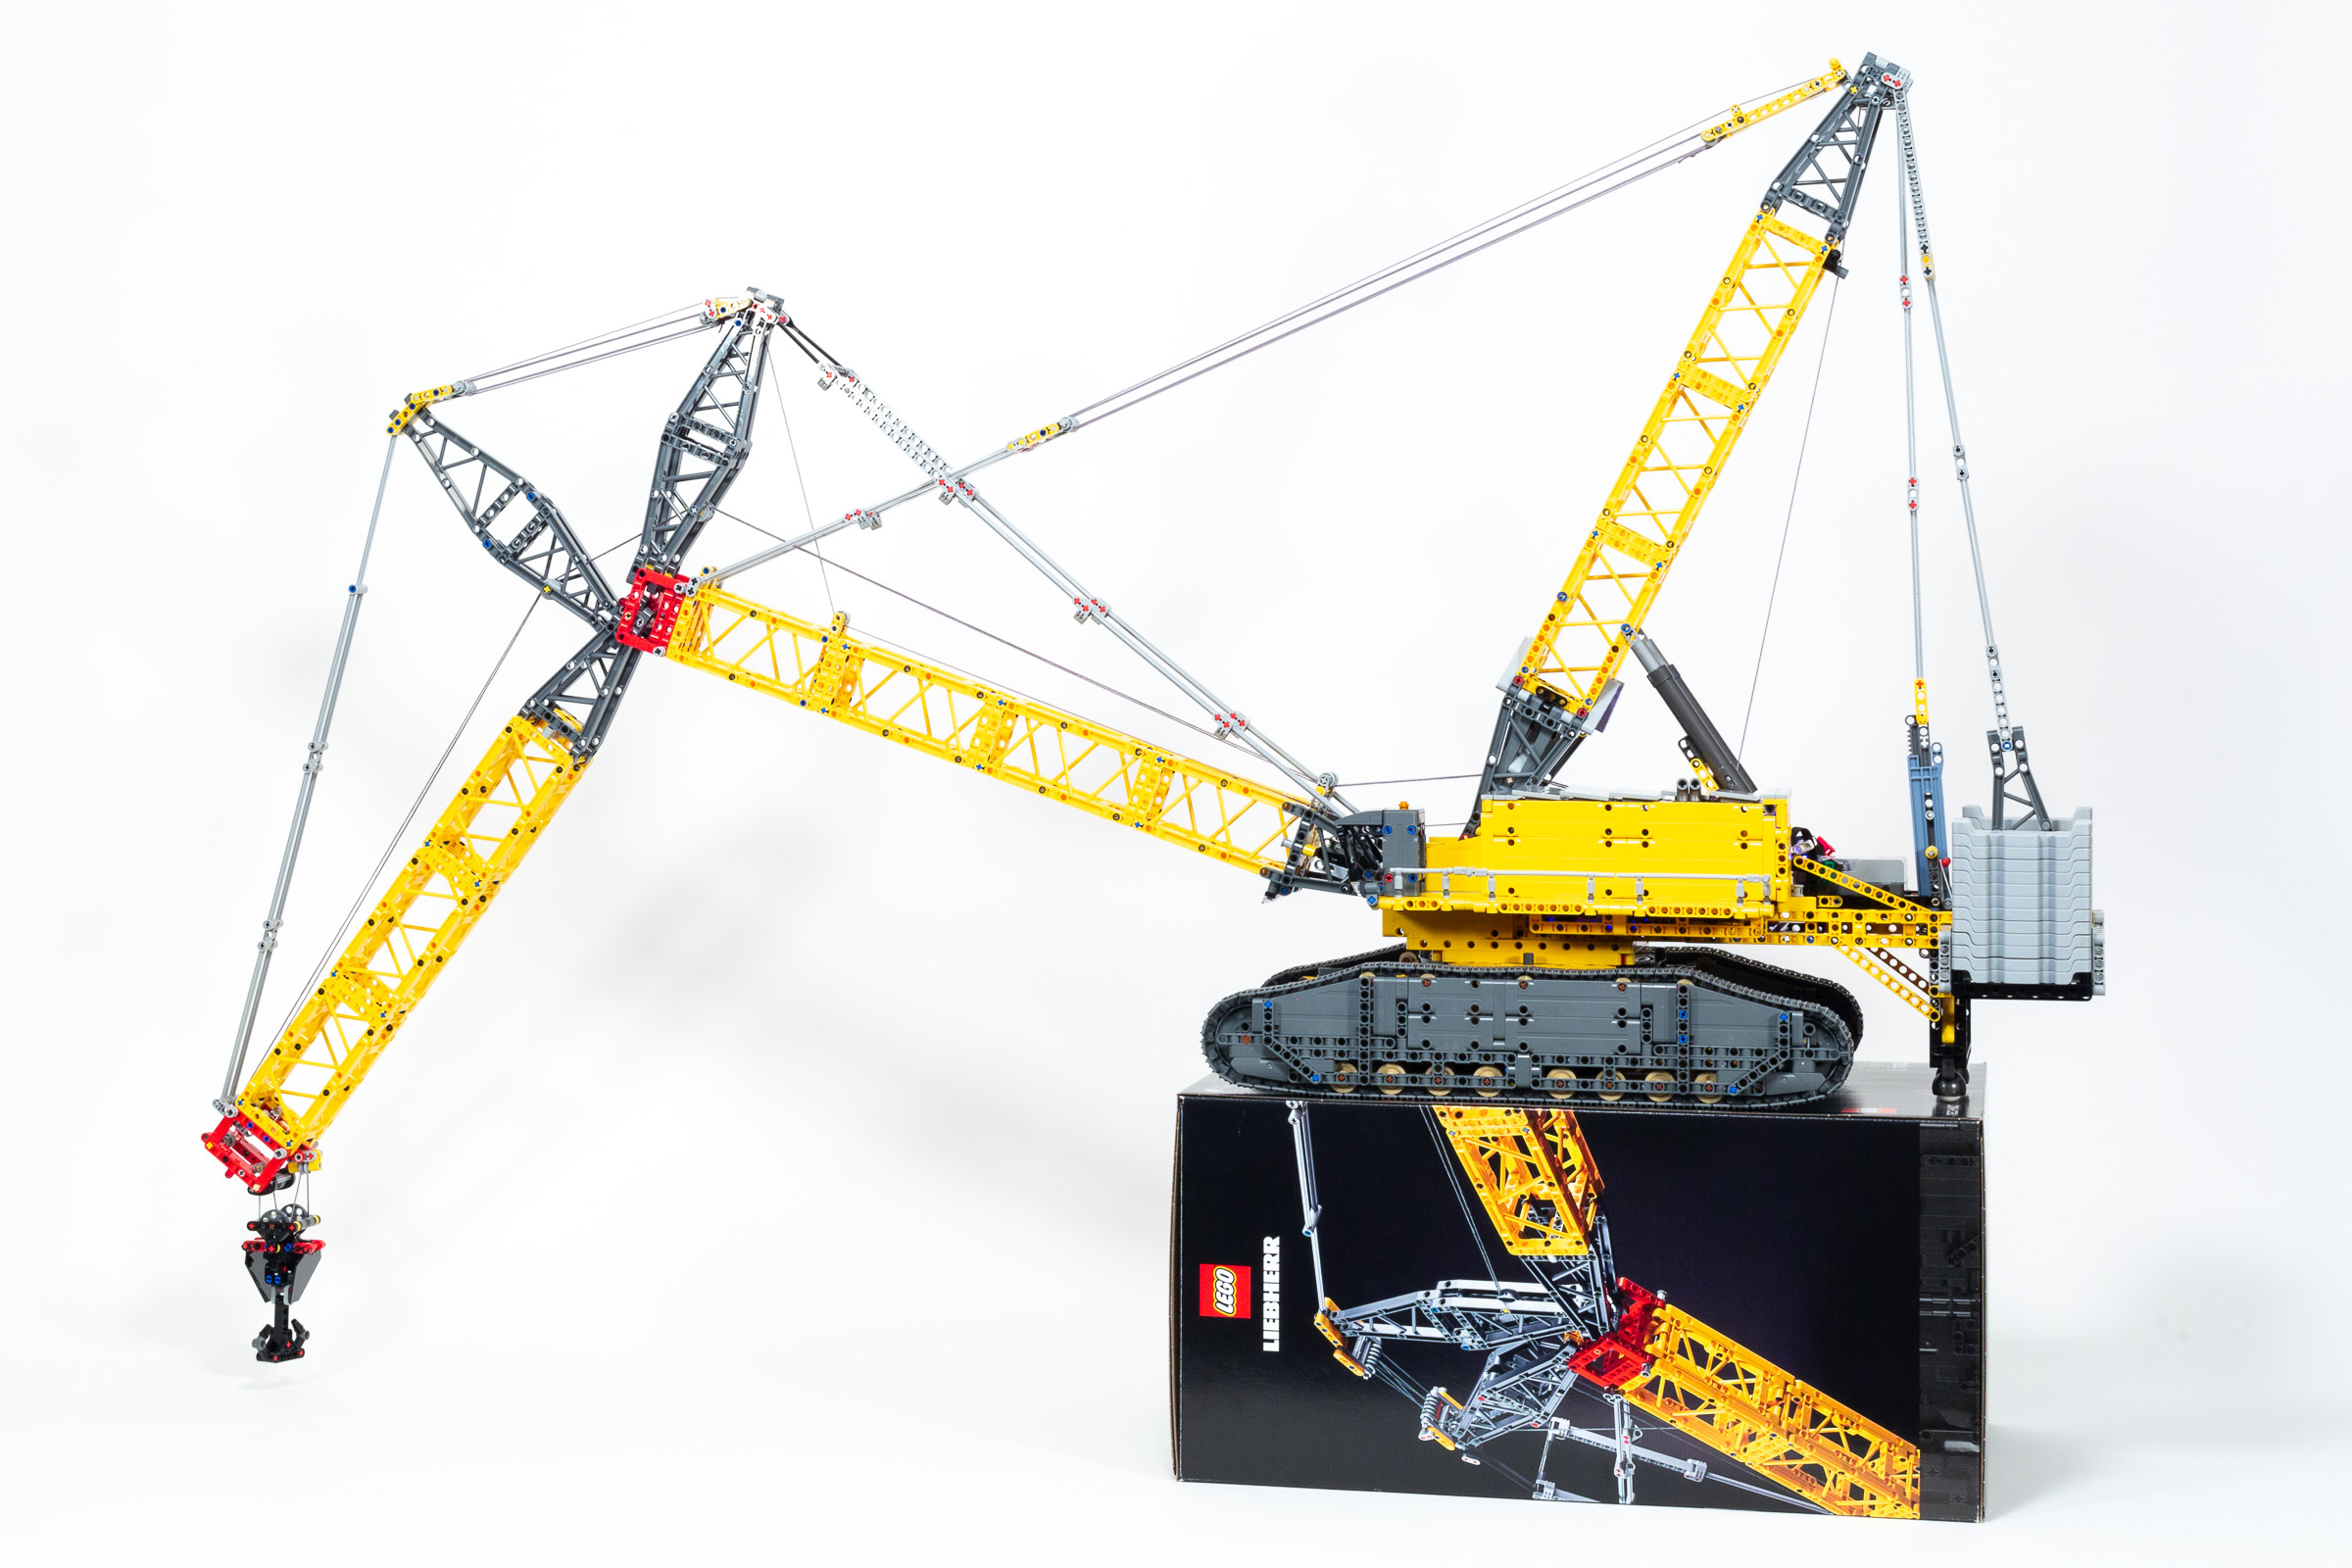
Completed model with cab and decking attached. (LEGO Minifigure and #42144 Material Handler for scale.)
Build time: 1:25 (85 minutes)
Value
I have already mentioned the high price of this set several times – it’s inescapable when we’re discussing a set that costs $700, especially when it contains fewer than 3000 pieces. That said, I wanted to make sure my assessment of value covers multiple dimensions and is as objective as possible.
For reasons I’ve explained in previous articles, I find the obsession with price-per-part a bit problematic. For one, it is trivial for The LEGO Group to keep giving us sets right around the mythical $0.10 price-per-part while reducing overall value by simply giving us a ton of tiny, low-value parts. That’s why I find price-per-gram to be the most objective assessment of value. It automatically adjusts for the difference between a set with a lot of small parts, and a set with fewer but larger parts.
| Set | Price | Part Count | Price-per-part | Weight | Price-per-gram |
|---|---|---|---|---|---|
| #31203 World Map | $249.99 | 11,695 pieces | $0.021 per-piece | 4020 grams | $0.062 per-gram |
| #21056 Taj Mahal | $119.99 | 2022 pieces | $0.059 per-piece | 1811 grams | $0.066 per-gram |
| #21058 Great Pyramid of Giza | $129.99 | 1476 pieces | $0.088 per-piece | 1832 grams | $0.071 per-gram |
| #77013 Escape from the Lost Tomb | $39.99 | 600 pieces | $0.067 per-piece | 530 grams | $0.075 per-gram |
| #10278 Police Station | $199.99 | 2923 pieces | $0.068 per-piece | 2602 grams | $0.077 per-gram |
| #71741 Ninjago City Gardens | $299.99 | 5685 pieces | $0.052 per piece | 3719 grams | $0.081 per-gram |
| #71043 Hogwarts Castle | $399.99 | 6020 pieces | $0.066 per-piece | 4899 grams | $0.082 per-gram |
| #10292 Friends – The Apartments | $149.99 | 2048 pieces | $0.073 per-piece | 1778 grams | $0.084 per-gram |
| #10297 Boutique Hotel | $199.99 | 3066 pieces | $0.065 per-piece | 2380 grams | $0.084 per-gram |
| #10312 Jazz Club | $229.99 | 2899 pieces | $0.079 per-piece | 2392 grams | $0.096 per-gram |
| #10270 Bookshop | $199.99 | 2504 pieces | $0.080 per-piece | 2085 grams | $0.096 per-gram |
| <#10320 Eldorado Fortress | $214.99 | 2509 pieces | $0.087 per piece | 2188 grams | $0.098 per-gram |
| #10282 Adidas Originals Superstar | $79.99 | 731 pieces | $0.109 per-piece | 735 grams | $0.109 per-gram |
| #10316 Rivendell | $499.99 | 6167 pieces | $0.081 per piece | 4375 grams | $0.114 per-gram |
| #77015 Temple of the Golden Idol | $149.99 | 1545 pieces | $0.097 per piece | 1308 grams | $0.115 per-gram |
| #10305 Lion Knights’ Castle | $399.99 | 4514 pieces | $0.089 per piece | 3265 grams | $0.122 per-gram |
| #77012 Fighter Plane Chase | $34.99 | 387 pieces | $0.090 per piece | 285 grams | $0.123 per-gram |
| #10303 Loop Coaster | $399.99 | 3756 pieces | $0.106 per-piece | 3189 grams | $0.125 per-gram |
| #42146 Liebherr Crawler Crane LR 13000 (this set) | $699.99 | 2883 pieces | $0.243 per piece | 5100 grams | $0.137 per-gram |
| #60339 Double Loop Stunt Arena | $159.99 | 865 pieces | $0.267 per-piece | 865 grams | $0.185 per-gram |
Note: Prices based on date of initial release. (The LEGO Group increased the price of many older sets in late 2022.)
Unfortunately for this set, it fares poorly on both the classic price-per-part metric ($0.243 per-part), as well as the more ‘balanced’ price-per-gram metric ($0.137 per-gram). This is despite the fact that the set’s weight is ballasted (pun intended) by the inclusion of weighted elements totaling 987 grams — those 24 elements account for nearly 20% of the weight of the complete set!
The most comparable set that I’m aware of is the #42100 Liebherr R 9800 Excavator. While I did not have the chance to build it, I know that it also had two Technic hubs, even more motors (although four were of the smaller size), and 1225 more pieces — and it retailed for just $450 when it was released in 2019. The set was short-lived and would have likely seen a price bump to at least $500 if it were still in production during the price adjustments of late 2022. It nonetheless offers a direct and non-flattering comparison to the set we are reviewing today.
I do not know how to say this delicately, but even when I attempt to justify the set’s high cost based on the inclusion of two Technic Control+ hubs and six motors, it’s just a really poor value. In the conclusion I will highlight other aspects of value such as build time and play value.
Conclusion
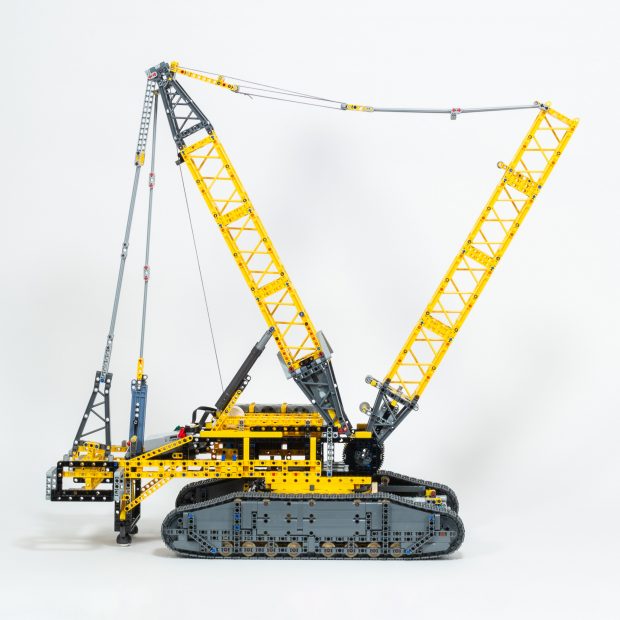
Because the #42146 Liebherr Crawler Crane LR 13000 is impressively large and really well designed, I find myself wanting to give it a high rating. On the positive side, it offers a really fun build process and the completed model is both impressive to behold and fun to play with. I also appreciate that the LEGO model bears a striking resemblence to the real vehicle, both in appearance and function.
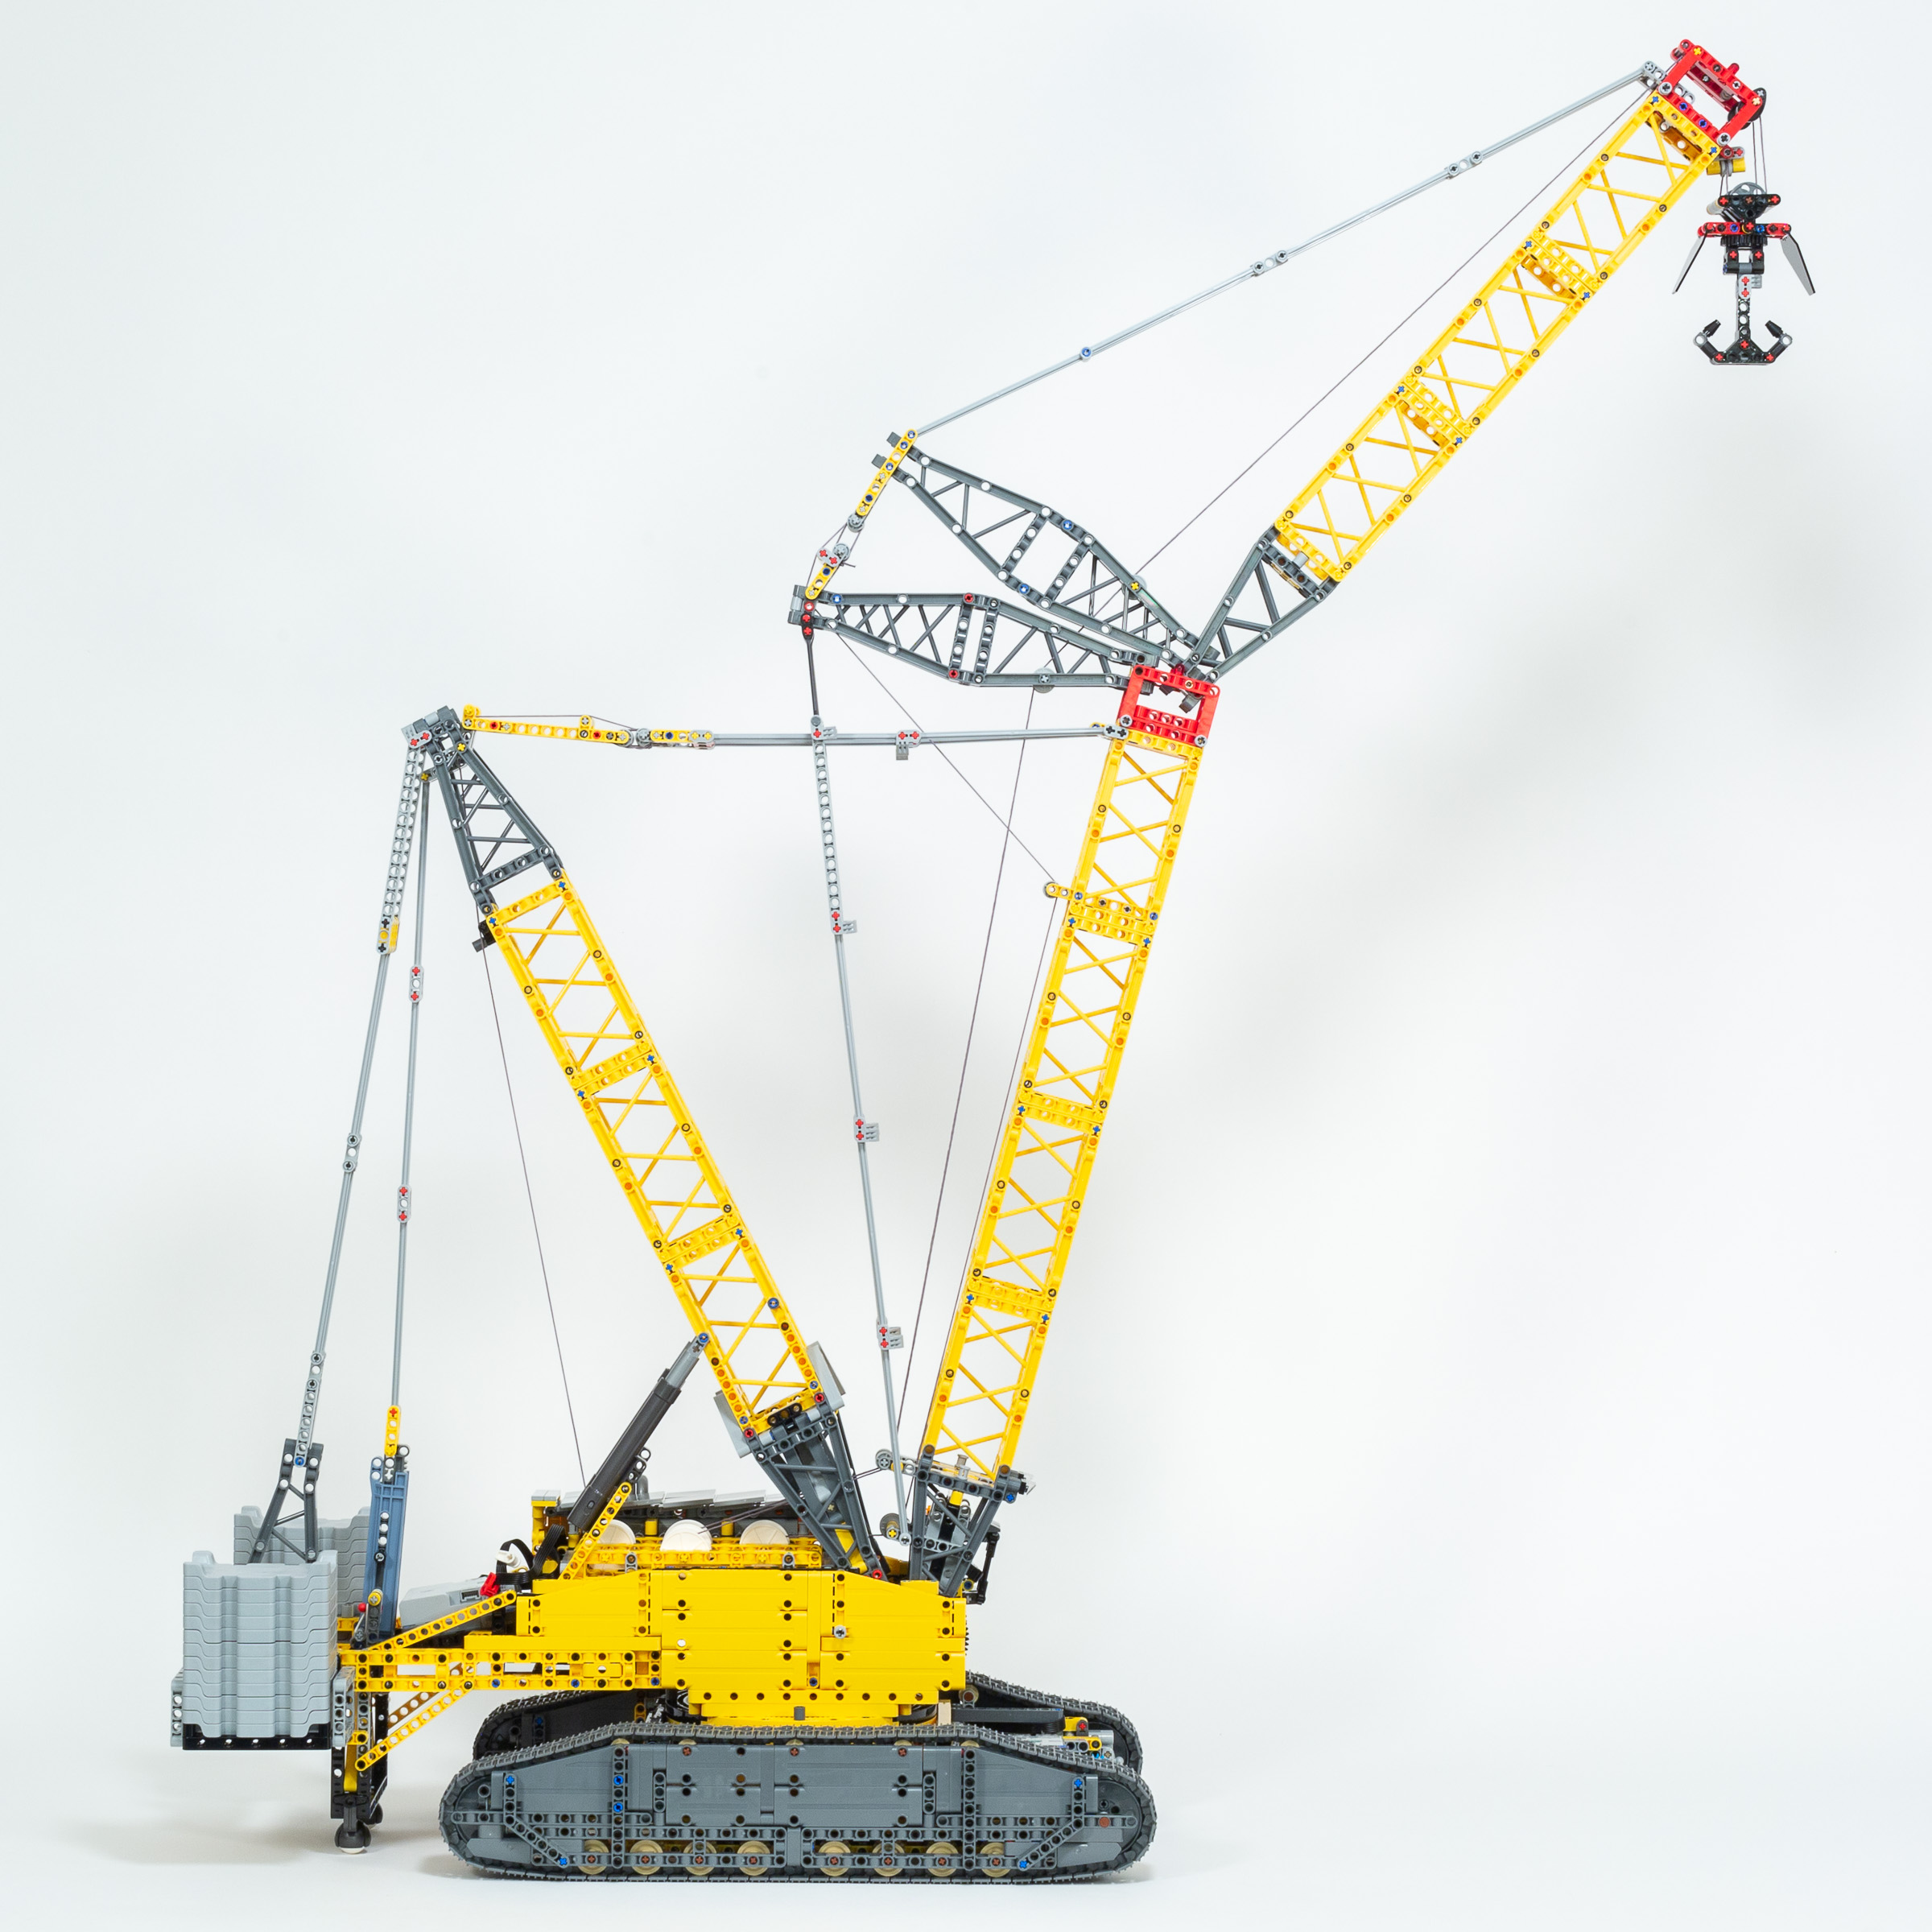
At full extension, the crane is 100 cm (39″) high.
The real-life Liebherr LR13000 Crawler Crane is manufactured in a wide range of configurations, and this set reflects one of the largest possible configurations of this massive vehicle. The models are described with up to five letter representing different features.
Based on their naming convention, a crane matching the LEGO set would be called SDW, with “S” representing the Heavy Main Boom, the “D” representing the Derrick configuration, and “W” for the additional bent section (called a ‘Luffing Fly Jib’) that extends beyond the main boom.

LR 13000 Crawler Crane Configurations (Photo: Liebherr)
The closest commercially available configuration is called the SDWB according to their website, with the missing “B” representing an additional ballast suspended behind the ballast that is mounted on the crane itself. That configuration allows lifting heights up to 248 meters.
Beyond the high price which was already covered in detail, there are several missed opportunities that I wanted to mention. The first issue is the new ballast element that doesn’t live up to my hope for a new weighted element. The part is made from an unfamiliar plastic that has an uneven and somewhat swirly finish. I can not tell if it is a solid plastic part of a much heavier composition, or a plastic element moulded around something made of metal. The real bummer is that it doesn’t have any studded or Technic connections. A pair of Technic Pin Holes on either side would have been extremely interesting since you could design a mechanism that’s similar to the hanging weights at the gym to easily adjust how tall of a stack of weights are needed at this time.
A minor aesthetic gripe is that most of the model is well decorated, but the two hubs sit awkwardly at the front and rear of the model. I am surprised they are not hidden within the rotating platform or base. I honestly think that they could have included just a couple printed parts and eliminated the sticker sheet completeley.
Lifting the hook too far causes the crane to fold up on itself.
I also want to highlight that the crane has a mechanical issue which is easy to encounter when controlling the upper hub manually using the Powered Up app (or an alternate Powered Up battery). If you are not paying attention, the winch that controls height of the hook can continue retracting after it reaches the top. This causes the boom and jib to fold in on themselves, which is tricky to undo. Not only do the brick-built supports get stuck in the girders, but the torque can cause the cable to get caught in the winch, often requiring that you remove the Technic axle to unwind the string all of the way.
No matter how I slice and dice the data, #42146 Liebherr Crawler Crane LR 13000 is ultimately a very cool set that is significantly diminushed by the extremely high price tag. Historically, when reviewing sets I have typically used price as a tiebreak — only in the most extreme case would exceptionally good or poor value cause the rating to shift by a whole point.
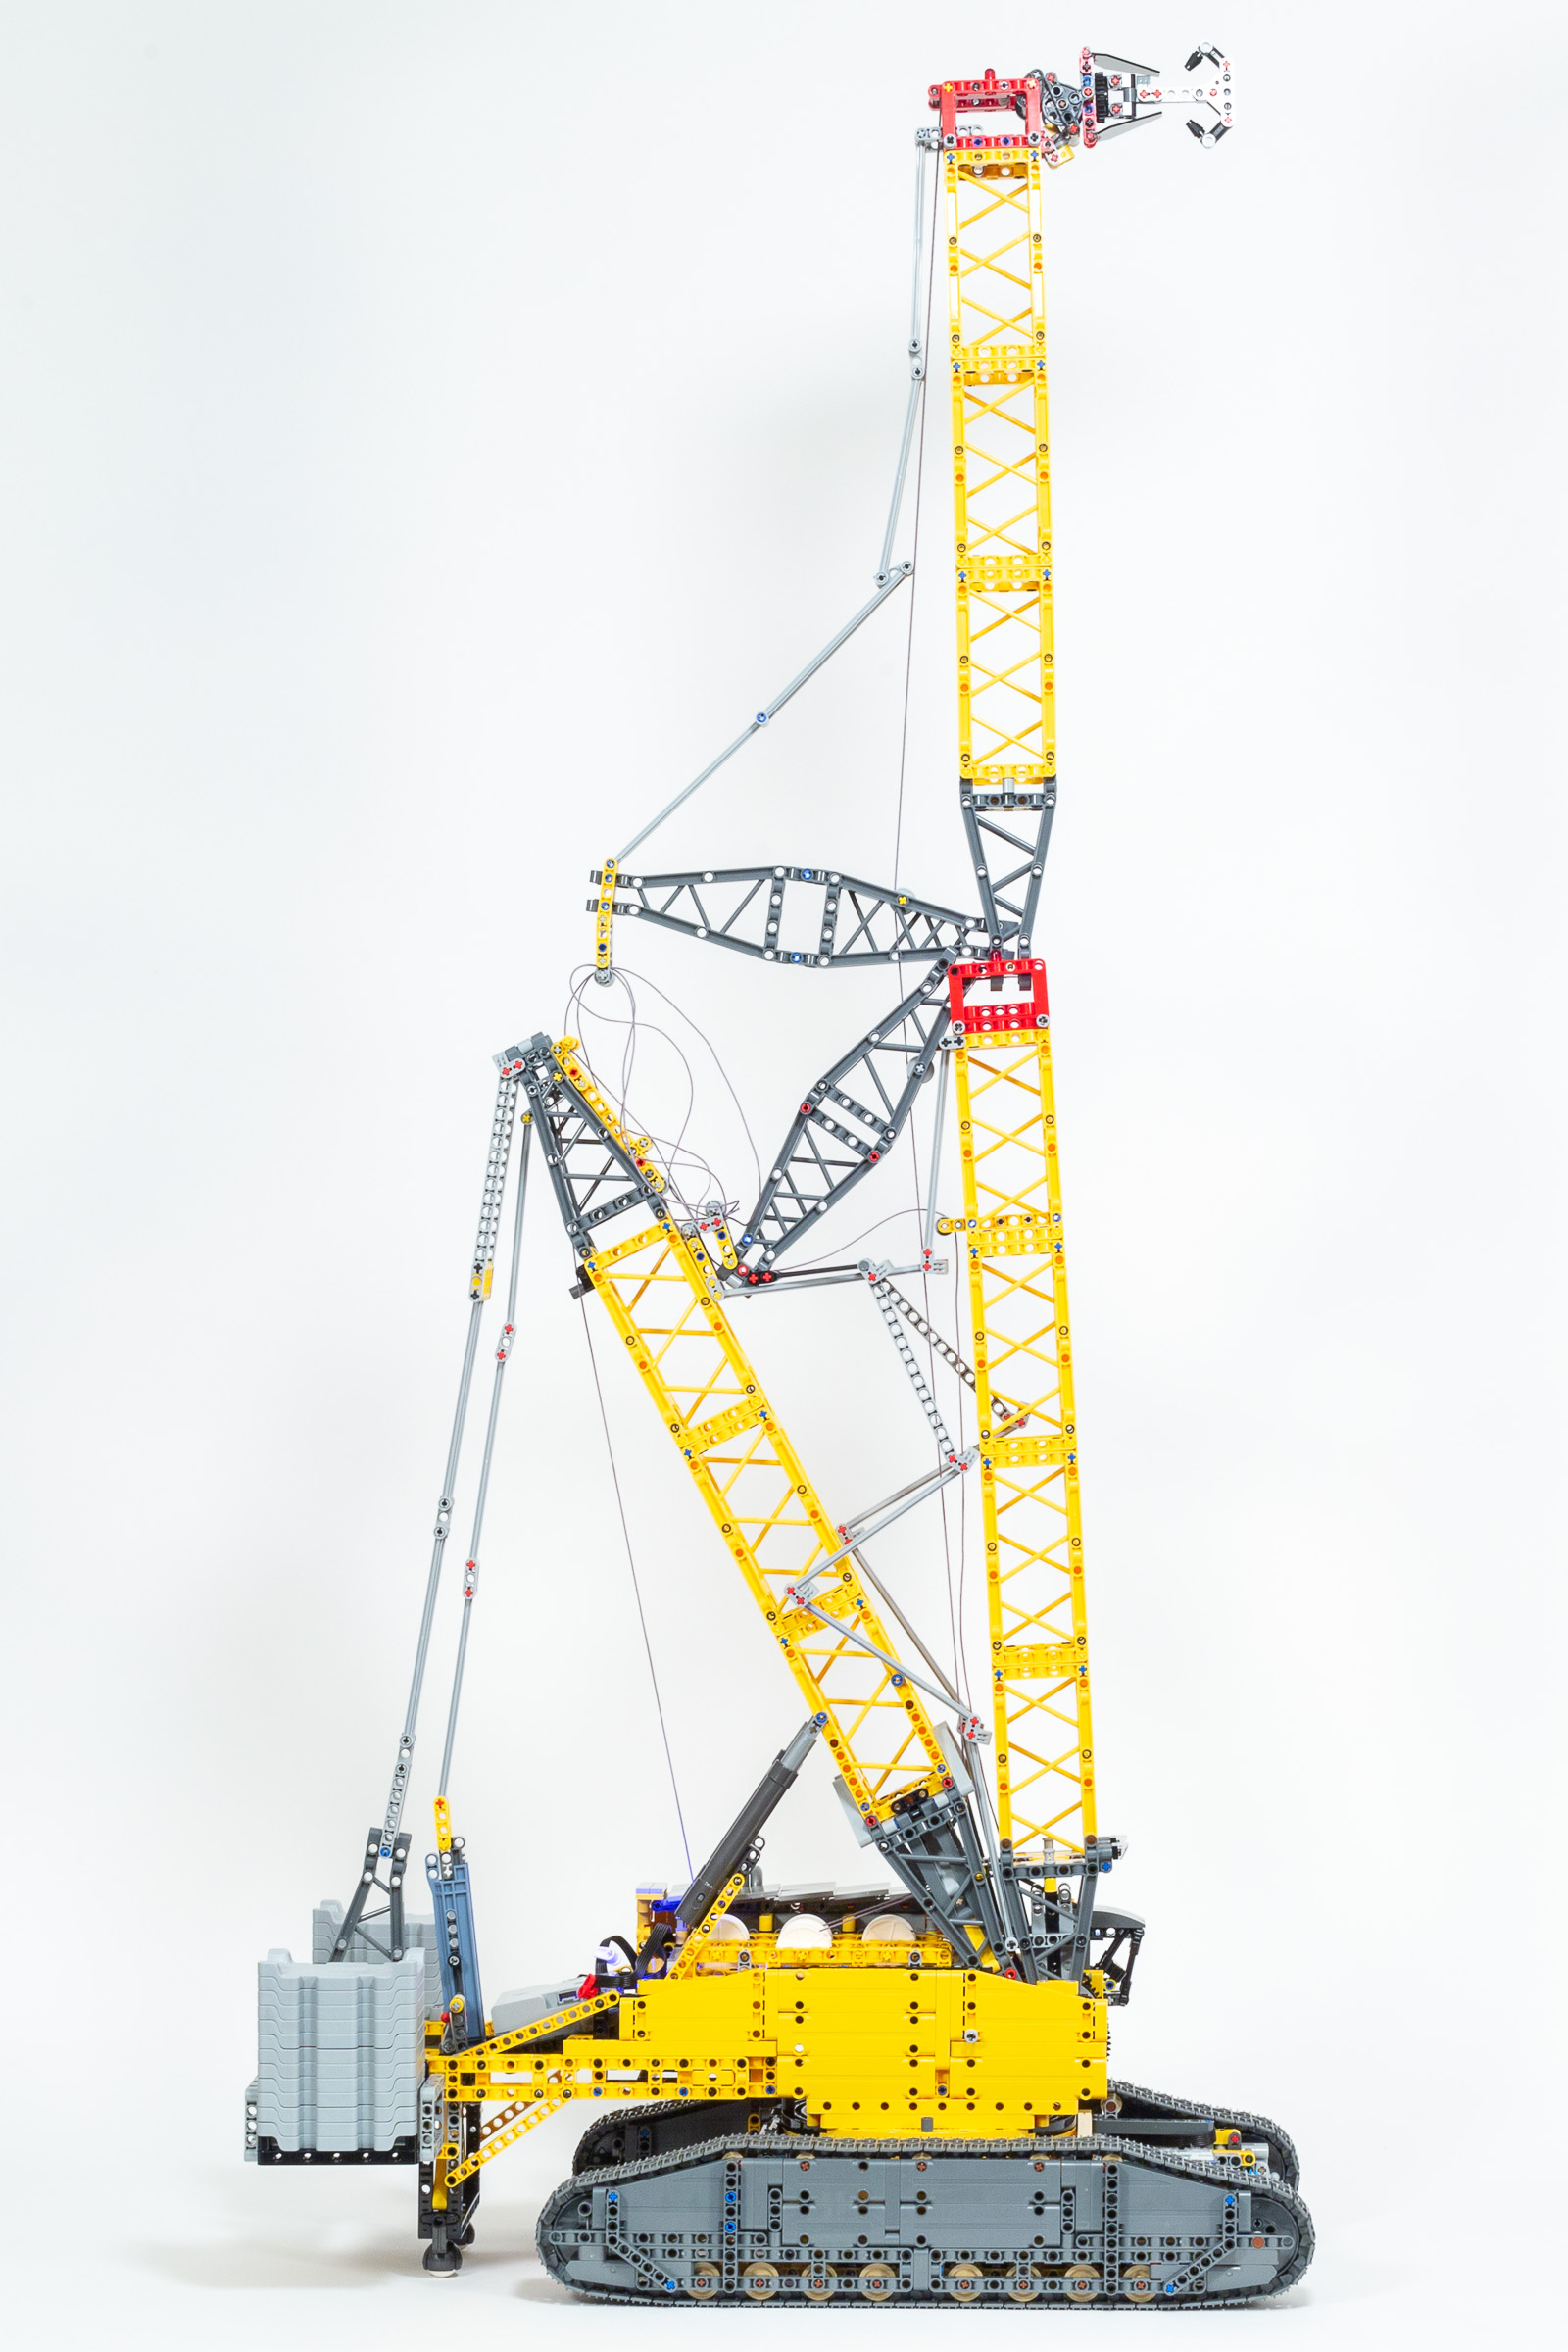
The crane can reach pretty far below its base.
This is one of those cases… The #42146 Liebherr Crawler Crane LR 13000 is an excellent set that sits at the tipping point between a 4/5 and an elusive 5/5 rating before we take price and value into account.
Will you lift #42146 Liebherr Crawler Crane LR 13000 into your home?
At the ridiculous $700 asking price, the set still earns a 3/5 (Good) rating because it really is an excellent build experience and an excellent model.
Its an absolute POS kit. Mine won’t rotate 360 degrees, the phone app doesn’t work, I had to load brickling 2. The instructions are awful, you have to be intuitive to put this thing together.
I just finished building the set and thoroughly enjoyed every step of the process. It’s definitely a challenging model—one that occasionally requires a bit of common sense, especially when working with the cable routing. The instructions can be a bit ambiguous in those sections, so some trial and error is to be expected.
One aspect I absolutely agree with is that a good way to evaluate the value of a LEGO set is by using the price-per-gram metric. Fortunately, I was able to get this set on sale at my local Costco for $650 CAD (approximately $475 USD). That works out to around $0.093 per gram, which puts it more in line with many other Lego sets. As much as I love this build, I honestly wouldn’t have paid the full retail price for it.
Factoring in the discounted price, I would rate this set a solid 4.5 out of 5. The build experience, size, and functionality are incredibly impressive. However, I deducted half a point because I feel LEGO could have added a few more thoughtful details. For instance, a retractable ladder to access the operator’s cab would’ve been a great touch, and the engine room feels a bit unfinished and underdeveloped, especially given the scale and ambition of the model.
That said, the scale and engineering of the LR 13000 are truly remarkable. The use of the new large linear actuators and the Control+ system delivers a very satisfying play and display experience. It’s a centerpiece for any Technic fan and a fun challenge for experienced builders.
I am having the damnest time trying to replace two of the large motors that were damaged when the completed set fell off of my table. You d would think that that Lego company would offer better support for a set that costs so much, and, is still being sold in Lego stores.
I assume that you contacted LEGO Customer Services? They tend to offer good support for their products, but it is possible they are unwilling to replace expensive parts like motors due to the model being dropped.
Good Luck!
Maybe it costs so much because of licenceing fees charged by
Liebherr to lego for the rights to allow to offer it as a kit. Also Legos cost for the parts and knowing that it will not be a big seller.
Also of what I read in other reviews a lot of things not included in the
Crane that should of been part of the kit To keep the cost of the kit down.
Appreciate that Lego made the effort to design the crane and offer it to be built.
Further wait to get it on special somewhere.here fo about $300 off, thate Lego offers from time to time, either for the kit itself or a combo purchase saving,
I have fully built but am having trouble with the hook spools. The app is telling me the cable is too short but I have used the correct one. I will rethread and see what happens. The most alarming thing to me is that as soon as I put weight on the hook the back supports down to the weights pop off. It is built to the manual but I cannot see how to stop this. The only thing I can think of is to put a couple of small beams on the sides to take the strain. Anyone else had these problems?
Slight correction. Both hubs are at the back. Also when using the Control + app, it sets its own limits when it calibrates and won’t let you raise the hook too high
Our grandson, 14 years old, purchased the 42146 Liebherr Crawler Crane LR 13000, here in Australia himself for AU$1049.99, I myself thought that it was overly expensive, however he wanted it so he purchased it. He assembled it in 16 hours and it now takes pride of place on a shelf in his bedroom and he is very pleased with himself.
I would like to improve it’s appearance by adding a set of LED lights to compliment the structure, does anyone have any idea where these can be obtained please as I cannot find them anywhere on the net.
There are a lot of different companies that offer lighting kits, but this is not my area of expertise. I would just search for “42146 LEGO Liebherr Lighting Kit” and see what you can find, if anything.
Here are two reasons to justify the higher cost of this set other than the electronics, and they are both related. First, the designer likely worked only with existing elements with this set scheduled to be released in August of 2022. However, the elements didn’t work with the set correctly so the set was delayed a year. (The first reason for the high price.) This was so new elements can be created and manufactured.
Thank you for the review. I really like the set. It also looks like a an educational build showing the pulley system at work. Despite of all the positives, I’m afraid I cannot justify spending so much money on this set, at least not at the full price. I’m already starting to see a pre-order price at some retailers staring at ~550 Eur. So we’ll see, if it goes even more down I might reconsider.
Smyths Toys in the UK have it on special quite often