
Review: #21344 The Orient Express (LEGO Ideas)
The Orient Express was known for opulent luxury and a high price tag. Let’s see if the LEGO version is on the same track…
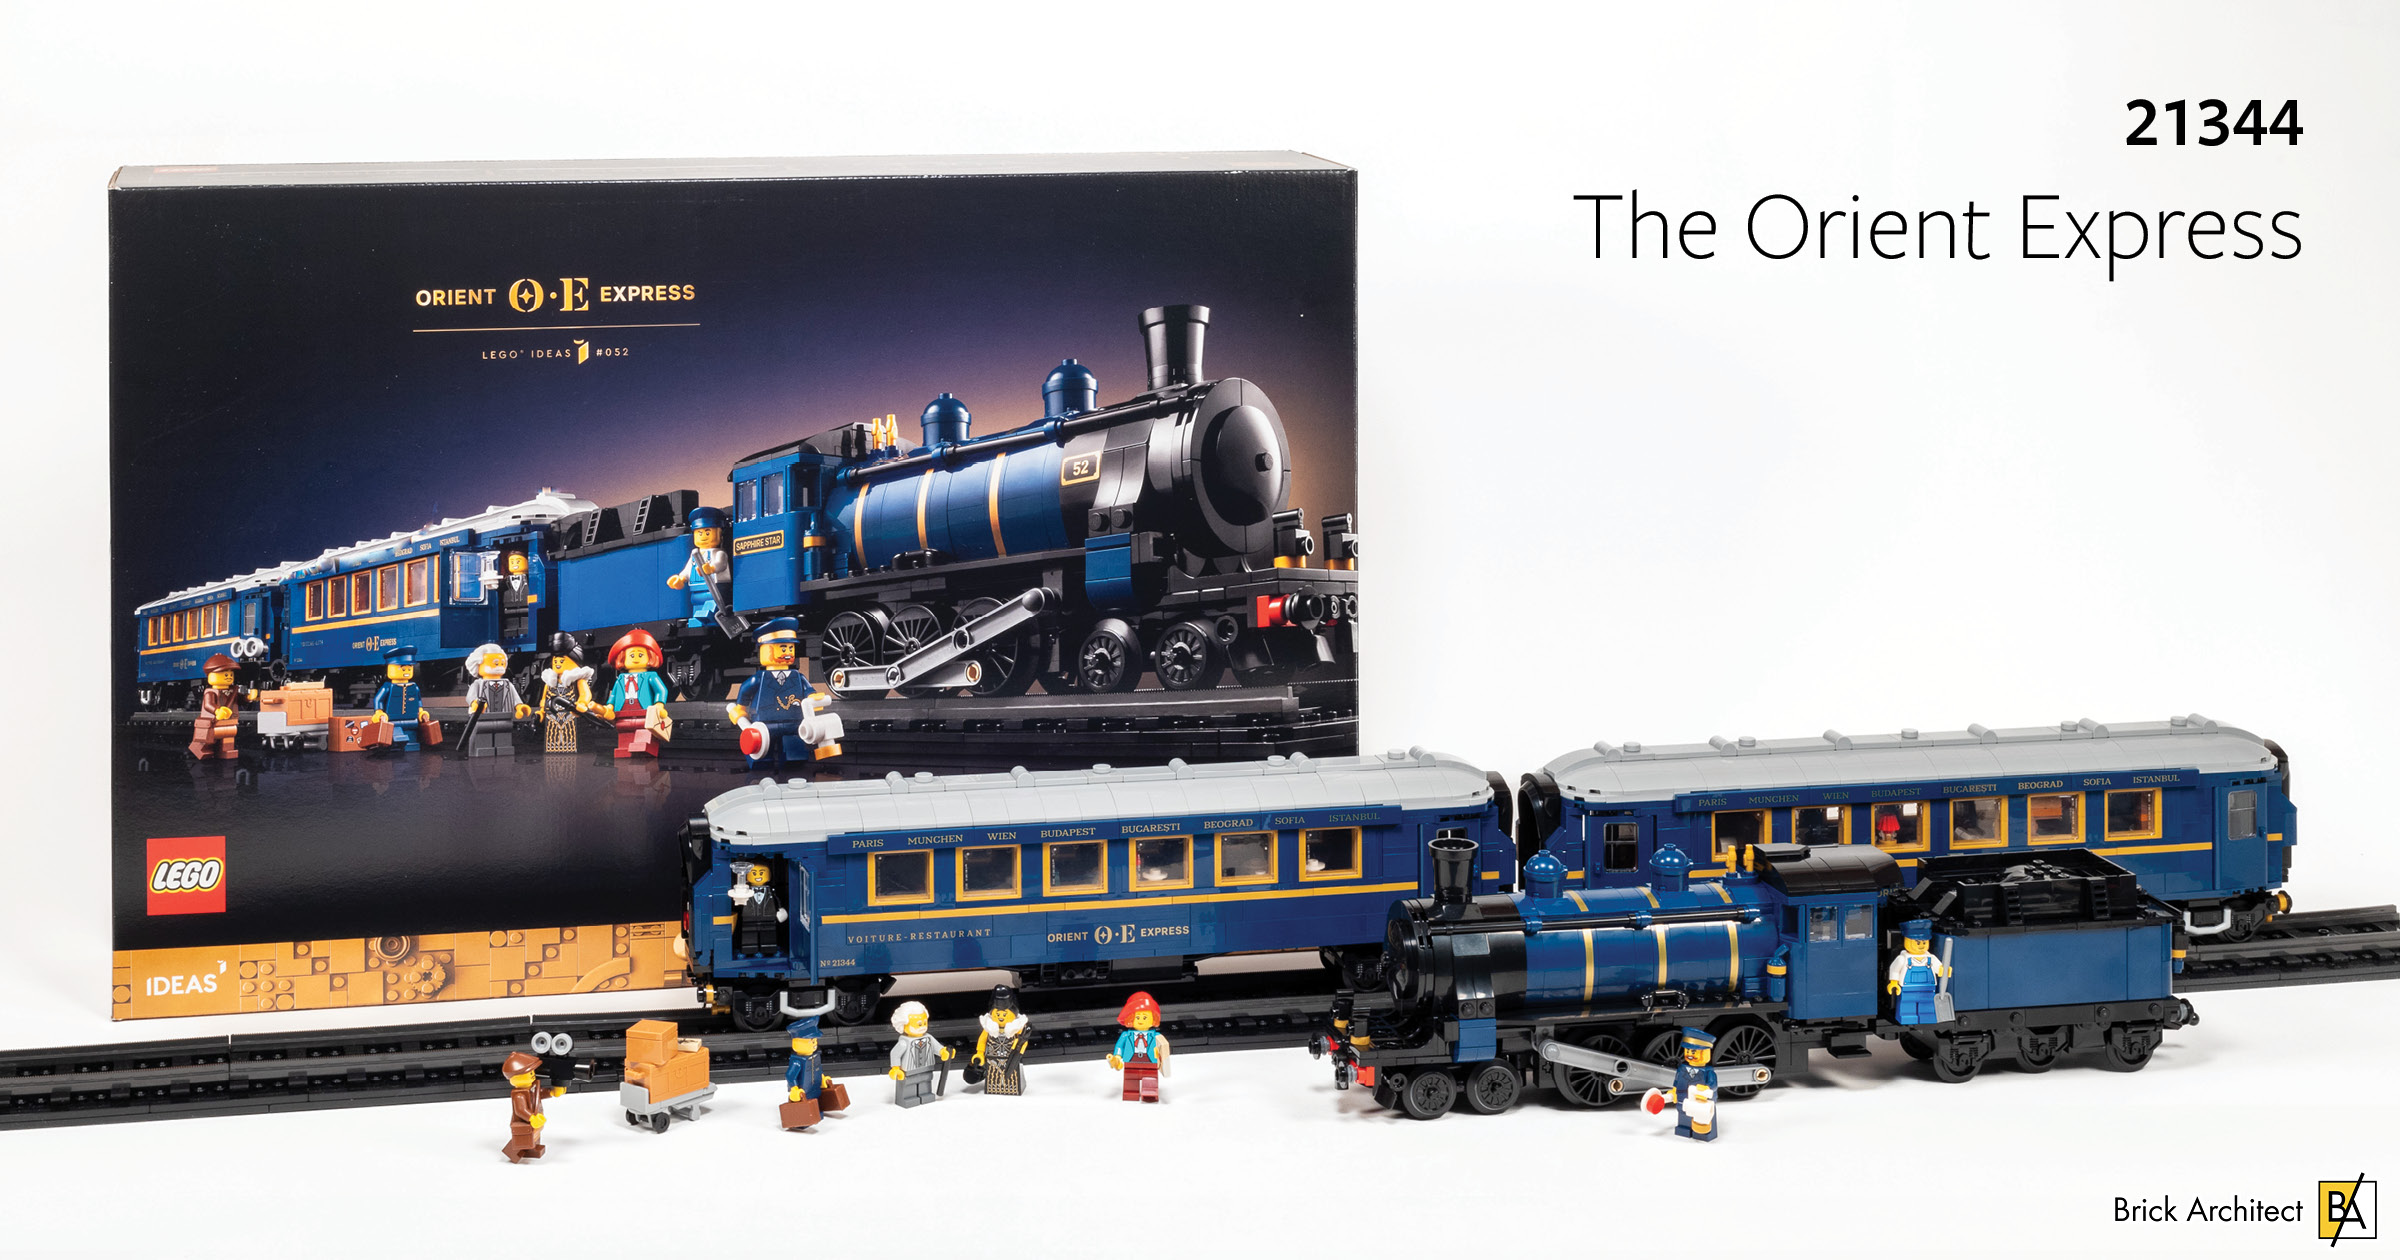
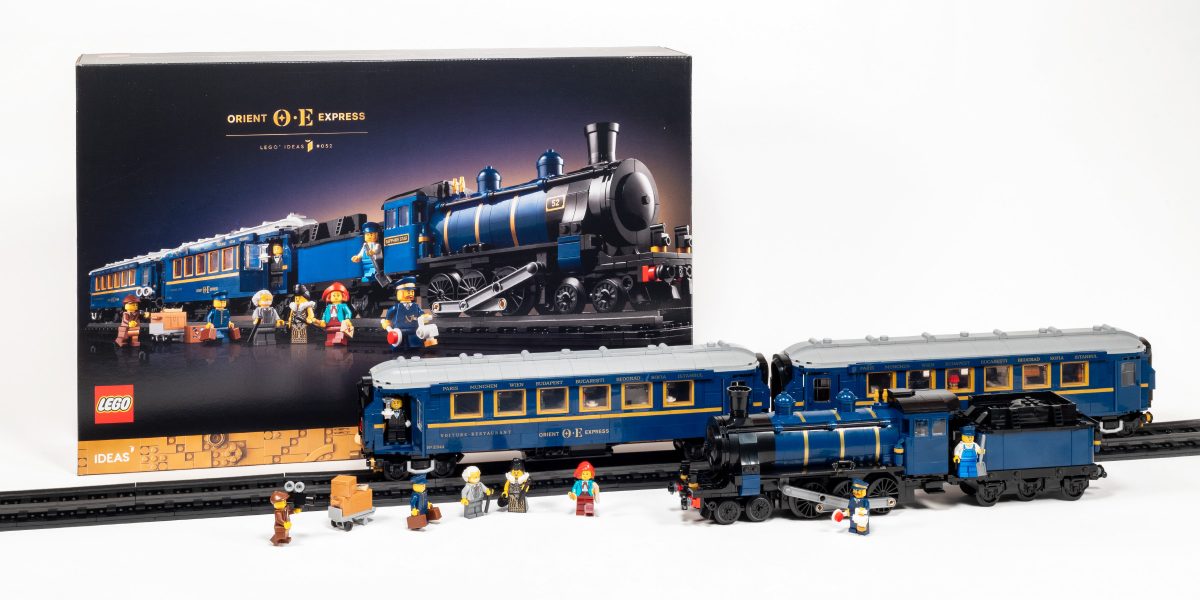
#21344 The Orient Express will be released on December 1, 2023. It costs $299.99 (299.99€ / £259.99 / 389.99 CAD / 469.99 AUD) and contains 8 minifigures and 2540 pieces. As with other large sets in the LEGO Icons lineup, it is recommended for ages 18+.
#21344 The Oriental Express – Box Front.
First Impressions
This set is one of the largest and most impressive sets to be approved through the LEGO Ideas program and turned into a real LEGO set. The original submission by Thomas Lajon featured a large 141Earth GreenDark Green engine with a single long 140Earth BlueDark Blue carriage behind it. The final set looks like it is about the same length overall, with a shorter engine and two shorter carriages – both in the same dark blue color.
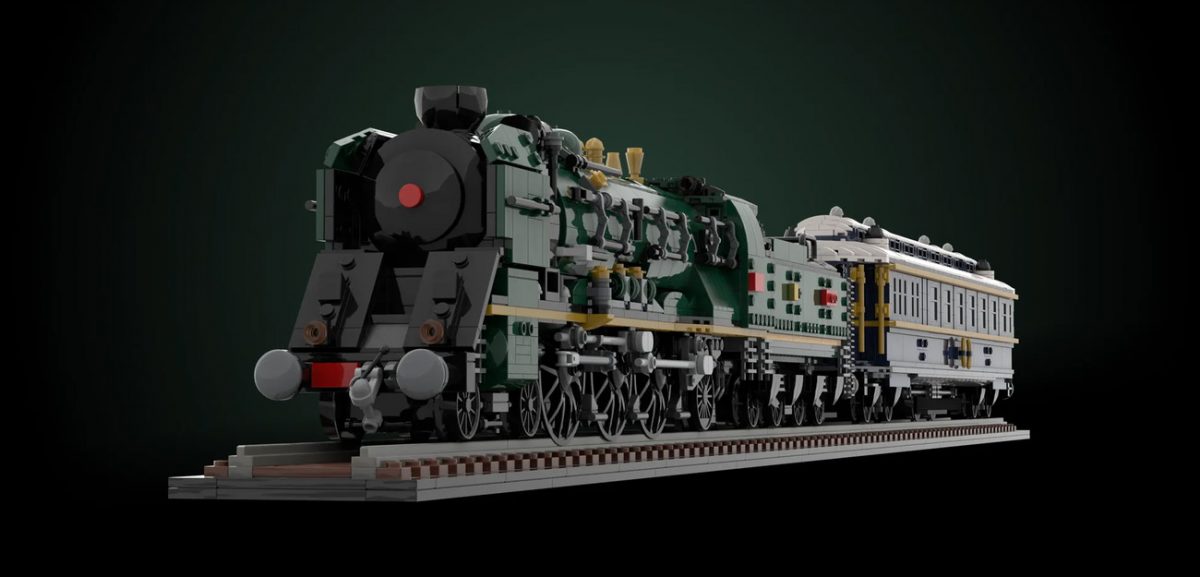
The original submission was a larger dark green engine with just one dark blue carriage.
When leaked photos showed up well before my copy arrived in the mail, I did not look closely, but the things that I did see looked great – a nice dark blue color, train that hopefully fits standard tracks, and space for minifigures inside. This does look like it couold be a fitting replacement for the long-retired #10194 Emerald Night after all. (It was released in 2009.)
First images of #21344 The Orient Express which were leaked through a product catalog.
Upon receiving the box in the mail, even before opening the shipping box I was immediately struck by the large size and heft of this set. It is not a thick box like #10326 Natural History Museum, but it is long and tall. It honestly feels heavier than most boxes of this size.
Historical Context
The Orient Express was a luxury rail service that (at it’s peak) served a route from Paris to Istanbul. Since Istanbul is located on the Bosphorus Strait (which separates Europe and Asia), it would have been seen as the gateway to what was then referred to as the Orient.
As I was not familiar with the historic luxury train service from Paris to Istanbul, the name “The Orient Express” caught me off guard. Many people believe that referring to all of Asia as ‘The Orient’ or something/someone from the region as ‘Oriental’ is dated and insensitive to the many cultures and traditions in that region. Others take a stronger stance that it is a racist vestige of colonialism, used by the west to label the region as exotic and inferior.
In the case of this LEGO Set, The Orient Express is a proper noun referring to a specific historical institution instead of a place or people, so the naming is historically accurate for a set based on that period. What feels less appropriate is the decision to re-launch a luxury train line on the same route in 2024 — under the same dated branding. (Maybe those well-heeled tourists who can afford to pay 3988€ for a one-night trip are comfortable having Caviar and Champagne with a side of Colonialism?)
This LEGO Set
The front of the box reveals a majestic-looking steam locomotive with a gorgeous 140Earth BlueDark Blue color and what looks like 297Warm GoldPearl Gold accents. The front of the engine is 26Black and the roof of the carriages are 194Medium Stone GreyLight Bluish Gray. Standing in front of the train we see a nice selection of 8 minifigures including two very affluent older travelers, a younger woman wearing brightly-colored clothes, a man holding a video camera, and four minifigures to take care of the train.
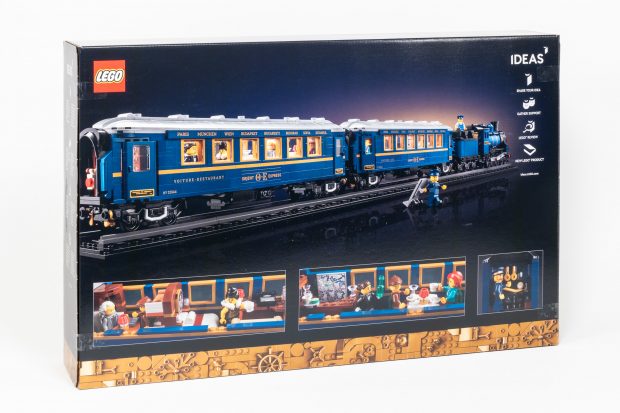
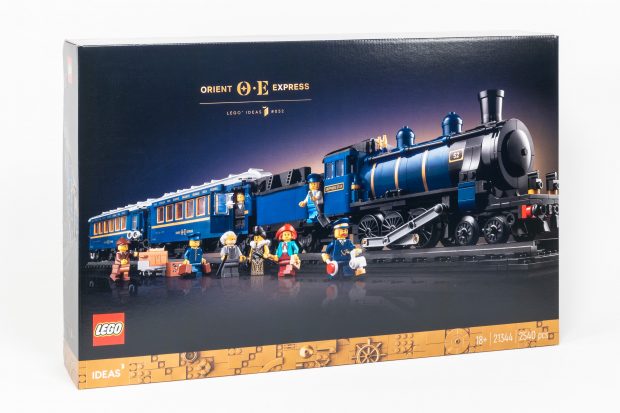
#21344 The Oriental Express – Back of the box.
The back of the box shows that the train rests on a raised section of track, built on a base that is three plates thick. We also see insets showing the travelers dining in luxury and the conductor watching the speed. (With such a short section of track, there is definitely trouble ahead, and trouble behind.)
Box Contents
Even though this is a pretty large set, the thinner box does not include a box-within-a-box like some other large sets such as the Natural History Museum which we just reviewed recently. The box was not damaged in transit, so it doesn’t seem like the double-boxing was needed. Inside the box, you will find a ton of numbered bags, and a pouch which I expect will include the building instructions and sticker sheet.
- Box Size: 57.8 × 37.5 × 11.3 cm (22 3/4 × 14 3/4 × 4 1/2”)
- Part Count: 2540 pieces
- LEGO Parts Weight: 2337.4 g (5.15 lbs)
- Weight-per-piece: 0.92 g/piece
- Price per piece: $0.118 per piece
- Price per gram: $0.128 per gram.
- Numbered bags/stages: 23
- Pieces per stage (average): 110 pieces.
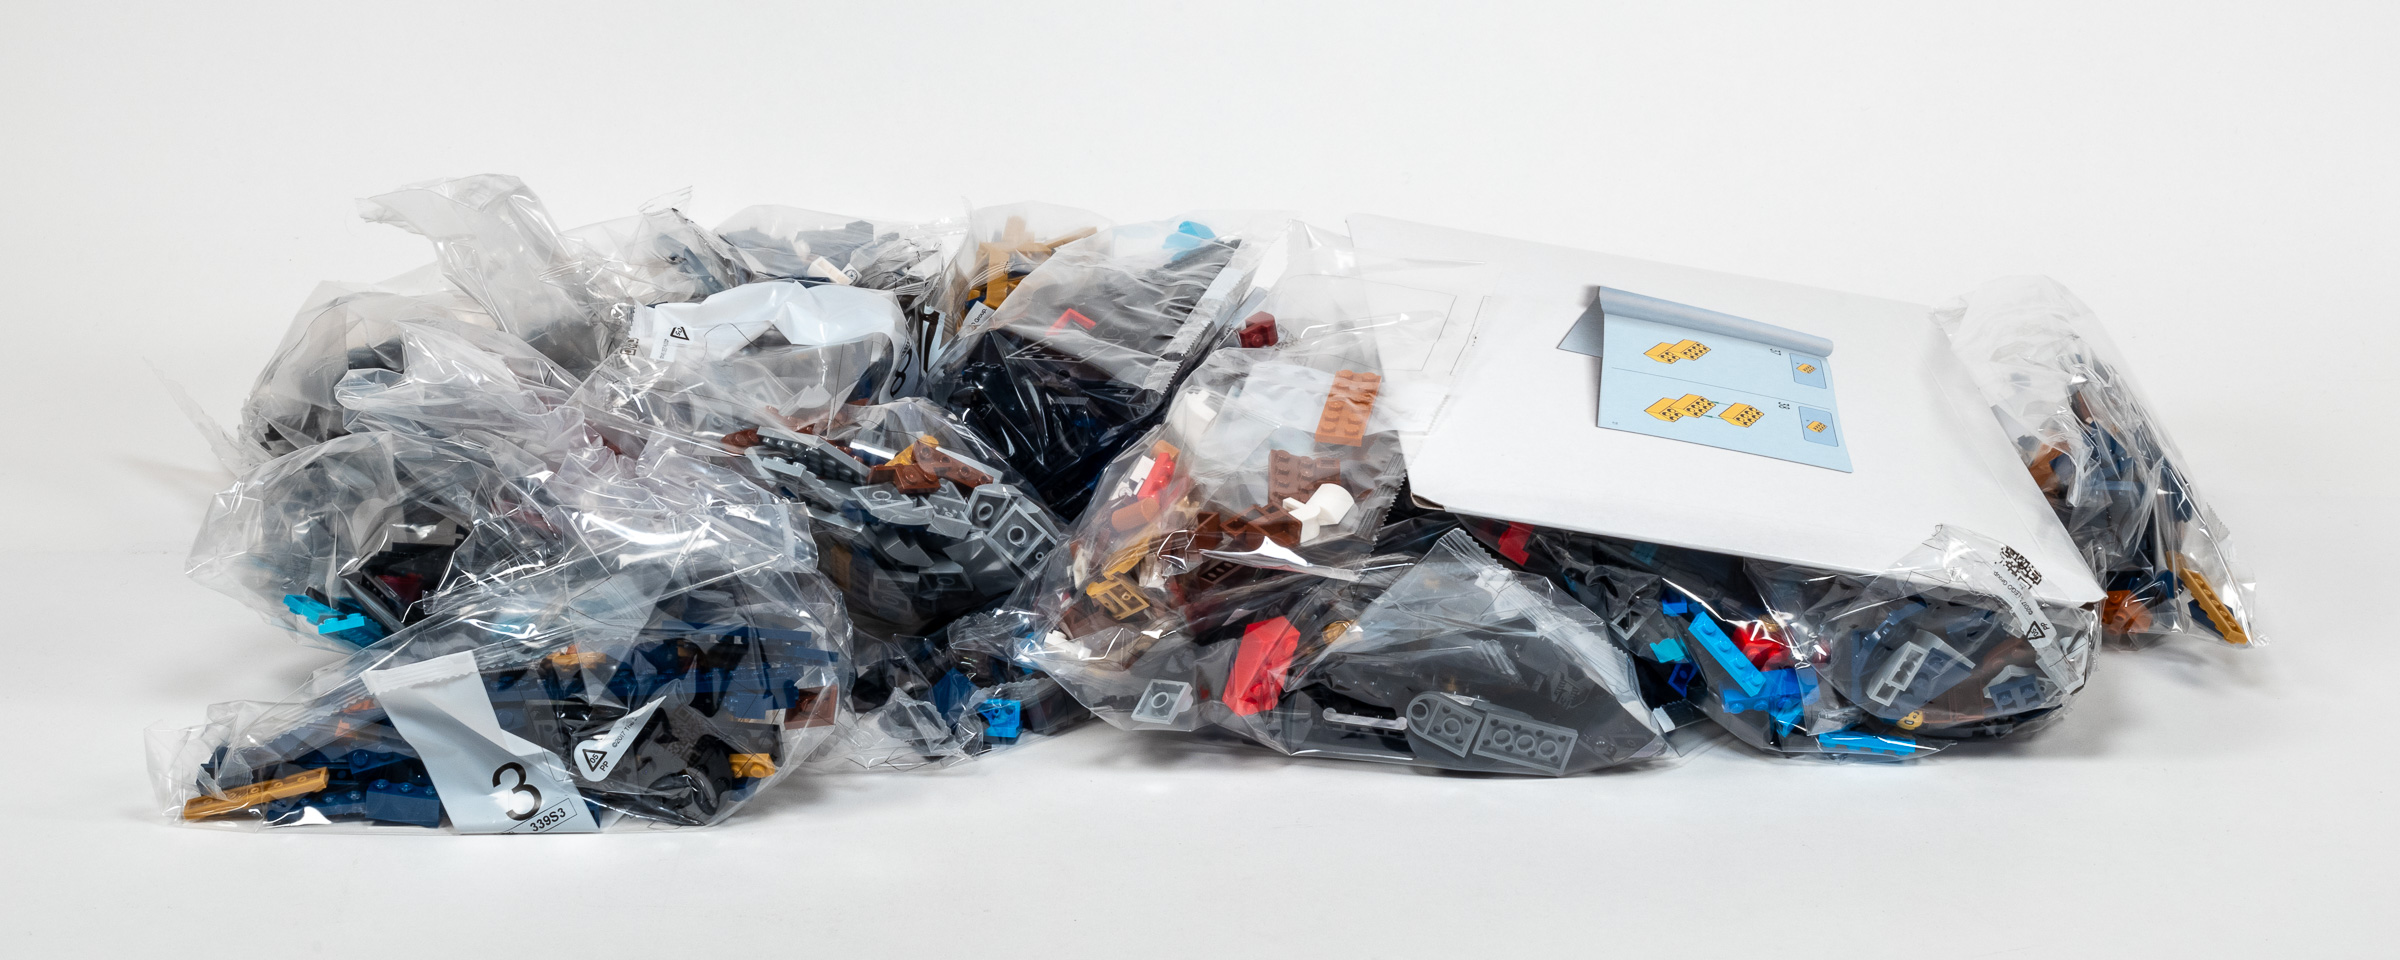
The build process takes place over 23 numbered stages.
- Bag 1: 1x large bag (marked 439S3).
- Bag 2: 1x extra-large bag (marked 339S3).
- Bag 3: 1x large bag (marked 339S3).
- Bag 4: 1x medium unmarked bag.
- Bag 5: 1x medium unmarked bag.
- Bag 6: 1x medium unmarked bag.
- Bag 7: 1x small unmarked bag.
- Bag 8: 1x large bag (marked 539S3).
- Bag 9: 1x medium bag (marked 339S3).
- Bag 10: 1x large bag (marked 339S3).
- Bag 11: 1x medium unmarked bag.
- Bag 12: 1x medium unmarked bag.
- Bag 13: 1x large bag (marked 339S3).
- Bag 14: 1x medium unmarked bag.
- Bag 15: 1x large bag (marked 539S3).
- Bag 16: 1x large bag (marked 339S3).
- Bag 17: 1x medium unmarked bag.
- Bag 18: 1x large bag (marked 339S3).
- Bag 19: 1x large bag (marked 339S3).
- Bag 20: 1x extra-large bag (marked 539S3).
- Bag 21: 1x medium unmarked bag.
- Bag 22: 1x medium bag (marked 339S3).
- Bag 23: 1x medium bag (marked 339S3).
- 2x extra-large un-numbered bags containing: 4x 8×16 Plates, 4x Train Wheels (both in 26Black), and 5x Straight Train Track in 316Titanium MetallicPearl Dark Gray.
- 1x extra-large un-numbered bag containing: 4x 6×16 Plates in 154Dark Red, 8x Straight Train Track in 316Titanium MetallicPearl Dark Gray.
- Cardboard pouch (marked 6471873) containing:
- 1x large instruction booklet containing 300 pages. 27.0 x 19.2 cm (10 5/8 x 7 5/8”).
- 1x small metallic sticker sheet containing 17 stickers (marked “10105411/6463585 ©2023 The LEGO Group”). 8.0 × 10.3 cm (3 1/8 × 4 1/16″).
- 1x medium sticker sheet containing 9 stickers (marked “10104846/6453260 ©2023 The LEGO Group”). 10.4 × 10.6 cm (4 1/8 × 4 1/8″)
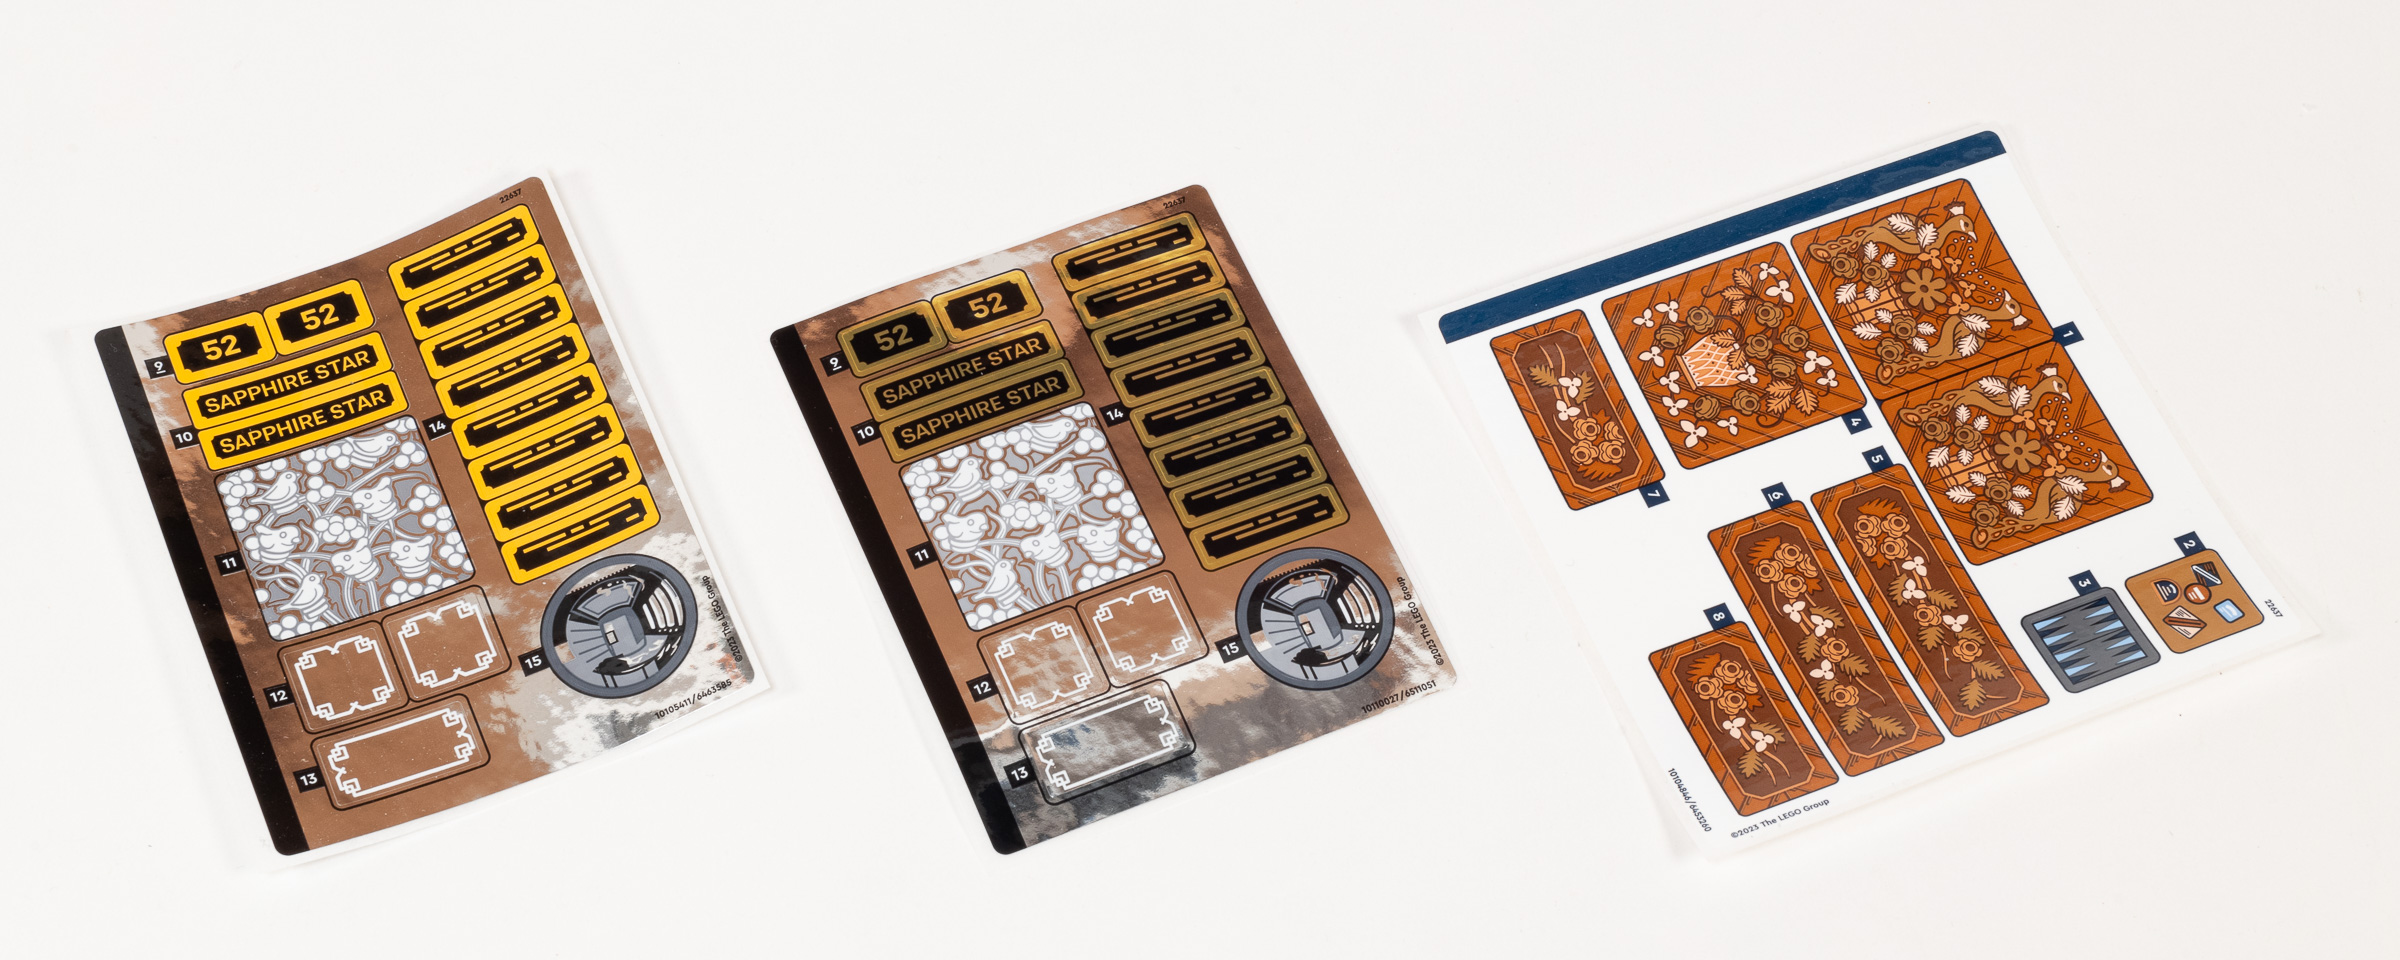
This set includes two sticker sheets. (The corrected version is in the middle.)
Build Process
As I prepare to start building, I am eager to see if the build techniques result in the intricately detailed interior and exterior that I am hoping for. I am also eager to see if it can be easily motorized, and will admit that I will be disappointed if it is difficult or impossible to motorize this model without adversely impacting the appearance. On the other hand, I am concerned that the model will look incomplete without the 26 stickers which are included in the set, since I generally do not use stickers when building sets.
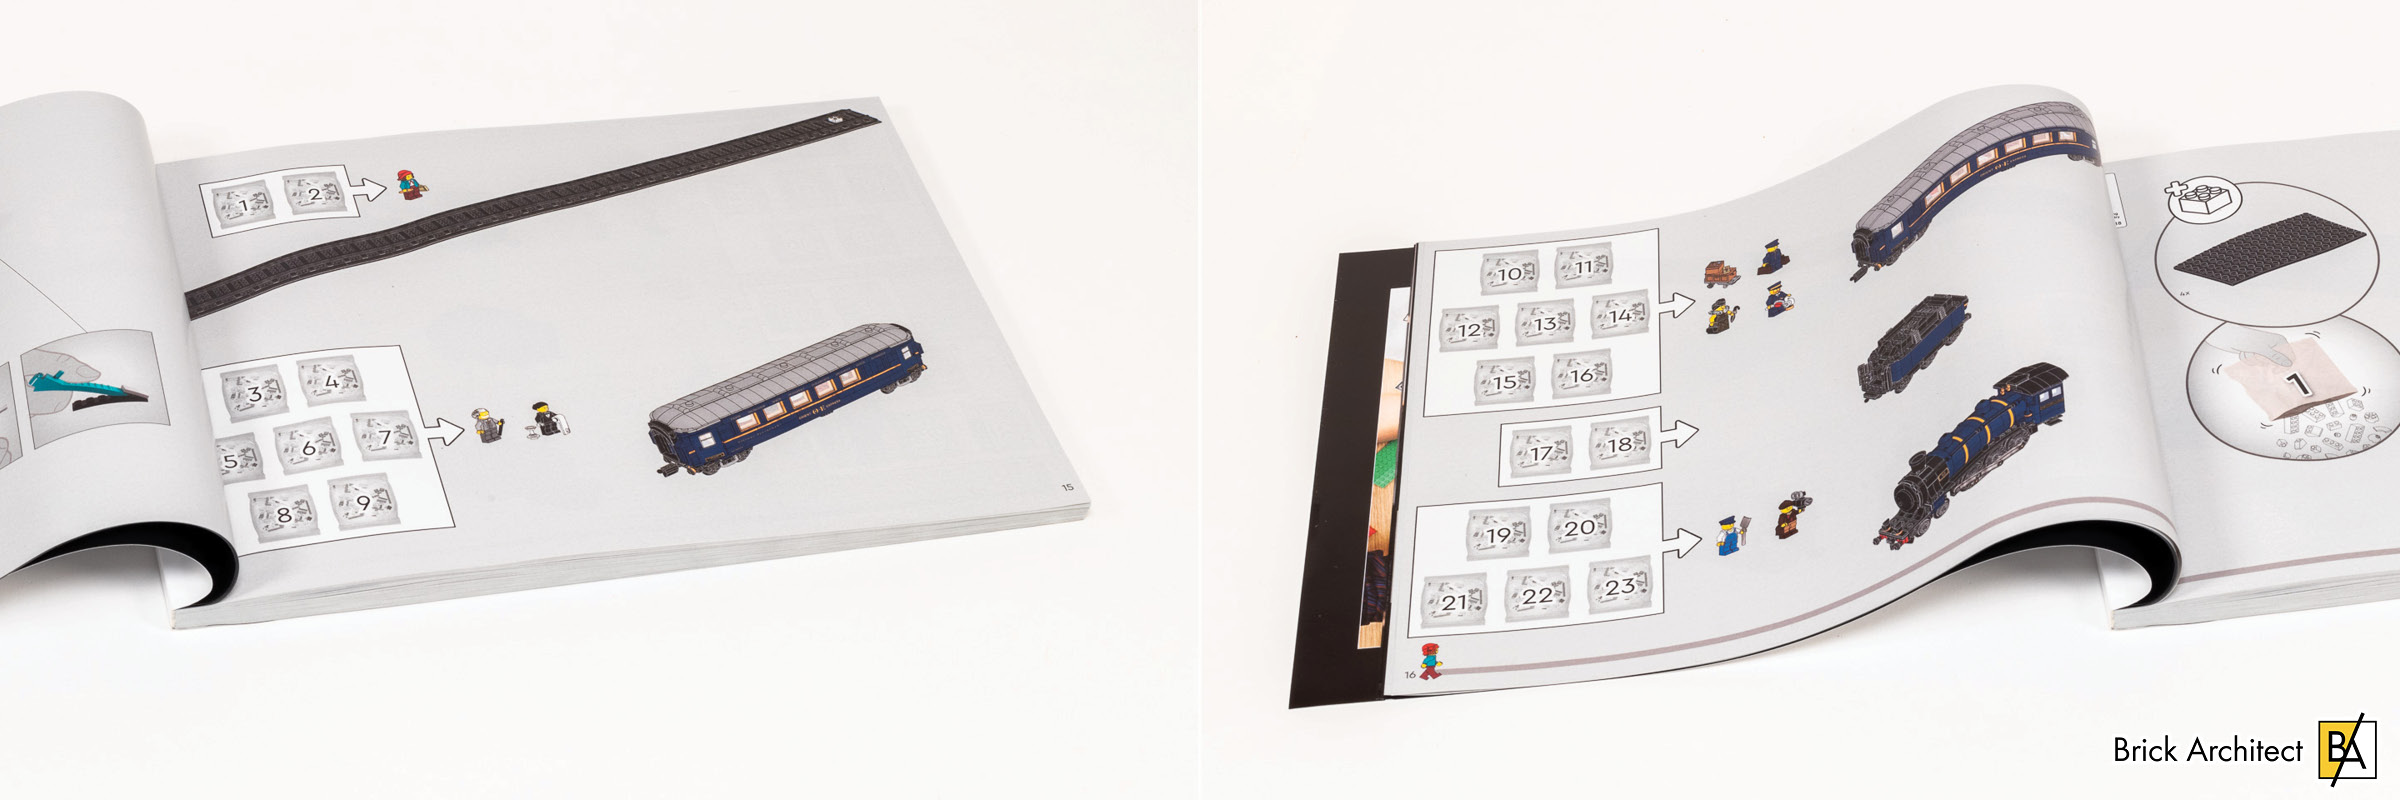
While there are 23 numbered bags in this set, it has 5 distinct stages.
The build process is broken into 23 numbered stages. With 2540 pieces in the entire set, that works out to an average of just 110 pieces per numbered bag. This tends to speed up the build process overall since it is easier to find the part you need in a smaller pile. I don’t prefer this approach, since each numbered stage often feels like an insubstantial contribution to the completed model.
Bags 1-2: Platform with Track
Eight boring minutes after starting this project, I have the completed the first bag. It creates the middle section of a very wide platform where the train will be able to rest once it is complete. The sections of track will be attached the entire length using 1×2 plates separated by 1×8 Tiles.
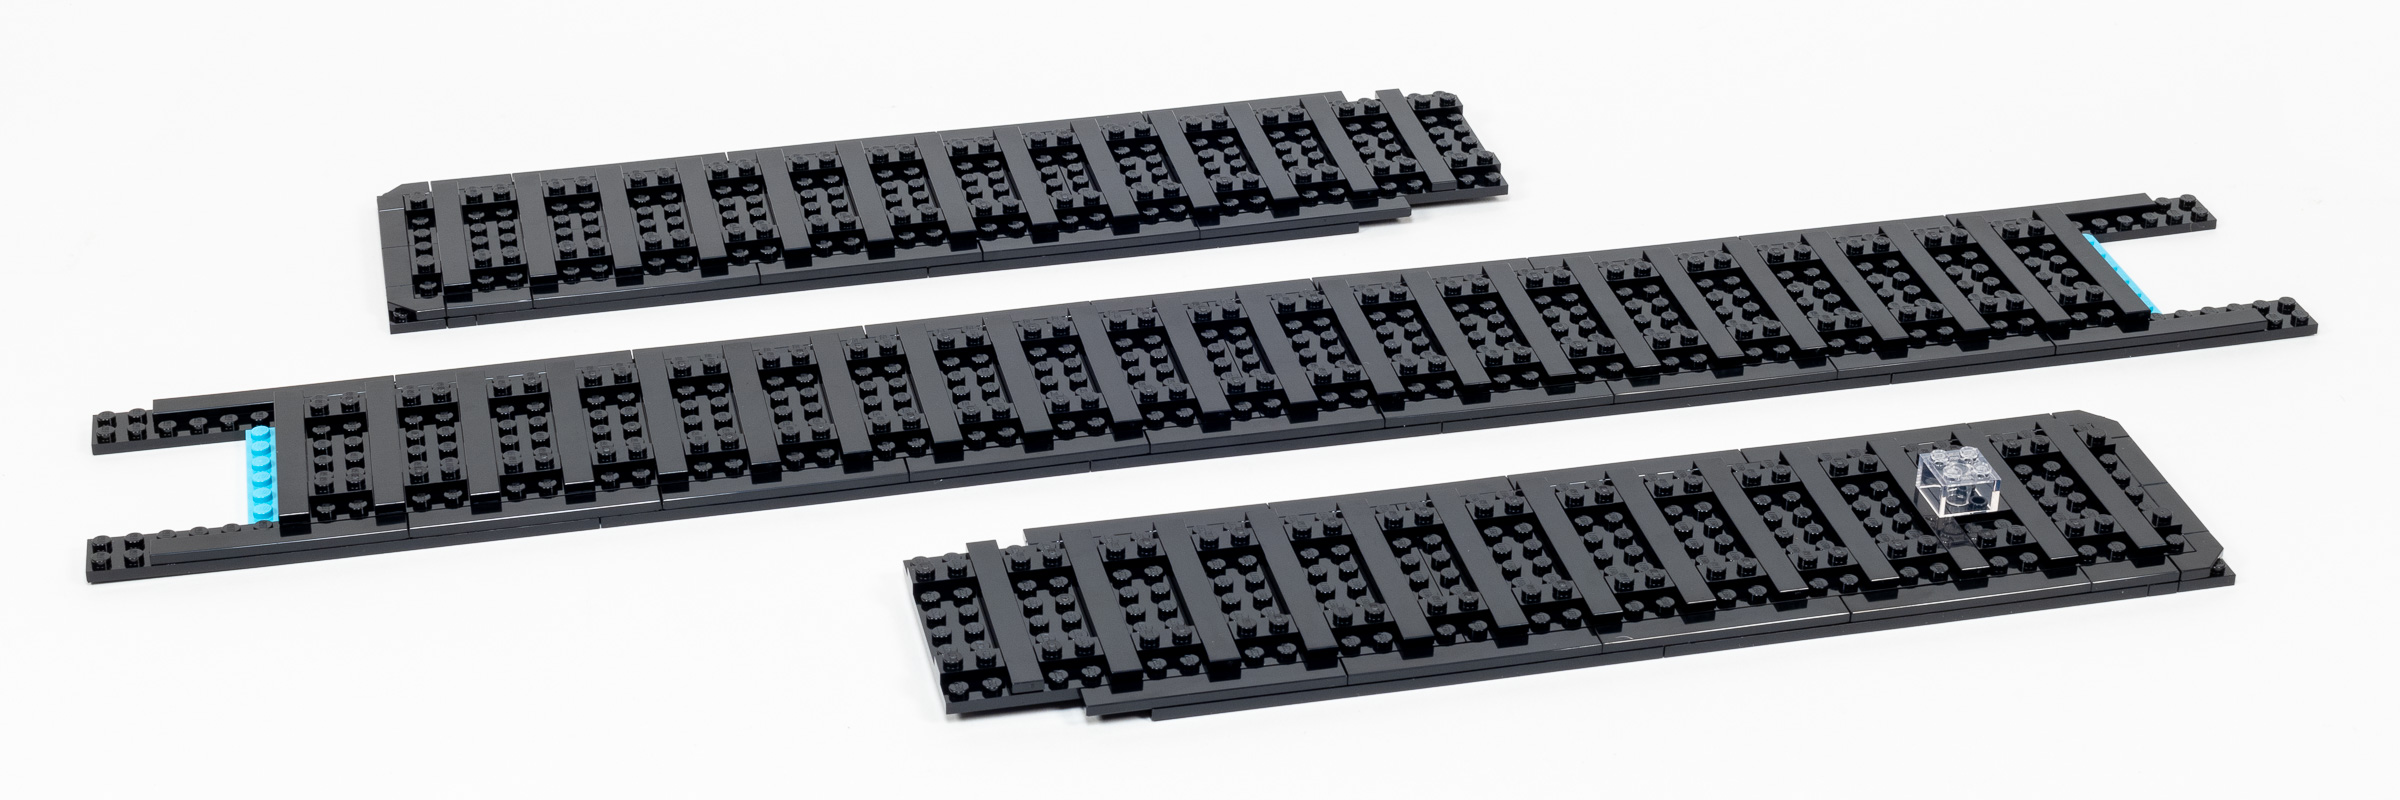
The lareger section in the middle is built in the first bag, and the two smaller sections in the second bag.
We finish this extremely wide base in Bag 2, which is nearly as boring as the first, although I can not quite explain why the end was designed using wedge plates for the last three studs. With a width of 146 studs (116.7 cm / 46″) it already can barely fit on the seamless white backdrop where I take most of my photos.
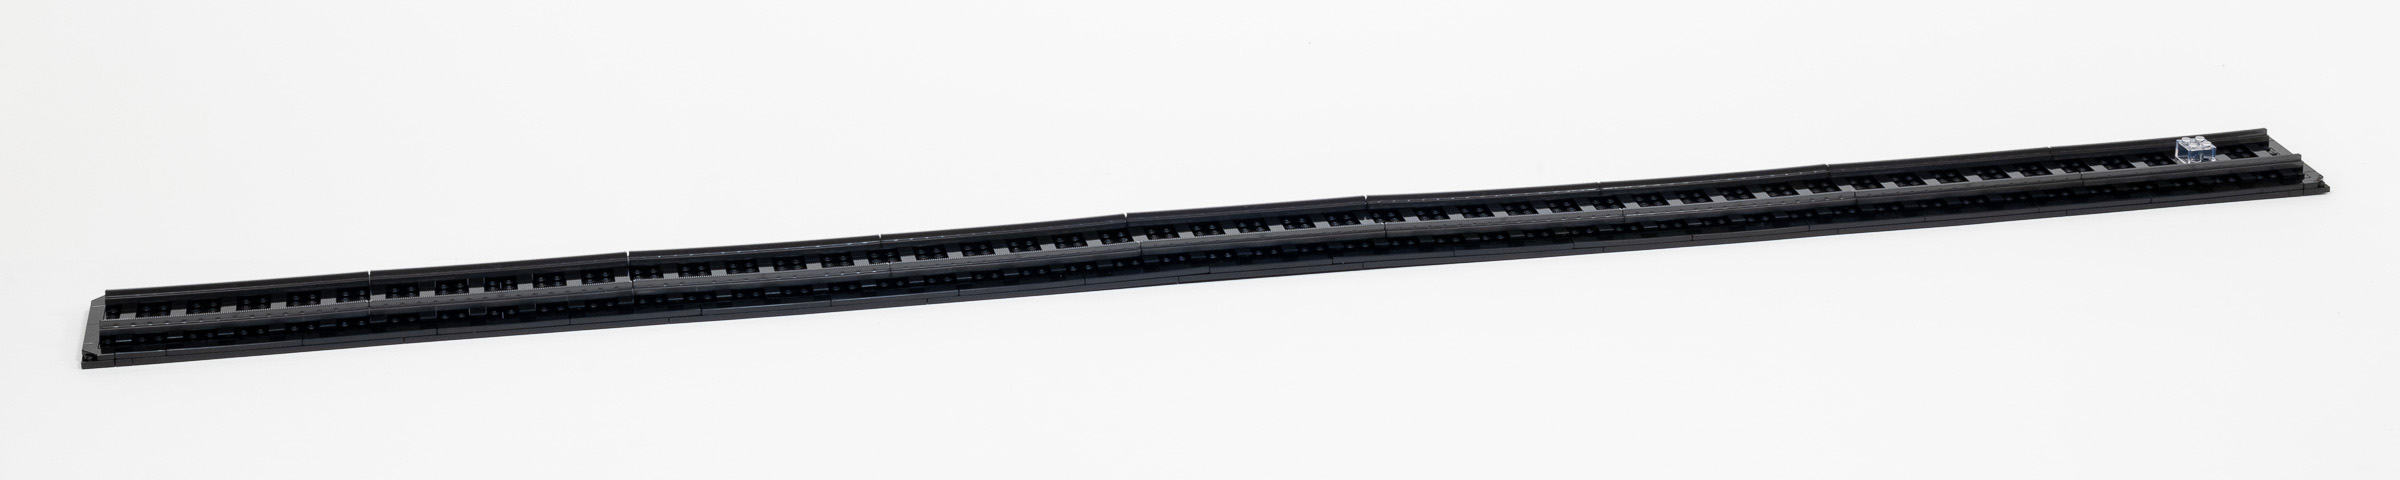
The base is 146 studs (116.7 cm / 46″) wide.
Build time: 18 minutes. (Bag 1: 8 minutes, Bag 2: 10 minutes)
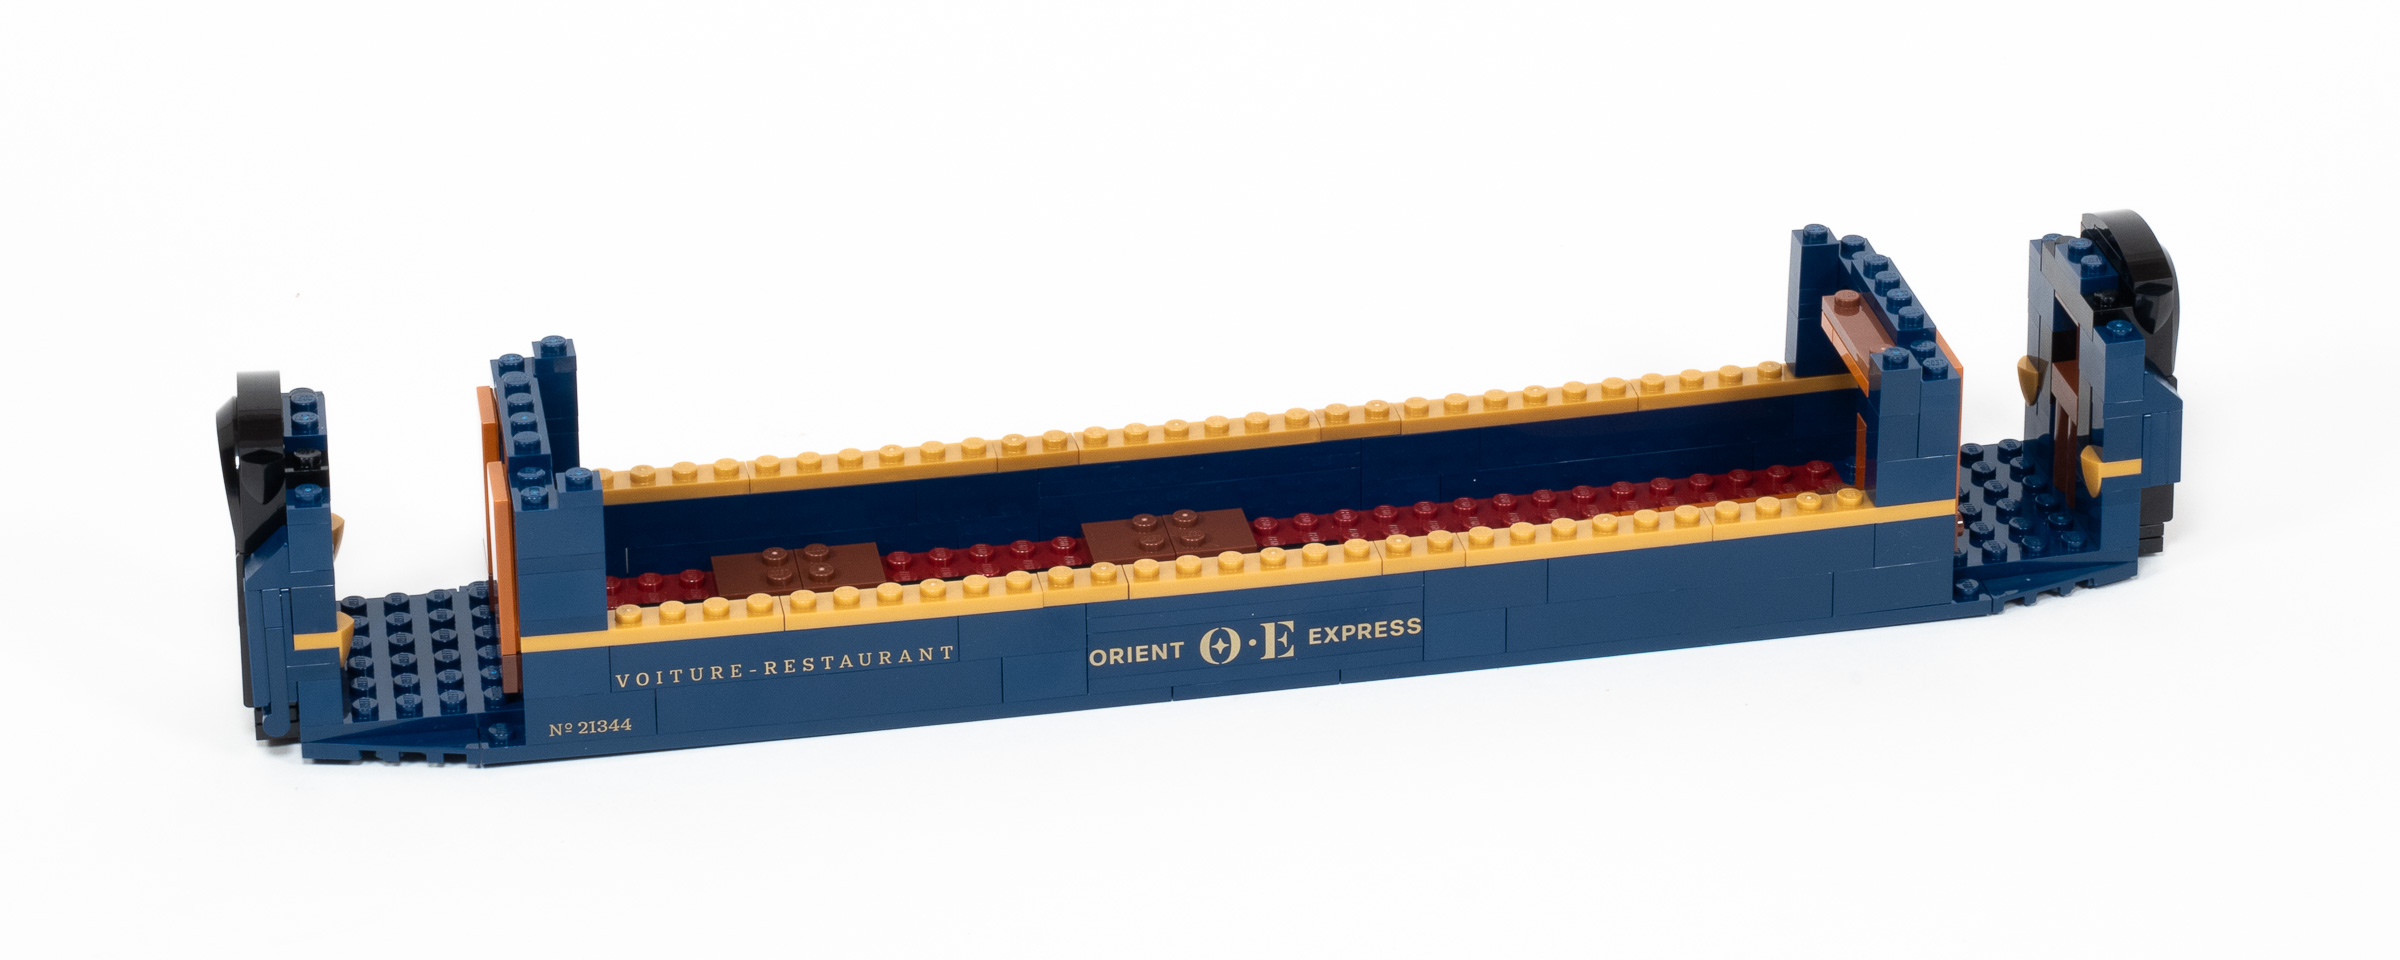
Bags 3-9: Dining Car
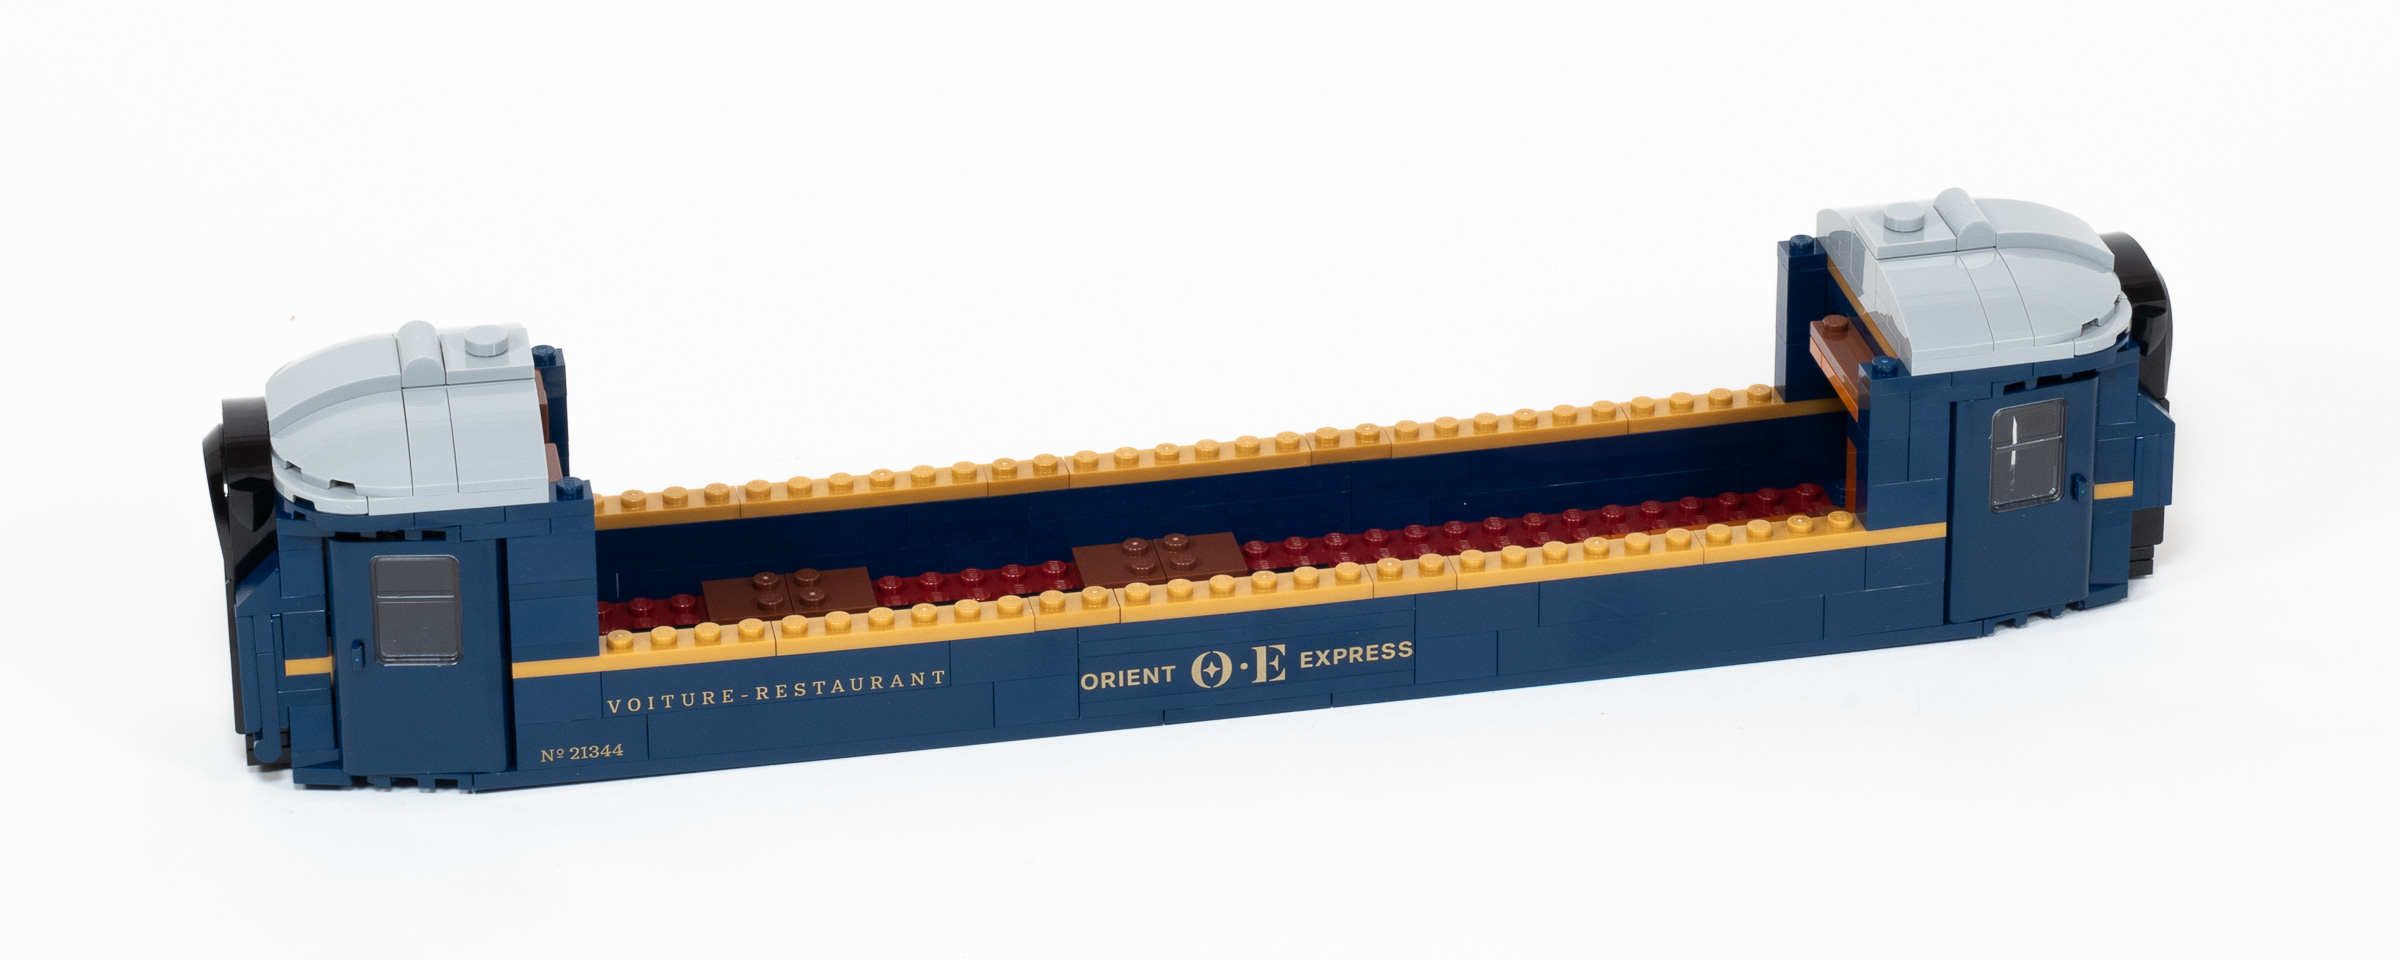
While dumping out the parts from Bag 3, I immediately saw the rich colors: 140Earth BlueDark Blue and 297Warm GoldPearl Gold in particular. I also noticed a lot of printed parts, which was a bit surprising given the large number of stickers included in the set. I do appreciate printed parts when decoration is strictly needed, so I was pleased to see this. We quickly build out the base which is 8-studs wide, rather than the more common 6-stud width of most LEGO City trains. Upon this, we build up part of the walls, which allows us to see this rich color combination coming together for the first time.
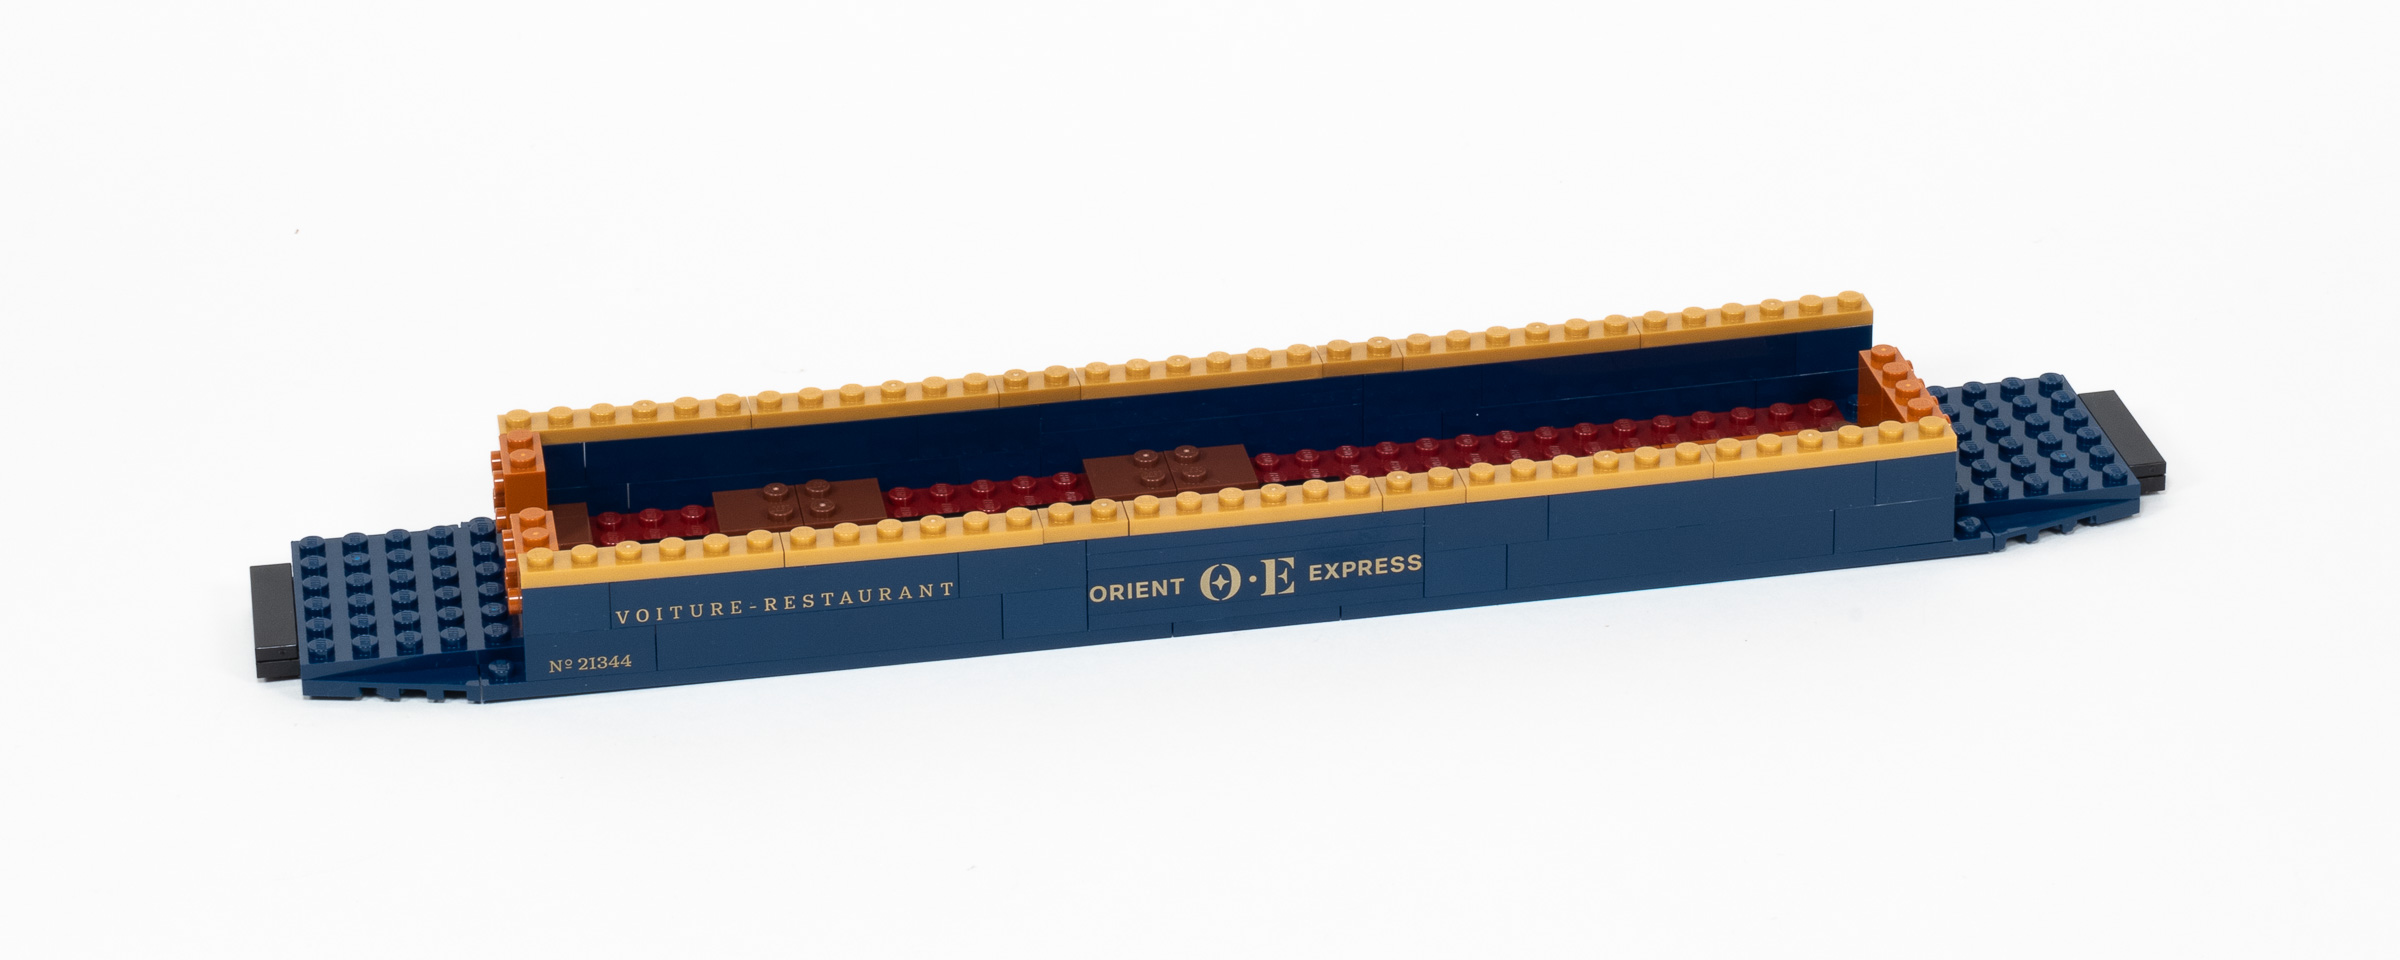
Completed carriage base in Bag 3.
Bag 4 adds some slow, intricate assemblies that include the arched doorways at the end of the carriage itself, and another archway that separates the area with the door from the rest of the car. These take time, since they leverage SNOT techniques and lots of small 1×1 elements. There are also ‘wood’ panels on either side which can be decorated with stickers that have an intricate Art Nouveau pattern.
Arched assemblies are added to the front and back in Bag 4.
I like how the overall shape of the carriage comes together in Bag 5. This is due to the installation of the four doors which you find on both sides and both ends of the car. They are installed at a subtle angle which gives the car a more slender overall appearance and a less rectangular form. We also add two curved roof assemblies, further smoothing the overall shape. The only downside is that these sections of the roof are not easily removeable, making it difficult to pose minifigures in these areas, and nearly impossible to see the stickered parts featuring the decorated wood paneling (although I did not apply the stickers).
Angled doors and a curved roof added in Bag 6.
Bag 6 adds rich furnishings to this comfortable dining car. We start by building two dining tables that are overflowing with plates and drinks, followed by two chairs at each table. After rotating the model 180 degrees, we build a curved bar in the back corner of the car. This is also nicely built and uses some interesting techniques.
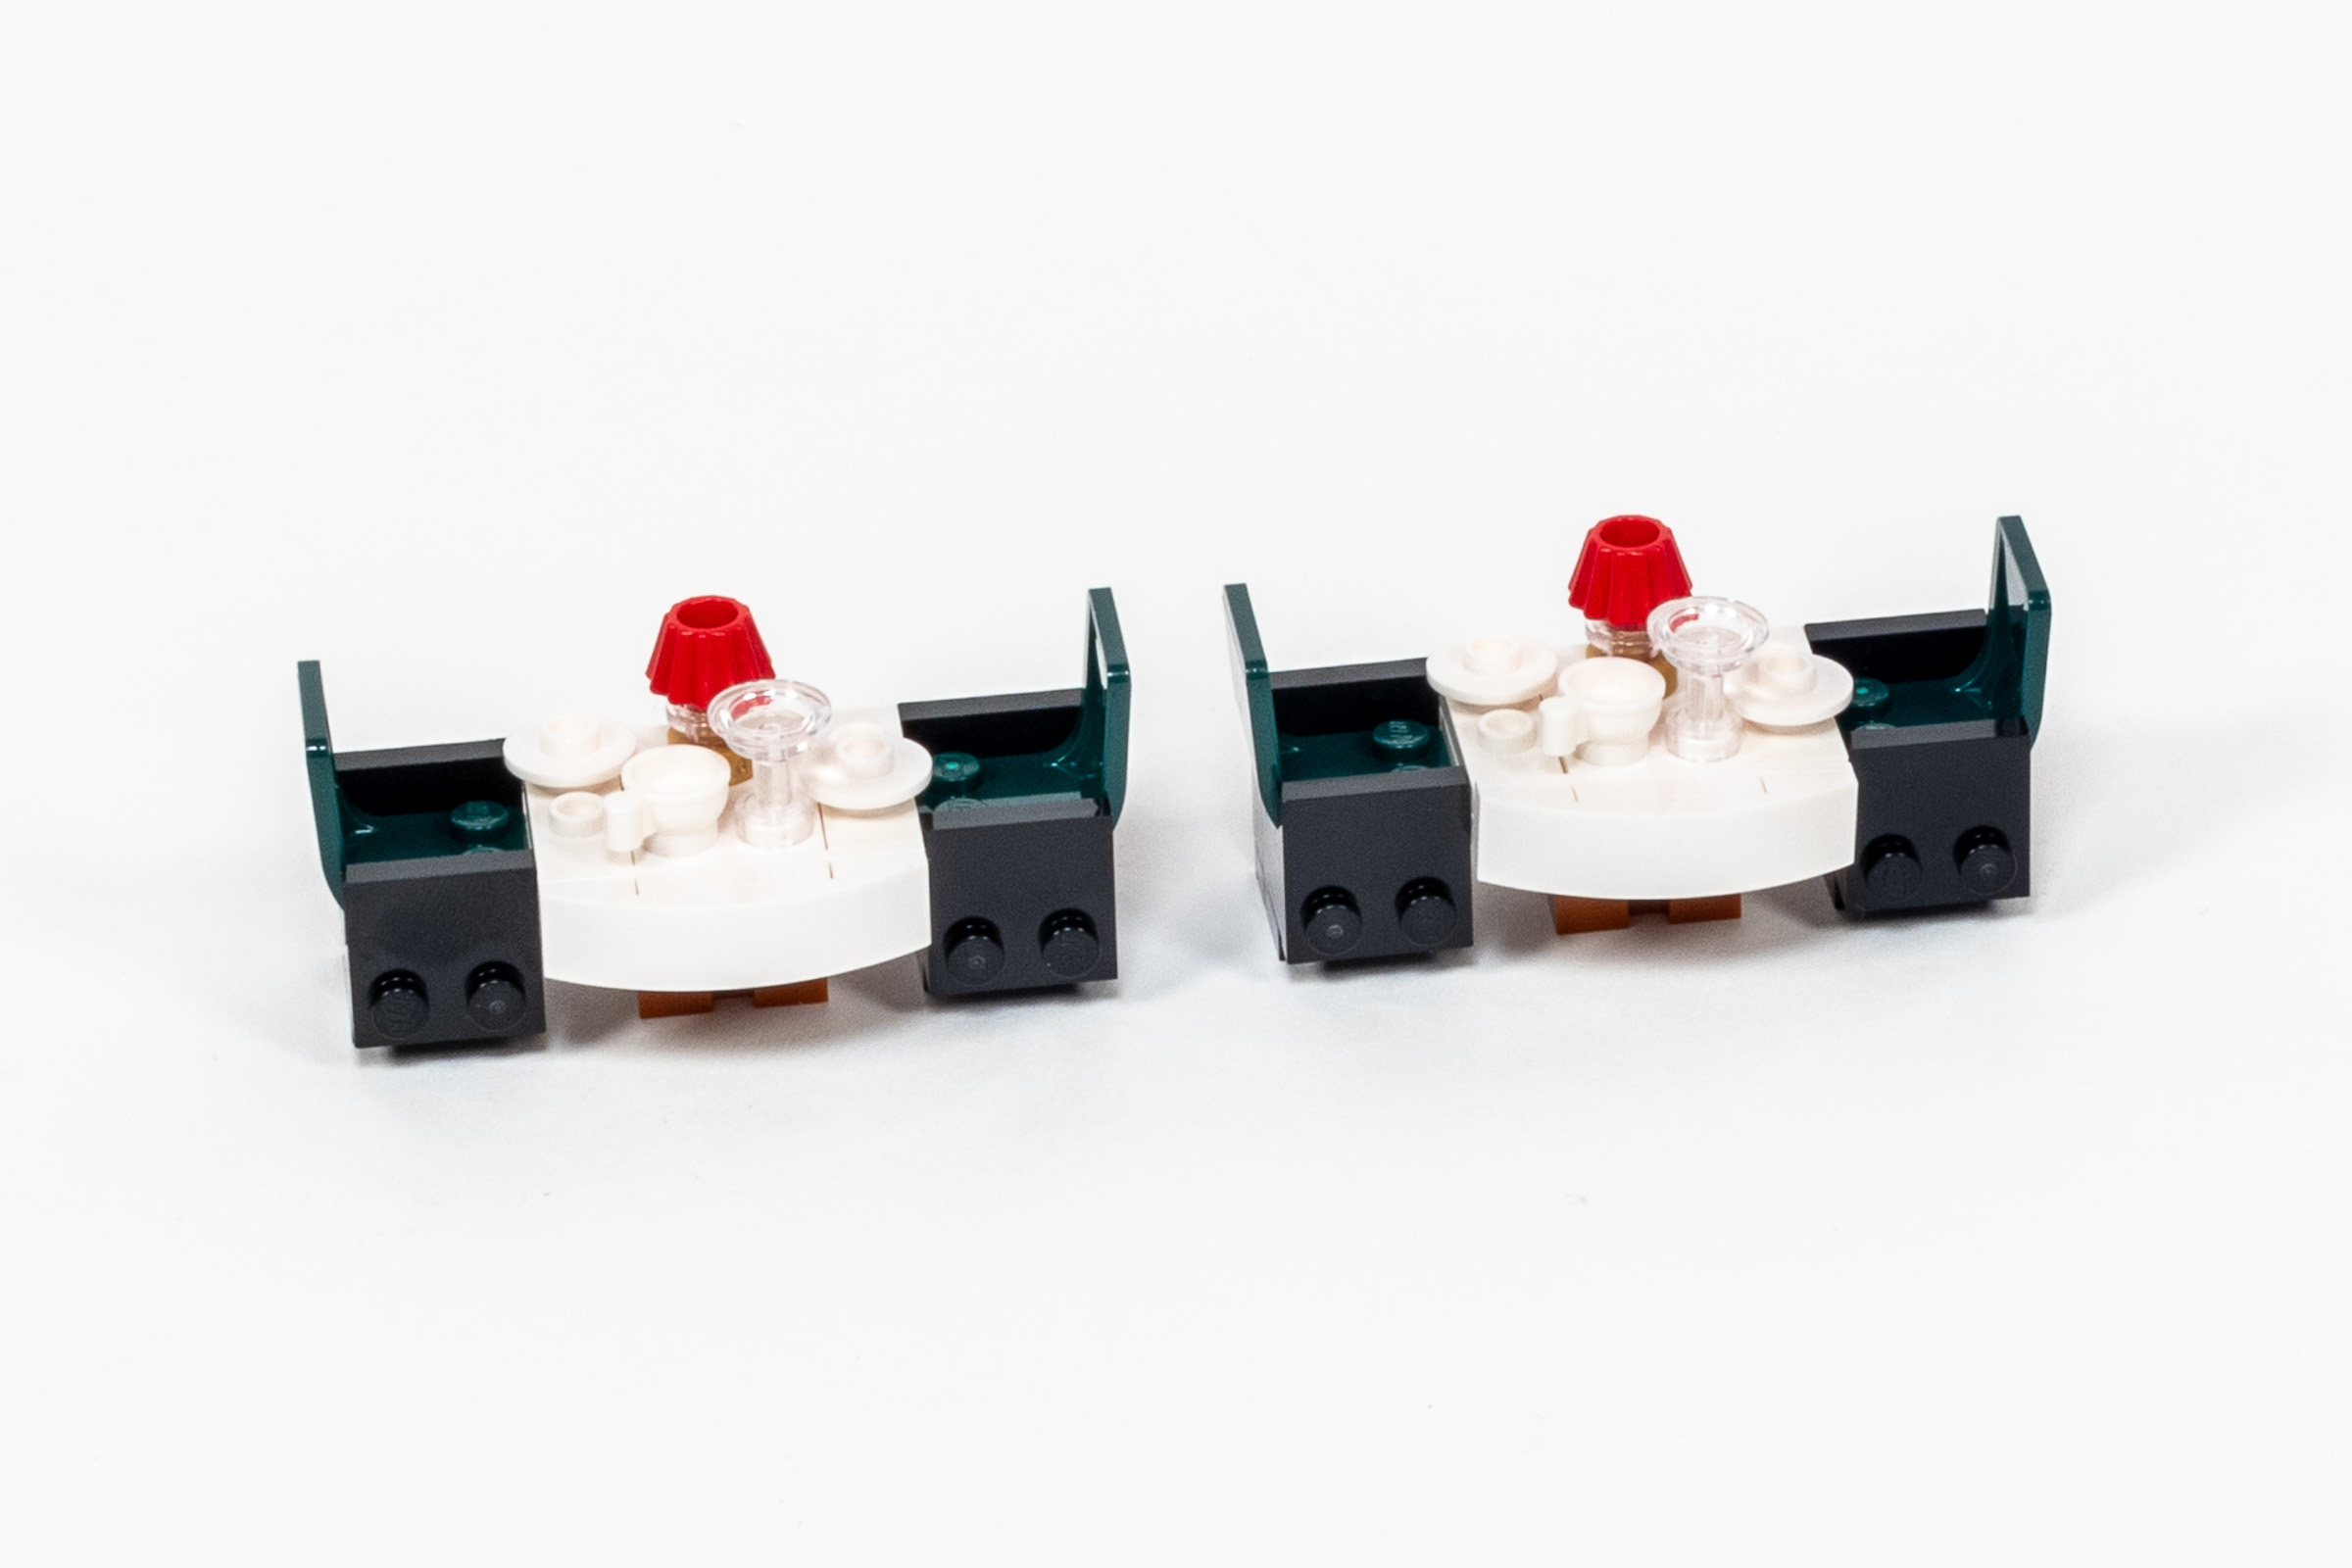
We add tables and chairs to the dining car in Bag 6.
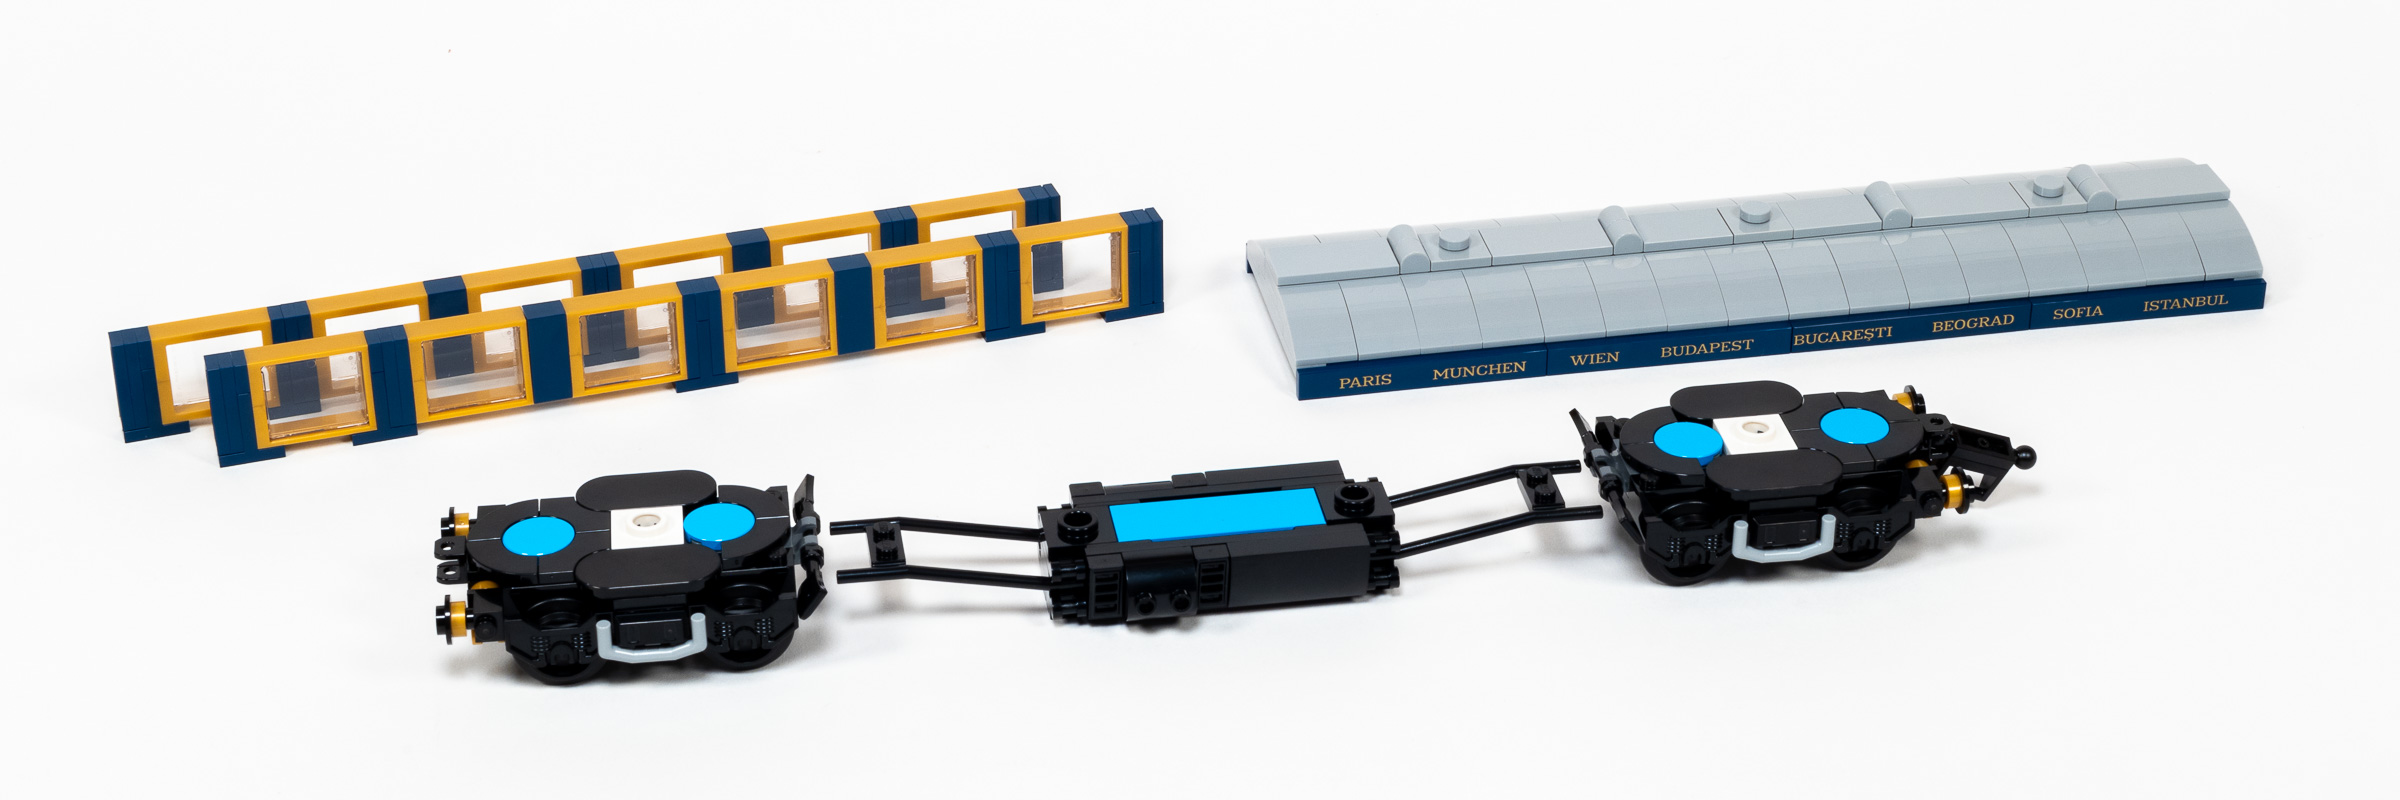
We build just two sub-assemblies in Bag 7 – for the windows on either side of the train car. What I like is that this entire assembly is built sideways, using a brand new SNOT element to good effect to lock it in place inbetween every other window. The evenly spaced 297Warm GoldPearl Gold windows look great.
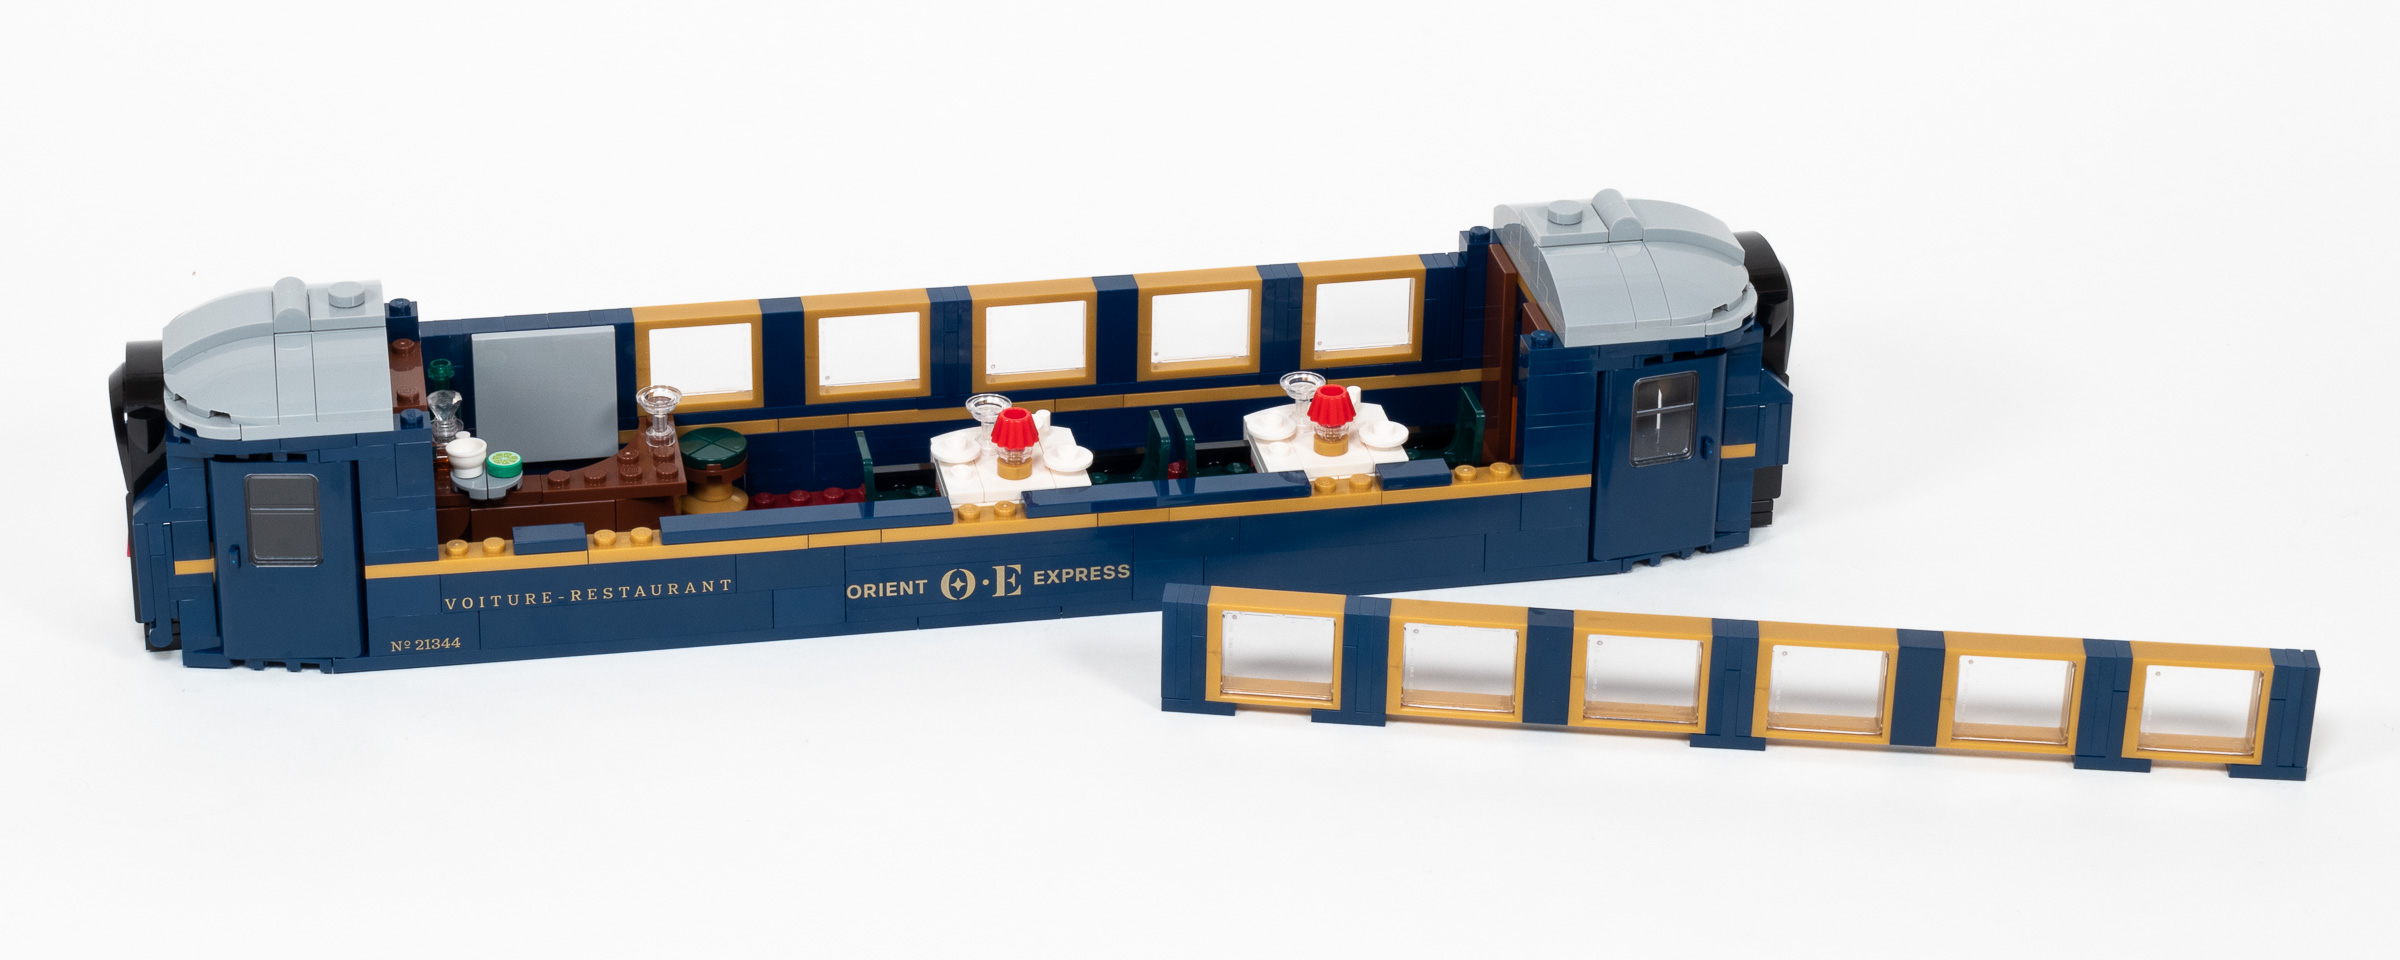
adding the window assemblies in Bag 7.
The roof is a single large assembly that we build in Bag 8. It can be removed easily to access the interior of the carriage. As someone who detests stickers but doesn’t mind printed parts, I am extremely pleased to see that all of the exterior decoration of the train so far is achieved using LEGO Elements or printed parts. The 8 destinations listed along the top edge are printed on four 1×8 Tiles.
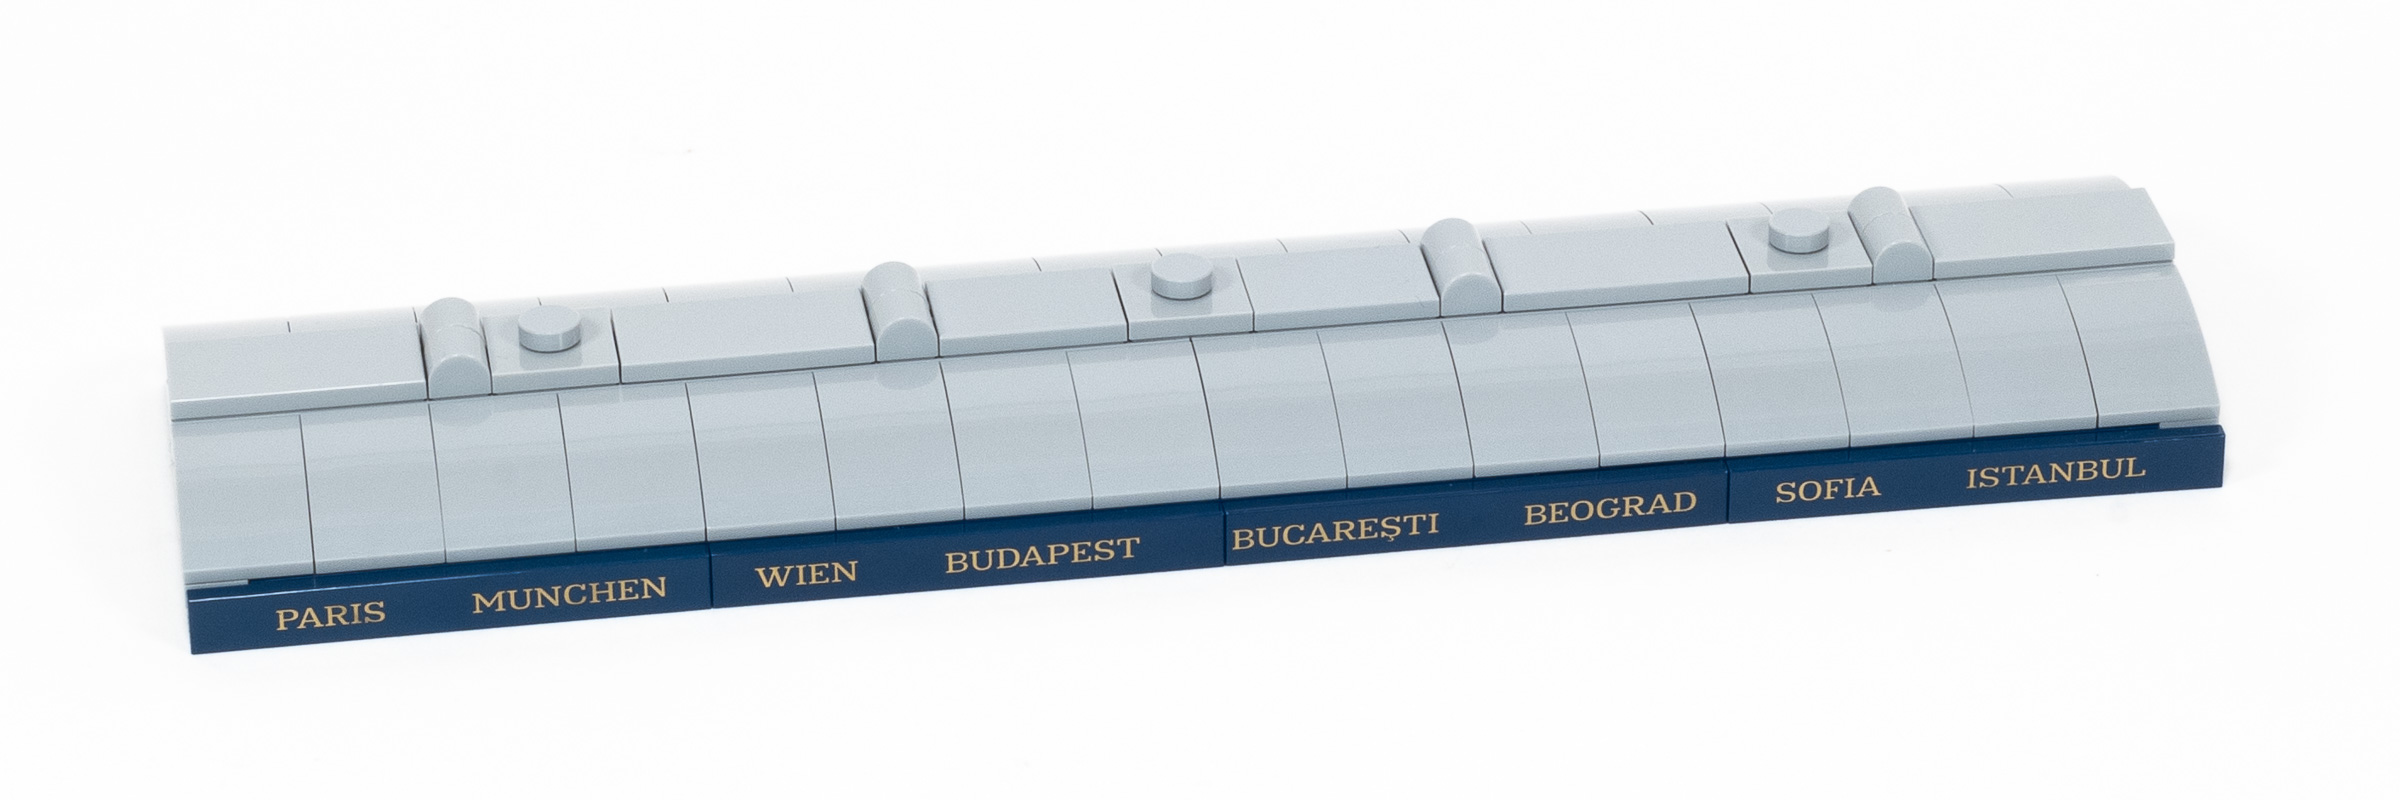
The roof assembly contains the names of eight cities on the route.
It’s finally time to assemble the trucks (or bogies) which house the wheels in Bag 9, marking the completion of our first carriage. We build two identical, and very intricate assemblies. About half of the effort goes into making them strong and covering the top with smooth tiles so the train is able to turn, while the rest of the effort goes into some intricate detailing.
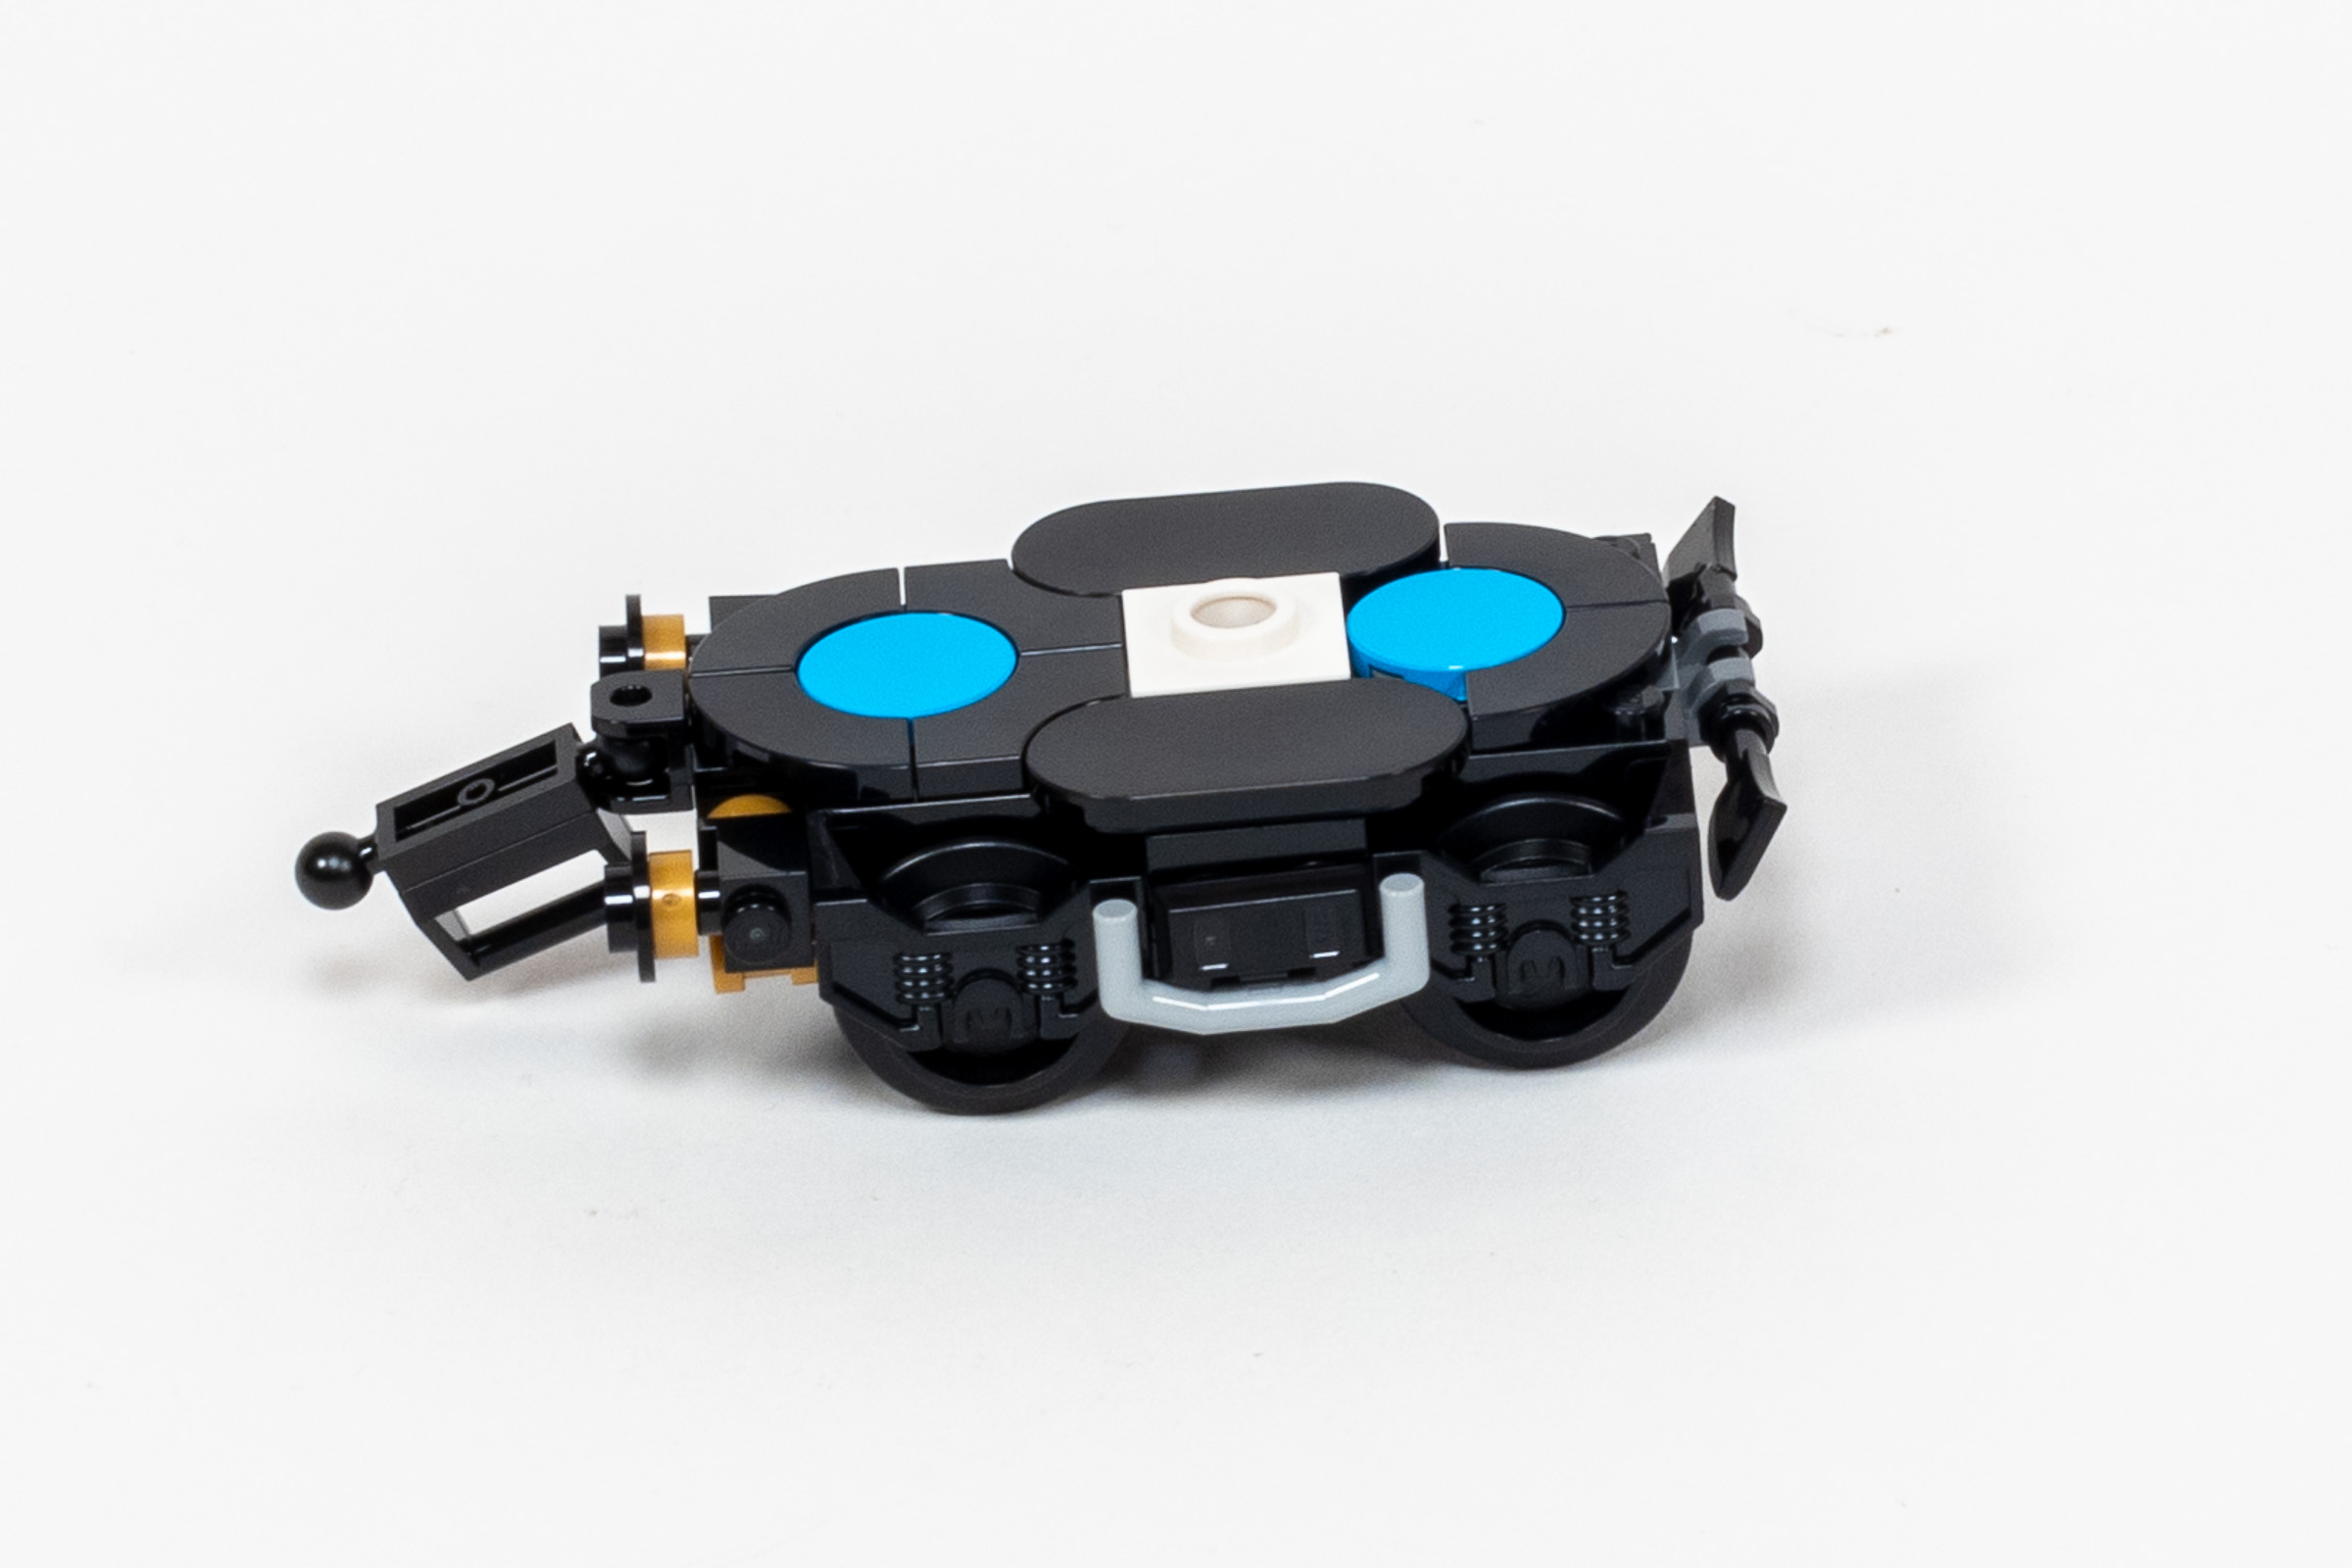
The trucks are intricately detailed and use clever building techniques.
Two of the more interesting parts usages include the Saucer (part 38799) used as a bumper facing towards the next car, and the use of Meat Cleavers (part 79811) to achieve a nice angled detail on the other side. While they are barely noticeable in the completed car, the attention to detail reinforces the high level of craftsmanship that went into the design of this set.
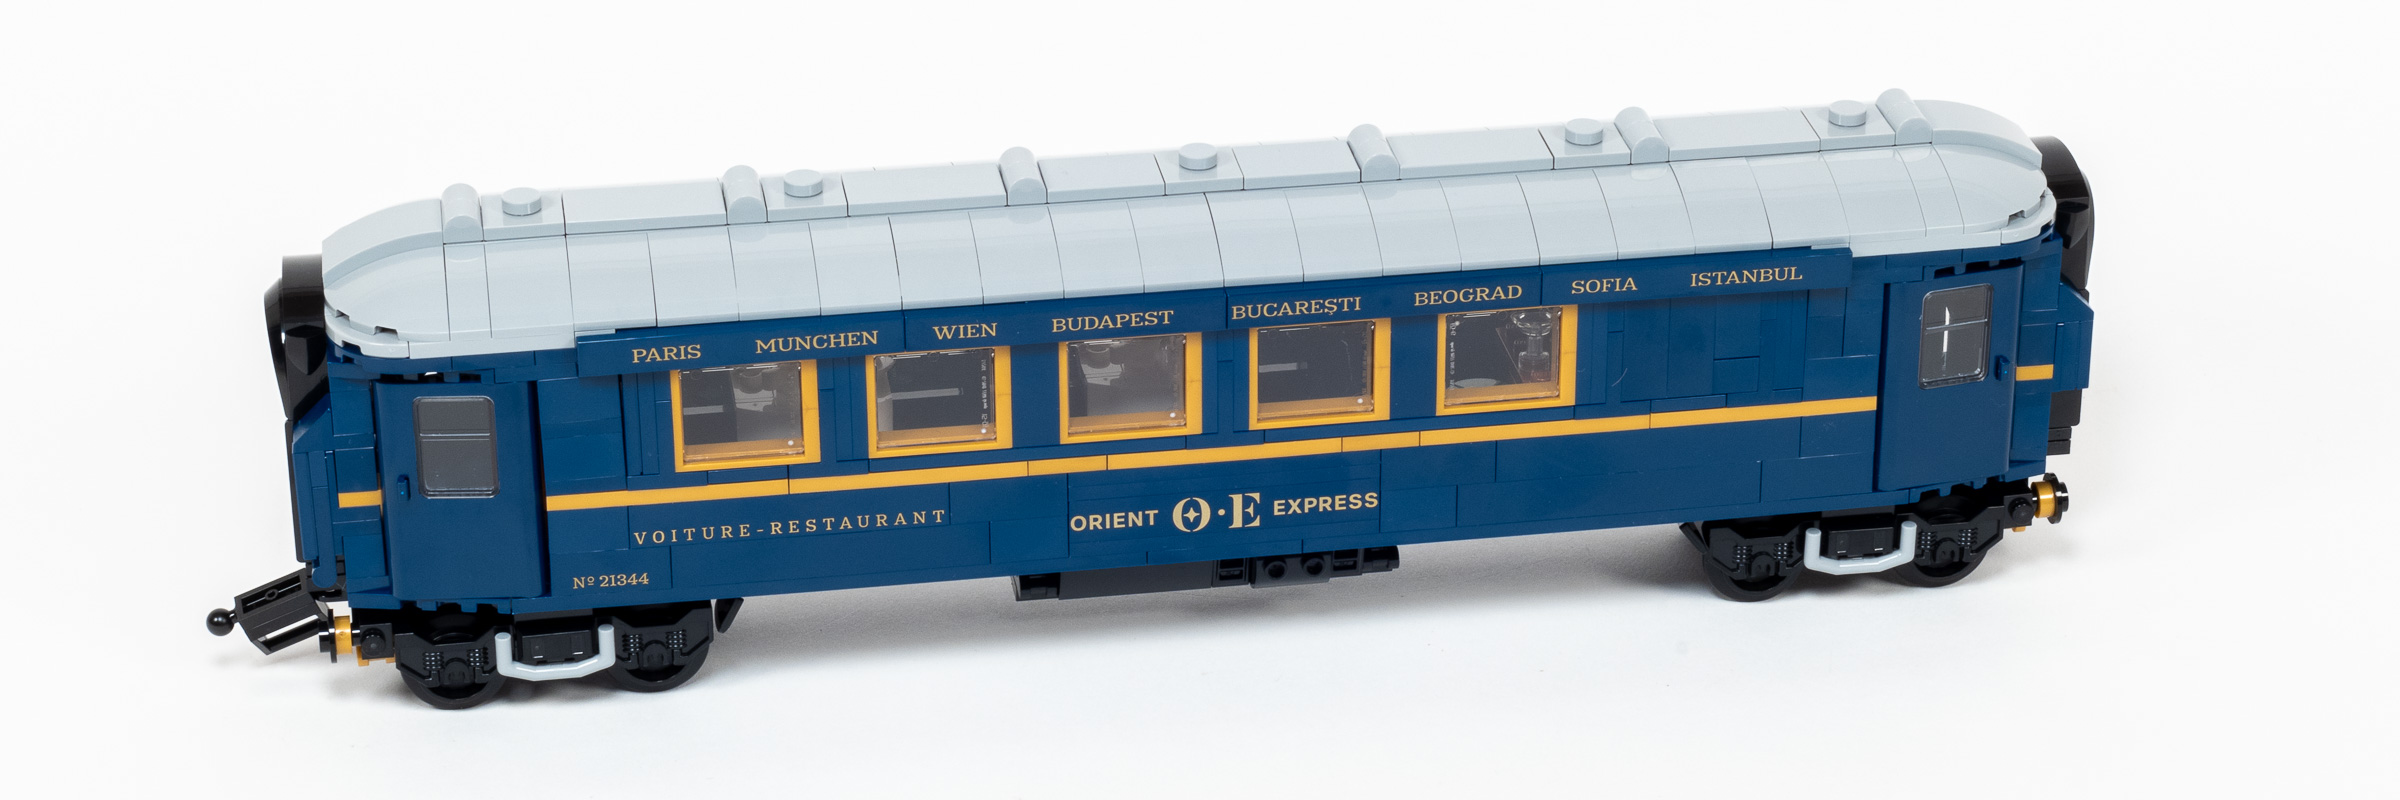
The dining car is complete!
Build time: 71 minutes. (Bag 3: 9 minutes, Bag 4: 13 minutes, Bag 5: 6 minutes, Bag 6: 11 minutes, Bag 7: 9 minutes, Bag 8: 9 minutes, Bag 9: 14 minutes.)
Bags 10-16: Sleeper Car
In Bag 10, we build the foundation for the second carriage which is almost the same as the first one. We can already see a different interior layout featuring an intricate tile floor that utilizes the new 2×2 Tile w/ 2 cutouts (part 3395). It has the same printed pattern as the first one, except this one reads “Lits” (“Beds”) to indicate that it is a sleeper car. We also build a small cart and luggage.
Sleeper Car base and Luggage Cart.
As in the previous carriage, Bag 11 continue with the two sets of walls on both ends of the car. Moving on to Bag 12, we add the four doors and the curved roof assemblies on both ends of the train.
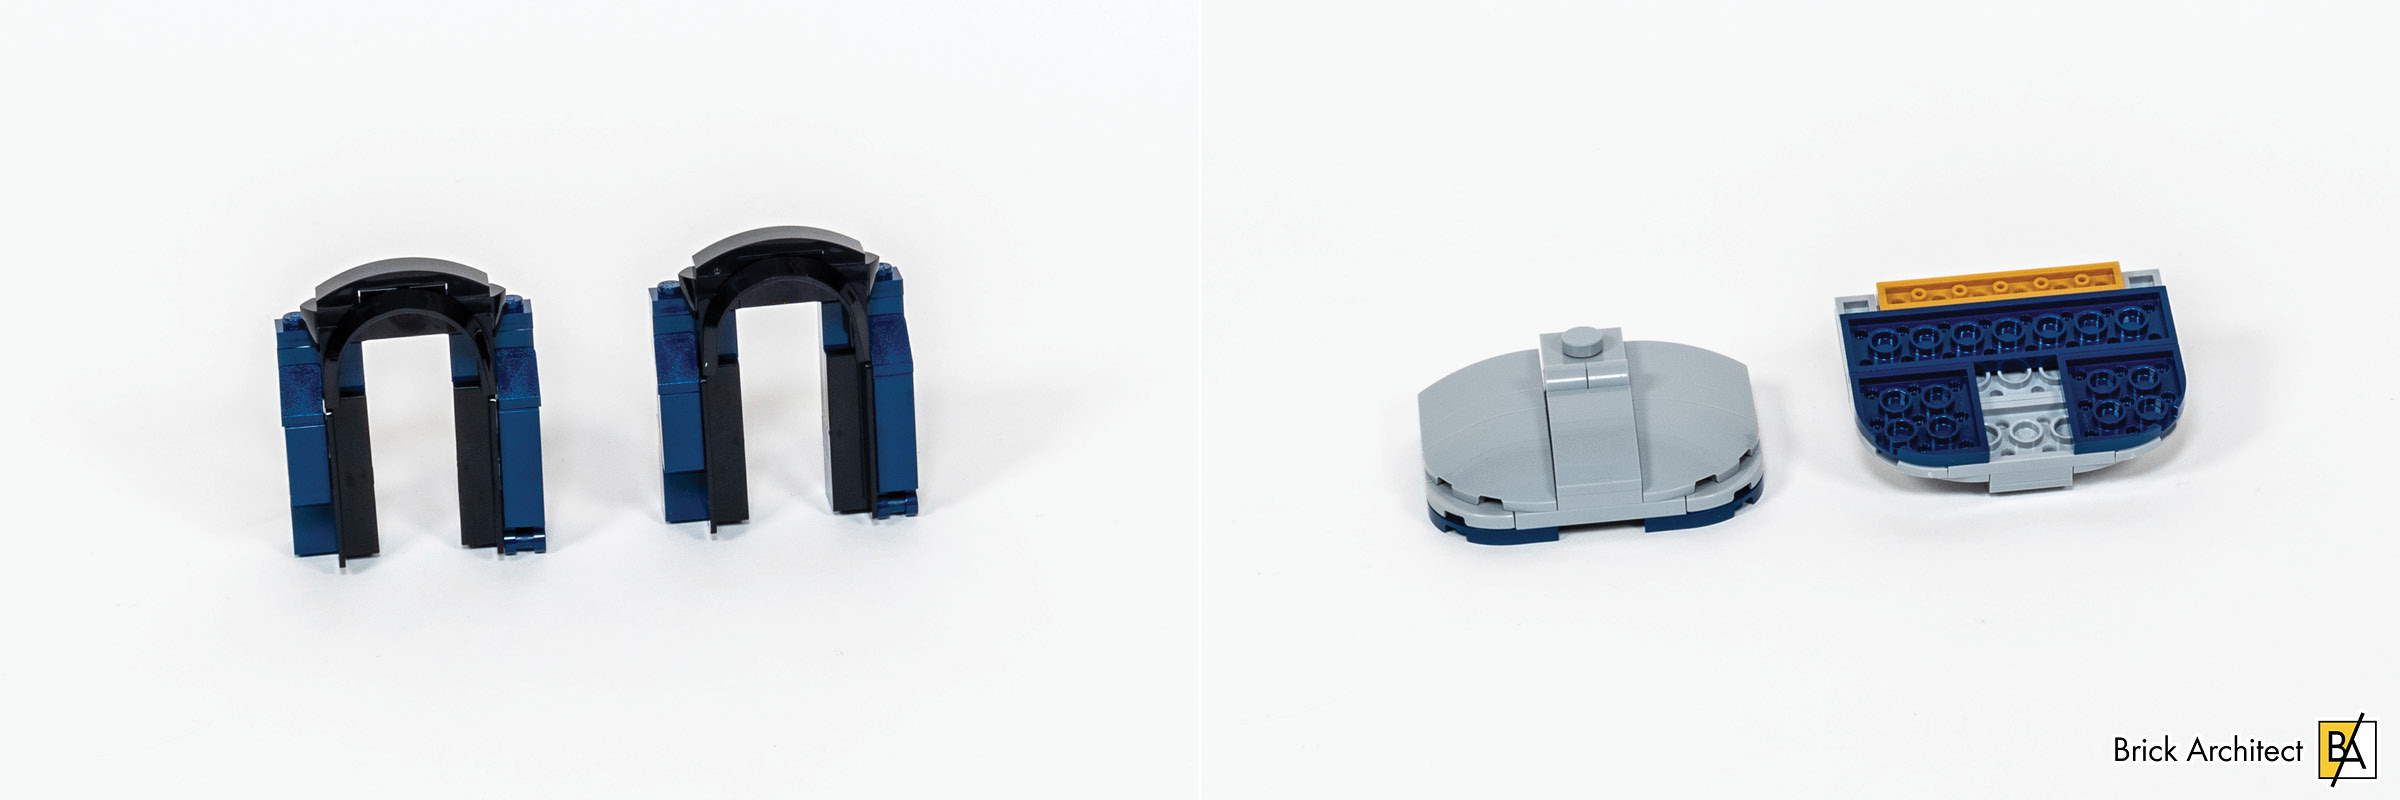
Door end assemblies in Bag 11 (left) and curved roof assemblies in Bag 12 (right).
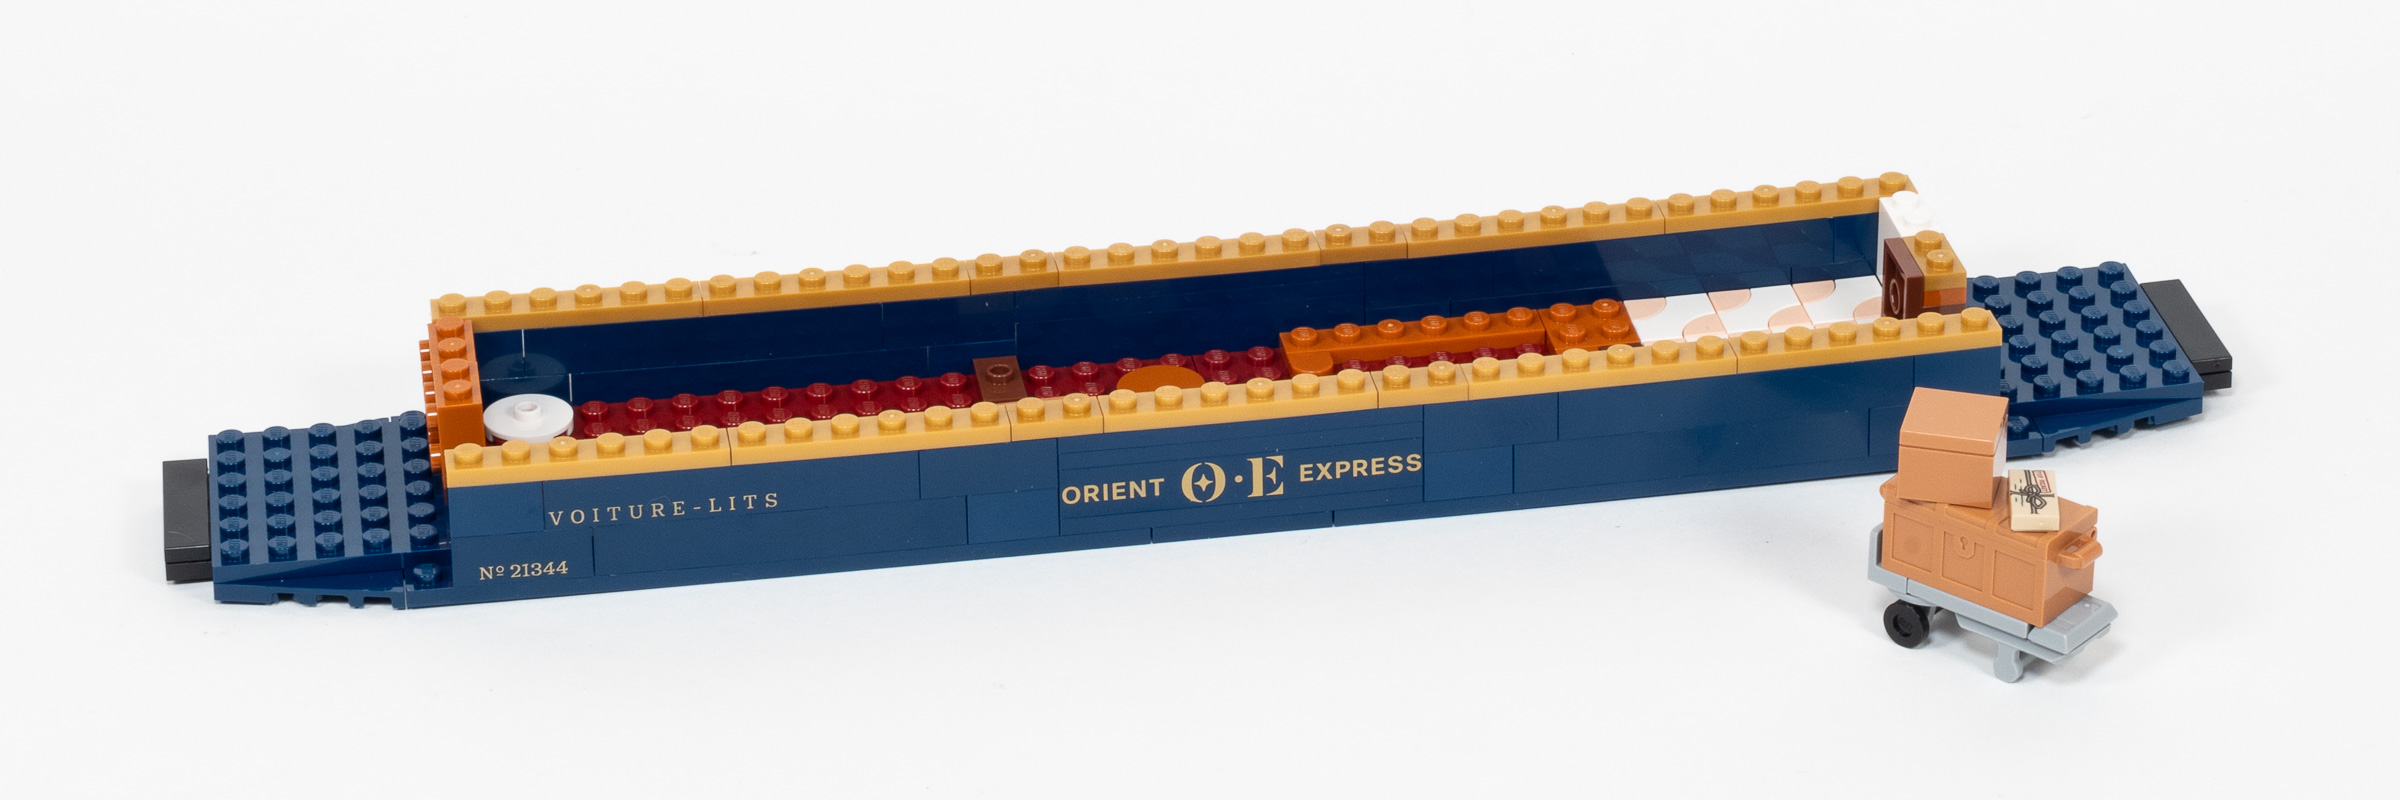
Bag 13 is completely different from the first carriage because it is when we fill the sleeper car with two distinct areas, a small economy room with bunks, and a large opulent room with a big bed, couch, typewriter, and fancy bathroom. My only critique is that there is no hallway to get from one of the cabins to the dining car. I think they could have made the smaller room even smaller by having a narrow corridor, while allowing the ‘Presidential Suite’ to occupy the full width of the car. In this configuration, you would just ensure that the fancy room is always the last car on the train.
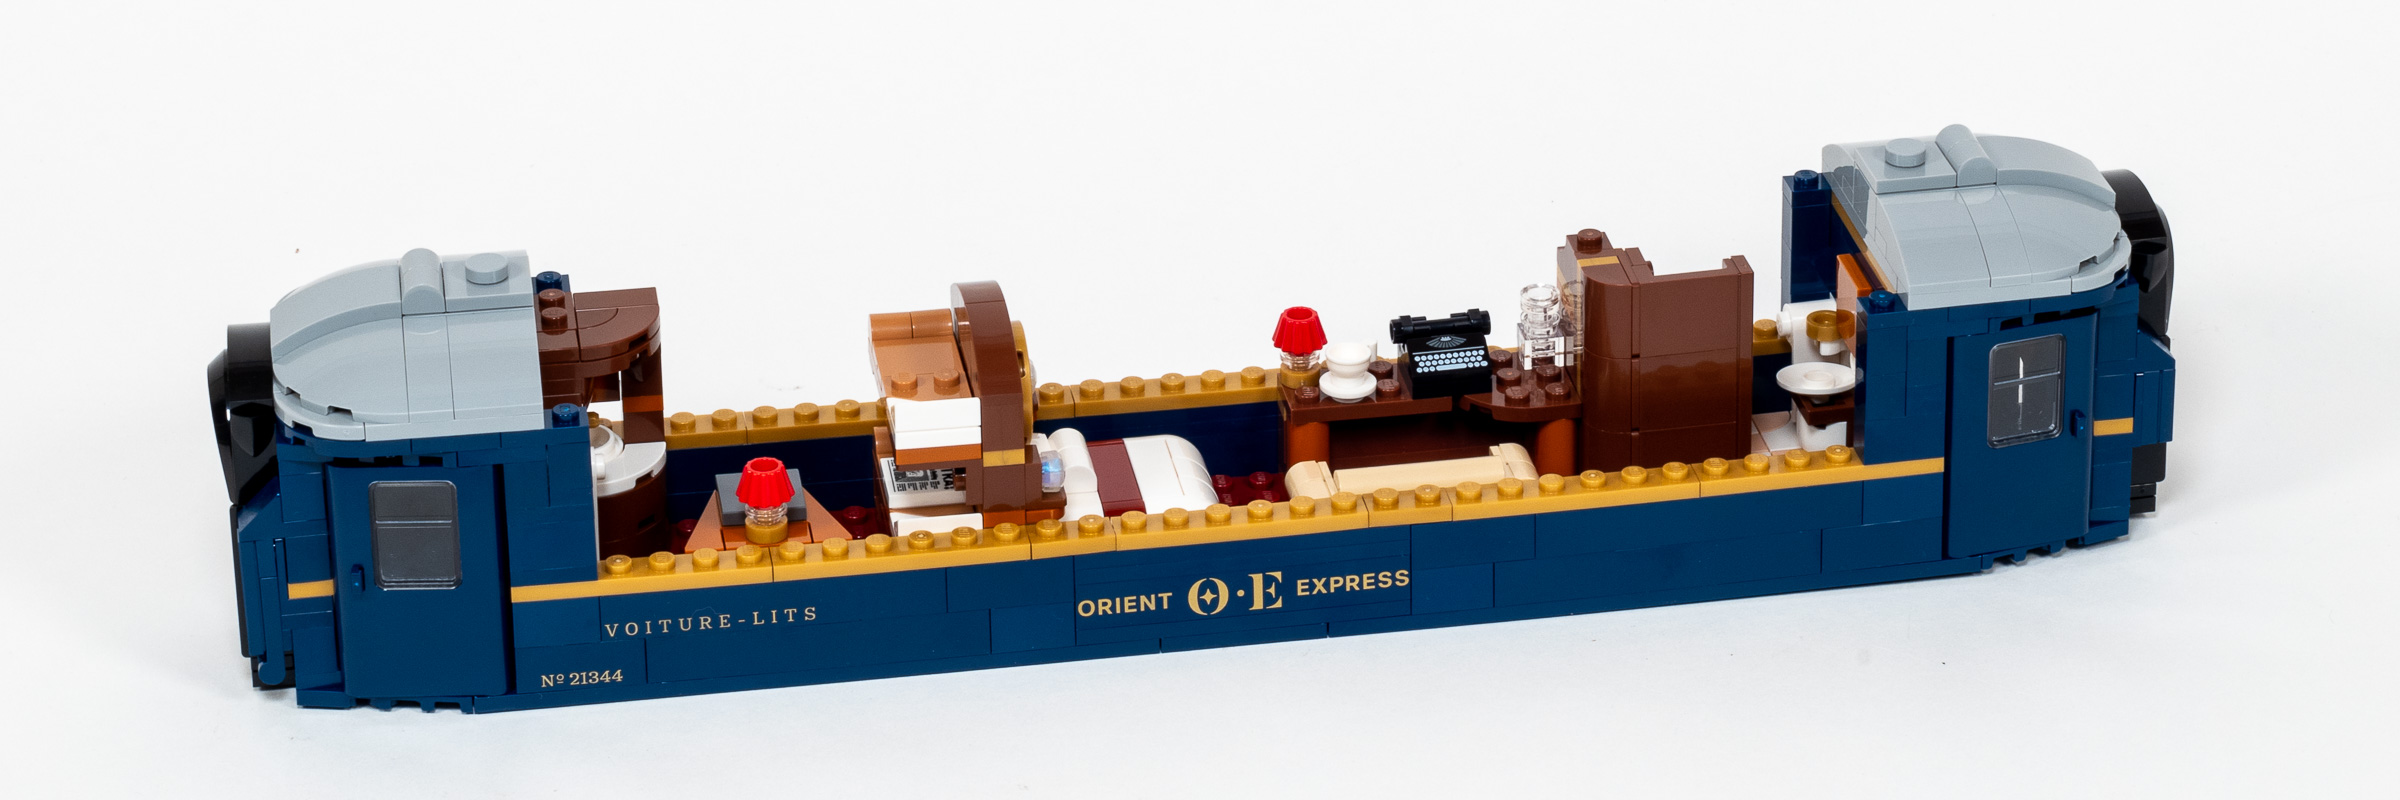
A small room with bunk beds on the left, and a glamorous suite on the right side of the car.
There isn’t much to say about Bags 14-16 that we didn’t cover in the first carriage, since they are basically the same process. First we build the Window assemblies, then the roof, and finally the trucks. The finished result is elegant and nearly identical to the first car.
The various sub-assemblies completed in Bags 14-16.
Build time: 80 minutes. (Bag 10: 12 minutes, Bag 11: 12 minutes, Bag 12: 8 minutes, Bag 13: 17 minutes, Bag 14: 9 minutes, Bag 15: 9 minutes, Bag 16: 13 minutes.)
Bags 17-18: Hopper
Bag 17 is quick, resulting in a small base for the hopper that rides behind the engine. One detail was confusing at first but makes sense in practice is how the central wheels are not attached with studs, but rather slotted into place so that they can slide slightly. This is needed to allow the train to go around a tight radius — clever!
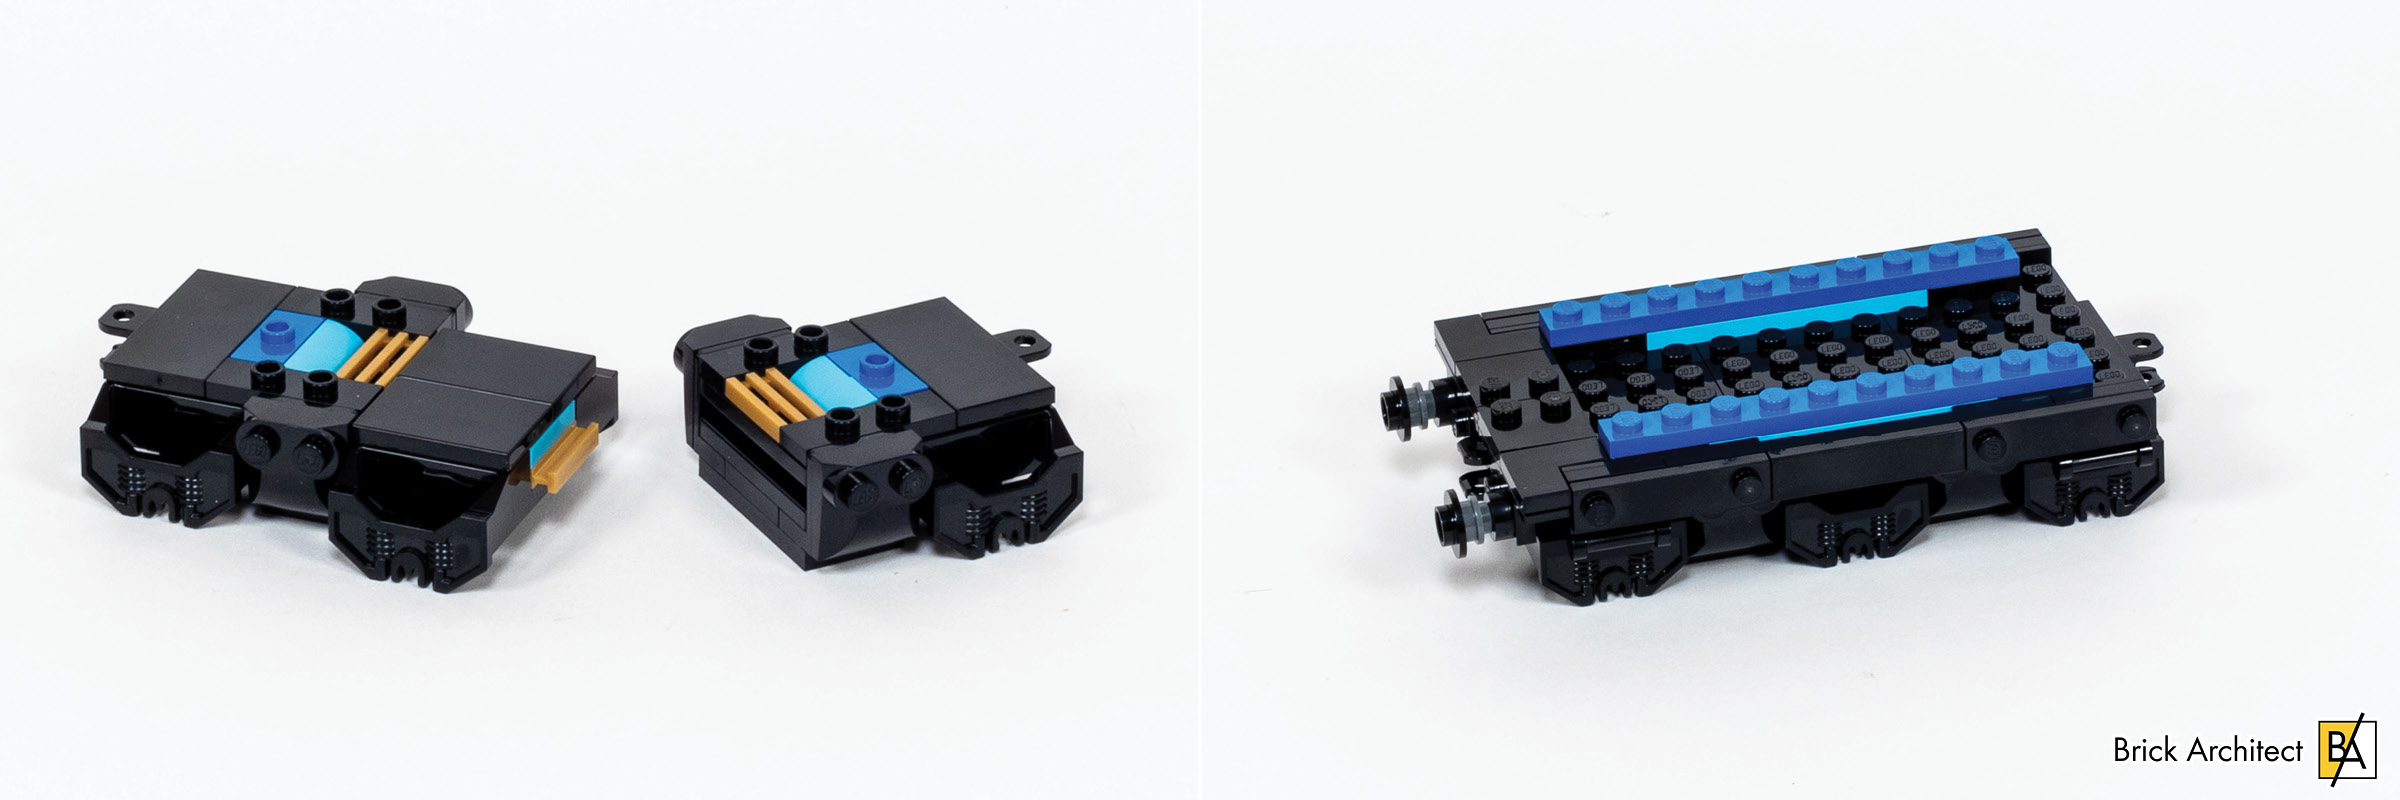
A module containing the middle wheels is designed to slide within grooves.
We finish the hopper car in Bag 18. While there aren’t any especially interesting techniques or part usage, I did get to use the new 4×8 Inverted Tile (part 83496) for the first time — there’s one with the smooth side facing outward on each side.
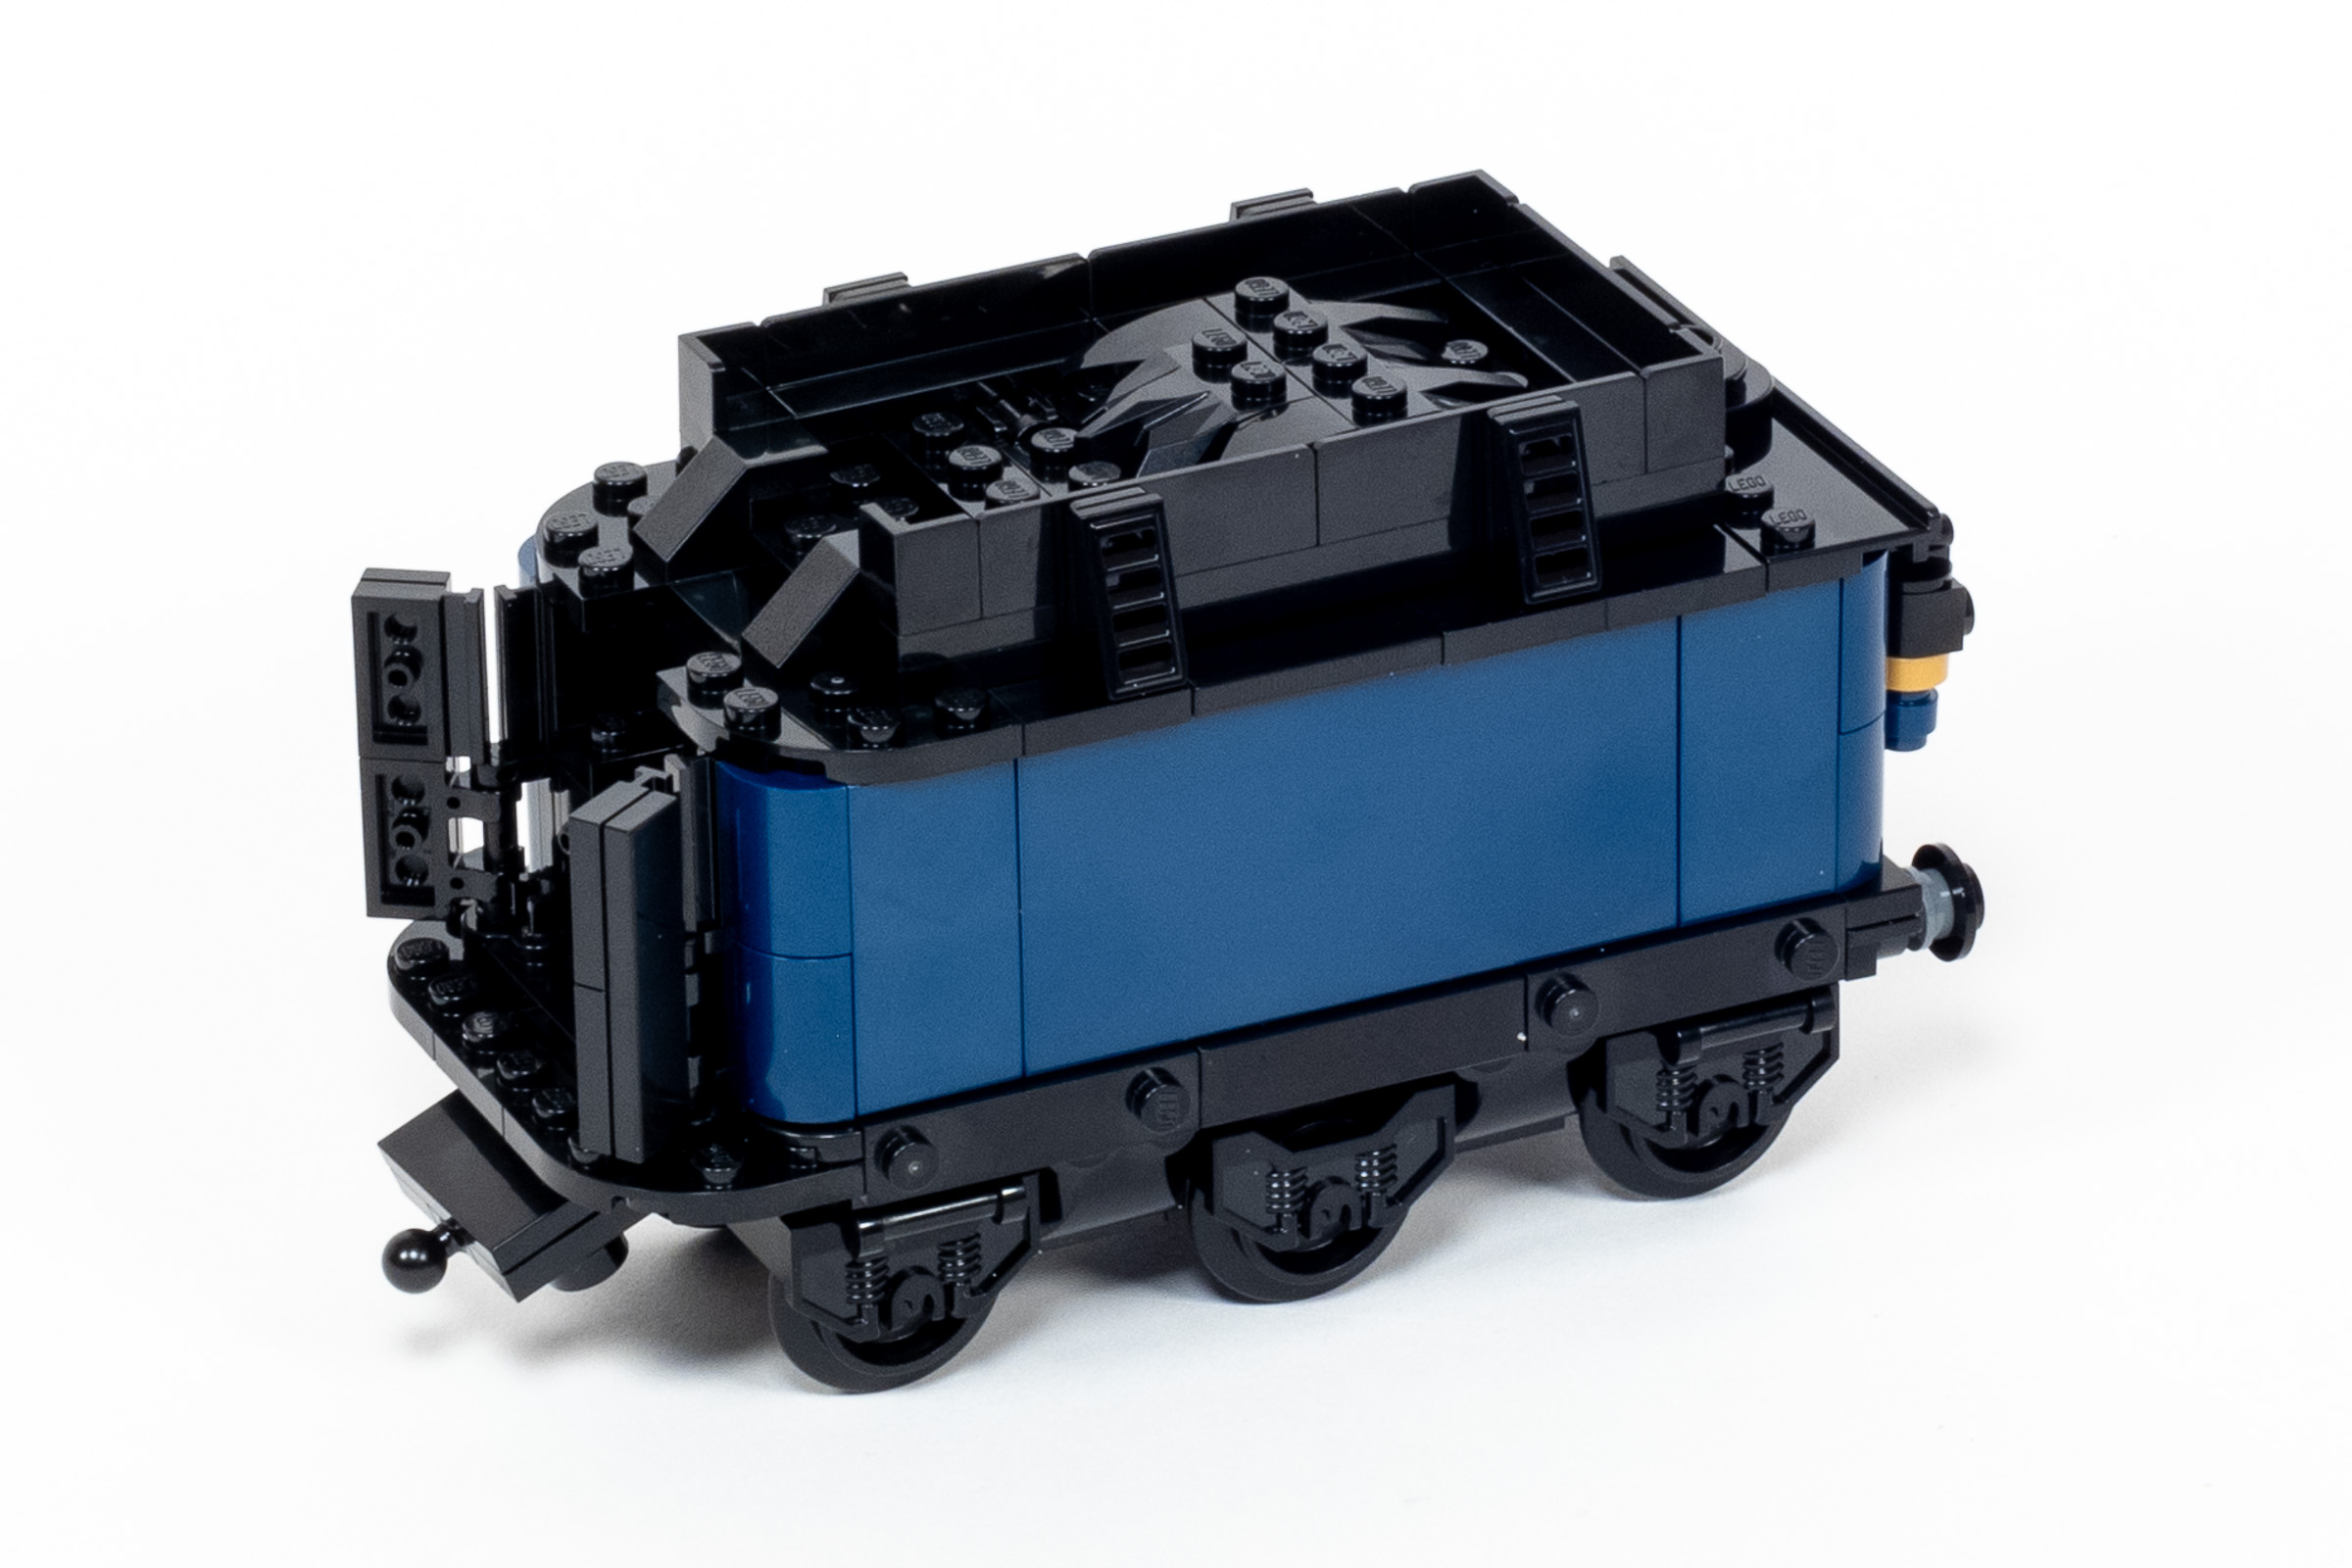
The completed hopper car.
Build time: 24 minutes. (Bag 17: 7 minutes, Bag 18: 17 minutes.)
Bags 19-23: Engine
The final module of this set is the steam engine. In Bag 19 we build a sturdy brick-built central assembly. Things are getting a lot more shapely in Bag 20. The bulk of the bricks are used to create a brightly colored central assembly with scatter of SNOT elements resulting in a bunch of studs facing outward. We also start to shape the front end of the train, which uses curved elements and slopes to create a rounded profile.
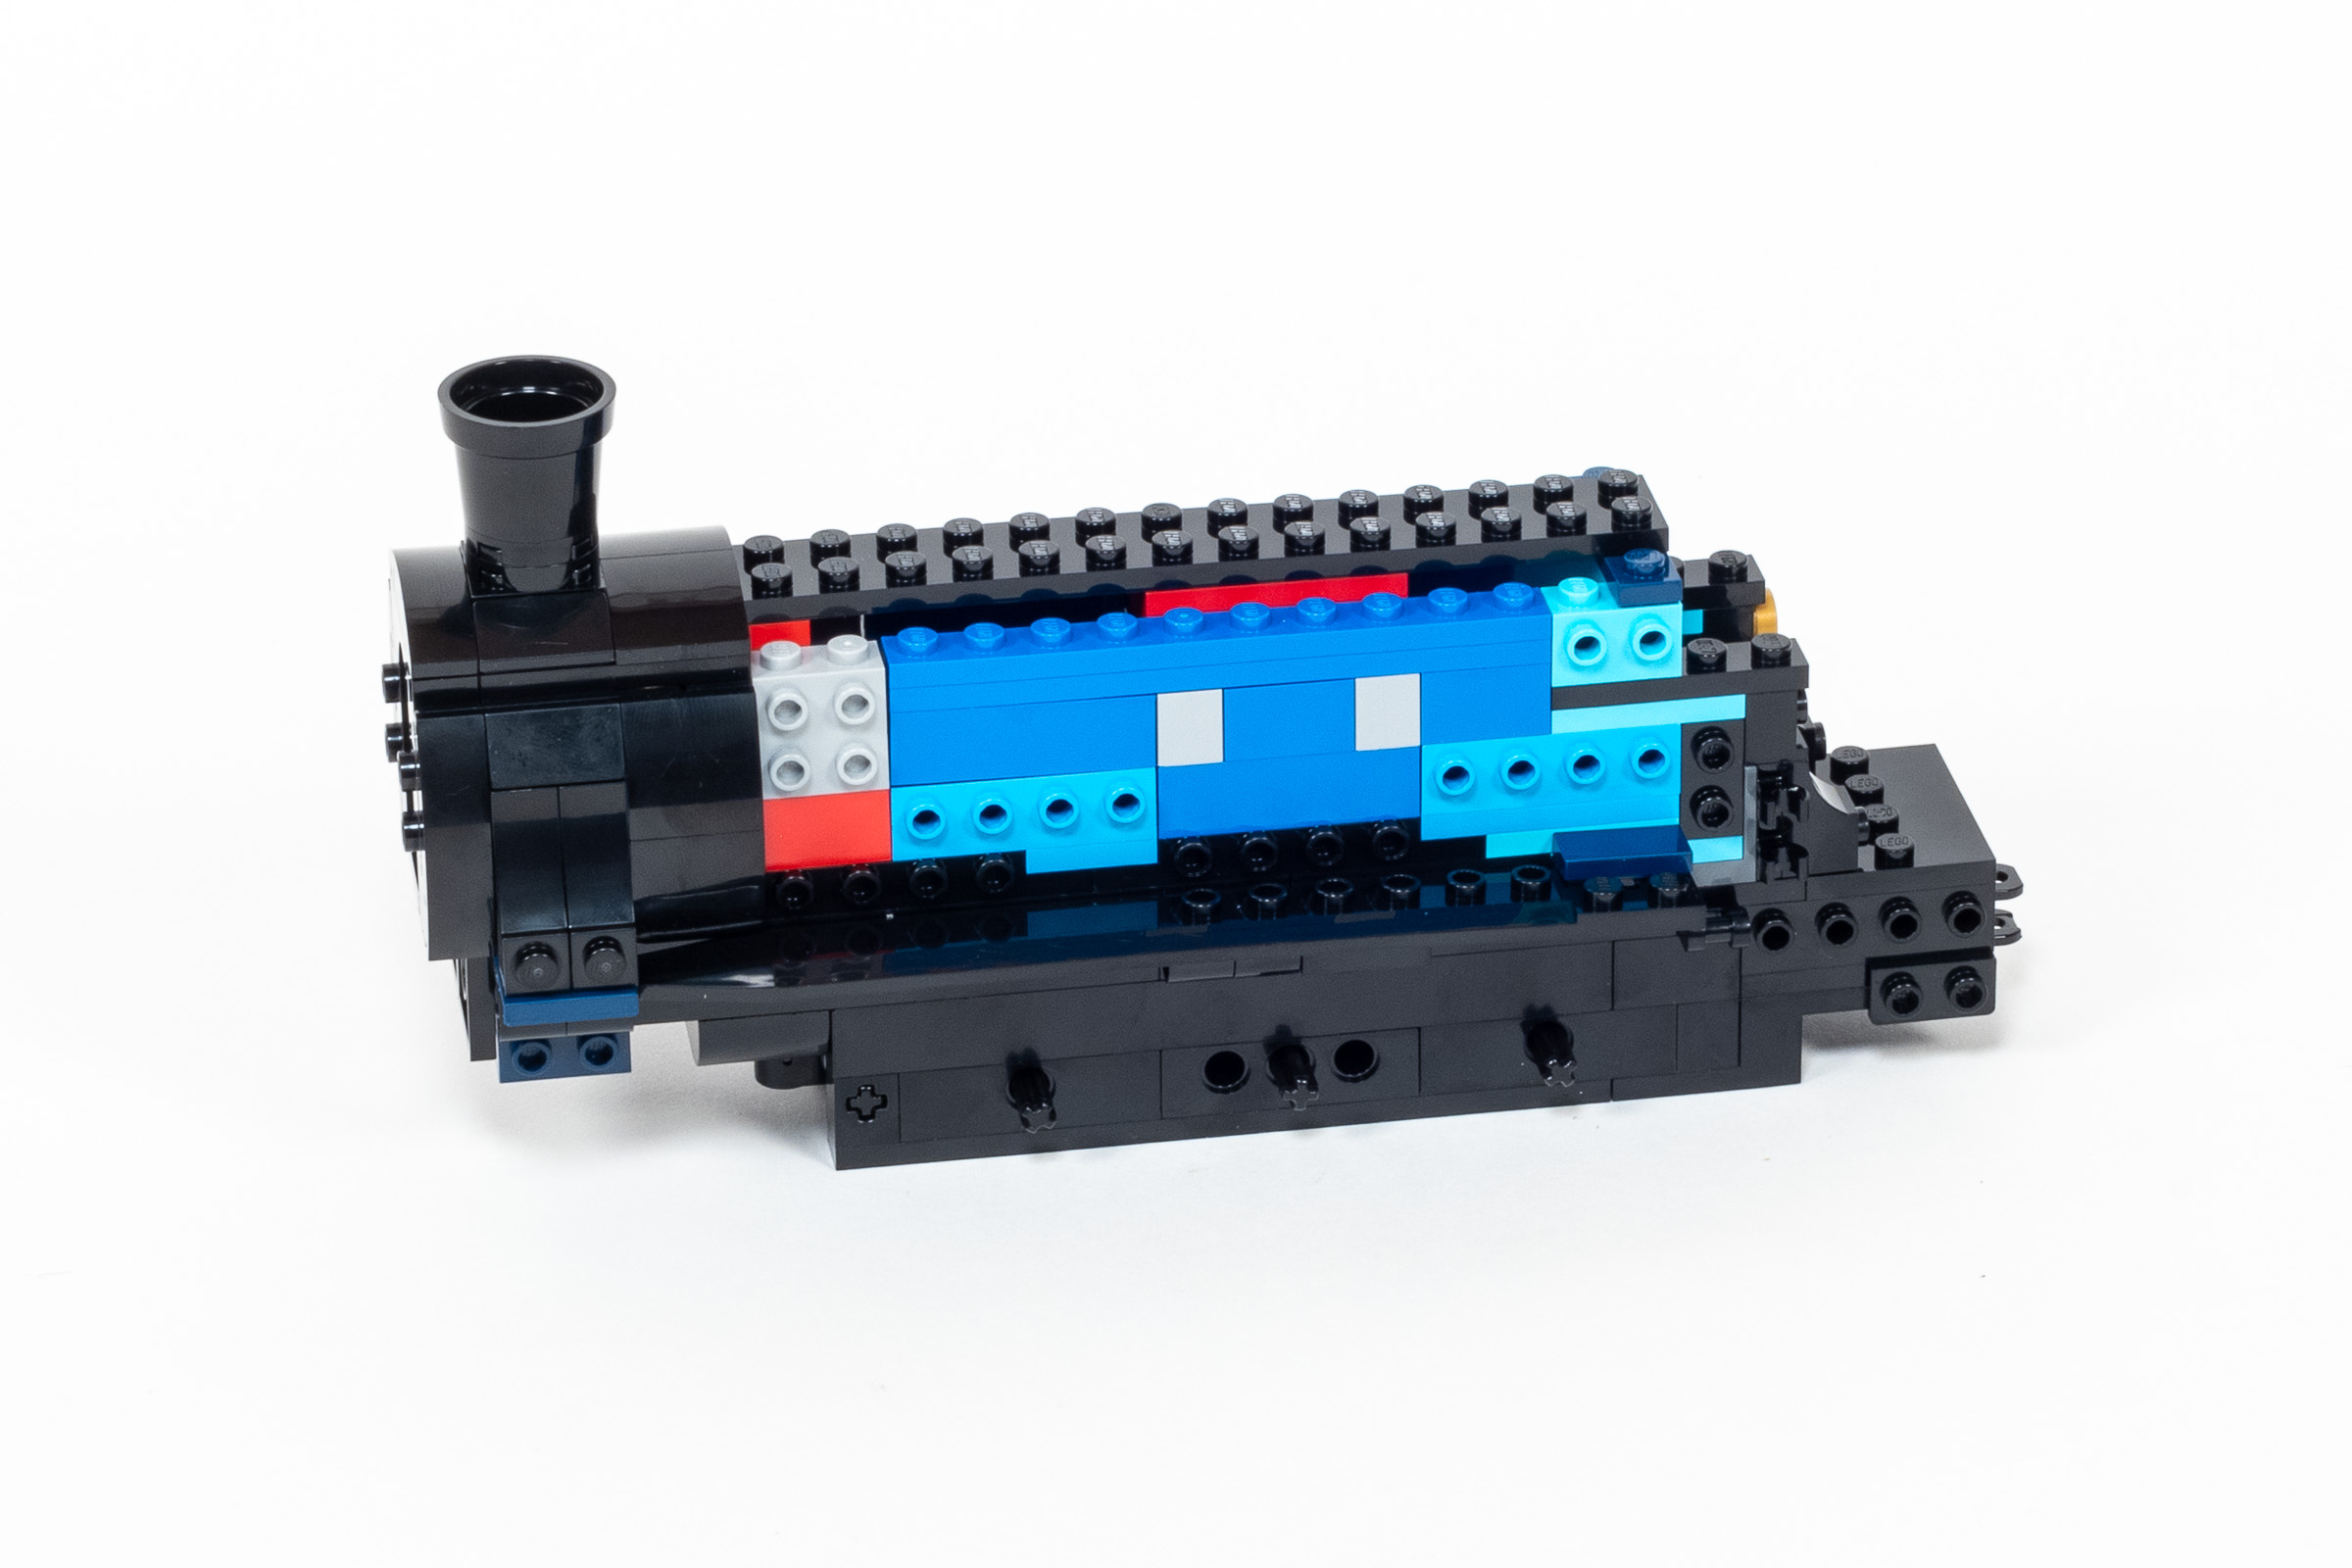
Central Assembly at the end of Bag 20.
Bag 21 is pretty sparse and only takes a few minutes to build. In this bag we continue the rounded profile, but switch from black to [dark blue] curves to give it the iconic tubular shape of most steam engines. There’s a really clever part usage for the two dark blue boiler tops, which I will leave for you to discover on your own.
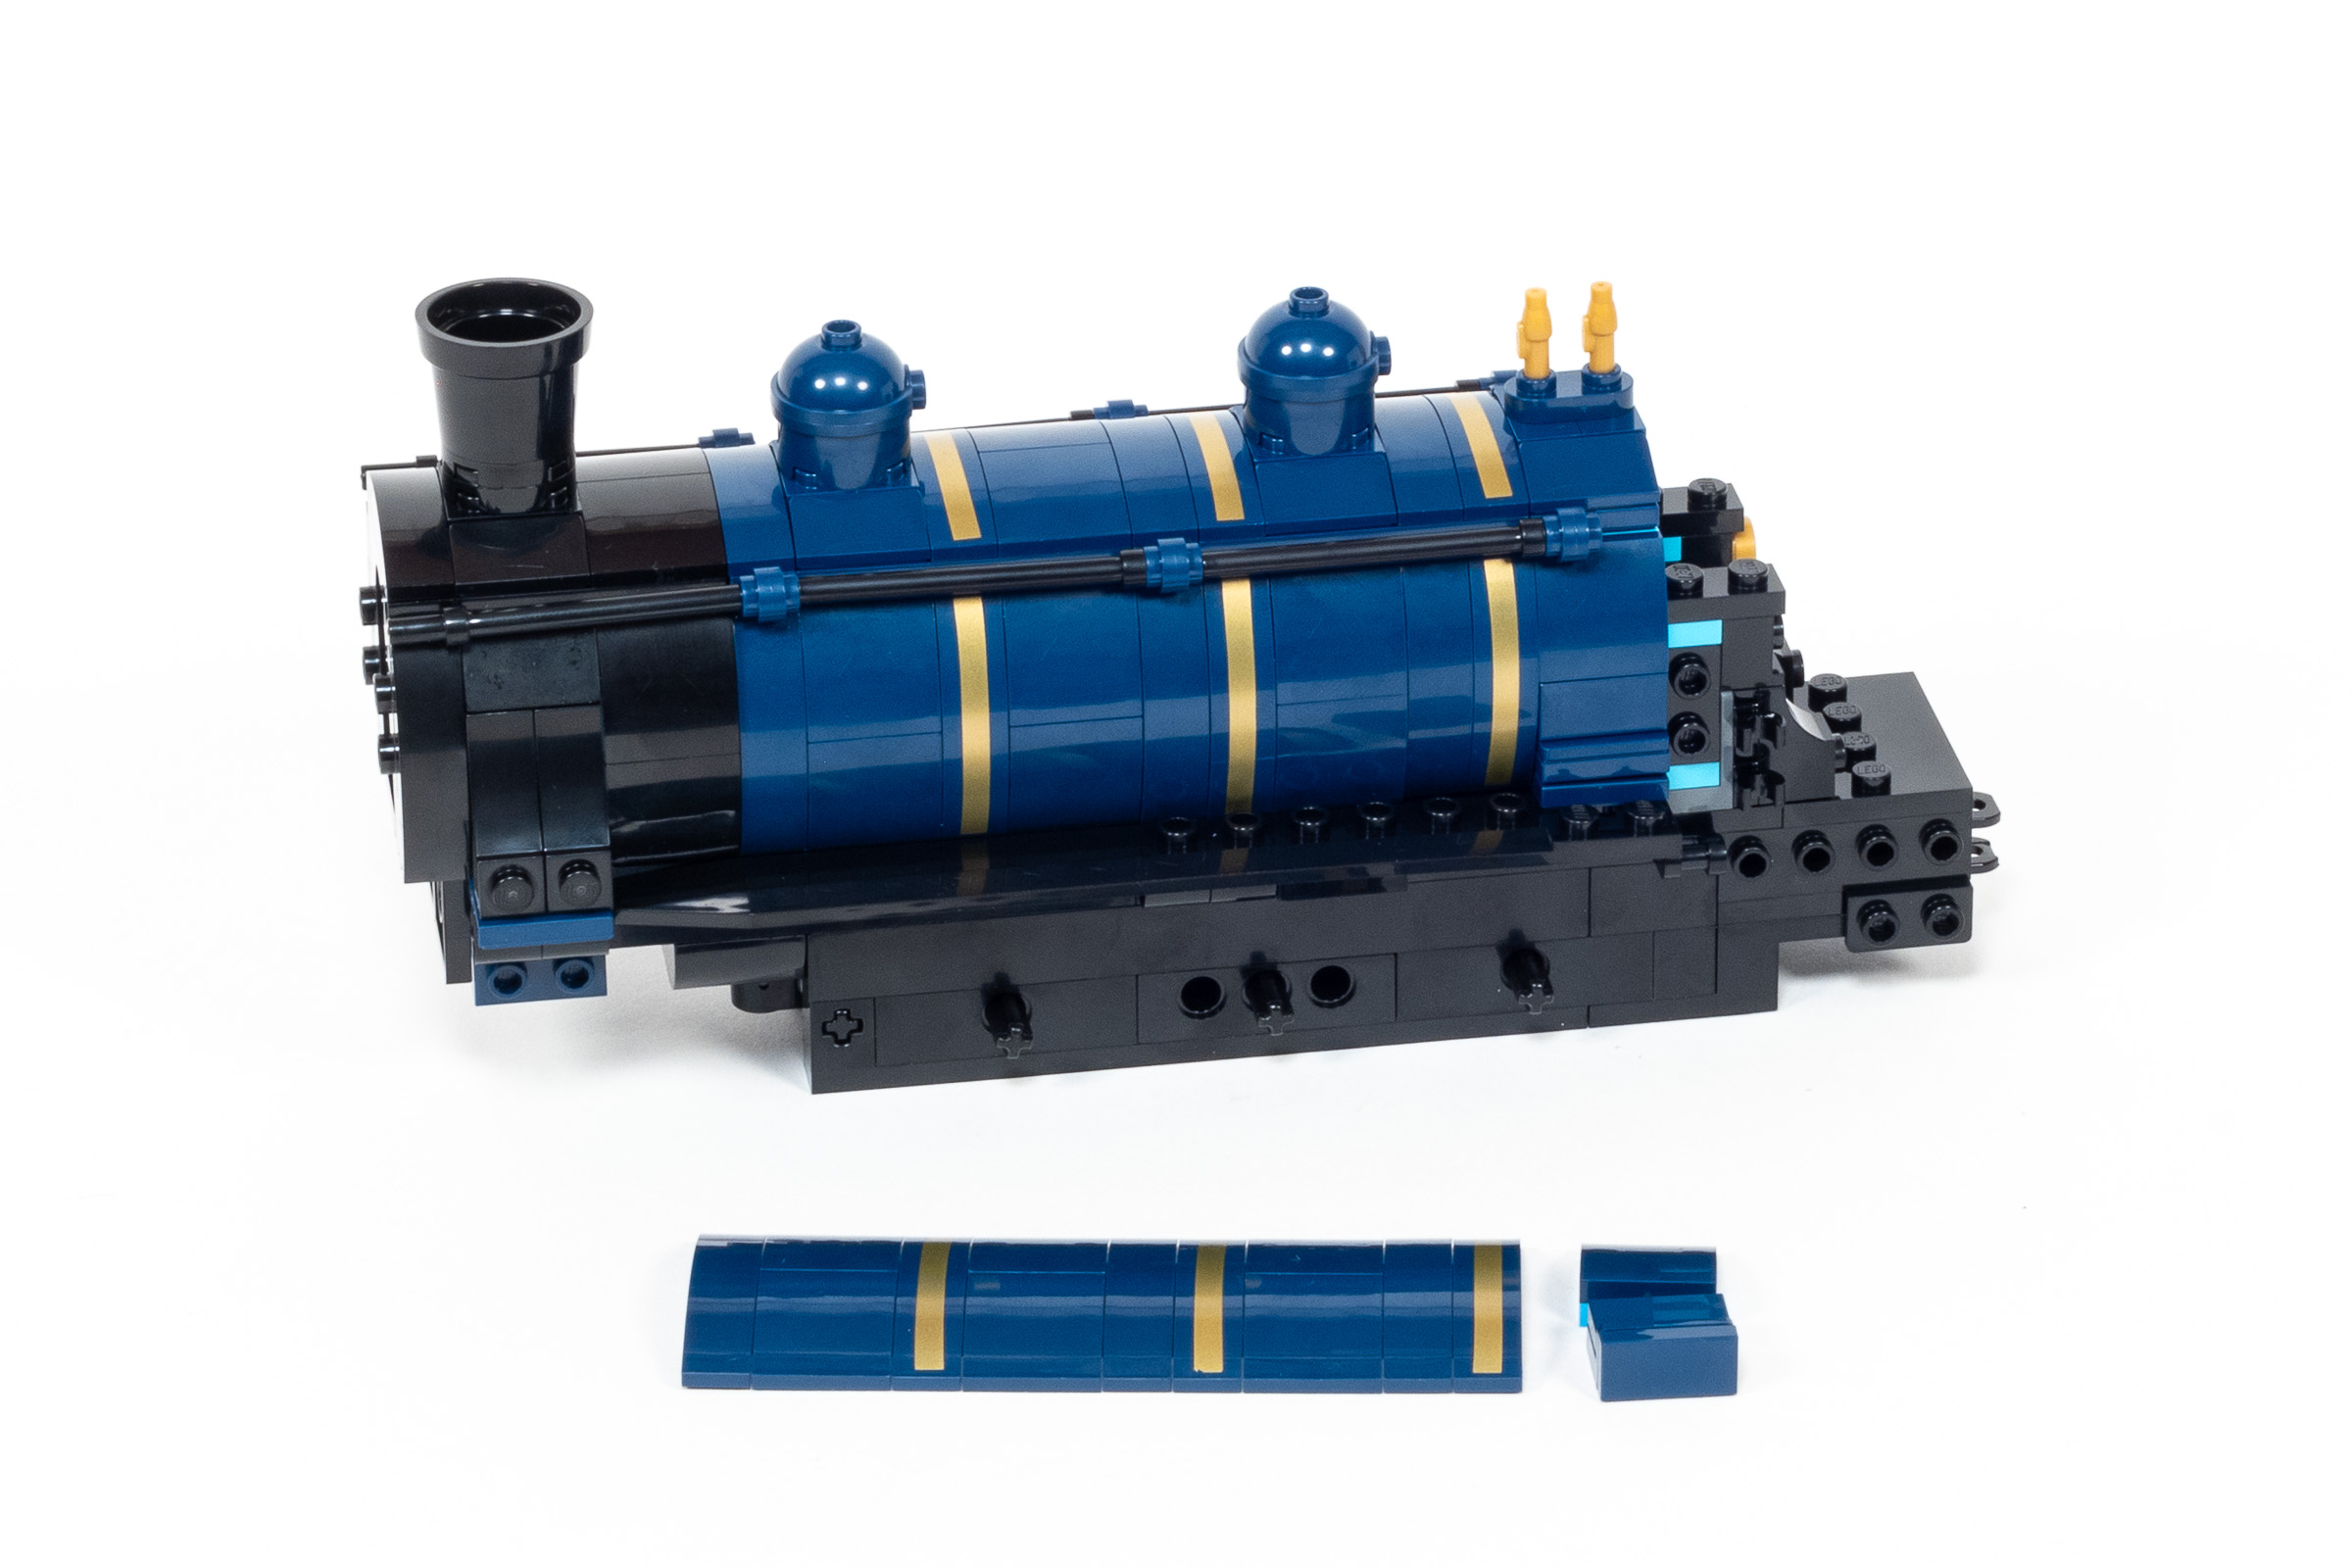
Exterior taking shape, before adding the panel to the opposite side.
I had to do some research to accurately describe what we build in Bag 22. It begins with the the addition of several levers and dials which we surround with windows on two sides to create the cab. After this, we add three wheels to each side. The front and back wheel has a flange to help keep it on the track. I suspect in a real engine, the middle wheel has a flange as well, but it is probably omitted in the LEGO set for the same reason that the middle trucks need to slide in the hopper car – so it can make extremely tight turning radiuses that are unrealistic for a real train but are reflected in our LEGO city.
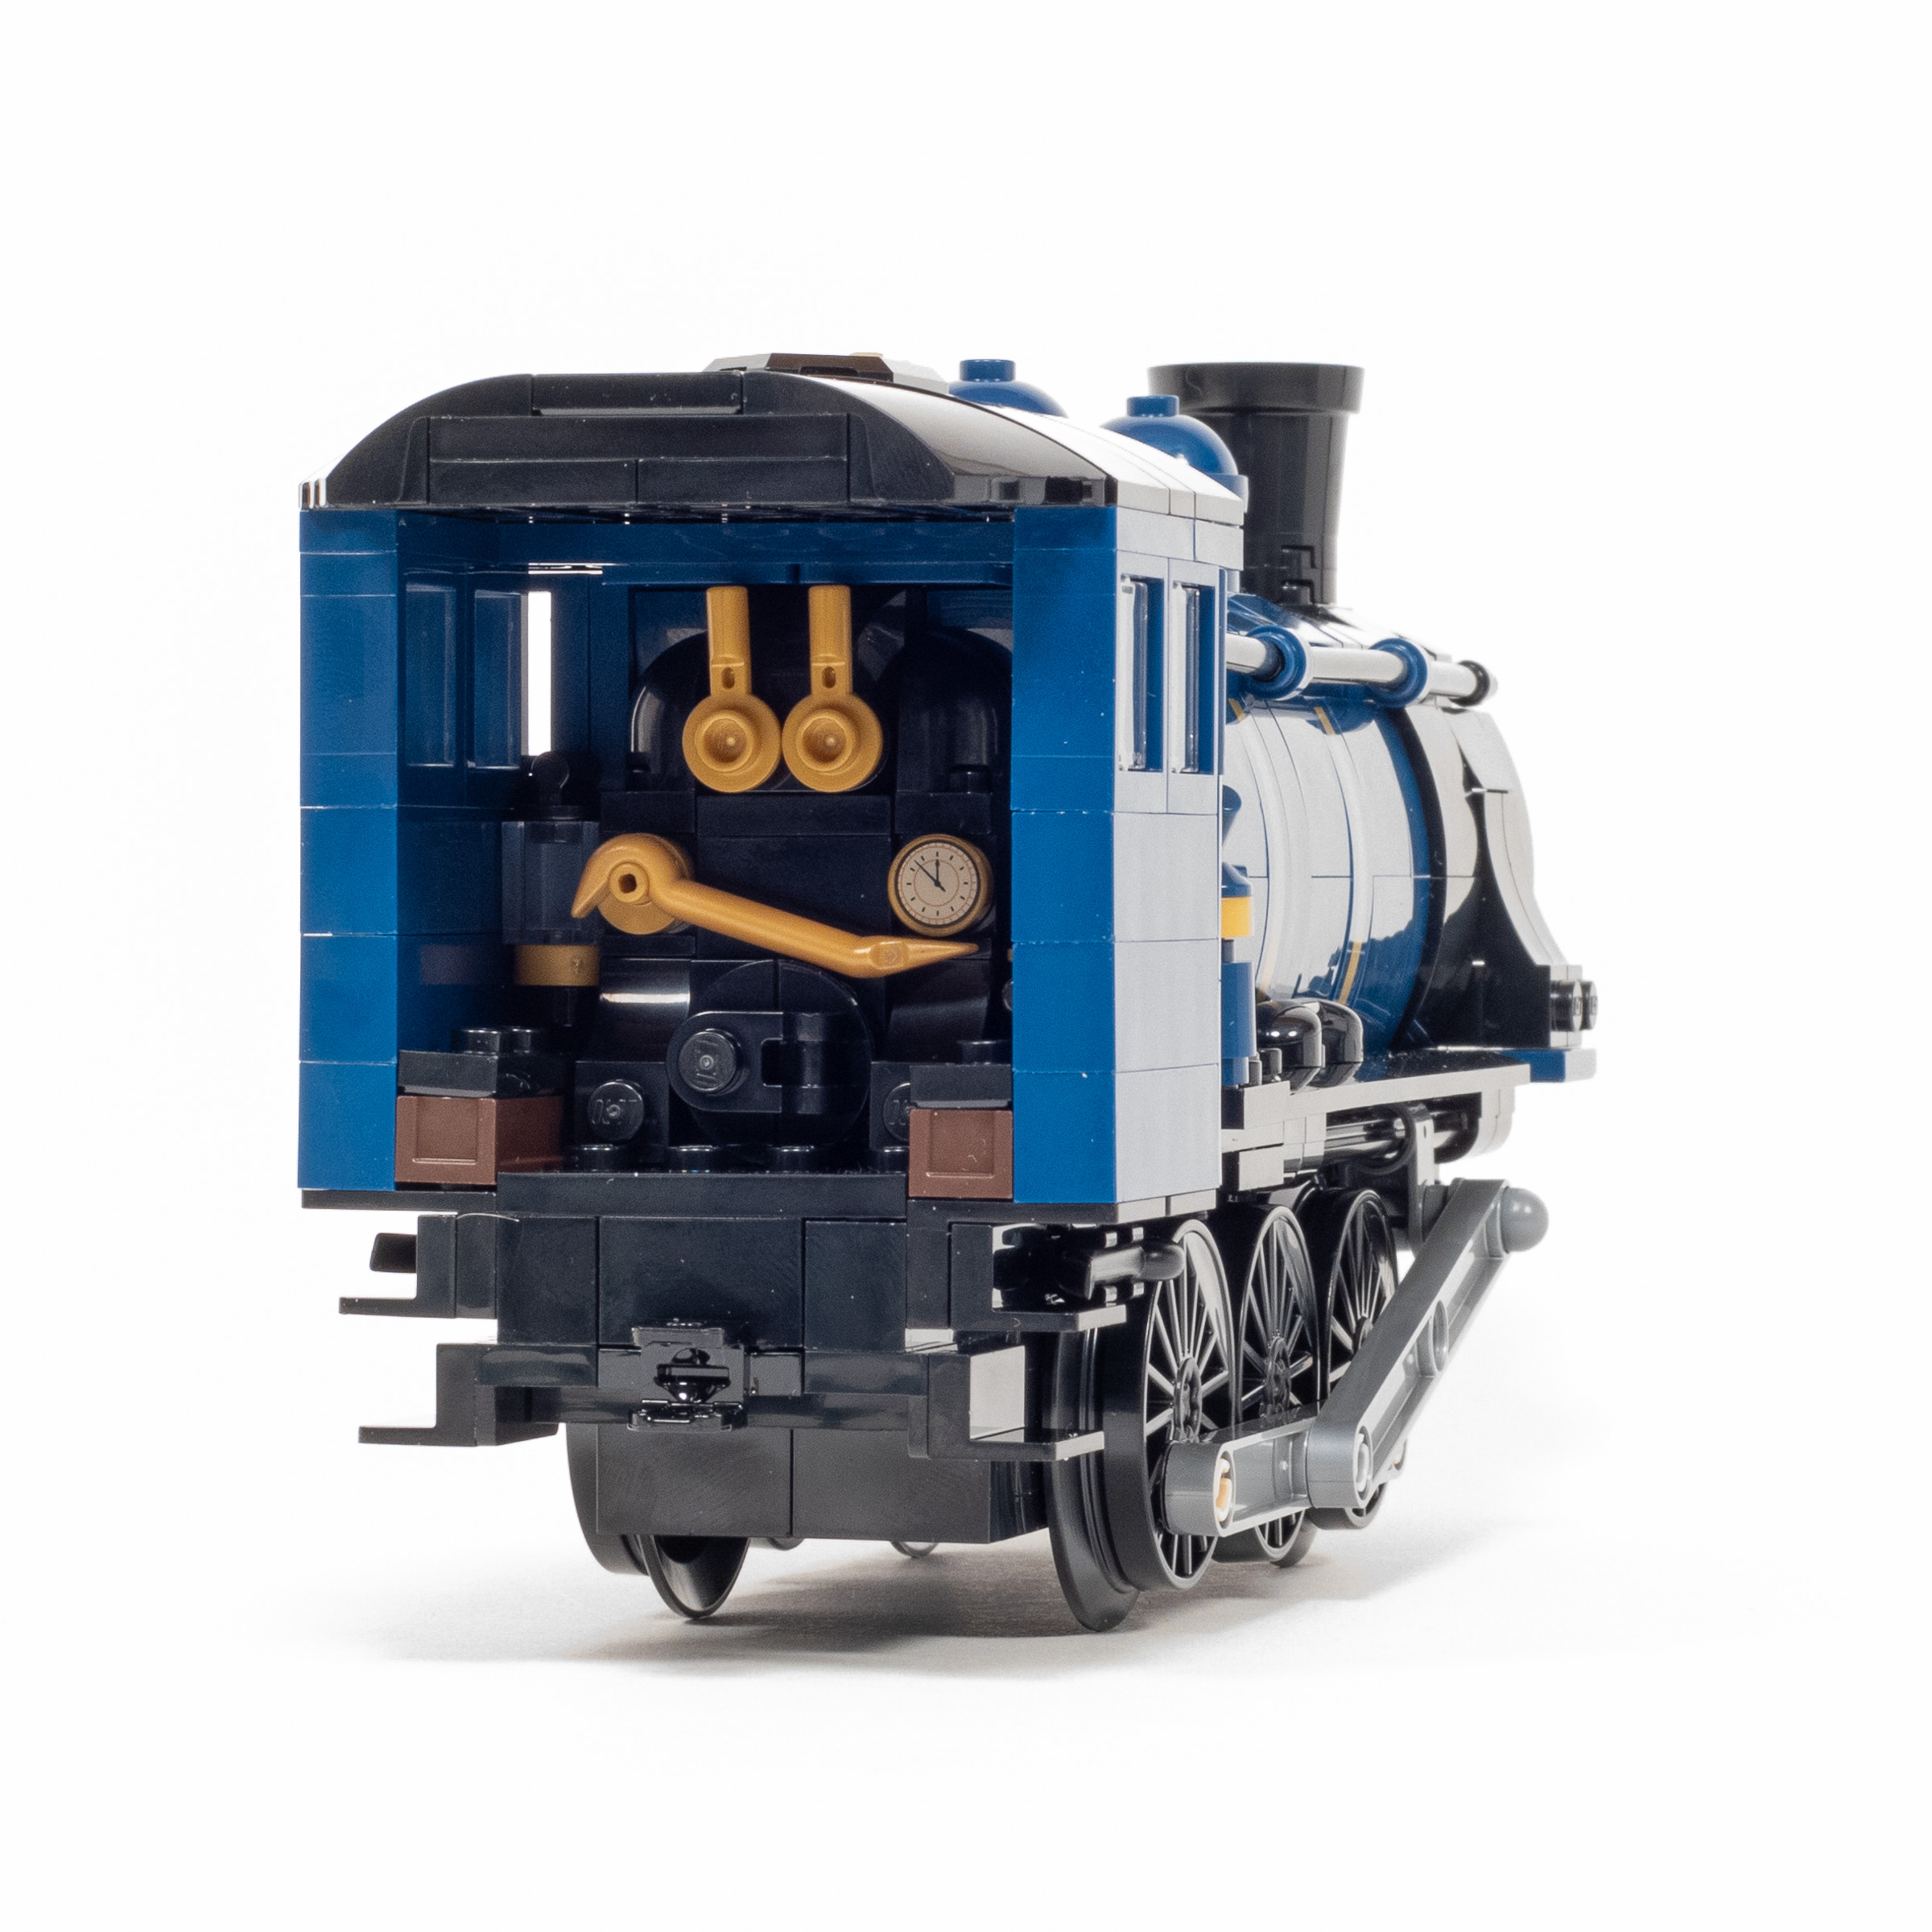
A closer look inside the cab.
What I learned is that the bar connecting the wheels is called the Coupling Rod (or Side Rod). It is connected to the Piston Rod (which moves front to back) with the aptly-named Connecting Rod. This causes the angle of the Connecting Rod to change as the wheels rotate.
The various rods connected to the three wheels on each side.
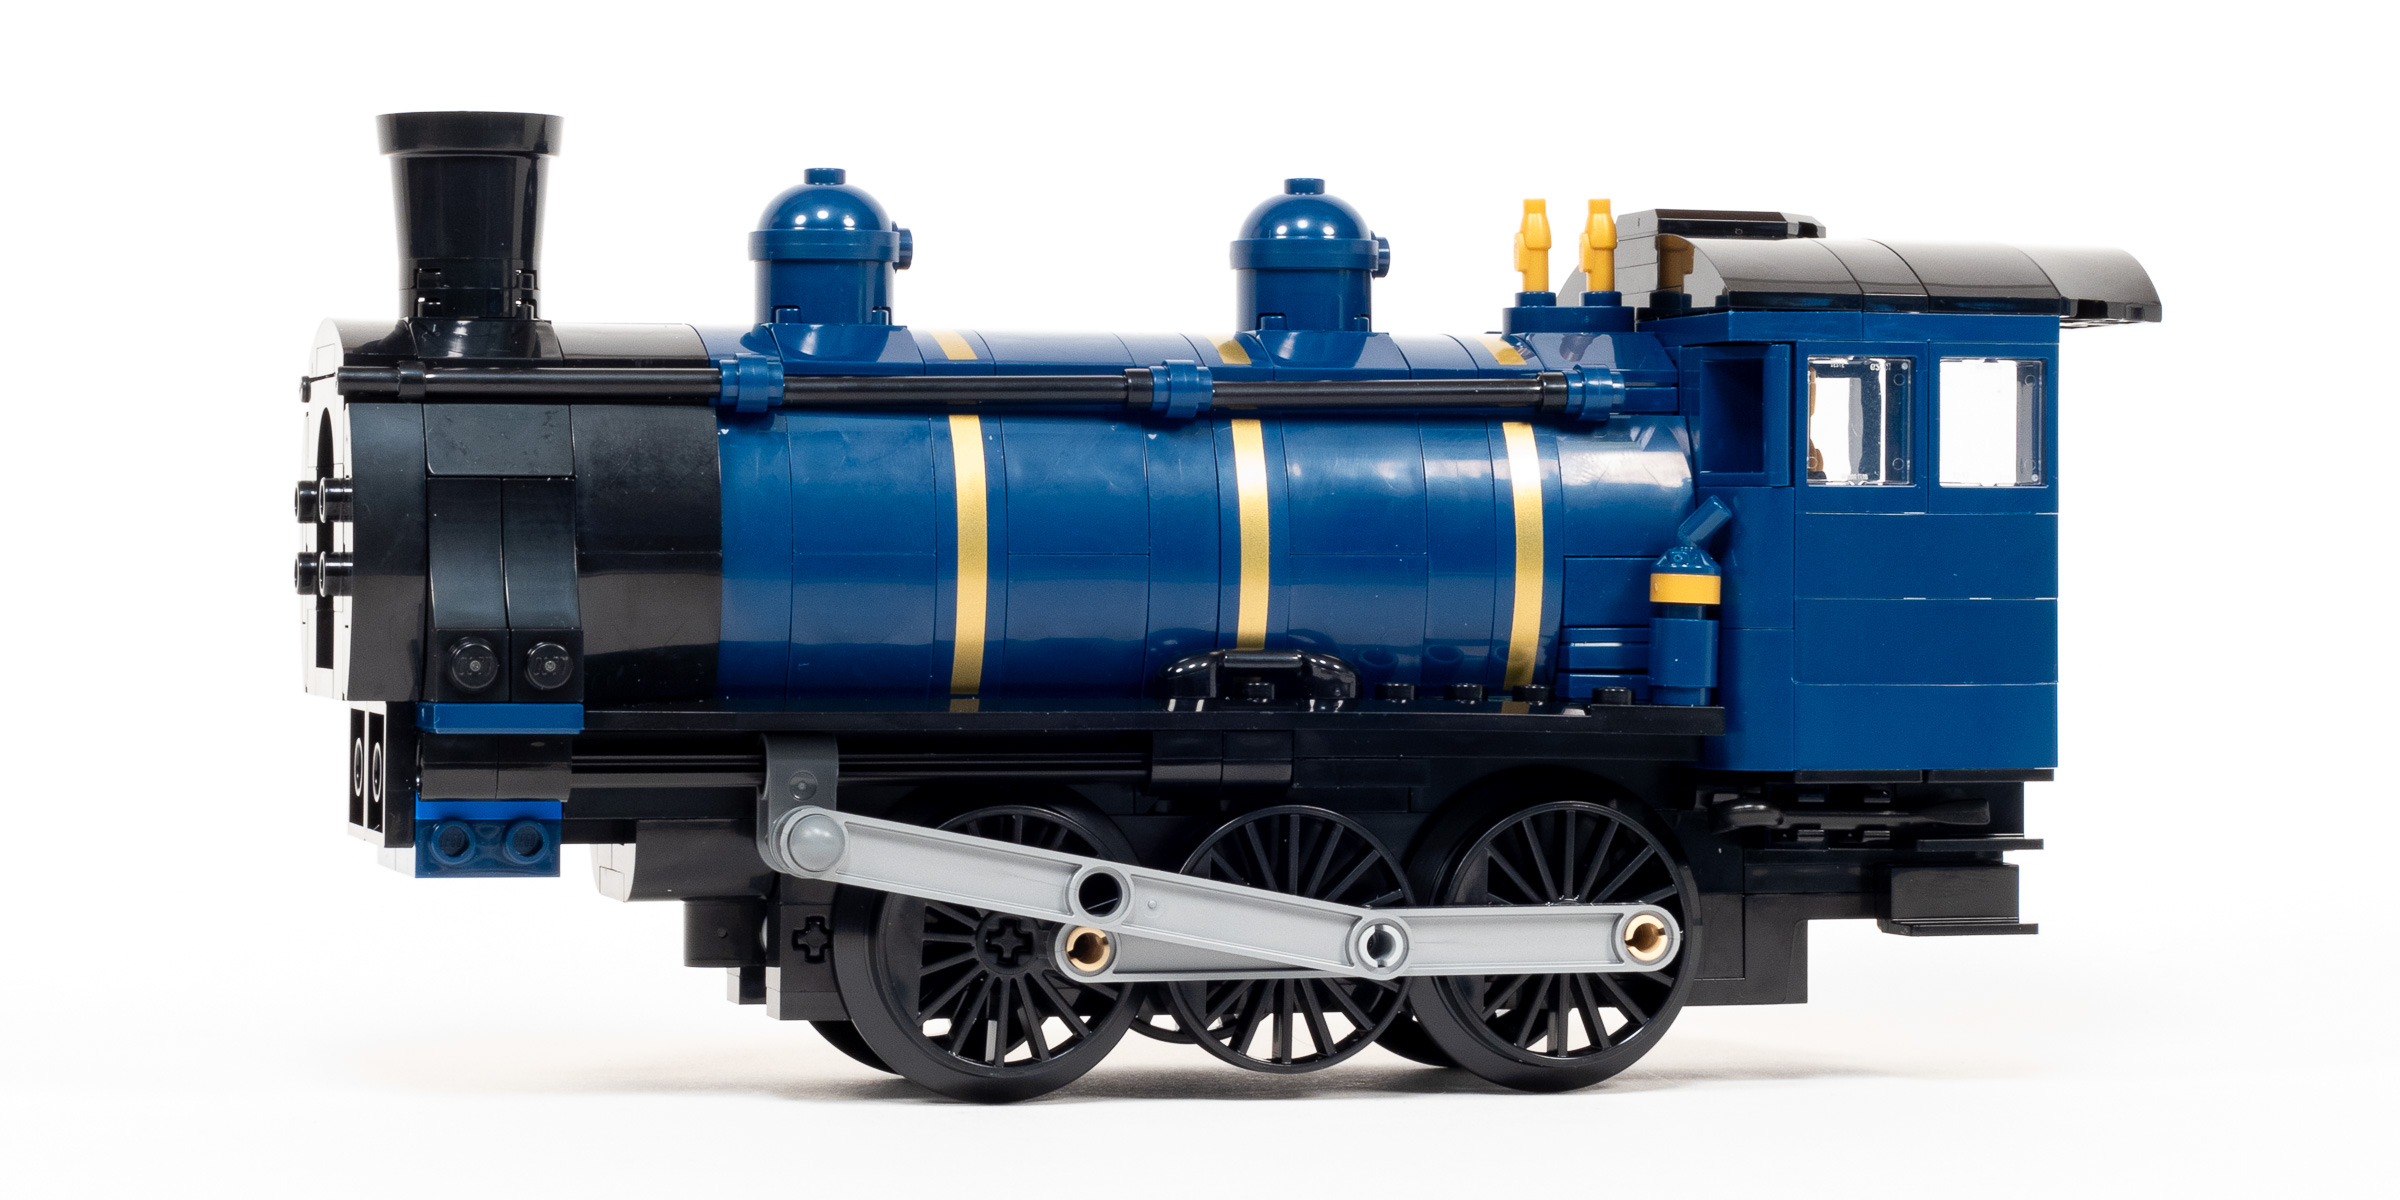
The final bag is quick and anticlimatic – we build a small assembly with two sets of wheels (called the Lead Truck or Leading Bogie). It is placed in front of the three sets of wheels driving the engine, but it is not attached to the rest of the engine very well, and flops around if you pick the engine up. I do find this a bit dissapointing, and wish that they found a different way to give it the required flex while being more structurally sound when lifted. We round the set off with a cowcatcher to protect the front wheels, and a round module that covers the front of the boiler.
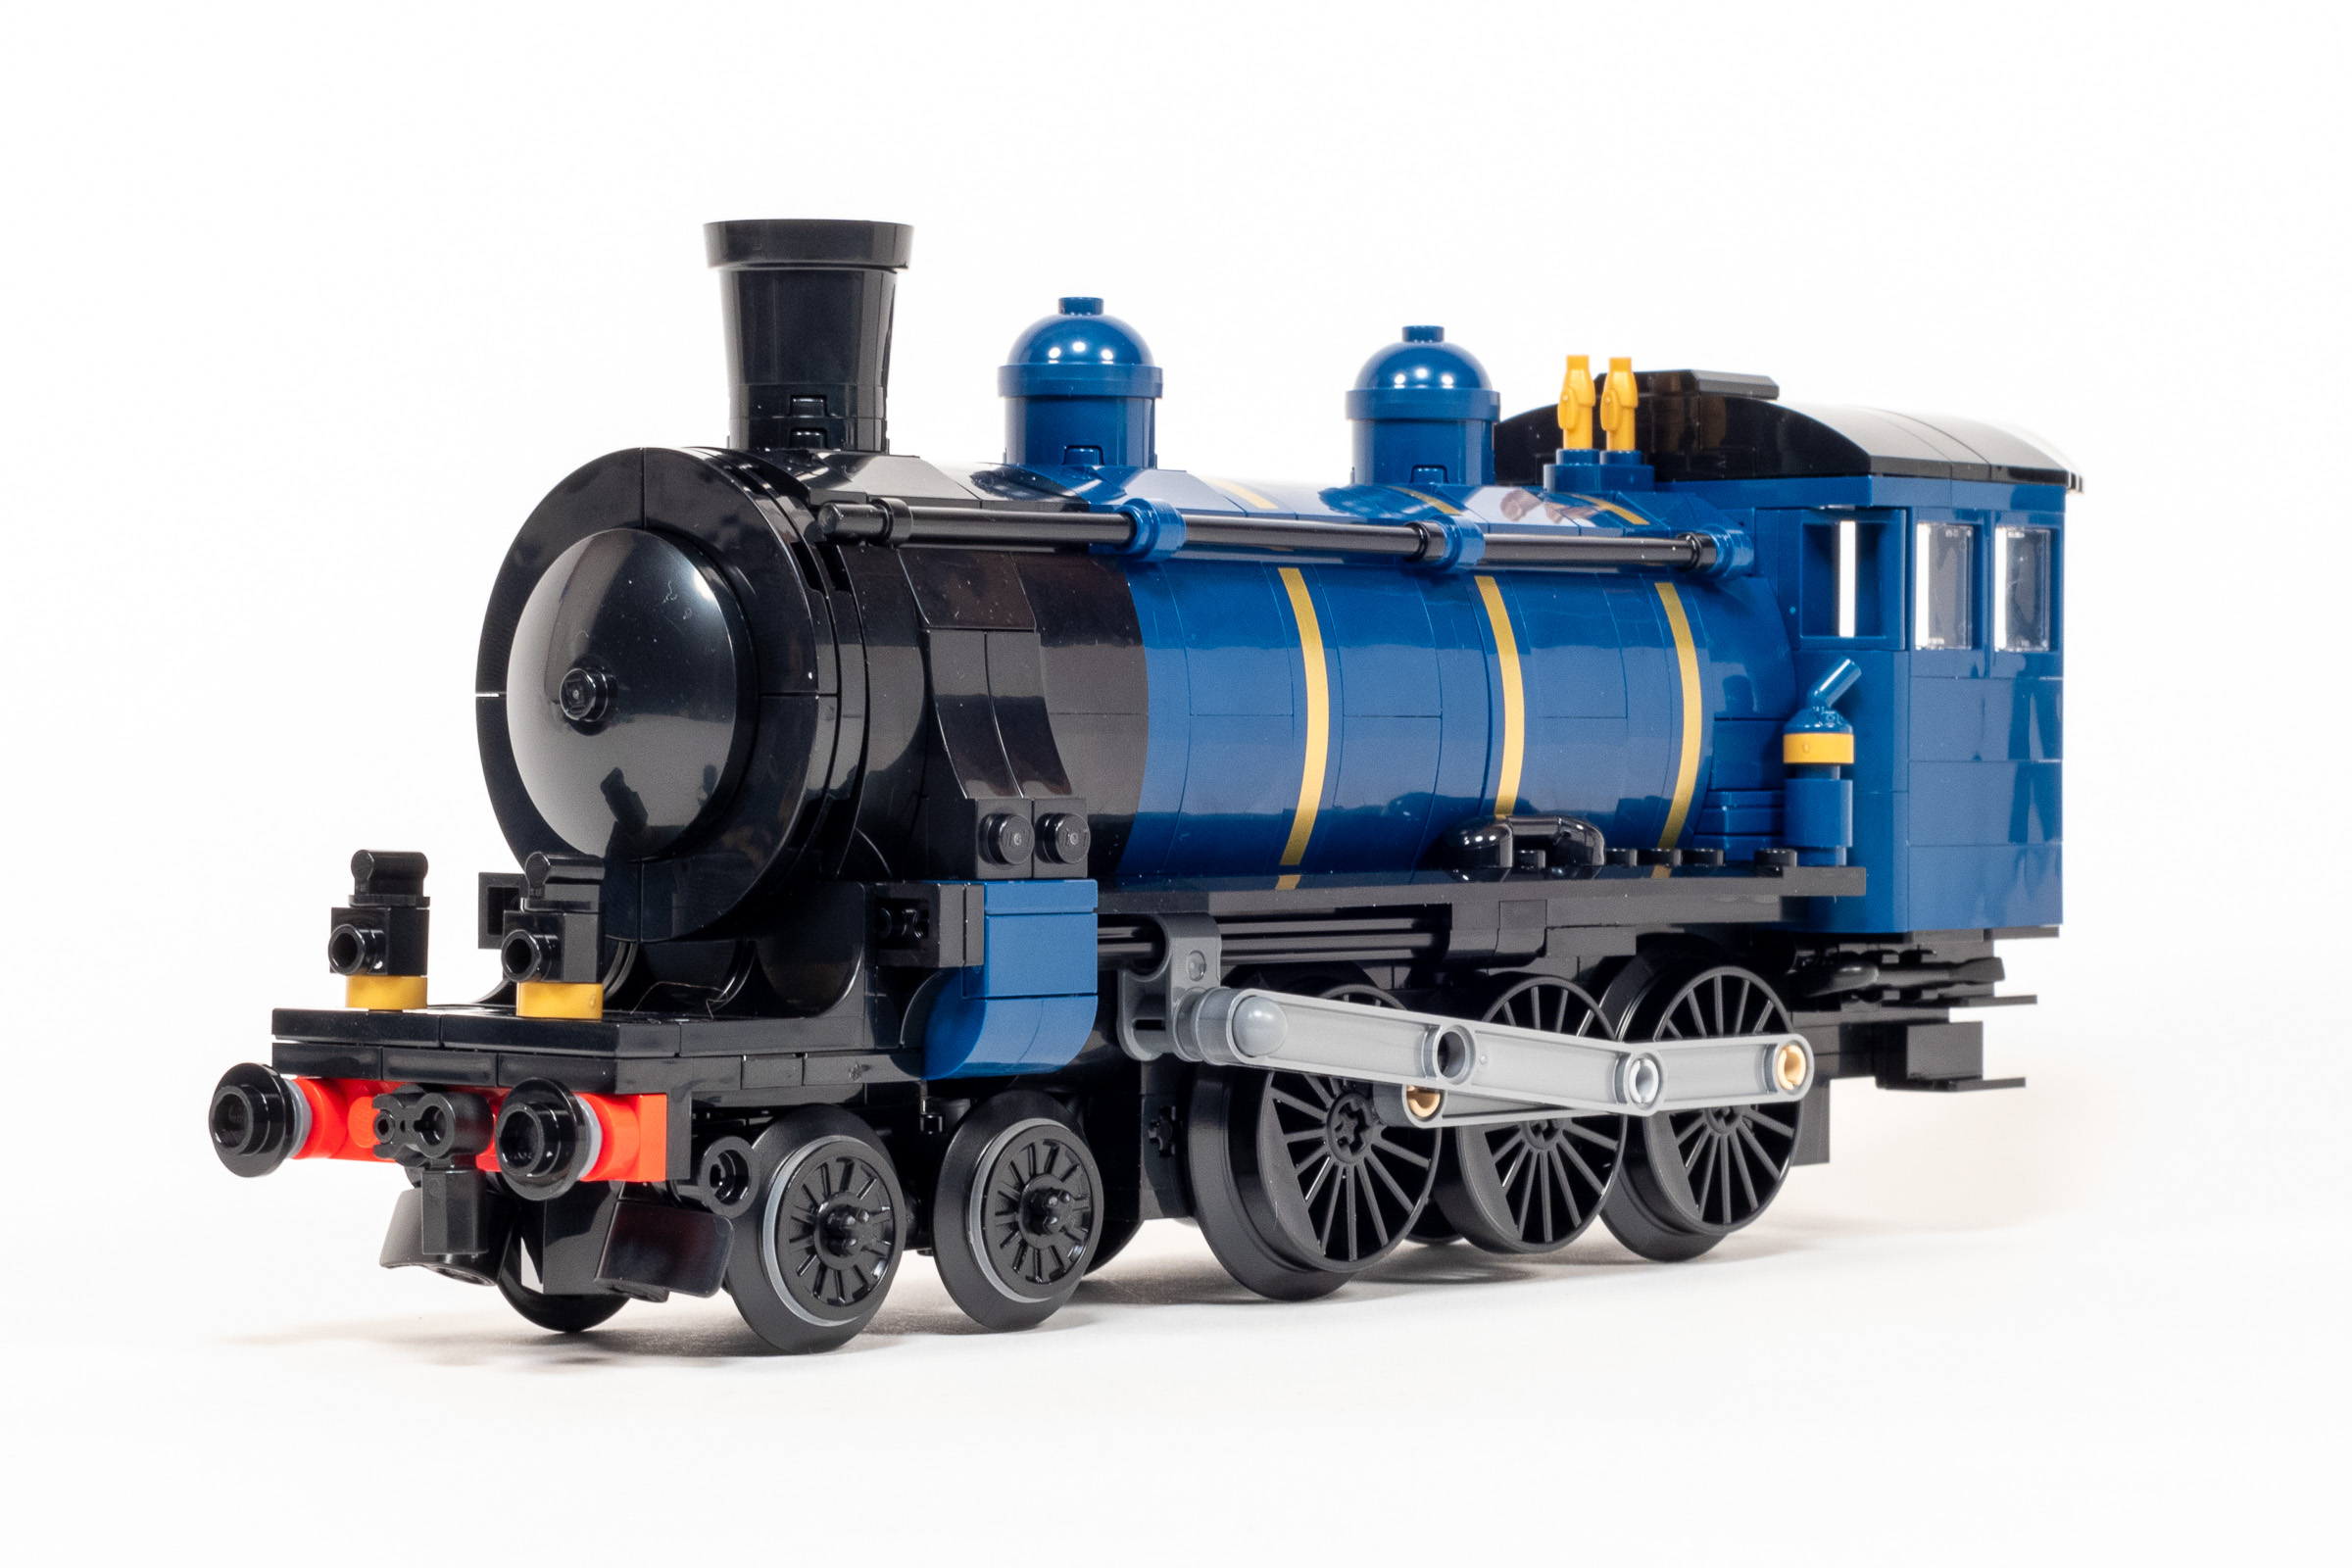
Completed Steam Engine.
Build time: 55 minutes. (Bag 19: 9 minutes, Bag 20: 11 minutes, Bag 21: 7 minutes, Bag 22: 17 minutes, Bag 23: 11 minutes.)
Value
Assessing the value of a LEGO model is pretty subjective, which is why I have included objective assessments of value such as price-per-part and my preferred metric: price-per-gram. This is my second review to also include price-per-minute analysis, to better understand the build time and complexity.
Price-per-part
While I prefer to assess value based on the price-per-gram, I always include the price-per-piece as it is a metric that people are used to seeing. About 2540 pieces for $300 works out to a dissapointing $0.118 per-piece.
Anything over $0.10 per-piece gets extra scrutiny, especially when it is not a costly licensed theme like Star Wars. With LEGO Ideas, they also need to compensate the fan designer. In the case of this set, they may need to also pay a license fee to current owners of the Orient Express brand – even though this train is based on a historical representation of the train instead of a modern one.
Price-per-gram
Assessing value based on the weight of the LEGO pieces included in the set results in a cleaner assessment of value. This approach better accounts for sets with a lot of small parts, as well as sets with fewer large parts.
| Set | Price | Part Count | Price-per-part | Weight | Price-per-gram |
|---|---|---|---|---|---|
| #31203 World Map | $249.99 | 11,695 pieces | $0.021 per-piece | 4020 grams | $0.062 per-gram |
| #21056 Taj Mahal | $119.99 | 2022 pieces | $0.059 per-piece | 1811 grams | $0.066 per-gram |
| #21058 Great Pyramid of Giza | $129.99 | 1476 pieces | $0.088 per-piece | 1832 grams | $0.071 per-gram |
| #77013 Escape from the Lost Tomb | $39.99 | 600 pieces | $0.067 per-piece | 530 grams | $0.075 per-gram |
| #10278 Police Station | $199.99 | 2923 pieces | $0.068 per-piece | 2602 grams | $0.077 per-gram |
| #71741 Ninjago City Gardens | $299.99 | 5685 pieces | $0.052 per piece | 3719 grams | $0.081 per-gram |
| #71043 Hogwarts Castle | $399.99 | 6020 pieces | $0.066 per-piece | 4899 grams | $0.082 per-gram |
| #10292 Friends – The Apartments | $149.99 | 2048 pieces | $0.073 per-piece | 1778 grams | $0.084 per-gram |
| #10326 Natural History Museum | $299.99 | 4014 pieces | $0.075 per piece | 3343 grams | $0.090 per-gram |
| #10312 Jazz Club | $229.99 | 2899 pieces | $0.079 per-piece | 2392 grams | $0.096 per-gram |
| #10270 Bookshop | $199.99 | 2504 pieces | $0.080 per-piece | 2085 grams | $0.096 per-gram |
| #10297 Boutique Hotel | $229.99 | 3066 pieces | $0.075 per-piece | 2380 grams | $0.097 per-gram |
| #10320 Eldorado Fortress | $214.99 | 2509 pieces | $0.087 per piece | 2188 grams | $0.098 per-gram |
| #21060 Himeji Castle | $159.99 | 2125 pieces | $0.075 per piece | 1600 grams | $0.100 per-gram |
| #10282 Adidas Originals Superstar | $79.99 | 731 pieces | $0.109 per-piece | 735 grams | $0.109 per-gram |
| #10316 Rivendell | $499.99 | 6167 pieces | $0.081 per piece | 4375 grams | $0.114 per-gram |
| #77015 Temple of the Golden Idol | $149.99 | 1545 pieces | $0.097 per piece | 1308 grams | $0.115 per-gram |
| #10305 Lion Knights’ Castle | $399.99 | 4514 pieces | $0.089 per piece | 3265 grams | $0.122 per-gram |
| #77012 Fighter Plane Chase | $34.99 | 387 pieces | $0.090 per piece | 285 grams | $0.123 per-gram |
| #21341 Disney Hocus Pocus: The Sanderson Sisters’ Cottage | $229.99 | 2316 pieces | $0.099 per piece | 1860 grams | $0.124 per-gram |
| #10303 Loop Coaster | $399.99 | 3756 pieces | $0.106 per-piece | 3189 grams | $0.125 per-gram |
| #21344 The Orient Express (this set) | $299.99 | 2540 pieces | $0.118 per piece | 2337 grams | $0.128 per-gram |
| #42146 Liebherr Crawler Crane LR 13000 | $699.99 | 2883 pieces | $0.243 per piece | 5100 grams | $0.137 per-gram |
| #60339 Double Loop Stunt Arena | $159.99 | 865 pieces | $0.267 per-piece | 865 grams | $0.185 per-gram |
Note: Prices based on date of initial release. (The LEGO Group increased the price of many older sets in late 2022.)
This table is sorted by price-per-gram as it is the most objective measure of value that is available to us. What we see is that this set not only offers a poor price-per-part, but also a relatively poor price-per-gram. HAd the set been priced at $250 instead of $300, it would have a price-per-gram of $0.107, which is almost exactly middle of the pack.
Price-per-minute
I have been recording the build time for most of the sets that I built in the past couple years. This allows me to experiment with a new value metric: price-per-minute. This metric assumes that I build every set at about the same speed… This is probably not entirely true, but since I am only including models which I built in the table below, it should offer one additional way to think about the value of a LEGO set.
In the case of this set:
$300 / 248 minutes = $1.21 / minute.
| Set | Price | Part Count | Price-per-part | Price-per-gram | Build time | Price-per-minute |
|---|---|---|---|---|---|---|
| #31203 World Map | $249.99 | 11,695 pieces | $0.021 per-piece | $0.062 per-gram | 613 minutes | $0.41 per-minute |
| #10325 Alpine Lodge | $99.99 | 1517 pieces | $0.070 per-piece | $0.095 per-gram | 151 minutes | $0.66 per-minute |
| #21056 Taj Mahal | $119.99 | 2022 pieces | $0.059 per-piece | $0.066 per-gram | 177 minutes | $0.68 per-minute |
| #10297 Boutique Hotel | $229.99 |
3066 pieces | $0.075 per-piece | $0.097 per-gram | 333 minutes | $0.69 per-minute |
| #21060 Himeji Castle | $159.99 | 2125 pieces | $0.075 per-piece | $0.100 per-gram | 210 minutes | $0.76 per-minute |
| #10307 Eiffel Tower | $629.99 | 10,001 pieces | $0.063 per-piece | $0.092 per-gram | 803 minutes | $0.78 per-minute |
| #10312 Jazz Club | $229.99 | 2899 pieces | $0.079 per-piece | $0.096 per-gram | 295 minutes | $0.88 per-minute |
| #21058 Great Pyramid of Giza | $129.99 | 1476 pieces | $0.088 per-piece | $0.071 per-gram | 146 minutes | $0.89 per-minute |
| #10320 Eldorado Fortress | $214.99 | 2509 pieces | $0.087 per-piece | $0.098 per-gram | 260 minutes | $1.01 per-minute |
| #10303 Loop Coaster | $399.99 | 3756 pieces | $0.106 per-piece | $0.125 per-gram | 378 minutes | $0.106 per-minute |
| #21344 The Orient Express (this set) | $299.99 | 2540 pieces | $0.118 per-piece | $0.128 per-gram | 248 minutes | $1.21 per-minute |
| #10326 Natural History Museum | $299.99 | 4014 pieces | $0.074 per-piece | $0.090 per-gram | 213 minutes | $1.30 per-minute |
| #42146 Liebherr Crawler Crane LR 13000 | $699.99 | 2883 pieces | $0.243 per-piece | $0.137 per-gram | 467 minutes | $1.50 per-minute |
I want to be super clear that build times are approximate, and do not include time to apply stickers because I do not use them. There is a good chance that I have gotten slightly faster at building over time, and I assure you that some of these build times are inflated due to lack of sleep or building while distracted by an interesting podcast.
I continue to be surprised by the huge discrepancy in this small dataset, from at little as 66 cents-per-minute to as much as $1.50 per-minute (more than double). A few possible reasons for better value in this metric include: low price-per-part (lots of small parts to assemble), complicated building instructions, or less repetitive builds. Even the average number of parts per numbered bag plays a major role, since you can more quickly find the parts you need if you only have fewer parts on the table at a given time.
This set offered me more than four hours of build time, not including time getting ready, looking through the instruction booklet, opening bags, or photographing my progress. I believe the main cause for the high cost-per-minute is that this set has a lot fewer parts than most sets at this price point. It is interesting to note that the build time for this set was actually longer than the #10326 Natural History Museum, despite the fact that the museum contains neary 500 more pieces. This is a testament to one of my favorite things about this set — it is packed with interesting and advanced building techniques.
Conclusion
#21344 The Orient Express is one of the most enjoyable building experiences I have had in recent years. I especially enjoyed the high level of detail in both the exterior and interior of the two passenger carriages. The train feels like it is part of the same cohesive world that was popularized in the Modular Building Series — real places that a minifigure can live their life with similar conveniences to those that actual humans enjoy. The vintage aesthetic also places it firmly into the range of eras that have been captured in the Modular Building Series so far, especially sets evoking the Roaring Twenties like #10251 Brick Bank or #10297 Boutique Hotel.

The selection of minifigures would fit in perfectly in the Modular City.
This is why this set was quickly in the runnings for our top 5/5 star rating. This is actually a difficult position to be in as a reviewer because I find myself looking for excuses to not give the set top marks, which can interfere with simply enjoying the building experience. Thankfully, the build process was engaging enough to keep my attention through the very end (after slogging through the first two bags, that is…)

The train can navigate crazy turns, but it looks a bit silly.
One of the my first concerns was that a train with such long carriages could not drive on standard curved LEGO track. While it looks absurd on these extremely tight radiuses, I’m happy to report that all of the linkages work correctly and it can navigate these tight turns. It does look like it is chasing it’s tail — on a perfectly circular track the train covers 9 sections of track, which works out to 202° around the circle. (I think you could fit two more carriages with the engine nearly pushing the back of the train.)
I was worried that the finished model would look incomplete without applying the numerous stickers included in the set, but I am happy to report that the majority of the exterior decoration is achieved using printed parts! The only outward-facing stickers are small stickers on the bottom of each door to the two carriages, and two stickers on each side of the Engine. I think it still looks great without them applied. The stickers for the interior are very nice and I think most people will appreciate the extra vintage style that they add to the set.
#21344 The Orient Express is a beautiful LEGO set that will appeal to many builders.
There is a single factor that keeps this set from receiving top marks: the high price. At $250, this would have earned a 5/5 rating, but $300 is too much for this set… It is objectively a poor value offering a poor price-per-part, price-per-gram, and even price-per-minute. I do need to stress that this is an excellent set despite the price tag. Thanks to beautiful detailing, excellent storytelling, and interesting building techniques, it easily earns a rating of Recommended (4/5 stars). If only you can find it on sale to bring the overall value in line with other great sets.
Despite the lower value based on these objective measures of value, I would still recommend this set over #10326 Natural History Museum because it is a more satisfying build experience. It is amazing that they are releasing two $300 sets for a similar audience of Adult builders on December 1, 2023, and I am happy to say that #21344 The Orient Express is the better choice for most builders.
Now that you’ve read the review, check out my follow-up article with instructions showing how easy it is to add a battery pack and motor to this set without adversely impacting the aesthetics: Motorizing #21344 The Orient Express.
What an incredible review! The details you highlighted about the Orient Express are amazing, and it truly captures the essence of the iconic train. I love how LEGO continues to combine nostalgia with creativity. This set is definitely a must-have for both LEGO and train enthusiasts!
Thank you so much for this review – really helpful in deciding to pick this up before it retires – thanks!
Thanks so much for your excellent review
Munich is also spelled wrong – it says “Munchen” instead of “München”.
How about the quality of the gold prints on the boiler? I have seen several reviews pointing out they are all over the place, not aligned at all and curved. Unacceptable for that price.
The spelling has definitely been discussed on several other LEGO blogs, and I agree that this kind of mistake is unacceptable on a high-priced set.
I did also observe that the vertical stripes of gold are a bit inconsistent. In my case, they were not bad enough to adversely impact the overall look, but I think some other folks got even worse prints than I received.
It is too bad that there are a number of quality issues and the high price, since this is a delightful build experience otherwise.
Hi Tom, I know you like to get the details right, so here’s a small one:
When you wrote “bogey” you probably meant “bogie”. They sound the same but have quite different meanings…
https://british-american-dictionary.com/bad-words/bogey-uk/
I find it amazing how many things get through quality control at a company that still pretends that “only the best is good enough” is their motto. Just in this set, the spellings of București and München are wrong, the mistake with the sticker sheet, the press photo with that front bogie not properly on track, proving how floppy it is.
Ronald, thank you. I have corrected this error in the text.
I agree that the errors associated with this set are disappointing, especially since it is a delightful set otherwise. Maybe future production runs will have the higher quality level we have learned to expect of products from The LEGO Group.
The name of Romania’s capital is wrongly printed. BUCARESTI instead of BUCURESTI. Another proof of LEGO’s incompetence. With so many Romanians working abroad, probably a lot even in LEGO Company they couldn’t find one to ask him and therefore weren’t able to print correctly. The names are written in the local language of each state.
I learned about this after posting the review. I am also eager to see how The LEGO Group responds to this error.